 So if you ever wanted to learn about photoshop, maya, substance, unreal engine, or some general skills like sketching, drawing, etc. Now is the perfect time to level up your skills. Drop to the artstation website and start learning today!
 Windows 10 has displayed one of the most efficient and user-friendly interfaces. However there have been many issues on the backend of this commonly praised operating system: For example, Windows Update is still a wonky and error-laded system application. One example of this error is Windows Update Error 0x80073712 which stands in the way of users just wanting to keep their PCs updated hassle-free.
The error code 0x80073712 signifies that a file needed by Windows Update to function is either damaged, missing, or corrupted. However, this does not mean that your Windows version will forever stay as-is with no mode to update it. Windows Update Error 0x80073712 is perfectly fixable with the set of provided steps below and some of Windows’ built-in troubleshooting steps:
DISM.exe /Online /Cleanup-image /Scanhealth
DISM.exe /Online /Cleanup-image /Restorehealth
If after all the aforementioned solutions, you still experience problems with Windows Update, the problem may lie in the registry that is either damaged or corrupted. You may choose to do manual editing of your Windows registry by opening your Windows registry editor. But doing so is risky as one wrong letter may do incalculable damage to your system. To do so safely for more inexperienced users we recommend using a third-party registry cleaner/tools, many of which can be found online.
 So if you ever wanted to learn about photoshop, maya, substance, unreal engine, or some general skills like sketching, drawing, etc. Now is the perfect time to level up your skills. Drop to the artstation website and start learning today!
 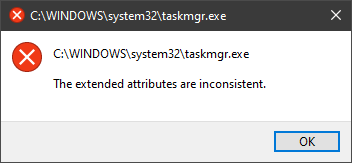 In this guide, we will show you common ways in fixing Extended Attributes are inconsistent errors inside your Windows that are easy to do and less time-consuming than complete reinstallation of the system.
SweetIM Toolbar for Internet Explorer is a browser add-on which adds various shortcuts to your browsers for easy access. This toolbar also changes your homepage to home.sweetim.com. The toolbar is typically bundled with the free Sweet Instant Messenger program and does not necessarily get uninstalled when Instant Messenger is removed from the user’s PC. Additionally, if the home page and search settings were modified by this toolbar, they need to be manually reverted back by the user.
This extension injects various ads into your browser search results and changes your default search engine. While you are browsing the internet, this software records your website surfing data, clicks, and possibly private information. Several Anti-virus programs have classified SweetIM Toolbar as a potentially unwanted application and are not recommended to keep.
Error code 0xc004f034 occurs when Windows 10 users fail to activate their operating system. This activation error code affects not only Windows 10 but those using other versions of the Windows operating system including Windows 8.1. Users experiencing this problem will notice the following common symptoms which occur:
 Error Causes
Error code 0xc004f034 usually results from issues related to activation servers. In such cases when servers are busy, users will not be able to complete the activation process which would result in access to their Windows 10 edition of choice. The error code may also result from issues related to your product key. For this reason, be sure to use the correct product key when you attempt to activate Windows 10.
The completion of manual repair methods can be an effective way to correct issues like error codes in Windows 10. To begin, however, ensure you follow the instructions as given as making even a slight mistake will result in unfavorable results. If, for whatever reason, you have trouble completing the steps suggested below, feel free to contact a Windows repair technician. This type of IT professional is usually equipped with knowledge and expertise to access your particular situation. Otherwise, see the manual repair methods listed below and complete at least one method to fix error code 0xc004f034.
If there is a problem with your product key, you will need to ensure you fix it before you can resolve error code 0xc004f034. Follow the instructions below after ensuring you have a valid product key.
Your system will activate Windows 10 if the issue was related to the use of an invalid product key. However, attempt manual method two if error code 0xc004f034 reappears and you are unable to complete the activation process.
In many cases, error code 0xc004f034 occurs simply due to a busy server. This was the case in 2015 in particular when Windows users first received access to editions of Windows 10 like Windows 10 Pro. To complete this process, you will need to follow the instructions below, repeating the last step until the activation occurs.
If this method is successful, you will finally be able to update your system to the Windows 10 edition of your choice. This process may take just a few minutes – and several attempts – before you resolve the issue. Remember to be patient. However, contact a Windows repair technician to evaluate your system if the issue persists for more than a few days.
get-hotfix KB1111111, KB2222222, KB3333333Note: In the command given above, you need to replace “KB1111111, KB2222222, KB3333333” with the actual update KB numbers.
 In today's world any professional, whatever be design, print, web design or similar is using one or more Adobe programs. Adobe has cemented itself as a must-have software for any kind of serious and even amateur work. Sadly in the latest Windows 11 adobe software in some instances can slow down your computer and put some hard load on the CPU. If you are one of these unfortunate users, keep reading because we have a few things you can do to solve this.
“Windows could not configure one or more system components. To install Windows restart the computer with error code 0xc1900101-0x30018.”When you check on the Windows 10 rollback log, you will see a part with the “iisetup.exe” that’s related to the abort. Usually, the upgrade process completes over 50% and gets stuck and then rolls back later on and generates the error logs. This kind of error, in most cases, appears during the upgrade of Windows 10 and is related with the Internet Information Services or IIS in Windows 10. For some unknown reason, it restricts the installation or the upgrade which causes the error to appear. To fix the “Windows could not configure one or more system components” error, you can try to remove the IIS from the Windows Features or rename the “inetsrv” folder. You could also move all the folders related to IIS to another drive. For more details, refer to the options provided below.
Linkury Smartbar Engine is a Brower Toolbar for Internet Explorer. Upon investigation, we discovered that this toolbar does not work with the latest versions of Internet Explorer.
From the Author:
What the Smartbar does: – Changes the default search engine in your web browser’s built-in search box. – Changes the default home page of your web browser. – Adds alternative “page not found” functionality. – Enable search from the address bar of your web browser. – Allows software updates of the application once a new version is released. – Adds, removes, or modifies components interacting with search input fields.
While installed, users may see additional unwanted ads throughout their browsing sessions.
Several anti-virus applications have marked this toolbar as a Browser Hijacker, and it is not recommended to keep it on your computer, especially if you are using a newer version of internet explorer that renders this toolbar useless.
MyWebFace is a browser extension developed by Mindspark. This extension claims to allow users to easily access websites that allow them to make a cartoon portrait of themselves. While this may seem interesting in the beginning, all this extension does is to add links to already popular websites that are easy to find.
When installed MyWebFace changes your default search engine and your home page to MyWay.com.
While the extension is running it gathers user browsing information, allowing it to mine data and better server unwanted ads throughout your browsing sessions. MyWebFace has been marked as a Browser Hijacker by many anti-virus programs, and while not considered malware, it is not recommended to keep it on your computer.
chkdsk /f /r
powercfg /hibernate /size 100