How to Fix 'We Couldn't Install Windows Technical Preview 0x80070070 - 0x20005' Error Code on Windows 10
We Couldn't Install Windows Technical Preview 0x80070070 - 0x20005 -- What is it?
Some Windows users have been experiencing errors in an attempt to upgrade to Windows 10 OS. This includes the “We Couldn’t Install Windows Technical Preview 0x80070070 – 0x20005” error code. If you’re one of the many users who’ve encountered this error, you might want to check the available space on your device. Error code 0x80070070 – 0x20005 occurs when you do not have the required space to be able to install the upgrade.
Solution
Error Causes
Just like the other alternatives of error code 0x80070070 – 0x20005 such as 0x80070070 – 0x50011, 0x80070070 – 0x50012, and 0x80070070 – 0x60000, We Couldn't Install Windows Technical Preview 0x80070070 - 0x20005 is most likely caused by the following:
Insufficient disk space in your computer
Incomplete installation or improper deletion of applications
In order to upgrade to Windows 10, you need to have at least 40 to 50 GB of free space in your device. Thus, you need to free up some space in order to successfully upgrade your system to Windows 10. See below for the manual methods you can employ to solve your problem.
NOTE: It would be best to seek help from an experienced technician if you are not confident enough to perform the manual methods yourself or you can alternatively make use of an automated tool.
Method One: Clean Up Your Device
Click Start then browse Afterwards, click on This PC.
Right-click on Local Disk (C:) then choose
Under the General tab, click on Disk Cleanup.
Once the Disk Cleanup window appears, check all items you want to clear down, making sure that the recycle bin is empty and clear any temp files, as well as error logs. Click OK once you’re done.
Repeating the same process above, clear down your system files as well to ensure that the old OS files from your previous system are taken down by clicking on Clean up system files in the Disk Cleanup window.
Method Two: Uninstall Unused Applications
Sometimes, there are unused applications just lying around your device. This may take up your needed space from your device for a system upgrade. Uninstalling these applications can make space that will eventually elude error code 0x80070070 – 0x20005 along with its alternatives – code 0x80070070 – 0x50011, code 0x80070070 – 0x50012, and code 0x80070070 – 0x60000.
Open the Control Panel then select Programs and Features.
Check on unused applications on your device
Right-click on the unused application then select
Method Three: Remove or Archive Files
If there are tons of images, media, videos, or documents that you rarely use but will still be needing in the future, you can move these files to another drive where Windows 10 will not be installed on.
If there are no secondary drives in your device, consider using a USB Drive or external hard disk. Another option you can do is making use of cloud storage programs like One Drive or Google Drive. In this way, you’ll still have access to these files even if it’s not in a physical location while making larger space in your device.
Method Four: Scan Your Device For Viruses
Most Windows users download applications or software regularly. These applications or software might come from unsafe sites where you might have accidentally downloaded a virus or malware along with the legit application or software you intended to download.
With that said, it is highly recommended to download and install in your device a reliable and powerful antivirus. Using an antivirus, you can now perform an overall scan of your device’s system. Once you’re able to detect and remove any suspected virus or malware, you’ll now be able to get rid of the error code 0x80070070 – 0x20005. After solving the issue, you can now resume upgrading to Windows 10.
Method Five: Download An Automated Tool
Can’t seem to put up with the long and technical manual repair process? You can still fix this error by downloading and installing a powerful automated toolthat will surely get the job done in a jiffy!
This is a typical MS Outlook error code. This error message may prevent you from sending and receiving emails via your Outlook account. The error message is displayed in the following format:
"An unknown error has occurred. 0x80040600"
If this is the primary source of your communication in the office, then this error can cause you a great deal of inconvenience as it may prevent you from running important business errands via your Outlook account efficiently.
Therefore, when you experience the 0x80040600 error on your PC, it is advisable to fix it immediately.
Solution
Error Causes
This error code is triggered due to multiple reasons. These include but are not limited to:
PST (Personal Storage Table) file reaches its file size limit
PST file corruption
Viral infection
Incorrect Windows registry settings
Improper shutdown of Outlook
This error code can lower your office productivity as you may be unable to send and receive emails on your Outlook account. Also, you may get locked out of your account and be unable to view your calendar entries and open email attachments saved previously in your account.
Further Information and Manual Repair
To resolve the error on your PC, you don’t have to wait for the network personnel to fix it or be a computer expert. Here is a list of easy and effective DIY methods to help you fix this error code right away.
Method 1: Download a PST File Repair
If the error occurs because your PST file has reached it maximum limit which is normally 2 GB or because of PST file corruption, then it is advisable to download a PST file repair tool. After downloading it, simply run it on your PC. This tool will immediately fix the damaged PST file and file the issue.
Method 2: Download an Antivirus
Deadly viruses like Trojans and spyware can penetrate into your PC if through downloads and opening phishing emails. Therefore, to remove such viruses it is important to install an antivirus and scan your entire PC.
Method 3: Install Restoro.
If the problem is associated with incorrect Windows registry settings or viral infection, it is advisable to download Restoro.
This software is multi-functional deployed with 6 different and powerful utilities including an antivirus, a registry cleaner, and a system optimizer to name a few.
The registry cleaner repairs the registry corrects the settings and fixes the damaged files.
The antivirus on the other hand simultaneously removes all types of viruses including Trojans, spyware, malware, and adware on the system. While the system optimizer feature ensures the PC performance and speed are not compromised during the scanning and cleanup process.
This software is safe, efficient, and compatible with all Windows versions. It has a user-friendly interface and simple navigations which makes it quite easy for all levels of users including novice and intermediate to operate.
Click here to download Restoro and resolve the 0x80040600 error code on your PC today!
Recently, a number of users reported an error in Google Chrome that says, “ERR_SOCKET_NOT_CONNECTED”. If you are one of these users, read on as this post will guide you in resolving this error. This kind of error in Chrome is kind of vague so it could be caused by a couple of factors like DNS server issues, Socket Pools, third-party plugins or extensions, and many more.
Whatever the cause may be, there are several options you can check out to resolve the problem. You can try to flush the Socket Pool or change the DNS address or remove unwanted extensions or reset your Google Chrome browser.
Option 1 – Try to flush the Socket Pool
Open Google Chrome and in the address bar, type “chrome://net-internals/”.
After that, select Sockets on the left side panel.
Next, select Flush socket pools from the right-side panel.
And once it’s done, restart your Chrome browser and check if the “ERR_SOCKET_NOT_CONNECTED” is fixed or not.
Option 2 – Try to change the DNS Server
In this option, you can try changing your current DNS settings to the Google Public DNS as it could also help in fixing the “ERR_SOCKET_NOT_CONNECTED” error. To do so, follow the steps below.
The first thing you have to do is right-click on the network icon in the Taskbar and select Network and Sharing Center.
Next, click on the “Change Adapter Settings” option.
After that, search for the network connection that you are using to connect to the internet. Note that the option might be “Wireless Connection” or “Local Area Connection”.
Right-click on your network connection and click on Properties.
Then select the new window to choose the “Internet Protocol 4 (TCP/IPv4)” option.
After that, click on the Properties button and click the checkbox in the new window for the option “Use the following DNS server addresses”.
Type in “8.8.8.8” and “8.8.4.4” and click OK and exit.
Option 3 – Get rid of any conflicting browser extensions
Open Chrome and press Alt + F keys.
Go to More tools and click Extensions to look for any suspicious browser extensions or toolbars.
Click the Recycle bin and select Remove.
Restart Chrome and press Alt + F keys again.
Proceed to On Startup and mark Open a specific page or set of pages.
To check if the browser hijacker is still active, click Set pages, if it is active, overwrite the URL.
Option 4 – Try to reset Google Chrome
Before you proceed, make sure that the Chrome browser is not running anywhere in the background via Task Manager. Once you’ve made sure that it’s no longer running, refer to these steps:
Tap the Win + R keys to open the Run dialog box.
Then type “%USERPROFILE%AppDataLocalGoogleChromeUser Data” in the field and tap Enter to open this location.
From there, look for the Default folder and then tap the Shift + Delete button and if a confirmation prompt appears, click on Yes.
After deleting the Default folder, open Google Chrome and click on the three vertical dots icon located in the top-right corner to open the menu.
Next, click on Settings and scroll down and then click on Advanced to open the Advanced Settings.
Then scroll down until you see the “Reset and clean up” section and click the “Restore Settings to their original defaults” option.
After that, you will see a confirmation box and from there, click on the Reset settings button to reset your Google Chrome browser.
Steam Autumn sale is still raging and other storefronts like EPIC and GOG have also had their go, and as the year slowly closes we reflect on the best games released this year.
The games presented are not in any particular order and as sales are still raging pick one for you for a good time.
F1 Manager 22
If you are into formula racing this new manager is something we will wholeheartedly recommend. How it has been a very long time since a good F1 manager has been released this one is breath of fresh air. Masterfully done and fun to play, also licensed with real teams and cars get it here: https://store.steampowered.com/app/1708520/F1_Manager_2022/
Stray
I like cats, but this game is on another level from its competitors. Unique approach, great storyline, and of course orange cat as the main character! Set in a cyberpunk environment following the story of some unfortunate androids you can do most cat things like playing in boxes, etc but essentially the game is a puzzle platformer which in my opinion is a great thing. Meow your things and get the game while it is discounted: https://store.steampowered.com/app/1332010/Stray/
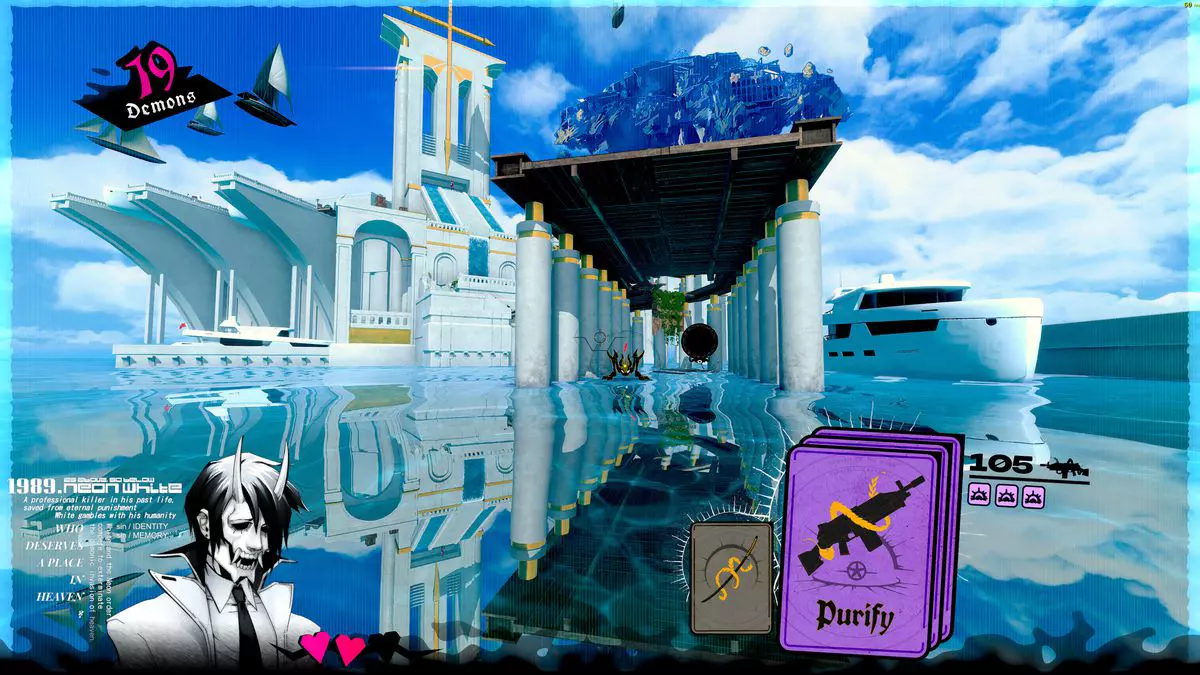
Neon White
Mirror's Edge was the very unique game when it was released introducing parkour into the gaming world, and Neon white brings it one level up. With competitive parkour FPS gameplay this game is great for killing some time and competing with your friends but most of all it is fun to play experience. Get it here: https://store.steampowered.com/app/1533420/Neon_White/
This game needs to be experienced in order to fully grasp its magnitude and quirkiness. From the creators of borderlands comes a new IP fusion of fantasy, guns, and crazy ideas all wrapped into an action RPG looter shooter with a recognizable borderlands style of graphics. https://store.steampowered.com/app/1286680/Tiny_Tinas_Wonderlands/
Norco
Winner of multiple awards, Norco is a classic point-and-click adventure game with a great sci-fi story with a lot of environmental focus. Story and atmosphere are the main selling points for the game and if you enjoy good stories with interesting characters give this one a go: https://store.steampowered.com/app/1221250/NORCO/
Final Fantasy 14: Endwalker
Expansion for Massive multiplayer online roleplaying game brings so much to the table that we just could not oversee it and place it aside. Technically not full standing game since it is the expansion it still delivers on many fronts and since it is supposedly the last expansion now is the best time to pick it up and give a final fantasy 14 a go: https://store.steampowered.com/app/1592500/FINAL_FANTASY_XIV_Endwalker/
Elden Ring
Of course, the list would not be complete if we did not include Elden ring, a great example of how a difficult but well-executed game can go over and beyond. With a story on par with great epics and compact as in dark souls, this title will provide you with many hours of gameplay and content. https://store.steampowered.com/app/1245620/ELDEN_RING/
On April 7th Microsoft has released Windows build 21354 for their flagship OS and updates are rolling. Alongside the new update builds Microsoft has decided to create and release Windows 21354 build as an installable ISO image for anyone who wishes to do a clean installation of Windows without the need to update it after the installation.
We have not seen this move by Microsoft in a long time and honestly, we are welcoming it, it is always great to have updated ISO Windows build than to install the old version and sit through an hour or more of updates.
If you are interested in getting this ISO image and you are part of the insider program you can download it from here.
If you would like to read more helpful articles and tips about various software and hardware visit errortools.com daily.
In today's IT world, if you want a computer for typical day-to-day actions and gaming, there are 3 primary ways you can go. An Apple computer with its proprietary hardware and operating system or a typical machine with Windows or Linux operating system.
Each system has both advantages and disadvantages and picking the right one might be difficult for some users. From hardware differences to specific software and operating system, each system is aimed at a different type of work, and in this article, we will explore each one and help you in choosing the right one for you.
Apple ecosystem
Apple has managed to create a unique ecosystem of its own devices, from its iMac desktop computers to more professional MAC studio and power MAC and all the way to tablet iPad and iPhone are powered by Apple's own operating system that connects all of these devices into one large system. So if you really need one singular ecosystem this is a huge advantage.
The ecosystem on the side, MAC computer systems are great, some would argue best for coding, design, video work, and sound editing. MAC M2 chip is optimized for all of these tasks and a specially tailored operating system is just the icing on the cake. Specific Apple-made software like a logic pro or final cut also helps a lot to position MAC systems on top of the line.
Reading all of this you might think hey this is the computer for me, it does everything! Sadly the truth is not like that. The first thing that is difficult on MAC systems and a maybe big reason that it is not so adopted outside professional working environment is lack of games. If you are a gamer or plan on using MAC for gaming, well I have some bad news. The second big turn-off is that MAC systems tend to be more expensive than PC systems, yes components are of higher quality but rest assured that you will pay for also for branding.
Get MAC as your workstation for serious work and for good tech support, if you need a plain home computer keep reading.
Windows PC machine
There is no better feeling than assembling your own computer, tweaking hardware to make a monster and despite haters hating, Windows is the best all-around operating system on the market. It is supporting the largest variety of hardware and the largest variety of software.
The best platform for serious gaming and streaming Windows machine has cemented itself as a multimedia powerhouse. But, this kind of computer is not alien to being also a professional machine, you can practically do everything that you can do on Apple or Linux machine inside Windows, yes some things might require extra steps or will be slightly slower but in the end, being able to do anything is the greatest strength of Windows machine.
Of course, every system has its flaws and Windows is not immune to that. One of the biggest is being the operating system for every hardware ever made and every software as well while keeping legacy support for old software and hardware, basically, its biggest strength is in the same time its biggest weakness leading to sometimes stability issues. Also being able to place any kind of hardware can also lead to the same stability issues. Executing something a little slower than other systems and having some extra steps can also be looked upon as weaknesses.
Linux system
First and perhaps for some people, the biggest advantage of the Linux operating system is its price, it is completely free! Other advantages include the great server and networking included in the OS itself, the large amount of customization, and unmatched stability. The ability to write scripts inside the OS terminal is also a great thing and coding is much more streamlined and friendlier than on other machines.
The power of Linux is the ability to change anything, even on the system layer, no other operating system will let you change the basic functionality of the OS itself while Linux will let you do this. It is also the only operating system you can fully use by booting it up from a USB stick and having the same experience as it was installed on a local hard drive. Among other OS mentioned earlier, Linux is by far the lightest one, taking the smallest amount of memory among the three.
The bad side of the Linux machine is the steep learning curve, among the three mentioned operating systems rest assured Linux is the most difficult to learn and be comfortable in it. The operating system will require you to know the hardware and how computers work in order to fully use its potential. Other things that place it behind are not so wide hardware support compared to Windows and the somewhat confusing distro model.
Linux versions come in form of different distro packages and first-time users will face many of them being left in awe of which one to choose. Also installing drivers and software via a package system can also be a tedious task as well, often being that some version of the driver will not work on the newer version of the Linux distro.
Get a Linux machine if you are well versed in computer technology, if you want great customization of the OS itself or if you do not want to spend money on OS and software since almost entire Linux software is open source.
When you try to open Outlook 20016 and other programs on your Windows 10 PC and end up getting an error instead saying, “Failed to register a VB Script DLL. Reinstall or run Regsvr32.exe Vbscript.dll to self-register”, read on as this post will help you resolve the problem and help you re-register the vbscript.dll file. Follow each one of the steps below carefully to fix the problem.
Step 1: In the Start search, type “cmd” and from the search results that appear, right-click on Command Prompt and select the “Run as administrator” option from the context menu.
Step 2: After opening Command Prompt as admin, type the regsvr32.exe vbscript.dll command and hit Enter to execute it.
Step 3: After entering the command, it will re-register the concerned DLL file using the regsvr32.exe, a Windows OS tool. The Regsvr32 tool is a command-line utility that allows users to register or unregister OLE controls like the DLL and ActiveX (OCX) controls in the Windows operating system. After the command you entered has successfully run, you will see a message saying, “DllRegisterServer in vbscript.dll succeeded.”
On the other hand, if re-registering the DLL file didn’t work, you might have to log on to your computer using an administrator account and then try re-registering the DLL file once more. But before you do that, you need to create a system restore point first so that if anything goes wrong, you can always undo the changes you’ve made. After creating a system restore point, double-click on the downloaded .reg file to add its contents to the Registry. After that, try opening the program you were trying to open but weren’t able to because of the error.
If it doesn’t work, you can always reinstall the affected programs that throw up the error and see if it resolves the problem. You could also seek the help of a one-click solution to fix the problem for you. This program is a useful tool that does not only repair corrupted registries and optimize your PC’s overall performance but also resolves any DLL issues like the Failed to register a VB Script DLL. Reinstall or run Regsvr32.exe Vbscript.dll to self-register” error. Aside from that, it also cleans out your computer for any junk or corrupted files that help you eliminate any unwanted files from your system. This is basically a solution that’s within your grasp with just a click. It’s easy to use as it is user-friendly. For a complete set of instructions for downloading and using it, refer to the steps below.
If you encounter an error message that says, “<Drive>: is not accessible, The File or directory is corrupted and unreadable” when you try to connect your USB or external device, then the File System could have been corrupted or the external device might be infected with malware. On the other hand, it is also possible that the device might have some physical damage.
To fix the “The file or directory is corrupted and unreadable” error, you can try to run Check Disk or scan your computer for malware or you could also format the destination drive. For more details, refer to each one of the given options below.
Option 1 – Run the Check Disk utility
You can also run the Check Disk utility to fix the error when you connect your USB or external device.
In the Windows Search box, type “command prompt” and from the search results, right click on Command Prompt and select “Run as administrator”.
After opening Command Prompt, type this command and tap Enter: chkdsk <Partition Letter>: /f /r /x /b
The command you entered will start to check for errors and fix them automatically. Else, it will throw an error message saying, “Chkdsk cannot run because the volume is in use by another process. Would you like the schedule this volume to be checked the next time the system restarts? (Y/N)”.
Tap the Y key to schedule Disk Check the next time your computer restarts.
Option 2 – Try to format the destination drive
Formatting the drive can also help you resolve the error. To format it, follow these steps:
To get started formatting your drive, tap the Win + E keys and then go the access page of the drive.
Next, right click on the drive and select Format.
After that, uncheck the “Quick Format” option and then format your drive properly.
Now once the formatting process is finished, unplug the drive and plug it back in afterwards.
Check if the error is already fixed. If the drive is not initialized, tap the Win + R keys and hit Enter.
After opening the Run dialog box, type “diskmgmt.msc” and hit Enter to open Disk Management.
From there, right click on the drive volume and select initialize Disk.
Next, select the correct partition type and proceed.
Option 3 – Try scanning your computer for malware using Windows Defender
Your computer could be infected with malware which might have triggered the “The file or directory is corrupted and unreadable” error. To fix this, you need to scan your computer using a reliable program like Windows Defender.
Tap the Win + I keys to open Update & Security.
Then click on the Windows Security option and open Windows Defender Security Center.
Next, click on Virus & threat protection > Run a new advanced scan.
Now make sure that Full Scan is selected from the menu and then click the Scan Now button to get started.
As previously announced by Google feature to quickly delete the last 15min of browsing history via one button is rolling out now.
For now, only Apple users will be available to use this feature but the Android update is scheduled for later this year, a strange move by Google but it is what it is.
For anyone who is unfamiliar with this feature, basically, Google wants a quick way to remove the last 15min of browsing history as a supposedly stated request to make deleting browsing history much easier.
Google came up with this idea so you can keep the previous history intact but remove just 15min time frame, no additional explanation was given on why 15 but I presume it is some round number that came up as the middle one with research, read telemetry info.
Using quick delete requires being signed into Search with a Google account. Users can access the option by simply tapping on the avatar icon to access the settings then choosing "Delete last 15 minutes."
In case you don’t know, the .Net Framework is a programming infrastructure introduced by Microsoft. You will need it to run on lots of services and applications. Note that most of the applications that require the .Net Framework are packed with their installation files which is why it will be installed automatically on your computer when you install an application. However, there are instances when you’ll get an error message saying, “The .NET Framework 4.7 is not supported on this operating system” while trying to install the .NET Framework as a standalone service.
The very reason why this error message appears is stated in the error message itself. Although the .Net Framework is supported on Windows 10, it is not actually compatible with some other Windows 10 versions. So it is most likely that you are seeing this error message because the .Net Framework in your computer is not compatible with the Windows 10 version you are running. Since that’s the case, you need to update Windows 10 to fix the problem.
Updating your Windows 10 computer is the only solution you can try to fix this problem. Thus, it is advised that you check for Windows Updates even if you are now using the latest version of Windows 10. And since the issue is caused by an incompatible operating system version, once you install the exact version of Windows 10 required by the .Net Framework, the problem will be fixed. Simply follow the steps given below to do so.
Step 1: Tap the Win + R keys to open the Run dialog box.
Step 2: After that, type in “winver” in the field and tap Enter.
Step 3: Next, your Windows 10 version should be given in the new window that appears. Take note that the number after the Version which is in the second line is your version number of Windows 10. And that the number must be 1507 or 1709. The first two digits in these numbers are the year while the second two represent the month when the update was released. So if you are running a 1709 version, this means that the Windows 10 version you are using was released in September 2017.
Step 4: The next thing you have to do is to make sure that you have the Windows 10 version that’s compatible with the .Net Framework. To verify, you need to click here and click on the System Requirements.
After opening the link, take a look at the Supported Operating System section where it says, “Windows 10 Anniversary Update” and “Windows 10 Creators Update”. Since there are users who are not familiar with the version numbers related to both the Anniversary and Creators updates, refer to the list given below.
November Update (1511)
Anniversary Update (14393)
Creators Update (1703)
Fall Creators Update (1709)
Spring Creators Update (1803)
As you can see, the Creators Update has version 1703 while the Anniversary Update has version number 14393 so if you are using a version lower than the 14393 version then it’s no wonder you aren’t able to install the .Net Framework 4.7 on your Windows 10 PC. Now all that’s left to do is to update your Windows 10 version and make sure that you will be updating it to the latest version available and then try installing the .Net Framework again.
Ieframe.dll is a Dynamic Link Library, a collection of small programs. It is stored in C:\WINDOWS\SYSTEM32. The function of this dll file is to convert Html code into web pages on IE (Internet Explorer). When this file gets corrupt, you start experiencing ieframe.dll errors on your system.
Ieframe.dll error is displayed in either of the following formats:
"Res://ieframe.dll/dnserror.htm#"
"Cannot find the file ieframe.dll"
"File Not Found C:WINDOWSSYSTEM32IEFRAME.DLL"
Solution
Error Causes
The Ieframe dll error code may occur due to multiple reasons. These include:
Incorrect Firewall settings
Ieframe.dll corruption and damage
Missing Ieframe.dll file
Internet Explorer issues
Viruses and malware attack
Outdated security software applications
If you wish to continue browsing on Internet Explorer, then it is important for you to resolve this error right away.
Further Information and Manual Repair
Here are some of the best solutions to resolve the Ieframe dll error on your PC:
Cause: Missing Ieframe.dll file
Solution: If Ieframe dll error file is missing, this means you have either accidentally deleted it while uninstalling a certain program that also shared this file.
Therefore the best way to resolve the issue is to restore the missing Ieframe.dll file. To do this check the recycle bin. If you find the file, simply restore it in the following path C:\Windows\System32.
However, if you are unable to find it, then download it from a reliable website.
Cause: Incorrect Firewall Settings
Solution: In case the error is generated due to incorrect Firewall settings, then try disabling this software. See if this works and resolves the error.
Cause: Internet Explorer Issues
Solution: Sometimes the Ieframe dll error can occur due to Internet Explorer issues. Here it is recommended to reinstall and update the latest version of IE on your system. This can be done by removing the program from the system.
Go to the Control Panel, click Add/remove programs, and uninstall the program. After uninstalling the old version, install a new and updated version of IE on your system and try running it again.
If it works, great the error is resolved. However, if it persists, then this means the problem is deeper and bigger than you think. The reason can be severe viral infection and malware attack not just damaging Ieframe.dll file but also exposing your system to privacy errors and threats.
Cause: Damaged and Corrupt Ieframe.dll files
Solution: The files can get corrupt when the registry overloads with data. It stores important and unnecessary files like junk files, cookies, internet history, temporary files, and invalid registry entries.
Such files take up a lot of disk space and damages dll files. To resolve this issue it is advisable to download Restoro. This is a powerful registry cleaner, that detects and resolves all registry issues in seconds. It wipes out unnecessary and obsolete files cluttering the registry and restores the damaged Ieframe.dll files.
It is efficient, safe, and compatible with all Windows versions. It has an intuitive interface and easy navigation which makes it simple and easy to use.
Cause: Viral Infection
Solution: If the underlying cause is a viral infection, Restoro takes care of that too. It is more than a registry cleaner.
It is embedded with a powerful antivirus that removes all malicious software from your PC including viruses, Trojans, spyware, malware, and adware. And unlike a typical antivirus, it does not reduce the speed of your system. Its system optimizer utility boosts your PC speed dramatically.
Click here to download Restoro on your PC today and resolve Ieframe dll error today!

 Error Causes


 As previously announced by Google feature to quickly delete the last 15min of browsing history via one button is rolling out now.
For now, only Apple users will be available to use this feature but the Android update is scheduled for later this year, a strange move by Google but it is what it is.
For anyone who is unfamiliar with this feature, basically, Google wants a quick way to remove the last 15min of browsing history as a supposedly stated request to make deleting browsing history much easier.
Google came up with this idea so you can keep the previous history intact but remove just 15min time frame, no additional explanation was given on why 15 but I presume it is some round number that came up as the middle one with research, read telemetry info.
Using quick delete requires being signed into Search with a Google account. Users can access the option by simply tapping on the avatar icon to access the settings then choosing "Delete last 15 minutes."
As previously announced by Google feature to quickly delete the last 15min of browsing history via one button is rolling out now.
For now, only Apple users will be available to use this feature but the Android update is scheduled for later this year, a strange move by Google but it is what it is.
For anyone who is unfamiliar with this feature, basically, Google wants a quick way to remove the last 15min of browsing history as a supposedly stated request to make deleting browsing history much easier.
Google came up with this idea so you can keep the previous history intact but remove just 15min time frame, no additional explanation was given on why 15 but I presume it is some round number that came up as the middle one with research, read telemetry info.
Using quick delete requires being signed into Search with a Google account. Users can access the option by simply tapping on the avatar icon to access the settings then choosing "Delete last 15 minutes."