I often switch between my desktop speakers and headphones and because of this I very often use the volume adjustment bar to adjust sound levels so it is not too loud and each time when I set it I get annoying BEEP at the end. Now personally this might not bother you and you might want to leave it since it can be a useful feature to tell you how much volume is loud but if you are adjusting multiple times volume during the say it can become really frustrating to hear it each time, especially when switching to headphones and it beeps into your ears.
In this guide, I will show you how to remove the beep so it is not heard anymore when you adjust the volume. Please know that beep is part of the Windows sound scheme and you can either remove specific sound with a completely silent wave or just turn off all windows alert sounds.
Open Windows settings and go to system > sound
in system sound, go to the right part of the screen and click on the sound control panel
In the sound control panel click on the Sounds tab
In the sounds, tab click on the drop-down menu under the sound scheme and choose no sounds.
There you go! You have successfully removed annoying BEEP each time you adjust the volume in Windows 10
Hello everyone and welcome to how to fix Windows when it is not starting tutorial. Here we will tackle some common problems and solutions in order to help you to get back both your computer and Windows in working order.
Windows not booting and loading is an annoying issue that can even result in complete loss of your data and can also consume a lot of time if no other solution than clean install remains. Also if you are not tech-savvy, this issue can cost you as well since you will have to hire a professional to solve this problem for you.
Here at Error Tools, we aim to help so you can overcome your PC issues yourself by providing you daily with tutorials, tips, and tricks and helping you with all of your Windows issues.
All of that being said, let's see what are issues that can prevent your computer or Windows from booting up and get around them so everything is back in working order.
Use repair tool
Windows 10 comes with a startup repair tool that has the goal to repair and fix errors preventing Windows from booting up. To use this tool however you will need Windows 10 bootable USB stick. You can create a bootable USB directly on the Microsoft site. Once you have it ready, plug it in and reboot your computer, choose to boot from USB. When you are on the Windows setup screen, click on next and then on Repair your computer.
Go to troubleshoot > Advanced options > Startup repair.
When Startup repair is clicked, Windows will boot, scan files for issues, and if they are found he will automatically fix them.
“Windows Failed to Start” 0xc00000f error
If you get this error on your boot of Windows, then you have corrupted boot configuration data. In order to fix this error, you will also need a bootable USB with Windows 10 on it. Make one on the Microsoft site if you don't have it and reboot your computer, boot from USB, on the setup screen click on next and then on Repair your computer. Click on Troubleshoot and then on the command prompt. In the command prompt type the following:
bootrec /FixMbrbootrec /FixBootbootrec /ScanOsbootrec /RebuildBcdexit
Reboot your PC without a USB
Boot into safe mode
Safe mode for Windows loads only its core without drivers and with minimal services. If you can boot into safe mode then the issue is with some application or driver causing the problem. Try the selective boot option to eliminate what is causing the error.
Make sure your hardware is connected
Some RAM or hard drive out of socket can cause Windows not to be able to boot, check all connections just in case.
If everything else fails, perform a clean Windows installation. The reason for Windows not booting up can be caused by various viruses and malware also if that case it would be best to format and perform a clean install.
It really sucks when you can’t fully enjoy the newest version of your favorite OS.
Windows 11 is still relatively fresh and consequently has some annoying little bugs that really ruin our experience. The good news is that you’re not alone and most of them are easy to fix.
Here are 5 commonly reported Windows 11 issues and what you can do to get rid of them.
1. Windows 11 audio problems
One of the absolute most irritating things in the world is struggling with the sound on your computer. Windows 11 users have reported facing the issue of low or no sound. If you’re currently experiencing the same frustration, you can be relieved. Chances are fixing it will only take a few minutes.
The first thing to check would be whether you accidentally muted your device by pressing the mute button on your keyboard. Yes, we know it sounds a lot like the old “have you tried turning it off and on again?” But it’s important to leave no stone unturned, and the most obvious things are usually the ones we easily overlook.
Moreover, if you have several audio output sources, check whether the right one is selected. You can do this via the Action Center or through Settings. If you want to use the same source every time, we also recommend you set it as the default one.
It’s also important to have a good, up-to-date audio driver. More often than not, this will be the true cause of your audio struggles. Make sure to update your driver, and if that doesn’t work out, you can always un- and reinstall it or install a different one.
Lastly, if all attempts remain unsuccessful, run the audio troubleshooter to figure out what’s actually going wrong.
2. Unable to find files
Such a powerful new operating system, yet it can’t seem to do the simplest thing imaginable? The File Explorer not responding on Windows 11 is one of the most frustrating and most common problems with Microsoft’s newest iteration of its awesome OS.
However, 9/10 times it can be fixed by simply restarting your PC. You could also try killing the Windows Explorer process in the Task Manager and then rerunning it.
If these don’t help, check whether there are any pending Windows 11 updates. A single missing update can compromise your PC’s functionality, so always make sure to install them all on time.
Should none of that work, then there are other ways to solve the File Explorer problem. However, then the issue is probably a bit deeper and it’s no longer in the ‘easy fix’ territory.
3. Start menu not working
Just like the File Explorer, the Start menu is a fundamental element of your OS. So, it’s only natural that its malfunction grinds your gears. It may be more customizable than on previous Windows versions, but it doesn’t always work smoothly.
If you’re facing the so-called Start menu critical error, there are a few things this could be caused by. Usually it means you turned off your system while an important update was still being installed, there is a corrupt file on your PC, or Windows forcefully stopped a program.
Whatever the reason, the solution should be pretty simple. Try the basic steps: restarting your File Explorer (like we explained above) and signing out and back into your account. If that doesn’t do anything, you may want to try uninstalling third-party start menu apps (if you have any), since they can interfere with your default programs’ functionality.
Now, those are the easy fixes. If you get nowhere with them, you might need to identify the root cause and search for more complex solutions than that.
4. Snipping tool not working
Our beloved screenshot tool was introduced with Windows 10 and Microsoft decided to keep it. However, you were probably just as disappointed as us when you tried to run it and failed.
Normally, this can be fixed by installing the latest Out-of-band (OOB) update, or even pending updates in general. Even if your system appears to be up-to-date, run the checker just in case.
Another cool thing Windows 11 lets you do is ‘Repair’ and ‘Reset’, which is the easiest way to troubleshoot your Snipping tool. If this fails, you can also try the good old un- and reinstall method. Simply uninstall the tool through the Control Panel and reinstall it from the Microsoft Store.
Furthermore, in the case of an upgrade from Windows 10 to 11, it may be that the old Snipping tool version is interfering with the launch of the new one. If you don’t care that much about the additional options available with the enhanced screenshot tool, you can use the old version instead.
Simply go to your C Drive, find the Windows.old folder, search for the tool and open it from there. Make sure to pin it to your taskbar as well, if you know you’re going to use it often.
5. Can’t install the latest update
The latest Windows 11 version, 22H2, has brought tons of enhancements to our dearest operating system. Unfortunately, a lot of users still haven’t had the opportunity to experience it. A mere update of your OS version should be the one thing that goes smoothly, but sometimes that’s not the case.
Failure to install 22H2 can be caused by a few things. Most commonly, the issue is caused by lack of storage space or corrupted files, but there could be other culprits.
There are a couple of things you could try. For example, it’s crucial that your drivers be up-to-date and some important services be enabled. These are: Windows Modules Installer, Background Intelligent Transfer Service, Cryptographic Service, Windows Update services.
To enable them, search ‘Services’, find the service you need and right-click on it. Open ‘Properties’ and select the startup type ‘Automatic’.
It may also be necessary to unplug all peripherals that aren’t crucial and disable third-party antivirus tools until after the update is finished.
Ultimately, you can run the Windows Update troubleshooter to detect and fix other possible issues.
Summary
Tiny bugs like these are nothing out of the ordinary. That said, we still all hate when they happen.
Hopefully some of our solutions have helped you to a smoother Windows 11 experience. But if you’re still struggling, feel free to reach out to us. We’d be happy to help!
If your Windows 10 computer is downloading or installing updates but suddenly an error pops up saying, “GWXUX has stopped working”, read on as this post will show you what you can do to resolve the problem. GWXUX is a process responsible for downloading and installing Windows updates and is installed on your computer via Windows Updates. That particular update is known as “KB3035583”. Through this process, the “Get Windows 10” pop-ups are installed and initiated by Microsoft. This process is also capable of checking the compatibility of your PC to run Windows 10 as well as preparing it for installation. However, this process might also result in excessive usage of Disk and sometimes, CPU. So in this post, you will be guided on how you can fix the issue with the GWXUX. Follow the instructions given below carefully.
Option 1 – Disable GWXUX in the Task Scheduler
You will have to disable the gwxux.exe process to run from the Task Scheduler. Thus, you need to follow the steps below to do so.
Open the Cortana Search box and then type “task scheduler” in the field.
Then click on Task Scheduler from the related search results that appear to open it.
After opening the Task Scheduler, navigate to Microsoft > Windows > Setup > gwx on the left panel from the Task Scheduler Library.
Once you select the GWX folder, you will see two tasks that are listed under that folder. Select both of these tasks and permanently disable them.
Restart your computer to apply the changes made and check if the issue is now fixed or not.
Option 2 – Uninstall the KB3035583 Windows Update
To uninstall the KB3035583 Windows Update, you need to go to Control Panel, and for you to do that, type “control panel” in the Cortana Search box.
After that, click on Control Panel from the related search results given.
Once Control Panel is pulled up, search for “View Installed Updates” in the search field from the top right part of the window.
Next, click on a link labeled, “View Installed Updates” under the Programs and Features menu.
After clicking the link, you will see the list of all the installed updates in your computer from the Windows Updates.
Now look for an update named “KB3035583” and select it.
You should notice the Uninstall button located at the top portion of the sub-menu ribbon as you can see on the snippet below. Click on that button to uninstall the KB3035583 Windows Update.
After uninstalling the update, make sure to restart your computer to apply the changes made.
Option 3 – Try using the System File Checker
System File Checker or SFC is a built-in command utility that helps in restoring corrupted files as well as missing files. It replaces bad and corrupted system files with good system files that might be causing the error 0x80200056. To run the SFC command, follow the steps given below.
Tap Win + R to launch Run.
Type in cmd in the field and tap Enter.
After opening Command Prompt, type in sfc /scannow
The command will start a system scan which will take a few whiles before it finishes. Once it’s done, you could get the following results:
Windows Resource Protection did not find any integrity violations.
Windows Resource Protection found corrupt files and successfully repaired them.
Windows Resource Protection found corrupt files but was unable to fix some of them.
After running the System File Checker, restart your computer and check if the error with the GWXUX.exe file is now fixed or not.
Plugin.dll is a dynamic link library file associated with Adobe Photoshop CC powered by Adobe Systems Incorporated for the Windows Operating System.
DLL are small programs similar to ‘exe’ files which allow multiple software programs to share the same functionality. It is used to call commands, load applications, and successfully execute applications.
Plugin.dll error messages may appear during program installation, while a plugin.dll related software program (Adobe Photoshop CC) is running, during startup and shutdown.
Solution
Error Causes
Plugin.dll errors may occur due to multiple reasons such as:
Missing or corrupt Plugin.dll files
Viral infection
Issues in the Windows registry
Broken registry keys
Plugin.dll errors may appear on a Windows-based computer as the following:
“Plugin.dll not found."
“The file Plugin.dll is missing."
“Cannot register Plugin.dll."
"Cannot start Adobe Photoshop CC. A required component is missing: Plugin.dll. Please install Adobe Photoshop CC again."
All the causes of the plugin.dll error code are associated with the registry. It is advisable to repair this error before it causes serious damages to your system.
Further Information and Manual Repair
To repair the plugin.dll error on you system, you don’t have to hire a technician or be adept at computer programming.
The best way to resolve this error code is to download Restoro. This is a new, innovative, high and multi-functional PC fixer integrated with powerful and performance-driven multiple utilities. It includes a registry cleaner, and system stability scanner.
So, whether the cause of the error code Plugin.dll error on your system is missing DLL files or even broken registry keys, Restoro can help you repair all these issues in no time. It is user-friendly and can be operated by users of all levels.
Dll files go missing and registry gets corrupt because of the data overload in the RAM/the hard disk.
This happens due to poor PC maintenance. The registry tends to save all the activities performed on the PC this includes even the junk files, invalid registry entries and files from uninstalled programs. If the registry is not cleaned regularly, such files accumulate a lot of disk space which leads to registry malfunctioning.
It damages .dll files and eventually corrupts the registry.
By scanning your PC with a powerful registry cleaner, you can easily wipe out the files cluttering your PC and clear your disk space.
Additionally, it also repairs the damaged plugin.dll files, fragmented disk and corrupt registry. Thereby restoring your PC to its normal condition and resolving the plugin.dll error code on your system.
Besides this, you can also run Restoro on your PC to resolve speed issues and Active X and class errors. It is safe, efficient and compatible with all Windows versions.
Click here to download Restoro and resolve the plugin.dll error.
One of the most useful tools in the Windows 10 operating system is the Windows Media Creation tool. This tool is used to download and install the latest version of Windows 10. However, there are times when you might encounter some issues while using this tool. One of these issues is the Error code 0x80072F76 – 0x20016. If you encounter this error, you will see the following error message during setup:
“We’re not sure what happened, but we’re unable to run this tool on your PC. If you continue experiencing problems, reference the error code when contacting customer support – Error code: 0x80072F76 – 0x20016.”
This kind of error in the Media Creation tool could be due to an interrupted download or unstable internet connection, and many more. To fix it, you can run the Windows Update troubleshooter or try using another browser to download the tool to another location. You can also try changing the DNS or the ISP connection or use the Windows 10 Update Assistant as well as delete the $Windows.~BT & $Windows.~WS folders.
Check out the given suggestions below to fix the Media Creation Tool Error code 0x80072F76 – 0x20016 in your Windows 10 computer.
Option 1 – Try to run the Windows Update troubleshooter
Windows 10 have various troubleshooters that can help you resolve many system issues. So if you’re dealing with Windows Update errors like Error Code 0x80072f76 – 0x20016, you can run the Windows Update troubleshooter to resolve it.
To run the Windows Update troubleshooter, go to Settings and then select Troubleshoot from the options. From there, click on Windows Update and then click the “Run the troubleshooter” button. After that, follow the next on-screen instructions and you should be good to go.
Option 2 – Try using a different browser to download the tool to another location
You could also use another browser in downloading the tool and place it in a different location on your computer but if you do not have another browser, you can just install one and then download the same tool to another location like the Desktop.
Option 3 – Try to change the DNS
Tap the Win + R keys to open the Run dialog box.
Then type “inetcpl.cpl” in the field and hit Enter to pull up the Internet Properties.
After that, go to the Connections tab and select the LAN settings.
From there. Uncheck the “Use a Proxy Server” option for your LAN and then make sure that the “Automatically detect settings” option is checked.
Now click the OK and the Apply buttons.
Restart your PC and then check if the Media Creation tool error is fixed.
Note: If you are using a third-party proxy service, you have to disable it.
Option 4 – Try to change the ISP connection
There are times when the connection to the Microsoft servers is interrupted due to some glitch or it could also be blocked by your Internet Service Provider or ISP. To rule out this possibility, you can try to change your computer’s internet connection and then see if it fixes the problem.
Option 5 – Try to use the Windows 10 Update Assistant
There’s another tool you can use as an alternative to the Media Creation tool. It is called the Windows 10 Update Assistant. This tool can also help you download and install Windows updates seamlessly.
Option 6 – Try to delete the $Windows.~BT and $Windows.~WS folders
From time to time, the Windows Update files also get corrupted which can cause some problems and conflicts when downloading and installing a Windows Update. To fix this, you need to delete the $Windows.~BT & $Windows.~WS folders in your computer.
If you are trying to install Microsoft Office on your Windows 10 computer but encounter an error code 30068 instead, read on as this post will guide you in fixing this problem. One of the causes of this error is an issue with the Office Click-to-Run service. It can also occur due to issues with the installation. And aside from the error code 30068, the error codes could also appear like this: 30068-29 (2), 30068-4 (3), 30068-4 (1715), 30068-39 (3), and many more.
In most cases, the installation of Microsoft Office happens directly from the Microsoft servers which work via Click-to-Run service. This service is an alternative to MSI or offline installation. It is a Microsoft streaming and virtualization technology that helps in reducing the time that’s required to install Microsoft Office. Although it saves a lot of time, it also requires a good and stable internet connection for it to properly work. So if you encounter error code 30068 or any of the aforementioned error codes above when using this service, here are some potential fixes that could help.
Option 1 – Try to restart your computer and reinstall Office
The first thing you can do is restart your computer and then try installing Office again. It is possible that there’s some glitch and a restart might fix it. Once you’ve restarted your computer, install Office again. And if the online installation didn’t work, you can also try to download an offline Office setup.
Option 2 – Try checking if the Click-to-Run service is disabled
The next thing you can do is to verify if the Click-to-Run service is enabled or disabled. You can check its status in Services. How? Refer to these steps:
Tap the Win + R keys to open the Run dialog box and then type “services.msc” in the field and tap Enter or click OK to open Services.
Next, look for the Microsoft Click-to-Run service from the list of services and once you found it, double click on it.
After that, go to the General tab and in the Startup type section, click on the drop-down menu and select Automatic.
Then click on the Apply and OK buttons to save the changes made.
Once you’re done, try to install Office again and see if the error is now fixed.
Option 3 – Try to uninstall and reinstall Office
If neither of the two given options above worked, then you might want to uninstall Office and reinstall it. All you have to do is download the Microsoft Office Uninstall tool from the official site of Microsoft and run it. This will remove any incomplete Office installation as well as unwanted files. It will also get rid of all the Office apps and settings on your computer. This same option can be also applied if you encountered error code 30068-4 (3) when installing Office. On the other hand, if the Uninstaller tool throws an error that says, “Office installation is missing”, you have to check if there is an ongoing installation of Office.
Dell laptop is a great choice for laptop users who like to have the best configuration, fast working platform, and long warranty period. But this does not mean that your errors can’t pop up on Dell laptops.
Users can experience a variety of hardware and software-related issues on Dell laptops. And one such error is the error code 0146.
This is a typical Dell laptop hard drive-related error code. It can cause your Dell laptop to freeze and system applications to stop responding for a long period of time. Therefore, it is recommended to fix the error immediately.
Solution
Error Causes
Error 0146 may be triggered due to several reasons on your system. These include:
Program corruption
Viral infection
Hard drive issues
Further Information and Manual Repair
The good news is that error 0146 is easy to fix. Here are some of the easy do it yourself methods that you can try to resolve error 0146 on your system:
Method 1 - Run a Virus Scan
Malware and viruses can corrupt and damage the hard drive and trigger error 0146. In such an event, it is recommended that you open your antivirus, update it and run a full virus scan on your PC.
Once the scan is complete, remove all the viruses. This will hopefully resolve the error 0146.
Method 2 - Run Your Laptop in Safe Mode and Clean Boot
Another alternative is to run your Dell laptop in safe mode and clean boot. To do this, simply disconnect all the attached devices like wireless printers, routers, and USB keys and turn off your laptop.
Turn it on again and then press and hold the F8 key. Make sure you do it quickly before the Windows logo comes up. Now select ‘Safe mode with networking’ and press enter.
After that, open System Configuration Utility by going to the start menu and typing ‘msconfig’ in RUN, and then click OK. In the System Configuration Utility click General then selective startup. Now uncheck the load startup items box ad select services and then check the hide all Microsoft services box and disable all.
To apply these changes, click ‘Apply’ and then OK. Now restart your laptop.
Method 3 - Change to SATA Drive
Sometimes error 0146 may pop up due to hard drive configuration changes.
If this is the reason for error occurrence, then simply go to Dell Laptop BIOS. Check whether the hard drive configuration has been changed to AHCI SATA from SATA Drive.
If it has changed, then it is advisable to change it back to SATA Drive. When you are done back up all your data, and then format your hard drive. It is important to create a backup because formatting will make you lose all your data.
Once you format the hard drive, reinstall Windows from scratch.
Method 4 - Run a Registry Scan
If the error 0146 results due to program corruption then there is a possibility that the underlying reason might be registry damage. Therefore it is advisable to run a registry scan and repair it.
To do so, download Restoro. This is a cutting-edge and user-friendly PC Fixer integrated with a registry cleaner.
Run it to scan for registry issues. It removes all obsolete files corrupting and damaging the registry, repairs important and damaged system files and cleans the registry in the shortest time.
Click here to download Restoro and resolve error 0146.
Oobesttings error is the blue screen of death error caused by some faulty settings inside the Windows registry. The good news is that this is not a hard error to fix and if by any chance you are one of the unfortunate people getting this dreaded annoying error, please do keep reading because we have several things that you can do in order to eliminate this issue from your computer.
Reboot your system
This is the easiest and straightforward solution and can work sometimes since if the system has not been properly rebooted in a while memory could be filled with various processes and it can trigger oobesettings error. A simple restart of the system can solve the issue by decluttering files and emptying memory.
Scan and repair with SFC
If rebooting the system was not helpful and sadly you still receive an error then let's scan and repair system files by using Windows built-in tool SFC. In order to use this, we will have to run the command prompt in elevated administrator mode. Follow instructions closely.
First click on the search icon on the taskbar and type in CMD
The command prompt will show as a search result, on the right side click on Run as administrator.
Once it opens type in following command: sfc /scannow and press ENTER
Wait for the process to finish completely and restart your device after.
Repair the system registry
If the SFC scan has not repaired the issue then we will move to the next solution that involves repairing the system registry itself. Please note that you need to follow step-by-step for provided instructions since playing with the system registry can cause some serious issues if not done properly and can even render the system unstable. That being said, let's begin:
Press ⊞ WINDOWS + R to open Windows run dialog
Type inside regedit and press ENTER
Inside registry editor locate the following key: HKEY_LOCAL_MACHINE/SYSTEM/CurrentControlSet/Control/Session Manager/ Memory Management. and click on it to see properties
Inside the properties right-click on CommitLimit value and choose delete. Confirm with yes.
Close registry editor and reboot your computer.
Reset Windows 11
If even clearing key inside the registry editor has not helped next step would be to reset the system itself.
Press ⊞ WINDOWS + I to open Windows settings and click on System on the left.
Inside on the right part click on Recovery
In recovery click on the button next to Reset this PC that says Reset PC
Choose between keep my files and remove everything (a better option is remove everything, but be sure that you have all your files on a separate drive backed up)
Choose between Cloud Download or Local reinstall.
Click on next to confirm choices and after that on Reset to start the reset process.
Follow onscreen instructions until it is fully done.
If by any chance your search result in Windows is misleading, missing, or incorrect then it is a high probability that your search index is out of date. To repair this issue follow this guide step by step.
Please take note that rebuilding the whole search index can take a long time on some systems depending on the size of the index itself, CPU speed, HD speed, etc. Sometimes it can take even hours on large drives.
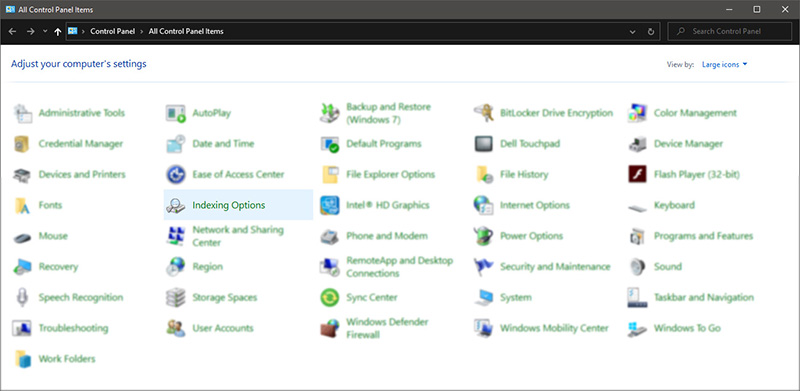
First, press ⊞ WINDOWS + R to open the run dialog and type in it Control panel to open the control panel.
Once you are in the control panel, switch your view to large icons and locate Indexing options.
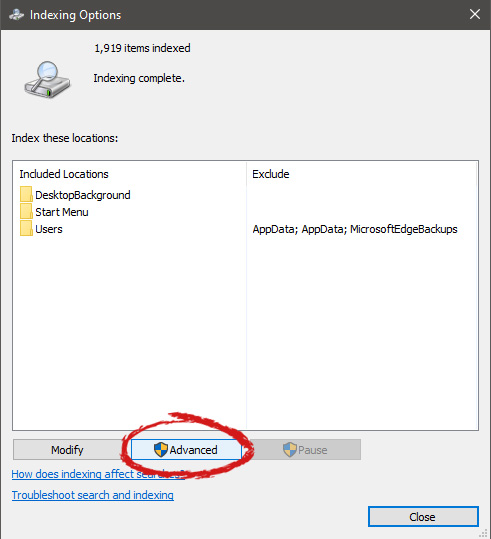
Inside indexing options, click on advanced.
In advanced options click on the rebuild and confirm.
Leave your computer to finish and your searches should be working fine now.
Installing Windows Updates in your Windows 10 computer does not always go smoothly as there are instances when you could encounter some errors along the way. One of these errors is error code 0x80244022 –WU_E_PT_HTTP_STATUS_SERVICE_UNAVAIL HTTP 503. This kind of error can be encountered when you check, download or install any updates. At the time of writing, it isn’t known yet what the exact cause of this error is. However, there are some potential fixes you can check out to fix it.
When this error occurs, you will see the following error message on your screen:
“There were some problems installing updates, but we’ll try again later. If you keep seeing this and want to search the web or contact support for information, this may help: (0x80244022).”
To fix error code 0x80244022, refer to the potential fixes provided below.
Option 1 – Disable the Proxy server
The first thing you can do is to try disabling the Proxy server as it might be the reason why you’re getting error 0x80244022 for Windows Updates. To disable the proxy server, refer to the steps below.
Tap the Win + R keys to open the Run dialog box.
Then type “inetcpl.cpl” in the field and hit Enter to pull up the Internet Properties.
After that, go to the Connections tab and select the LAN settings.
From there. Uncheck the “Use a Proxy Server” option for your LAN and then make sure that the “Automatically detect settings” option is checked.
Now click the OK and the Apply buttons.
Restart your PC.
Note: If you are using a third-party proxy service, you have to disable it. In addition, if you are also using a VPN, you can try to disable it as well.
Option 2 – Run the DISM tool
You can run the DISM tool as well to help fix the error code 0x80244022 during Windows Update. Using this built-in tool, you have various options such as the “/ScanHealth”, “/CheckHealth”, and “/RestoreHealth”.
Open the Command Prompt with admin privileges.
Then type in the following commands and make sure to hit Enter right after you type each one of them:
Dism /Online /Cleanup-Image /CheckHealth
Dism /Online /Cleanup-Image /ScanHealth
exe /Online /Cleanup-image /Restorehealth
Do not close the window if the process takes a while as it will probably take a few minutes to finish.
Option 3 – Perform a System File Checker scan
The SFC or System File Checker scan could detect and automatically repair damaged system files that could be causing error code 0x80244022 to appear when you try to update your Windows 10 computer. SFC is a built-in command utility that helps in restoring corrupted files as well as missing files. It replaces bad and corrupted system files with good system files. To run the SFC command, follow the steps given below.
Tap Win + R to launch Run.
Type in cmd in the field and tap Enter.
After opening Command Prompt, type in sfc /scannow and hit Enter.
The command will start a system scan which will take a few whiles before it finishes. Once it’s done, you could get the following results:
Windows Resource Protection did not find any integrity violations.
Windows Resource Protection found corrupt files and successfully repaired them.
Windows Resource Protection found corrupt files but was unable to fix some of them.
Once done, restart your computer.
Option 4 – Try disabling the Firewall or antivirus program
Disabling the antivirus program or Firewall or any other security software installed in your computer is always a good idea you can try when the Windows Update process does not go smoothly. So before you try updating your computer again, make sure to disable the antivirus or security program and once the Windows Update is done, don’t forget to enable the antivirus program back again.
Option 5 – Try resetting the Windows Update components
Open Command Prompt with admin privileges.
After that, type each one of the following commands and hit Enter after you key in one after the other.
net stop wuauserv
net stop cryptsvc
net stop bits
net stop msiserver
Note: The commands you entered will stop the Windows Update components such as Windows Update service, Cryptographic services, BITS, and MSI Installer.
After disabling WU components, you need to rename both the SoftwareDistribution and Catroot2 folders. To do that, type each one of the following commands below, and don’t forget to hit Enter after you type one command after the other.
Next, restart the services you’ve stopped by entering another series of commands. Don’t forget to hit Enter after you key in one command after the other.
net start wuauserv
net start cryptsvc
net start bits
net start msiserver
Close Command Prompt and reboot your PC.
Option 6 – Run the Windows Update Troubleshooter
You might also want to run the Windows Update Troubleshooter as it could also help in fixing Windows Update Error. To run it, go to Settings and then select Troubleshoot from the options. From there, click on Windows Update and then click the “Run the troubleshooter” button. After that, follow the next on-screen instructions and you should be good to go.


 Oobesttings error is the blue screen of death error caused by some faulty settings inside the Windows registry. The good news is that this is not a hard error to fix and if by any chance you are one of the unfortunate people getting this dreaded annoying error, please do keep reading because we have several things that you can do in order to eliminate this issue from your computer.

 Once you are in the control panel, switch your view to large icons and locate Indexing options.
 Inside indexing options, click on advanced.
 In advanced options click on the rebuild and confirm.
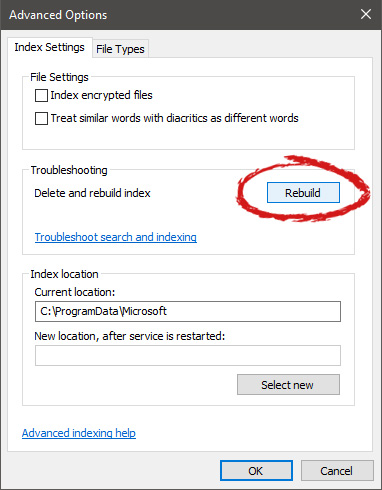 Leave your computer to finish and your searches should be working fine now.