One of the preferred ways to upgrade Windows 10 is by creating a bootable USB drive. However, you might change your mind when you encounter an error during the Windows 10 Setup that says, “We can’t find a USB flash drive”. Worry not for this error can be fixed using some suggestions that will be provided in this post.
The funning thing about this error in Windows setup is that the computer says it’s not there when it’s clearly there. To fix this problem, you need to check if the USB device is accessible on your computer or you can also try a different USB device. In addition, you could check if there are any issues with both the USB 3.0 and USB 2.0 ports as it could be the reason why you’re getting the error or fix the bad sectors in the USB drive as well as see if the USB drive is set as the primary drive.
Option 1 – Try to check if the USB is accessible on your PC
The first thing you can do to resolve the problem is to check if you can access your USB device from your computer. All you have to do is open File Explorer and check if the USB device is listed there or not.
Option 2 – Try to connect a different USB device
The next thing you can do to fix the error is to try connecting a different USB device, specifically the one that has more significant storage space. You also have to make sure that it’s working on a different PC.
Option 3 – Fix any issues with the USB 3.0 and 2.0 ports
Although the USB 3.0 ports are compatible with the USB 2.0 ports, it does not necessarily mean that there wouldn’t be any problem when you use them which is why it’s best to fix any issues in them or better yet, use a compatible drive.
Option 4 – Try to fix the bad sectors in the USB drive via CHKDSK
When it comes to some issues concerning the hard drive or removable devices, there is a utility in Windows that might help which is called “chkdsk”. To use it, follow the steps below.
Tap the Win + S keys to open the Search box.
Then type “command prompt” in the field and from the search results that appear, right-click on Command Prompt and select “Run as administrator”.
After opening an elevated command prompt, copy and paste the following command and hit Enter:
Note: In the command given above, “[/F]” will try to fix the system errors while “[/R]” will be the one to fix the bad sectors.
Now if you are prompted to run CHKDSK after your reboot your PC, just tap Y and reboot your PC.
If CHKDSK is not able to find any errors, tap the Win + E keys and navigate the access window. From there, right-click on the concerned drive and click on Properties.
After opening Properties, click on the tab Tools and then click on the “Check” button under the Error-checking section.
Wait until the process is completed and then restart your computer.
Option 5 – Try checking if the USB is set as the primary drive
You might also want to check if the USB drive is set as the primary drive because if it is, then it won’t appear on the list. It could also be that the USB drive has a primary disk in it. To undo it, you need to use the DISKPART utility.
In the Start Search, type “command prompt” and right-click on Command Prompt from the search results, and then select the “Run as administrator” option.
Next, execute the “diskpart” command to initiate the DISKPART utility.
After that, type the “list disk” command and tap Enter to display the list of disks on the computer. You have to take note of the drive number or letter of the concerned USB drive.
Once done, type the “select disk <X>” command where X is the drive letter or number and tap Enter.
Then execute the “list partition” command to see the list of all the partitions in your computer. It should be listed as 0, 1, or 2. 0 is the primary partition.
Now type the “select partition 0” command and tap Enter and then type “delete partition” to delete the selected partition.
You can do the same to the other partitions as well and when you’re done, execute the format command to turn the USB drive into a standard one.
USB Kill, a USB device is able to fry and damage your computer, mobile phone, router, etc. This device is quite dangerous and can kill electronics the moment it is inserted into an available port. By now people should know that they should not put unknown USB sticks into their devices because of potential virus and malware threats but this raises using unknown sticks to a whole new level.
Kill kits are not really new to the market, they have existed before but lately, technology really progressed and the latest USB sticks are really good, their success rate is around 95% which is pretty high and should not be taken lightly.
The second thing that you really should not play with strange USB sticks is that they dropped in price really hard, although top Kill kits will still go as high as around 300 USD, there are really cheap ones lurking in Ali Express that are just 6 USD!!! that makes them affordable devices for the mass market.
The device is made to take energy and current from the port it is plugged in, multiply it and release its charge back into the device, successfully frying some components immediately. Some more professional Kill sticks can even fry devices even when the device itself is not powered and can be even started remotely.
The point of this article is to make you aware that you should not in any kind of circumstances use and plug-in USB sticks into your devices that you do not know where they come from, especially from the mail!!
A couple of Windows 10 users recently reported getting an error that says, “The group or resource is not in the correct state to perform the requested operation” while opening UWP Applications as well as accessing the File Explorer.
You can encounter this kind of error mostly on File Explorer, Microsoft Store application, and other UWP applications. This indicates that this error occurs during both the Windows Classic Application and the Universal Windows Platform Applications.
There are several ways to fix this error. You can try to run a System File Checker scan, or run the DISM tool or the Program Compatibility troubleshooter or Windows Store Apps troubleshooter or try to reset or reinstall Windows 10 or the affected application that's not working. However, before you do any of these troubleshooting tips, you can try to perform System Restore first as it could undo the changes you’ve made in the system which might have caused the error.
Tap the Win + R keys to open the Run dialog box.
After that, type in “sysdm.cpl” in the field and tap Enter.
Next, go to the System Protection tab then click the System Restore button. This will open a new window where you have to select your preferred System Restore point.
After that, follow the on-screen instructions to finish the process and then restart your computer and check if the problem is fixed or not.
If System Restore wasn’t able to fix the error, then you can refer to each one of the following options.
Option 1 – Try to use the DISM tool
You might want to repair potentially corrupted files in your system as having them could also trigger the “The group or resource is not in the correct state to perform the requested operation”. To repair these corrupted system files, you can run the DISM commands:
Tap the Win + X keys and click on the “Command Prompt (Admin)” option.
After that, input each one of the commands listed below sequentially to execute them:
Dism /Online /Cleanup-Image /CheckHealth
Dism /Online /Cleanup-Image /ScanHealth
Dism /Online /Cleanup-Image /RestoreHealth
Once you’ve executed the commands given above, restart your computer and check if the DCOM error is now fixed.
Option 2 – Run the System File Checker Scan
Aside from the DISM tool, you can also run a System File Checker scan. It is another built-in command utility that helps in restoring corrupted files as well as missing files. It replaces bad and corrupted system files to good system files that might be the cause why you’re getting the error. To run the SFC command, follow the steps given below.
Tap Win + R to launch Run.
Type in cmd in the field and tap Enter.
After opening Command Prompt, type in sfc /scannow
The command will start a system scan which will take a few whiles before it finishes. Once it’s done, you could get the following results:
Windows Resource Protection did not find any integrity violations.
Windows Resource Protection found corrupt files and successfully repaired them.
Windows Resource Protection found corrupt files but was unable to fix some of them.
Reboot your computer.
Option 3 – Try to run the Program Compatibility Troubleshooter
You might also want to run the Program Compatibility Troubleshooter. This built-in troubleshooter is available in the Windows Update & Security section. From there, select Troubleshoot. This will find a list of programs for you and since you have already downloaded the driver files, just click on Not Listed located at the top of the program list. After that, browse and select the driver files and then let the program do its job. In addition, you can try to run the Windows Store apps troubleshooter as it can also help you resolve the problem.
Option 4 – Reset your computer
Tap the Win key or click on the Start button located in the Taskbar.
Then click on the Power button at the bottom right portion of the screen.
Next, press and hold the Shift key on your keyboard and then click on Restart. This will restart your Pc into the Advanced Startup options.
Note: Once you have access to the Advanced Startup options, you have to go to the setting which allows you to Reset your Windows 10 PC. All you have to do is select Troubleshoot > Reset this PC to reach the following screen
Afterward, select either the “Keep my files” option and then proceed to the next on-screen instructions that follow to reset your Windows 10 computer without losing your files.
In case you don’t know, Windows 10 actually allows users to set the Keyboard Repeat Rate and Repeat Delay. Both of these terms are interrelated and when you make active, any text field or an editor and then press and hold a single character key, it will quickly type the character for the first time and will show delay until the second and later characters appear. This is what you call the Keyboard Repeat Delay. On the other hand, the rate at which the later character appears is known as Keyboard Repeat Rate.
There are two ways you can set the Keyboard Repeat Rate and the Keyboard Repeat Delay on Windows 10. The first one is using the Keyboard Properties while the second one is using the Registry Editor.
Option 1 – Set up Keyboard Repeat Rate and Repeat Delay via Keyboard Properties
First, tap the Win + R keys to open the Run dialog box and type in “control keyboard” in the field, and hit Enter to open the Keyboard Properties.
From there, you can use the slider to make the respective options for both Keyboard Repeat Delay and Repeat Rate shorter or whatever you prefer them to be.
You should also see a text field in the mini window where you can test out your preferences. Once done, click on the Apply and OK buttons to save the changes made.
Option 2 – Keyboard Repeat Rate and Repeat Delay via Registry Editor
Tap the Win + R keys to open the Run utility and type “Regedit” in the field and then hit Enter to open the Registry Editor.
Next, navigate to this registry path: HKEY_CURRENT_USERControl PanelAccessibilityKeyboard Response
From there, you can set your own value for both the AutoRepeatDelay and AutoRepeatRate registry keys so that you can set the Keyboard Repeat Rate and Repeat Delay in Windows 10.
Once you’re done, exit the Registry Editor and restart your computer to save the changes made.
Dune, arguably one of the best science fiction novels ever written was brought to a big screen first time by David Linch. Sadly movie itself went through development hell and a lot of troubles and the end result was somewhat strange. The audience was divided on it, some hated it, some loved it but for sure it left a mark in cinema history. Years have passed and just when people forgot about ever receiving another try on a book adaptation Denis Villeneuve has brought his vision of Frank Herbert's novel into its full glory on a big screen.
The interesting thing about this new Dune movie was that from the start Denis envisioned it as a two-movie part openly saying that book itself is too complex to be done in a single movie. But, the issue arises when information about Dune part two was hanging on a thread on how well Dune part one will be received and performed in the box office. This naturally brought all kinds of speculation and worry among fans of the franchise, especially because the movie itself was really good and well made.
Well for all of you fans and people who wanted to see a continuation of the story can rest at peace now since the Legendary picture has officially announced and green-lighted Dune part two. The budget was given and we can expect part two at the beginning of 2023.
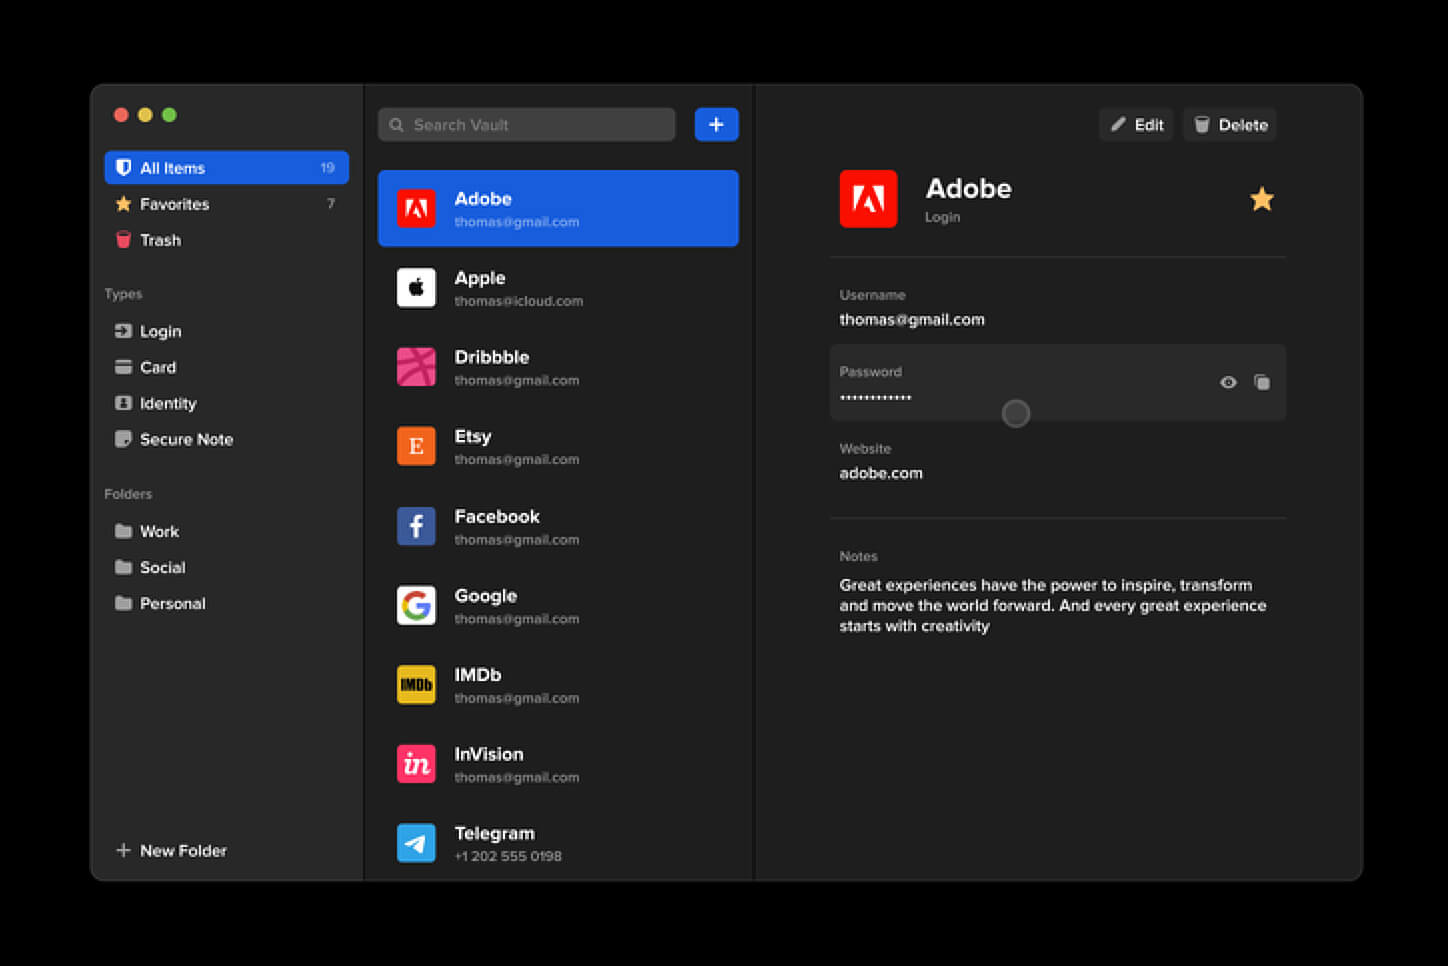
Many times we were talking and writing here on Errortools.com about security, privacy, hacking, identity theft, etc. We tried to raise important security questions and I hope I have managed to at least shed some light and change maybe some bad behaviors for some, helping them embrace better routines about their security on their PC.
In this light, I will today present you with one neat and awesome piece of software, a password manager worth your time and money (if you want premium features): BitWarden.
What BitWarden offers?
The first thing that it offers is the completely free basic plan, granted BitWarden is not an open-source project nor completely free but it has an unlimited free basic plan that will cover 90% of user needs. There is also a free basic unlimited plan for Organizations letting you and one more user share files and other stuff via BitWarden making it a cool option if you need it.
Premium features offer you encrypted sharing of files, two-step login, 1GB file attachments (encrypted), Bitwarden Authenticator (TOTP), Vault Health Reports, Emergency Access, and Priority Support. The cost for all of these additional features is 10 USD per year for an individual plan or 40 USD per year for organizations where you will get an increase of maximum users from 2 to 6. Yes, you read that correctly, only 10 USD per YEAR for the whole set of features. Granted if you do not need any of them, enjoy the free version forever.
Besides very low premium cost BitWarden will offer you compatibility with all major browsers and devices including both Android and iOS platforms making it a great cross-platform solution to login and maintain your passwords anywhere with just one click.
Once installed all you need to do is set one master password and be very careful not to lose or forget this one, if you do all of your other generated passwords will be lost forever.
Features
Secure Password Sharing
Share your encrypted data quickly and easily, and only with the users or teams who need access
Cross-Platform Accessibility
Access critical data in your Bitwarden vault from any location, browser, and device
Cloud-Based or Self-Host
Get up and running in minutes in the cloud or you can self-host Bitwarden for complete data control
Security Audit & Compliance
Open source and third-party audited, Bitwarden complies with Privacy Shield, GDPR, CCPA regulations
Vault Health Reports
Access insightful reports to reveal weak, reused passwords, and other helpful data security metrics
Directory Sync
Our powerful Directory Connector streamlines user and group onboarding and keeps them in sync
Always-On Support
Our Customer Success agents are available to support you around the clock
Detailed Event Logs
Bitwarden creates audit trails to help you keep track of user and group access to sensitive data
Flexible Integrations
Unite your existing systems with Bitwarden using SSO authentication, Directory services, or powerful APIs
Conclusion
There are many password managers out there but via recommendation I have tried BitWarden and truth to be told, I really never felt the need to try anything else, it is great at what it does and it is moving forward with features and it is constantly updated and maintained.
If you connected headphones to your Windows 10 computer to listen to audio but when you check it in the playback devices, you’re not able to find it, read on as this post will guide you in what you can do to figure out what exactly caused this kind of problem and how you can resolve it.
This kind of issue could simply be with the headphone itself or the headphone port or your operating system. So if it turns out that the problem is with the hardware, you might have to replace the components. However, it is recommended that you troubleshoot the problem first before doing that. The most basic thing you can do is to try changing the headphone port, although this can be quite difficult since most computers don’t have any extra port for headphones if your computer has one, then give it a go. If it still didn’t work, follow each one of the options provided below.
Option 1 – Try to run the Playing Audio troubleshooter
Since the Windows 10 operating system has the Playing Audio Troubleshooter, you can use this troubleshooter to try and fix the problem with the “No Audio Output Device is installed” error. You can access this tool in the Control Panel or in the Taskbar Search and even on the Troubleshooters page of Windows 10.
Run this troubleshooter and see if it can fix the issue or not.
Option 2 – Try to update the Audio driver
If the error has something to do with software, chances are it might be related to the audio driver – it could be that the newest version of your Windows 10 does not work well with the old version of the driver. This is why you have to update your audio driver to the newest available version.
Tap the Win + R keys to open the Run dialog box and then type in MSC and tap Enter or click OK to open the Device Manager.
Expand the section of the Audio inputs and outputs.
And then from the drop-down menu, select the Update Driver option and follow the on-screen instructions to install the latest version of the driver.
Then also click on the option, “Search automatically for updated driver software.
Restart your PC after the installation.
Note: If updating the Audio driver didn’t work, you can go to the website of your PC manufacturer and look for the support section where you can download the drivers for your computer. You just need to take note of your PC’s correct model and model number so you can find the appropriate driver.
Option 3 – Try enabling the headphones from the playback devices
Tap the Win + R keys to open the Run dialog box and type the “CPL” command.
Tap Enter to open the Playback devices.
Next, right-click on any open space section and check the boxes for the “Show Disconnected Devices” and “Show Disabled Devices” options.
After that, this should help in displaying the headphones in the section of Playback devices.
And if they are disabled, you can just right-click them to have them enabled.
This error code occurs when users fail to activate their Windows operating system. It is one of the more popular Windows error codes since it affects many versions of Windows including Windows 7, Windows 8.1, and Windows 10. Error code 0x8007007b has common symptoms which include the following:
Inability to activate a Windows installation
Message box highlighting error code 0x8007007b
Solution
Error Causes
Error code 0x8007007b in Windows 8.1 usually results due to one or more main clauses. Windows 8.1 users may experience this error due to the use of volume-licensed media. The error code may also arise if the activation wizard is unable to connect to Key Management Service (KMS) host computer or if corrupted system files are present on your computer.
Further Information and Manual Repair
Windows error codes such as Error code 0x8007007b can be a complicated issue, requiring the use of technical knowledge and skills. For this reason, we have listed instructions in the simplest of forms to enable even average users to successfully complete manual repair methods that will resolve error code 0x8007007b.
Below are the two main methods for correcting this issue.
Method One: Use Multiple Activation Key (MAK) to Activate Windows
This method involves the use of a Multiple Activation Key (MAK) instead of the Key Management Service (KMS) to activate the Windows operating system you intend to use on your PC. This manual repair method requires the use of Command Prompt so ensure you follow the instructions provided carefully so as to avoid the risks of causing harm to your system.
Step one: Select Windows log key + X.
Step two: Click Command Prompt, then Admin
Step three: Type in admin password if Command Prompt requests it
Step four: Type slmgr -ipk followed by the MAK product key. Note that the product key should have 25 characters with dashes between them like this xxxxx-xxxxx-xxxxx-xxxxx-xxxxx
Attempt to activate your Windows installation once you’ve completed the exact instructions above. If you are unable to complete this process, consider getting help from a Windows repair technician or simply move to the next manual repair method listed below.
Method Two: Run System File Checker
System File Checker (SFC) enables Windows users to scan and repair errors or corruption on system files. Since such errors within your system files can cause error code 0x8007007b to occur, follow the steps below to fix this error code.
Step One: Go to Start and type Command Prompt or CMD.
Step Two: Run as Administrator
Step Three: Type sfc /scannow with a space between “sfc” and “/scannow”.
The System File Checker tool will begin scanning your machine for corrupted or missing files in need of repair. If these files are found on your system, the tool will repair and replace them. Once this is done, restart your computer then check to see if you can now activate your Windows operating system.
Method Three: Use an Automated Tool
If you wish to always have at your disposal a utility tool to fix these Windows 8 and other related issues when they do arise, download and install a powerful automated tool.
In today's modern world many households have internet access, most of the connection nowadays is done via Wi-Fi or wireless but there is a high probability that you have also a few devices connected via cable. There are of course many disadvantages and advantages between cable connection and wireless connection.
The main advantages of a hard cable connection are of course faster speed and stability compared to Wi-Fi. But if we look into the cables themselves there is also a big difference between them. Not all cables are the same and quality as well as speed vary a lot between them. Choosing the right cable is essential in order to make a maximum of your internet and we have some great tips and explanations of what cables do so you can make the right choice and enjoy your full internet potential.
Not all cables are the same
Cheap cables and expensive ones are not the same no matter what everyone tells you. The old proverb you get what you pay is true and more expensive cables will be made from better materials and will have a higher transfer rate.
Quality network cables are separated into different categories with proper markings and when buying one you should always look for these markings on the cables themselves, do not buy cables that do not have markings since they will often provide lower transfer rates or will not be shielded from outside influences resulting in packet drops and instability in a network.
Categories and what they mean are:
Cat-5 with a maximum speed of 100Mbps, typically unshielded.
Cat-5e with a maximum speed of 1Gbps, available in both shielded and unshielded varieties.
Cat-6 with a maximum speed of 10Gbps for runs under 55 meters (around 180ft), available in both shielded and unshielded varieties.
Cat-6a with a maximum speed of 10Gbps, shielded.
Cat-7 uses a proprietary GG45 connector rather than the standard RJ-45 connector seen on other cables for speeds of 10Gbps, shielded.
Cat-8 with a maximum speed of 25Gbps (Cat-8.1) or 40Gbps (Cat-8.2) at a distance of around 30 meters (around 100ft), shielded.
Unless stated, these standards are typically rated at their quoted speeds for a run of around 100 meters (around 330 ft) and use a standard RJ-45 Ethernet connector. Each generation of cable is designed to be compatible with the generations that came before it, so it’s possible (for example) to use a Cat-6a cable with a router that only supports speeds of 1Gbps.
Shielded cables
When purchasing higher quality cable you might not be able to choose if you have shielding or not since some standards like Cat-6a, Cat-7, and Cat-8 are always shielded. But if you do not have the need for these and you are satisfied with Cat-5e for example you can choose.
Shielded cables are a little more expensive but they will provide you with a coating that will eliminate interference from outside waves making cables more reliable. Of course, if the cable will go through a room that does not have many radio waves or some other interferences then buying a shielded cable is a waste of money.
Cable platings
Usually, there are two types of connector platings on connectors, silver, and gold, and people usually think that gold is much better but there are major differences between silver and gold platings and truth to be told there is no better one, both are different and should be considered depending on your need.
Silver plating will provide you with faster speed since its conductivity is larger than gold, but gold is slower on the oxidation front so its life span is longer. On the other hand, if your cables are always connecting and disconnecting gold will be first to be scrubbed off from the surface since the gold coating is much thinner.
Overall if you would only connect cable once and have slower internet than cable capacity gold is the way to go, in another case if you would use the cable as always connecting and switching and your internet plan is the same as cable transfer capacity you might want to go with silver one.
Cable material quality
Network cables are made from copper, your standard conduction material but even here there are differences in quality and therefore the chance of pocket losses over it. More quality less loss and more stable connection and this will depend on the purity of copper that is used in the cable itself. More purity in copper, more stability, simple as that.
Conclusion
So as you can see, there are a lot of different things that will influence your pick of proper network cable but the overall best advice is to get one that will fit well into your needs and setup. pair it up with your router and your internet plan since just simply buying something that you can not use is really a waste of money.
A general rule of thumb, which is followed by most users, is to download the specific missing DLL file and place it within the software’s installation directory. However, this can be harmful to your system as hackers often upload popular malicious DLL files to target systems. Thus, you should avoid downloading DLLs from the internet. And follow these steps to fix the DLL error:
Restart your computer
System restore to an earlier state
Run a malware/virus scan
Update all the hardware drivers
Running SFC /scannow command in command prompt
Then do as the error suggests, reinstall the program if it’s feasible. Game files can take several hours to install and therefore, reinstallation can be a cumbersome job. Also, frustrating if the error appears after reinstallation.
Update device drivers manually, such as graphics drivers, DirectX software if you see DLL missing error while running game
As you know, networks that are domain-based are common in organizations and companies. These domain-based networks require multiple computers to be controlled through a single node known as a server. And the one that sets certain policies and restrictions on every system that is joined to the domain is the server administrator.
So if you want to add your computer to a domain, you need to have the following information available:
The domain name
A user account name that’s registered in the active directory associated with the server
Windows Enterprise, Pro, or education version
In this post, you will be guided on how you can join or remove a domain. To get started, follow the given instructions below.
Option 1 – Joining a domain
First, you need to connect your computer to the network associated with the server since your computer and the server have to be on the same network.
Next, click the Start button and then click on the gear-like icon for Settings to open it.
After that, navigate to this path: Accounts > Access work or school.
Then click on Connect. This will open a new dialog box and from there, select the “Join this device to a local Active Directory domain” option.
Afterward, you will be asked to enter the username and password of your domain account.
Now select your Account type and when you proceed, you have to restart your computer. Your domain account should now be created.
Option 2 – Removing a domain
You need to open the Windows 10 Settings app.
And from there, go to this path: Accounts > Access work and school.
Next, select the account you want to remove from the domain and then click on Disconnect.
A prompt will then appear that says, “Are you sure you want to remove this account? This will remove your access to resources like email, apps, network, and all content associated with it. Your organization might also remove some data stored on this device”. Just click on Yes.
This will give you a Disconnect from the organization prompt.
Now click on Disconnect and select Restart now to restart your computer. This will complete the removal process of the domain.


 Many times we were talking and writing here on Errortools.com about security, privacy, hacking, identity theft, etc. We tried to raise important security questions and I hope I have managed to at least shed some light and change maybe some bad behaviors for some, helping them embrace better routines about their security on their PC.
In this light, I will today present you with one neat and awesome piece of software, a password manager worth your time and money (if you want premium features): BitWarden.
Many times we were talking and writing here on Errortools.com about security, privacy, hacking, identity theft, etc. We tried to raise important security questions and I hope I have managed to at least shed some light and change maybe some bad behaviors for some, helping them embrace better routines about their security on their PC.
In this light, I will today present you with one neat and awesome piece of software, a password manager worth your time and money (if you want premium features): BitWarden.

