Realtek sound device not playing sound is a common Windows issue. It happens occasionally and luckily it can be solved with a little effort and in a short time period. Today in this article we will explore the most common reasons and solutions for driver malfunction for Realtek inside Windows 10. If you have this particular problem, go from step 1 to the last step since all steps are meant to go from simplest to the most complex.
All of that being said let us fix your Realtek driver issue.
Check Speakers or/and Headphones first
The first thing would in any troubleshooting be to check are your speakers turned on or are your headphones connected and the volume or switch on them is set properly. Nothing more embarrassing than spending an hour or so troubleshooting only to find out that issue was in a malfunction of speakers or them not being turned on.
Check the Volume control in Windows
Same as the previous step where you have checked hardware, now it is time to check to see if the volume control is set properly and not by any chance muted or volume is brought all the way down.
Check if the Device Manager is reporting an error and update the driver
If both hardware is functioning properly and volume control in Windows is set correctly then the issue might be in Windows not detecting device or driver malfunction. In any case, the Device Manager will be the one who will report this problem. In order to check to see if the driver is properly working press ⊞ WINDOWS + X to open the hidden start menu.
Once it opens, click on Device Manager to open it,
If you have a driver device error inside Windows, you should see it immediately when entering the Device Manager, it will have a yellow exclamation mark beside it. Right-click on it and choose update driver.
Reinstall driver
If driver update failed or you already have the latest drivers, reinstalling them could fix the issue since drivers might have corrupted during installation of some update or application. Follow steps from point 3 to get to the driver in Device Manager, then right-click on it but instead of update choose to uninstall. Reboot Windows once the driver is uninstalled and Windows will install a new one.
Check Windows update
Check to see if the latest Windows update is installed, update your Windows if needed
Fix driver issue with DRIVERFIX
If everything else fails, get DRIVERFIX, a premium solution for your PC issues, and fix driver errors.
Task View feature inside Windows 11 is actually a great feature, letting you quickly view open windows and virtual desktops. How Task view itself could be reached with keyboard shortcut combination of ⊞ WINDOWS + TAB some users will prefer this way of using it and thus button on the taskbar is something you do not want or need.
There is a very easy way to remove mentioned button and I will show you how to do it.
Right-click the taskbar button itself and click on Hide From Taskbar.
That’s it, you have done it.
Now in order for you to bring it back if you change your mind, you will have to do some extra steps but it is nothing difficult.
Right-click on the taskbar and click on Taskbar settings, you will be lead to Personalization > Taskbar.
Inside locate Taskbar Items and switch Task View to ON, you will see the Task View button right away showing itself again.
The Windows 10 operating system utilizes a variety of measures in order to track your app launches so that it can boost both your start and search results. It can personalize the start menu based on the apps that you use the most on the Start menu as well as the search results. This way, the App Launch Tracking is definitely useful especially when you want to access your favorite and frequently used apps quickly in the Start menu and search results on your Windows 10 computer.
On the other hand, Windows 10 provides users with the ability to control their privacy settings in order to protect the privacy of users. Windows 10 users can either opt to enable the app launch tracking to improve the start menu and search menu or opt to disable the app launch tracking in order to prevent the Windows operating system from tracking that you open if you really value your privacy that much. Whichever setting you prefer, you need to change the privacy control settings as well as make some tweaks in the Windows Registry in order to turn on or turn off the app launch tracking feature.
Option 1 – Turn off or turn on app launch tracking via Settings
Go to Settings and click on Privacy.
After that, toggle On the “Let Windows track app launches to improve Start and search results” option on the right side of the page under the General Settings to enable the app launch tracking feature.
And of course, if you wish to disable the app launch tracking feature, simply toggle Off the “Let Windows track app launches to improve Start and search results” option on the very same page under General Settings.
After that, close the Settings window.
Note: Keep in mind that when you disable the app launch tracking feature, the “Show most used app” setting will either be grayed out or labeled as “Disable” on your Windows 10 computer. Thus, if you want to keep viewing the most used apps, just re-enable the app launch tracking feature if you have disabled it.
Option 2 – Turn off or turn on app launch tracking via Windows Registry
Before you proceed, make sure to create a System Restore point
Tap the Win + R keys to open the Run dialog box.
Then type “Regedit” in the field and hit Enter or click OK to open the Registry Editor.
Windows Setup in Continuous Reboot Loop – What is it?
After upgrading to Windows 10 operating system from Windows 7 or Windows 8/8.1, a lot of Windows users are complaining about the Windows setup in a continuous reboot loop. The computer would just keep on rebooting every time the machine is booted and this incites frustration for a lot of Windows users.
Solution
Error Causes
When Windows launched the third update for Windows 10, users trying to upgrade to Windows 10 encountered an endless reboot loop problem. The computer will crash repeatedly. The KB3081424, which is a roll-up of bug fixes of Windows 10, continuously fails once you start the update process and then triggers a message showing: “We couldn’t complete the updates, undoing the changes.” The undoing process will then cause a system reboot mandatorily.
Once you log back on your computer again, the Windows 10 update will try to reinstall KB3081424. You will not be able to stop the update which will cause your Windows setup in a continuous reboot loop.
The KB3081424 will not be successfully installed since if it fails for the first time, that initial failure can be detected to create a bad entry in your Windows 10 registry. This will then prevent your subsequent attempts to reinstall KB3081424 to make it work correctly.
Further Information and Manual Repair
In order to fix the problem of Windows 10 setup in a continuous reboot loop, there are a few methods you can try. Try following these simple steps and you’ll be able to get rid of the problem.
Note: If you’re not highly confident to solve this issue on your own, it is highly recommended to consult an authorized computer technician who would be knowledgeable enough to fix the issue for you. In addition, you can also use a system optimizer to resolve the issue.
Method One: Check For Windows Update
Microsoft Windows released an updated fix for the Windows setup in continuous reboot loop problem. You can try fixing the issue through Windows Update.
Open Settings
Go to Update & Security
Select Windows Update then choose Check for updates
At this point, an additional update will be installed and downloaded to your operating system to resolve the continuous reboot loop problem.
Method Two: Eliminate Bad Registry Entry
Before KB3081424 attempts to install again, you can try doing this solution:
Click on the Start menu then type regedit
Once the window opens, go to HKEY_LOCAL_MACHINESOFTWAREMicrosoftWindows NTCurrentVersionProfileList
Create a backup for your registry key (since this process is a bit risky). Select ProfileList then click on File and Export then choose your backup name.
From the ProfileList IDs, remove anything with ProfileImagePath in it.
Close Regedit then reboot. By this time, the KB3081424 should properly install.
Method Three: Perform A Startup Repair
Another thing you can try to solve the Windows setup in continuous reboot loop problem is to perform a startup repair from a working computer.
Ensure that all unnecessary devices are disconnected from your computer as your computer might detect them.
If you are connected to a network, you need to disconnect from this as well.
On a working computer, download the Windows 10 ISO then you can perform a startup repair.
Boot your computer from the Windows 10 DVD.
To change your BIOS option to boot from the Windows 10 DVD, follow these steps:
Boot your computer then press the F2 function key to enter setup.
NOTE: You must do this quickly since the BIOS loads rapidly.
Once you’re inside the BIOS, navigate to the Boot Configuration screen. On this screen, you’ll be able to change the first device to be loaded.
Go to Removable Devices then hit Enter. Removable devices could either be a thumb drive or DVD. Select DVD to put it at the top and be the first boot device.
Save your changes by pressing on the F10 function key. A setup confirmation box will appear with a message Save configuration changes and exit now. Select Yes.
Exit BIOS by pressing on the ESC key. You should be prompted to boot from the Windows 10 DVD at this point.
If you're not able to execute the aforementioned processes on your own, get help or download and install a powerful system optimizerto assist with the windows continuous reboot loop process and other Windows 10 error messages.
If you are checking for an update on your Windows 10 PC and you got the error 0x80070005 due to some ACCESS DENIED permissions issue, then read on as this post will show you what you can do to fix the problem.
For some reason, the Windows Update does not have enough rights or permissions to continue further which is why you’re getting an error instead. Thus, the first thing you can do before you troubleshoot further is to make sure that you’re logged in as admin. However, if you’re already logged in as one, then here are some suggestions that might help you fix the Windows Update Install Error 0x80070005.
Option 1 – Restart your computer and try installing the Updates again
You can restart your computer and then try installing the updates once again. There are instances when a simple restart resolves Windows Update errors. Thus, after you restart your computer, check for updates once again and see if you’re still getting the error or not.
Option 2 – Delete the contents in the Software Distribution folder and Catroot2 folder
Open the WinX Menu.
From there, open Command Prompt as admin.
Then type in the following command – don’t forget to hit Enter right after typing each one of them.
net stop wuauservnet start cryptSvcnet start bitsnet start msiserver
After entering these commands, it will stop the Windows Update Service, Background Intelligent Transfer Service (BITS), Cryptographic, and the MSI Installer
Next, go to the C:/Windows/SoftwareDistribution folder and get rid of all the folders and files thereby tapping the Ctrl + A keys to select them all and then click on Delete. Note that if the files are in use, you won’t be able to delete them.
After resetting the SoftwareDistribution folder, you need to reset the Catroot2 folder to restart the services you just stopped. To do that, follow these steps:
Type each one of the following commands.
net start wuauservnet start cryptSvcnet start bitsnet start msiserver
After that, exit Command Prompt and restart your computer, and then try to run Windows Update once more.
Option 3 – Try running the Windows Update Troubleshooter
Running the built-in Windows Update troubleshooter is one of the things you can first check out as it is known to automatically resolve any Windows Update errors like error 0x80070005. To run it, go to Settings and then select Troubleshoot from the options. From there, click on Windows Update and then click the “Run the troubleshooter” button. After that, follow the next on-screen instructions and you should be good to go.
Option 4 – Take control of the User App Data
There are times when permission to access the files is not configured correctly. As a result, it blocks the downloading of the updates. Thus, you have to take full control of the User App Data which is placed at C:/Users/USERNAME/AppData.
First, go to C:/Users/USERNAME/AppData and right-click on it then select Properties.
Next, click on the Edit button in the Properties window and click OK to confirm if you got a User Account Control elevation request.
After that, select user/group from the permission windows or click on the Add button to add another user or group. It would be best if you add “Everyone” to give permission.
Then check “Full Control” under the “Allow” column to assign full access rights control permissions.
Now edit the permission to Full Control for “Everyone”.
Click OK to save the changes made and then exit.
Option 5 – Try to update Windows after a couple of minutes or an hour
There are times when the issue is from Microsoft’s end. It could be that there’s some issue with Microsoft’s server so it would be better if you give it a couple of minutes or an hour or so before trying to run Windows Update again.
If you are trying to upgrade your computer but encounter the Windows Update Error 0x800F081F – 0x20003 instead, then read on as this post will guide you in fixing this Windows Update error. This kind of error is commonly encountered when upgrading your copy of Windows 10 and is caused by errors with various developer-related settings that are being enabled in the system.
When you encounter Windows Update Error 0x800F081F – 0x20003, you will see either of these error messages:
“We couldn’t install Windows 10. The installation failed in the SAFE_OS phase with an error during INSTALL_UPDATES operation: Error 0x800F081F”“The installation failed in the Safe_OS phase with an error during apply_image operation: Error: 0x800f081f – 0x20003”
To fix this kind of Windows Update error, you need not use external programs but you can try to disable the Developer Mode, run the Windows Update troubleshooter or restart all the Windows Update-related services and components. For more details, refer to the options provided below.
Option 1 – Try to disable Developer Mode
You might have to disable Developer Mode to fix the Windows Update Error 0x800F081F – 0x20003. How? Refer to these steps:
Tap the Win + I keys on your keyboard to open the Settings app.
Next, go to Update & Security > For Developers.
From there, select the toggle for Sideload apps or Microsoft Store apps located on the right-side panel.
If you get any prompt, just click on Yes.
After that, navigate to Apps > Apps & features and then click on Optional features on the right-side panel.
Then scroll down to locate the Windows Developer Mode entry and select it and click on Uninstall.
Once you’re done uninstalling the Windows Developer Mode component, close the Settings app and restart your computer to apply the changes made.
Option 2 – Try to run the Windows Update Troubleshooter
You should also try to run the built-in Windows Update troubleshooter as it could help you resolve the Windows Update Error 0x800F081F – 0x20003. To run it, go to Settings and then select Troubleshoot from the options. From there, click on Windows Update and then click the “Run the troubleshooter” button. After that, follow the next on-screen instructions and you should be good to go.
Option 3 – Try restarting various Windows Update-related services and components
Tap the Win + X key combination and select Command Prompt (Admin) to open Command Prompt with admin privileges.
After opening Command Prompt, copy and paste each one of the commands listed below one by one and tap Enter right after you enter each command.
Once you’ve entered all the commands given above, they will stop all the Windows Update services that are running on your computer as well as clear the SoftwareDistribution folder, and reset the Catroot2 folder. Now you have to start all these Windows Update services you’ve just stopped by executing the following commands:
net start wuauserv
net start bits
net start appidsvc
net start cryptsvc
After that, restart your computer and try to run the setup again, and see if the error is now fixed.
Hello and welcome to our software series review. Weel this time we could say this is more of a service review since the application we are going through today is online and you can use it freely without ever needing to install it.
When we choose software that we are going to review and recommend we really try to recommend something that is worth your time and money, Cartoonize fits in both categories in my opinion.
First of all basic plan of this graphic software is completely free and as mentioned it is working online, also as one more feature basic plan does not even require you to have an account of any kind, all you need to do is go to the website of the application and you can start using it right away. There is also paid plan for extra features if you need them billed monthly or annually.
Features
First things first, this is not Photoshop or GIMP and it does not aim nor want to be. This is something else, directed and pointed at the different types of users. This application is aimed at people that want to make some quick graphics and post them on social media and it does that very well. Even without knowledge to use graphic software this one is so well designed and straightforward that even a complete newcomer can do something right away.
So as the application that wants to be used by people that want to place some cool pictures or ads on their social media what it offers. For starters simplicity and ease of use, every option that you can use is on the left side of the screen nicely packed into the vertical toolbox. Inside the toolbox, you have access to various tools, effects, and filters that you can apply to your image.
Tools explained
Image manager
The first section on the tool panel is the image manager, here you can upload your images, delete them, search stock images, and so forth. nothing more to say about this one as it is only a basic file manager.
Edit
In this tool panel, there are a lot of basic settings for your image manipulations divided into 3 sections: Basics, Enhance, and Creative. In the basic section, you can crop, resize and rotate your image. Enhance panel will let you set exposure, color, vibrance, tint, and details (sharpen). Finally, the Creative part will let you remove the background with AI in a single click, replace colors in the image, and add a vignette and round image.
Effects
In the effects panel, you will be given 4 options to choose from Cartoonizer, Digital art, Sketcher, and painting. Each option once clicked will open another set of options tied to chosen preset where you will be able to choose a different style from chosen template. Once you click on the desired template it will be applied to your image and in the upright corner, you will have edit options to tweak it to your liking. You can play around as much as you want because only once you click on the apply button, the effect will be applied to your image.
Filters
Same as in the effects tool panel here you will also get a series of different filters that you can apply to your image. As in the previous tool once clicked on the chosen filter, you will be given options for its variations and details edits. How there is really plenty of filters options and combined with its own presets I will not focus on explaining what each one is doing since picture thumbnails are pretty accurate and just one look at them will explain to you everything you need to know.
Overlays
In the overlays panel, you can as the name says overlay different kinds of effects on your image. You can add snow, fog, sun flares rain, and many more. Presets work identically to previous effects and filters.
Masks
If you want to place your image in a certain shape or in-text this is the section for you. You will be presented with sections as custom text, shapes, brushes, floral, animals, and patterns. Each section will once again lead to plenty of variations on the chosen subject where you can pick one that you like the most and tweak its options.
Text
As the name suggests, this section is to add text to your picture or design. If you are making some cool ad for Facebook, Instagram, or other social media I believe that you will spend most of your time in this section adding text and tweaking it so it looks best. You have all the tools that you will need to make a catchy title or smaller block of text and you can add multiple texts to your picture tweaking their own visual appearance, the font used, color, and some effects like a drop shadow.
Draw
In the draw section, you will be able to freely draw whatever you like with your mouse or pen if you have one. you have basic options for a brush and eraser so you can erase stuff. Pretty basic tool but it gives a nice touch to underline something, circle it, etc.
Graphics
This panel will let you place various already made graphic assets into a picture. You have hearts, hats, glasses, etc. There really are tons of premade graphics along with thematic ones like new year, st. Patric day and more.
Frames
As the name suggests this section will place a frame of your choice around your picture. You can choose the style of frame, position, color, and many more. There are various styles and each style has its own options.
Conclusion
Cartoonize is a great online application that will let you quickly and easily do cool and nice image edits. As mentioned you can also add various effects, text, and graphics and use this app to make some quick and nice ads for social media. You have the option to publish to your social media right from the app in the save dialog but you can also of course download your image or design to your local computer.
Please note that for this review we used the pro, paid version so all of the features were unlocked. We wanted to give you a full overview of the full potential of the app. In my opinion, the small monthly fee that they charge is well worth it when you see all things that you can do with it.
Go to the cartoonize website and check it out, basic option is completely free and it does not even require making an account. Have fun, be creative and take care, I hope to see you again tomorrow.
100sOfRecepies is a Browser Extension developed by MindSpark Inc. that provides users with hundreds of recopies for breakfast, lunch, dinner, and dessert. This extension may appear very handy at the start, however, it may monitor your browser activity, and send it back to the developer to better serve ads. This extension injects itself into the System Registry allowing it to run each time your computer is restarted.
While browsing the internet with this extension installed you may see additional ads, sponsored links, and pop-up ads displayed in your browser.
Many anti-virus scanners have detected this extension as a Browser Hijacker and are therefore not recommended to keep on your computer.
About Browser Hijackers
Browser hijacking is actually a form of an unwanted program, often a web browser add-on or extension, which causes modifications in browser settings. They are made to disrupt web browser programs for various reasons. Usually, it’ll force users to predetermined sites which are aiming to increase their advertisement income. Nevertheless, it’s not that harmless. Your internet safety is compromised and it is also very annoying. In a much worst case, your browser could be hi-jacked to download malware that may do a great deal of damage to your laptop or computer.
Major symptoms that your web browser has been highjacked
The typical symptoms that indicate having this malware on your computer are:
1. the browser’s home page is changed2. bookmark and the new tab are also modified3. the default search engine is changed and the browser security settings have been lowered without your knowledge4. find new toolbars which you did not add5. unstoppable flurries of pop-up ads show up on your personal computer screen6. your web browser gets slow, buggy crashes often7. Inability to navigate to certain websites, particularly anti-malware and also other security software webpages.
How does a browser hijacker infect a computer?
There are several ways your computer can become infected with a browser hijacker. They generally arrive by way of spam e-mail, via file sharing websites, or by a drive-by-download. They could also come from add-on software, also known as browser helper objects (BHO), web browser plug-ins, or toolbars. Some browser hijackers spread in user’s computer systems using a deceptive software distribution technique known as “bundling” (generally through freeware and shareware). An example of some well-known browser hijacker includes Babylon, Anyprotect, Conduit, DefaultTab, SweetPage, RocketTab, and Delta Search, but the names are continually changing.
Browser hijackers could record user keystrokes to gather potentially valuable information that leads to privacy issues, cause instability on computers, drastically disrupt the user experience, and eventually slow down the PC to a point where it will become unusable.
Browser Hijacker Malware – Removal
Some browser hijacking could be quite easily stopped by discovering and eliminating the corresponding malware program from your control panel. But, most hijackers are hard to get rid of manually. No matter how much you try to remove it, it can come back over and over. Moreover, browser hijackers could modify the Computer registry so that it could be very tough to restore all of the values manually, particularly when you are not a very tech-savvy person.
Can't Install Safebytes Anti-malware due to the presence of Malware? Try This!
All malware is bad, but certain kinds of malicious software do a lot more damage to your PC than others. Some malware sits in between your computer and the internet connection and blocks some or all sites which you want to check out. It would also block you from adding anything to your machine, especially anti-virus programs. So what to do when malicious software keeps you from downloading or installing Anti-Malware? Do as instructed below to eliminate malware through alternate ways.
Eliminate malware in Safe Mode
In the event the malware is set to load at Windows start-up, then booting in safe mode should avoid it. Just the minimum required applications and services are loaded when you boot your computer in Safe Mode. Listed below are the steps you need to follow to start your computer into the Safe Mode of your Windows XP, Vista, or 7 computers (go to Microsoft website for instructions on Windows 8 and 10 computers).
1) At power-on/startup, press the F8 key in 1-second intervals. This will invoke the “Advanced Boot Options” menu.2) Choose Safe Mode with Networking with arrow keys and hit Enter.3) When this mode loads, you should have an internet connection. Now, use your internet browser to download and install Safebytes.4) As soon as the software program is installed, allow the scan run to remove viruses and other threats automatically.
Switch over to an alternate web browser
Malicious program code could exploit vulnerabilities on a particular web browser and block access to all anti-virus software sites. The best way to overcome this problem is to choose a browser that is known for its security measures. Firefox contains built-in Malware and Phishing Protection to keep you secure online.
Install and run anti-malware from the Thumb drive
To effectively get rid of the malware, you might want to approach the issue of running an anti-virus program on the affected PC from a different perspective. Do these simple measures to clear up your infected computer by using a portable antivirus.
1) On a virus-free PC, download and install Safebytes Anti-Malware.2) Insert the pen drive on the same PC.3) Run the setup program by double-clicking the executable file of the downloaded software, with a .exe file format.4) When asked, select the location of the USB drive as the place where you want to put the software files. Follow the instructions on the screen to finish off the installation process.5) Now, transfer the USB drive to the infected computer system.6) Double-click the EXE file to open the Safebytes program right from the thumb drive.7) Simply click “Scan Now” to run a scan on the affected computer for viruses.
Protect Your Computer and Privacy With SafeBytes Anti-Malware
To help protect your computer or laptop from a variety of internet-based threats, it’s important to install an anti-malware application on your personal computer. However, with countless numbers of antimalware companies in the marketplace, nowadays it’s tough to decide which one you should buy for your laptop. Some of them are excellent, some are ok types, while some will affect your PC themselves! You need to be careful not to pick the wrong product, particularly if you purchase a premium application. Amongst few good applications, SafeBytes Anti-Malware is the strongly recommended software for security-conscious people.
Safebytes is one of the well-established computer solutions firms, which provide this complete anti-malware software program. Through its cutting-edge technology, this software protects your personal computer against infections caused by different types of malware and similar internet threats, including adware, spyware, trojans horses, worms, computer viruses, keyloggers, potentially unwanted programs (PUPs), and ransomware.
SafeBytes carries a plethora of wonderful features which can help you protect your computer from malware attack and damage. Here are some of the good ones:
Robust Anti-malware Protection: By using a critically acclaimed anti-malware engine, SafeBytes provides multi-layered protection which is made to catch and remove threats that are concealed deep in your PC.
Active Protection: SafeBytes offers complete and real-time security for your PC. It’ll check your PC for suspicious activity at all times and shields your PC from unauthorized access.
Website Filtering: Through its unique safety rating, SafeBytes informs you whether a website is safe or not to visit it. This will assure that you’re always certain of your safety when browsing the online world.
Lightweight Utility: SafeBytes is really a lightweight application. It consumes an extremely small amount of processing power as it runs in the background therefore you will not observe any computer performance issues.
24/7 Premium Support: Skilled technicians are at your disposal 24/7! They will immediately fix any technical issues you may be experiencing with your security software.
Technical Details and Manual Removal (Advanced Users)
If you’d like to carry out the removal of 100sOfRecepies manually rather than using an automated software tool, you may follow these simple steps: Navigate to the Windows Control Panel, click on the “Add or Remove Programs” and there, select the offending program to uninstall. In cases of suspicious versions of web browser extensions, you can easily remove them through your browser’s extension manager. You may also want to reset your web browser settings, as well as delete browsing history, temporary files, and internet cookies.
To ensure the complete removal, find the following Windows registry entries on your system and delete them or reset the values appropriately. Please keep in mind that only advanced users should try to manually edit the registry because incorrect file removal leads to a major problem or even a PC crash. In addition, certain malware is capable of replicating itself or preventing deletion. It is recommended that you carry out the removal procedure in Safe Mode.
On September 18th, 2017, Cisco’s Talos announced that CCleaner, a popular utility with billions of worldwide users, had been compromised by hackers, and was used to unwittingly distribute hidden malware in its installer. Later in the day, Piriform, the publisher of CCleaner, confirmed the problem.
Undetected by all but 1 major antivirus including CCleaner’s own parent company, this occurred for over a month and impacted over 2.7 million users. Users of CCleaner v5.33.6162 and CCleaner Cloud v1.07.3191 for 32-bit Windows are affected. These downloads were live on CCleaner’s official site from August 15th to September 12th, 2017. Anyone who downloaded the program during this time could be affected.
The company claims that while the hackers set up the backdoor and many users were impacted, that the perpetrators have been arrested and that the malware never successfully performed its full task and compromised user’s PCs or sent out their data; in the wake of recent security breaches such as Equifax, users are understandably worried. Given the severity of the threat of hacking and data theft, users should take action immediately if they have CCleaner.
Technical Details of CCleaner Malware Injection
First reported by Talos, the malware, which was hidden in the CCleaner installer without the publisher noticing (despite them being owned by Avast, a massive Anti-virus company), modified a core program DLL file to evade detection, and creates several registry keys. Not only were these files not flagged by any major Anti-Virus, but they were also even digitally signed by Piriform via their Symantec certificate, meaning your PC and security program would likely whitelist and trust the malicious installer. The malware gathers personal information on a user’s PC, including IP address and running programs, and sends it to a remote server. In our testing, the program sent data to IP 216.126.225.148.
Restore Your PC (If Possible)
As of the publication of this article, there have been no assurances given that updating or even uninstalling CCleaner will remove the malware is installed. The only action thus far has been shutting down the remote server where user data was being sent has been shut down by authorities. For this reason, it is best to remove the underlying malware separately, as its presence represents a serious security threat. Unfortunately, as this could have been installed as far back as August 15th, 2017, your System Restore points may not go back that far, or even if they do, restoring to such an outdated point may cause unintended problems with other programs you use and potentially lost files and data. Manually backing up files and doing a full format or clean Windows installation would likely be successful in fully removing the malware, but is extremely time-consuming and can be difficult for many PC users. Unfortunately, this makes a PC Restore or format an unattainable option for many.
Update CCleaner to the Latest Version
While CCleaner has told users to update to the latest version of the program. Prior to doing so, we recommend fully uninstall CCleaner, ensuring you check its program files folders and registry keys, manually deleting any remnants, and then re-downloading the latest version from the official site and reinstalling clean.
If you are using a Windows 10 PC that has different processors clubbed together, chances are you might encounter an error saying, “MULTIPROCESSOR CONFIGURATION NOT SUPPORTED” during a Windows upgrade or software installation.
This error is actually caused by a bug check with a value of 0x0000003E. This error also indicates that the processors in your computer are asymmetric in relation to one another. So if you want to upgrade you need to have all the processors of the same type and level. But worry not for this guide will help you in fixing this error.
The MULTIPROCESSOR_CONFIGURATION_NOT_SUPPORTED error can occur in several cases such as during an installation of Windows 10, or when the driver is loaded, or when Windows Start or Shutdown and the chances of you getting a blue screen is very much high. To fix this error, refer to the options given below and make sure to follow them carefully.
Option 1 – Try to disable the Hyper-Threading in your BIOS
Hyper-Threading in the BIOS lets a processor (multi-threaded) run various tasks in a simultaneous manner. To disable this, here’s what you have to do:
Restart your computer and boot into it right after. To do that, tap the F2 key.
Once you’re in the BIOS, locate the Hyper-Threading option which should be located under the Performance section along with other options like Multi-core support, Rapid Start technology, and many more.
Disable Hyper-Threading and then make sure to save the changes and exit BIOS.
Note: Although Hyper-Threading is only used when necessary, there are some OEMS that don’t have the option to disable it and if that’s the case, you need to try other options given below.
Option 2 – Try to disable the Virtualization in the BIOS
Virtualization in the BIOS allows users to run a single physical resource such as the server or storage device to appear that it is running as multiple logical resources. It is also properly termed as “HYPER-V”. To disable it, refer to these steps:
Boot into the BIOS as you did earlier.
Then look for the Security options.
After that, from Security options, look for Virtualization Technology or VTX among the options given.
Then turn it off and restart your computer.
Note: Although Windows 10 offers features such as the Device Security for Core Isolation and Memory Integrity, if you turn them off at the software level, it will not help at all. If you’re able to resolve the error, you can do some further research and see what software or hardware you can use to further help you.
Option 3 – Try checking if there are any BIOS updates available for your PC
Updating the BIOS may help you resolve the MULTIPROCESSOR CONFIGURATION NOT SUPPORTED error. You can just go to the OEM’s website as they offer utility software that can download BIOS firmware and update it without any problem. BIOS updates usually offer enhancements and fixes to some issues like this one.
Microsoft Edge may be about to win a lot of fans by introducing a new feature that it says could prevent one of the most annoying things about being online. A new update to the browser suggests it is looking at a way to block auto-playing videos by default when a user navigates to a website. People spotted a new entry to the Microsoft Edge Canary browser where the company tries out its in-progress updates, that suggests auto-playing videos may have had their day at last.
The new addition, for Mac, Windows, and Linux systems, is called “Autoplay Limit Default Setting”, with the description suggesting that Microsoft Edge would set the media autoplay setting to "Limit" as a default - stopping videos from starting up when a user lands on a website.
Currently, Edge offers two options for users to control media autoplay - "Allow" (the current default setting), where all videos on a website will play automatically with sound, and "Limit", where media won’t be autoplayed on sites that a user has previously visited. It appears that Microsoft is looking to test the feature in Canary before rolling it out to a wider user base - as blocking autoplaying videos can cause issues for some websites.
The same Canary entry also hints at a future "Block" option, which would presumably stop any videos or media from playing when a user lands on a website. However, this feature, which is also listed as being available for Mac, Windows, and Linux systems, doesn't appear to be enabled as yet.
If you would like to read more helpful articles and tips about various software and hardware visit errortools.com daily.


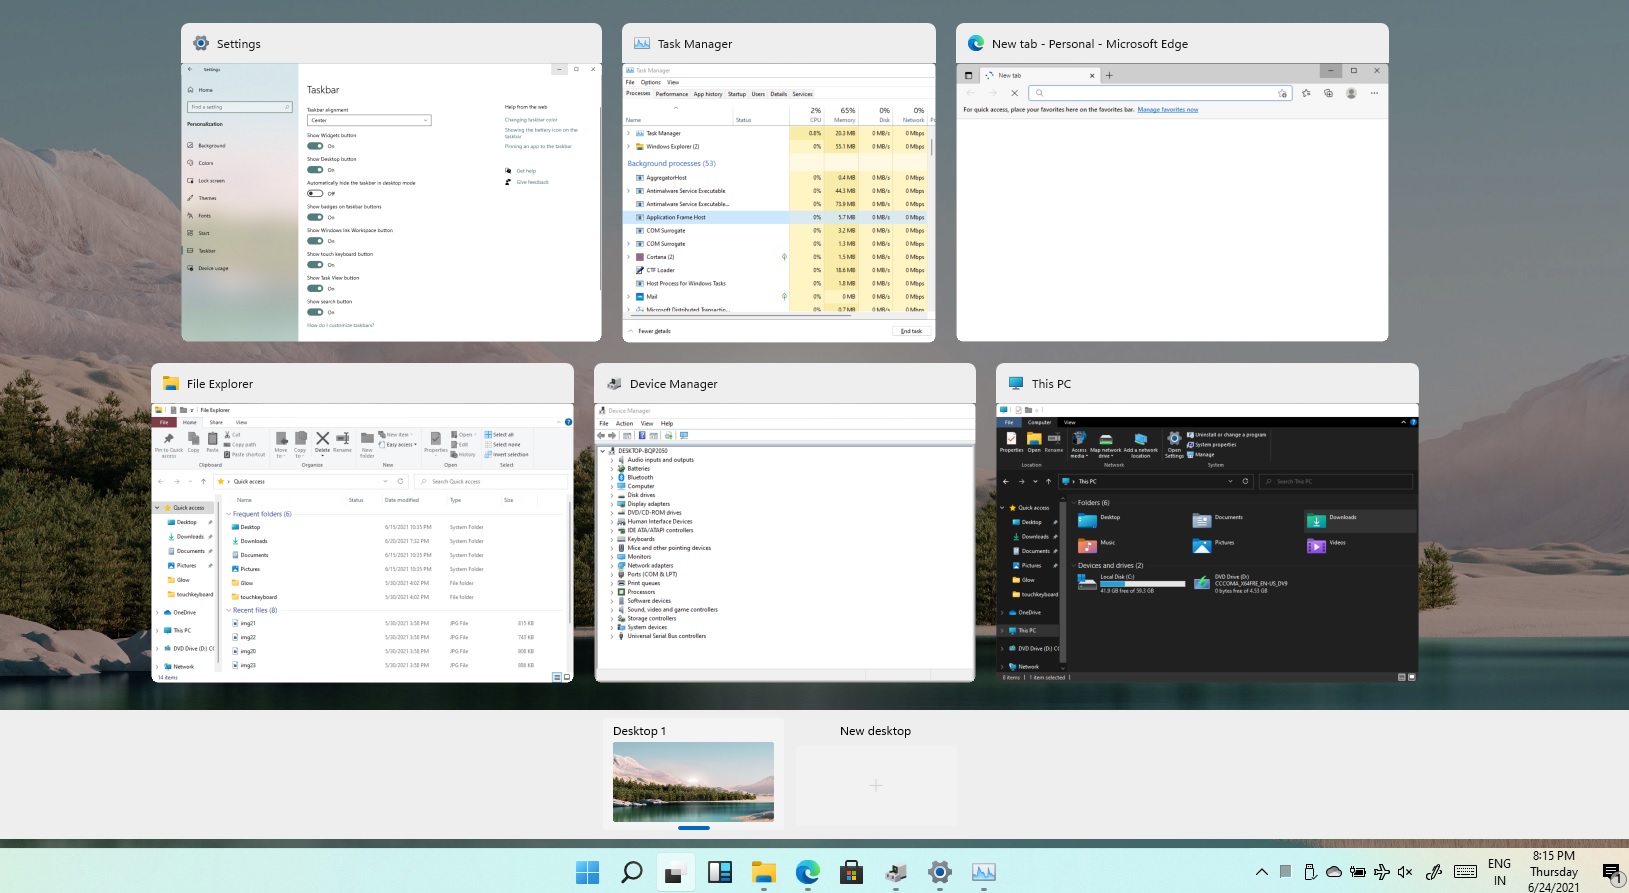 Task View feature inside Windows 11 is actually a great feature, letting you quickly view open windows and virtual desktops. How Task view itself could be reached with keyboard shortcut combination of ⊞ WINDOWS + TAB some users will prefer this way of using it and thus button on the taskbar is something you do not want or need.
There is a very easy way to remove mentioned button and I will show you how to do it.
Right-click the taskbar button itself and click on Hide From Taskbar.
That’s it, you have done it.
Now in order for you to bring it back if you change your mind, you will have to do some extra steps but it is nothing difficult.
Right-click on the taskbar and click on Taskbar settings, you will be lead to Personalization > Taskbar.
Inside locate Taskbar Items and switch Task View to ON, you will see the Task View button right away showing itself again.
Task View feature inside Windows 11 is actually a great feature, letting you quickly view open windows and virtual desktops. How Task view itself could be reached with keyboard shortcut combination of ⊞ WINDOWS + TAB some users will prefer this way of using it and thus button on the taskbar is something you do not want or need.
There is a very easy way to remove mentioned button and I will show you how to do it.
Right-click the taskbar button itself and click on Hide From Taskbar.
That’s it, you have done it.
Now in order for you to bring it back if you change your mind, you will have to do some extra steps but it is nothing difficult.
Right-click on the taskbar and click on Taskbar settings, you will be lead to Personalization > Taskbar.
Inside locate Taskbar Items and switch Task View to ON, you will see the Task View button right away showing itself again. 
