If you are trying to install or upgrade your Windows 10 computer but suddenly encountered an error message saying, “Windows Could not configure one or more system components”, read on as this post will show you how you can fix the problem.
You are not alone in experiencing this problem as other users also reported having the same scenario. Some of them reported getting the following error message:
“Windows could not configure one or more system components. To install Windows restart the computer with error code 0xc1900101-0x30018.”
When you check on the Windows 10 rollback log, you will see a part with the “iisetup.exe” that’s related to the abort. Usually, the upgrade process completes over 50% and gets stuck and then rolls back later on and generates the error logs. This kind of error, in most cases, appears during the upgrade of Windows 10 and is related to the Internet Information Services or IIS in Windows 10. For some unknown reason, it restricts the installation or the upgrade which causes the error to appear. To fix the “Windows could not configure one or more system components” error, you can try to remove the IIS from the Windows Features or rename the “inetsrv” folder. You could also move all the folders related to IIS to another drive. For more details, refer to the options provided below.
Option 1 – Try to remove the IIS from Windows Features
The IIS is installed from the Windows Features and you can find it at Control Panel > Programs. From there, uncheck the checkbox for the Internet Information Services. Once done, click on the OK button to save the changes. Note that this process will get rid of all the related programs, services, and folders from Windows 10. So if you want to, you can just install them later on or use an offline installer from the official site of Microsoft.
Option 2 – Try renaming the inetsrv folder
The next option you can check out to resolve the problem is to rename the “inetsrv” folder. If you have uninstalled IIS from the Windows Features, this should remove the folders as well, however, it didn’t remove the folder then you have to delete the folders that are related to the IIS by following these steps:
First, you have to boot into the Advanced Recovery Mode and from there, open Command Prompt.
Next, execute this command to rename the folder from this location, C:Windowssystem32inetsrv: rename C:/Windows/system32/inetsrv/inetsrv.old
Once done, boot into your computer normally and try to upgrade Windows 10 again, and check if the problem is fixed or not.
Option 3 – Try to move the folders related to IIS to a different drive
Tap the Win + R keys to launch the Run utility and type “services.msc” in the field and hit Enter to open the Windows Services Manager.
Next, look for the Application Host Helper Service from the list of services and stop it.
Once done, take ownership of the “WinSxS” folder and then move the *windows-iis*.*” folders to another drive. You can just search using the “*windows-iis*.*” keyword in the Start Search.
Next, tap the Ctrl + X keys and paste the folders to another drive.
After that, start the update process for Windows 10 again.
In today’s world and age, there are some essential IT skills that basically everyone should know. No matter in what field you are working some skills are just needed in order to function properly in the work. So, without further ado let's dive into what are these essential IT skills everyone, even your grandmother should know.
5 Essential IT skills everybody should know
Word processing
No matter are you creating or editing business documents or just trying to help a friend or relative, word processing skill is an essential asset and requirement in today’s age. Writing anything on a bunch of paper is time-consuming, papers can get lost, and searching for a particular item inside a bunch of papers is not a really enjoyable experience. A much easier solution is to write, format, and keep everything on the computer and almost all employers are asking for this skill.
Send and using emails
Today we live in the digital age and most communication is done in real-time via messaging apps and file sharing is done via file-sharing services. Despite mentioned technology, many files are shared and sent through emails. When a message is too long or complex when it needs to have some attachment or to be kept in archive emails are the way to go and therefore using email is a must-have essential skill.
Using search engines
When talking about using search engines we really do not think about firing up your favorite browser, going into the search engine,s and typing cat pictures. What we think is that a person should know how to use a search engine properly, tweak its search options, and phrase words and sentences to find everything he or she needs.
Doing data work
Data entry and data calculations have been made easier than ever thanks to today's technology. Microsoft excel, libre office calc, google sheets, etc. are all capable of performing a great variety of calculations and keeping track of plenty of required data. This skill is often asked by employers as an essential one.
Cyber security
Each employee or person, in general, should be quite aware of various scams and best practices to keep itself safe in this digital world. We have several articles on this topic and there are a great variety of articles on the internet as well.
Conclusion
No matter are you young or old, employed or looking for a job, these skills are a must-have in today’s world. There are a lot of great tutorials online on these various topics and I am sure that your knowledgeable friend or cousin would be happy to help and show you how to do all of these things.
Razer is a well-known brand among PC gamers and users, it started as a peripheral manufacturer focused on keyboards and mouse but after years passed Razer expanded its inventory offerings. It soon started offering headphones and lately has branched into wider product lines like gaming chairs and protection masks.
It is not a big surprise that Razer is expanding into other branches of the PC industry. This time, however, it has revealed not one but three new hardware for your PC. Case fans, all in one liquid cooler and power supply.
There are not many details about the products themselves but one thing is one hundred percent confirmed, they come with Razer Chroma, all of them, even the fans.
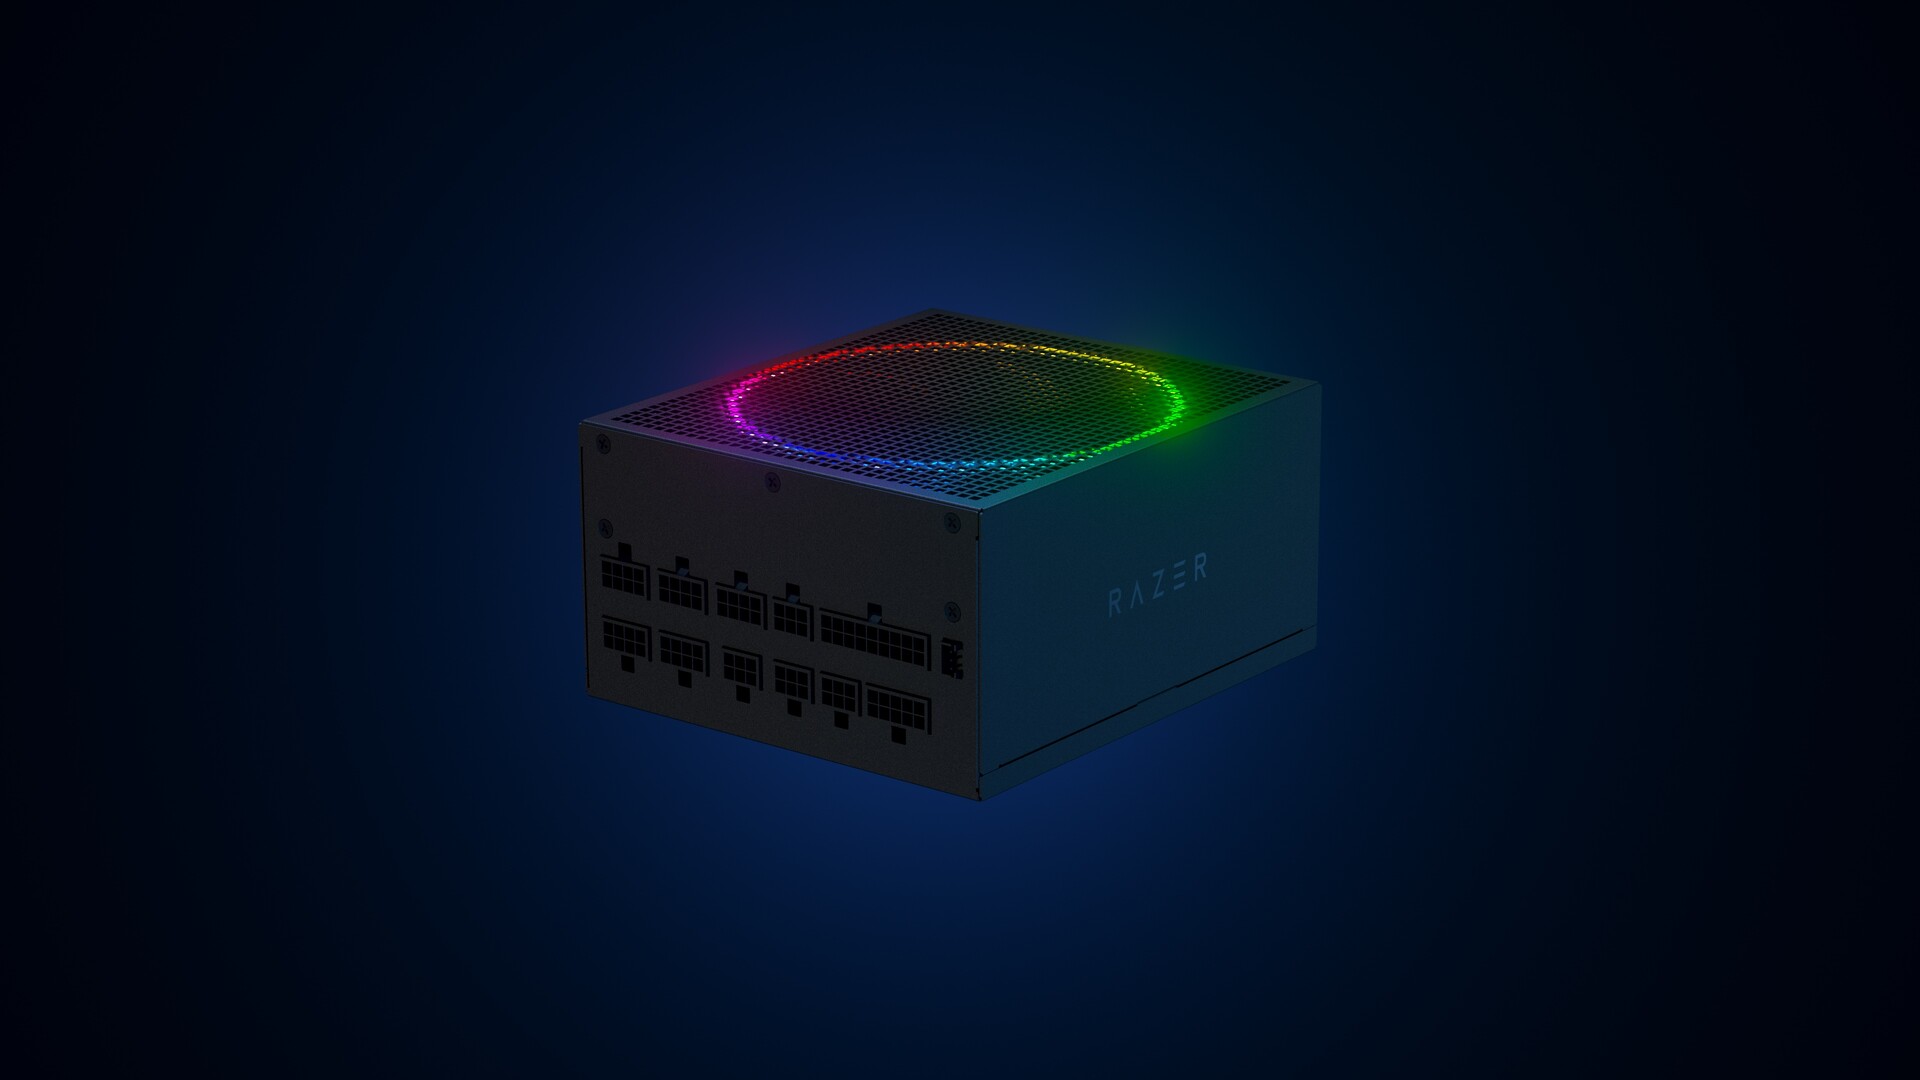
Katana Chroma ATX PSU
Most interesting for me personally is Razers Katana, the power supply unit. It is a modular power supply ranging from 750W to 1200W with the additional option of Titanium rated one with an impressive 1600W of power. Power supply will start shipping in early 2022 and at the time of writing this article no price range has been released.
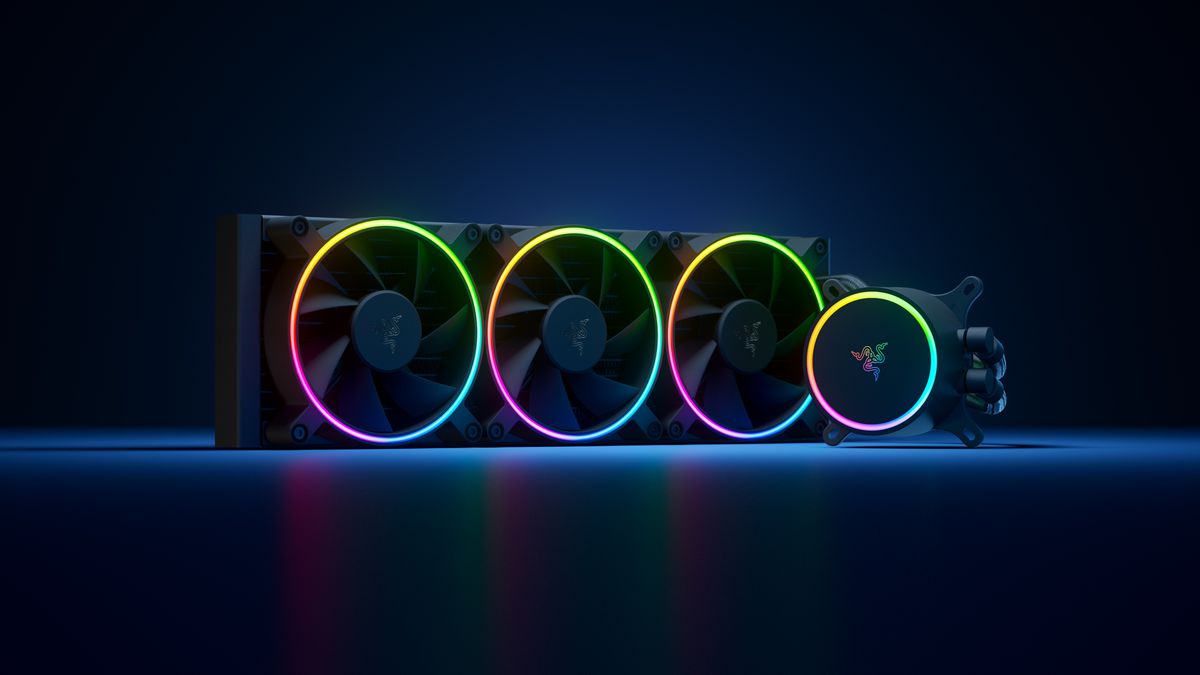
Razer Hanbo AIO
Hanbo liquid cooler will feature an optimized intake design so it can ensure greater heat transfer and fluid dynamic for improved reliability and silent operation. Radiator comes in 240mm size with two fans and a larger one of 360mm with three fans. The pump will be able to rotate in any direction of full 360 degrees so it can fit in any case. Hanbo will be released in November this year but no pricing has been released so far.
Razer Kunai Chroma case fans
Kunai fans will boast high static pressure performance with lowered noise. They will go as far as 2200rpm for the 120mm version where the 140mm version will go up to 1600rpm. They will come with addressable LEDs and up to eight fans will be able to be connected to Razer’s PWM fan controller that will come with a magnet at the back for easy attachment to any steel part of PC casing.
PWM will use Razer’s Synapse software to customize pulse width modulation in order to improve airflow and noise. PWM will be priced at $49.99 in the Razer Store and it is available for preorder. Fans are priced at $44.99 for one 120mm or $129.99 for a three-pack of 120mm. One 140mm will go for $49.99 and a three-pack will be $129.99.
BSOD or Blue Screen of Death errors are one of the most common errors you can encounter on your Windows PC. One of these BSOD errors is the “ACPI_BIOS_ERROR”. If you suddenly get this error, it means that there is some problem in booting the operating system from your hard drive or Windows was not properly installed on your PC. In addition, this error could also mean that there is something wrong with the CMOS battery located in the motherboard.
Unlike other BSOD errors, the workaround for this error is a bit different as these workarounds require a bit more expertise in updating the BIOS as well as setting the correct boot configuration. If you know are capable enough in troubleshooting the problem, refer to the instructions laid out below to fix the BSOD “ACPI_BIOS_ERROR”.
Option 1 – Try to remove the SSD and update the BIOS
The first thing you have to do is to check the primary storage devices on your PC. If you have just installed a new hard drive or SSD recently on your computer, then it’s most likely the cause of the BSOD error. Moreover, you should also ensure that your BIOS is up-to-date to the latest available build.
Remove the SSD/HDD and inject a different HDD that was already preinstalled in your Windows PC.
After that, update the BIOS to the latest available build. After updating it, insert the old SSD/HDD and then try to boot your PC again. The problem should be fixed now. If not, refer to the next given option.
Option 2 – Try to check the CMOS battery and reset the CMOS module
As mentioned earlier, the CMOS battery might also be the one that’s causing the problem. It is a physical component of the motherboard and is a memory chip that contains all the settings configuration on your computer and is also powered by a battery. So if your battery loses power, the CMOS will be reset and as a result, all the configurations will be gone as well. It is also possible that the CMOS module is not properly working and every time things are saved, they are properly written due to the battery. That’s why you have to consider changing the CMOS battery and see if it fixes the problem. In addition, you also have to make sure that you completely reset the CMOS module and then try booting your PC again.
Option 3 – Try to check the BIOS settings
If the BIOS settings are incorrect, chances are that’s the reason why you’re getting the “ACPI_BIOS_ERROR” BSOD error. Every BIOS has different settings which you can make use of to enhance your computer experience. So make sure that your BIOS is up-to-date and that the settings are in accordance with your requirement.
Another thing you can try is to disable the Legacy USB and the Legacy BIOS in the BIOS settings if you are trying to install a 64 bit Windows version. Make sure that you also enable AHCI before plugging in the installation drive on your PC. Moreover, ensure that your PC is using IDE or Integrated Drive Electronics mode instead of SATA or Serial Advanced Technology Attachment. Aside from that, try to check the extracted setup if it is in NTFS format, if it is, you should extract the ISO in FAT32 and use it to install Windows.
Option 4 – Try to reset the ACPI Compliant Control Method
ACPI or Advanced Configuration and Power Interface provide an open standard that operating systems can use to detect hardware, perform power management, as well as monitor the status of your device and provide information for other processes. Chances are, there are some misconfigurations with this module on your PC that lead to believing that there is no battery present. That’s why you need to reset it and see if it fixes the BSOD error or not.
Boot your PC into Safe Mode.
Tap the Win + R keys to open the Run dialog box.
Type in “devmgmt.msc” in the field and tap Enter to open the Device Manager.
After opening the Device Manager, go to the “Batteries” section and click it to expand it and then right-click on the “Microsoft ACPI-Complaint Control Method Battery” option and click on Uninstall.
After you disable the module, click on any empty space and then click the “Scan for hardware changes” option.
Then check if you can now boot your PC normally and without the BSOD error.
If you are trying to install a Windows 10 upgrade but was interrupted with an error saying, “0x80070003 – 0x2000D, The installation failed in the SAFE_OS phase with an error during MIGRATE_DATA operation”, then you’ve come to the right place as this post will help you sort this problem out.
When you get this kind of error while trying to upgrade your computer, although there could be various reasons for this, the primary one is that when you upgrade from one update to another, something stopped the upgrade process to migrate the user data. To fix this error, you can try to run both the DISM tool and the System File Checker to automatically repair any corrupted system files. You could also try checking the free storage space of your primary drive and if you have any file lock apps like BitLocker, consider disabling them for they could also be the reason why you’re getting the error.
Option 1 – Run the DISM tool
Running the DISM Tool helps in repairing the Windows System Image as well as the Windows Component Store in Windows 10 which might be the reason behind the Windows Upgrade error 0x80070003 – 0x2000D. Using this built-in tool, you have various options such as the “/ScanHealth”, “/CheckHealth”, and “/RestoreHealth”.
Open the Command Prompt as admin.
Then type in this command: exe /Online /Cleanup-image /Restorehealth
Do not close the window if the process takes a while as it will probably take a few minutes to finish.
Once it’s done, restart your computer and then check if the issue is resolved or not on the next startup.
Option 2 – Run the SFC scan
The SFC or System File Checker scan could detect and automatically repair damaged system files that could be causing the Windows Upgrade error to appear. SFC is a built-in command utility that helps in restoring corrupted files as well as missing files. It replaces bad and corrupted system files to good system files. To run the SFC command, follow the steps given below.
Tap Win + R to launch Run.
Type in cmd in the field and tap Enter.
After opening Command Prompt, type in sfc /scannow and hit Enter.
The command will start a system scan which will take a few whiles before it finishes. Once it’s done, you could get the following results:
Windows Resource Protection did not find any integrity violations.
Windows Resource Protection found corrupt files and successfully repaired them.
Windows Resource Protection found corrupt files but was unable to fix some of them.
Reboot your PC.
Option 3 – Try checking the free storage space on your primary drive
The next option you can try to resolve the error is to see if you have enough free storage space on the primary drive because if you don’t then it’s probably the reason why you’re getting this error. To fix it, you need to free up some storage space by following these steps:
Open Setting > System > Storage from the WinX Menu.
From there, you will see a list of all the local and connected storage devices along with the details on the free space.
Now make sure that the Storage Sense feature is turned On then go find a link that says “Free Up Space” and click it to open.
After that, a screen which is the built-in program in Windows 10 will appear and will scan your computer for the following junk files so you can free up disk space:
Windows Upgrade Log Files
System created Windows Error Reporting Files
Thumbnails
Temporary Internet Files
Previous Windows Installation Files
Delivery Optimisation Files
DirectX Shader Cache
Note: Once you’re done freeing up space on your drive, try to run the setup file again.
Option 4 – Try disabling BitLocker and other file lock apps
If you are using BitLocker or other file lock apps, then it could be the reason why you’re getting the error. Usually, file lock apps don’t cause any kind of issue, however, if you have something that works on file level like BitLocker, you can try to disable it. Once you’ve disabled it, try to install the Windows 10 Upgrade again and after you do, enable BitLocker again. This should fix the problem.
If you have a laptop that is slowing down and some usual tasks are sluggish you probably mean that it is time to change it and get a new one. Altho it is a good solution and it will guarantee that you will be able to do your tasks with more speed and comfort, straight purchasing is not always the best thing to do.
There are things you can do and some upgrades that are cheaper and will bring your laptop back into the game and extend its usage for a few more years.
1. Clean it
The most common issue for slowing down of computer is dust and dirt that accumulates over time and usage. If the laptop has not been properly cleaned in a while, cleaning it and placing new thermal paste on the CPU can do wonders. If you are not keen on doing this yourself or do not possess the required skillset take it to your local IT center for cleaning.
2. Uninstall software that you are not using
Various software can have speeding effects on computers, it can have some services running in the background and thus take precious resources slowing the whole system. If you are not using software, uninstall it.
3. Do not install the latest software
If you are using your computer for basic tasks there is no really need to install the latest and best. A lot of new software will require new hardware and things that offer are not so much better nor even required to justify the upgrade. Let us take office, for example, if you are using it to just write some text and not using any advanced options there is really no need to switch to a newer version, the old one will do just fine tasks that you are in need of.
4. Replace HD
Now this fits in the domain of upgrading your hardware but still it is much cheaper than replacing the whole laptop. Windows 10 works much better with SSD and SSD itself is faster than your standard HD, especially if it is slower model spinning in only 5400RPM. Operation of HD replacement is simple and straightforward and anyone can do it but the benefits of replacement will be visible right away. With a new SSD instead of an old mechanical one, you will have the feeling that you actually bought a new laptop.
5. Add more RAM
This is basically the last thing you can do in order to speed up your old laptop that will not break your bank account. Upgrading RAM was always the thing that can push your computer to have more power and to behave better while you are doing tasks. One important thing here is to first see how much RAM you have in your computer. If you are packing already 8GB then upgrading will not do much but if you have only 4GB, raising it to 6GB or 8GB will be beneficial. Also, check if the model of the laptop supports more RAM in the first place.
Conclusion
We have covered here a vast array of options in order to get your laptop back into the game with variability between hardware upgrades to taking care of your software. Whatever option you choose to do it will speed up your computer but among all of them, replacing the hard drive will do the most.
If you were trying to run Windows Update or activate Windows Firewall or download from the Windows Store but encounter the Windows Update Error 0x80070422 instead, read on as this post will show you how you can resolve the problem.
This kind of Windows Update error occurs when the Windows Update or WUAUSERVE is not started or when the Background Intelligent Transfer Service or BITS can’t be started. It could be that they are disabled or because they have no enabled devices associated with them. Whichever the case is, you can check out the options given below to fix the Windows Update Error 0x80070422 and make sure that you create a System Restore point first before you start.
Option 1 – Check the status of some Windows Update Services
Tap the Win + R keys to open the Run dialog box.
Next, type “services.msc” in the field and hit Enter or click OK to open Services.
From the list of Services, look for the following services and make sure that their Startup type is as follows:
Windows Update – Manual (Triggered)
Background Intelligent Transfer Service – Manual
After that, check if the Service status of the listed services above is set to Running. If they’re not, click on the Start button to start these services and then check if you can now enable the Windows Update service or not.
Option 2 – Try to disable IPv6 in the Network Center
You might also want to disable IPv6 in the Network Center in order to fix the Windows Update Error 0x80070422. How? Follow these steps:
Tap the Win + X key combination on your keyboard and click on Network Connections.
This will open the Network Connections section under the Setting app. From there, click on the Network and Sharing Center link located at the right side of the panel which will open a Win32 version of the Windows settings known as Control Panel.
In the Control Panel, click on the network your computer is connected to.
A mini window will appear and in that window click on Properties which will open another mini window that will provide a list.
From this list, uncheck the option that says, “Internet Protocol Version 6 (TCP/IPv6)”.
Now click on OK and close all the other windows and see if it fixes the Windows Update error.
Option 3– Run the Windows Update Troubleshooter
If disabling IPv6 didn’t work, you could also try running the Windows Update Troubleshooter as it could also help in fixing any issues related to Windows Update including the Windows Update Error 0x80070422. To run it, go to Settings and then select Troubleshoot from the options. From there, click on Windows Update and then click the “Run the troubleshooter” button. After that, follow the next on-screen instructions and you should be good to go.
Option 4 – Try running the DISM tool
You can also try to run the Deployment Imaging and Servicing Management or DISM tool to fix the Windows Upgrade error. Using this built-in tool, you have various options such as the “/ScanHealth”, “/CheckHealth”, and “/RestoreHealth”.
Open the Command Prompt with admin privileges.
Then type in the following commands and make sure to hit Enter right after you type each one of them:
Dism /Online /Cleanup-Image /CheckHealth
Dism /Online /Cleanup-Image /ScanHealth
exe /Online /Cleanup-image /Restorehealth
Do not close the window if the process takes a while as it will probably take a few minutes to finish.
Option 5 – Run Microsoft’s online troubleshooter
Running Microsoft’s online troubleshooter might also help you fix the Windows Update Error 0x80070422. This online troubleshooter is known to help in fixing Windows Update errors, it scans your computer for issues that might be causing the problem and then fixes them automatically.
If you got encounter an error message saying, “Error opening file for writing” while running a setup file to install some program on your computer, read on as this post will give you some suggestions on how you can fix it. You can encounter this error when running a setup file for installing a program like GlassWire, Notepad++, VLC, Steam, OBS, Mod Organizer, WinpCap, NSIS, FileZilla, BSPlayer, Kodi, Wireshark, rtcore64, qt5core.dll, MSI Afterburner, GWCtlSrv.exe, npf.sys, vcredist_86 and many more. And so when this error pops up while you run a setup file, refer to the steps given below which might help resolve the problem.
Step 1: First, you have to make sure that there is no other installation in progress as multiple installations can most likely cause this error to show up. You can restart your computer and try to run the setup file again.
Step 2: If you still got the error even after your restart your computer, click on Retry to try again and if it does nothing, click Abort to terminate the installation. After that, go to the folder where you’ve placed the setup file and then delete it.
Step 3: Make sure that you have enough disk space on your computer. You can use the Windows 10 Storage Sense feature which can clean all the temporary files from your computer and help you save storage space. To use Storage Sense, follow the steps below.
Open Setting > System > Storage from the WinX Menu.
From there, you will see a list of all the local and connected storage devices along with the details on the free space.
Now make sure that the Storage Sense feature is turned On then go find a link that says “Free Up Space” and click it to open.
After that, a screen which is the built-in program in Windows 10 will appear and will scan your computer for the following junk files so you can free up disk space:
Windows Upgrade Log Files
The system created Windows Error Reporting Files
Thumbnails
Temporary Internet Files
Previous Windows Installation Files
Delivery Optimisation Files
DirectX Shader Cache
Note: Once you’re done freeing up space on your drive, try to run the setup file again.
Step 4: If freeing up space didn’t help, you can just delete the setup file and download another one from the official homepage of the program. From there download the setup file and place it in a different location. After that, run the setup file once again.
Step 5: Make sure that you have downloaded the correct setup file according to your operating system, i.e. x64 or x86.
Step 6: Restart your computer once more and make sure that you sign in as administrator. After that, right-click on the setup file and click “Run as administrator”.
If it still didn’t help, you might want to take ownership of the folder where you saved the setup file. How? Follow the steps below but before you do that, you have to create a System Restore Point first, once that’s done, proceed.
First, locate the concerned folder and right-click on it then select Properties.
Next, click on the Edit button in the Properties window and click OK to confirm if you got a User Account Control elevation request.
After that, select user/group from the permission windows or click on the Add button to add another user or group. It would be best if you add “Everyone” to give permission.
Then check “Full Control” under the “Allow” column to assign full access rights control permissions.
Now edit the permission to Full Control for “Everyone”.
As you can notice in Blue Screen errors, most of them point out a file that’s related to the errors. One of these files is the Storport.sys file which is a system file related to the storage of data in the storage unit of a computer. This file is created by the Microsoft Storage Port Driver. So if this file ends up getting dragged on Blue Screen errors, there can be a number of reasons for why it’s happened. Blue Screen errors related to the Storport.sys file may include conflicts with the hardware, incompatible firmware issues, corrupted drivers, missing or corrupted system files, to name a few.
Here are some of the common Blue Screen errors related to the Storport.sys file:
KMODE_EXCEPTION_NOT_HANDLED
KERNEL DATA INPAGE
PAGE FAULT IN A NONPAGED AREA
SYSTEM THREAD EXCEPTION NOT HANDLED
IRQL NOT LESS OR EQUAL
SYSTEM SERVICE EXCEPTION
Microsoft Windows is the one that provides the Storport.sys file a storage port driver that is suited especially for the use of high-performance buses like fiber channel buses and RAID adapters. There are a number of advantages in using Storport instead of the SCSI Port, according to Microsoft:
“Improved performance, both in terms of throughput and the system resources that are utilized.
Improved Miniport driver interface that addresses the needs of high-end storage vendors, particularly host-based RAID and fiber channel vendors.”
If you encounter any of the above-mentioned Blue Screen of Death errors, then here are some troubleshooting options that might help but before you get to them, you can try to perform a System Restore first especially if you have the habit of creating System Restore points. This might fix the problem. To perform a system restore, refer to these steps:
First, tap the Win + R keys to open the Run dialog box.
After that, type in “sysdm.cpl” in the field and tap Enter.
Next, go to the System Protection tab then click the System Restore button. This will open a new window where you have to select your preferred System Restore point.
After that, follow the on-screen instructions to finish the process and then restart your computer and check if the problem is fixed or not.
If System Restore didn’t help in fixing the Blue Screen error, now’s the time for you to resort to the troubleshooting tips provided below but before you get started, make sure that you create a System Restore point first. In addition, you also have to boot into Safe Mode with Networking before you carry out the troubleshooting steps below.
Option 1 – Try to update or rollback your device drivers
The first thing you can try to fix the Storport.sys Blue Screen error is to either update or roll back the device drivers. It is most likely that after you updated your Windows computer that your driver also needs a refresh. On the other hand, if you have just updated your device drivers then you need to roll back the drivers to their previous versions. Whichever applies to you, refer to the steps below.
Open the Devices Manager from the Win X Menu.
Then locate the device drivers and right-click on them to open the Properties. Note that the main drivers that might be the cause behind the Storport.sys Blue Screen error will be listed under the “ID ATA/ATAPI controllers” section as well as the “Storage controllers” section.
After that, switch to the Driver tab and click on the Uninstall Device button.
Follow the screen option to completely uninstall it.
Finally, restart your computer. It will just reinstall the device drivers automatically.
Note: You can also directly download the relevant drivers of your computer from the manufacturers’ website. So if you have an SSD, the issue might be due to an old storage driver.
Option 2 – Try to recreate the Storport.sys file
If the first option didn’t work, the next thing you can do is to recreate the Storport.sys file. Every time your Windows 10 PC boots up, it looks for all the system drivers in place and if it is unable to find them, it tries to create them. This is why if you remove your corrupt driver file, chances are, you might get a fixed file recreated just for you. How? Refer to the steps below.
Boot your Windows 10 PC in Safe Mode.
Then open File Explorer and navigate to this location: C:/Windows/System32/drivers
From there, look for the file named sys and rename it to Storport.old.
Note: As you can see, the file’s extension has changed from .sys to .old.
Now restart your computer and check if the Storport.sys Blue Screen error is now fixed.
Option 3 – Run System File Checker or SFC scan
System File Checker or SFC is a built-in command utility that helps in restoring corrupted files as well as missing files. It replaces bad and corrupted system files to good system files. To run the SFC command, follow the steps given below.
Tap Win + R to launch Run.
Type in cmd in the field and tap Enter.
After opening Command Prompt, type in sfc /scannow
The command will start a system scan which will take a few whiles before it finishes. Once it’s done, you could get the following results:
Windows Resource Protection did not find any integrity violations.
Windows Resource Protection found corrupt files and successfully repaired them.
Windows Resource Protection found corrupt files but was unable to fix some of them.
Reboot your PC.
Option 4 – Try to run the DISM commands
You might want to repair potentially corrupted files in your system as having them could also trigger the Storport.sys Blue Screen error. To repair these corrupted system files, you can run the DISM commands:
Tap the Win + X keys and click on the “Command Prompt (Admin)” option.
After that, input each one of the commands listed below sequentially to execute them:
Dism /Online /Cleanup-Image /CheckHealth
Dism /Online /Cleanup-Image /ScanHealth
Dism /Online /Cleanup-Image /RestoreHealth
Once you’ve executed the commands given above, restart your computer and check if the dxgkrnl.sys Blue Screen error is now fixed.
Option 5 – Run the Blue Screen Troubleshooter
Troubleshooting Blue Screen of Death errors wouldn’t be complete without the Blue Screen troubleshooter. As you know, it is a built-in tool in Windows 10 that helps users in fixing BSOD errors like Storport.sys. It can be found on the Settings Troubleshooters page. To use it, refer to these steps:
Tap the Win + I keys to open the Settings panel.
Then go to Update & Security > Troubleshoot.
From there, look for the option called “Blue Screen” on your right-hand side and then click the “Run the troubleshooter” button to run the Blue Screen Troubleshooter and then follow the next on-screen options. Note that you might have to boot your PC into Safe Mode.
As you know, Microsoft’s Windows Media Creation Tool is a useful tool that helps you download and install the latest version of the Windows 10 operating system. However, there are times when it could encounter some problems during the update process. One of these programs is the following error message:
“0x8007001F-0x20006, The installation failed in the SAFE_OS phase with an error during REPLICATE_OC operation.”
The error pointed out the “Safe OS phase”. It is the phase that’s initiated to install all the required Windows Updates. Thus, the possible cause for this error could have something to do with an interrupted download, internet connection, and many more. Although this error could be caused by a lot of factors, fixing it shouldn’t be that hard. You can try to reset the Windows Update Components or delete the Windows Update cache. You could also disable both the Firewall and your antivirus program temporarily or run the Windows Update in a Clean Boot state, as well as run the Windows Update troubleshooter. To get started troubleshooting the error, follow each one of the suggestions provided below.
Option 1 – Try to reset the Windows Update components
Resetting the Windows Update components could help you resolve the Windows Update error 0x8007001f – 0x20006. How? Refer to the following steps:
Open Command Prompt with admin privileges.
After that, type each one of the following commands and hit Enter after you key in one after the other.
net stop wuauserv
net stop cryptsvc
net stop bits
net stop msiserver
Note: The commands you entered will stop the Windows Update components such as Windows Update service, Cryptographic services, BITS, and MSI Installer.
After disabling WU components, you need to rename both the SoftwareDistribution and Catroot2 folders. To do that, type each one of the following commands below, and don’t forget to hit Enter after you type one command after the other.
Now, restart the services you’ve stopped by entering another series of commands. Don’t forget to hit Enter after you key in one command after the other.
net start wuauserv
net start cryptsvc
net start bits
net start msiserver
Exit Command Prompt and then restart your computer.
Option 2 – Try to delete the Windows Update Cache
You might also want to delete the Windows Update cache since there are times when existing corrupt or incomplete Windows Update files can cause some problems in downloading and installing Windows Updates. To achieve this, simply delete the “$Windows.~BT” & “$Windows.~WS” folders in your computer. Once you’re done, try to run Windows Update again and see if the error is now fixed.
Option 3 – Try to temporarily disable anti-virus and Windows Defender Firewall
As mentioned, the error could be due to the antivirus program or the Windows Defender Firewall installed on your computer. Thus, disabling them or any security software installed in your computer is always a good idea you can try when you’re not able to access the shared drive on your computer. There are times when you encounter problems like error 0x8007001f – 0x20006 due to interference of antivirus or security programs. Thus, you have to disable both your antivirus program and Windows Defender Firewall for the meantime and check if it fixes the error or not
Option 4 – Run the Windows Update in a Clean Boot State
It is possible that some third-party application is the one that’s causing the problem so it’s best if you put your computer in a Clean Boot state. During this state, you can start the system with a minimum number of drivers and startup programs that will surely help you in isolating the root cause of the issue.
Log onto your PC as an administrator.
Type in MSConfig in the Start Search to open the System Configuration utility.
From there, go to the General tab and click “Selective startup”.
Clear the “Load Startup items” check box and make sure that the “Load System Services” and “Use Original boot configuration” options are checked.
Next, click the Services tab and select the “Hide All Microsoft Services” check box.
Click Disable all.
Click on Apply/OK and restart your PC. (This will put your PC into a Clean Boot State. And configure Windows to use the usual startup, just simply undo the changes.)
After that, try to run Windows Update again.
Note: If you are able to install the app without any trouble at all then it means that the error is caused by some third-party application on your computer. You need to look for the culprit and uninstall it once you found it.
Option 5 – Run the Windows Update Troubleshooter
You might also want to run the Windows Update Troubleshooter as it could also help in fixing error 0x8007001f – 0x20006. To run it, go to Settings and then select Troubleshoot from the options. From there, click on Windows Update and then click the “Run the troubleshooter” button. After that, follow the next on-screen instructions and you should be good to go.
Finally upgraded to Microsoft’s newest OS, but the performance is a bit sluggish? Here are a few useful tips you may not have thought about that could significantly transform your experience!
How to speed up Windows 11?
1. Disable startup programs
There are many programs that launch right on startup that really aren’t essential. This, in turn, causes your PC to launch and run more slowly.
To check which programs are enabled on startup, go into the Task Manager and select the Startup tab. Find every program that doesn’t need to launch immediately, right-click on it and press ‘Disable’.
This will not shut down the program in that instant. It’ll just prevent it from running automatically as you turn on your PC. You can always launch it manually when you need it.
2. Expand your memory and storage
If you want your PC to run super smoothly, you need to have enough memory to support that. This is especially significant for those of you who love to multitask. Upgrading your RAM gives your PC more space to store the temporary data it needs to complete processing tasks. In other words, processing takes a lot less time.
Your long-term storage is equally important. Hopefully at this point you’re already using SSD over HDD, since this type of storage offers a faster boot time.
Credit: Marc Pezin on Unsplash
In any case, we recommend expanding your storage capacity. The more files and data you store, the more there is to load, significantly influencing your PC’s speed. Larger storage capacity means new data and essential updates can be stored comfortably, preventing any strain on your PC’s performance.
3. Clean up disk space
If you aren’t willing to upgrade your storage just yet, the least you can do is clean up your storage right now.
Aside from manually deleting stuff you no longer need, you can also get rid of temporary files that clutter up your storage and eat up performance for no reason. To get to them, click Windows + X and select ‘Run’ (or just type it in the search bar).
A small window will pop up, where you need to type %temp%. This will take you to a whole folder full of all the temporary files you can remove without thinking twice.
For those who upgraded from Windows 10, there’s a neat trick to get rid of potential leftover files you don’t need on your brand new iteration. Only do this if you’re 100% sticking with Windows 11, though. Go to System > Storage > Temporary files. Make sure to only leave ‘Previous Windows Installation’ and ‘Windows Update Clean-up’ checked and click on ‘Remove files’.
Lastly, make use of Windows 11’s fantastic Storage Sense feature. Turning it on will enable your PC to constantly watch out for junk or unused files to optimize your PC’s performance to the maximum.
4. Install pending updates
This one should go without saying, but pending updates can be detrimental to your Windows 11 performance. The longer you leave them untouched, the more bugs the outdated programs and patches can cause. So, make sure to regularly check for updates and install them as soon as they’re available.
5. Disable visual effects
As cool as visual effects, animations, shadows and transparency are, they can also put quite a toll on your computer’s speed. On a newer setup this generally shouldn’t be a problem, but if you do notice a drop in performance, definitely consider turning off some of these settings.
To do this you can go to the Control Panel, System Properties and click the ‘Advanced’ tab. In the Performance section, choose Settings. If you’d like a quicker way to get to the dialog (Performance Options) with Visual Effects, you can also type sysdm.cpl in the search bar.
Once there, you can either have your PC choose what’s best, choose the best appearance or the best performance. The other option is to manually toggle the effects off and on. The biggest obstacles to speed are taskbar animations, window shadows, control/element animations and animations upon minimizing/maximizing.
Credit: Windows on Unsplash
In the same vein, you should go to Settings > Personalization > Colors and disable Transparency, to prevent your computer from doing overtime just to hit the aesthetic appeal.
6. Get rid of bloatware
Bloatware is one of the biggest culprits of slow computer speed.
Pre-installed software that’s pretty much useless but takes up valuable system resources has been around since day one. No matter which device or platform you’re talking about. Luckily, a lot of it is removable, making it easy to lighten the load on your device.
To boost your Windows 11 computer, go to Settings > Apps > Installed apps.You’ll probably see a bunch of apps you don’t want or need. Click on the three dots next to each one you want to remove and press ‘Uninstall’.
Aside from helping optimize performance, removing bloatware has another great benefit. Unfortunately, often this pre-installed software is quite vulnerable, exposing you to great risk of cyberattacks. So, removing it definitely improves your device’s security and gives you at least some peace of mind.
Summary
These are a few of our fastest tips for boosting performance. There are other, more complex and time-consuming ways, of course. If you’ve tried these quick ones and still need advice on how to improve your PC’s speed, feel free to reach out!

 5 Essential IT skills everybody should know
 Razer is a well-known brand among PC gamers and users, it started as a peripheral manufacturer focused on keyboards and mouse but after years passed Razer expanded its inventory offerings. It soon started offering headphones and lately has branched into wider product lines like gaming chairs and protection masks.
It is not a big surprise that Razer is expanding into other branches of the PC industry. This time, however, it has revealed not one but three new hardware for your PC. Case fans, all in one liquid cooler and power supply.
There are not many details about the products themselves but one thing is one hundred percent confirmed, they come with Razer Chroma, all of them, even the fans.
Razer is a well-known brand among PC gamers and users, it started as a peripheral manufacturer focused on keyboards and mouse but after years passed Razer expanded its inventory offerings. It soon started offering headphones and lately has branched into wider product lines like gaming chairs and protection masks.
It is not a big surprise that Razer is expanding into other branches of the PC industry. This time, however, it has revealed not one but three new hardware for your PC. Case fans, all in one liquid cooler and power supply.
There are not many details about the products themselves but one thing is one hundred percent confirmed, they come with Razer Chroma, all of them, even the fans.
 Most interesting for me personally is Razers Katana, the power supply unit. It is a modular power supply ranging from 750W to 1200W with the additional option of Titanium rated one with an impressive 1600W of power. Power supply will start shipping in early 2022 and at the time of writing this article no price range has been released.
 Hanbo liquid cooler will feature an optimized intake design so it can ensure greater heat transfer and fluid dynamic for improved reliability and silent operation. Radiator comes in 240mm size with two fans and a larger one of 360mm with three fans. The pump will be able to rotate in any direction of full 360 degrees so it can fit in any case. Hanbo will be released in November this year but no pricing has been released so far.
 Kunai fans will boast high static pressure performance with lowered noise. They will go as far as 2200rpm for the 120mm version where the 140mm version will go up to 1600rpm. They will come with addressable LEDs and up to eight fans will be able to be connected to Razer’s PWM fan controller that will come with a magnet at the back for easy attachment to any steel part of PC casing.
PWM will use Razer’s Synapse software to customize pulse width modulation in order to improve airflow and noise. PWM will be priced at $49.99 in the Razer Store and it is available for preorder. Fans are priced at $44.99 for one 120mm or $129.99 for a three-pack of 120mm. One 140mm will go for $49.99 and a three-pack will be $129.99.
Kunai fans will boast high static pressure performance with lowered noise. They will go as far as 2200rpm for the 120mm version where the 140mm version will go up to 1600rpm. They will come with addressable LEDs and up to eight fans will be able to be connected to Razer’s PWM fan controller that will come with a magnet at the back for easy attachment to any steel part of PC casing.
PWM will use Razer’s Synapse software to customize pulse width modulation in order to improve airflow and noise. PWM will be priced at $49.99 in the Razer Store and it is available for preorder. Fans are priced at $44.99 for one 120mm or $129.99 for a three-pack of 120mm. One 140mm will go for $49.99 and a three-pack will be $129.99. 

