 The console itself is coming in cylindrical shape powered by Intel CPU and ASUS GPU of the unknown chipset. It has Seagate Baraccuda 1TB SSD and it is VR-ready. The console will have raytracing and will be 4K ready.
In some cases, a couple of Windows 10 laptops, especially the newer ones that run the NVIDIA RTX series GPUs have been experiencing some problems, particularly with their headphone jacks which seem to be malfunctioning even though the internal speakers works just fine. And despite having all the drivers updated to their latest versions, the problem still occurs.
According to security experts, this kind of problem occurs on laptop computers that are manufactured by MSI and since there is still no workaround or reliable fix released by the company, in this post you will be guided on how you can resolve the problem with the headphone jack. So if you are using a laptop made by MSI and are experiencing the same issue, then you’ve come to the right place.
There are several potential fixes you can check out to resolve the problem, you can try to force reboot your computer or clean your headphone jack and then plug it back in properly. In addition, you could also try to update your Audio drivers or set your headphone as default. For more information, follow each one of the given options below.
The first thing you can do is to force reboot your computer as this simple fix could help in fixing the problem. This option is quite simple, just make sure that before you do it, you have to save all your work.
The next thing you can do to fix the problem is to clean your headphone jack and plug it back in properly. Make sure that you use a cotton swab in cleaning the headphone jack as there are instances where some dust might have settled in the port which results in issues like your headphone jack no working.
If the glitch in your audio has something to do with software, chances are it might be related to the audio driver – it could be that the newest version of your Windows 10 does not work well with the old version of the driver. This is why you have to update your audio driver to the newest available version.
Note: If updating or reinstalling the Audio driver didn’t work, you can go to the website of MSI and look for the support section where you can download the drivers for your computer. You just need to take note of your PC’s correct model and model number so you can find the appropriate driver.
There are times when you plug a headphone, it does not toggle the default audio device. Thus, to fix this issue, you have to set the default audio device to the headphones manually. To do that, follow these steps:
Since the Windows 10 operating system has the Playing Audio Troubleshooter, you can use this troubleshooter to try and fix the problem with the headphones. You can access this tool in the Control Panel or in the Taskbar Search and even on the Troubleshooters page of Windows 10.
 The console itself is coming in cylindrical shape powered by Intel CPU and ASUS GPU of the unknown chipset. It has Seagate Baraccuda 1TB SSD and it is VR-ready. The console will have raytracing and will be 4K ready.
 Parallels is an application developer for MAC OS mostly known for its PC virtualization software Parallels Desktop, a PC virtualization software running on Macs enabling running Windows and Linux with respective software on your MAC.
With its latest Desktop 17 version, the software can run natively on both Intel-based and M1-based MACs. Thanks to this feature MAC users will be able to benefit from various speed improvements while running both Windows 10 or Windows 11 preview.
On both Intel and M1 setups, Parallels resumes Windows and Linux up to 38% faster, provides an up to 25% bump in 2D graphics and a six-time increase in OpenGL graphics processing. M1-centric stats include 33% faster Windows start-up times, up to 28% faster DirectX 11 performance, and up to 20% better disk performance on Windows 10 Insider Preview.
Parallels Desktop 17 delivers a set of fresh features including a new video driver that enhances video and game playback and boosts Windows UI responsiveness. An improved Coherence mode lets users run Windows apps within the Mac environment, cutting down on distracting changes in appearance during Windows sign-in, shut down, and software updates.
Drag-and-drop operations are also improved, with support for text and graphics between Mac and Windows applications. This function works well with MAC OS Monterey's Quick Note feature, which can accept content from any Windows app.
USB support, disk management, copy and paste unformatted text, and automatic virtual machine optimization also receive upgrades.
Parallels is an application developer for MAC OS mostly known for its PC virtualization software Parallels Desktop, a PC virtualization software running on Macs enabling running Windows and Linux with respective software on your MAC.
With its latest Desktop 17 version, the software can run natively on both Intel-based and M1-based MACs. Thanks to this feature MAC users will be able to benefit from various speed improvements while running both Windows 10 or Windows 11 preview.
On both Intel and M1 setups, Parallels resumes Windows and Linux up to 38% faster, provides an up to 25% bump in 2D graphics and a six-time increase in OpenGL graphics processing. M1-centric stats include 33% faster Windows start-up times, up to 28% faster DirectX 11 performance, and up to 20% better disk performance on Windows 10 Insider Preview.
Parallels Desktop 17 delivers a set of fresh features including a new video driver that enhances video and game playback and boosts Windows UI responsiveness. An improved Coherence mode lets users run Windows apps within the Mac environment, cutting down on distracting changes in appearance during Windows sign-in, shut down, and software updates.
Drag-and-drop operations are also improved, with support for text and graphics between Mac and Windows applications. This function works well with MAC OS Monterey's Quick Note feature, which can accept content from any Windows app.
USB support, disk management, copy and paste unformatted text, and automatic virtual machine optimization also receive upgrades. Users when upgrading to Windows 10 operating system from Windows 8/8.1 or Windows 7, often encounter error code 8007002c. This error occurs when there’s an attempt made in performing an overall clean boot procedure. During the installation process, it will reach a certain maximum limit, for instance, 75%, and then reverts to its original state. Sometimes, after installation, users will encounter a black screen issue and there is no cursor visible.
 Error Causes
Misconfigured system files that create registry errors within your operating system normally cause error code 8007002c in Windows 10. This registry error happens when there are new programs being installed over old ones without the old programs uninstalled entirely. Another possible cause could be from some malicious software like spyware, adware, and viruses.
Caution: The following steps are complicated. The risk of being in a no-boot situation or data loss might be encountered. It would be best to be supervised by an experienced user, especially in using the command line.
In order to fix Error code 8007002c occurring in Windows 10 upgrade, you can follow this step-by-step manual repair method. Once the repair method is correctly executed, users will most likely quickly resolve issues such as the Error code 8007002c and be able to upgrade to Windows 10 operating system smoothly.
However, in such cases where there are complex instructions and thus need an expert, seek help from a Windows professional. You may also want to consider making use of an automated tool whenever needed.
There are several ways to fix Error code 8007002c, but here are the most effective and efficient methods:
To be able to download and install the necessary updates, you may use the force Windows Update tool. See below for the steps:
NOTE: Don’t forget to hit Enter after every command.
Dism /Online /Cleanup-Image /CheckHealth
Dism /Online /Cleanup-Image /ScanHealth Dism /Online /Cleanup-Image /RestoreHealth
Here’s how you can input a machine name:
Another reason why Error code 8007002c occurs is when there’s a defective and wrongly installed memory chip. Try using the Windows Memory Diagnostic to diagnose if there are RAM Issues.
One more possible cause why Error code 8007002c occurs is due to third-party software. To fix this error, you can try booting up your device with Selective Startup -- a boot type where you can load a limited set of startups and services.
Can’t seem to put up with the long and technical manual repair process? You can still fix this error by downloading and installing a powerful automated tool that will surely get the job done in a jiffy!
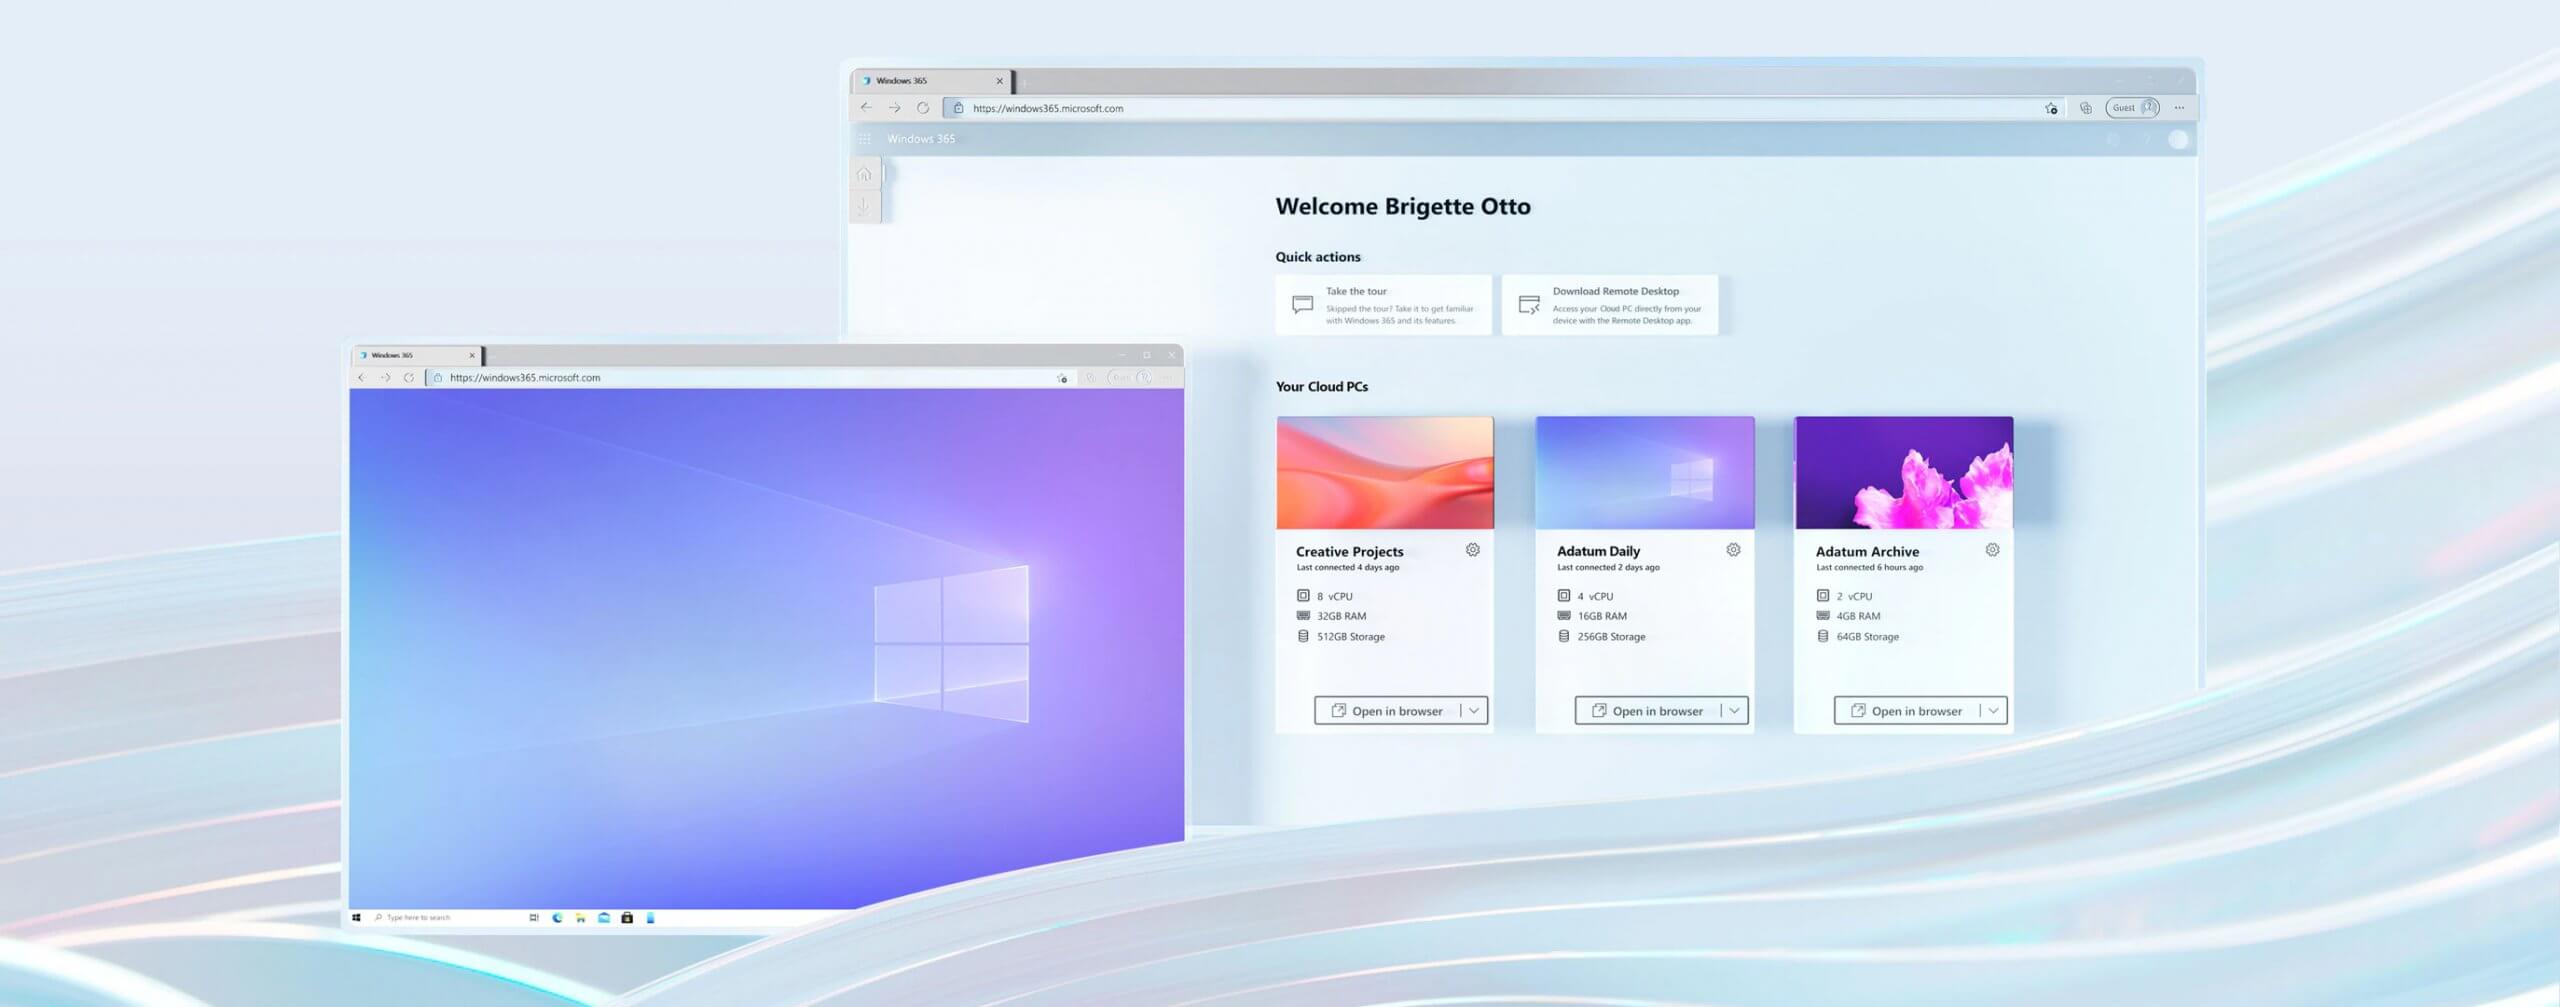 Microsoft has announced Windows 365, a new cloud-based operating system aimed mainly at businesses of all sizes.
Just after Windows 11 announcement and presentation, we are seeing another Windows announcement from Microsoft. Dive into the following text in order to find out what exactly is new Windows 365, its role in today's IT world, and do you need it?
Microsoft has announced Windows 365, a new cloud-based operating system aimed mainly at businesses of all sizes.
Just after Windows 11 announcement and presentation, we are seeing another Windows announcement from Microsoft. Dive into the following text in order to find out what exactly is new Windows 365, its role in today's IT world, and do you need it?
cd "folder location address"Step 5: After that, enter the following script to disable the security questions:
Update-AllUsersQAOnce you’ve completed the steps above, the Security Questions should be disabled and you will be notified with a message stating that the feature has been disabled. On the other hand, if you have a change of heart and you want to enable the Security Questions back, here are some steps you need to take: Step 1: First, open the PowerShell window as admin. Step 2: Next, run the same script with one more parameter such as:
Update-AllUsersQA -answer SecretAnswerStep 3: And that’s about it. Do not forget to replace the Secret Answer with your preferred one and once you’re done, it will be set as the answer for all the Security Questions. Step 4: Now all that’s left to do is go to the Settings app to change the answer to the questions and you should be good to go.
Error Code 0x80072efe is a fairly common error code that generally occurs in Windows 10. It is most often associated with the process of performing updates using the Windows Update tool.
Common symptoms include:
While Error Code 0x80072efe can cause a number of frustrating issues on your device, the good news is that there are several methods that can be used to fix this error. The two most common methods are actually fairly easy to perform and do not require advanced tools or knowledge. However, if you don’t feel like you will be able to perform the necessary steps on your own, be sure to get in touch with a qualified computer repair technician to help you in the resolution of this particular error.
Error CausesTwo things are generally behind the appearance of Error Code 0x80072efe on a Windows device. The first is that one or more of your registry keys are not available, have been corrupted, or are not installed properly. The second is that necessary DLL files aren’t working properly within your machine.
However, other things can mimic these causes, which is why the two methods listed below will resolve the issue in most cases.
Fortunately, there are two resolution methods that can be used quickly and easily when Error Code 0x80072efe arises on your Windows computer. Neither of these requires advanced knowledge or skill, but if you don’t feel comfortable with performing these steps on your own, it is recommended that you contact a qualified computer repair technician in order to get assistance.
Here are the best ways to resolve Error Code 0x80072efe on your computer:
If your time or date has been set incorrectly, it can make your system logs appear to have incorrect information, which can lead to the appearance of Error Code 0x80072efe. Because this is the easiest thing to fix if it is indeed the problem that is making the error code appear, this should always be the first thing that you try when this error code arises.
In order to check your time and date settings, follow these simple steps:
If method one has not successfully resolved Error Code 0x80072efe, you may need to attempt method two.
In some cases, your firewall can prevent your machine from accessing the information that it needs in order for the installation or update to go through correctly. If that is the case, you can follow a few simple steps to turn off your firewall, just while you install the update, and then turn it back on.
In order to do so, follow these steps:
Note that if this method allows you to successfully bypass the error code, you’ll need to make sure to turn the firewall back on when you are finished. Even though it can interfere with the Update process, your firewall is still very important to your computer.
If you wish to always have at your disposal a utility tool to fix these Windows 10 and other related issues when they do arise, download and install a powerful automated tool.