So far I believe each person on this planet has at least heard of Marvel superhero movies, perhaps even watched a few of them, and no wonder. Movies are spawning now over 20 titles and they are not really released as events described in them.
Throw into mix TV series and you can get confused pretty fast. Now it was officially stated that all TV series that were released before Wanda vision is no canon in Marvel cinematic universe which simplify thing a little but there are still series that are.
So without further blabbering around here is a list of Marvels films and TV series in chronological order:
Captain America: The First Avenger
Captain Marvel
Iron Man
Iron Man 2
The Incredible Hulk
Thor
The Avengers
Iron Man 3
Thor: The Dark World
Captain America: The Winter Soldier
Guardians of the Galaxy
Guardians of the Galaxy Vol. 2
Avengers: Age of Ultron
Ant-Man
Captain America: Civil War
Spider-Man: Homecoming
Doctor Strange
Black Panther
Thor: Ragnarok
Ant-Man and The Wasp
Black Widow
Avengers: Infinity War
Avengers: Endgame
WandaVision
The Falcon and The Winter Soldier
Spiderman: Far From Home
Loki
And there you go, if you have someone who has not yet seen movies or you would like to view that as the story is revealed and not by the date they were released now you can easily with this list.
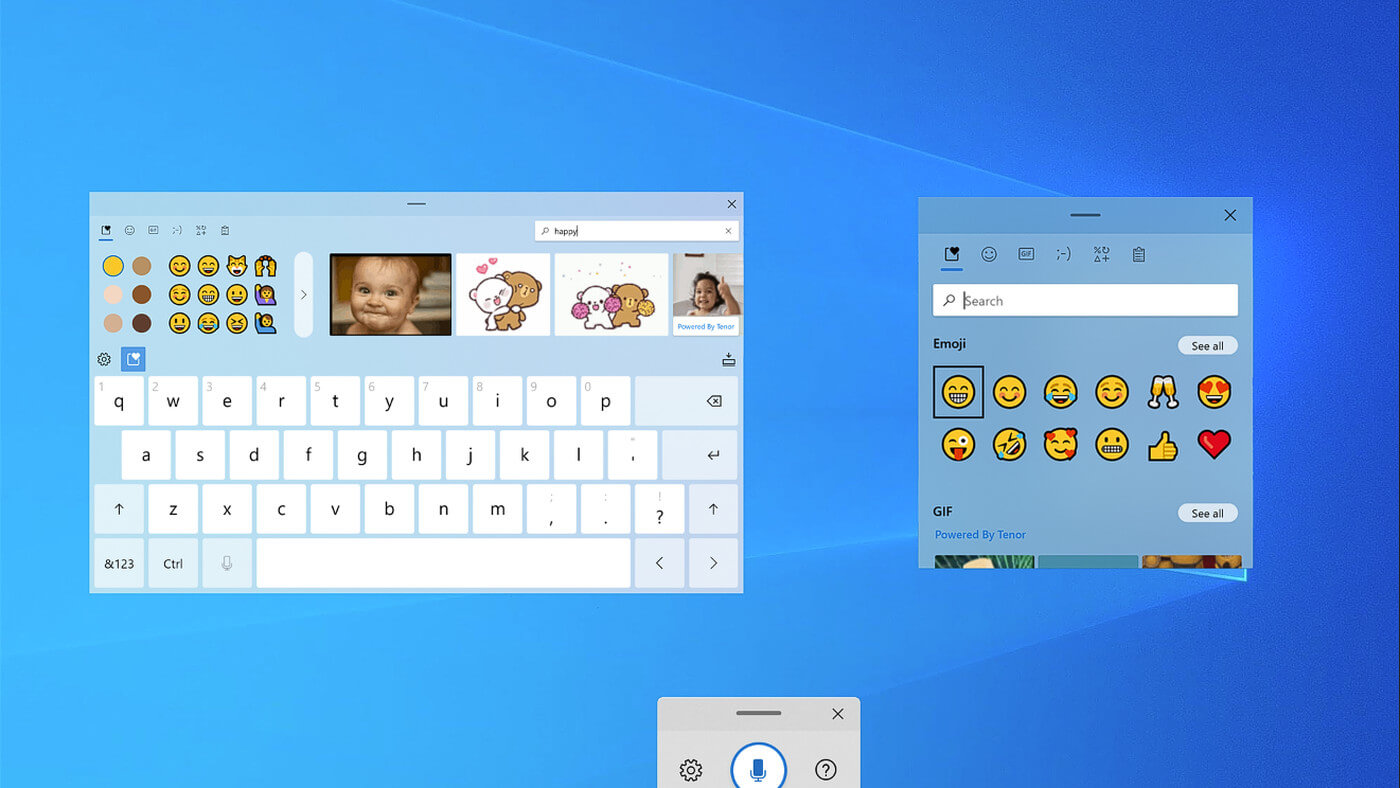
If by any chance you are working on a touchscreen PC, tablet, or any similar device and have no access to a hardware keyboard there is a way to place Touch Keyboard on your screen for easy typing, and you can enable icon on the taskbar for easy access.
Enabling the Touch Keyboard
Right-click on the Taskbar
Select Taskbar Settings
Go to Personalization > Taskbar
Click on Taskbar Corner Icons to expand it
Click on the switch next to Touch Keyboard to turn it ON
Close settings
The icon will immediately appear on the Taskbar in the lower right corner. Clicking the icon virtual keyboard will appear on the lower part of the screen.
You can use this keyboard to type in applications the same as you were typing on hardware one.
By taping on X in the upper right corner, you will hide the keyboard. Tap on the icon in Taskbar to bring it up again.
Hide the Taskbar icon
If you do not want to use Touch Keyboard anymore you can easily hide the icon:
Right-click on the Taskbar
Select Taskbar Settings
Go to Personalization > Taskbar
Click on Taskbar Corner Icons to expand it
Click on the switch next to Touch Keyboard to turn it OFF
Still sitting on the fence about upgrading to Windows 11 because you don’t know what to expect? Interestingly, the new edition somehow manages to be both a total revamp and still very similar to its predecessor in many ways. It’s really something to experience for yourself.
We do want to give you a sneak peek, though. So here’s an overview of the biggest changes Windows 11 brings to the table.
What’s different in Windows 11?
1. Visual changes
The first thing anyone will notice after switching to Windows 11 is the striking visual difference. The entire interface is smoother, cleaner and more minimalistic than on Windows 10, even resembling the macOS in some instances. Perhaps the most obvious change in appearance is the Start menu and Taskbar location, which is now at the bottom center. It’s actually very neat, but if you’re someone who loves familiarity, don’t worry, you can move it back to the left.
Centralized Taskbar and Start menu
Moreover, you’ll notice that the Taskbar includes a Microsoft Teams icon by default (which you can, of course, remove) and that Live Tiles are gone. The News and Interests section has also been removed - or, shall we say, replaced. As opposed to Windows 10, news, weather forecasts and other information are now displayed as widgets.
To add to the cleanliness of the UI, Microsoft also enhanced the ‘Snap Layouts’ feature to help you better organize your windows and maximize screen real estate. It’s similar to app grouping on your smartphone. In Windows 10 this feature is slightly restricted, as it requires some manual resizing and dragging. In Windows 11, you can just hover over the minimize/maximize option on a window, select a layout and throw the windows in there.
Snap Layouts
2. New accessibility features
Microsoft has certainly paid attention to accessibility with Windows 10, but Windows 11 takes this to a whole new level.
One of the ways Windows 11 has taken things up a notch is by adding the long-awaited ‘Live Captions’ feature and advanced Narrator options.
Live Captions apply both to media played on your PC as well as your own speech when you’re using the microphone. Keep in mind that, as with almost all kinds of subtitles, you have to be prepared for a potential delay. However, it’s barely noticeable and doesn’t take away from the usefulness of this awesome new feature whatsoever.
As for the Narrator, there are three new voice packs to choose from. Microsoft has tried to put emphasis on a more natural voice than we are used to. So, now you can choose between Aria, Jenny and Guy, who will read pretty much anything off your screen out loud. Aside from this, Microsoft has also expanded the list of braille displays supported by the Narrator feature. For users with anxiety or trouble concentrating, a welcomed addition is the Focus app, which is no longer part of the Clock app. It’s now separate and called ‘Focus Sessions’, automatically triggering the Do Not Disturb mode when activated. It blocks all pop-ups and flashes and lets you work in peace until you’re ready to switch it off.
3. Android apps
Android users may rejoice! Windows 11 supports the use of your favorite applications now.
Microsoft has done this by integrating the Amazon Appstore to the Windows 11 Microsoft Store. From there, you can download your favorite Android apps and use them on your PC in a smartphone-like window.
Unfortunately not too many apps are supported at this time, but Microsoft is working on making the emulation possible for many more. Also, the option is only available in specific regions at this moment - check out if you’re one of the lucky ones.
4. Improved gaming performance
Avid gamers will be happy to hear that Microsoft has put some effort into streamlining Windows 11 for their gaming needs.
To give gamers a supreme visual experience, Windows 11 offers the ‘Auto HDR’ feature. As long as your monitor is HDR-compatible, this feature will automatically adjust the colors, brightness and contrast of games without any input from you.
Another update is DirectStorage, which we were introduced to in Windows 10 already. In Windows 11, it’s been improved to tweak loading times and overall gaming performance efficiency even better. The predisposition for it to work optimally is that your device has an NVMe SSD.
The Xbox Game Bar also helps gamers towards a smoother experience. It allows in-game screenshots, viewing processes that are running (similar to the Task Manager), monitoring the CPU and GPU performance and frame rate, integrating the Xbox App and more. There’s also a number of widgets you can now use with the Game Bar, for example the Spotify widget.
Xbox Game Bar
Another cool addition is the Xbox Game Pass, which unlocks hundreds of games to play on your Xbox App, with new additions coming in every month.
5. Smart App Control
Aside from a sleek new look and better accessibility for all users, Windows 11 also comes with a security power-up. Bear in mind that this feature is only available on clean Windows 11 installs.
Smart App Control (SAC) is an AI-powered new feature designed to protect your PC from potential threats. It blocks untrustworthy apps and adware and helps detect potentially unwanted apps, maintaining your PC’s performance and keeping your system safe.
It comes with an ‘Evaluation’ mode, which you should definitely select when running SAC for the first time. That way, the app monitors your usage and assesses whether you’re a candidate for SAC. Some users need it to be on all the time, for others it might be too distracting. Evaluation mode will turn SAC on or off based on your usage.
Don’t disable SAC again unless you’re absolutely sure you don’t need it, since reenabling it will require a fresh install. We recommend you don’t turn it off, as it is a neat feature protecting your data and files from malware at all times.
Summary
Have we piqued your interest in trying Microsoft’s latest OS? It’s a pretty exciting new iteration, but we’ll let you find out for yourself. We hope you like it!
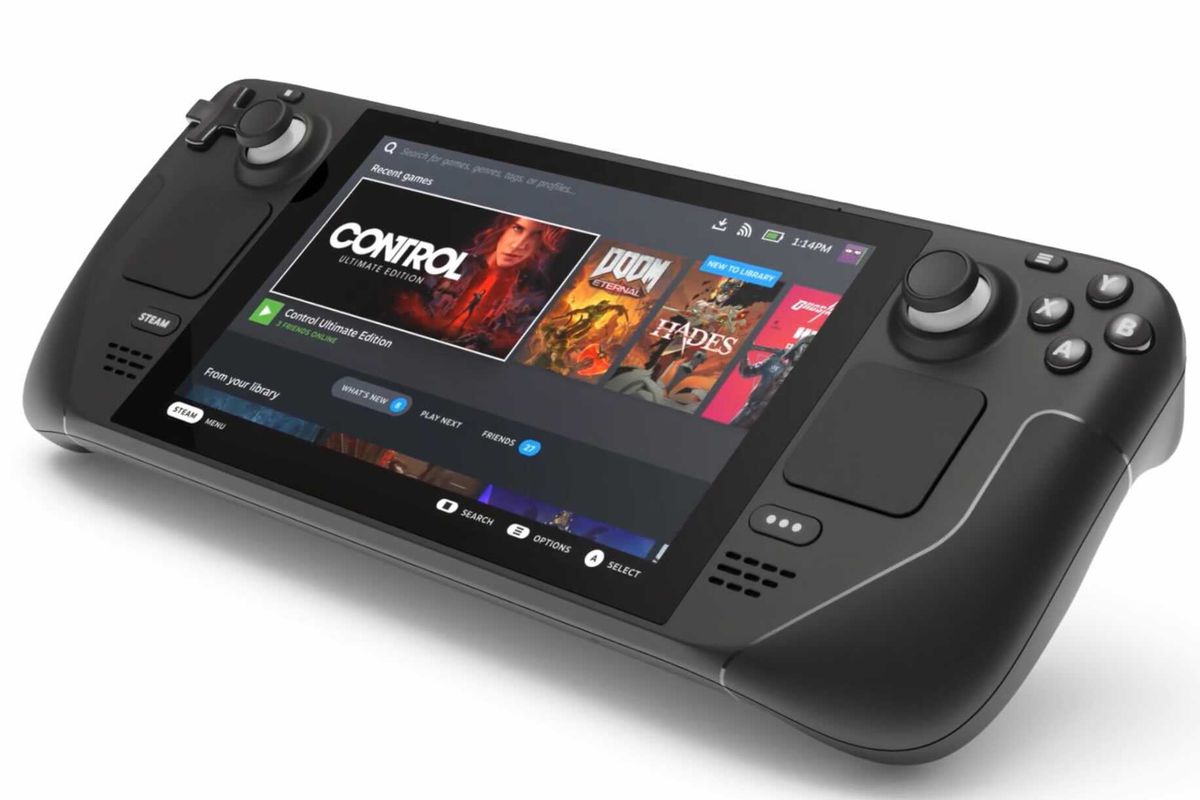
Valve has announced the first gaming PC handheld console: Steam Deck. At its core, Stead Deck is just a portable, small PC in little casing. It uses AMD Zen 2 CPU and RDNA 2 GPU architecture, has 16GB of RAM, Wi-Fi, and Bluetooth.
It is a portable device with both a touchpad and joystick packing a seven-inch screen with a resolution of 1280x800 (16:10 aspect ratio). The screen has an ambient light sensor for automatic light adjustments same as your modern mobile device.
Stating to Valve battery will hold up from two to eight hours depending on the activity of the user and what exactly he is doing. The handheld comes also with a carrying case.
Steam Deck operating system and software
Out of the box, Steam Dock comes with the latest Valve’s version of SteamOS 3. Just for comparing, the steam box was coming SteamOS 2, so this new Linux-based OS is aimed to provide better performance and better compatibility.
Naturally, all Linux games in your Steam library will work right out of the box but Valve has something called PROTON inside OS, it is emulation software based on Wine that will supposedly let you play all of your Library games on a given OS.
One big thing to mention here is that this is PC after all meaning that if you do not like having SteamOS on it you can install Windows instead and so far as we know it will support Windows 11. Now with Windows 11, you will be able to play all of your Steam games and run any kind of Windows software on it including EPIC store, battle.net, and others.
Cost and release date
The initial release date is set for December 2021 and today on July 16th Valve is opening you can reserve your copy if you want to pre-purchase. Follow this link if you want to reserve your copy. Reserve your Steam Deck device
The price of the device will depend on the memory capacity which you would like to have. Please note that each of the 3 offered devices will have the same hardware, the only difference will be in memory available, and the most expensive version will also have anti-glare screen, everything else is identical.
64GB model will be $399, 256GB model will have the price of $529 and largest one with whooping 512GB will be $649
Conclusion
Valve ventures into the digital hardware domain again but it is unsure will they make it this time. Both Steam machine and their controller were in long run failed and later unsupported products so perhaps some customer caution is advised.
Although having a handheld PC is tempting I would advise seeing how the overall market will accept this contraption before throwing money into it.
HomeworkSimplified is a Browser Hijacking extension for Google Chrome developed by Mindspark. This extension will set your home page and new tab to MyWay.com.
From the Terms of Use: As part of the download process for the Toolbar, you may be given the option to reset your Internet browser’s homepage to an Ask homepage product and/or reset your new tab page to an Ask new tab product. If you do not wish to reset your homepage and/or new tab page to the Ask homepage and/or Ask new tab product(s), you can decline/opt-out of these features by checking or unchecking the appropriate box(es) during the download process for the Toolbar.
While installing this extension monitors user browsing activity and sends it back to Mindspark servers, where they are later used/sold to better target and inject unwanted ads and sponsored content into your browsing sessions.
About Browser Hijackers
Browser hijacking is regarded as the web’s constant danger that targets web browsers. It is a kind of malware program that redirects the web browser requests to some other suspicious websites. Browser hijacker malware is developed for numerous reasons. Typically, browser hijacking is used for earning advertising revenue that comes from forced ad clicks and website visits. It may appear harmless, but the majority of such websites are not legitimate and will pose a major threat to your online safety. Additionally, hijackers will make the whole infected system vulnerable – other harmful malware and viruses will take hold of these opportunities to get into your computer effortlessly.
Indications of browser hijack
The typical signs that signify having this malicious software on your computer are:
1. your homepage is reset to some mysterious website2. you observe new unwanted bookmarks or favorites added, usually directed to advertisement-filled or pornography sites3. the default search engine is changed and the web browser security settings have been brought down without your knowledge4. you’re getting new toolbars you have never seen before5. you may notice numerous pop-up adverts on your computer screen6. your browser has instability problems or exhibits frequent errors7. you’ve prohibited entry to certain web pages, including the website of an anti-malware software developer like SafeBytes.
How they get into your computer or laptop
There are several ways your computer can become infected by a browser hijacker. They usually arrive through spam e-mail, via file-sharing networks, or by a drive-by download. They are generally included with toolbars, add-ons, BHO, plug-ins, or browser extensions. Browser hijackers sneak into your pc along with free software application downloads also that you unwittingly install alongside the original. Typical examples of browser hijackers include CoolWebSearch, Conduit, OneWebSearch, Coupon Server, RocketTab, Snap.do, Delta Search, and Searchult.com.
Browser hijacking may lead to serious privacy issues and also identity theft, disrupt your browsing experience by taking control of outbound traffic, considerably slows down your computer or laptop by depleting a lot of system resources and result in system instability as well.
How you can get rid of a browser hijacker
Some kinds of browser hijackers can be removed from the computer by uninstalling malicious software programs or any other recently added shareware. But, certain hijackers are very hard to identify or remove since they might get themselves connected with certain crucial system files which allow it to operate as a necessary operating system process. You should think about undertaking manual repairs only if you happen to be a tech-savvy individual, as potential risks are associated with tinkering with the system registry and HOSTS file.
You might opt for automatic browser hijacker removal by just installing and running an efficient anti-malware application. To eradicate any browser hijacker from your computer, you should download this certified malware removal application – SafeBytes Anti-Malware. Employ a system optimizer (like Total System Care) together with your anti-malware software to correct various computer registry issues, eliminate system vulnerabilities, and boost your computer overall performance
How To Get Eliminate Virus That Is Preventing Anti-Malware Downloads?
All malware is inherently harmful, but certain kinds of malware do a lot more damage to your computer than others. Some malware variants modify web browser settings by adding a proxy server or change the PC’s DNS configurations. In these instances, you will be unable to visit some or all of the websites, and thus not able to download or install the necessary security software to remove the malware. If you’re reading this article, you may have got affected by malware that prevents you from downloading a security application like Safebytes Antimalware on your PC. Do as instructed below to eliminate malware in alternate ways.
Get rid of viruses in Safe Mode
The Windows-based PC includes a special mode known as “Safe Mode” where only the bare minimum required applications and services are loaded. In the event the malware is blocking access to the internet and affecting your PC, launching it in Safe Mode enables you to download anti-virus and run a diagnostic scan whilst limiting possible damage. In order to get into Safe Mode or Safe Mode with Networking, press the F8 key while the system is booting up or run MSCONFIG and locate the “Safe Boot” options under the “Boot” tab. Once you are in Safe Mode, you can attempt to install your antivirus application without the hindrance of the malware. At this point, you can run the antivirus scan to remove viruses and malware without any hindrance from another application.
Switch over to an alternative browser
Certain viruses might target vulnerabilities of a particular web browser that obstruct the downloading process. If you are not able to download the security application using Internet Explorer, this means the virus may be targeting IE’s vulnerabilities. Here, you must switch over to another browser such as Chrome or Firefox to download the Safebytes Anti-malware program.
Install anti-malware on a USB drive
Another option is to store and run an anti-malware software program entirely from a Pen drive. Adopt these measures to use a USB drive to fix your infected computer system.
1) Make use of another virus-free computer to download Safebytes Anti-Malware.2) Mount the pen drive on the same computer.3) Double click on the exe file to run the installation wizard.4) Select the flash drive as the destination for saving the file. Follow the activation instructions.5) Now, transfer the pen drive to the infected computer.6) Double-click the EXE file to open the Safebytes tool right from the thumb drive.7) Click on the “Scan” button to run a full system scan and remove malware automatically.
SafeBytes Anti-Malware - More Protection For You Personally
If you’re looking to install anti-malware software for your PC, there are plenty of tools on the market to consider but you cannot trust blindly anyone, regardless of whether it is free or paid software. A few of them are good, some are ok types, while some will harm your computer themselves! You need to be careful not to select the wrong product, particularly if you purchase a premium application. While considering the dependable programs, Safebytes AntiMalware is certainly the strongly recommended one.
SafeBytes anti-malware is a highly effective and user-friendly protection tool that is made for end-users of all levels of computer literacy. With its outstanding protection system, this software will easily detect and remove most of the security threats, including adware, viruses, browser hijackers, ransomware, PUPs, and trojans.
SafeBytes possesses a plethora of wonderful features that can help you protect your PC from malware attack and damage. Listed below are some of the best ones:
Real-time Active Protection: SafeBytes provides an entirely hands-free live protection and is set to check, prevent and remove all computer threats at its first encounter. It’ll regularly monitor your computer for hacker activity and also provides users with superior firewall protection.
Anti-Malware Protection: This deep-cleaning antimalware application goes much deeper than most anti-virus tools to clean out your PC. Its critically acclaimed virus engine detects and disables hard-to-remove malware that conceals deep inside your PC.
Website Filtering: SafeBytes gives an instant safety rating to the web pages you are going to visit, automatically blocking harmful sites and ensuring that you’re certain of your safety while browsing the world wide web.
Light-weight: SafeBytes is a lightweight and easy-to-use antivirus and antimalware solution. Since it utilizes low computer resources, this application leaves the computer’s power exactly where it belongs to: with you actually.
Premium Support: You will get 24/7 technical support to quickly resolve any issue with your security application.
On the whole, SafeBytes Anti-Malware is a solid program since it has lots of features and can identify and eliminate any potential threats. You can be sure that your PC will be protected in real-time once you put this tool to use. For the best protection and the best value for your money, you can’t get better than SafeBytes Anti-Malware.
Technical Details and Manual Removal (Advanced Users)
If you’d like to manually get rid of Homework Simplified without using an automated tool, it might be possible to do so by removing the application from the Microsoft Windows Add/Remove Programs menu, or in cases of web browser extensions, going to the browser’s AddOn/Extension manager and removing it. You’ll likely also want to reset your web browser.
To ensure the complete removal, find the following Windows registry entries on your computer and eliminate them or reset the values accordingly. Please note that this is for experienced users only and could be difficult, with wrong file removal causing additional PC errors. Furthermore, some malware keeps replicating which makes it tough to eliminate. Carrying out this malware-removal process in Safe Mode is suggested.
There are instances when you open a picture or an image in the Windows Photo Viewer and instead of displaying the image, it displays nothing and you’ll see an error message instead that says, “Windows Photo Viewer can’t display this picture because there might not be enough memory available on your computer”.
Although this may look like a clear-cut issue of less storage space or low RAM in your computer, that’s not always the case. Security experts noticed that even when your computer has enough resources and disk space, this kind of problem could still occur. So if you experience the same thing, you need to check the Color Profile of your screen. For more information, refer to the detailed instructions provided below but before you proceed, make sure that you close some processes in the Task Manager or restart your computer and see if it helps in fixing the problem. You can also try using the Disk Cleanup tool. To use it, refer to these steps:
Tap the Win + R keys to open the Run dialog box and then type “cleanmgr” in the field and hit Enter to open the Disk Cleanup window.
After that, select the drive you want to clean.
Now click OK to clean the disk and restart your computer.
If the Disk Cleanup tool didn’t help in resolving the issue, refer to the instructions below.
Step 1: In the search box, type “color management” and then select the “Change advanced color management settings for display” option from the search results. Or you could simply go to Settings > System > Display, Advanced display settings, and from there, select display and click on the Display adapter properties of Display.
Step 2: Next, switch to the Color Management tab and click on the Color Management button.
Step 3: Select the monitor where you’re getting the “Windows Photo Viewer can’t display this picture because there might not be enough memory available on your computer” error in the next window. And if you have two displays, make sure that you select the primary display. You also have an option to identify the monitor.
Step 4: Once confirmed, select the “Use my settings for this device” checkbox.
Step 5: After that, select the Profile listed under the “Profiles associated with this device” option and then click on Remove.
Step 6: Next, go to the Advanced tab and make sure that all settings are set to System default which includes a device profile, perceptual images, rendering intent, Relative Colorimetric, and many more.
Step 7: Once you’re done, you have to restart your computer and then try to open the same image you were trying to open earlier and then check if you can now open it instead of seeing the error.
If you wish to continue where you have left off when you signed out of Windows follow this guide and learn how to continue your work after signing in, restart apps in your Windows.
You can set Windows 10 to Automatically save your restartable apps when you sign out and restart them after you sign in. Here’s how:
Right-click on the Windows logo to open the secret menu
Select Settings
Click open Accounts
From the left side, select Sign-in options
Scroll down till you see Restart apps setting
Toggle the Automatically save your restartable apps when you sign out and restart them after you sign in setting to On position
Error code 0x000000D1 is a serious error that is displayed when Windows automatically shuts down to protect the system against further damage.
Usually, when this error occurs, the message displayed to the users states something like STOP 0x000000D1 DRIVER_IRQL_NOT_LESS_OR_EQUAL.
Solution
What Causes 0x000000D1 Error?
Usually, the STOP 0x000000D1 error code is caused by issues like incompatibilities, third-party drivers, driver conflicts, outdated drivers, malicious drivers, and other related problems.
Speaking technically, the message displayed to the user actually means that the kernel-mode driver has tried to gain access to memory at an unreasonably high process IRQL.
If left unfixed, STOP 0x000000D1 error can become quite serious. Increased frequency of occurrence may not only lead to data loss but can cause system corruption as well. That’s why it is crucial to fix it and to resolve the underlying issues causing it as soon as possible.
Further Information and Manual Repair
There are different ways of quickly fixing this error, some of which are briefly listed below as follows.
The solution advised for advanced users is to start the system and log on to it as the administrator. Then do to Start button. Click on All Programs -> Accessories-> System Tools-> System Restore. Here you will find the option, “Restore my computer to an earlier time”. Click on it and select ‘Next’. A list of restore points will appear in front of you. Select the latest restore point and then click on ‘Next’. The confirmation window will appear again. Click on the Next button again. Restart your computer. Congratulations, you have successfully restored your computer.
Another way that’s more suitable for novice users goes as follows. Download a repair utility tool. Now install the program. You are most likely to come across a Scan button. Once that happens, choose the Fix/Repair button. Your scan will be completed. The error will be removed. You can then restart your computer again to ensure the error is no longer displayed.
Some other suggestions to keep your computer from encountering these problems in the future are outlined below.
Update all your drivers. Obsolete or old hardware or software driversmay also trigger this STOP 0x000000D1 error.
If you have recently installed or modified a driver or hardware and the error has occurred afterward, it is highly likely that the installation or modification has caused it. Revert back to the original settings to steer clear of this driver in the future.
Updating your computer does not always end up successfully as there are a number of things that could go wrong with the Windows Update module in your Windows 10 computer. One of the issues you could face when you update your computer is error 0x80244019. This error could be caused by a number of factors. If you are currently having problems fixing this Windows Update error, read on as this post will help you resolve this problem.
Here’s the full content of the error:
“There were some problems installing updates, but we’ll try again later. If you keep seeing this and want to search the web or contact support for information, this may help: (0x80244019).”
In this kind of Windows Update error, you might not be able to get the download file of the requested update started to your computer and this could be due to some third-party application or the overall internal components that contribute to the functioning of the Windows Update module.
Refer to each one of the following options to fix the Windows Update error 0x80244019.
Option 1 – Restart your computer
The most basic thing you can do to fix the problem is to restart your computer. It usually works in fixing common issues like the Windows Update error 0x80244019. However, if it didn’t work, proceed to the next given options below.
Option 2 – Try to run the Windows Update Troubleshooter
The Windows Update Troubleshooter will help you in fixing error 0x80244019. This is a great built-in tool from Microsoft that helps users fix any issues with Windows Update. So this is worth a try to solve the problem.
To use the Windows Update Troubleshooter, follow the steps below.
Tap Win + I keys again to open the Windows Settings panel.
Go to Update & Security and then go to Troubleshoot.
Under the Troubleshoot section, on your left-hand side, scroll down to find Windows Update and then click on Run the troubleshooter option and follow the on-screen instructions and then see if it fixes the problem.
Option 3 – Try configuring the Windows Update-related Services
Configuring all the Windows Update-related services could also help in fixing the error as it makes sure that all the required services are available.
Tap the Win + R keys to open the Run dialog box.
Then type “cmd” in the field and tap Enter to open an elevated Command Prompt.
Next, execute the following commands. Note that you have to type and enter each command one after the other.
SC config wuauserv start= auto
SC config bits start= auto
SC config cryptsvc start= auto
SC config trustedinstaller start= auto
The commands you executed will make sure that the Windows Update-related services are available. Once it’s done, restart your computer and see if the Windows Update error is now fixed.
Option 4 – Run Windows Update in a Clean Boot State
It could be that some third-party application is the one that’s causing the problem so it’s best if you put your computer in a Clean Boot state. During this state, you can start the system with a minimum number of drivers and startup programs that will surely help you in isolating the root cause of the issue.
Log onto your PC as an administrator.
Type in MSConfig in the Start Search to open the System Configuration utility.
From there, go to the General tab and click “Selective startup”.
Clear the “Load Startup items” check box and make sure that the “Load System Services” and “Use Original boot configuration” options are checked.
Next, click the Services tab and select “Hide All Microsoft Services” check box.
Click Disable all.
Click on Apply/OK and restart your PC. (This will put your PC into a Clean Boot State. And configure Windows to use the usual startup, just simply undo the changes.)
After that, try to run Windows Update again.
Note: If you are able to install the app without any trouble at all then it means that the error is caused by some third-party application on your computer. You need to look for the culprit and uninstall it once you found it.
Option 5 – Try to fix the Proxy Settings
In the Cortana search box, search for Internet Explorer and then click on the related search result.
After that, tap the Win + T keys on your keyboard and click on Internet Options.
Next, navigate to the Connections tab and click on LAN Settings.
Then click on the Advanced button and delete all the entries in the list generated in the Exceptions section. And if the Advanced button is disabled because the “Use a proxy server for your LAN (These settings will not apply to dial-up or VPN connections)” option is disabled then you are good to go. Now proceed to the next step.
Tap the Win + X keys or right-click on the Start button and select Command Prompt (Admin) or you could also search for “cmd” in the Cortana search box and right-click on Command Prompt from the search results and select the “Run as administrator” option.
If a User Account Control appears, click on Yes to proceed. After that, type each one of the commands listed below, and don’t forget to hit Enter after you type each one of them.
netsh winhttp reset proxy
net stop wuauserv
net start wuauserv
Now restart your computer and check if the problem is fixed or not by checking for Windows Updates again.
As you know, Excel sheet is frequently acclaimed as one of the most useful software that allows users to create spreadsheets, crunch numbers as well as prepare a business report. Usually, tapping the arrow keys to move from one cell to another. However, there are times when you might experience trouble in tapping them – for instance, they won’t work when you tap them.
This kind of problem can be quite frustrating since no matter what you do, especially when you tap the arrow keys, instead of a single cell, it moves the entire spreadsheet. If you are one of the users who experience this problem, worry no more for this post will guide you on what you can do to fix it.
When arrow keys won’t function as intended in Excel spreadsheets, it could be due to unintended behavior of the Scroll key or it could be related to some issues with the keyboard driver. Whatever the cause is, here are some suggestions you can check out to fix it.
Option 1 – Try to disable the Scroll Lock
The first thing you can do to fix this problem with arrow keys is to disable the Scroll Lock. Although doing this is easy, newer laptops don’t actually come with it so if your keyboard does not come with a scroll key, all you have to do is tap the Fn key and disable Scroll Lock. Aside from that, you could also use the on-screen keyboard to turn off the Scroll Lock. You will see its status on the Excel sheet which will help you to double-check. Moreover, you could also tap the Shift + F14 keys to toggle off the Scroll Lock. To use the on-screen keyboard to turn off Scroll Lock, follow the steps below.
Tap the Windows key and type “on-screen keyboard” and then tap Enter.
Once the on-screen keyboard is opened, you should see that the Scroll Lock is on the “On” position since the ScrLk keys are in blue.
Like pointed out earlier, you can utilize the Scroll Lock indicator located in the status bar as well as disable or enable the scroll key by using this feature on Microsoft Excel.
Option 2 – Try turning on the Sticky key
If disabling the Scroll Lock did not fix the problem, you can try turning on the Sticky Key instead. A lot of users reported that this option fixed the problem for them. So you should try to turn on the Sticky key and to do that, follow the steps below.
First, type “control panel” in the Start Search and click on Control Panel from the search results.
Next, select the “Turn On Sticky Keys” option and click on OK.
After that, go back and uncheck the “Turn On Sticky Keys” option. This should fix the malfunctioning arrow keys on Excel.
Option 3 – Try running the Hardware and Devices Troubleshooter
The first thing you can do to fix the problem is by running the Hardware Troubleshooter. Although it won’t make much of a difference, there’s still a possibility that it could automatically fix the problem with these function keys. To use it, refer to these steps:
The first thing you need to do is click on Start and then on the gear-like icon to pull up the window for Settings.
After opening Settings, look for the Update and Security option and select it.
From there, go to the Troubleshoot option located on the left-hand side of the list.
Next, select Hardware and Devices from the list and open the Troubleshooter and run it. Once it is doing its job, wait for it to complete the process and then restart the system.
After the system restarts, check if the problem’s now fixed. If not, refer to the next option given below.
Option 4 – Update the keyboard driver
You can also update the keyboard driver to fix the problem. There are cases when an outdated or corrupted driver can fix the problem. To do so, follow the steps below.
Tap the Win + R keys to open the Run dialog box.
Then type “devmgmt.msc” in the field and hit Enter to open the Device Manager.
From there, look for the keyboard driver and click on it.
Next, right-click on the keyboard driver and select the Update driver option.
After that, click the “Search automatically for updated driver software” option to proceed.
Option 5 – Reinstall the keyboard driver
If updating the keyboard driver didn’t help, then you might want to reinstall it. How? Follow the steps below.
Tap the Win + R keys to launch Run.
Type in MSC into the box and tap Enter or click OK to open the Device Manager.
After that, a list of device drivers will be displayed. Look for the keyboard driver, right-click on it and then select “Uninstall device”.
After that, unplug the device and restart your PC.
Then plug your device back in. Assuming your device is connected to your PC, open the Device Manager again.
Next, click on the Action button and click the Scan for hardware changes button. That should fix the problem
Note: You could also completely uninstall the driver and go directly to the manufacturer’s website and download the latest driver for your hardware and then install it.
Runtime Error 713 is an error that occurs during the distribution of a Visual Basic application that includes a data report.
The error is displayed on the screen when you try to open the data report from your desired application.
Error Causes
The reason why computer users often experience the Runtime Error 713 is that the data report run-time file also referred to as Msdbrptr.dll is not included in your setup package.
Though this error does not pose any big threat to your computer, however, it is recommended to fix the error because the Runtime error 713 may hamper your ability to install and access new programs.
Further Information and Manual Repair
Don’t you panic if you see Runtime Error 713 message pop up on your PC? This error is rated easy to repair and can be fixed in a couple of minutes.
There are two ways to fix Runtime Error 713. You can choose whichever 2 alternatives suit you best.
Method 1
First, open your project and include a reference to the data report file, the Msdbrptr.dll file. Locating this file is not difficult. It is listed as Microsoft Data Report Designer v6.0 in the reference dialog box. Sometimes you may see this file listed more than once.
Now when this happens be sure to select the file that is associated with Msdbrptr.dll. After you select it, the reference will be verified. Once verification is complete, you are good to go. Now you can try rebuilding your setup package again.
Method 2
The second alternative is to add the Msdbrptr.dll file manually in PDW (the Package and Deployment Wizard). Simply add the file in the Included Files dialog box window and run the PDW. Now you are all set to rebuild your setup package.
Whether you follow method 1 or 2 after you rebuild the setup package and the installation is complete, you will see the following files in the indicated folders:
<windows system>Msdbrptr.dll
<program files>Common Files\Designers\Msderun.dll
<windows system>Msstdfmt.dll
The presence of these files indicates successful installation and now you can easily try opening the data report.
If you’ve noticed, all you have to do to fix Runtime Error 713 was to include the Msdbrptr.dll file.
So, next time if you or your friends experience Runtime Error 713, you know exactly what to do and how to fix it.
 So far I believe each person on this planet has at least heard of Marvel superhero movies, perhaps even watched a few of them, and no wonder. Movies are spawning now over 20 titles and they are not really released as events described in them.
 If by any chance you are working on a touchscreen PC, tablet, or any similar device and have no access to a hardware keyboard there is a way to place Touch Keyboard on your screen for easy typing, and you can enable icon on the taskbar for easy access.


 Valve has announced the first gaming PC handheld console: Steam Deck. At its core, Stead Deck is just a portable, small PC in little casing. It uses AMD Zen 2 CPU and RDNA 2 GPU architecture, has 16GB of RAM, Wi-Fi, and Bluetooth.
It is a portable device with both a touchpad and joystick packing a seven-inch screen with a resolution of 1280x800 (16:10 aspect ratio). The screen has an ambient light sensor for automatic light adjustments same as your modern mobile device.
Stating to Valve battery will hold up from two to eight hours depending on the activity of the user and what exactly he is doing. The handheld comes also with a carrying case.
Valve has announced the first gaming PC handheld console: Steam Deck. At its core, Stead Deck is just a portable, small PC in little casing. It uses AMD Zen 2 CPU and RDNA 2 GPU architecture, has 16GB of RAM, Wi-Fi, and Bluetooth.
It is a portable device with both a touchpad and joystick packing a seven-inch screen with a resolution of 1280x800 (16:10 aspect ratio). The screen has an ambient light sensor for automatic light adjustments same as your modern mobile device.
Stating to Valve battery will hold up from two to eight hours depending on the activity of the user and what exactly he is doing. The handheld comes also with a carrying case.
