Instagram posting has been reserved for mobile phones for a very long time but in October 2021 that privilege has come to an end. Instagram added the long-awaited ability to post to Instagram from the website. You get nearly all of the same filters and editing tools that you can find in the iPhone and Android app, too.
In order to post via computer on your Instagram account all you need is a browser. The first step, of course, is to go to instagram.com and login into your account, if you do not have an account, you can make one for free. Next, click on the + icon in the upper right corner.
Create a new post screen will open, in this screen click on the Select from computer blue button on the bottom. The file manager will open, choose your desired photo and confirm. After that, you will be presented will an adjustment screen for a photo, here you can crop the photo, zoom in, adjust the aspect ratio, or if you wish add more photos to create a slide show.
Once you are done will all of these adjustments, click on Next in the upper right. From there you will be taken into a filter screen where you can apply one of many filters or if you want, you can adjust brightness, contrast, saturation, temperature, etc. just like in the application on your phone. Once you have the desired result, again click on Next in the upper right part of the screen.
Lastly, you will be given an option to write a caption for the photo if you wish and add a location. Once this step is finished you can post the feed by clicking on share in the upper right part.
That is all to it, just like in a mobile application you can now use your computer for Instagram posting.
Intel announced that Pat Gelsinger (CEO) and Dr. Ann Kelleher (technology Department head) will discuss Intel’s process and packaging innovations on an upcoming webcast that will happen on July 26th.
The spokesman will talk and provide a deeper look at the process and packaging roadmaps for Intel. As we know Intel is planning to expand its production capabilities, outsource some of its technologies and offer foundry services to other chip design companies.
The strategy will also include a shift to a 7nm process and Intel’s effort to set itself again as leader of CPU performance by 2024.
There is also a chance that we will hear exact plans for Intel in the next three or four years.
Intel didn't reveal much else about what Gelsinger and Kelleher plan to discuss during the webcast. The event will be streamed on July 26 at 2 pm PT via the Intel Newsroom; it will also be available to watch on-demand after the stream ends.
Windows Terminal is a new free Microsoft terminal sort of application. When you open either Power Shell or Command Prompt in Windows they will be opened in different windows, and if you want several of each you will have several windows of each on your screen.
Windows Terminal fixes this by opening each of the Instances of Command Prompt and Power Shell as separate tabs inside itself making it much easier to manage multiple instances of named applications.
You can also run both Power Shell and Command prompt tabs in the same Windows Terminal. Luckily running command prompt and power shell in different tabs is not the only thing you can do. Windows Terminal lets you choose your own theme, it has emoji support, GPU rendering, split panes, and many more customizable options.
Windows 11 will have Terminal as the default command-line environment for opening Power Shell or Command prompt, even Windows Subsystem for Linux (WSL)
Setting Windows Terminal as the default application
If I was successful I have managed to show you that Windows Terminal is something that you should use even if you do not or cannot upgrade to Windows 11. You can use it inside Windows 10 also.
First thing is to download and install it. You can get Windows Terminal from the official Microsoft website here: Windows Terminal page
After download and installation are completed, open the Terminal app and select the down arrow menu, click Settings. Alternatively, you can use CTRL + + shortcut.
Inside Settings by default Default Terminal application would be set to Windows Console Host
Click on the Default Terminal application to bring a drop-down menu and choose Windows Terminal from the list.
Now by default once opened Windows Terminal will use Power Shell as the default profile, however, you can change this by clicking on the drop-down for the default profile where you can choose between Command Prompt, Power Shell, Windows Power Shell, or Azure Cloud Shell. Pick one that you prefer, click on Save and it will be opened as default on the next run.
If your Windows 10 computer is having problems connecting to a wireless network and it takes too long to respond and only keeps on displaying the “Checking network requirements”, then you’ve come to the right place as this place will walk you through fixing the problem.
There are two things that can happen when your computer connects to a wireless network. Windows can either connect to the wireless network successfully or return an error message that says, “Cannot connect to the network. However, if none of these things happened, and it only remains at the “Checking network requirements” message, then it could be due to obsolete or incompatible drivers in your computer, particularly the network adapter drivers. To fix this problem, you can try to update or reinstall these drivers, reset the TCP/IP, or run the Network Adapter troubleshooter, as well as reset the Network. For more information, refer to the given options below.
Option 1 – Update the Network Adapter drivers
The first thing you can do to resolve the problem is to update the Network Adapter drivers by following these steps:
Tap the Win + R keys to launch the Run window and then type in the “devmgmt.msc” command and hit Enter to open the Device Manager window.
Under the Device Manager, you will see a list of drivers. From there, look for the Network Adapters and expand them.
Look for the Broadcom Network Adapter and right-click on it, as well as other network adapters that have an exclamation icon, and update them all.
Restart your PC and see if it helped in fixing the problem.
Note: If updating the network drivers didn’t help in fixing the problem, you can also try to uninstall the very same drivers and restart your Windows 10 PC. After that, the system itself will reinstall the drivers you just uninstalled. Alternatively, you can also download and install the drivers from the manufacturer’s website directly.
To reinstall the network adapter drivers, refer to these steps:
Open the Devices Manager from the Win X Menu.
Then locate the device drivers and right-click on them to open the Properties.
After that, switch to the Driver tab and click on the Uninstall Device button.
Follow the screen option to completely uninstall it.
Finally, restart your computer. It will just reinstall the device drivers automatically.
Option 2 – Try to reset the TCP/IP
As you know, the TCP/IP or the Internet Protocol is the most important thing if you want to use the internet on your computer. That’s why if it ends up getting corrupted, you need to reset the TCP/IP to fix the problem. To reset TCP/IP, refer to these steps:
In the Windows start the search, type “command prompt” and right-click on Command Prompt from the search results.
Then select the “Run as administrator” option to open Command Prompt with admin privileges.
After that, execute this command: netsh int ip reset resettcpip.txt
Once it’s done, exit Command Prompt and restart your computer and then check if the error is now fixed.
Option 3 – Run the Network Adapter troubleshooter
To run the Network Troubleshooter, refer to these steps:
Open the Search bar on your computer and type in “troubleshoot” to open the Troubleshoot settings.
Next, scroll down and select the “Network Adapter” option from the right pane.
Then click on the Run Troubleshooter” button.
After that, your computer will check for any possible errors and will pinpoint the root cause of the problem if possible.
Restart your computer.
Option 4 – Try to perform Network Reset
You can also try to perform a Network Reset to resolve the problem. This will reset the entire network configuration including your IP address. To perform Network Reset, follow these steps:
Tap the Win + I keys to open Settings.
From there, go to the Network and Internet section.
Next, scroll down and look for “Network Reset” under the status pane.
After that, click on Network Reset and then on Reset now to start resetting the network configuration. Once done, check if it is able to fix the error or not.
If the Task Manager is either blank or is not showing processes on your Windows 10 computer, then here are a few things you can do to resolve this issue. This kind of problem can occur due to some system file corruption or some malware infection in the system.
Here are some suggestions you can try to resolve the problem with the Task Manager on your Windows 10 PC.
Option 1 – Try restarting your computer
The most common and most of the time effective way to resolve this kind of issue is to simply restart your computer. Thus, you have to restart your computer and see if it helps in fixing the Task Manager issue or not. If not, you can try the next given options below.
Option 2 – Run the DISM tool
If the first option didn’t work, then running the Deployment Imaging and Servicing Management tool can help you resolve the issue with the Task Manager as it will repair the Windows System Image as well as the Windows Component Store in Windows 10.
After you access the Advanced Startup options, select Command Prompt by using the arrow keys on your keyboard.
Next, type in this command: DISM /Online /Cleanup-Image /RestoreHealth
Do not close the window if the process takes a while as it will probably take a few minutes to finish.
Option 3 – Make sure that the display columns are selected in the Task Manager
You have to make sure that you have checked or selected the display columns you want to be displayed. So if none of them are selected, you might not see any details at all. Thus, you need to right-click on the space near Name and select the columns.
Option 4 – Run the System File Checker Scan
System File Checker or SFC is a built-in command utility that helps in restoring corrupted files as well as missing files. It replaces bad and corrupted system files with good system files that might be the reason why the Task Manager is blank or is not showing processes. To run the SFC command, follow the steps given below.
Tap Win + R to launch Run.
Type in cmd in the field and tap Enter.
After opening Command Prompt, type in sfc /scannow
The command will start a system scan which will take a few whiles before it finishes. Once it’s done, you could get the following results:
Windows Resource Protection did not find any integrity violations.
Windows Resource Protection found corrupt files and successfully repaired them.
Windows Resource Protection found corrupt files but was unable to fix some of them.
Restart your computer.
Option 5 – Troubleshot the problem in a Clean Boot State
There are some instances that some conflicting programs installed in your computer might be the one that’s causing the Task Manager issue. To identify which program is causing the problem, you need to put your computer in a Clean Boot State. To do so, follow the steps below.
Log onto your PC as an administrator.
Type in MSConfig in the Start Search to open the System Configuration utility.
From there, go to the General tab and click “Selective startup”.
Clear the “Load Startup items” check box and make sure that the “Load System Services” and “Use Original boot configuration” options are checked.
Next, click the Services tab and select the “Hide All Microsoft Services” check box.
Click Disable all.
Click on Apply/OK and restart your PC. (This will put your PC into a Clean Boot State. And configure Windows to use the usual startup, just simply undo the changes.)
From there, start to isolate the problem by checking which one of the programs you installed recently is the root cause of the problem.
Option 6 – Try scanning your computer using Windows Defender
As mentioned, the Task Manager issue might be caused by some malware in the system and so to eliminate the malware, you have to scan your computer using security programs like Windows Defender.
Tap the Win + I keys to open Update & Security.
Then click on the Windows Security option and open Windows Defender Security Center.
Next, click on Virus & threat protection > Run a new advanced scan.
Now make sure that Full Scan is selected from the menu and then click the Scan Now button to get started.
Each you connect time external devices like scanners, printers, and the likes to a Windows 10 computer, the device either pushes the drivers through the USB or any other port, or you are expected to install the drivers through external media. In both cases, the driver will be loaded into the system, allowing you to use the device. However, it doesn’t always go smoothly as you could encounter some errors like the “Windows cannot load the Device Driver for this hardware because a previous instance of the Device Driver is still in memory ( Code 38 )”.
If you encounter such an error in the Device Manager, then this means that a previous version of the device driver is still in memory and that each time the device is used, that previous version is loaded into memory and then unloaded which triggers the “Windows cannot load the Device Driver for this hardware because a previous instance of the Device Driver is still in memory (Code 38)” error. This kind of error occurs if the operating system loads the unwanted driver or if it fails to unload the driver.
It could be that there is an obsolete version of the driver that’s still installed in the system or it could also be that you need to update your USB drivers as they could be outdated or the problem could also be due to some third party program that is interfering with the installation. Whatever the cause is, here are some suggestions you can check out to resolve the problem.
Option 1 – Uninstall previously installed drivers and reinstall their latest working version from the manufacturer’s website
The first thing you can do is to uninstall the drivers that are currently installed on your computer and then reinstall their latest working versions from their official sites. This kind of error is commonly encountered while loading drivers for scanners and printers. This is due to the fact that their drivers and software come along with a package which is usually in external media like CD or DVD. So when you install the software package, there’s a possibility that a newer version has been launched by its manufacturer. When that happens, you have to uninstall the previously installed driver package and then download the drivers from the manufacturer’s website and install them.
Option 2 – Run the Hardware and Devices Troubleshooter
The first thing you need to do is click on Start and then on the gear-like icon to pull up the window for Settings.
After opening Settings, look for the Update and Security option and select it.
From there, go to the Troubleshoot option located on the left-hand side of the list.
Next, select Hardware and Devices from the list and open the Troubleshooter and run it. Once it is doing its job, wait for it to complete the process and then restart the system.
After the system restarts, check if the problem’s now fixed. If not, refer to the next option given below.
Option 3 – Update or reinstall the Universal Serial Bus Controller driver
Since it could be a driver issue, you can try to update or reinstall the Universal Serial Bus Controller drivers using the Device Manager. Refer to the following steps:
First, click the Start button and type “device manager”.
Then click on the “Device Manager” from the search results to open it.
From there, look for the “Universal Serial Bus controllers” option and then right-click on each one of the USB drivers and select the Update Driver from the menu.
Note: If it is a regular USB drive, then it will be listed as a USB Mass Storage Device but if you have a USB 3.0 device, then look for a USB 3.0 Extensible Host Controller.
Restart your PC and then click the “Search automatically for updated driver software” option.
Note: If updating the USB Controller drivers didn’t work, you can try to reinstall them instead.
Option 4 – Restart your computer in a Clean Boot State
If the first three given options didn’t work and you still see the error when you connect external devices, you can try putting your computer in a Clean Boot State and then try connecting them again.
Log onto your PC as an administrator.
Type in MSConfig in the Start Search to open the System Configuration utility.
From there, go to the General tab and click “Selective startup”.
Clear the “Load Startup items” check box and make sure that the “Load System Services” and “Use Original boot configuration” options are checked.
Next, click the Services tab and select the “Hide All Microsoft Services” check box.
Click Disable all.
Click on Apply/OK and restart your PC. (This will put your PC into a Clean Boot State. And configure Windows to use the usual startup, just simply undo the changes.)
Now try to connect the external devices and check if the error is now gone.
The Disk Management tool in Windows 10 is a built-in tool that contains a user interface used to manage disk partitions to administrators of the computer. There are lots of instances when you have to change the size of the hard disk partition or reduce the size and so on. This is where the Disk Management tool comes in. It’s useful as the command line interface can be quite confusing and risky for some users. However, there are cases when this tool stops working. A proof of this the reports submitted recently by some Windows 10 users. Based on the reports, the Disk Management does not load or respond. If you are having the same problem, read on as this post will give you some suggestions on what you can do to resolve the problem.
Option 1 – Try restarting the Disk Management Service
Tap the Win + R key combination to open the Run dialog box.
Then type “services.msc” in the field and hit Enter or click OK to open the Windows Services Manager.
Next, scroll down in the service list until you see the Virtual Disk Service. Double click on it to open and then select Automatic.
Click on Apply and OK to save the changes made.
If it hasn’t started yet, you can just click on the Start button to start the Service. The Virtual Disk service provides management services for disk, volumes, file systems as well as storage arrays.
Now save all the changes you’ve made and restart your computer. Then check if you can now use the Disk Management tool without any problem.
Option 2 – Try using the System File Checker scan
System File Checker or SFC is a built-in command utility that helps in restoring corrupted files as well as missing files. It replaces bad and corrupted system files with good system files that might be causing some issues with the Disk Management tool. To run the SFC command, follow the steps given below.
Boot your PC into Safe Mode.
Tap Win + R to launch Run.
Type in cmd in the field and tap Enter.
After opening Command Prompt, type in sfc /scannow
The command will start a system scan which will take a few whiles before it finishes. Once it’s done, you could get the following results:
Windows Resource Protection did not find any integrity violations.
Windows Resource Protection found corrupt files and successfully repaired them.
Windows Resource Protection found corrupt files but was unable to fix some of them.
Option 3 – Try using the DISM tool
Aside from the System File Checker, the DISM tool can also help you resolve the issue with the Disk Management tool. It helps in restoring the health of your computer.
Open the Command Prompt as admin.
Then type in this command: Dism /Online /Cleanup-Image /RestoreHealth
Do not close the window if the process takes a while as it will probably take a few minutes to finish.
Option 4 – Try using Diskpart and Fsutil
If both the System File Checker and DISM tool didn’t work, you can use command-line tools like diskpart and fsutil. These command-line tools are powerful but you need to be careful especially if you’re not that familiar with using them. However, it’s recommended that you have somebody who knows if you’re really inexperienced with this kind of stuff.
Over time Applications change, some for the better some for worse. Some of them even stop receiving updates and are old and vulnerable. Sometimes standards change and some file types are not used anymore. Software evolves along with technology and that is good.
Keeping old and useless applications inside your Windows is not so good. From various exploits to simply taking up space, maybe even slowing down OS it is always wise and good to clean your Windows from unwanted old applications.
In this article, we will be mentioning some relics of old and providing you with an explanation of why you should remove them from your system if by any chance you still have them on it.
Silverlight
Silverlight was meant to be a competitor for Adobe Flash, it is a WEB framework that enables rich media content inside your WEB browser. The issue is that it is not developed anymore and today's browsers do not support it.
The only browser that actually can support it is internet explorer which itself is not supported and how there is practically 0 content on today's modern WEB that will require Silverlight, it is safe and recommended to remove it.
Adobe Flash
Speaking of Adobe Flash, you should remove it as well. Flash has stopped receiving support as of January 2021 and browsers have dropped support for it and even blocked it due to security issues.
However, there still might be some local installation of Flash itself inside Windows along with the old Shockwave player that stopped receiving support in 2019. You should remove them both.
JAVA
Now this one is tricky, by itself JAVA does not present any security issues since browsers do not support it anymore and the desktop version is not really slowing down your computer. This one has simply put just another media runtime that is not used and simply takes up space and resources.
However if you have some applications that you do use that rely on it (I can really just think of JAVA Minecraft at this point) leave it of course but in any other case, it is just purely not needed.
Quicktime
While we are at media runtime and stuff that just simply is not needed, Quicktime is one of them. Now this Apple Video player and codec is still pretty developed and active in Apple’s iOS environment, Windows version has not been updated since 2016 and it was discovered that it contains some critical vulnerabilities.
Uninstall it and if you need a player that could play MOV files, just use a VLC player that can play them without any separately installed codec.
uTorrent
This one, the same as CCleaner was once a good application, as a matter of fact, it was the best torrenting application. Sadly it has fallen from its grace very low, from getting tons of ads in its interface to findings in 2015 that code of torrent client was packed with a crypto miner that used system resources of an installed computer to mine crypto without user’s awareness.
You should uninstall this torrent client if you would like to get your PC back and not provide it for cryptocurrency mining for the company that developed it. Use qBittorrent or TIxati, open-source and free ones that have everything needed for any torrenting needs.
Toolbars and Browser extensions
There are a lot of toolbars for browsers and extensions that are malicious in nature or simply not updated providing security issues. It is very advisable to remove this as soon as possible.
WinRAR
WinRAR has gained its large popularity solely for the reason that you could download it from the official site like shareware and use it forever. The license never expired and you could use it indefinitely. Sadly not much has been improved in the application itself and it is slowly falling out in its range of what it can do.
There are better open source and free options today like 7zip, PeaZip, ZIPvare, and more that are working the same as WinRAR if not even better.
Windows and manufacturers Bloatware
Yes, applications that come bundled with Windows and with some laptops that include manufacturers made software for different tasks like its own specific media players, calculators, etc.
It is known that these applications are not better than their open-source rivals and there are too many of them including some that you will probably never use. It is the same as buying a new phone bundled with tons of applications that you do not need, did not ask for, and do not use. Delete all of them.
Considering Windows there are also some Store application like Candy Crush Saga demo and other are safe to remove if not needed.
That’s it, our advice for old and not needed applications so you can keep your PC safe and fast.
Universal Windows Platform (UWP) applications are the modern application in the windows store that can be used in all the Window devices like Xbox, Hololens, Tablet, PC or Phone. Basically, UWP provides a common platform for every device that runs Windows 10. When attempting to login into these applications and receive this error:
Can’t sign in with a Microsoft accountThis program is blocked by group policy. For more information, contact your system administrator.0x8000704ec
Then this post is for you. We will guide you on how to easily resolve issues, please follow the steps provided.
Local group policy editor solution
Press ⊞ WINDOWS + R to open the Run dialog.
In the Run dialog box type gpedit.msc and press ENTER to open Group Policy Editor.
Inside the Local Group Policy Editor, navigate to the path below:
Computer Configuration > Windows Settings > Security Settings > Local Polices > Security Options
On the right pane, double-click on Accounts: Block Microsoft accounts to edit its properties.
Under Local Security Setting tab, click on the drop-down and select This policy is disabled.
Click Apply > OK to save the changes.
Exit Group Policy Editor.
Registry editor solution
As always, it is highly recommended to make a backup of the registry editor just in case that something goes wrong.
Press ⊞ WINDOWS + R to open the Run dialog.
In the Run dialog box, type regedit and hit ENTER to open Registry Editor.
A surprisingly large amount of things present at your home can and do interfere with your wi-fi signal making it weak so devices are dropping it, having trouble connecting, or being slow.
Hello and welcome to our latest article where we will take a look at all things that are present in a lot of homes but are very bad for your WI-Fi signal.
Bad router placement
Having a router in a bad position can have some really large effects on WI-Fi signal strength and its availability. Usually, we do not give great attention to where we are placing our router but it has been proved over and over again that being close to certain objects does indeed have a great influence on the wireless signal strength and performance.
So, what are these objects and bad positions where we could place the router and effectively kill his Wi-Fi capabilities?
Fish Tanks
Water will block all radio waves including Wi-FI signals and waves themselves, so having a router next to the aquarium or any large source of water is a bad idea. You should always look at water as something bad for your Wi-Fi and move your router away from it as far as possible.
Bookshelves
Paper is another story and example of the dampening effect on radio waves. Did you know that various patterns of paper are used in silent rooms and recording studios in order to eliminate sound reflection from surfaces? Well besides absorbing sound waves, the paper also absorbs Wi-Fi signals and if you have a large bookshelf with a lot of books packed one beside another you just have a great wall of signal absorbing.
Mirrors
The problem with mirrors is in their coating that goes over the glass in order to turn it into the mirror, that coating is metal and as such, it is absorbing signals in large amounts. If you have an old or high-quality mirror that has a silver coating things are even worse since silver will absorb even more waves than modern cheap ones.
TV
Yup, TV is also on this list and for a similar reason as a mirror, although TV does not have coatings of metal, they have something even worse: a large metal plating on the back. Metal plating is there to produce structural integrity of the TV set and provide it with shielding from electromagnetic waves and as such it will prevent Wi-Fi waves as well. Do not place the router behind your TV.
Things that influence signals in homes
Any kind of metal decoration
Now when we covered mirrors and TV because of the metal they have, we must take a look at the metal itself. Any kind of metal stuff that you might have like baskets, figures, statues, frames, etc will effectively block your signal.
Kitchen appliances and Home utilities
Kitchen appliances like refrigerators, microwaves, ovens, stoves, etc. along with home appliances and utilities like dishwashers, washing machines, dryers, etc are large metal objects enclosed in a metal cage that will block signals from spreading further and it is no secret that most kitchens have weaker Wi-Fi because of this reason.
Home gyms
This is a logical conclusion as to everything explained so far if you have a workout room or small gym at home it is probably filled with weights that are metal and have mirrors inside, all of that will interfere and block signals.
Things blocking your Wi-Fi that you have no easy control over
Walls
Thick walls will dampen signals, thick walls from bricks will dampen even more and concrete walls will kill it almost completely. Any kind of metal reinforcement wiring inside walls will reduce and kill signals as well.
Floors and ceiling
This is somewhat important if you have a floor beneath or under the room where is your router located, but for the same reason how walls are blocking your signal floor and ceiling can do it as well, especially since most of the time they are made of some stronger material like concrete with metal fence inside.
Heating systems
If you have a heating system that is composed of metal radiators with water inside, then in terms of Wi-Fi signal strength you have an aquarium but in a metal box, and as such it will greatly reduce signal strength.
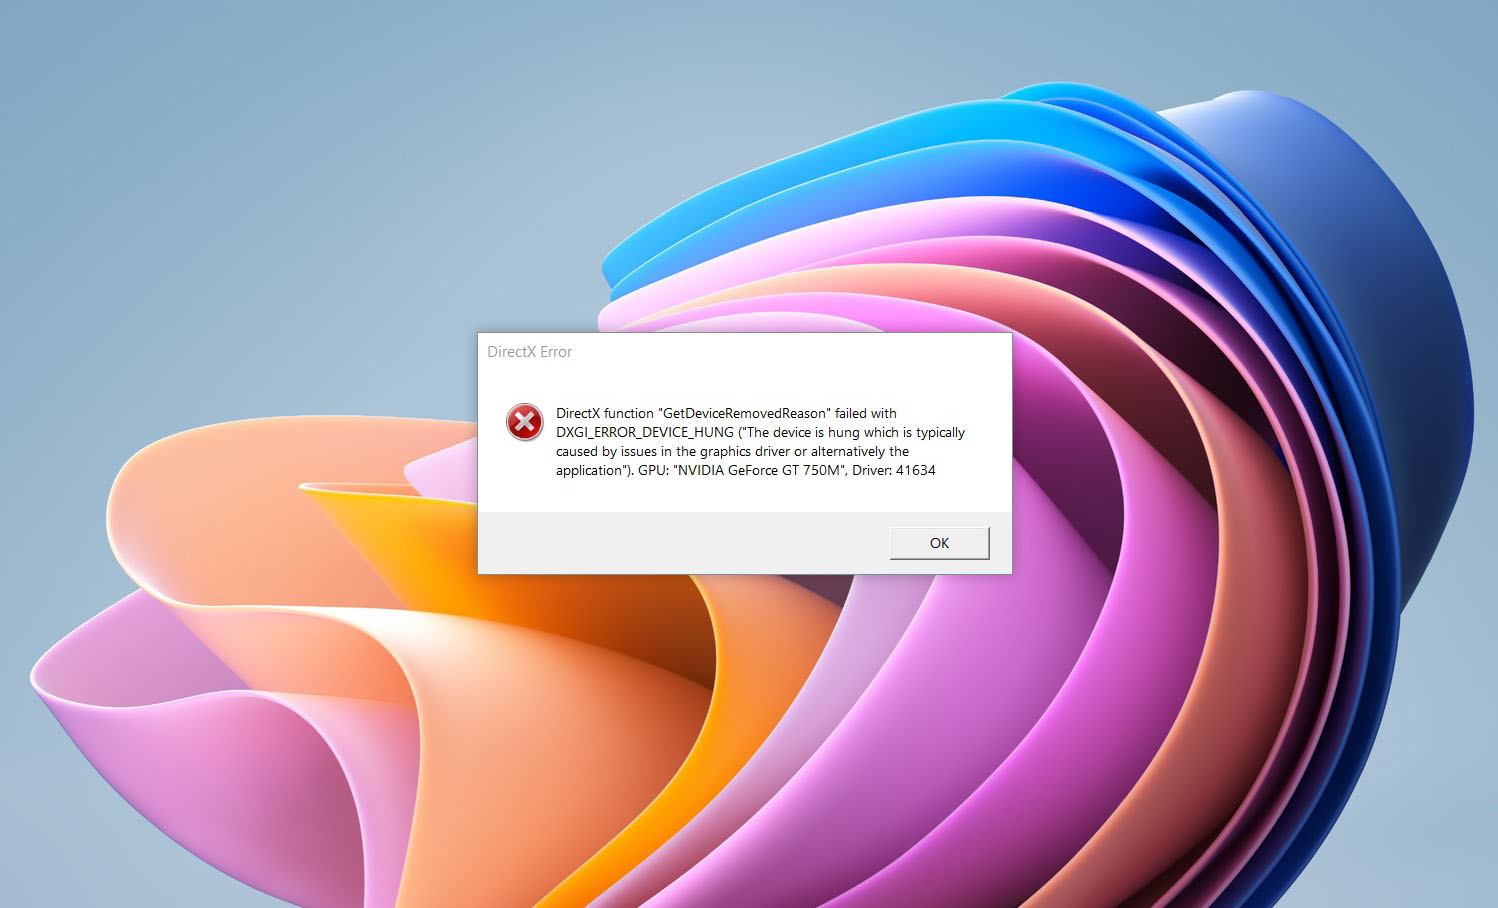
DirectX function GetDeviceRemovedReason error is a DirectX error that comes up during playing games on Windows 11 operating system. Usually, the error occurs in gaming systems powered by AMD and very rarely if any times at all on Nvidia or intel platforms.
If you are one of the gamers affected by this error, fear not because we have a solution for you. Follow provided fix guide in order to correct this error and get back to gaming asap.
1. Update drivers
The first thing of course is to update your graphic card driver, you can do this with your graphic cards panel software or directly in Windows itself but the best practice and one that I would recommend is to go to your graphic card manufacturer’s website and download the latest driver there, and then install it inside Windows 11.
2. Change power mode
Changing power mode inside Windows 11 can solve this issue since sometimes Windows power manager if it is set to anything except best performance can interfere with the proper functioning of the graphic adapter, and because of this error. To change the power setting do the following:
Press ⊞ WINDOWS + I to open settings
Click on the System tab
Select power & battery on the right part
Click on the menu beside power mode
Select the best performance
3. Run SFC scan
Corrupted system files can also cause this error and if previous steps have not resolved it we will use Windows built-in tool SFC scan to find and repair all bad files in windows.
Press ⊞ WINDOWS + S to open the search menu
Type in Windows terminal and run it as administrator
If prompted click on YES on UAC
Press CTRL + SHIFT + 2 to run command prompt
Type in sfc /scannow and press ENTER
Wait for the whole process to finish and then reboot your system
4. Reinstall the problematic game
Sometimes game files can get corrupt and maybe even overwritten, try with game reinstallation if the problem still persists.

 Intel announced that Pat Gelsinger (CEO) and Dr. Ann Kelleher (technology Department head) will discuss Intel’s process and packaging innovations on an upcoming webcast that will happen on July 26th.
The spokesman will talk and provide a deeper look at the process and packaging roadmaps for Intel. As we know Intel is planning to expand its production capabilities, outsource some of its technologies and offer foundry services to other chip design companies.
The strategy will also include a shift to a 7nm process and Intel’s effort to set itself again as leader of CPU performance by 2024.
There is also a chance that we will hear exact plans for Intel in the next three or four years.
Intel didn't reveal much else about what Gelsinger and Kelleher plan to discuss during the webcast. The event will be streamed on July 26 at 2 pm PT via the Intel Newsroom; it will also be available to watch on-demand after the stream ends.
Intel announced that Pat Gelsinger (CEO) and Dr. Ann Kelleher (technology Department head) will discuss Intel’s process and packaging innovations on an upcoming webcast that will happen on July 26th.
The spokesman will talk and provide a deeper look at the process and packaging roadmaps for Intel. As we know Intel is planning to expand its production capabilities, outsource some of its technologies and offer foundry services to other chip design companies.
The strategy will also include a shift to a 7nm process and Intel’s effort to set itself again as leader of CPU performance by 2024.
There is also a chance that we will hear exact plans for Intel in the next three or four years.
Intel didn't reveal much else about what Gelsinger and Kelleher plan to discuss during the webcast. The event will be streamed on July 26 at 2 pm PT via the Intel Newsroom; it will also be available to watch on-demand after the stream ends. 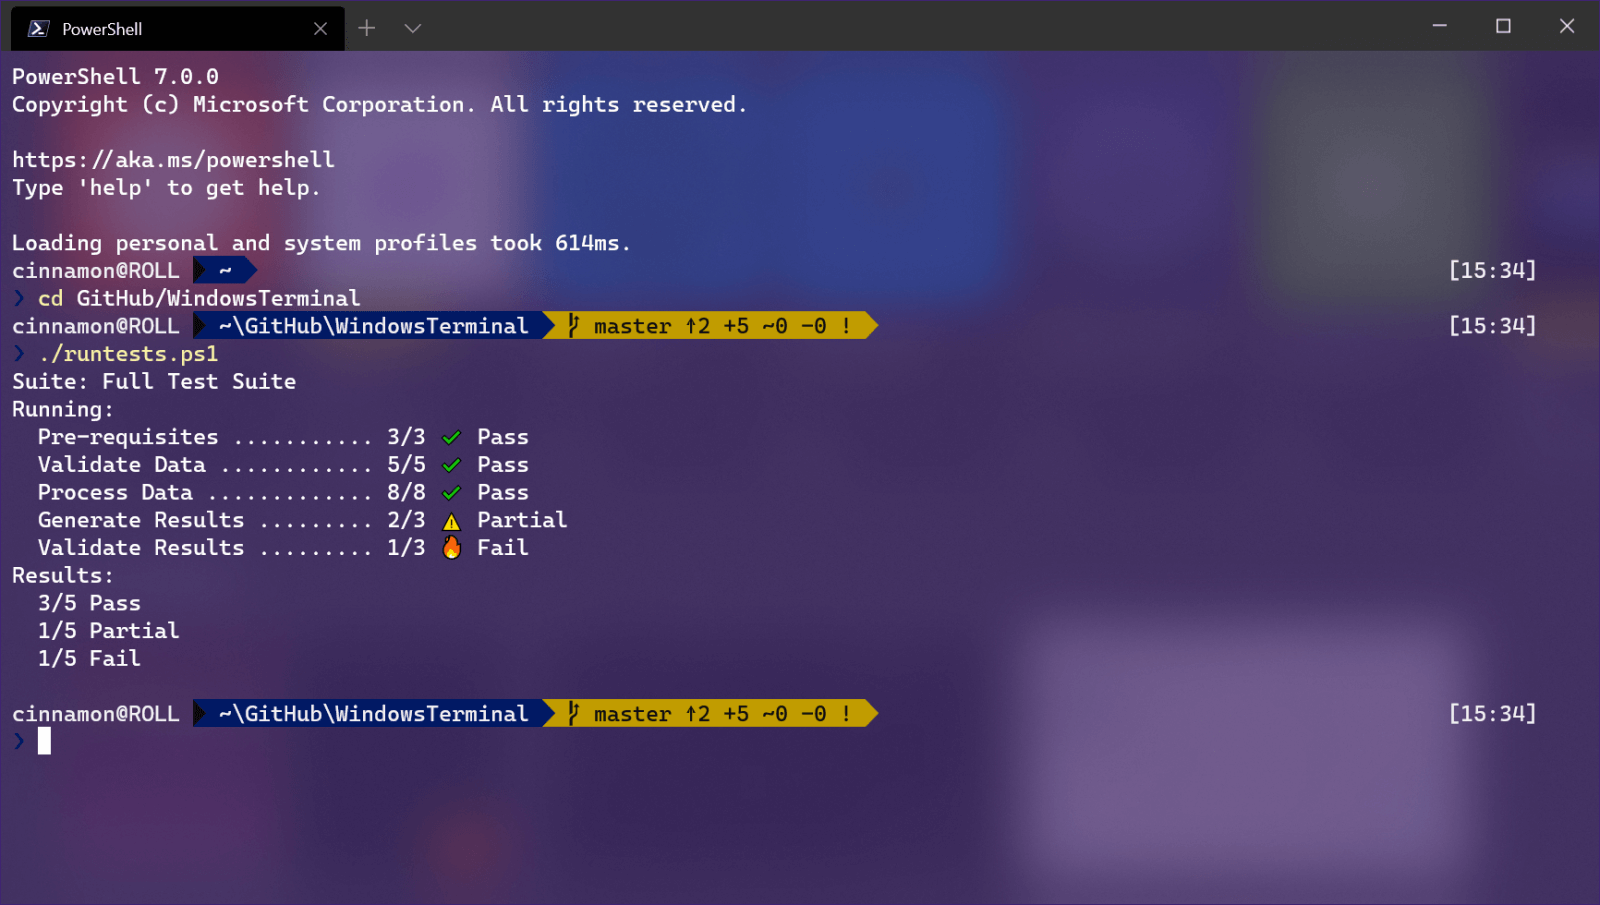 Windows Terminal is a new free Microsoft terminal sort of application. When you open either Power Shell or Command Prompt in Windows they will be opened in different windows, and if you want several of each you will have several windows of each on your screen.
Windows Terminal fixes this by opening each of the Instances of Command Prompt and Power Shell as separate tabs inside itself making it much easier to manage multiple instances of named applications.
You can also run both Power Shell and Command prompt tabs in the same Windows Terminal. Luckily running command prompt and power shell in different tabs is not the only thing you can do. Windows Terminal lets you choose your own theme, it has emoji support, GPU rendering, split panes, and many more customizable options.
Windows 11 will have Terminal as the default command-line environment for opening Power Shell or Command prompt, even Windows Subsystem for Linux (WSL)
Windows Terminal is a new free Microsoft terminal sort of application. When you open either Power Shell or Command Prompt in Windows they will be opened in different windows, and if you want several of each you will have several windows of each on your screen.
Windows Terminal fixes this by opening each of the Instances of Command Prompt and Power Shell as separate tabs inside itself making it much easier to manage multiple instances of named applications.
You can also run both Power Shell and Command prompt tabs in the same Windows Terminal. Luckily running command prompt and power shell in different tabs is not the only thing you can do. Windows Terminal lets you choose your own theme, it has emoji support, GPU rendering, split panes, and many more customizable options.
Windows 11 will have Terminal as the default command-line environment for opening Power Shell or Command prompt, even Windows Subsystem for Linux (WSL)
 Over time Applications change, some for the better some for worse. Some of them even stop receiving updates and are old and vulnerable. Sometimes standards change and some file types are not used anymore. Software evolves along with technology and that is good.
Keeping old and useless applications inside your Windows is not so good. From various exploits to simply taking up space, maybe even slowing down OS it is always wise and good to clean your Windows from unwanted old applications.
In this article, we will be mentioning some relics of old and providing you with an explanation of why you should remove them from your system if by any chance you still have them on it.
Over time Applications change, some for the better some for worse. Some of them even stop receiving updates and are old and vulnerable. Sometimes standards change and some file types are not used anymore. Software evolves along with technology and that is good.
Keeping old and useless applications inside your Windows is not so good. From various exploits to simply taking up space, maybe even slowing down OS it is always wise and good to clean your Windows from unwanted old applications.
In this article, we will be mentioning some relics of old and providing you with an explanation of why you should remove them from your system if by any chance you still have them on it.

 If you are one of the gamers affected by this error, fear not because we have a solution for you. Follow provided fix guide in order to correct this error and get back to gaming asap.