Logo

Bluetooth Headset in Windows gets disconnected

Many Windows 10 users use a Bluetooth headset as these kinds of Audio devices, as you know, lack wires since wires tend to get entangled and break which could get quite inconvenient. This is why using a wireless headphone is more preferable since it’s much simpler, however, using a wireless headphone also means it comes with a charging requirement and if it fails to charge, there is no music or audio or anything that you need a Bluetooth headphone for.

However, wireless headphones are also susceptible to problems as you might encounter some problems when connecting your wireless headphone to your Windows 10 computer. One of these problems include when you try to get sound from the wireless device but nothing happened. This indicates that the Bluetooth headphone is disconnected in some way for some unknown reason even if you’ve already plugged it in. Thus, if you encounter this scenario, then there are several options you need to check out to fix the problem. To start troubleshooting the problem, here are the options you need to use as a reference.

Option 1 – Try turning off the device and turning it back on

The first thing you can do to resolve the problem is to turn off your wireless audio device and wait for a couple of seconds before you turn it back on. In most cases, this should fix the problem. In fact, you can also try to unpair and pair the Bluetooth audio device and see if it fixes the problem or not.

Option 2 – Try to set the headphone as the default device manually

There are times when you plug a headphone, it does not toggle the default audio device. Thus, to fix this issue, you have to set the default audio device to the headphones manually. To do that, follow these steps:

  • First, right-click on the volume icon located on the system tray.
  • Next, select the Open sound settings option to open the Sound section in the Windows 10 Settings app.
  • After that, go to the Output section and select Headphones for the “Choose your output device” option. This should fix the problem for you.

Option 3 – Try running the Bluetooth Troubleshooter

As you know, Windows 10 has various troubleshooters with user-friendly interfaces where you can utilize them to fix issues in your PC. And since you’re dealing with some Bluetooth problem, you have to run the built-in Bluetooth Troubleshooter. To do this, follow these steps:

  • Open the Windows 10 Settings.
  • Then go to Update & Security > Troubleshoot.
  • You should find the option for Bluetooth on your right-hand side – click on it then click on the “Run the troubleshooter” option.
  • Now follow the next screen options.

Option 4 – Try to update or reinstall the Bluetooth driver

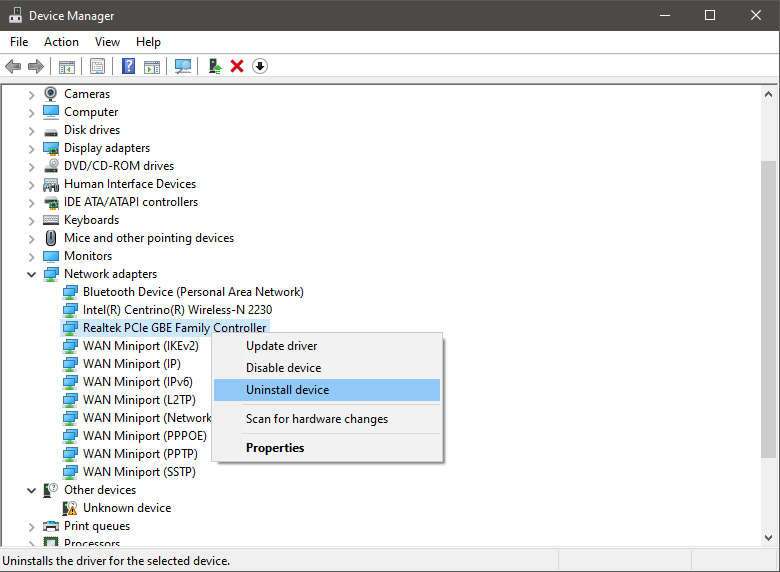
The issue might have something to do with the Bluetooth drivers. It could be that it is outdated and needs to be updated or that you recently updated it and since then you have trouble in removing the Bluetooth devices and so to fix the issue, you can update, roll back or uninstall the Bluetooth drivers. How? Follow the steps below.

  • Tap the Win + X keys to open the Device Manager.
  • Next, look for the Bluetooth device and right-click on it.
  • Select the option “Update driver”.
  • After that, a new popup window will appear. In there, select the option, “Search automatically for updated driver software”.

Note: Checking the update may take a few minutes so you’ll have to wait until it finishes. If it is able to find an update, you must install it. And if you want to reinstall the Bluetooth driver, just select the “Uninstall driver” option and follow the next on-screen instructions that follow.

Do You Need Help with Your Device?

Our Team of Experts May Help
Troubleshoot.Tech Experts are There for You!
Replace damaged files
Restore performance
Free disk space
Remove Malware
Protects WEB browser
Remove Viruses
Stop PC freezing
GET HELP
Troubleshoot.Tech experts work with all versions of Microsoft Windows including Windows 11, with Android, Mac, and more.

Share this article:

You might also like

Enable or Disable Optional Windows Features
As you know, Windows operating system comes with tons of features. Some of which are not intended to be used by normal customers or users directly which means that only a small percentage of the huge user base of the operating system leverages the use of such features. However, they’ve added some major value to the feature list of the operating system. You can find these features under the “Turn Windows Features on and off” option. This indicates that if you want to, you can just type in “Turn Windows Features on and off” in the search box and then enable any feature that you want to enable. Aside from that, there are other ways you can disable or enable the optional Windows Features in your Windows 10 computer.

Option 1 – via Control Panel

  • Open Control Panel and select Uninstall a Program.
  • After that, select the “Turn Windows features On or Off” option on the left side.

Option 2 – via Command Prompt

  • Tap the Win + X combination on your keyboard or right-click on the Start button and then click on Command Prompt (Admin). Alternatively, you can also type “cmd” in the Cortana search box and right-click on the Command Prompt icon, and select the “Run as administrator” option.
  • If a User Account Control or UAC prompt appears, click on Yes.
  • Next, type in the following command to see the list of the available features.
DISM /online /get-features /format:table | more
  • Now all you have to do is copy the name of the feature that you want to enable and for you to do that, you need to execute the following command:
DISM /online /enable-feature /featurename:[Enter the name of the feature here] –All
Note: Now if you want to disable a feature that’s already enabled in your computer, refer to these sub-steps:
  • First, you need to check what features are enabled, and for you to find out, enter this command: DISM /online /get-features /format:table | find “Enabled" | more
  • And if you want to check the detailed information about a particular feature, you can enter this command: DISM /online /get-featureinfo/featurename:[Enter the name of the feature here]

Option 3 – via Windows Powershell

As you know, the Windows Powershell is a very important tool in Windows 10, and a powerful one at that since you can do a lot of things using this command line. So while you use this tool you need to populate the list of available features first and then you have to download the feature your desired feature.
  • Search for PowerShell in the Cortana search box and then run it with administrator privileges.
  • Next, type in the following command to populate the list of available features:
Get-WindowsOptionalFeature –Online
  • After that, enter the following command to install any feature you want to enable from the list of available features:
Get-WindowsOptionalFeature -Online -FeatureName *Type feature name*
  • Now enter the following command to enable your desired feature:
Enable-WindowsOptionalFeature -Online -FeatureName “Type feature name” –all
  • And if you want to disable any enabled feature, just enter the following command:
Disable-WindowsOptionalFeature -Online -FeatureName “Type feature name”

Option 4 – via an external installation source

You also have the option to fetch the latest features from an updated offline source. The source could be an ISO any other type of image or just a folder. So you need to decide if you want to use Windows Powershell or Command Prompt.
  • If you want to use Command Prompt, just enter this command: exe /online /enable-feature /featurename:< /All /Source:<Enter the path of the feature here>
  • If you want to use Windows Powershell, use this command: Install-WindowsFeature –Source “<Enter the path of the feature here>”
Note: If you want to get the latest features, you need to get the latest version of the image of the operating system that you are trying to install the feature from.
Read More
Fixing the Port in use, please wait
Recently, a number of Windows 10 users reported an issue wherein they try to print from their PCs but were unable to and got an error message instead that states, “Port in use, please wait”. However, no matter how long they waited, nothing changed and they were still unable to print from their computers. On the other hand, when some of the users attempted to print wirelessly from their mobile devices, the printing continues which indicates that there is some issue between the computer and the printer. So if you are one of the users who are currently facing this problem, then this post should help. To fix this issue with your Printer, here are some possible fixes you can try that might work.

Option 1 – Run the Printer Troubleshooter

The first thing you can do to fix the “Port in use, please wait” error is to run the Printer Troubleshooter. This built-in troubleshooter in Windows 10 can help you fix most print issues. It checks if you have the latest printer drivers and then tries to fix and update them automatically. Aside from that, it also checks if you have connectivity issues or if the Print Spooler and the required Services are running fine. To run it, follow the steps below.
  • Tap the Win + R keys to open the Run dialog box.
  • Next, type “msdt.exe /id PrinterDiagnostic” in the field and click OK or hit Enter to open the Printer Troubleshooter.
  • Then click the Next button and follow the next on-screen instructions to fix the issue with the printer.

Option 2 – Try updating the Printer drivers

You might also want to try updating your printer drivers. All you have to do is locate the USB Composite Device. For complete details, follow the steps below.
  • First, click the Start button and type “device manager”.
  • Then click on the “Device Manager” from the search results to open it.
  • From there, look for the USB Composite Device option and right-click on it, and select the Update Driver from the options.
  • Restart your PC and then click the “Search automatically for updated driver software” option.
Note: You also have the option to download the latest version of your Printer from the manufacturer’s website.

Option 3 – Try selecting the correct port for your Printer

If the first two options given above didn’t work, then maybe it’s time to select a correct port for your printer since the wrong port has been selected which is why you’re getting the “Port in use, please wait” error.
  • Open “Devices and Printers” from the Start search.
  • Next, look for your printer from the list of devices and right-click on it, and then select Printer Properties.
  • Now go to the Ports tab under the newly opened Properties window and make sure that the port type matches the connection on the list of ports currently in use.
Note: If your printer is using a USB connection then the port should have a USB or DOT 4 in its description but if your printer is using a network connection then it should have the following description:
  • WSD
  • Network
  • IP
And if you notice that there are several listings for the same type of port, you have to change the selection to a different one and then click the OK button to save the changes made.
Read More
VirtualBox displays Black screen
If VirtualBox suddenly displays a black screen without any text or mouse cursor when you are trying to boot a guest operating system, then read on as this post will guide you in fixing such an issue. This black screen occurs when Windows 10 failed to provide a specific setting that VirtualBox requires. Consequently, you will not be able to install or use any guest operating system in VirtualBox even if your PC has virtualization support, the best thing you can do now is to fix this black screen issue. There are two ways you can fix this black screen in VirtualBox, you can either try to disable Hyber-V or disable 3D Acceleration. For more details, refer to each one of the given options below.

Option 1 – Try to disable Hyper-V

Hyper-V is a built-in virtualization tool available in Windows that helps users in creating a virtual machine as well as install a guest operating system without using any third-party tool like VMware, VirtualBox, and many more. However, the problem with this virtualization tool is that some systems cannot run it and VirtualBox simultaneously which is most likely why the screen abruptly turns into black. Thus, you have to disable Hyper-V to resolve the problem. How? Refer to these steps:
  • In the Start Search, type “Turn Windows features on or off” and then click on it from the results.
  • Once you’ve opened the Windows Features window, remove the checkmark from the Hyper-V box.
  • Click the OK button and then restart your computer.
  • Now try to use VirtualBox again and see if the problem is fixed.

Option 2 – Try to disable 3D Acceleration

The guest operating system will use the host computer’s GPU to render 3D graphics if you enable the 3D Acceleration for the virtual machine. To simply put it, it will enhance the graphics of the virtual machine and will let you use 3D graphics. Although it may seem nice, it can actually cause the black screen to appear as well so you might have to disable it to isolate the problem. In fact, a lot of operating systems have failed to use the 3D Acceleration for the guest operating system because of this black screen issue. To disable it, follow these steps:
  • Open VirtualBox on your computer and select the virtual machine.
  • Next, click on the Settings button and go to the Display section.
  • After that, look for a checkbox named “Enable 3D Acceleration” located on your right-hand side and then uncheck it.
  • Save the changes you’ve made and reboot your PC and see if you can now run the virtual machine without any problem.
Read More
How to Fix Camera app Error code 0xa00f4243
Windows 10 has a UWP app for its Camera that you can use to take pictures and videos. However, if you suddenly encounter an error code 0xa00f4243 while using the Camera UWP app, then you’ve come to the right place as this post will provide some potential fixes that you can use to fix the problem. This kind of error could be due to an outdated or corrupted driver or a third-party program. When this error appears on the Camera UWP app, you will see the following error message:
“Close other apps. It looks as though another app is already using the camera. If you need it, here’s the error code: 0xA00F4243 (0xC00D3704)”
To fix the error code: 0xA00F4243 (0xC00D3704) in the Camera UWP app, you can try to run the Windows Store Apps troubleshooter or reset the Camera app or update or reinstall the driver or apply some tweaks in the Registry Editor. In addition, you can also try checking the Windows Services or run the System File Checker.

Option 1 – Try to run the Windows Store Apps troubleshooter

The Windows 10 Store Apps Troubleshooter will help you in fixing the Camera UWP app error code: 0xA00F4243 (0xC00D3704). This is a great built-in tool from Microsoft that helps users fix any app installation issues. So this is worth a try to solve the problem. This built-in tool also helps you fix the Windows 10 Store if it isn’t working. To use the Windows Store Apps Troubleshooter, follow the steps below.
  • Tap Win + I keys again to open the Windows Settings panel.
  • Go to Update & Security and then go to Troubleshoot.
  • Under the Troubleshoot section, on your left-hand side, scroll down to find Window Store Apps.
  • Then click on the Run the troubleshooter option and follow the on-screen instructions and then see if it fixes the problem.

Option 2 – Try to reset the Camera app to fix

As pointed out earlier, you can also reset the Camera app to fix the error. To do so, follow the steps below.
  • The first thing you have to do is go to the My Pictures folder under the C: drive of the File Explorer and then delete the Camera Roll folder.
  • Once you’re done, right-click on an empty area on your screen and create a new folder and name it “Camera Roll”.
  • Then from the Start menu open the Settings app and select System.
  • From there, navigate to the Apps and features section.
  • Now go to Camera and click on the Advanced Options and click the Reset button.

Option 3 – Try to reinstall the drivers for the Camera app

You might want to reinstall the Camera drivers as it could resolve the problem. To do so, refer to these steps:
  • First, boot your computer into Safe Mode.
  • After that, tap the Win + R keys to launch Run.
  • Type in devmgmt.msc  into the box and tap Enter or click OK to open the Device Manager.
  • After that, a list of device drivers will be displayed. From there, look for the driver listed under the Camera section and then, right-click on each entry of the device drivers and select the “Uninstall Device” option from the menu.
  • Now restart your computer.
  • After restarting your computer, go to the Settings app and Check for Updates in the Windows Update section.

Option 4 – Try to use the Registry Editor

  • Tap the Win + R keys to open the Run utility and type “Regedit” in the field and hit Enter to open the Registry Editor.
  • After that, navigate to this registry key: ComputerHKEY_LOCAL_MACHINESOFTWAREWOW6432NodeMicrosoftWindows Media FoundationPlatform
  • Here, look for a DWORD named “EnableFrameServerMode” and if you can’t see it, just create a new DWORD by right-clicking on any empty space.
  • Then select New > DWORD (32-bit) Value and name it as “EnableFrameServerMode”.
  • Double click on the newly created DWORD and set its Value data to “0” and click on OK.
  • Restart your computer and see if it fixes the Camera UWP app error code: 0xA00F4243 (0xC00D3704).

Option 5 – Try checking the Windows Services

Note that this option only applies to computers with Intel Hardware for the Camera.
  • Tap the Win + R keys to open the Run dialog box and type “services.msc” and hit Enter to open the Services Manager.
  • Next, look for the “Intel(R) RealSense(TM) Depth” service from the list of services and double click on it to open its Properties.
  • After that, change its Startup Type to “Automatic” and make sure it’s running and then click on the Apply and OK buttons to save the changes made.
  • Restart your computer and check if the problem has been resolved.

Option 6 – Try running System File Checker or SFC scan

System File Checker or SFC is a built-in command utility that helps in restoring corrupted files as well as missing files. It replaces bad and corrupted system files to good system files. To run the SFC command, follow the steps given below.
  • Tap Win + R to launch Run.
  • Type in cmd in the field and tap Enter.
  • After opening Command Prompt, type in sfc /scannow
The command will start a system scan which will take a few whiles before it finishes. Once it’s done, you could get the following results:
  1. Windows Resource Protection did not find any integrity violations.
  2. Windows Resource Protection found corrupt files and successfully repaired them.
  3. Windows Resource Protection found corrupt files but was unable to fix some of them.
  • Reboot your PC.
Read More
BringMeSports Removal Malware Removal Tutorial

BringMeSports is a browser extension developed by Mindspark Inc. that lets you watch live sports streams, follow sports scores, and catch up on the latest news from the sports world. BringMeSports installs an extension into your browser that replaces your default home page with the MyWebSearch starting page, it also replaces your default search engine, shows additional ads, and while running, collects personal and web browsing data that is later sent back to be Sold / Forwarded to serve ads. While browsing the internet with this extension installed, you will see additional ads and sponsored links appear in your search results. It may even show pop-up ads. Several anti-virus scanners have marked this extension as a Browser Hijacker and are therefore not recommended to keep on your computer.

About Browser Hijackers

Browser hijacking is a type of unwanted software, commonly a web browser add-on or extension, which causes modifications in web browser’s settings. Browser hijacker malware is created for many different reasons. The idea would be to force users to visit particular websites that are trying to increase their website visitor traffic and produce higher ad income. Although it might appear naive, all browser hijackers are damaging and therefore always regarded as security risks. Browser hijackers can even allow other harmful programs without your knowledge to further damage your personal computer.

Signs of browser hijack

There are various symptoms of browser hijacking. Here are a few of them: 1. you notice unauthorized changes to your Internet browser’s homepage 2. you find re-directed to websites you never meant to visit 3. the default search engine is changed and the web browser security settings have been lowered without your knowledge 4. you’re finding new toolbars you have never seen before 5. you observe numerous ads pop up on the browsers or computer screen 6. your web browser gets slow, buggy crashes frequently 7. you are blocked to access those sites of computer security solution providers.

Precisely how browser hijacker infects computers

Browser hijackers attack computer systems through malicious email attachments, downloaded infected computer files, or by going to infected internet sites. They could also come from add-on programs, also called browser helper objects (BHO), web browser extensions, or toolbars. A browser hijacker could also be installed as a part of freeware, shareware, demoware, and pirated programs. Common examples of browser hijackers include CoolWebSearch, Conduit, Coupon Server, OneWebSearch, RocketTab, Snap.do, Delta Search, and Searchult.com. The existence of any browser hijacker malware on your computer might drastically diminish the web browsing experience, track your online activities that result in troublesome privacy concerns, create system stability problems and eventually cause your computer to slow down or to a practically unusable state.

How you can remove browser hijackers

Some hijackers could be removed by deleting the free software they were included with or by removing any extension you have recently added to your system. Having said that, many hijackers are quite tenacious and need specialized tools to eliminate them. And there’s no denying the very fact that the manual fixes and removal methods can certainly be a complicated job for a novice PC user. Also, there are plenty of risks associated with fiddling around with the system registry files.

What To Do If You Cannot Install Any Anti-Malware?

Every malware is bad and the consequences of the damage could vary based on the specific kind of malware. Certain malware variants alter internet browser settings by including a proxy server or modify the computer’s DNS configurations. In these instances, you will be unable to visit certain or all of the websites, and therefore unable to download or install the required security software to remove the infection. If you are reading this, odds are you’re stuck with a malware infection that is preventing you to download or install Safebytes Anti-Malware software on your system. Although this type of issue will be difficult to circumvent, there are a few actions you can take.

Install in Safe Mode

In Safe Mode, you could change Windows settings, uninstall or install some programs, and remove hard-to-delete malware. If the malicious software is set to load automatically when the computer starts, switching to this particular mode may prevent it from doing so. To enter into Safe Mode or Safe Mode with Networking, press F8 while the PC is starting up or run MSCONFIG and look for the “Safe Boot” options in the “Boot” tab. Once you are in Safe Mode, you can try to install your antivirus software application without the hindrance of the malware. After installation, run the malware scanner to get rid of most standard infections.

Utilize an alternate internet browser to download the anti-malware application

Web-based viruses could be environment-specific, aiming for a particular browser or attacking particular versions of the browser. The most effective way to overcome this issue is to select a web browser that is renowned for its security features. Firefox comprises built-in Malware and Phishing Protection to keep you safe online. Create a portable anti-malware for removing viruses Another option is to create a portable anti-malware program onto your USB stick. To run anti-virus using a USB flash drive, follow these simple steps: 1) Download the anti-malware on a virus-free PC. 2) Insert the USB drive on the same system. 3) Run the setup program by double-clicking the executable file of the downloaded software, which has a .exe file format. 4) Select the drive letter of the pen drive as the place when the wizard asks you exactly where you want to install the anti-malware. Do as instructed on the screen to complete the installation process. 5) Transfer the flash drive from the uninfected PC to the infected PC. 6) Run the Safebytes Anti-malware directly from the flash drive by double-clicking the icon. 7) Click the “Scan” button to run a full system scan and remove malware automatically.

Protect Your PC & Privacy With SafeBytes Anti-Malware

If you are looking to buy anti-malware for your PC, there are lots of brands and packages for you to consider. A few of them do a great job in getting rid of malware threats while some will affect your PC themselves. You need to be careful not to pick the wrong product, especially if you buy a premium program. One of the recommended software is SafeBytes AntiMalware. SafeBytes carries a very good reputation for top-quality service, and clients appear to be very happy with it. Safebytes is among the well-established computer solutions firms, which provide this complete anti-malware application. Using its cutting-edge technology, this application will assist you to eliminate multiples types of malware such as viruses, PUPs, trojans, worms, ransomware, adware, and browser hijackers. SafeBytes has got a variety of features that can help you protect your computer from malware attacks and damage. Let’s check out a few of them below: Robust Anti-malware Protection: With a critically acclaimed malware engine, SafeBytes offers multilayered protection which is intended to catch and get rid of viruses and malware which are hidden deep in your computer system. Active Protection: SafeBytes provides real-time active checking and protection against all known viruses and malware. It’ll continuously monitor your laptop or computer for hacker activity and also provides users with superior firewall protection. “Fast Scan” Abilities: SafeBytes Anti-Malware has a multi-thread scan algorithm that works up to 5 times faster than any other anti-malware software. Internet Security: Safebytes assigns all sites a unique safety score that helps you to have an idea of whether the webpage you are going to visit is safe to view or known to be a phishing site. Lightweight Utility: SafeBytes is a lightweight and user-friendly anti-virus and anti-malware solution. Since it utilizes negligible computer resources, this application leaves the computer’s power exactly where it belongs: with you actually. Premium Support: Support service is available for 24 x 7 x 365 days via email and chats to answer your queries.

Technical Details and Manual Removal (Advanced Users)

If you wish to manually remove BringMeSports without the use of an automated tool, it may be possible to do so by removing the program from the Windows Add/Remove Programs menu, or in cases of browser extensions, going to the browsers AddOn/Extension manager and removing it. You will likely also want to reset your browser. To ensure the complete removal, manually check your hard drive and registry for all of the following and remove or reset the values accordingly. Please note that this is for advanced users only and may be difficult, with incorrect file removal causing additional PC errors. In addition, some malware is capable of replicating or preventing deletion. Doing this in Safe Mode is advised. The following files, folders, and registry entries are created or modified by BringMeSports
Files: C:Program Filesbringmesports_1c chrome extensionbarBringMeSportsCrxSetup.exe C:Program Filesbringmesports_1c chrome extensiont8sql.dll C:Program Filesbringmesports_1c chrome extensionBringMeSportsCrxSetup.exe C:Program Filesbringmesports_1c chrome extensionBringMeSportsCrxSetup.05F72CDF-5595-450B-9BAB-B1F6C606AAEC.exe C:Program Filesbringmesports_1c chrome extensionBringMeSportsCrxSetup.1E4C7E0D-19E7-4C18-ADB3-3D45FC4BE84C.exe C:Program Filesbringmesports_1c chrome extensionBringMeSportsCrxSetup.85D40F0D-233C-463F-8BAB-F6D446902D65.exe C:Program Filesbringmesports_1c chrome extensionBringMeSportsCrxSetup.A94A3339-330B-4B96-B05A-B909E6BB85A1.exe C:Program Filesbringmesports_1c chrome extensionBringMeSportsCrxSetup.EEE1FB37-85E3-49E8-BC44-36CC97CE3B73.exe C:Program Filesbringmesports_1c chrome extensionsqlite3.dll C:Program Files (x86)BringMeSports_1cEI C:Program Files (x86)BringMeSports_1c C:Users%USERNAME%AppDataLocalBringMeSports_1c C:Users%USERNAME%AppDataLocalIAC C:Users%USERNAME%AppDataLocalLowBringMeSports_1cEI C:Users%USERNAME%AppDataLocalLowBringMeSports_1c C:Users%USERNAME%AppDataRoamingMozillaFirefoxProfilesXXX.defaultextensionscffxtbr@BringMeSports_1c.com C:Users%USERNAME%AppDataLocalGoogleChromeUserDataDefaultExtensionsllkjooekcinmdmojmfdjhidbakfpepod Registry: HKEY_CURRENT_USERMicrosoftInternet ExplorerApproved Extensions, value: F653D037-97FA-4755-98C1-7F382EEB59A7 HKEY_CURRENT_USERMicrosoftInternet ExplorerApproved Extensions, value: CC53BD19-7B23-43B0-AB7C-0E06C708CCED HKEY_CURRENT_USERMicrosoftInternet ExplorerApproved Extensions, value: 002D1BA6-4766-4D7D-82B8-F49439C66F97 HKEY_CURRENT_USERMicrosoftInternet ExplorerToolbar, value: cc53bd19-7b23-43b0-ab7c-0e06c708cced HKEY_CURRENT_USERWow6432NodeMicrosoftInternet ExplorerToolbar, value: cc53bd19-7b23-43b0-ab7c-0e06c708cced HKEY_CURRENT_USERMicrosoftWindowsCurrentVersionExtPreApprovedbc61ca7a-6b81-47ec-b62d-ae1a236cadb9 HKEY_CURRENT_USERMicrosoftWindowsCurrentVersionExtPreApproved82c7004a-078e-468c-9c0f-2243618ff7cb HKEY_CURRENT_USERMicrosoftWindowsCurrentVersionExtPreApproved6285c254-4465-4f8b-a009-5f42ab02c291 HKEY_CURRENT_USERMicrosoftWindowsCurrentVersionExtPreApprovedA8CC25D-66FF-41DF-B3B4-416079EF8F87 HKEY_CURRENT_USERMicrosoftWindowsCurrentVersionexplorerBrowser Helper Objectsf653d037-97fa-4755-98c1-7f382eeb59a7 HKEY_CURRENT_USERMicrosoftWindowsCurrentVersionexplorerBrowser Helper Objects02d1ba6-4766-4d7d-82b8-f49439c66f97 HKEY_CURRENT_USERWow6432NodeMicrosoftWindowsCurrentVersionExtPreApprovedf0c8ccc2-baaa-4236-ad0a-22b5a401b9ef HKEY_CURRENT_USERWow6432NodeMicrosoftWindowsCurrentVersionExtPreApprovedA8CC25D-66FF-41DF-B3B4-416079EF8F87 HKEY_CURRENT_USERWow6432NodeMicrosoftWindowsCurrentVersionexplorerBrowser Helper Objectsf653d037-97fa-4755-98c1-7f382eeb59a7 HKEY_CURRENT_USERWow6432NodeMicrosoftWindowsCurrentVersionexplorerBrowser Helper Objects02d1ba6-4766-4d7d-82b8-f49439c66f97 HKEY_CURRENT_USERMicrosoftInternet ExplorerLow RightsElevationPolicyfa460720-7b38-421d-981c-66f0ae288fb9 HKEY_CURRENT_USERMicrosoftInternet ExplorerLow RightsElevationPolicya2b4da91-a53c-4a84-b486-40080de13a9b HKEY_CURRENT_USERMicrosoftInternet ExplorerLow RightsElevationPolicy89b7ae32-9c52-41d6-a64d-14d7bdec9c58 HKEY_CURRENT_USERMicrosoftInternet ExplorerLow RightsElevationPolicy32a63172-5bcc-4d7e-9fe8-072eee6c287e HKEY_CURRENT_USERWow6432NodeMicrosoftInternet ExplorerLow RightsElevationPolicya2b4da91-a53c-4a84-b486-40080de13a9b HKEY_CURRENT_USERWow6432NodeMicrosoftInternet ExplorerLow RightsElevationPolicy89b7ae32-9c52-41d6-a64d-14d7bdec9c58 HKEY_CURRENT_USERWow6432NodeMicrosoftInternet ExplorerLow RightsElevationPolicy32a63172-5bcc-4d7e-9fe8-072eee6c287e HKEY_CURRENT_USERWow6432NodeMicrosoftInternet ExplorerLow RightsElevationPolicy1856a7bd-de8c-488b-aa7a-5682d13166fc HKEY_CURRENT_USERWow6432NodeMicrosoftInternet ExplorerLow RightsElevationPolicy164ea1fc-b0a0-4202-8c65-e4ba4d54a3ae HKEY_CURRENT_USERMicrosoftWindowsCurrentVersionExtStatsF653D037-97FA-4755-98C1-7F382EEB59A7 HKEY_CURRENT_USERMicrosoftWindowsCurrentVersionExtStatsCC53BD19-7B23-43B0-AB7C-0E06C708CCED HKEY_CURRENT_USERMicrosoftWindowsCurrentVersionExtSettingsCC53BD19-7B23-43B0-AB7C-0E06C708CCED HKEY_CURRENT_USERMicrosoftWindowsCurrentVersionExtSettings02D1BA6-4766-4D7D-82B8-F49439C66F97 HKEY_CURRENT_USERWow6432NodeMicrosoftInternet ExplorerSearchScopes8c9ef753-beb6-4582-b653-93ac59274437 HKEY_CURRENT_USERMicrosoftInternet ExplorerSearchScopes8c9ef753-beb6-4582-b653-93ac59274437 HKEY_CURRENT_USERMicrosoftInternet ExplorerDOMStoragebringmesports.com HKEY_CURRENT_USERMicrosoftInternet ExplorerDOMStoragebringmesports.dl.tb.ask.com HKEY_CURRENT_USERBringMeSports HKEY_CURRENT_USERMicrosoftInternet ExplorerDOMStoragebringmesports.dl.myway.com HKEY_LOCAL_MACHINEHKEY_CURRENT_USER[APPLICATION]MicrosoftWindowsCurrentVersionUninstall..Uninstaller BringMeSports_1cbar Uninstall Internet Explorer BringMeSports_1cbar Uninstall Firefox BringMeSportsTooltab Uninstall Internet Explorer
Read More
How to Obliterate PyLocky Ransomware

What is PyLocky ransomware? And how does it execute its attack?

PyLocky ransomware is a file-locking malware created in order to lock important files and demand ransom from victims in exchange for data recovery. This new ransomware uses the .lockymap extension in marking the files it encrypts. It starts to execute its attack by dropping the following malicious payload in the system:
Name: facture_4739149_08.26.2018.exe SHA256:8655f8599b0892d55efc13fea404b520858d01812251b1d25dcf0afb4684dce9 Size: 5.3 MB
After dropping its malicious payload, this crypto-malware connects the infected computer to a remote server where it downloads more malicious files and places them on system folders. It then applies a data gathering module used to gather data about the user and the computer. The malicious files that were downloaded earlier along with the data obtained are used for another module called stealth protection. This allows PyLocky ransomware to execute its attack without detection from any security or antivirus programs installed in the system. It also modifies some registry keys and entries in the Windows Registry such as:
  • HKEY_CURRENT_USERControl PanelDesktop
  • HKEY_USERS.DEFAULTControl PanelDesktop
  • HKEY_LOCAL_MACHINESoftwareMicrosoftWindowsCurrentVersionRun
  • HKEY_CURRENT_USERSoftwareMicrosoftWindowsCurrentVersionRun
  • HKEY_LOCAL_MACHINESoftwareMicrosoftWindowsCurrentVersionRunOnce
  • HKEY_CURRENT_USERSoftwareMicrosoftWindowsCurrentVersionRunOnce
Once all the modifications are carried out, PyLocky ransomware will begin encrypting its targeted files using a sophisticated encryption cipher. Following the encryption, it adds the .lockymap extension to each one of the encrypted files and releases a ransom note named “LOCKY-README.txt” which contains the following content:
“Please be advised: All your files, pictures document and data has been encrypted with Military Grade Encryption RSA ABS-256. Your information is not lost. But Encrypted. In order for you to restore your files, you have to purchase a Decrypter. Follow these steps to restore your files. 1* Download the Tor Browser. ( Just type in google “Download Tor“ 2‘ Browse to URL: http://4wcgqlckaazungm.onion/index.php 3* Purchase the Decryptor to restore your files. It is very simple. If you don’t believe that we can restore your files, then you can restore 1 file of image format for free. Be aware the time is ticking. Price will be doubled every 96 hours so use it wisely. Your unique ID : CAUTION: Please do not try to modify or delete any encrypted file as it will be hard to restore it. SUPPORT: You can contact support to help decrypt your files for you. Click on support at http://4wcgqlckaazungm.onion/index.php”

How does PyLocky ransomware spread over the web?

PyLocky ransomware spreads using malicious spam email campaigns. Creators of this threat embed an infected attachment to spam emails and send them using a spambot. Crooks may even use deceptive tactics to trick you into opening the malware-laden immediately which is something you must not do. Thus, before opening any emails, make sure that you’ve thoroughly checked them. To successfully obliterate PyLocky ransomware from your computer, refer to the removal guide laid out below.
  • Step 1: Launch the Task Manager by simply tapping Ctrl + Shift + Esc keys on your keyboard.
  • Step 2: Under the Task Manager, go to the Processes tab and look for the process named facture_4739149_08.26.2018.exe and any suspicious-looking process which takes up most of your CPU’s resources and is most likely related to PyLocky ransomware.
  • Step 3: After that, close the Task Manager.
  • Step 4: Tap Win + R, type in appwiz.cpl and click OK or tap Enter to open Control Panel’s list of installed programs.
  • Step 5: Under the list of installed programs, look for PyLocky ransomware or anything similar, and then uninstall it.
  • Step 6: Next, close the Control Panel and tap Win + E keys to launch File Explorer.
  • Step 7: Navigate to the following locations below and look for PyLocky ransomware’s malicious components such as facture_4739149_08.26.2018.exe and LOCKY-README.txt as well as other suspicious files, then delete all of them.
%TEMP% %WINDIR%System32Tasks %APPDATA%MicrosoftWindowsTemplates %USERPROFILE%Downloads %USERPROFILE%Desktop
  • Step 8: Close the File Explorer.
  • Step 9: Tap Win + R to open Run and then type in Regedit in the field and tap enter to pull up Windows Registry.
  • Step 10: Navigate to the following path:
HKEY_CURRENT_USERControl PanelDesktop HKEY_USERS.DEFAULTControl PanelDesktop HKEY_LOCAL_MACHINESoftwareMicrosoftWindowsCurrentVersionRun HKEY_CURRENT_USERSoftwareMicrosoftWindowsCurrentVersionRun HKEY_LOCAL_MACHINESoftwareMicrosoftWindowsCurrentVersionRunOnce HKEY_CURRENT_USERSoftwareMicrosoftWindowsCurrentVersionRunOnce
  • Step 11: Delete the registry keys and sub-keys created by PyLocky ransomware.
  • Step 12: Close the Registry Editor and empty the Recycle Bin.
Try to recover your encrypted files using the Shadow Volume copies Restoring your encrypted files using Windows Previous Versions feature will only be effective if PyLocky ransomware hasn’t deleted the shadow copies of your files. But still, this is one of the best and free methods there is, so it’s definitely worth a shot. To restore the encrypted file, right-click on it and select Properties, a new window will pop up, then proceed to Previous Versions. It will load the file’s previous version before it was modified. After it loads, select any of the previous versions displayed on the list like the one in the illustration below. And then click the Restore button.
Read More
Fix The update isn’t applicable in Windows
There are times when you install a Windows update to your Windows 10 computer but you only got an error message saying, “The update isn’t applicable to your computer”. This is unusual as Windows was the one that downloaded them in the first place. To understand the reason behind this error, read on as this post will also give you a couple of suggestions you can try to fix the problem. One of the main reasons why this error occurs is that your computer might not have the required installed updates and many more. Other reasons include:
  1. The update might be replaced. There are instances when a newer Windows version is already available on the computer and that the version you are trying to manually install is an older version which is why the Windows update failed.
  2. The update might already be installed. There are times when the update process is still in progress and the earlier payload might have already been installed.
  3. It could also be that it’s a wrong update for architecture. As you know, updates are designed accordingly based on the architecture of the computer so if the update you are trying to install does not match the architecture of your CPU then it’s no wonder you’re getting an error message.
  4. Your computer might be missing a prerequisite update. There are Windows updates that depend on other updates so if you missed one and you’re installing another one, it could be the reason why you’re getting the error.
To fix the problem, here are some suggestions that might help.

Option 1 – Try verifying the package and the Processor Architecture

As pointed out earlier, updates are made according to the Windows versions. Thus, if one of the updates failed to install, you need to check if it’s applicable or not. The best way to do that is by searching the Windows update name on the official website of Windows. It could be that the Processor Architecture is not compatible with the Windows Update you are trying to install. If you have an X86-based processor, you can’t install x64-based installations of Windows and vice-versa. This usually happens when you’ve downloaded the update manually and then tried installing it.

Option 2 – Try checking if the update is old

The issue might be because you are trying to install an old Windows update which is why it didn’t work. To check, go to Settings > Update and Security > View Update history. From there, you can look for the update.

Option 3 – Try checking if the update is already installed

To verify the update, just go to the Windows Update history once more as you did in option 2, and then see if the update is already installed or not.

Option 4 – Try checking the prerequisites

AS mentioned earlier, there are some updates that depend on other updates before they get installed on your computer. The best way to verify is by checking the Microsoft Knowledge Base (KB). And to verify if the prerequisite updates are installed or not, just run the command below in PowerShell:
get-hotfix KB1111111, KB2222222, KB3333333
Note: In the command given above, you need to replace “KB1111111, KB2222222, KB3333333” with the actual update KB numbers.

Option 5 – Try running the Windows Update Troubleshooter

As you know, Windows 10 has various auto-repair built-in tools to help users fix small issues which used to get fixed manually. And in this case, you will need the Windows Update Troubleshooter to fix the issue.
  • Go to Settings and click on Update and Security.
  • From there, click Troubleshoot and click on Windows Update and then click the “Run the troubleshooter” option.
  • After that, it will try to detect and automatically fix common issues in the Windows Updates which can be resolved by Windows itself. Note that the process may take several minutes before it completes so you need to wait until it’s done. Once it’s done, in case you have some pending update that wasn’t realized by the system early on, it will apply the fix right away and restart the Windows Update service.
Read More
Steps to Fixing Error Code 38

Error Code 38 – What is it?

Error Code 38 is a device driver error that users encounter on any Windows 2000 operating system and its following versions.

It occurs when the peripheral device that you connect to your PC cannot be accessed due to an inability of the Windows system to acknowledge the driver as a previous record of the driver being loaded is found in its memory.

It is a common error that users come across and appears on your PC with the following message:

“Windows cannot load the device driver for this hardware because a previous instance of the device driver is still in memory. (Code 38)”

Solution

driverfix boxError Causes

Error Code 38 is prompted when incomplete program files are left in the Windows system which damage or corrupt its files. There are various factors that contribute to this, some of which are:

  • An incomplete program installation
  • An incomplete program uninstallation
  • Hardware is not removed properly
  • System recovery from viruses
  • An improper system shut down

The above triggers are very likely to create incomplete files within the Windows registry thereby leading to its damage and corruption.

This is especially true in the case of your PC when it has recovered from viruses when using anti-virus software. The anti-virus in its effort to remove the virus also could remove the files which contain them thereby increasing the risk of the error code.

These damaged files can severely impact the health of your PC and are imperative to fix it immediately to prevent further problems.

Further Information and Manual Repair

Although this error code may pose serious problems for your PC, thankfully, it is very similar to other PC driver errors and thus is an easy one to get rid of. Here are various methods that you can use to get your PC running smoothly again.

Method 1 – Restart your PC

The easiest method you can use to solve your PC error code is to simply restart your PC. It may be that the error prompted upon connecting the device you have connected is merely a temporary problem, and upon restart, will resume functioning smoothly.

Method 2 – Run the Troubleshooting Wizard

If restarting your PC does not help, you will have to find the exact nature of the problem by running the troubleshooting wizard for the device and then address the problem accordingly. To do this, proceed with the following steps:

  1. Run Device Manager on your PC
  2. Click on the program under the installed programs that is creating problems for you
  3. Click on the ‘General’ Tab
  4. Click ‘Troubleshoot’
  5. Upon opening, the Troubleshooting Wizard will ask a series of questions regarding the error. Answer the questions and follow its directions for solving the error code.

After following the directions of the Troubleshooting wizard, make sure to restart your PC for the changes to take effect. Now check if your device is still causing problems.

Method 3 – Use System Restore

If the error persists, you can use system restore to eliminate the problem. Here is how to do so:

  1. Log in using an Administrator account
  2. Click ‘Start’ button and select All Programs > Accessories > System Tools > System Restore
  3. Click ‘Restore my computer to an earlier time’ and click ‘Next’
  4. Select the last Windows to restore point from the ‘On this list, click a restore point’ list, and click ‘Next’
  5. Click ‘Next’ on the confirmation window to proceed
  6. Restart your PC after restoration is complete

By restoring the system via a last saved system checkpoint, you can obtain undamaged Windows system files that can help resolve the error code.

Method 4 – Manually uninstall and reinstall the device driver

If using system restore does not work either, you may have to resort to manually uninstalling and then reinstalling the device driver causing the problem.

This would be necessary since the remaining incomplete files due to a partial removal or installation of programs are responsible for the error code. By uninstalling and reinstalling the device driver program, it would lead to the completion of the files.

You can do this by firstly logging in as Administrator and opening Device Manager. Select the device that is causing the problem and double click it; make sure that the peripheral is connected properly to the PC.

Upon opening, click on the ‘Driver’ tab and then select ‘Update Driver’. Make sure to refer to the system documentation that you received with your PC or computer to check for the motherboard details and driver specifics.

Method 5 – Use software to automatically download the driver

Manually uninstalling and reinstalling the driver will do the trick; however, it may be time-consuming especially when you would have to resort to your hardware user manual.

Using a program such as DriverFIX can save you a lot of time and frustration in having your device to work properly on your computer.

DriverFIX, with its user-friendly approach to help you fix your PC issues, comes with an integrated database that detects which drivers you need to reconfigure within just a few seconds and downloads it automatically.

It further ensures that your drivers are installed in their entirety leaving no room for any incomplete files to remain that create Error Code 38, or any other driver-related errors for that matter.

It also has the added advantage of being able to backup and restores your files should there be the slightest possibility of system file damage. DriverFIX is the answer to fixing your PC error codes accurately and quickly.

Click here to download DriverFIX to fix Error Code 38 quickly and effectively!

Read More
Fix MS Store Error 0x80131500 in Windows
One of the essential parts of the Windows 10 operating system is the Microsoft Store as it is the distribution hub of numerous applications such as Netflix, Facebook, and many more. In fact, Microsoft is planning to make it a hub not just for UWP applications but also Windows Classic applications. Microsoft has already built a bridge with the power of Project Centennial which allows developers to migrate and upload their Windows Classic applications to the Microsoft Store. Although the Microsoft Store has been constantly improving, there are still times when you might face an error while using it. One of these errors is error 0x80131500. When you encounter this error, you will get the following error message on your screen:
“Try that again, Something happened at our end, Waiting a bit might help, The error code is 0x80131500 in case you need it.”
To fix this error, you can try changing your internet connection, toggle the date & time settings, change DNS, create a new user account, run the Microsoft Store Apps troubleshooter or reset the Microsoft Store as well re-register it using Windows PowerShell.

Option 1 – Try changing your internet connection

The first thing you can do is to change your internet connection. If you are using Ethernet, you can try to connect to a Wi-Fi connection instead and see if it helps.

Option 2 – Try to toggle the Date and Time settings

The first thing you can try is to sync the Date and Time of your computer as the wrong Date and Time settings are one of the most common causes of connection problems like the error 0x80131500. This is because of the incompatibility between the SSL Certificate validation date and the System Clock. Thus, you have to sync your System Clock. Refer to the steps below to do so.
  • Start by tapping the Win + I keys to open the Windows Settings.
  • Next, go to Time & Language > Date & time.
  • From there, turn the toggle on for the “Set time automatically and Set time zone automatically” option on the right-side panel.
  • After that, click on Region & language located on the left side panel and make sure that the Country or region on the right-side panel is set to the country you live in.
  • Now close the Settings app and restart your computer and see if it fixes the problem or not.

Option 3 – Try to change the DNS Server

In this option, you can try changing your current DNS settings to the Google Public DNS as it could also help in fixing error 0x80131500. To do so, follow the steps below.
  • The first thing you have to do is right-click on the network icon in the Taskbar and select Network and Sharing Center.
  • Next, click on the “Change Adapter Settings” option.
  • After that, search for the network connection that you are using to connect to the internet. Note that the option might be “Wireless Connection” or “Local Area Connection”.
  • Right-click on your network connection and click on Properties.
  • Then select the new window to choose the “Internet Protocol 4 (TCP/IPv4)” option.
  • After that, click on the Properties button and click the checkbox in the new window for the option “Use the following DNS server addresses”.
  • Type in “8.8.8.8” and “8.8.4.4” and click OK and exit.

Option 4 – Try to create a new Administrator User account

If you have a standard account, you can try creating a new account but this time, you create an administrator user account and then see if the error is fixed or not. Note that you have to sign in with your main account before you can create an admin account.

Option 5 – Run the Microsoft Store Apps troubleshooter

The Microsoft Store Apps Troubleshooter will help you in fixing the error 0x80131500. This is a great built-in tool from Microsoft that helps users fix any app installation issues. So this is worth a try to solve the problem. This built-in tool also helps you fix the Windows 10 Store if it isn’t working. To use the Windows Store Troubleshooter, follow the steps below.
  1. Tap Win + I keys again to open the Windows Settings panel.
  2. Go to Update & Security and then go to Troubleshoot.
  3. On your right-hand side, scroll down to find the Windows Store Apps and then click on the Run the troubleshooter option and see if it fixes the problem.

Option 6 – Try to reset the Microsoft Store cache

Just like browsers, Microsoft Store also caches as you view apps and games so it is most likely that the cache is no longer valid and must be removed. To do so, follow the steps below.
  • Right-click on the start button and click on Command Prompt (administrator).
  • Next, type in the command, “exe” and tap Enter. Once you do, the command will clear the cache for the Windows Store app.
  • Now restart your PC and afterward, try opening Microsoft Store again and then try to install your app or update your computer again.

Option 7 – Try to re-register the Microsoft Store app via PowerShell

  • Tap the Win + X key combination or right-click on the Start button and click on the Windows PowerShell (Admin) option.
  • If a User Account Control or UAC prompt appears, just click on Yes to proceed and open the Windows PowerShell window.
  • Next, type in or copy-paste the following command to re-register the Microsoft Store app and tap Enter:
powershell -ExecutionPolicy Unrestricted Add-AppxPackage -DisableDevelopmentMode -Register $Env:SystemRootWinStoreAppxManifest.xml
  • Wait for the process to be completed and then restart your computer.
Read More
Repair Windows 10 Update Error 0x80070003, 0x20007

Error Code 0x80070003, 0x20007 - What is it?

Update Error 0x80070003, 0x20007 One of the most common errors encountered by users who updated to Windows 10 is the Error Code 0x80070003-0x20007. Normally, this error code is accompanied by the message saying “Windows could not search for new updates. An error occurred while checking for new updates or your computer” or “Error(s) found: Code 0x80070003 Windows update encountered an unknown error”.

This update-related error is often encountered any time while your device automatically installs updates once there’s an available system update or during manually installing updates for a specific app. Regardless if you are using a tablet, laptop, or PC, this update-related error could occur after upgrading your system to Windows 10.

Solution

Restoro box imageError Causes

There are several reasons why the update-related Error Code 0x80070003-0x20007 occurs. This includes the following:

  • Windows Firewall-related problem
  • A conflict in your device’s system might be present
  • Not enough space in your RAM
  • Not enough space in your installation disk
  • Problems in your system memory

Further Information and Manual Repair

An effective way to address problems like the Error Code 0x80070003-0x20007 is by applying certain manual repair methods. However, ensure that you strictly follow instructions since one slight slip-up might result in critical issues. If you’re not knowledgeable enough, it would be best to consult help from a professional Windows technician or you can make use of an automated tool to solve any issues you’re encountering.

When you encounter the update-related Error Code 0x80070003-0x20007, you must take action immediately to address the problem to lessen the risk of losing all your data or damaging the Windows registry host.

In fixing Error Code 0xC1900101-0x30018, you can repeat the same steps used for 0xc000021a (Method One) then apply the following steps as well:

  • Uninstall your antivirus prior to upgrading your system
  • Ensure that you have a simple machine name with no periods, dashes, or hyphens.
  • Restart several times then try again.
  • Disable the General USB Devices in your machine like the Smart Card Reader.
  • If you use a SCSI hard disk, ensure that you have available drivers you can use as your storage such as a thumb drive, and ensure as well that it is connected. Once you’re on the Windows 10 setup, click on Custom Advanced Option then use the Load Driver command in order to load the right driver for the SCSI drive. If this fails, try switching to an IDE-based hard disk.
  • Once done, perform a clean boot then try restarting the device again.
  • If you are upgrading your system using the .ISO file, disconnect your device from the Internet during setup. If your device is connected to the Internet by LAN or Wi-Fi, you need to disable both first then proceed to set up again.
  • If you’re performing the update through Windows Update, disconnect from the Internet LAN or Wi-Fi once the download reaches 100% then proceed with the installation.
  • If this still does not work, you can try using the .ISO file in upgrading.
  • Switch to a local account if your machine is connected to a domain.
  • Disconnect all external devices attached to your machine including gaming controllers, external hard disk, USB keys, and printers.

If the above steps still do not work, you can try performing a repair by doing the following steps:

  1. Put the installation disc into the disc drive. Afterward, boot the computer.
  2. Once the message: “Press any key to boot from CD or DVD…” appears, press any key.
  3. Choose a language, currency, time, and a keyboard or another input method. Click Next.
  4. Click on Repair your computer
  5. Select the operating system that you wish to repair then click Next
  6. Open the Command Prompt by clicking it in the System Recovery Options dialog box.
  7. Type BOOTREC /FIXMBR then hit Enter
  8. Type BOOTREC /FIXBOOT then hit Enter
  9. Type Drive:bootBootsect.exe /NT69 All then hit Enter

Can’t seem to put up with the long and technical manual repair process? You can still fix this error by downloading and installing a powerful automated tool that will surely get the job done in a jiffy!

Read More
1 2 3 171
Logo
Copyright © 2023, ErrorTools. All Rights Reserved
Trademark: Microsoft Windows logos are registered trademarks of Microsoft. Disclaimer: ErrorTools.com is not affiliated with Microsoft, nor claims direct affiliation.
The information on this page is provided for information purposes only.
DMCA.com Protection Status