 A not long time ago we had an article about the deep WEB and dark WEB here on errortools.com explaining its origins and its purpose. The article can be found here if you are interested: https://errortools.com/windows/what-is-deep-and-dark-web/
Now at this point in time, we want to present you with 15 great Deep WEB sites that could offer you some information not found anywhere else, that could offer you some privacy, or simply to have some fun and safely explore how it is like to be part of deep WEB.
Take notice that for successful visiting of given sites you will need to have installed TOR browser. More about Tor browser itself can be found here: https://errortools.com/blog/software-review-series-tor-browser/ and its official website for download here: https://www.torproject.org/download/
Make sure that you copy the onion link and paste it into your TOR browser in order to access the site. That being said, let’s begin.
http://mail2tor2zyjdctd.onion/
If you want secure and private ways of sending your emails then look no further. Mail2Tor uses a webmail client and encrypts each email received or sent, combine that for not storing IP addresses and you have a private and safe environment for your emails.
http://zqktlwiuavvvqqt4ybvgvi7tyo4hjl5xgfuvpdf6otjiycgwqbym2qad.onion/wiki/index.php/Main_Page
The Hidden Wiki is the go-to site if you want to explore more of deep WEB since it is the site of collected .onion sites. Think of it as a registry of onion sites that want to be accessed publicly but offer anonymity.
http://torlinksd6pdnihy.onion/
TorLinks is another site focusing on .onion site listings. Site themselves are divided into categories and are easy to find. Take note that .onion sites come and go so make sure to visit frequently both The Hidden Wiki and TorLinks in order to be updated.
Torch is the oldest and most well-known search engine for dark web links, with its database of over a million .onion websites there is a chance that you will find what you are looking for on it.
http://3g2upl4pq6kufc4m.onion/
Integrated into TOR itself as a default search engine DucDuckGo has proven itself to be a great competitor and challenger to Google. But unlike Google, DuckDuckGo will not track you nor store your search activities making it a great general private search engine.
https://www.facebookwkhpilnemxj7asaniu7vnjjbiltxjqhye3mhbshg7kx5tfyd.onion/
Yup, Facebook has its own .onion version of its popular platform. Now since Facebook itself is a social media platform anonymity is out of the question but with .onion routing, you can have and maintain a Facebook account from locations where you normally could not like in some countries where Facebook.com is banned.
http://galaxy3bhpzxecbywoa2j4tg43muepnhfalars4cce3fcx46qlc6t3id.onion/
Galaxy3 is also a social platform, the site is mostly populated with code experts and other individuals posting all kinds of stuff.
http://vrimutd6so6a565x.onion/index.php/Board
Dark Lair was the first image exchange website that evolved into a social network. One difference from the other two mentioned is that you can engage in the website without registration as an anonymous user.
https://www.propub3r6espa33w.onion/
The aim of the five-time Pulitzer Prize winner ProPublica is “To expose abuses of power and betrayals of the public trust by government, business, and other institutions, using the moral force of investigative journalism to spur reform through the sustained spotlighting of wrongdoing.”
It’s the first major online publication to have a .onion address. The non-profit newsroom is funded by organizations such as the Sandler Foundation and has made countless contributions to the fight for free speech and privacy.
http://7rmath4ro2of2a42.onion/
Soylent news is an onion site that well brings news. The difference from other sites of the same content is that Soylent news is community moderated without any big names involved so it is authentic in its content.
ttp://ciadotgov4sjwlzihbbgxnqg3xiyrg7so2r2o3lt5wz5ypk4sxyjstad.onion/
Tor’s history is an unlikely tale. It was created by the U.S Navy with the purpose of helping informants in foreign nations to communicate safely over the Internet. The Central Intelligence Agency (CIA), in that spirit, released a .onion site so that people from across the globe can browse their resources securely and anonymously.
https://secrdrop5wyphb5x.onion/
Secure drop is a platform for changing leaked information and for journalists to communicate with their leads in private. It is used by Washington Post, Pro Publica, and The Guardian.
http://answerszuvs3gg2l64e6hmnryudl5zgrmwm3vh65hzszdghblddvfiqd.onion/
Hidden Answers is Reddit or Quora of the dark web but as in the spirit of the dark web, all discussed topics and stories are in total anonymity.
http://scihub22266oqcxt.onion/
With over 50 million research papers in the domain of science shared freely, Sci-Hub eliminates all barriers of free knowledge and offers a unique approach to education and scientific information.
http://smrtmxdxognxhv64.onion/
Smartmixer is a bitcoin mixer. The service scrambles your bitcoin with other users making your purchases completely anonymous.
And that's it. 15 dark WEB onion sites you need to visit. I hope that you enjoyed the list and found something useful in it. Also, note that onion links can change overnight so if any of provided links do not work just go to DuckDuckGo and search for the site with the onion at the end.

 Error Causes
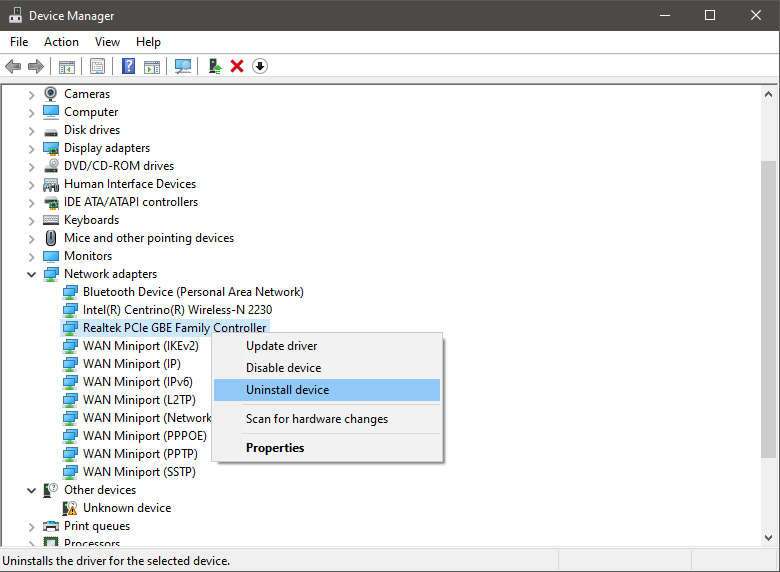
 In the Device Manager expand Network adapters, choose adapter, right-click on it and choose Uninstall.
 Install latest driver or reboot so Windows will install the driver automatically
In the Device Manager expand Network adapters, choose adapter, right-click on it and choose Update Driver.
Install latest driver or reboot so Windows will install the driver automatically
In the Device Manager expand Network adapters, choose adapter, right-click on it and choose Update Driver.

 In command prompt type next line and press ENTERDEL /F /S /Q /A “C:\Windows\System32\drivers\mfewfpk.sys
Reboot the system
In command prompt type next line and press ENTERDEL /F /S /Q /A “C:\Windows\System32\drivers\mfewfpk.sys
Reboot the systemSoftware Updater is an ad-supported browser extension hijacker that claims to update your PC programs and drivers. In addition to managing the installation of your selected software, this install manager will make recommendations for additional free software that you may be interested in. Additional software may include toolbars, browser add-ons, game applications, anti-virus applications, and other types of applications. The hijacked homepage, softwareupdater.com, did not have valid legal privacy and disclaimer policies on its website as of publication date.
This software adds a Windows Task Scheduler in order to launch the program at various times, including system startup. The software has access to all installed applications on your PC and can install bundled products with unwanted malware. It is also commonly distributed in bundles with unwanted software. Several anti-virus programs have classified this software as malware and are therefore not recommended.
taskkill /IM "processname" /T /F processname – it is the name of the process which you can see on the Details tab of the Windows Task Manager. /IM – it is the one that specifies the image name of the process, which follows, that is to be terminated. /T – it is the one that kills not just the main process but also the child process. /F – it is the one that terminates the process forcefully.
wmic process where name='processname.exe' deleteNote: In the given command, you need to replace “processname.exe” with the name of the particular process you want to terminate which is found in the Details tab of the Windows Task Manager.
kill -id pidNote: In the given command above, “pid” is the Process ID number of the process you want to terminate. And for you to identify this number, you need to open the Details tab of the Windows Task Manager once again and take note of the number against the process you want to get rid of. Alternatively, you can also run the following command in the PowerShell prompt that you’ve pulled up to get the process ID number:
Get-ProcessFor example, “5364” is the process ID number for the DimScreen.exe process which is the process you want to terminate. In order for you to kill this process, you need to type in this command:
kill -id 5364
“This status code is returned if the client has already downloaded resources since the last visit and is displayed to notify the client browser that the requested resources is already stored in the browser cache which hasn’t been modified.”Follow each one of the given fixes below to resolve the issue.
chkdsk /f /r
Wondering if upgrading to Windows 11 will boost your gaming experience? We can’t give you a straightforward answer, sadly. But we can take you through the tweaks you can expect if you have all the right requirements and help you make a final decision.
Essentially, the answer to this question is yes. Microsoft has definitely added a bunch of enhancements and features to its latest OS to give gamers the best possible experience. However, you have to keep in mind that this may not work out smoothly for every single user.
Whether you’ll be able to fully take advantage of the Windows 11 gaming features really depends on your setup. As expected, Windows 11 has more demanding system requirements than its predecessor.

So, unless your hardware can run the new OS comfortably, you might not be able to make the most of all these gaming perks. In that case, we recommend you first upgrade your hardware and then make the switch. Be prepared to be a little surprised by a few other interesting changes in comparison to Windows 10, though!
For some of the new gaming features to work, it’ll also be necessary for you to have an NVMe SSD and an HDR-compatible monitor. So let’s take a look at 4 big improvements you can expect if your setup is compatible.
For this powerful feature to work, you need a compatible graphics card and, as stated before, an NVMe SSD. It’s also important for your GPU to support the DirectX 12 graphics API at least. And since we’re on that subject, you’ll be happy to know that Windows 11 has also introduced a new version of the API called DirectX 12 Ultimate.
Now, what does DirectStorage do? It’s a new feature designed to make full use of the speedy storage of NVMe SSDs. It also transfers game data directly onto the graphics card, lightening the load on your CPU. Normally the CPU would have to decompress the data first, but DirectStorage helps bypass this. That’s how loading times are reduced and games run more smoothly.
Windows 11’s Game Mode is certainly a welcomed addition. When you turn on Game Mode, usage of background apps that aren’t essential to your game is reduced. This results in the game you’re running becoming a priority process. This way, it uses your hardware and system resources to the max. Ultimately, the Game Mode means less lag and higher frame rates so you can play undisturbed and fully enjoy your gaming session.
For this one you’ll absolutely need an HDR-compatible monitor. Basically, HDR (High Dynamic Range) means a wider range of contrasts and colors that can be displayed on a monitor.
Windows 10 has an HDR feature, but you have to turn it on and off manually (“Use HDR”). Plus, users have reported that, if left on, it results in an unappealing appearance of content other than movies and games.
Windows 11 fixes that problem with its AutoHDR feature. Toggling it results in the system automatically adjusting the color contrast, balance and brightness based on what you’re currently looking at. For gamers, this means vivid imagery in every single game, resulting in a supreme visual experience. You can check out Microsoft’s own video showcasing the power of AutoHDR.
Aside from AutoHDR, another way Windows 11 improves the visual aspect is through its support for refresh rates of up to 360Hz.
It’s no secret that Microsoft wants to integrate Windows and Xbox. We’ve seen some attempts with Windows 10, but they’re pretty wonky compared to the new OS.
Windows 11’s built-in Xbox Game Bar enables quite a few options all gamers desire. You can take screenshots and videos of your game and send them, for starters. Furthermore, you can use it to see audio settings and monitor your PC’s performance without having to leave the game or open the Task Manager.

Widgets are also a really cool part of the Game Bar. You can choose from a wide variety of widgets, such as Xbox Achievements, Spotify, Gallery, Xbox Social and more.
Moreover, the Xbox Game Pass has been streamlined on Windows 11. Game Pass is a subscription service that unlocks hundreds of awesome games and supports cloud streaming. Do keep in mind that the games are only unlocked for a certain period of time, as the selection rotates once in a while.
Windows 11 does offer tweaks that require zero input from you. However, there are a few things you can do manually to get even more out of your new OS while gaming.
Windows 11 has done quite a bit for avid gamers. We hope your setup is compatible with all these new features and you can experience these enhancements ASAP!