Fix Microsoft Visual C++ Runtime Library Error, Microsoft Windows operating system supports a form of shared libraries that are known as DLL (Dynamic-link libraries). These are also known as code libraries that are used by multiple processes while one copy is loaded into memory.
Runtimes are also code libraries that are loaded by applications when the application is called to run on the system. The most common runtime libraries that are used today are Visual C++ Runtime Library and Java Runtime Environment.
These libraries are practically used for nearly every single application you run on your system. Therefore it is very important that these libraries are in good working order.
Microsoft Visual C++ Runtime Library Error occurs when this runtime library becomes corrupted.
When Microsoft Visual C++ Runtime Library Error occurs, the applications powered by this runtime library fail to run smoothly, resulting in locking you out of those applications and hampering your ability to work on them.
Generally speaking, this error indicates system instability and poor PC maintenance. If this error is not fixed timely it can expose your system to serious PC damages like system freeze, crashes, and data loss.
Solution
Error Causes
Microsoft Visual C++ Runtime Library Error is triggered for numerous reasons. These include:
Poor program installation
Disk fragmentation
Missing and damaged .dll files
Registry corruption
Malware invasion
In a nutshell, it can be said that the deep-rooted cause of the Microsoft Visual C++ Runtime Library Error is the registry. All the causes listed above are associated with the registry.
For simplification, the registry is the main database of your system that stores all the activities executed on the computer in the RAM, the hard disk.
This includes both the important data and junk files such as temporary files, internet history, bad registry keys, invalid registry entries, and also the files from the uninstalled programs.
If these files are not removed from the registry frequently, it overloads the hard disk and leads to obscure error message displays on your system like the Microsoft Visual C++ Runtime Library Error as warning signs.
Sometimes, rebooting the system may fix the Microsoft Visual C++ Runtime Library Error. However, this is temporary. Error message pops again after some time. So, instead of seeking out a temporary solution, it is advisable to look for a solution that can repair this error for the longest time.
Further Information and Manual Repair
There are two ways to fix the Microsoft Visual C++ Runtime Library Error code. One is to reinstall the Visual C++ runtime libraries. This can be a complex task if you are not a computer programmer or technically sound.
However, the second way, or let’s just say the best and easiest way to resolve this problem is to download Restoro.
This is truly an easy way as it requires no technical expertise or programming knowledge to repair the Microsoft Visual C++ Runtime Library Error.
Restoro is an advanced, user-friendly, and multi-functional repair tool integrated with profound powerful utilities like an intuitive registry cleaner, system stability scanner, and anti-virus.
It has a smooth interface, easy navigation, and a simple layout making it easy for users and even novices to operate it to resolve the Microsoft Visual C++ Error in seconds.
The registry cleaner scans your entire PC for registry issues. It wipes out all the invalid, unnecessary, and obsolete files clearing up your disk space. In addition to this, it repairs fragmented disks, damaged .dll files (runtime code library), and repairs the registry.
Along with these benefits, Restoro also functions as a system optimizer thus boosting the performance of your system. It can be downloaded by all PC Windows users as it is compatible with all Windows versions.
Click here to download Restoro on your PC to resolve the Microsoft Visual C++ Runtime Library Error code and to ensure optimum PC performance and health.
If, while using your computer, you encounter the ACPI.sys Blue Screen error, read on as this post will guide you in fixing the problem. The ACPI.sys file is a Windows operating system file that is related to the MSDN 2939. ACPI.sys, the Windows ACPI driver, is an inbox component of the Windows operating system. It is the one that supports the power management as well as the Plug and Play or PnP device enumeration. And so if this file ends up getting corrupted, it is known to cause a Blue Screen error.
Another possible cause for the ACPI.sys Blue Screen error includes RAM issues, incompatible firmware, hard disk issues, corrupted drivers or malware infection, and so on. Here are some Blue Screen errors that can be triggered by the ACPI.sys file:
KMODE EXCEPTION NOT HANDLED
PAGE FAULT IN A NONPAGED AREA
SYSTEM THREAD EXCEPTION NOT HANDLED
IRQL NOT LESS OR EQUAL
KERNEL DATA INPAGE
SYSTEM SERVICE EXCEPTION
To fix the Blue Screen error associated with the ACPI.sys file, refer to the instructions provided below.
Option 1 – Try to recreate the ACPI.sys file
If the first option didn’t work, the next thing you can do is to recreate the ACPI.sys file. Every time your Windows 10 PC boots up, it looks for all the system drivers in place and if it is unable to find them, it tries to create them. This is why if you remove your corrupt driver file, chances are, you might get a fixed file recreated just for you. How? Refer to the steps below.
Boot your Windows 10 PC in Safe Mode.
Then open File Explorer and navigate to this location: C:/Windows/System32/drivers
From there, look for the file named ACPI.sys and rename it to ACPI.old.
Note: As you can see, the file’s extension has changed from .sys to .old.
Now restart your computer and check if the ACPI.sys Blue Screen error is now fixed.
Option 2 – Try to update or rollback the ACPI Driver
The first thing you can try to fix the Storport.sys Blue Screen error is to either update or roll back the device drivers. It is most likely that after you updated your Windows computer that your driver also needs a refresh. On the other hand, if you have just updated your device drivers then you need to roll back the drivers to their previous versions. Whichever applies to you, refer to the steps below.
Tap the Win + X keys to open the Win X menu and from there, select the Device Manager.
After opening the Device Manager, look for the ACPI.sys driver and right-click on it, and then select Properties.
Next, go to the Driver section. Note that the rollback option would only be available if you’ve recently updated the ACPI.sys driver. So if you can’t see it then click on the Update Driver button.
After that, Windows will automatically check for the problems that could be related to the Blue Screen error.
Finally, restart your computer. It will just reinstall the device drivers automatically.
Note: You can also directly download the relevant drivers of your computer from the manufacturers’ website. So if you have an SSD, the issue might be due to an old storage driver. On the other hand, if updating the ACPI driver, didn’t work, you can also try to copy the ACPI.sys system driver file from the System32 folder of another computer that’s functioning properly and runs the same Windows OS version. Afterward, place it on your problematic computer and check if it fixes the BSOD error or not.
Option 3 – Run System File Checker or SFC scan
System File Checker or SFC is a built-in command utility that helps in restoring corrupted files as well as missing files. It replaces bad and corrupted system files with good system files. To run the SFC command, follow the steps given below.
Tap Win + R to launch Run.
Type in cmd in the field and tap Enter.
After opening Command Prompt, type in sfc /scannow
The command will start a system scan which will take a few whiles before it finishes. Once it’s done, you could get the following results:
Windows Resource Protection did not find any integrity violations.
Windows Resource Protection found corrupt files and successfully repaired them.
Windows Resource Protection found corrupt files but was unable to fix some of them.
Reboot your PC.
Option 4 – Run the Blue Screen Troubleshooter
Troubleshooting Blue Screen of Death errors wouldn’t be complete without the Blue Screen troubleshooter. As you know, it is a built-in tool in Windows 10 that helps users in fixing BSOD errors like ACPI.sys. It can be found on the Settings Troubleshooters page. To use it, refer to these steps:
Tap the Win + I keys to open the Settings panel.
Then go to Update & Security > Troubleshoot.
From there, look for the option called “Blue Screen” on your right-hand side and then click the “Run the troubleshooter” button to run the Blue Screen Troubleshooter and then follow the next on-screen options. Note that you might have to boot your PC into Safe Mode.
Option 5 – Run System Restore
Tap the Win + R keys to open the Run dialog box.
After that, type in “sysdm.cpl” in the field and tap Enter.
Next, go to the System Protection tab then click the System Restore button. This will open a new window where you have to select your preferred System Restore point.
After that, follow the on-screen instructions to finish the process and then restart your computer and check if the problem is fixed or not.
Error code 0x8024402f is a Windows Update error indicating some sort of connectivity issue. Windows may show you theError 0x8024402f in Windows 10 whenever you try to download and install new updates. This error is caused by small interruptions in communications between the computer to be updated and the update to be downloaded. These issues usually resolve themselves. Windows Firewall settings may also be blamed for this problem.
Common symptoms
Error code 0x8024402f prevents you from installing the latest version of Windows 10
This Error prevents you from downloading new and latest updates from Microsoft
Solution
Error Causes
This error is caused by a problem with the Microsoft .NET Framework 4 Client Profile.
This error can occur even if no changes are made to network settings.
Your Firewall settings may cause this problem.
A high number of update requests on the Windows Update server may cause this problem.
More Information and Manual Repair
Method 1:
Exit Windows Update. Wait for 10 to 15 minutes, and then restart Windows Update to check for updates. OR
Turn on Windows Automatic Update so that updates are installed automatically every 24 hours.
Method 2:
Uninstall the Microsoft .NET Framework 4 Client Profile:
Click Start>Control Panel>Programs and Features
Locate the Microsoft .NET Framework 4 Client Profile
Right-click and then select Uninstall/Change
Confirm that you want this component to be uninstalled. This may take a few minutes.
Reboot your computer
When the system has restarted, re-run Windows Update as you normally would.
Method 3:
Check your internet connection:
As mentioned earlier the error code 0x8024402f is related to connection problems with Windows Update. It means that your computer isn’t able to connect with the Microsoft Update server; therefore you’re unable to receive any new updates. So, you either have a problem with the internet connection or the Microsoft Update server is corrupted. If the problem is caused by the Microsoft Update server, you just need to wait a while because Microsoft staff will most probably solve the problem quickly.
Method 4:
But, if the issue isn’t related to your internet connection, you should perform the following method:
Got to Search and enter Identify and Repair
Open Identify and repair network problems
Click on the Search Result.
It should automatically Start the identifying process
If your network has any issue then it will show you and ask you to fix it.
Now, establish your internet connection. The problem 0x8024402 should be solved by now and you’ll be able to update your Windows 10 Technical Preview to the latest 10049 builds.
Method 5:
Turn on Windows Firewall:
If you have some anti-malware or antivirus on your Windows 10 PC, then it might turn off Windows Firewall on its own or create its own Firewall as default. If this is the case, you will need to turn on Windows Firewall.
Search for "Firewall" OR
Click on Windows Firewall from Control Panel.
On the left pane, Click on Turn Windows Firewall ON or OFF.
Click on Turn on Windows Firewall then Click Ok.
That is it. Now, try again and see if you are still getting Windows Update Error 0x8024402f in your Windows 10.
Method 6:
This is an advanced method:
If the above steps fail, then you might surely want to try this advanced method, which is Enabling ActiveX in your Router Firewall settings.
If you had turned off ActiveX in your Router Firewall settings then this must be the culprit and so Error 0x8024402f is shown whenever you try to get Windows Update.
All you need to do is Enable ActiveX by going to your Router Firewall settings and that should do it. The Error should be gone for good now and you will be easily able to install the Updates in your Windows 10.
If you do not possess the technical expertise required to accomplish this yourself or do not feel comfortable doing so, download and install a powerful automated tool to get the job done.
Default applications in previous Windows versions were a pretty straightforward process. The user went to the settings application and picked for each category which application he would like to choose from the list of installed ones.
In Windows 11 things are little changed. In this article, we will show you how to choose the default internet browser inside Windows 11, and sadly it is a more tedious task than in previous versions.
Choosing default browser in settings
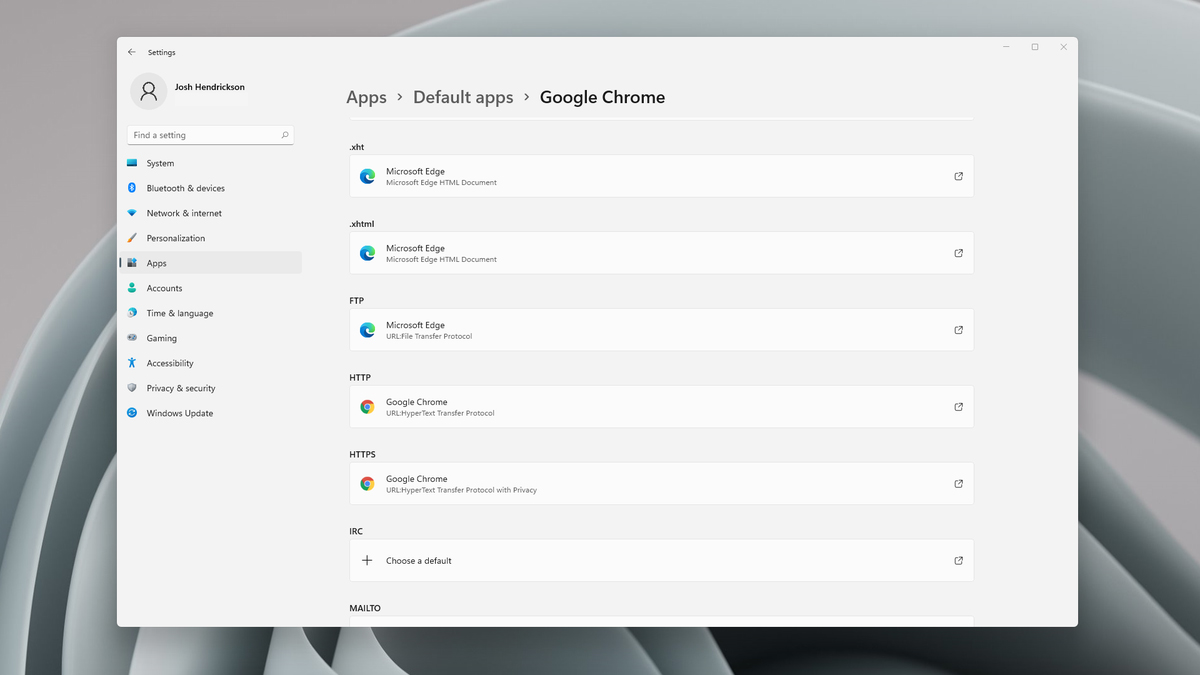
As in previous versions of the Windows operating system you will need to use the settings application in order to change your default Internet browser. Previously, in Windows 10, a variety of general categories like email, web browser, and photo viewer were all listed under the Default Apps section of the Settings panel. It was easy to click on one of those categories and click on the option you like best from the small pop-up suggestion window.
In the Windows 11 Insider Build, you’ll see a gauche list of an individual file or link types that you’ll need to specify your preferred browser for. The types include: HTM, HTML, PDF, SHTML, SVG, WEBP, SHT, FTP, HTTP, and HTTPS. There are additional optional types you can specify your preferred browser for as well.
The issue here is in order to use a single browser which most users do you will have to go through each file type and set your preferred one. I am really not sure why this was introduced or why it has to be this way, all I can do is hope that in the final release of Windows 11 this feature will be rolled back as it used to be and that you could set your default browser in just one simple click.
Researchers have discovered 16 vulnerabilities in Bluetooth connections that could be exploited and make from minor to some serious damage to your device. The flaw can be used on chips manufactured by Intel, Qualcomm, and Texas Instruments while connecting to external devices like speakers, headphones, keyboards, mice, etc.
Who is affected?
Mentioned chips are used by many in a vast range of devices including big players with their products like Microsoft Surface laptops, Dell desktops, Samsung Phones, Google Pixel, and OnePlus handsets.
The Bluetooth bug affects a wide range of devices, including smartphones, laptops as well as smart home gadgets. In total, more than one billion devices that rely on Bluetooth are believed to be impacted.
What is the damage?
The amount of damage possible with this flaw depends on the type of device with the chipset. Some devices can only be crashed after a specially crafted packet is sent to the flawed chip. If that's the case with your gadget, it can be easily resolved with a simple restart.
With other devices, hackers can take advantage of the Bluetooth Classic flaw to remotely run malicious code. That could allow malware to be installed remotely. Researchers say vendors were informed about these issues months ago before the findings were published.
The good news is this should have given plenty of time for the relevant patches to be pushed out that remedy the flaws. However, you'll need to make sure that you're running the latest version of the operating system to be protected by the patch crafted by the manufacturers.
Android Bluetooth threat
The researchers emphasize the lack of basic tests in Bluetooth certification to validate the security of Bluetooth Low Energy (BLE) devices. The BrakTooth family of vulnerabilities revisits and reasserts this issue in the case of the older, but yet heavily used Bluetooth classic (BR/EDR) protocol implementations.
We would also advise users to disable Bluetooth on devices that do not need it. This way you can prevent attackers from sending you malformed LMP packets. Since BrakTooth is based on the Bluetooth Classic protocol, an adversary would have to be in the radio range of the target to execute the attacks. So, in a safe environment Bluetooth can be enabled.
Many times we were talking and writing here on Errortools.com about security, privacy, hacking, identity theft, etc. We tried to raise important security questions and I hope I have managed to at least shed some light and change maybe some bad behaviors for some, helping them embrace better routines about their security on their PC.
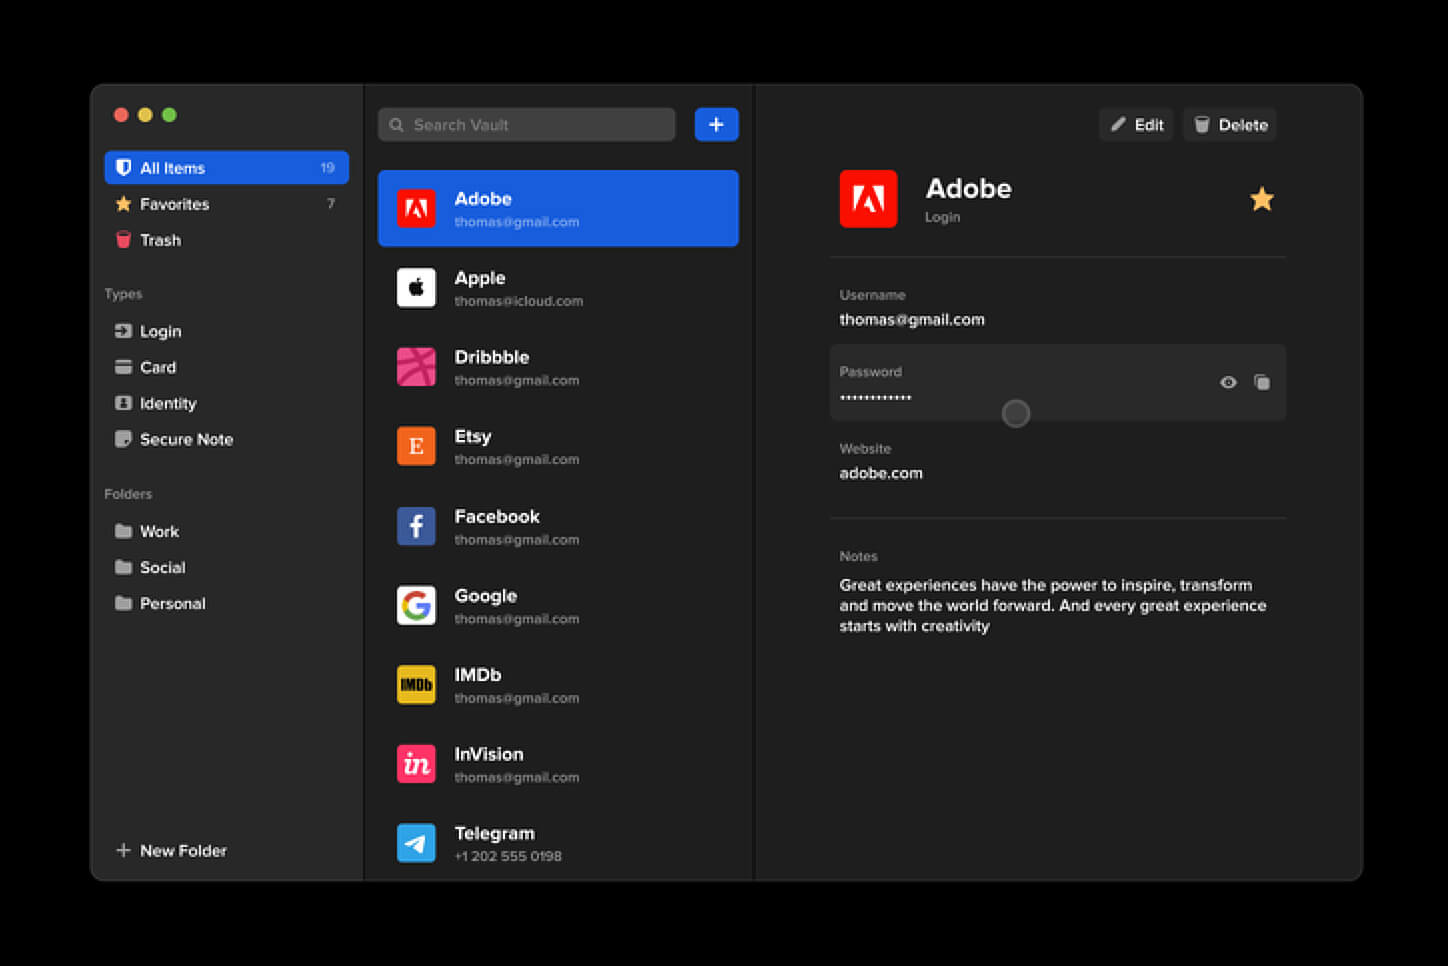
In this light, I will today present you with one neat and awesome piece of software, a password manager worth your time and money (if you want premium features): BitWarden.
What BitWarden offers?
The first thing that it offers is the completely free basic plan, granted BitWarden is not an open-source project nor completely free but it has an unlimited free basic plan that will cover 90% of user needs. There is also a free basic unlimited plan for Organizations letting you and one more user share files and other stuff via BitWarden making it a cool option if you need it.
Premium features offer you encrypted sharing of files, two-step login, 1GB file attachments (encrypted), Bitwarden Authenticator (TOTP), Vault Health Reports, Emergency Access, and Priority Support. The cost for all of these additional features is 10 USD per year for an individual plan or 40 USD per year for organizations where you will get an increase of maximum users from 2 to 6. Yes, you read that correctly, only 10 USD per YEAR for the whole set of features. Granted if you do not need any of them, enjoy the free version forever.
Besides very low premium cost BitWarden will offer you compatibility with all major browsers and devices including both Android and iOS platforms making it a great cross-platform solution to login and maintain your passwords anywhere with just one click.
Once installed all you need to do is set one master password and be very careful not to lose or forget this one, if you do all of your other generated passwords will be lost forever.
Features
Secure Password Sharing
Share your encrypted data quickly and easily, and only with the users or teams who need access
Cross-Platform Accessibility
Access critical data in your Bitwarden vault from any location, browser, and device
Cloud-Based or Self-Host
Get up and running in minutes in the cloud or you can self-host Bitwarden for complete data control
Security Audit & Compliance
Open source and third-party audited, Bitwarden complies with Privacy Shield, GDPR, CCPA regulations
Vault Health Reports
Access insightful reports to reveal weak, reused passwords, and other helpful data security metrics
Directory Sync
Our powerful Directory Connector streamlines user and group onboarding and keeps them in sync
Always-On Support
Our Customer Success agents are available to support you around the clock
Detailed Event Logs
Bitwarden creates audit trails to help you keep track of user and group access to sensitive data
Flexible Integrations
Unite your existing systems with Bitwarden using SSO authentication, Directory services, or powerful APIs
Conclusion
There are many password managers out there but via recommendation I have tried BitWarden and truth to be told, I really never felt the need to try anything else, it is great at what it does and it is moving forward with features and it is constantly updated and maintained.
Instaling and removing applications from your Windows can sometimes leave some traces that are unpleasant and can cause annoyances. One of these annoyances is the program in the startup section of the task manager.
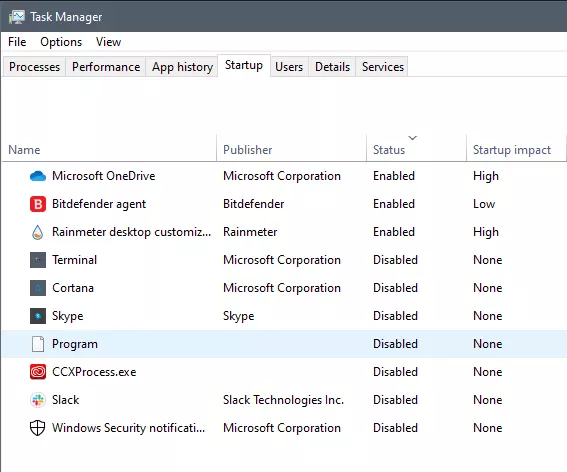
If you ever opened task manager and went into the startup section trying to disable some of the startup items on your Windows boot there might be a chance that you have experienced and seen a program without any icon or information about it just sitting there.
This is due to some applications being removed from the system but for some reason, it still shows itself in startup and it is quite annoying. So here we will show you how to get rid of this annoyance so your startup is clean again without junk in it.
Removing a program from startup
Locating the source of the issue
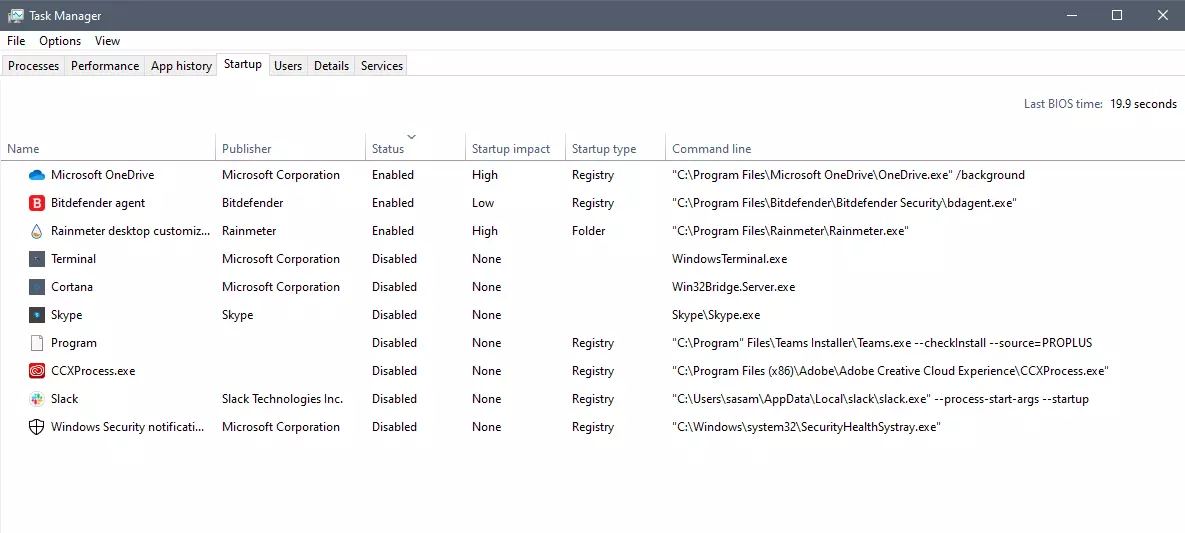
The first thing of course is to open the task manager itself and navigate to the startup tab. Inside the startup tab right-click on the column header and tick or enable Startup type and command line. Now you will see the location of the supposed file (that is missing or you could just go there by right-clicking on the item, but here it is greyed).
99% of the time startup type will be registry since the file is missing, if it was a file fix would be just to simply delete the file in the folder but since it was installed and not properly removed registry key is still present but the file cannot be found. After confirmation that the file is indeed missing and that the startup type is registry open the registry editor by typing Regedit in search and pressing enter.
Removing the key from registry
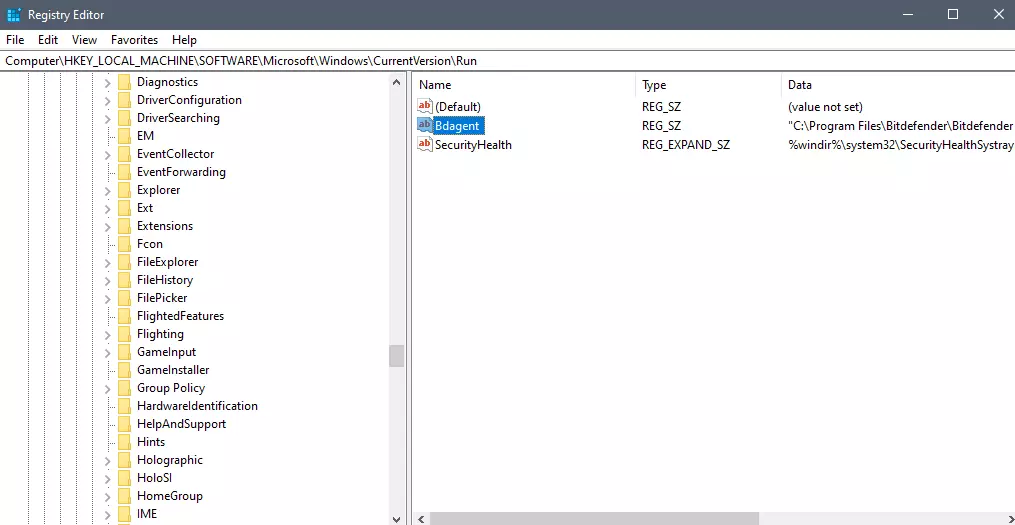
Inside Registry editor navigate to: HKEY_CURRENT_USER\SOFTWARE\Microsoft\Windows\CurrentVersion\Run. Inside on right part, you will see all auto-start entries added by installed applications.
Locate one that is causing issues by comparing its path with the path inside the task manager command line and delete the key. Once the key is deleted right-click on RUN on the left part and choose HKEY_LOCAL_MACHINE to quickly jump on that key location and repeat the process of key deletion if needed. HKEY_LOCAL_MACHINE will delete startup entry for all users and sometimes entry will not be present here since the application is not installed for all users or there are no other users on the machine.
After the procedure is finished, reboot your systems in order to apply changes.
Disk partitioning is a concept that’s been around for so long, but is still only familiar to few. If done right, it can help get your computer in perfect order.
Today we bring you a simple definition of disk partitioning, its pros and cons, and a quick tip on how to do it properly to reap its full benefit!
Definition and purpose
The simplest way to define disk partitioning would be: it’s exactly what it sounds like. It means taking a hard disk drive and separating it into different segments. These segments are called partitions. You can visualize it as cutting a cake into smaller pieces - not necessarily of the same size, though.
So what is the purpose of these pieces?
Well, when you first get a hard drive, it’s basically just a bunch of unallocated storage space. Until there’s at least one partition, this space is unusable to your operating system. Once you create a partition, your OS will recognize it as usable storage space.
You can choose to create a single partition and use it for all your files, from program files to personal data. A lot of off-the-shelf computers come with one primary partition like this and a small secondary one reserved for recovery purposes.
Whether or not you want to split your disk into more than one segment is up to you. We would generally recommend it, though. The whole point of partitioning is for each segment to have its own purpose.
So treating all your storage space as a single unit containing different file types would be like constructing an office building with only one massive room for everything - day-to-day work, conferences, interviews, etc. And all of this for different departments of the company. You can see how this might get a little messy.
Creating multiple partitions eliminates the task of running several different types of files from the same place. This takes a heavy load off the entire process of accessing data.
Disk partitioning also brings a ton of other benefits to the table. An important disclaimer, though: there are disadvantages too. We will walk you through both sides to help you get an objective idea and make an informed decision.
Source: Kina on Unsplash
What are the benefits of disk partitioning?
1. Better file organization
This is the most obvious and perhaps the biggest advantage of partitioning your hard drive.
As we already mentioned, partitioning allows you to create separate segments for different file and data types. You wouldn’t want to use the same partition for your system files and for games, would you?
If organization and time management are important to you, then multiple partitions are the right solution. Searching for specific files will be much easier overall. Say you have one hard drive, but three partitions: C for the system files alone, D for multimedia files and documents, and E for games and apps. Your computer loads the system from C without interference from the other two, and you know exactly where to look when searching for a file.
2. Easy reinstallation
File management isn’t the only thing made faster and simpler thanks to partitioning. If you opt for creating multiple segments on your drive, reinstalling Windows will be easy peasy.
That’s because all you need to do is format the partition your system is on. Then you reinstall the OS on it, and there you go. Now you have a clean installation, with all your files saved on other partitions intact. You can even make a copy of your system partition, so you can revisit the exact same installation in the future if you want. And the whole time your pictures, music, documents stay exactly where you left them.
Source: Andrew M on Unsplash
3. Possibility of using multiple file systems
By now you’ve understood that partitions function completely separately. This means that, if for some reason you need multiple file system capabilities, partitioning will allow that.
One segment could be used for, say, an NTFS file system, while another could run ext or APFS.
4. Running different OSes
You’re an avid Windows user but need to use Linux on the side? No problem. You don’t need to buy a separate computer or anything. The possibility of running different file systems also means you can use partitioning to run multiple operating systems.
Doesn’t that sound enticing? One machine for multiple totally different uses!
5. Backup and recovery made simple
Data loss can happen on any disk, partitioned or not. However, it’s much easier to get it back on a partitioned one. You know where you stored what, and each partition can be backed up exactly as it is. It’s also a lot faster to back up single partitions than entire hard drives.
Ultimately this also means a faster path to recovery. If you lose or accidentally delete important files and data, you might want to use a recovery tool like Recuva to scan for them and get them back. Recuva is even powerful enough to recover data from damaged hard drives. But no matter how powerful, scanning a whole drive is strenuous for any recovery tool. Scanning independent partitions is a lot more convenient than that, and will get you to your goal more efficiently.
6. Optimized performance
Now, let’s keep in mind that computer performance is influenced by a number of factors. Partitioning alone isn’t what makes it better or worse. However, it can contribute to optimization. It’s easier for your computer to scan, say, a 40 GB partition to fetch the system file it needs than scanning the entire capacity of your drive.
7. Improved security (possibly*)
Separate partitions can help make your system more secure. Firstly, they minimize file corruption. If one partition gets corrupted, the others should remain unaffected. And keeping in mind the previous point about backup and recovery, ‘fixing’ the damaged partition would be much easier than fixing the entire hard drive.
Partitioning also improves security in terms of malware protection. A malicious attack on one partition is easier to deal with than malware on the whole drive. If your system partition gets infected, you can simply reinstall your OS and that should do the trick.
*Do keep in mind that partitioning can’t defend you against more advanced attacks. So make sure not to give in to a false sense of security.
What are the disadvantages of partitioning?
1. Data is still vulnerable
Yes, it’s easier to back up and recover data from independent partitions. And yes, partitioning may help protect separated files and data to a higher degree. But remember: everything is still on a single physical drive. So while digital errors and issues may be easier to deal with on partitioned drives, physical damage obviously won’t be.
If your hard drive is destroyed in some way, all data on it will be gone. That’s why, if you have crucial files on your PC, it’s important to give them the proper backup treatment before it’s too late.
2. Disbalance of space
Allocating storage space on separate partitions may be a little more tricky than you think. You may fill up one partition a lot faster than another. So on one side you’re struggling with space, and on another you have too much of it to spare. Imagine nearly filling up your system partition and then it turns out you need a lot more space for its updates than you thought.
That’s why you really have to be sure you actually have enough files of different types that you need help managing efficiently. Otherwise you’ll just create a struggle and disbalance in terms of storage.
3. Increased risk of error
If done incorrectly, partitioning can lead to more harm than good. Aside from space disbalance, there is an increased risk of incorrect partition sizes and formatting. Plus, human error is also a factor: in a moment of distraction, you may erase one partition when you meant another. Undoing such mistakes will definitely be tedious and time-consuming.
4. SSDs eliminate the need of partitioning
SSDs (solid-state drives) don’t function in the same way that HDDs do. They have faster read times and can organize files on their own. This quite literally eliminates the need for organization on your part.
Partitioning: yes or no?
The bottom line is that multiple partitions might not be necessary for the average user. But if you’re planning on storing many file types or different file and operating systems on the same PC, then you should give it a shot. It’s also an excellent solution for businesses, of course.
And if our pros and cons list isn’t enough to help you decide, you can always send us a message and we’ll help you make the right choice.
Decided to partition your hard drive?
If you’ve decided to give it a go, you definitely should make sure to do it right.
The two most effective and reliable ways to partition are using the built-in options on Windows or investing in a dedicated partitioning tool, like the EaseUS Partition Master. Which one you'll opt for depends on your specific needs.
Option 1 may be more suitable for users with at least some level of experience. In this case, you’d have to know exactly which steps to take without making errors. This is done in Disk Management on Windows 10/11. From there, you can select the partitions you’d like to split into different volumes of selected sizes.
If this is your first time partitioning, we highly suggest you either consult professionals for this or move on to option 2. The EaseUS partitioning software is specifically designed for beginners, with an intuitive interface helping you succeed in the process. All you need to do is pick the Partition Master package tailored to your needs and follow their guide.
Each package offers technical support as well, and even free upgrades (to varying degrees based on your subscription). Plus, all of this is valid for not one, but two PCs.
It’s the perfect solution for a smooth and error-free partitioning process. If you want to organize your hard drives efficiently and make the most of all your space without doing irreparable damage, it’s definitely worth the investment.
The Error Code 0x80200056 will appear in a few different instances, though always applies to an interrupted download. Windows 10 will quickly discover that their upgrade and/or download did not work correctly. Not every user who upgrades to Microsoft Windows 10 will face this issue, only a select few random instances will occur.
Common symptoms include:
A dialog box appears with the Error Code 0x80200056
Microsoft Windows 10 upgrade is unsuccessful
Users are unable to open any applications after completing the Microsoft Windows 10 install
Solution
Error Causes
This error can be caused by a number of common problems, the first of which is the easiest to diagnose.
If during the upgrade process, you accidentally restarted your PC, or inadvertently signed out of your PC, the error will occur.
Third-party software conflicts can cause this error message during the Microsoft Windows 10 upgrade.
Error Code 0x80200056 may also appear if you have corrupted system files on your PC.
A change in date and time during the Microsoft Windows 10 upgrade could potentially cause this error.
None of these causes should overtly affect the operation of your PC, but merely prevent the upgrade and/or download from functioning correctly. If your PC is exhibiting other operating system errors in addition to Error Code 0x80200056, it would be wise to contact Microsoft Support before the issues lead to a possible catastrophic failure.
Further Information and Manual Repair
With the very recent release of Microsoft Windows 10, we are seeing a number of users discuss Error Code 0x80200056. Luckily, there are three different methods that any home user can perform to alleviate the error and complete the Microsoft Windows 10 download successfully.
Method 1
Use if your PC restarted accidentally during the upgrade, or if you accidentally signed out of Windows during the upgrade.
Make sure that your PC or Laptop is plugged in, to avoid another accidental restart.
Turn your PC on, or make sure that it is running. (Close any and all unnecessary programs)
Attempt the upgrade again, you should be able to run the upgrade successfully without further issue.
The following solution methods will apply if corrupted files, date/time changes, or third-party software interference is the issue causing Error Code 0x80200056.
Method 2
The following solution methods will apply if corrupted files, date/time changes, or third-party software interference is the issue causing Error Code 0x80200056.
Click on your “start” icon and choose the CMD (command prompt) option.
Right-click on “command prompt” and choose “run as administrator”.
Paste the command “bitsadmin.exe /reset /allusers” into the command prompt and press ENTER.
Restart your PC and attempt the Microsoft Windows 10 upgrade again.
Method 3
Click on your “start” icon and choose the CMD (command prompt) option.
Select “run as administrator” (enter a password if asked to do so).
Enter the following command into the command prompt- “sfc/scannow”, press ENTER.
Do not close the command prompt window until the entire process is complete.
The scan will determine if you have any missing or corrupted files. You will receive a message that says either: “Windows Resource Protection did not find any integrity violations”.Or “Windows Resource Protection could not perform the requested operation”.
If you received the first message, then your files are fine. The second message indicates that there are file corruption issues.
To repair the disjointed files, restart your PC in SAFE MODE, and reopen the command prompt window.
Enter the following command into the command prompt- “sfc/scannow”, press ENTER.
After the scan is run again, you will receive a message stating that the files have been successfully repaired.
Restart your PC in normal mode and start the Microsoft Windows 10 upgrade again.
To use a powerful tool to resolve Windows 10 upgrade Error Code 0x80200056 issue, download a powerful tool.
Click here to download Restoro.
If any of these methods do not allow for the successful upgrading of your Windows system, contact the Microsoft Support team. Make sure to include in your message to support what fixes you have attempted, and what the outcomes were. As Microsoft Windows 10 is so incredibly new, there are bound to be issued while the program is in its infancy. Fortunately, a majority of these issues should be worked out by Microsoft relatively quickly.
Error Code 0xC1900200, 0x20008 (Code 0xC1900202 – 0x20008) – What is it?
Error Code 0xC1900200, 0x20008 (Code 0xC1900202 – 0x20008) is an error that occurs when you attempt to upgrade to Microsoft Windows 10, but the minimum requirements have not been met by your computer. You will therefore be unable to upgrade to Microsoft Windows 10 until your computer is updated or upgraded to meet those requirements.
Common symptoms include:
When attempting to upgrade a dialog box with Code 0xC1900200 – 0x20008 (Code 0xC1900202 – 0x20008) is displayed.
Your computer is unable to begin the Microsoft Windows 10 upgrade process.
Solution
Error Causes
Error Code 0xC1900200 – 0x20008 (Code 0xC1900202 – 0x20008) occurs when you are unable to begin the Microsoft Windows 10 upgrade because your computer does not meet the minimum requirements to run Microsoft Windows 10.
You are unable to begin the upgrade because your computer does not meet the required system or hardware specifications.
You are not running the correct version of Microsoft Windows to be able to begin the upgrade.
You are not running the latest updated version of Microsoft Windows 7 SP1 or Microsoft Windows 8.1.
Error Code 0xC1900200 – 0x20008 (Code 0xC1900202 – 0x20008) as stated, simply means your computer does not meet the requirements to update and does not indicate a permanent problem or inability to continue to use your computer. This error only means that you will not be able to upgrade to Microsoft Windows 10 until your computer is made to meet these requirements.
Further Information and Manual Repair
There are several solutions that the user can complete at home that should fix the problem resulting in a manifestation of Error Code 0xC1900200 – 0x20008 (Code 0xC1900202 – 0x20008). Below are several options that should resolve this error.
Method 1:
Verify what version of Microsoft Windows you are currently running, older, outdated, or no longer supported versions of Microsoft Windows are not able to upgrade to Microsoft Windows 10. If you are not running one of the following versions you will have to update before being able to upgrade.
The most current version of Microsoft Windows 7 SP1
The most current version of Microsoft Windows 8.1
Method 2:
Your computer's system specifications do not meet the requirements to be able to upgrade to and run Microsoft Windows 10. To check your system specifications do the following.
Click on the start button in the bottom left corner, then locate the control panel on the menu, click on it to open.
Once it opens, locate system and security on the menu and click to open, click on system and this will show you your amount of RAM and processor speed.
Find device manager on the left-hand side click this then select display adapter, and it will show you your current video card.
Click on the start button again, then click on the computer in the menu, this will show you your hard drive size, and available space.
If you have the option available you can simply run the get Microsoft Windows 10 app to check compatibility. Once you have your system specs make sure they meet or exceed the following.
1 GHz or higher processor or SoC
1 gig of RAM for 32 bit and 2 gigs of RAM for 64 bit
16 GB available hard drive space for 32 bit, 20 GB for 64 bit
Minimum of DirectX9 that has 1.0 WDDM
At least an 800x600display
If your computer does not meet these minimum requirements, upgrade the components necessary to meet them. If you do not possess the technical expertise required to accomplish this yourself or do not feel comfortable doing so, download and install a powerful automated tool to get the job done.
Method 3:
Your computer might not meet the aforementioned requirements to make an upgrade because of insufficient hard drive space or resources. Learn how to create or make space on your computer here.
Method 4:
Many people hold on to and use the same computer for a very long time. It is possible that your computer cannot be upgraded to meet the requirements, or that the cost to do so would be so high that a new computer would be cheaper. If that is the case, your only option may be to replace your computer.
If you have received a BSOD error message that says, “Tcpip.sys”, read on as this post will show you how you can fix the problem. The “Tcpip.sys” means Transmission Control Protocol over Internet Protocol. It is a library of a set of rules that are used to interconnect different devices all over the internet. The Tcpip.sys file is a driver and if a BSOD error message includes this one, it could only mean that the driver file is corrupted or incompatible with your system or there are some conflicting programs installed in your computer.
To fix this error, you can try the following workarounds. Make sure to carefully follow each one of them.
Option 1 – Check for conflicting or incompatible programs by putting your PC in a Clean Boot state
As mentioned, the “tcpip.sys” BSOD error might be caused by some problematic programs that clash with your existing operating system. Several users reported that numerous programs that are supposedly designed to enhance computer performance are causing conflict in the system instead. To identify which program is causing the problem, you need to put your computer in a Clean Boot State. To do so, follow the steps below.
Log onto your PC as an administrator.
Type in MSConfig in the Start Search to open the System Configuration utility.
From there, go to the General tab and click “Selective startup”.
Clear the “Load Startup items” checkbox and make sure that the “Load System Services” and “Use Original boot configuration” options are checked.
Next, click the Services tab and select the “Hide All Microsoft Services” checkbox.
Click Disable all.
Click on Apply/OK and restart your PC. (This will put your PC into a Clean Boot State. And configure Windows to use the usual startup, just simply undo the changes.)
After putting your PC in a Clean Boot State, try creating a system restore point and see if the problem still occurs. Clean Boot troubleshooting is designed to help you isolate the problem. For you to execute a clean boot troubleshooting, you must do a couple of actions (the steps are given above) and then restart your PC after every action. You might have to disable one third-party app after the other to really isolate the issue. And once you’ve narrowed down the problem, you can either disable the third-party app that’s causing the problem or remove it. Note that you must switch your PC back into the Normal Startup mode after you’re done troubleshooting the problem. Here’s how you can do it:
From the “Start” menu, go to System Configuration.
After that, switch to the General tab and click the option for “Normal Startup”.
Next, go to the Services tab and clear the checkbox for “Hide all Microsoft services”.
Then find and click “Enable all” and if prompted, you have to confirm.
Afterward, go to the Task Manager and enable all the Startup programs and confirm the action.
Restart your PC when prompted.
Option 2 – Disabling Antivirus Software
There are cases when the “tcpip.sys” BSOD error is caused by the antivirus program installed in your computer that’s blocking some essential operations. Because of this, the operating system fails which throws up the BSOD error. As you know, the antivirus program is designed to protect the computer and monitor every action in the system. However, there are instances when the antivirus program gives false positives and shuts down some modules even if it’s harmless. So this could be the case for the “tcpip.sys” error. To verify if the problem is indeed caused by the antivirus program in your computer, you need to temporarily disable it. After you’ve disabled it, restart your PC and then check if the problem’s fixed or not.
Option 3 – Try to update all your Drivers
From time to time, drivers get corrupted or outdated so it’s no surprise that they conflict with the operating system and cause errors like the “tcpip.sys” BSOD error. To fix the problem, you need to update all your drivers especially the network driver since the “tcpip.sys” error is closely related to this driver. Follow the steps below to update your drivers.
Tap the Win + R keys to launch Run.
Type in devmgmt.msc into the box and tap Enter or click OK to open the Device Manager.
After that, a list of device drivers will be displayed. If you see a red or yellow sign that shows up against the driver, right-click on the driver’s name and select “Update Driver Software” or “Uninstall”. And if you find any “Unknown device”, you need to update it as well.
Select the “Search automatically for updated driver software” option and then follow the instructions to complete the process.
Restart your PC.
Note: You also have the option to go directly to the website of your graphics card manufacturer and check if there’s a new update – if there is, download it. After that, you could also check if there’s a new update of the game you’re getting the issue of the black bar.


 Choosing default browser in settings
 Researchers have discovered 16 vulnerabilities in Bluetooth connections that could be exploited and make from minor to some serious damage to your device. The flaw can be used on chips manufactured by Intel, Qualcomm, and Texas Instruments while connecting to external devices like speakers, headphones, keyboards, mice, etc.
 Many times we were talking and writing here on Errortools.com about security, privacy, hacking, identity theft, etc. We tried to raise important security questions and I hope I have managed to at least shed some light and change maybe some bad behaviors for some, helping them embrace better routines about their security on their PC.
In this light, I will today present you with one neat and awesome piece of software, a password manager worth your time and money (if you want premium features): BitWarden.
Many times we were talking and writing here on Errortools.com about security, privacy, hacking, identity theft, etc. We tried to raise important security questions and I hope I have managed to at least shed some light and change maybe some bad behaviors for some, helping them embrace better routines about their security on their PC.
In this light, I will today present you with one neat and awesome piece of software, a password manager worth your time and money (if you want premium features): BitWarden.