Diablo 2 resurrected has hit official release and servers seem to be finally taken care of and everything seems to be running smoothly now. The game also received great praise from gamers and attracted old players of the original Diablo 2 game.
 Speaking of old players of old Diablo 2, they can transfer their old characters into remaster and continue playing them within this new great HD environment. There are some steps and requirements but we are here to help and transferred characters will bring full stash, inventory, and equipped items with them.
There are not many requirements for this transfer to occur but they must be respected in order to be successful. The first thing is a minor requirement and somewhat annoying but it needs to be done, firstly fire up Diablo 2 resurrected and create a character, any kind of character with any kind of name, any kind of class. This strange requirement is to actually create a character folder and register it inside D2 resurrected so we can copy old ones there.
The second requirement will be that characters that you wish to be transferred must be offline characters. Old battle net online characters cannot be transferred at this moment and probably will not be in the future as well. So for all of you that wish to transfer online characters, bad luck, for the rest of us casuals playing offline single-player mode, we can enjoy our characters.
The process itself of transferring characters when previously mentioned requirements are met is just a simple and copy operation. If you have somewhere backed your characters go into your backup folder and copy files in c:\users\*current user*\saved games\*diablo 2 resurrected folder*
If you do not have characters backed up and just have old Diablo 2 installed and playing it, you can go to c:\users\*current user*\saved games\*diablo 2 folder* and just copy all characters files into c:\users\*current user*\saved games\*diablo 2 resurrected folder*
Your old characters end with .d2s extension, grab all that you want to transfer, and copy them into D2R. Take note that copied characters cannot be brought back into Diablo 2, once they are copied into Diablo 2 resurrected all further progress on them will be tied to the new game.
That’s it about the transfer process and requirements for it. Fire up the new game version and enjoy.

“SYSTEM [DRIVER] USB AUDIO DEVICE An audio stream is currently in use [DRIVER] Legacy Kernel Caller.”Step 2: The next thing you have to do is remove all the external hardware connected to your computer. In this step, you have to disconnect external hardware from your computer. Based on reports from users who experienced the same issue, the “TV card” is the culprit so make sure you remove that one. Once you’ve removed it, open Command Prompt and run the “powercfg –requests” command again and you’ll see that the “Legacy Kernel Caller” will no longer be on the list. In addition, your computer will get into its regular sleep mode once the hardware is removed. Once you do that, the driver gets hung and won’t release the power request despite being used. Step 3: Try using the request override option The powercfg command also offers a request override option which allows users to disable the requests from applications and services to wake the computer from sleep mode. To run this command, simply open Command Prompt with admin privileges. After you open Command Prompt, type the following command and hit Enter to disable requests from applications and services that causes the computer to wake from sleep state.
Powercfg -requestsoverride Driver "Legacy Kernel Caller" SystemStep 4: Check the streaming and media applications You also have to check if your computer is running an audio or video service in the background. In such cases, your computer won’t be able to go to sleep mode if these services are running in the background. You might have noticed that when you play a video or audio, your computer never goes to sleep. And if you have put it to sleep in between watching the video, then it’s probably why your computer is waking up. Thus, you have to stop these services. Step 5: Check the devices that can wake your computer If you didn’t see the Legacy Kernel Caller in the result after you execute the ”powercfg –requests” command, then you can try to execute the following command instead.
powercfg –devicequery wake_armedAfter you enter this command, it will give you a list of all the devices that can wake your computer. So if there is anything other than the mouse, keyboard, touchpad, you have to check the power configuration of that device. To do that, go to the Device Manager and disable the device’s “Allow this device to wake the computer” option in its Properties Step 6: Check the Sleep Advanced Settings
FoxTab Toolbar is a browser hijacking toolbar add-on for IE, Firefox, Chrome, and Opera browsers that claims that it allows you to access your favorite sites faster, and improving your overall search and browsing experience. 1-click access to search results, most popular websites, and web services directly from our Foxtab browser toolbar.
Fox tab will integrate itself into your browser, modifying the search engine, welcome page, and new tab. This toolbar may change some browser settings, display unwanted ads, and sometimes displays additional ads from its ad sponsor. Some of the settings that this toolbar changes can lower the security of your browser.
Upon installation the toolbar ads scheduled tasks in Windows, allowing it to run with your browser every time, and to automatically update itself. Several anti-virus programs have flagged this software as Malware and therefore it is classified as a browser hijacker and recommended for optional removal.
 Error Causes
“An internal error has occurred: The specified resource name cannot be found in the image file. (0x90070716).”You can also encounter this error when you run the System Image Backup function. As mentioned, you can resolve this error using two potential fixes namely checking the status of the Windows Backup Service and checking the settings in the Windows Registry. For more details, refer to the instructions provided below but before you proceed, it would be better if you create a System Restore point first.
 In the menu choose device manager and click on it.
 When the device manager opens, expand the Imaging devices or Cameras section.
Right-click Integrated Camera or the primary webcam, and click Properties.
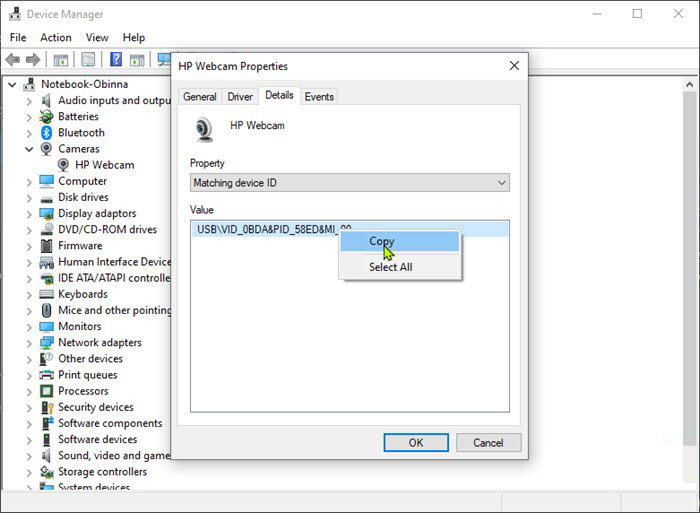
Go to the Details tab.
Under the Property section, click to select Matching device ID from the drop-down.
Right-click the value and select Copy
When the device manager opens, expand the Imaging devices or Cameras section.
Right-click Integrated Camera or the primary webcam, and click Properties.
Go to the Details tab.
Under the Property section, click to select Matching device ID from the drop-down.
Right-click the value and select Copy
 The next step is to download and install Windows Driver Kit (WDK)
$id = (Get-CimInstance Win32_PnPEntity |

where caption -match '<PRIMARY CAMERA>').pnpDeviceID

$ppid = "{0}{1}" -f '@',$id

Set-Location c:\<FOLDER>

Devcon status $ppid

Devcon disable $ppid

Devcon status $ppid
To enable the camera device, run the command below in PowerShell:
devcon enable $ppid