- Press ⊞ WINDOWS to open the start menu and click on the settings
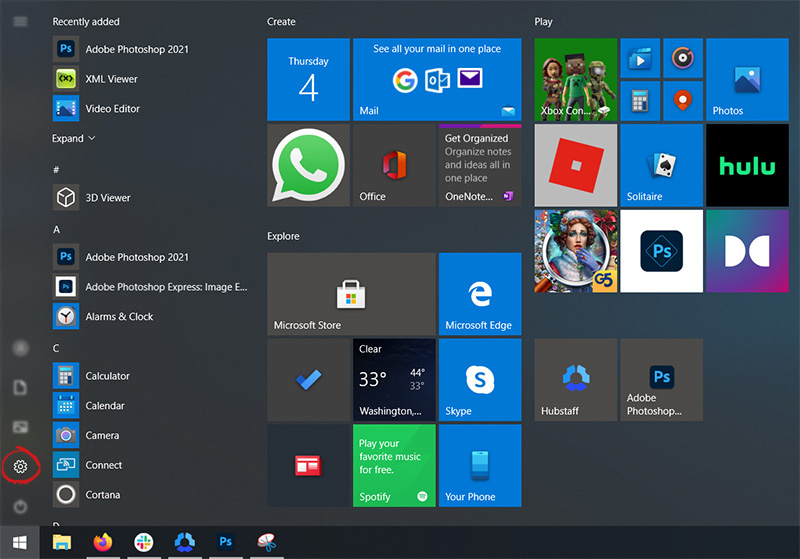
- On settings, screen click on system

- When the system dialog opens go to Power & Sleep and on the right side change all values to never.

Steam Autumn sale is still raging and other storefronts like EPIC and GOG have also had their go, and as the year slowly closes we reflect on the best games released this year.
The games presented are not in any particular order and as sales are still raging pick one for you for a good time.

If you are into formula racing this new manager is something we will wholeheartedly recommend. How it has been a very long time since a good F1 manager has been released this one is breath of fresh air. Masterfully done and fun to play, also licensed with real teams and cars get it here: https://store.steampowered.com/app/1708520/F1_Manager_2022/

I like cats, but this game is on another level from its competitors. Unique approach, great storyline, and of course orange cat as the main character! Set in a cyberpunk environment following the story of some unfortunate androids you can do most cat things like playing in boxes, etc but essentially the game is a puzzle platformer which in my opinion is a great thing. Meow your things and get the game while it is discounted: https://store.steampowered.com/app/1332010/Stray/

Mirror's Edge was the very unique game when it was released introducing parkour into the gaming world, and Neon white brings it one level up. With competitive parkour FPS gameplay this game is great for killing some time and competing with your friends but most of all it is fun to play experience. Get it here: https://store.steampowered.com/app/1533420/Neon_White/

Shredder's revenge is a love letter to classic beat-them-up games found in old dusty arcades back in old times. Fast frenzy action, pixel art graphics, and tons of fun!!! Get it now and start partying like it was 1980: https://store.steampowered.com/app/1361510/Teenage_Mutant_Ninja_Turtles_Shredders_Revenge/

This game needs to be experienced in order to fully grasp its magnitude and quirkiness. From the creators of borderlands comes a new IP fusion of fantasy, guns, and crazy ideas all wrapped into an action RPG looter shooter with a recognizable borderlands style of graphics. https://store.steampowered.com/app/1286680/Tiny_Tinas_Wonderlands/

Winner of multiple awards, Norco is a classic point-and-click adventure game with a great sci-fi story with a lot of environmental focus. Story and atmosphere are the main selling points for the game and if you enjoy good stories with interesting characters give this one a go: https://store.steampowered.com/app/1221250/NORCO/

Expansion for Massive multiplayer online roleplaying game brings so much to the table that we just could not oversee it and place it aside. Technically not full standing game since it is the expansion it still delivers on many fronts and since it is supposedly the last expansion now is the best time to pick it up and give a final fantasy 14 a go: https://store.steampowered.com/app/1592500/FINAL_FANTASY_XIV_Endwalker/

Of course, the list would not be complete if we did not include Elden ring, a great example of how a difficult but well-executed game can go over and beyond. With a story on par with great epics and compact as in dark souls, this title will provide you with many hours of gameplay and content. https://store.steampowered.com/app/1245620/ELDEN_RING/

Blackouts are one of the most annoying things that can happen in the modern age. We have all learned to depend on electricity, maybe too much, so having a backup plan in these unpleasant situations is necessary. Here are some good gadgets for these kinds of situations.

The fully charged power bank is a great item that could fill up your phone or tablet. If it is a larger power bank it could fill them up all the way to the top several times and having charged phone or tablet can help greatly with some fun during dark times. The power bank can also be used to fill up other gadgets on this list so if the power outage is expected to last longer perhaps it would be wiser not to waste it on phone/tablet games.

If the power bank is too short-lived for your needs, a portable generator is always a good option since it can provide power for longer time periods. The solar generator is what we recommend because it is much cheaper to produce electricity but it is limited if a power surge comes at night, one on gasoline is more stable and practical but it costs more to produce electricity.

One more electric-producing device on the list, this one however is aimed at charging your phone, tablet, or laptop by harvesting Sun's energy and turning it into valuable electricity for your devices. Fully silent and easy to operate this is a great tool for power outrage. It will not be able to produce electricity for smaller house appliances but for basic phone/tablet/laptop needs it will suffice.

Self-sustained with its own battery, panic lights are great assets for lightning when power is not present. They can turn automatically when the circuit detects that power is missing but can be also manually switched on or off. There are many versions of panic lights ranging from the light they produce to how long can they work so picking the right one will depend entirely on your home size and needs.

If you lack panic lights USB headlamp is a great choice to light your way and it works even better than a flashlight, although a flashlight is also a great tool, a headlight will provide you with free arms to do various things that you would not be able to by holding a flashlight. Modern headlights come with LED lights so they provide a good amount of light with small power consumption and they can be recharged in a power bank, solar charger, or generator.

LED Lantern is a gadget sitting somewhere between a headlight and a panic light, it offers around the same light amount as a panic light but you can carry it around with you. Of course, it will drain its battery faster than a panic light and it will still need to carry around but it can offer some good options when you need it, like taking it with you to the toilet.

An electric lighter is also one of the things that you will need, it can ignite candles, paper, stoves, etc. Its battery is usually enough for extensive use and there are small chances that it will need to be recharged. Having matches is also smart, just in case.

Great gadget when outbreaks last long or when you get hungry. Not all households have gas ovens so a Solar oven is a great tool to keep you full of food. Granted it will not be on par in speed and quality with a regular oven but when it is the only option it will suffice.
 When File Explorer opens go to VIEW > OPTIONS. Inside options select “Show hidden files, folders, and drives”, uncheck “Hide protected operating system files (Recommended)”, and click APPLY > OK
Go to the recycle bin and check to see if files have managed to show up.
When File Explorer opens go to VIEW > OPTIONS. Inside options select “Show hidden files, folders, and drives”, uncheck “Hide protected operating system files (Recommended)”, and click APPLY > OK
Go to the recycle bin and check to see if files have managed to show up. In the command prompt type in the following: rd /s /q C:\$Recycle.bin
Reboot your system
In the command prompt type in the following: rd /s /q C:\$Recycle.bin
Reboot your systemCHKDSK [volume [[path] filename]] [/F] [/V] [/R] [/X] [/C] [: size]]Note: In the command given above, “[/F]” will try to fix the system errors while “[/R]” will be the one to fix the bad sectors.
 Error Causes