Error Code 0x80070008 - What is it
Error Code 0x80070008 generally appears on machines running Windows 10, although it may sometimes also appear on earlier versions of the software, going all the way back to Windows 7, when the error was first introduced.
Common symptoms include:
- Inability to complete the Windows 10 Update process fully
- Machine running slowly
- Messages about a lack of memory on the device in question
If Error Code 0x80070008 has appeared on your computer, there are several things that you can do in order to fix the error and be able to install updates as necessary. Most of these methods are simple enough to use, even for the most inexperienced users, but at least one of the methods may require advanced knowledge or comfort in changing your settings on a deeper level.
If you don’t feel comfortable in your ability to use the steps below to resolve Error Code 0x80070008, get in touch with a qualified technician who is experienced in memory issues and Windows 10 error code resolution to assist you.
Solution
 Error Causes
There are three basic causes for Error Code 0x80070008. The first is that your machine may not have enough memory to finish the installation of an update. The second possible cause is that another program may be interfering with your machine’s ability to finish the update installation. Lastly, Error Code 0x80070008 can occur when a user has a lot of language packs, which may interfere with the ability to complete updates.
Further Information and Manual Repair
Because there are three different causes for Error Code 0x80070008, there are also three different methods to attempt to resolve the error. If you believe that the error may be caused by the number of language packs installed on your device, you should attempt method three first. Otherwise, use methods one and two first.
If you are not confident that you can do the steps below on your own to resolve Error Code 0x80070008, get in touch with a certified computer repair technician that is familiar with Windows 10 issues in order to fix the issue.
Here are the top three methods to resolve Error Code 0x80070008 on a machine running Windows 10:
Method One: Run the Windows Update Troubleshooter
When Error Code 0x80070008 first appears on your computer, one of the first steps that you can take to resolve the issue is to open up the Windows Update module and click on the “Troubleshoot” tool. This will run a scan on the Windows Update tool to attempt to identify the root cause of the problem and to resolve it automatically for you.
If the troubleshooter finds a problem, simply follow the steps on the screen to resolve the error. In some cases, you may want to restart your computer after this process is complete before you attempt to run the Windows Update tool again.
Method Two: Close All Programs Until Updates are Done
In some cases, a lack of memory on the machine can mean that running other programs while you are attempting to run Windows Update will cause the update process to fail. Closeout all of the programs that are running on the device, including any antivirus software or firewalls, before you run the update process. If this allows the Update process to run through to completion, you can then reactivate all of the programs that were running prior to the update.
Method Three: Remove Unwanted Language Packs
This method generally applies to users who have an abundance of language packs installed on their machine, usually more than 20 in total, which may interfere with the update process. To remove unwanted language packs, follow these steps:
- Step One: Open the Start Panel and select “Control Panel.”
- Step Two: Find the setting for “Clock, Language, and Region” and choose “Region and Language.”
- Step Three: Select the option for “Keyboards and Languages,” then under the settings for “Display language,” choose “install/uninstall languages” and select “uninstall display languages.”
- Step Four: For any languages that you do not wish to keep, deselect them and choose “Next.” It may require several minutes for the process to complete.
- Step Five: After the unwanted language packs have been removed from your computer, you can attempt to run Windows Update again. You may want to restart your computer first for maximum efficiency.
Method Four: Use An Automated Tool
If you wish to always have at your disposal a utility tool to fix these Windows 10 and other related issues when they do arise, download and install a powerful automated tool.
 Microsoft just released Windows 11 ISo file, based on the latest Insider Preview Build 22000.132. Inside build, you can try all-new features like clock updated app, snip tool, and everything releases so far via various patches. You can also use Windows 11 ISO file to do a clean install on your computer, but if you go with this option all of your existing files will be deleted.
 Razer is a well-known brand among PC gamers and users, it started as a peripheral manufacturer focused on keyboards and mouse but after years passed Razer expanded its inventory offerings. It soon started offering headphones and lately has branched into wider product lines like gaming chairs and protection masks.
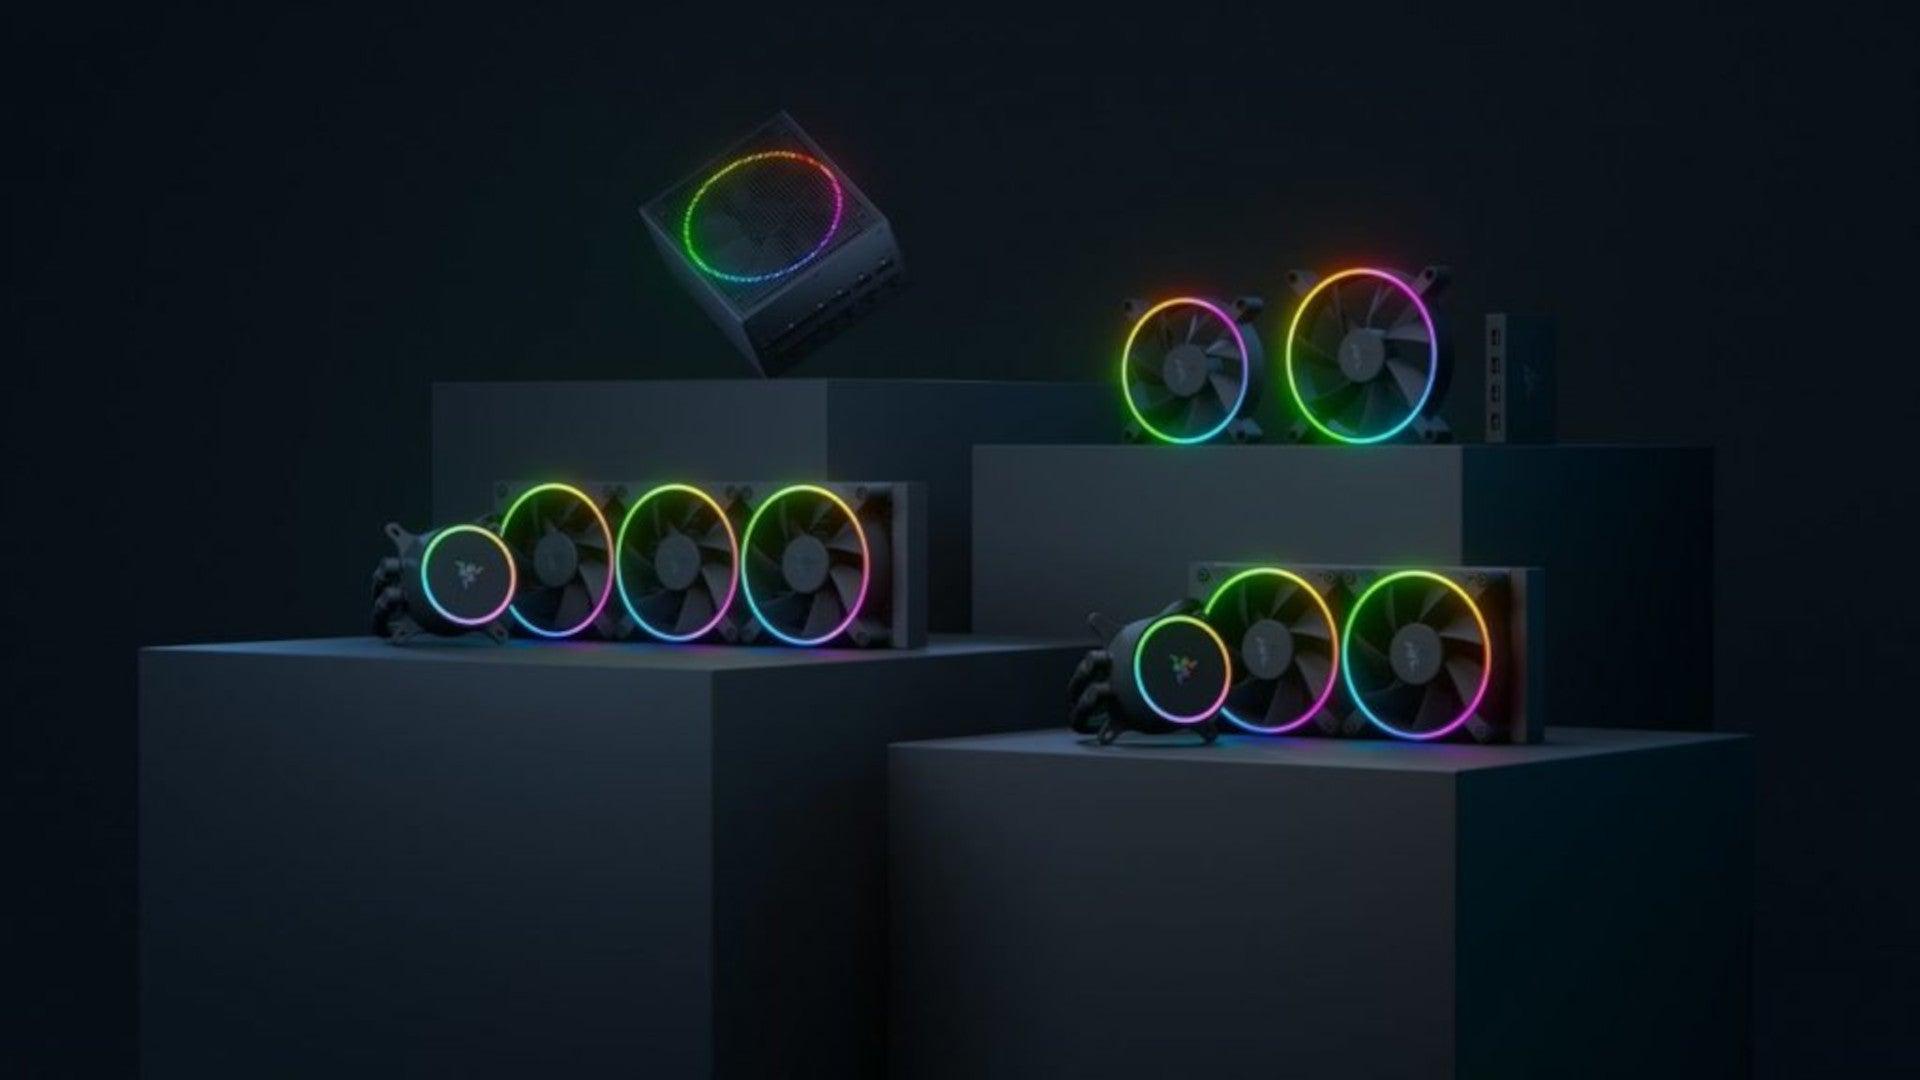
It is not a big surprise that Razer is expanding into other branches of the PC industry. This time, however, it has revealed not one but three new hardware for your PC. Case fans, all in one liquid cooler and power supply.
There are not many details about the products themselves but one thing is one hundred percent confirmed, they come with Razer Chroma, all of them, even the fans.
Razer is a well-known brand among PC gamers and users, it started as a peripheral manufacturer focused on keyboards and mouse but after years passed Razer expanded its inventory offerings. It soon started offering headphones and lately has branched into wider product lines like gaming chairs and protection masks.
It is not a big surprise that Razer is expanding into other branches of the PC industry. This time, however, it has revealed not one but three new hardware for your PC. Case fans, all in one liquid cooler and power supply.
There are not many details about the products themselves but one thing is one hundred percent confirmed, they come with Razer Chroma, all of them, even the fans.
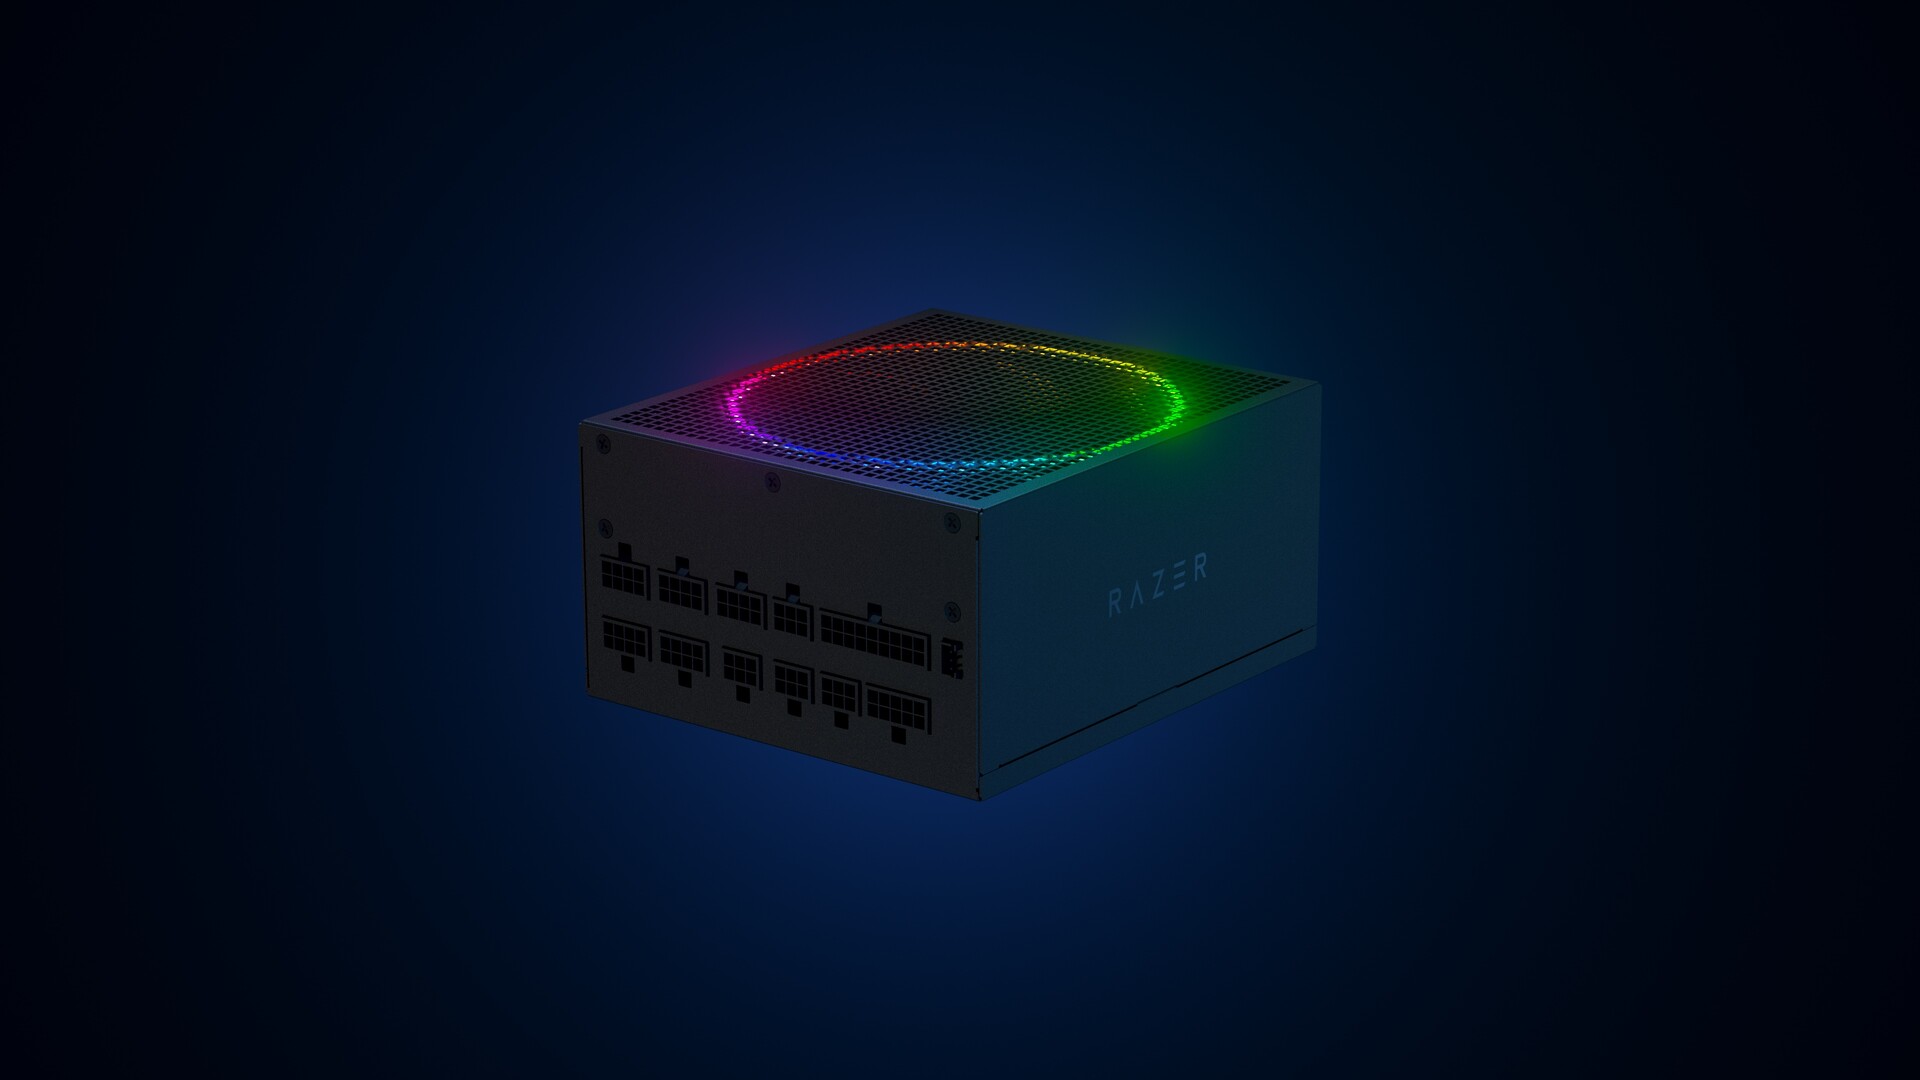 Most interesting for me personally is Razers Katana, the power supply unit. It is a modular power supply ranging from 750W to 1200W with the additional option of Titanium rated one with an impressive 1600W of power. Power supply will start shipping in early 2022 and at the time of writing this article no price range has been released.
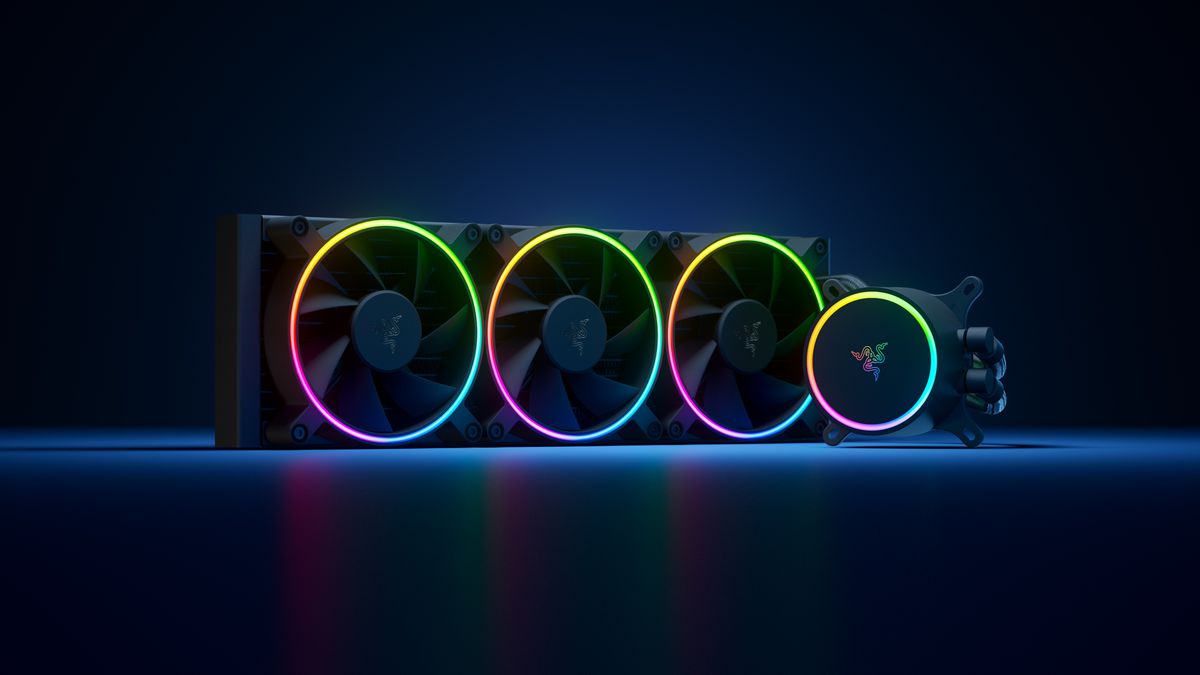 Hanbo liquid cooler will feature an optimized intake design so it can ensure greater heat transfer and fluid dynamic for improved reliability and silent operation. Radiator comes in 240mm size with two fans and a larger one of 360mm with three fans. The pump will be able to rotate in any direction of full 360 degrees so it can fit in any case. Hanbo will be released in November this year but no pricing has been released so far.
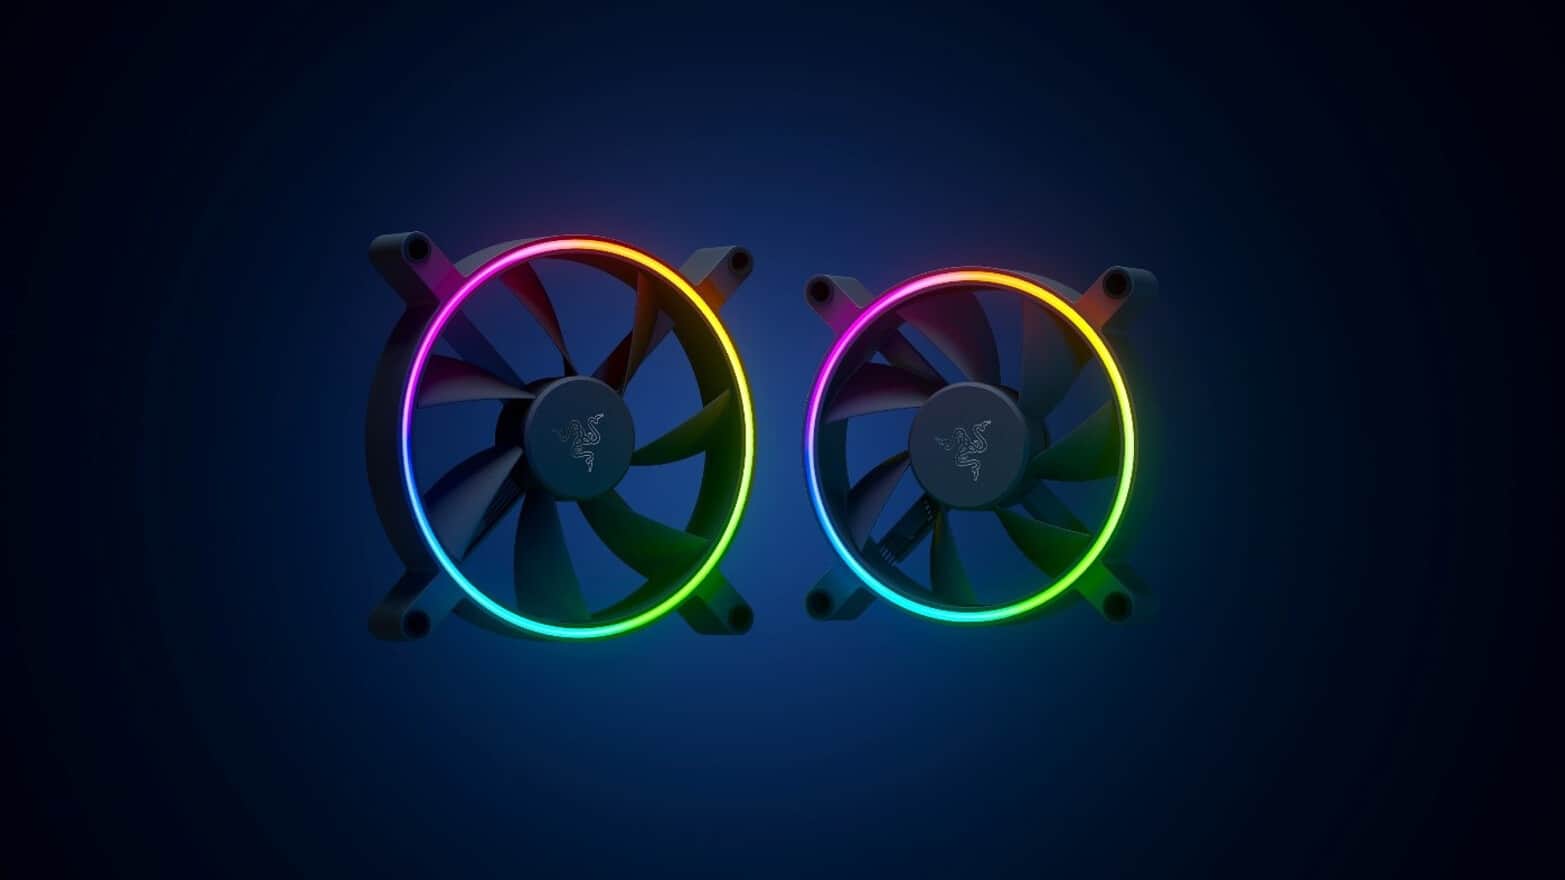 Kunai fans will boast high static pressure performance with lowered noise. They will go as far as 2200rpm for the 120mm version where the 140mm version will go up to 1600rpm. They will come with addressable LEDs and up to eight fans will be able to be connected to Razer’s PWM fan controller that will come with a magnet at the back for easy attachment to any steel part of PC casing.
PWM will use Razer’s Synapse software to customize pulse width modulation in order to improve airflow and noise. PWM will be priced at $49.99 in the Razer Store and it is available for preorder. Fans are priced at $44.99 for one 120mm or $129.99 for a three-pack of 120mm. One 140mm will go for $49.99 and a three-pack will be $129.99.
Kunai fans will boast high static pressure performance with lowered noise. They will go as far as 2200rpm for the 120mm version where the 140mm version will go up to 1600rpm. They will come with addressable LEDs and up to eight fans will be able to be connected to Razer’s PWM fan controller that will come with a magnet at the back for easy attachment to any steel part of PC casing.
PWM will use Razer’s Synapse software to customize pulse width modulation in order to improve airflow and noise. PWM will be priced at $49.99 in the Razer Store and it is available for preorder. Fans are priced at $44.99 for one 120mm or $129.99 for a three-pack of 120mm. One 140mm will go for $49.99 and a three-pack will be $129.99.  Once File Explorer is up and running right-click on the hard drive you wish to run disk cleanup on and click on properties.
 Properties Windows will open on the general tab, on that tab you have disk cleanup on the lower right part of properties, click on it.
 Wait for Windows to gather information about your hard drive and files on it. After it is finished you will be greeted with the next screen:
 Here you can thick and mark which items you would like to get rid of and which ones you would like to keep. Note that you can freely tick all of them and remove them since removing these files will not break WIndows in any way. make your choices and click on ok. You can also click on Clean up system files to run system files cleaner and get rid of junk there, you will not be able to choose any options there, Windows will alone clean up what is not needed.
After disk cleanup is finished least thing you will have is more free disk space, but like mentioned, keeping your Windows and computer healthy goes a long way in its usability, speed, and performance.
Here you can thick and mark which items you would like to get rid of and which ones you would like to keep. Note that you can freely tick all of them and remove them since removing these files will not break WIndows in any way. make your choices and click on ok. You can also click on Clean up system files to run system files cleaner and get rid of junk there, you will not be able to choose any options there, Windows will alone clean up what is not needed.
After disk cleanup is finished least thing you will have is more free disk space, but like mentioned, keeping your Windows and computer healthy goes a long way in its usability, speed, and performance.