If there are any third-party add-ons or proxy settings that interfere with your Windows 10 computer’s internet connection, then you will most likely encounter a problem where you see an error message saying, “Website is online but isn’t responding to connection attempts” when you try to run the Network Adapter troubleshooter.
Like pointed out, this kind of error can be caused by some proxy settings that prevent the connection. On the other hand, it could also be caused by some third-party add-ons. To fix this error, read on as this post will guide you on what you can do to fix it. You can try to turn off the proxy settings or disable the add-ons on your browser. You can also try resetting both the TCP/IP and DNS as well as reset the network. For more details, refer to the options provided below.
Option 1 – Try to turn off the proxy settings
There are some users who reported that they’ve fixed the problem after they’ve disabled the use of a proxy server using the built-in way. Follow the steps below to disable the proxy server.
Tap the Win + R keys to open the Run dialog box.
Then type “inetcpl.cpl” in the field and hit Enter to pull up the Internet Properties.
After that, go to the Connections tab and select the LAN settings.
From there. Uncheck the “Use a Proxy Server” option for your LAN and then make sure that the “Automatically detect settings” option is checked.
Now click the OK and the Apply buttons.
Restart your PC.
Note: If you are using a third-party proxy service, you have to disable it.
Option 2 – Try disabling the add-ons or browser extensions
The next thing you can do to fix the problem is to disable any extensions or add-ons on your browser. For instance, if you are using Chrome, here’s what you have to do:
Open Chrome and press Alt + F keys.
Go to More tools and click Extensions to look for any suspicious browser extensions or toolbars.
Click the Recycle bin and select Remove.
Restart Chrome and press Alt + F keys again.
Proceed to On Startup and mark Open a specific page or set of pages.
To check if the browser hijacker is still active, click Set pages, if it is active, overwrite the URL.
Option 3 – Try to update the Network Adapter Driver
Follow the steps below to update your Network Adapter Driver:
Tap the Win + R keys to launch the Run window and then type in the “MSC” command and hit Enter to open the Device Manager window.
From there, expand the list of all the network drives and update each one of them.
Note: If updating the network drivers didn’t help in fixing the problem, you can also try to uninstall the very same drivers and restart your Windows 10 PC. After that, the system itself will reinstall the drivers you just uninstalled. Alternatively, you can also download and install the drivers from the manufacturer’s website directly.
Option 4 – Try to reset the TCP/IP and the DNS cache
As you know, the TCP/IP or the Internet Protocol is the most important thing if you want to use the internet on your computer. That’s why if it ends up getting corrupted, you need to reset the TCP/IP to fix the problem. To reset TCP/IP, refer to these steps:
In the Windows start to search, type “command prompt” and right-click on Command Prompt from the search results.
Then select the “Run as administrator” option to open Command Prompt with admin privileges.
After that, execute this command: netsh int ip reset resettcpip.txt
Next, execute this second command: ipconfig /flushdns
Once it’s done, exit Command Prompt and restart your computer and then check if the error is now fixed.
Option 5 – Try to reset the Network
You can also try to perform a Network Reset to resolve the problem. This will reset the entire network configuration including your IP address. To perform Network Reset, follow these steps:
Tap the Win + I keys to open Settings.
From there, go to the Network and Internet section.
Next, scroll down and look for “Network Reset” under the status pane.
After that, click on Network Reset and then on Reset now to start resetting the network configuration. Once done, check if it is able to fix the error or not.
DailyLocalGuide is a Browser Extension developed by Mindspark for Google Chrome. This extension hijacks your default search engine, the home page, and new tab, setting them to MyWebSearch.com.
From the Author:
The Software and Services are sponsored by third-party advertisements and commercial offers and may also contain links to third parties websites, advertisements, products, offers, applications, and more. By downloading and using the Software you give your consent to display to you such Third Party Content (by using display ads, pops, coupons, price comparison, in-line text, and content recommendations) through Our or Our business partners’ technology.
While installed, this extension gathers user browsing activity and sends it back to ad servers. This information is later used to better target ads. When browsing the internet with DailyLocalGuide installed you will see additional injected ads and sponsored content throughout your browsing sessions.
About Browser Hijackers
Browser hijacking is actually a type of unwanted software program, commonly a web browser add-on or extension, which causes modifications in web browser’s settings. They are made to interfere with browser functions for a variety of purposes. It redirects you to the sponsored websites and inserts ads on the browser that helps its creator generate revenue. Nonetheless, it isn’t that innocent. Your online safety is compromised and it is also very irritating. When the malware attacks your computer, it starts to mess things up a whole lot that slows your system down to a crawl. In the worse case, you may be forced to tackle serious malware threats too.
Symptoms of browser hijacker malware
Symptoms that your web browser is hijacked include: your home page is reset to some unfamiliar website; you see new unwanted favorites or bookmarks added, typically directed to advertisement-filled or pornography websites; the essential web browser settings are modified and unwanted or unsafe sites are added to the trusted sites list; you find unsolicited new toolbars added; your internet browser will display endless pop-up ads; your web browser starts running slowly or presents frequent glitches; you have prohibited entry to particular webpages, for example, the website of an antivirus software manufacturer like SafeBytes.
Exactly how they get into the computer
Browser hijackers infect computer systems in numerous ways, including through a file-share, a drive-by download, or an infected e-mail. They can also be deployed through the installation of an internet browser toolbar, add-on, or extension. Some internet browser hijackers spread in user’s computers using a deceptive software distribution method called “bundling” (often through freeware and shareware). Popular examples of browser hijackers include Conduit, CoolWebSearch, Coupon Server, OneWebSearch, RocketTab, Searchult.com, Snap.do, and Delta Search.
Browser Hijacker Malware – Removal
Some browser hijacking could be simply stopped by discovering and removing the corresponding malware program from your control panel. However, most browser hijackers are hard to eliminate manually. Irrespective of how much you attempt to get rid of it, it can keep returning over and over. Apart from that, manual removal expects you to do many time-consuming and complicated actions that are hard to accomplish for novice computer users.
An anti-malware program is extremely effective with regards to finding out and eliminating browser hijackers that normal anti-virus software has missed. SafeBytes Anti-Malware detects all types of hijackers – such as DailyLocalGuide – and eliminates every trace quickly and efficiently.
What To Do If You Cannot Install Safebytes Anti-Malware?
Malware can cause many different types of damage to PCs, networks, and data. Certain malware types modify internet browser settings by including a proxy server or modify the PC’s DNS configuration settings. When this happens, you’ll be unable to visit certain or all websites, and therefore unable to download or install the required security software to eliminate the computer virus. If you’re reading this, you probably have affected by malware that prevents you from installing a computer security application such as Safebytes Antimalware on your PC. There are some solutions you can try to get around with this particular problem.
Remove malware in Safe Mode
The Windows OS has a special mode referred to as “Safe Mode” where just the minimum required programs and services are loaded. In case the malware is set to load immediately when the computer starts, switching into this mode may well prevent it from doing so. To start the computer into Safe Mode, hit the “F8” key on your keyboard right before the Windows boot screen shows up; Or right after normal Windows boot up, run MSConfig, check Safe Boot under Boot tab, and then click Apply. Once you’re in Safe Mode, you can attempt to install your antivirus program without the hindrance of the malicious software. Right after installation, run the malware scanner to remove most standard infections.
Obtain the security software in an alternate internet browser
Some viruses might target vulnerabilities of a particular browser that obstruct the downloading process. If you appear to have malware attached to Internet Explorer, then switch over to a different internet browser with built-in safety features, such as Firefox or Chrome, to download your favorite antivirus program – Safebytes.
Create a portable antivirus for eliminating viruses
Here’s another solution which is utilizing a portable USB anti-virus software that can check your system for malicious software without the need for installation. Adopt these measures to employ a USB drive to fix your corrupted computer.
1) Download the anti-malware on a virus-free computer.2) Plug the Flash drive into the uninfected computer.3) Double-click the Setup icon of the antivirus software to run the Installation Wizard.4) Choose a USB flash drive as the location when the wizard asks you where you intend to install the application. Follow the directions to finish the installation process.5) Transfer the USB drive from the clean computer to the infected PC.6) Run the Safebytes Anti-malware directly from the flash drive by double-clicking the icon.7) Run Full System Scan to identify and clean-up up all types of malware.
Highlights of SafeBytes Anti-Malware
Do you wish to install the best anti-malware program for your laptop? There are numerous applications available that come in free and paid versions for Windows systems. A few of them are excellent, some are decent, while some will destroy your computer themselves! You have to look for a product that has got a good reputation and detects not just computer viruses but other sorts of malware also. With regards to commercial antimalware tool options, many people go with well-known brands, like SafeBytes, and they are very happy with it.
SafeBytes anti-malware is a trustworthy tool that not only secures your computer permanently but is also very user-friendly for people of all ability levels. With its outstanding protection system, this software will automatically detect and remove most of the security threats, which include browser hijackers, viruses, adware, ransomware, PUPs, and trojans.
SafeBytes anti-malware offers an array of advanced features which sets it apart from all others. These are some of the highlighted features included in the product.
World-class AntiMalware Protection: Safebytes is based on the very best virus engine within the industry. These engines will detect and remove threats even during the initial phases of a malware outbreak.
Real-Time Protection: SafeBytes gives round-the-clock protection for your personal computer restricting malware attacks in real-time. This tool will continuously monitor your computer for suspicious activity and updates itself regularly to keep abreast of the constantly changing threat scenarios.
Internet Security: SafeBytes provides an instant safety rating about the web pages you’re going to check out, automatically blocking harmful sites and making sure that you are certain of your safety while browsing the world wide web.
Fast Scan: SafeBytes Anti-Malware possesses a multi-thread scan algorithm that works up to 5x faster than any other protection software.
Lightweight: SafeBytes is really a lightweight application. It uses up a very small amount of processing power as it operates in the background so you’re free to use your Windows-based computer the way you want.
Premium Support: You can get high levels of support around the clock if you are using their paid version.
Overall, SafeBytes Anti-Malware is a solid program as it has loads of features and can detect and eliminate any potential threats. Once you’ve downloaded and installed this software, you will no longer have to bother about malware or other security worries. If you need advanced forms of protection features & threat detections, buying SafeBytes Anti-Malware could be well worth the money!
Technical Details and Manual Removal (Advanced Users)
If you wish to perform the removal of DailyLocalGuide manually rather than employing an automated software tool, you can follow these measures: Navigate to the Windows Control Panel, click the “Add or Remove Programs” and there, select the offending program to uninstall. In cases of suspicious versions of browser plugins, you can actually remove it via your web browser’s extension manager. You will likely also want to reset your internet browser to its default configuration settings.
If you decide to manually remove the system files and Windows registry entries, utilize the following checklist to ensure that you know exactly what files to remove before carrying out any actions. But bear in mind, this is often a tricky task and only computer professionals could accomplish it safely. Furthermore, some malware keeps replicating which makes it tough to remove. Carrying out this malware-removal process in Safe Mode is suggested.
Files:
Directory %LOCALAPPDATA%\DailyLocalGuideTooltab.
Directory %LOCALAPPDATA%\Google\Chrome\User Data\Default\Extensions\hkeaafmlcginkhibjjdijabnpfobeibe
Directory %LOCALAPPDATA%\Google\Chrome\User Data\Default\Local Extension Settings\hkeaafmlcginkhibjjdijabnpfobeibe
Directory %LOCALAPPDATA%\Google\Chrome\User Data\Default\Sync Extension Settings\hkeaafmlcginkhibjjdijabnpfobeibe
Registry:
key DailyLocalGuide at HKEY_CURRENT_USER\Software\
key DailyLocalGuideTooltab Uninstall Internet Explorer at HKEY_CURRENT_USER\Software\Microsoft\Windows\CurrentVersion\Uninstall\
There are times when you might find it difficult to delete folders or files in File Explorer and it could be due to many reasons. One of these reasons can be attributed to the failure that can lock down the folders or files which prevents you from deleting them. In this kind of situation, you can utilize the Command Prompt to delete the folders, sub-folders, and files on your computer, and in this post, you will be guided on how exactly you can do that.
Before you proceed, keep in mind that when you use the Command Prompt incorrectly, it might affect your computer and render it inoperable, thus, you must be extra careful when executing the steps given below and it would also be better if you create a System Restore Point. After that, refer to the following instructions.
Step 1: First, in the Start Search, type “command prompt” in the field and from the search results, right-click on Command Prompt and then select the “Run as administrator” option to open Command Prompt with admin privileges.
Step 2: After opening Command Prompt as admin, navigate to the folder where the file you want to delete is located. Note that you have to execute the “cd” or the change directory command.
Step 3: Next, execute the following command in Command Prompt:
DEL /F /A <file path with extension>
Note: In the given command, “/F” is the force delete command, while “/A” is the command that selects the files with the ready for archiving attribute.
Step 4: After that, go to the location where you can find the folder you want to delete by using the “cd” command again. And then execute the following command right after:
RD /S <folder path>
Note: In the given command, “RD” is the command that removes the folder from the directory, while “/S” removes all of its sub-folders and files. On the other hand, if you also use the “/Q” parameter, you won’t see the “Y/N” confirmation but if you didn’t use it, then simply tap the Y button to proceed.
When we are working on our computer, we have tendencies to make it look and behave to our best needs and however, best suits us. The Internet has crawled into our lives and made itself a must-have in modern society, internet browsers as a crucial piece of software for viewing the web have also grown and made themselves to be more open for user settings and personalization, Chrome, one of the most popular browser has the option to open a specific set of pages one it is opened and that is what we will cover today in this tutorial.
No matter would you like to by default open some online store, maybe an email or news website, you can open each of them or all of them once Chrome is run, making your daily routine more enjoyable and stress-free.
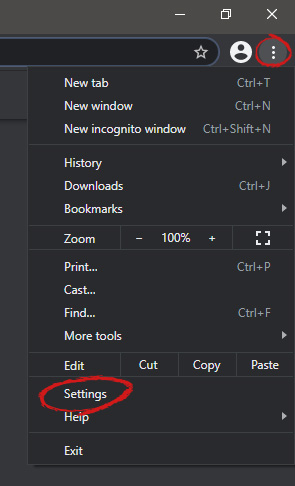
The first thing, of course, is to start Chrome itself, once Chrome is up, click on three dots in the upper right corner of the Chrome window and select settings.When you are in settings, on the left side move toward the bottom until you run into a tab that says On Startup and click on it. On right, a new section will open, click on Open a specific page or set of pages.You will be presented with the option to add a new page by typing its URL or getting it from bookmarks or using a specific opened one. You can repeat this process until you have added all pages that you wish to be automatically opened once Chrome is opened for the first time.
BONUS:
If you have noticed right above the setting that we have used for opening a specific set of pages there is the option Continue where you left off, this option will open each page exactly where it was when Chrome was shut down letting you keep viewing where you have left off. This is useful if by any chance your battery ran out or you had to quickly turn the computer off for whatever reason.
Activation errors in Windows 10 can interfere with your ability to fully use the system. When Error Code 0xC004C4AE appears on your computer, you may see a message that shows that the validation process has been stalled due to binaries that appear to have been tampered with.
While the text of this message may sound intimidating to people who are not familiar with the inner workings of the Windows 10 system, the basic meaning of the error message is that something has been introduced to the system that is not natively supported in Windows 10. During the Activation process, Windows checks to ensure that all of the Windows elements that are currently on the computer are valid and authentic to the Windows system. Usually, this particular error code refers to a language package that has been downloaded into the system using an outside application, which the Windows 10 operating system does not support.
Common symptoms include:
An error message when the activation is attempted
Inability to complete the Windows 10 Activation process
Inability to fully use apps in Windows 10 until the issue is resolved
This particular error can easily be resolved with a few simple steps. However, if you are not confident in your ability to use the methods below or they do not fully remove the issue on your computer, you may want to seek the assistance of a qualified repair technician who is well versed in the Windows 10 Activation process.
Solution
Error Causes
The most basic cause of Error Code 0xC004C4AE is that an unsupported language package has been enabled in the computer. This most often occurs when third-party applications have been used to introduce additional display languages to your system. While third-party applications that provide language packs are acceptable in some versions of the Windows operating system, the Windows 10 Activation process will not be able to complete if the system detects that one of these unofficial language packs exists on your machine.
Further Information and Manual Repair
There are several methods that may be helpful in resolving the basic issue in the display languages that causes Error Code 0xC004C4AE to appear:
Method 1:Restore Your System to an Earlier Point to Revert Changes
Use a backup copy to restore your computer to an earlier date, in effect undoing the changes that caused the error. When your system has been restored, you will be able to go through any language packs that are not native to the Windows operating system and remove them before re-attempting the installation and activation of the Windows 10 system.
This method is most useful if you keep a regular backup of your system and files. If you do not regularly back up the information on your computer, attempt one of the other methods instead. If you are unsure of how to use a backup to revert your changes or are not comfortable completing this step on your own, contact a certified Windows technician to assist you in the process.
Method 2: Revert to an Earlier System to Remove the Language Pack
If you are unable to restore your system using a backup, the other option to resolve Error Code 0xC004C4AE is to halt your installation of Windows 10 and go back to Windows 7 or Windows 8.1, from which you will be able to remove the language pack in question. Once the offending language pack has been completely removed from your computer, the Windows 10 Activation process should be able to proceed normally.
Several versions of windows don’t support language packages, so the best way to prevent this error from occurring is to avoid using any kind of third-party tool to install additional languages onto your Windows system. Activities Language You may be able to use third-party tools to instead complete alternative language actions without installing these languages as language packs.
If the above solutions do not help you to resolve Error Code 0xC004C4AE on your machine, get in touch with a qualified Windows repair technician, who may be able to perform the operations needed to remove the problematic language pack from your computer and allow the Windows 10 Activation process to continue to completion.
As you know, the Windows Firewall is designed not just to protect your computer from viruses and malware, and other security threats but it’s also designed to block any program from accessing the internet. Users are given the option to block both inbound and outbound traffic for any apps on their computers. However, this kind of option can often lead to not being able to access the internet.
In such cases, when you try to run the Windows Firewall Troubleshooter or the Windows Network Diagnostic troubleshooter, it will throw an error message that says, “Windows Firewall is preventing connections to your computer. The Windows Firewall rule HSS DNS Leak Rule may be blocking your connection”. If you are in this kind of scenario, then you’ve come to the right place as this post will guide you on how exactly you can fix this error.
When you encounter this kind of error, there are several options you can check out to fix it. You can try to allow an app or feature through the Windows Firewall or uncheck the HSS DNS leak rule in both private and public. For more details, refer to the suggestions provided below.
Option 1 – Try to allow an app or feature through Windows Firewall
The first thing you can do to get rid of the error is to allow a feature or app through the Windows Firewall. To do this, follow these steps:
Open the Windows Defender Security Center.
From there, select the Firewall and Network Protection option.
Next, click on the “Allow an app through firewall” option and then click on the “Change Settings” button and make sure that you have administrative privileges.
After that, select the app or feature you want to allow through the Firewall from the menu. You also have the option to manually add the app by using the “Add an App” option.
Then select the between the type of network an app can access such as:
Private Network will allow the app to connect to the internet only at home or work.
Public Network will allow the app to connect to the internet from anywhere, including Public WiFi hotspots.
Once done, restart your computer and see if it fixed the error or not.
Option 2 – Try to uncheck the HSS DNS leak rule in both private and public
The next thing you can do to fix the error is to uncheck the HSS DNS leak rule in both private and public. You can do this by following these steps:
Open the Windows Defender Security Center.
From there, select the Firewall and Network Protection option.
After that, click on the “Allow an app through firewall” option and then click on the “Change Settings” button and make sure that you have administrative privileges.
Next, scroll down until you see the HSS DNS leak rule in both private and public option and then uncheck it.
Now restart your computer and check if the error is now gone.
The Photos app in Windows 10 is the default photo viewer. However, there are times when it might encounter some problems while you use it. One of these problems in the Photos app reported recently is where users try to export or share the images and videos from the app but weren’t successful in doing so. This can be really quite a hassle in opening images on your computer, especially since the Photos app is the default photo viewer in Windows 10 and if you don’t have any other photo viewer app installed.
This kind of problem in the Photos app can be noticed when you try to use the “Remix” function for both photos and videos. In other words, this problem can occur with just pictures, videos, as well as a combination of both. So if you are trying to watch a video using this app, then you wouldn’t be able to play it. In such a case, the only thing you can hear is the audio but you wouldn’t see anything except for a hazy purple screen that has not export or share option.
There are several possible causes for this problem and it could be fixed by updating the display driver/graphics driver or disabling the hardware-accelerated video encoding. You could also try updating or resetting or reinstalling the Photos app. For more details, follow each one of the suggestions provided below.
Option 1 – Try to update the Graphics driver
You can try to update your Graphics card driver using the Device Manager in your computer to resolve the blank dialog boxes problem or you can also go directly to the website of your graphics card manufacturers like NVIDIA, Intel, or AMD and go to the section called Drivers then check if there’s a new available update – if there is, download and install it.
To update your Graphics driver via Device Manager, refer to these steps:
First, boot your computer into Safe Mode.
After that, tap the Win + R keys to launch Run.
Type in msc into the box and tap Enter or click OK to open the Device Manager.
After that, a list of device drivers will be displayed. From there, look for the Display Adapters and click on them.
After that, right-click on each entry under the Display Adapters and select the “Uninstall Device” option from the menu.
Now restart your computer.
After restarting your computer, go to the Settings app and Check for Updates in the Windows Update section.
Option 2 – Try disabling the hardware-accelerated video encoding
The next thing you can do to fix the problem is to disable the hardware-accelerated video encoding in your computer. To do that, follow these steps:
Open the Photos app and click on the visible three dots located in the upper right corner of the app and then select Settings.
From there, you should see the version number of the app in the “About this app” section. So if your app is version 2018.18071.****0.0 or greater, you should see the Video section which has a toggle button.
Turn that toggle button off to disable hardware-accelerated video encoding in the Photos app. This should fix the problem, if not, simply follow the next given options below.
Option 3 – Try to update the Microsoft Photos app
Open the Microsoft Store and click on the three horizontal dots for the menu located on the top right portion of the window to see the options.
Next, select Downloads and updates and then click the Get updates button in the top right. This will install any pending updates for all the apps including the Microsoft Photos app using the Microsoft Store.
Option 4 – Try resetting the Photos app
To get started in resetting the Photos app, open the Windows 10 Settings.
Then go to Apps > Apps & features.
After that, scroll down until you see the Photos app option – click on it and open its Advanced options.
From there, you will see the Reset button, click on it and click and then click on it once more to confirm.
Note: The process may take a couple of minutes to complete. Once it’s done, open the pictures again using the Photos app.
Option 5 – Try reinstalling the Photos app
If none of the options given above worked, then you might want to consider reinstalling the Photos app. Unlike what most users think, it isn’t really that hard reinstalling preinstalled apps as you have the Windows PowerShell for that. To use this program in reinstalling the Photos app, follow these steps:
Open the Windows PowerShell program with admin privileges and key in the following command:
Set-ExecutionPolicy Unrestricted
After that, execute this second command to re-register and reinstall the Microsoft Photos app.
Note: In the command given, do not forget to replace the “PackageFullName” with the actual package name for the Photos app. After executing the command, it will uninstall the Photos app from your computer so you need to install it again from the Windows Store by simply looking for it. Once you found it, just click on install to start the installation process.
The 0x0000001A is a severe memory management blue screen of death error code.
This is Windows error is also called a Stop code The system is automatically forced to reboot state which means any unsaved work is likely to be lost.
This error code pop-up locks you out of the program running on the screen and prevents you from working on it.
Solution
Error Causes
Experiencing error codes on your PC is an unusual activity that triggers that there is definitely something wrong with your system which should be repaired before it becomes a serious threat. The underlying causes of each error code are different.
When you come across a 0x0000001A error message this triggers several issues on your PC but largely it’s related to defective or mismatched RAM (Random Access Memory).
This could be due to disk De-fragmentation, cluttered registry, and overheating of PC hardware, or perhaps the power supply units that have been used to overcapacity which prompts your PC to show a 0x0000001A error message on your screen.
In addition to this, another reason could be a fault in the BIOS motherboard that could be outdated.
No matter what the underlying cause of the 0x000001A may be, it is imperative to get it resolved as it seriously damages your computer and leads to system failure.
Further Information and Manual Repair
Restoro is the best way to resolve almost all types of error codes including 0x0000001A in just a few clicks. It is a multi-functional PC registry cleaner that serves as a one-stop solution for all PC issues.
This tool can be used to resolve the blue screen of death errors like 0x0000001A in seconds and help you resume and get access to the program that you were working on before you experienced the error code.
With this helper, you don’t need to have the technical expertise or sound knowledge about the underlying cause of 0x0000001A.
This is an intuitive and advanced tool with built-in cutting edge technology that scans and identifies the cause of 0x00000001A and fixes it right away.
It has a neat design layout and a user-friendly interface that is easy to use for even novice users.
Restoro registry cleaner cleans up registry disk space, occupied by unnecessary files including junk files, invalid registry entries, temporary internet files, and entries of uninstalled programs that are still present in the registry.
It cleans and clears up disk space and wipes out clutter stored in the registry of your system which is likely to trigger RAM and memory mismanagement issues triggering an error code 0x0000001A pop-up message.
Restoro is feature-filled which makes it multi-functional. It is safe, secure and efficient. For optimum data security during repair, it creates backup files. This helps recover data in the event of data loss during repair, which is quite rare.
So what are you waiting for? Download Restoro Registry Cleaner today and resolve the error pop-up 0x0000001A now!
Buying a product and then finding out that is not working is one of the most annoying and disappointing things that a consumer can experience. It is no secret that Adobe software and services online can malfunction or detect somewhat false information and behave accordingly placing buyers in an awkward position.
Adobe no matter how huge and great can also still sometimes has software that can misbehave in this way and sometimes downloading their suite and buying it after can not be 100% registered and even after the money is transferred and purchase has been completed you can still have a trial status for your adobe cloud applications.
In this guide, we will address this issue and see how we can fix it so you can get back to your creative work in no time.
Follow this guide as it is presented step by step.
Wait an hour
No, seriously, wait an hour. Sometimes transaction and registration of transaction along with activation can take up to one hour of time. If you just made a purchase and you are still under trial in the launcher, give it a little time to detect the purchase and adjust accordingly.
Check to see if your subscription is active
Sign in to https://account.adobe.com/plans. If you have more than one account, make sure you sign in with the proper one.
Under My plans, select Manage plan.
In the Plan Information section, check to make sure that your subscription is active. If it’s expired, it's likely why you’re seeing messaging that indicates you are in trial mode or that your trial has expired.
If your subscription is showing as active, then an out-of-date payment method may be the issue.
To see if your payment information is current, in the Plan information section, select Manage payment.
If your payment method isn’t current, update your credit card information in the pop-up window and select Save.
Your new payment method will take effect in the next billing cycle.
Sing out and then sign back in
Open the Creative Cloud desktop app. (Select the icon in your Windows taskbar or the macOS menu bar.)
Select the Account icon in the upper right, and then select Sign out.
In the confirmation dialog box, select Sign Out. The Creative Cloud apps and services associated with your account are deactivated on the computer.
Sign in again to your Adobe account.
Launch any Creative Cloud app included in your membership, such as Photoshop or Illustrator. If prompted, sign-in on the next screen.
Update creative cloud applications
Open the Creative Cloud desktop app. (Select the icon in your Windows taskbar or the macOS menu bar.)
Depending on your version of the Creative Cloud desktop app, do one of the following:
On the Help menu, select Check for updates.
or
Select the three vertical dots icon in the upper-right corner of the app.
Choose Check for App Updates from the menu.
If you aren’t using the latest version of your Creative Cloud app, an update prompt appears next to it on the apps list. Select Update.
Remove entries in the HOSTS file
If the previous solutions do not work, your computer could have trouble connecting to Adobe's activation servers. This could be because of an incorrectly configured Operating System hosts file (Operating system hosts files map host names to IP addresses).
To solve this issue, try removing Adobe-related entries from the hosts file. You can remove the Adobe-related entries from the hosts file in two ways:
Automatically repair the hosts file using the Limited Access Repair tool: Repair the hosts file using the Limited Access Repair tool. With this method, you do not have to manually edit the hosts file -- the tool automatically repairs the file.
Reset the hosts file manually: If the issue is not fixed even after you run the Limited Access Repair tool, reset the hosts file manually:
To reset the hosts file on Windows, do the following:
Navigate to C:\WINDOWS\System32\drivers\etc.
Open the hosts file with a text editor such as Notepad.
Check for any Adobe-related entries in the hosts file.
If there are Adobe-related entries in the hosts file, move the file to the desktop, for example by dragging.
Delete the Adobe-related entries from the hosts file. Make sure that you do not delete any other entries.
Save the hosts file that you edited in the previous step. The updated hosts file should not have any Adobe-related entries.
Move the file from desktop to the original location: C:\WINDOWS\System32\drivers\etc. When moving the file, select the Replace option.
To reset the hosts file on macOS, do the following:
To find the hosts file, open Finder and then choose to Go > Go to Folder. In the box, type the following location and then press Return:/private/etc/hosts
If you are unable to locate the file, it means that the hosts file is hidden. Type the following command in terminal to unhide the file, and then repeat Step 1. chflags nohidden /etc/hosts
Open the hosts file using a text editor such as Text Edit.
Check for any Adobe-related entries in the hosts file.
If there are Adobe-related entries in the hosts file, move the file to the desktop, for example by dragging.
Delete the Adobe-related entries from the hosts file. Make sure that you do not delete any other entries.
Save the hosts file that you edited in the previous step.
Move the file from the desktop to the original location: /private/etc/hosts. When moving the file, select the Replace option.
It really sucks when you can’t fully enjoy the newest version of your favorite OS.
Windows 11 is still relatively fresh and consequently has some annoying little bugs that really ruin our experience. The good news is that you’re not alone and most of them are easy to fix.
Here are 5 commonly reported Windows 11 issues and what you can do to get rid of them.
1. Windows 11 audio problems
One of the absolute most irritating things in the world is struggling with the sound on your computer. Windows 11 users have reported facing the issue of low or no sound. If you’re currently experiencing the same frustration, you can be relieved. Chances are fixing it will only take a few minutes.
The first thing to check would be whether you accidentally muted your device by pressing the mute button on your keyboard. Yes, we know it sounds a lot like the old “have you tried turning it off and on again?” But it’s important to leave no stone unturned, and the most obvious things are usually the ones we easily overlook.
Moreover, if you have several audio output sources, check whether the right one is selected. You can do this via the Action Center or through Settings. If you want to use the same source every time, we also recommend you set it as the default one.
It’s also important to have a good, up-to-date audio driver. More often than not, this will be the true cause of your audio struggles. Make sure to update your driver, and if that doesn’t work out, you can always un- and reinstall it or install a different one.
Lastly, if all attempts remain unsuccessful, run the audio troubleshooter to figure out what’s actually going wrong.
2. Unable to find files
Such a powerful new operating system, yet it can’t seem to do the simplest thing imaginable? The File Explorer not responding on Windows 11 is one of the most frustrating and most common problems with Microsoft’s newest iteration of its awesome OS.
However, 9/10 times it can be fixed by simply restarting your PC. You could also try killing the Windows Explorer process in the Task Manager and then rerunning it.
If these don’t help, check whether there are any pending Windows 11 updates. A single missing update can compromise your PC’s functionality, so always make sure to install them all on time.
Should none of that work, then there are other ways to solve the File Explorer problem. However, then the issue is probably a bit deeper and it’s no longer in the ‘easy fix’ territory.
3. Start menu not working
Just like the File Explorer, the Start menu is a fundamental element of your OS. So, it’s only natural that its malfunction grinds your gears. It may be more customizable than on previous Windows versions, but it doesn’t always work smoothly.
If you’re facing the so-called Start menu critical error, there are a few things this could be caused by. Usually it means you turned off your system while an important update was still being installed, there is a corrupt file on your PC, or Windows forcefully stopped a program.
Whatever the reason, the solution should be pretty simple. Try the basic steps: restarting your File Explorer (like we explained above) and signing out and back into your account. If that doesn’t do anything, you may want to try uninstalling third-party start menu apps (if you have any), since they can interfere with your default programs’ functionality.
Now, those are the easy fixes. If you get nowhere with them, you might need to identify the root cause and search for more complex solutions than that.
4. Snipping tool not working
Our beloved screenshot tool was introduced with Windows 10 and Microsoft decided to keep it. However, you were probably just as disappointed as us when you tried to run it and failed.
Normally, this can be fixed by installing the latest Out-of-band (OOB) update, or even pending updates in general. Even if your system appears to be up-to-date, run the checker just in case.
Another cool thing Windows 11 lets you do is ‘Repair’ and ‘Reset’, which is the easiest way to troubleshoot your Snipping tool. If this fails, you can also try the good old un- and reinstall method. Simply uninstall the tool through the Control Panel and reinstall it from the Microsoft Store.
Furthermore, in the case of an upgrade from Windows 10 to 11, it may be that the old Snipping tool version is interfering with the launch of the new one. If you don’t care that much about the additional options available with the enhanced screenshot tool, you can use the old version instead.
Simply go to your C Drive, find the Windows.old folder, search for the tool and open it from there. Make sure to pin it to your taskbar as well, if you know you’re going to use it often.
5. Can’t install the latest update
The latest Windows 11 version, 22H2, has brought tons of enhancements to our dearest operating system. Unfortunately, a lot of users still haven’t had the opportunity to experience it. A mere update of your OS version should be the one thing that goes smoothly, but sometimes that’s not the case.
Failure to install 22H2 can be caused by a few things. Most commonly, the issue is caused by lack of storage space or corrupted files, but there could be other culprits.
There are a couple of things you could try. For example, it’s crucial that your drivers be up-to-date and some important services be enabled. These are: Windows Modules Installer, Background Intelligent Transfer Service, Cryptographic Service, Windows Update services.
To enable them, search ‘Services’, find the service you need and right-click on it. Open ‘Properties’ and select the startup type ‘Automatic’.
It may also be necessary to unplug all peripherals that aren’t crucial and disable third-party antivirus tools until after the update is finished.
Ultimately, you can run the Windows Update troubleshooter to detect and fix other possible issues.
Summary
Tiny bugs like these are nothing out of the ordinary. That said, we still all hate when they happen.
Hopefully some of our solutions have helped you to a smoother Windows 11 experience. But if you’re still struggling, feel free to reach out to us. We’d be happy to help!
QuickLook app is one of the best options to preview files without opening them in Windows 10. It works similar to the Quick Look feature of macOS. This Microsoft Store app has some really interesting features. It lets you preview images, documents, and media files. Also, just a hotkey is needed to preview the content of a file. There is no interface for the app. Only a preview window is visible.
You can also expand the preview window to full size. Apart from that, it lets you keep the preview window on top of the other opened applications. For image files, it also provides the EXIF data.
After installing this app, just select some file that you want to preview, and press the Spacebar key. That’s it! The preview window will open immediately to view the file content.
If you would like to read more helpful articles and tips about various software and hardware visit errortools.com daily.

 When you are in settings, on the left side move toward the bottom until you run into a tab that says On Startup and click on it. On right, a new section will open, click on Open a specific page or set of pages.
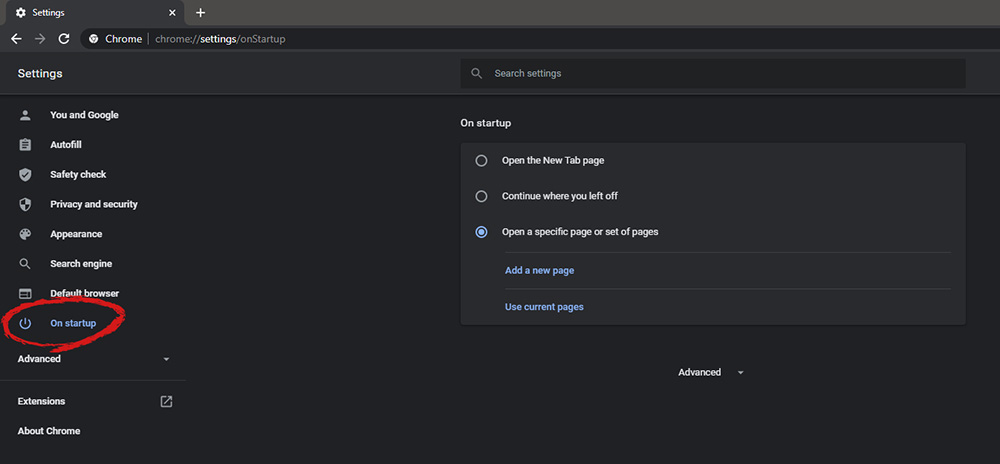 You will be presented with the option to add a new page by typing its URL or getting it from bookmarks or using a specific opened one. You can repeat this process until you have added all pages that you wish to be automatically opened once Chrome is opened for the first time.


