Logo

Fix SearchUI.exe errors inside your Windows

The SearchUI.exe file is the one that manages the search feature of Cortana. However, a number of users have recently reported that this feature stops responding within minutes of booting their Windows 10 computer. This kind of problem could be caused by missing system files or some issues with the Cortana program itself. And so if the SearchUI.exe file is not responding, then you wouldn’t be able to use the search feature of Cortana. But worry not for this post will walk you through fixing this problem.

Before you troubleshoot the problem, you can try to restart your computer and see if it helps, if it doesn’t, then proceed to the given options below.

Option 1 – Try to run the Search and Indexing troubleshooter

You might also want to run the Search and Indexing troubleshooter in Windows 10 as it checks whether the settings for Cortana are in place and automatically corrects any issues if the update or software installation has changed the settings. To run it just click on the Start button and select Settings > Updates and Security > Troubleshoot. From there, select the Search and Indexing Troubleshooter.

Option 2 – Restart Cortana’s process in the Task Manager

Restarting Cortana’s process in the Task Manager could also help you resolve the problem. Refer to the steps given below to do so.

  • Tap the Ctrl + Alt + Del keys to open the Security options window.
  • From there, look for the Task Manager in the given list and open it.
  • Next, look for the process of Cortana and right-click on it, and then select the End Task option to end its process.
  • After that, the Cortana process will restart by itself and re-initialize.

Option 3 – Try resetting Cortana

  • Open Cortana and go to the Settings section where you’ll see the “Turning off Cortana clears what Cortana knows on this device, but won’t delete anything from the Notebook. After Cortana is off, you can decide what you’d like to do with anything still stored in the cloud” option. Turn this option off.
  • Restart your PC.
  • After your computer boots, launch Cortana again and check.

Option 4 – Try running the DISM tool

You can try running the Deployment Imaging and Servicing Management or DISM tool to fix the Windows Upgrade problem. Using this built-in tool, you have various options such as the “/ScanHealth”, “/CheckHealth”, and “/RestoreHealth”.

  • Open the Command Prompt with admin privileges.
  • Then type in the following commands and make sure to hit Enter right after you type each one of them:
    • Dism /Online /Cleanup-Image /CheckHealth
    • Dism /Online /Cleanup-Image /ScanHealth
    • exe /Online /Cleanup-image /Restorehealth
  • Do not close the window if the process takes a while as it will probably take a few minutes to finish.

Option 5 – Try to reinstall Cortana

If none of the options given above works, you must consider reinstalling Cortana.

  • First, right-click on the Start button and click on the Windows Powershell (Admin) option from the list.
  • Next, type the following command and hit Enter to execute it:

Get-AppXPackage -Name Microsoft.Windows.Cortana | Foreach {Add-AppxPackage -DisableDevelopmentMode -Register "$($_.InstallLocation)AppXManifest.xml"}

  • Restart your computer and check if Cortana is now able to connect.

Option 6 – Try troubleshooting the problem in a Clean Boot State

There are instances that some conflicting programs installed in your computer might be the one that’s causing some issues with Cortana or causing the SearchUI.exe process to stop. To identify which program is causing the problem, you need to put your computer in a Clean Boot State. To do so, follow the steps below.
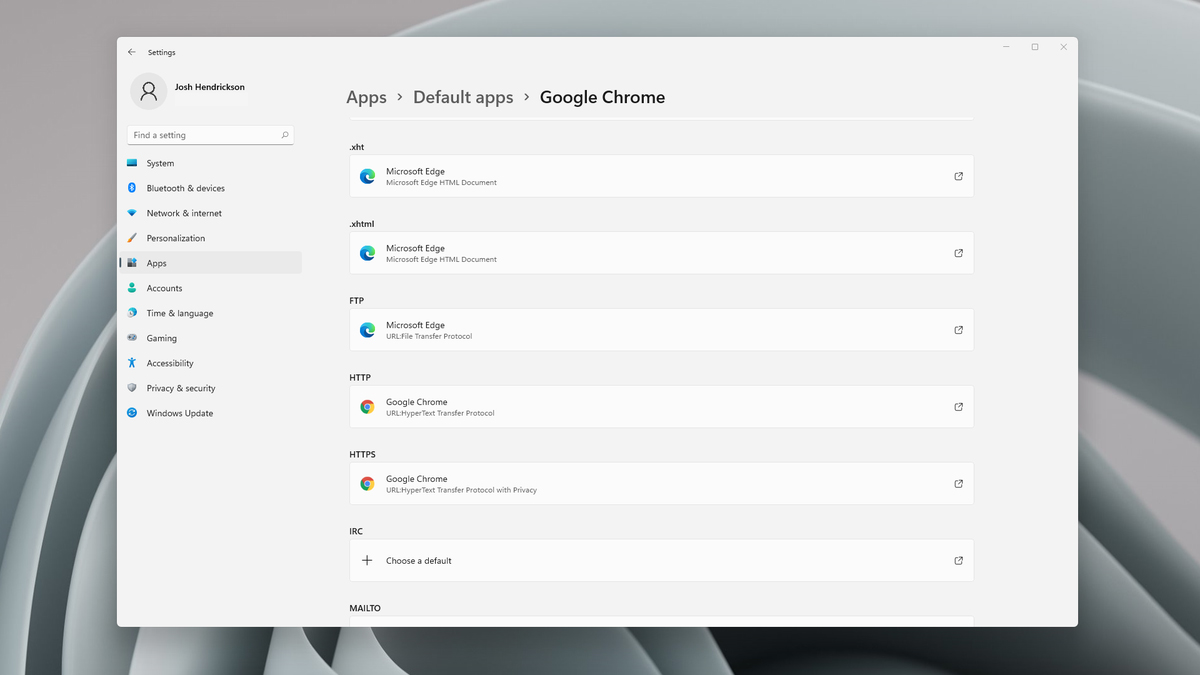
  • Log onto your PC as an administrator.
  • Type in MSConfig in the Start Search to open the System Configuration utility.
  • From there, go to the General tab and click “Selective startup”.
  • Clear the “Load Startup items” check box and make sure that the “Load System Services” and “Use Original boot configuration” options are checked.
  • Next, click the Services tab and select the “Hide All Microsoft Services” check box.
  • Click Disable all.
  • Click on Apply/OK and restart your PC. (This will put your PC into a Clean Boot State. And configure Windows to use the usual startup, just simply undo the changes.)
  • From there, start to isolate the problem by checking which one of the programs you installed recently is the root cause of the problem.

Do You Need Help with Your Device?

Our Team of Experts May Help
Troubleshoot.Tech Experts are There for You!
Replace damaged files
Restore performance
Free disk space
Remove Malware
Protects WEB browser
Remove Viruses
Stop PC freezing
GET HELP
Troubleshoot.Tech experts work with all versions of Microsoft Windows including Windows 11, with Android, Mac, and more.

Share this article:

You might also like

Fix NVIDIA Control Panel Access denied
As you know, the NVIDIA Control Panel is the central control panel for all devices that run the graphics drivers manufactured by NVIDIA. This control panel comes bundled with the drive package itself which is why there is no need for users to download it or update it separately. However, recently, some users reported that when they tried to make changes to the configuration in the NVIDIA Control Panel, they were unable to do so and encountered an error message instead saying, “Access denied. Failed to apply selected settings to your system”. If you also got the same error message, then you’ve come to the right place as this post will walk you through fixing this error in the NVIDIA Control Panel. There are several suggestions given in this article to fix the error. You can try to run the file named “nvcplui.exe” as an administrator or restore the most recent version of the folder where the aforementioned file is located. You could also try to restart NVIDIA’s process or restart the NVIDIA Display driver service or update the NVIDIA drivers in your computer. For more details, refer to each one of the options given below.

Option 1 – Try running the nvcplui.exe file as an administrator

  • Tap the Win + E keys to open File Explorer and navigate to this path: C:/Program Files/NVIDIA Corporation/Control Panel/Client
  • After that, look for the exe file and right-click on it, and then select the Run as administrator option.
  • Next, select Yes if a User Account Control or UAC prompt appears.

Option 2 – Try to restore the most recent version of the folder

The next thing you can do to fix the error is to restore the most recent version of the folder where the nvcplui.exe file is located. Keep in mind that this option is tricky so you have to be careful.
  • Tap the Win + E keys to open File Explorer.
  • Next, navigate to this path: C:/ProgramData/NVIDIA DRS
  • From there, right-click on the DRS folder and select Properties.
  • After that, go to the Previous Versions, System Protection, or System Restore tab in the Properties window.
  • Now restore the most recent version of the contents inside that folder. This will revert the old working configuration of DRS.

Option 3: Restart the process of the NVIDIA Control Panel

  • Tap the Ctrl + Shift + Esc keys to open the Task Manager.
  • After opening the Task Manager, look for the process named NVIDIA Control Panel Application.
  • Once you found it, expand it and right-click on the NVIDIA Control Panel sub-process, and click on End Task.
  • Now try opening the NVIDIA Control Panel from the Start Menu and see if it now works fine or not.

Option 4: Restart the NVIDIA Display Driver Service

  • Tap the Win + R keys to open the Run dialog box.
  • Then type “services.msc” in the field and hit Enter to open the Windows Services Manager.
  • After opening the Services window, you will see a list of services. From there, look for services named “NVIDIA Display Container LS” and double click on it to open its Properties.
  • Now make sure that the service is Started. If it isn’t, you need to start it, otherwise, you need to Stop it and Start It again. You also have to make sure that the Startup Type is set to Automatic.
  • Do the same for the NVIDIA LocalSystem Container service.
  • Restart your computer and check if the problem’s fixed.

Option 5– Try updating the drivers from the official site of NVIDIA

If both the first and second given options didn’t work, you can also try updating the drivers from the official NVIDIA website. And in case you don’t know the type of Nvidia graphics card that your computer is on, follow the steps below:
  • Tap the Win + R keys to open the Run dialog box.
  • Next type in “dxdiag” in the field and click OK or hit Enter to open the DirectX Diagnostic Tool.
  • From there, you can see what type of Nvidia graphics card that your system is on.
  • Take note of your graphics card information and then look for the best drivers for your operating system. Once you’ve downloaded and installed the file, restart your PC.
Read More
Mfplat.dll is missing or was not found
One of the primary packages that install the Windows Media Player is the Media Feature Pack among other related files that are needed by the associated software products. And one of the essential DLL files in that package is the mfplat.dll file which is needed by various games and streaming services. So if this DLL file goes missing, you will most likely encounter any of the following error messages:
  • “mfplat.dll missing”
  • “The application failed to start because mfplat.dll was not found.”
  • “The program can’t start because mfplat.dll is missing from your computer.”
In other circumstances, the Media Feature Package does not come pre-installed with the main Windows package especially for those who use Windows N, thereby causing the error to pop up. The main cause of this problem is that users who use Windows 10 N do not have the Media Feature pack pre-installed with the installation package. Aside from that, the installation package could go missing after a few Windows Updates or if you have uninstalled it by accident. To resolve this problem, you need to check out each one of the given options below.

Option 1 – Try to enable Media Playback via Command Prompt

If you encounter the mfplat.dll missing error when you attempt to run PLEX or other similar streaming service and you’ve already verified that the Media Feature Pack is indeed installed, you might want to try enabling it using an elevated Command Prompt. There are cases when a particular Windows Update ends up disabling the feature and creates the grounds which results in the mfplat.dll missing error. Thus, you can have to enable the feature via Command Prompt.
  • Tap the Win + R keys to open the Run dialog box.
  • Then type “cmd” in the field and hit Enter to open an elevated Command Prompt.
  • Next, click on Yes if a User Account Control prompt pops up.
  • After opening Command Prompt, copy and paste the following command and hit Enter to execute it:
dism /online /enable-feature /featurename:MediaPlayback
  • Close Command Prompt and then open the app once again to check if the problem is now fixed.

Option 2 – Try installing the Media Feature Pack for Windows 10 N version

As mentioned, the Windows 10 N version does not come with Windows Media Player. Meaning to say, the Media Feature Pack is also not installed by default or won’t be updated by the Windows Update component. So if you are not quite sure what Windows 10 version you currently have installed, refer to these steps:
  • Tap the Windows key + S and then type “about” in the search box.
  • From the search results, click on the “About your PC” to open the About tab of the Settings app.
  • Afterward, scroll down to the Windows specifications and check your Windows version under Edition.
Note: If you have verified that your PC is using the Windows 10 N version, you need to install the appropriate Media Feature Pack for your computer. How? Refer to the steps below:
  • Click this link to download and install the Media Feature Pack from Microsoft’s official website.
  • Upon installation, select the edition you want to install using the drop-down menu and then click on Confirm. Take note that there are few reasons why you’d want to install the older version since most streaming services like PLEX and most games usually require version 1803.
  • After that, wait until the request is validated. The download should begin in a few minutes automatically.
  • Once the download is completed, open the installation executable file and follow the next on-screen instructions to install the Media Feature Pack on your computer.
  • Restart your computer. After your computer has rebooted, open the application where you’re getting the mfplat.dll missing error and then check if the problem is now fixed.

Option 3 – Try to extract a copy of the mfplat.dll file from the windows.old directory

If you encounter the error shortly after you just upgraded to Windows 10 from an older version, the best thing you can do to resolve the problem is to use windows.old directory to fetch an old copy of the mfplat.dll file. To do so, follow the steps below.
  • Go to the Windows drive and then look for the windows.old directory where it preserves a copy of your old operating system as well as associated files in case something goes out of hand during the upgrade process.
  • After that, open the windows.old folder and then go to the syswow64 folder.
  • Next, from the syswow64 folder, copy the mfplat.dll file and paste it to C:/windows/syswow64.
  • Restart your computer and check if the error is now resolved or not.
Read More
Fix Invalid file handle Error during ...
If you encounter an error saying, “Invalid file handle” when you try to rename, copy, delete a file or other operations in your Windows 10 computer, then read on as this post will guide you in what you can do to fix it. This kind of error pops up when the operating system tries to carry out an operation on a folder or file using the following words:
CON, PRN, AUX, NUL, COM1, COM2, COM3, COM4, COM5, COM6, COM7, COM8, COM9, LPT1, LPT2, LPT3, LPT4, LPT5, LPT6, LPT7, LPT8, and LPT9
When you rename or create a folder or file using the reserved words given above, you could encounter an error that says, “The specified device name is invalid”. This occurs since these words are Windows system reserved words that you can’t use, unlike any other words. Thus, if you have a folder or file which contains any of the reserved words on another computer that runs a non-Windows operating system and you try to copy or rename it Windows, then it’s no wonder why you’re getting this error message. In such cases, you can always click on the Skip button to stop the operation. However, if there are various folders or files, you can just use the Command Prompt to carry out the task. All it takes is a simple command that will get rid of the folder as well as the files in it. How? Refer to the instructions given below. Step 1: Tap the Win + R keys to open the Run utility. Step 2: Next, type “cmd” in the field and then tap Enter to open Command Prompt. Step 3: After opening Command Prompt, execute the following command:
rd \.file-folder-path /S /Q
Note: The “rd” command will remove the directory or the folder while the “\.” command will select the current computer. The “/S” command, on the other hand, helps you in removing all the sub-directories and the files that are in the CON folder. The “/Q” command is not really mandatory since it helps you remove everything silently without any confirmation message. For example, if you have a folder named “CON” located on your Desktop, the path will be like this “C:/Users/<username>/Desktop/CON”. In this case, the command should be like this:
rd \.C:Users<username>DesktopCON /S /Q
However, if the error pops up for a whole different reason, you could use the following command instead to remove the reparse point extended functionality. Once you’ve entered the given command below, you should now be able to delete the file.
FSUTIL reparsepoint delete C:Users<username>DesktopFileName DEL C:Users<username>DesktopFileName
Read More
Access Denied, You don’t have permission
When you try to open a website but instead encounter an “Access Denied, You don’t have permission to access on this server” error message along with the ULR which you aren’t able to access with a reference number, then it is most likely caused by some network-related issue in your browser. Note that this error mostly occurs on Firefox browsers. The “Access Denied” error appears when your Mozilla Firefox browser uses a different proxy setting or VPN instead of what’s really set on your Windows 10 PC. Thus, when a website detected that there is something wrong with your browser cookies or your network, it blocks you which is why you can’t open it. To resolve this error, here are some suggestions you can try. And if you got the same error message on a different browser, you can still follow the possible solutions given below.

Option 1 – Try clearing everything about the website

  • Open your browser and tap the Ctrl + H keys on your keyboard.
  • After that, look for the listing of the website from your browser history and right-click on it.
  • Then select the “Forget about this site” option. This will get rid of all the data such as browsing history, cache, cookies, and passwords. Thus, if you have a password saved or other important data of the website, you have to save it first before you tap the Ctrl + H keys.

Option 2 – Try disabling the VPN

As pointed out earlier, if you are using VPN, this could be the reason why you’re getting the “Access Denied” error so the most obvious thing to do is for you to turn off the VPN and try to run the Windows Update once more. And if you use a VPN software that works using their software, you can just completely exit or log-off from its account. On the other hand, if you are using a built-in Windows 10 VPN, you can simply turn it off or delete all the settings you have created there.

Option 3 – Uninstall the VPN service you are using or use a different provider

If you disabling the VPN service worked in fixing the “Access Denied” error, you might want to uninstall it. As mentioned, website administrator blocks IP ranges if they notice any malicious activities and because of this, your IP address might fall into the banned range even if you didn’t do anything at all. To uninstall the VPN service, follow the steps below.
  • Tap the Win + R keys to open the Run dialog box
  • Then type “appwiz.cpl” in the field and hit Enter to open the Programs and Features in Control Panel.
  • From there, look for the VPN service you are using, select it and then click on Uninstall to remove it.
  • After that, restart your computer and try to install the latest version of the program again. It should work now. If not, proceed to the next available option below.

Option 4 – Try disabling the proxy server for your LAN

If your PC was just attacked by some adware or malware as of late, it is possible that it has changed the network settings in the system and might display spam advertisements. Thus, you have to disable the proxy server for your LAN. To do that, refer to these steps:
  • Tap the Win + R keys to open the Run dialog box.
  • Then type “inetcpl.cpl” in the field and hit Enter to pull up the Internet Properties.
  • After that, go to the Connections tab and select the LAN settings.
  • From there. Uncheck the “Use a Proxy Server” option for your LAN and then make sure that the “Automatically detect settings” option is checked.
  • Now click the OK and the Apply buttons.
  • Restart your PC.
Note: If you are using a third-party proxy service, you have to disable it.
Read More
Fix Steam stuck on Allocating disk space
If you have been stuck on allocating disk space on steam you know how annoying this error could be. Here you are, with your new game eager to play it and relax a little and all of the sudden steam gets stuck on allocating disc space. Luckily this error is fixable, follow provided guide to fix the error and continue with installing the game.
  1. Restart computer

    An old age solution of turning it off and turning it back on but in this case, it works 90% of the time.
  2. Run Steam as administrator

    Allocating disk space when done by a third-party application can be a task that requires privileges higher than the normal user. Find the steam executable file in the installation folder, right-click on it and run it as an administrator
  3. Clear Steam cache

    Launch Steam in admin mode. Once in the client, click on Steam at the top left corner of the screen. From the drop-down box, click on Settings. Once in the Settings, navigate to the Downloads tab. Click the Clear Download Cache option. Click OK on the prompt to confirm your action. Wait for the process to complete. When done, save changes and exit the client.
  4. Change download server

    Launch Steam client in admin mode. Once in the client, click on Steam at the top left corner of the screen. From the drop-down box, click on Settings. Once in the Settings, navigate to the Downloads tab. Click the drop-down menu under the Download Region. Choose a different server to download from. Exit the Steam client.
  5. Refresh installation files

    • Kill a Steam process in Task Manager.
    • Navigate to your Steam folder
    • Inside the Steam folder, select everything except the steamapps folder and the Steam.exe executable file.
    • Tap the Delete key on your keyboard.
  6. Turn off firewall

    Firewall can prevent steam and cut access to system operations, disable firewall to fix this issue.
  7. Stop overclocking

    If you have overclocked your PC, you can simply reverse the change. The steps you will need to take depends on the overclocking software. Launch the software and look for the option to stop the overclocking. Once done, restart your computer, rerun the game installation.
Read More
How to Install SafeBytes Anti-Malware Software When Malware Blocks or Prevents the Process
All malware is detrimental and the magnitude of the damage will vary greatly depending on the type of infection. Some malware variants modify internet browser settings by adding a proxy server or modify the PC's DNS settings. When this happens, you'll be unable to visit certain or all the sites, and therefore not able to download or install the required security software to clear out the computer malware. If you’re reading this article, chances are, you’re stuck with a virus infection that is preventing you from downloading and/or installing the Safebytes Anti-Malware program on your computer. Refer to the instructions below to remove malware through alternate methods.

Method 1: Install Anti-Malware in Safe Mode with Networking

If the malware is set to load automatically when Microsoft Windows starts, entering safe mode may block the attempt. Since only the minimal applications and services start-up in safe mode, there are rarely any reasons for conflicts to happen. You will need to do the following to remove malware in Safe mode.
  • 1) Tap the F8 key continuously as soon as your computer boots, however, before the large Windows logo or black screen with white texts come up. This would invoke the Advanced Boot Options menu.
  • 2) Choose Safe Mode with Networking using arrow keys and press Enter.
  • 3) When you are into this mode, you will have access to the internet once again. Now, utilize your web browser normally and download Safebytes Anti-Malware.
  • 4) After installation, do a complete scan and allow the software to get rid of the threats it detects.

Method 2: Utilize An Alternate Internet Browser to Download Anti-Malware Software

Malicious program code may exploit vulnerabilities in a specific web browser and block access to all antivirus software sites. If you suspect that your Internet Explorer has been hijacked by computer malware or otherwise compromised by cybercriminals, the most effective plan of action is to switch to an alternate web browser such as Chrome, Firefox, or Safari to download your chosen security program - Safebytes Anti-Malware.

Download SafeBytes Anti-Malware for Malware Removal

Method 3: Install and Run Anti-Malware From a USB Drive

To effectively remove the malware, you might want to approach the problem of installing an antivirus software program on the affected computer from a different angle. Adopt these measures to employ a flash drive to fix your infected computer.
  • 1) Use another malware-free PC to download Safebytes Anti-Malware.
  • 2) Plug the thumb drive into the uninfected computer.
  • 3) Double click on the executable file to open the installation wizard.
  • 4) Choose the drive letter of the USB drive as the place when the wizard asks you exactly where you would like to install the anti-virus. Follow activation instructions.
  • 5) Now, transfer the thumb drive to the infected computer.
  • 6) Double-click the antivirus program EXE file on the USB flash drive.
  • 7) Click on the “Scan Now” button to start the malware scan.
If no other method of downloading and installing the antivirus software works, then you've no other option than to hit the last resort: a full Windows reinstallation, the only approach known to have a 100% rate of success at virus removal.
Read More
Windows SmartScreen can’t be reached right now
SmartScreen is a cloud-based anti-phishing and anti-malware component that’s come packed in all Windows 8 (8.1) and Windows 10 versions. This security component is also used in several browsers and programs like Internet Explorer, Microsoft Edge and Outlook.com. Although this program is quite useful, there’ve been reports that SmartScreen is apparently blocking Microsoft’s own apps from opening. According to some users, they only get the “Windows SmartScreen can’t be reached right now” error message every time they try to open apps from the built-in Windows suite like Photos, Mail, Alarms, Maps, etc. Whenever Windows SmartScreen is either down or unreachable on an end-user PC, your computer won’t be able to download anything in both official and unofficial channels. This error might be due to a corrupted Windows account, or it could be that SmartScreen is disabled from the Windows Defender Security Center or it might be down due to an MS issue. In addition, the error might also be caused by a proxy entry.

Option 1 – Make sure that SmartScreen is enabled

Before anything else, the first thing you must do is to check if SmartScreen is even enabled as it might be the reason why you’re getting the error. You can verify this by simply going to the Windows Defender Security Center. To do so, follow the steps below.
  • Tap the Win + R keys to open the Run dialog box.
  • Next, type “ms-settings:windowsdefender” in the field and hit Enter to open the Windows Defender Security Center.
  • After that, click on the Open Windows Defender Security Center button located under Windows Security.
  • Then click on App & browser control.
  • From there, make sure that the Check apps and files toggle is set to Warn and then check the same thing for Microsoft Edge and SmartScreen for Microsoft Store apps.
  • If it turns out that SmartScreen is indeed disabled, you have to restart your computer after making some changes and then check if the issue is fixed upon the next startup.

Option 2 – Check if SmartScreen is down for maintenance

Another possible reason why SmartScreen is not working is that it might be scheduled for maintenance. When SmartScreen is scheduled for maintenance, it will become unreachable for a lot of users at the same time and so before you go over unnecessary troubleshooting steps, you need to verify if SmartScreen is down for maintenance or not.

Option 3 – Try to disable the proxy server

If applicable, you can try to disable the proxy server to fix SmartScreen. There are some users who reported that they’ve fixed the problem after they’ve disabled the use of a proxy server using the built-in way. In some instances, certain proxy servers can interfere with the SmartScreen component and cause it to become unusable. However, if you are not using a proxy server, just skip this option and proceed to the next one, otherwise, follow the steps below to disable the proxy server.
  • Tap the Win + R keys to open the Run dialog box.
  • Next, type “ms-settings:network-proxy” in the field and hit Enter to open the Proxy tab under Settings.
  • After that, scroll down to the Manual proxy setup and make sure that the toggle button of the “Use a proxy server” option is turned off.
  • Now restart your PC and check if the problem is fixed upon the next startup.

Option 4 – Try to create a new Windows user account

There are some users who were able to fix the problem by simply creating a new Windows user account. Although this solution will make you lose a couple of settings enforced through your user account, it’s actually effective in circumventing the “Windows SmartScreen can’t be reached right now” error. To create a new Windows user account, here’s what you have to do:
  • Tap the Win + R keys to open the Run dialog box.
  • And then type “ms-settings:otherusers” in the field and hit Enter to open the Family & other people tab under the Accounts menu.
  • After that, click on the “Add someone else to this PC” option and then click on “I don’t have this person’s sign-in information.
  • Next, insert the user credentials like emails, password, birth date, etc., and then click Next. Take note that if you want to create a new local user account, just click on Add a user without a Microsoft account.
  • After you’re done creating the new Windows user account, click the start icon and then click the account icon and choose to Sign out.
  • After you’re logged in, check if SmartScreen now works properly or not.
Read More
Enable or Disable Auto-Mounting in Windows
Every time a new drive or any storage device is connected to a Windows 10 computer, the operating system tends to allot a drive letter to it automatically. Not only that, as the OS also maps the location of the drive which helps it point the letter to the exact port location of the drive and serve requests from the user. As a result, it builds up a bit of cache as per the pattern in which the user uses the storage of the computer. This whole process is known as “Auto Mounting” which works for hard disks or optical drive readers that are connected using the SATA ports and even for USB drives that are connected using the USB ports. There are several ways you can enable or disable the Auto-Mount feature in Windows 10. You can do it using the MountVol tool or the Registry Editor or the Diskpart utility. Before you proceed, it is recommended that you create a System Restore point first so that you can always undo the changes you made in case anything goes wrong.

Option 1 – Enable or disable Auto Mounting via MountVol tool

In this option, you will be using the mountvol command in the Command Prompt. Refer to the steps below.
  • Tap the Wins key once and type in “command prompt” in the field.
  • From the search results, right-click on Command Prompt and select the “Run as administrator” option to run it with admin privileges.
  • Next, type the following command and tap Enter to enable the Auto Mount feature:
mountvol /E
  • On the other hand, if you want to disable the Auto Mount feature, type the following command instead:
mountvol /N
  • After that, type the command below to remove all the previously assigned drive letters:
mountvol /R
  • Finally, restart your computer.

Option 2 – Enable or disable Auto Mounting via Registry Editor

  • Tap the Win + R keys to open the Run dialog box.
  • Then type “Regedit” in the field and tap Enter to open the Registry Editor.
  • After that, navigate to this registry key: ComputerHKEY_LOCAL_MACHINESYSTEMCurrentControlSetServicesmountmgr
  • Next, look for a DWORD named “NoAutoMount”. If you can’t find a DWORD with that name then simply create a new DWORD with the same name and make sure that the base is selected to Hexadecimal.
  • Now double click on that DWORD and change its value to 0 if you want to enable it, otherwise, input 1 as its value to disable it.
  • Restart your computer.

Option 3 – Enable or disable Auto Mounting via Diskpart utility

  • Tap the Wins key once and type in “command prompt” in the field.
  • From the search results, right-click on Command Prompt and select the “Run as administrator” option to run it with admin privileges.
  • After opening Command Prompt as admin, type the following command and hit Enter to launch the Diskpart utility:
diskpart
  • After that, a User Account Control prompt will appear. Just click on the Yes button.
  • Next, type the following command and hit Enter:
automount
  • Following the command you entered, you will an output that either says, “Automatic mounting of new volumes enabled” or “Automatic mounting of new volumes disabled” which means you can use it to check the status of Auto Mount.
  • Now if you want to enable the Auto Mount feature, type the following command and tap Enter:
automount enable
  • And if you want to disable the Auto Mount feature, just enter the following command:
automount disable
  • To remove all the assigned letter and history of drives that were connected previously, type the following command:
automount scrub
  • Finally, restart your computer.
Read More
Comparing FAT32, NTFS, exFAT file system
When we get ourselves a new USB stick, new hard drive, or any storage device not including optical drives they are usually preformatted and ready to be used out of the box. However, reformating them has several benefits and while we are reformatting we can choose in which file system format we want the memory to be formatted. In this article, we will compare and explore 3 typical and standard format options you can get while formating a new media in Windows 10.

FAT32

The oldest one on the list, coming all the way from DOS days. Great for devices that need to be plugged in different operating systems and for USB flash drives. Its advantages are compatibility with all major operating systems and little memory usage comparing to other ones. However, the file system is limited to file sizes of the maximum capacity of 4GB and partitions can not exceed more than 32GB.

NTFS

First introduced in Windows NT this file system offered slower performance than FAT32 and somewhat limited usability but the main advantages were more stability and fewer errors. Its main advantages are support for files larger than 4GB and partitions larger than 32GB along with the ability for on the file encryption, main disadvantage would be limited operating system usage, NTFS can not be used on systems that work on FAT32 like MS-DOS for example or older versions of Windows. The best usage for this file system is in internal hard disk drives and system drives.

exFAT

New kid on the block, well at least from the perspective of the previous 2. exFAT offers unlimited file sizes and unlimited partition sizes but at a price that is even more limiting than NTFS. Some Linux distributions will require a driver to be installed in order to see the exFAT partition. The best use is in storage, in external hard drives. That's it, 3 major file systems, we hope that you have managed to learn something new today, and remember to drop by tomorrow for more articles about advice, tips, tricks, and troubleshooting.
Read More
Fix MOZILLA_PKIX_ERROR_MITM_DETECTED
If you’re having some problem browsing multiple websites on the Firefox browser on your Windows 10 computer, then this post might be of help. One of the most common problems you could encounter in Firefox is mostly related to HTTPS and one of them is the MOZILLA PKIX ERROR MITM DETECTED or ERROR SELF SIGNED CERT or SEC ERROR UNKNOWN ISSUER error which means that Firefox was unable to trust certificates issued on secured websites. If you encounter the MOZILLA_PKIX_ERROR_MITM_DETECTED error in Firefox, this indicates that something in your network or system is interrupting your connection and injecting certificates and when that happens, Firefox won’t trust it. In such cases, one of the culprits is malware. Malware will try to replace a legitimate certificate with its certificate. Another cause is security software where it keeps a tab on a secure connection and creates a false positive, for instance:
“In Microsoft Windows accounts protected by Family Safety settings, secure connections on popular websites like Google, Facebook and YouTube might be intercepted and their certificates replaced by a certificate issued by Microsoft in order to filter and record search activity.”
And if you are connected to a corporate network, there might be a monitoring/filtering product that could be replacing certificates. Moreover, there are also users who reported getting this issue when they use the Nightly version of Firefox. And if that’s the case, you have to try accessing secure websites using only the stable build especially when it comes to payments. However, if you are not doing that, then here are some options you need to check out.

Option 1 – Try turning off HTTPS Scanning on your security and antivirus programs

Each security-based software has a security option that allows you to turn off the HTTPS scanning functionality. They may be available under different names such as HTTPS Scanning, Scan SSL, Show safe result, Do not scan encrypted connections, etc. Find what is applicable for your security or antivirus software and then try turning it off temporarily and see if it helps in fixing the MOZILLA_PKIX_ERROR_MITM_DETECTED error in Firefox.

Option 2 – Try to disable security.enterprise_roots.enabled

The next thing you can do if the first option didn’t work is to disable security.enterprise_roots.enabled which is an HTTPS certificate check on Firefox. Note that this is not recommended but you have to at least try in order to fix the error.
  • Open Firefox and then type “about: config” in the Firefox address bar and hit Enter.
  • After that, if an info message appears, confirm it.
  • Next, search for the security.enterprise_roots.enabled preference and once you found it, double click on it.
  • Then change its value to true and restart the Firefox browser once. This will import all the custom certificates from the other security software into Firefox. As a result, it will make sure to mark those sources as trusted and you won’t get the MOZILLA_PKIX_ERROR_MITM_DETECTED error.
Read More
1 2 3 171
Logo
Copyright © 2023, ErrorTools. All Rights Reserved
Trademark: Microsoft Windows logos are registered trademarks of Microsoft. Disclaimer: ErrorTools.com is not affiliated with Microsoft, nor claims direct affiliation.
The information on this page is provided for information purposes only.
DMCA.com Protection Status