In case you don’t know, the Windows Script Host provides capabilities such as batch files but it also includes many other features like it can be used by a user manual as well as created by the operating system to automate the flow of operations in the system. However, there are a lot of errors that could take place in such a process. One of them is the following error:
“Script: <PATH of the VBS Script>
Line: x
Char: x
Error: The description of the error.
Code: xxxxxxxx
Source: (Source of the error)”
At the time of writing, it isn’t clear yet what the root cause of the error really is but there are several potential fixes you can check out to fix it. You can try to run the System File Checker or set the default value for the .vbs key, or troubleshoot the problem in a Clean Boot State. You could also try to repair Install Windows 10 or scan your computer for malware. For more detailed instructions refer to the following options.
Setting your computer in a Clean Boot State can help you diagnose and later troubleshoot the problems in your computer. During this state, the system will start with a minimal number of drivers and startup programs that help in isolating the problem with the interfering software. To put your computer in a Clean Boot State, follow the given steps below.
It is possible that your computer is infected with malware which could be why you’re getting the Windows Host Script error. Thus, you need to scan your computer using Windows Defender.

 Parallels is an application developer for MAC OS mostly known for its PC virtualization software Parallels Desktop, a PC virtualization software running on Macs enabling running Windows and Linux with respective software on your MAC.
With its latest Desktop 17 version, the software can run natively on both Intel-based and M1-based MACs. Thanks to this feature MAC users will be able to benefit from various speed improvements while running both Windows 10 or Windows 11 preview.
On both Intel and M1 setups, Parallels resumes Windows and Linux up to 38% faster, provides an up to 25% bump in 2D graphics and a six-time increase in OpenGL graphics processing. M1-centric stats include 33% faster Windows start-up times, up to 28% faster DirectX 11 performance, and up to 20% better disk performance on Windows 10 Insider Preview.
Parallels Desktop 17 delivers a set of fresh features including a new video driver that enhances video and game playback and boosts Windows UI responsiveness. An improved Coherence mode lets users run Windows apps within the Mac environment, cutting down on distracting changes in appearance during Windows sign-in, shut down, and software updates.
Drag-and-drop operations are also improved, with support for text and graphics between Mac and Windows applications. This function works well with MAC OS Monterey's Quick Note feature, which can accept content from any Windows app.
USB support, disk management, copy and paste unformatted text, and automatic virtual machine optimization also receive upgrades.
Parallels is an application developer for MAC OS mostly known for its PC virtualization software Parallels Desktop, a PC virtualization software running on Macs enabling running Windows and Linux with respective software on your MAC.
With its latest Desktop 17 version, the software can run natively on both Intel-based and M1-based MACs. Thanks to this feature MAC users will be able to benefit from various speed improvements while running both Windows 10 or Windows 11 preview.
On both Intel and M1 setups, Parallels resumes Windows and Linux up to 38% faster, provides an up to 25% bump in 2D graphics and a six-time increase in OpenGL graphics processing. M1-centric stats include 33% faster Windows start-up times, up to 28% faster DirectX 11 performance, and up to 20% better disk performance on Windows 10 Insider Preview.
Parallels Desktop 17 delivers a set of fresh features including a new video driver that enhances video and game playback and boosts Windows UI responsiveness. An improved Coherence mode lets users run Windows apps within the Mac environment, cutting down on distracting changes in appearance during Windows sign-in, shut down, and software updates.
Drag-and-drop operations are also improved, with support for text and graphics between Mac and Windows applications. This function works well with MAC OS Monterey's Quick Note feature, which can accept content from any Windows app.
USB support, disk management, copy and paste unformatted text, and automatic virtual machine optimization also receive upgrades.  Error Causes
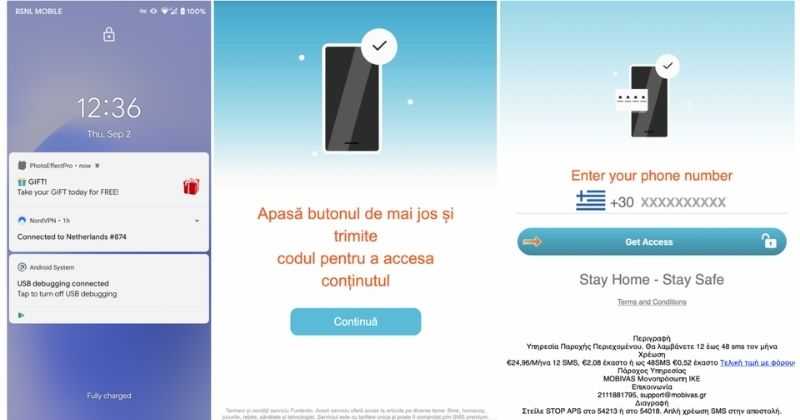 According to Zimperium zLabs, this malware that was recently detected has been doing its scams and attacks even in November of 2020 and has thus far accumulated hundreds of thousands of dollars in its scam.
On the surface it looks very harmless, asking for typical permissions like internet access, calls, and other related needed functions, and then it waits. After few months the real attack happens when users get charged with premium service they never subscribed to in the first place.
According to Zimperium zLabs, this malware that was recently detected has been doing its scams and attacks even in November of 2020 and has thus far accumulated hundreds of thousands of dollars in its scam.
On the surface it looks very harmless, asking for typical permissions like internet access, calls, and other related needed functions, and then it waits. After few months the real attack happens when users get charged with premium service they never subscribed to in the first place.
Error Code 0x80070032 is a command that most often relates to codes or commands that have not been entered correctly or do not apply to the given program. It can also appear when mail folders in Windows Mail are not able to sync in the way that they should between the local device and the servers owned by Microsoft.
Common symptoms include:
The primary methods used to address Error Code 0x80070032 are fairly basic and easy to complete. Most users should be able to complete these methods on their own and they do not require a lot of time to do. However, if you don’t feel like you have the experience, skills, or knowledge necessary to complete the steps listed below, consider getting in touch with a qualified Windows repair technician to assist you.
Error CausesThere are three basic methods that users can try in order to resolve Error Code 0x80070032 on their machine. These are fairly simple and easy to complete. However, if the methods below aren’t successful in resolving the error code or if you do not feel confident in your ability to use them, get in touch with a certified Windows repair professional to assist you.
If you believe that you are seeing the error due to entering a command that didn’t work, use Method One first. If you believe it is due to a mail syncing error, use Methods Two or Three.
Here are the top methods for addressing Error Code 0x80070032:
If you believe that you are experiencing Error Code 0x80070032 because of a command that you have entered, the best solution is to reinstall the program in which you were entering the command. You may also want to try updating your program, if able, before reinstalling it. Remember to restart the computer before reattempting to enter in the command that caused the error.
For many users, Error Code 0x80070032 appears because of a bug in one of the versions of Windows 10. If you believe that this is the case, open up your Windows Updates and check to see if there are any updates that you can install.
For users who are only seeing Error Code 0x80070032 because of the bug mentioned above, Windows released an update that should address the error code on its own. If your computer is fully updated, the error may be resolved on its own. Always remember to restart your computer after installing updates so that the necessary changes can take effect.
If the above methods did not resolve the problem successfully, you can switch to local access to your Windows Mail, rather than relying on Microsoft access. To do so, complete the following steps:
Once this is done, you can switch back to your Microsoft account, which should reset your syncing ability. Follow these steps to switch back:
“Error 2753, The File is not marked for installation.”Note that this kind of error is not bound to only some specific files but it can also happen with any file, be it an executable file or an MSI file. To fix this error, here are some possible solutions that you could try.
 Probably tired of even trying to hide it, Steam has released that this year's big Steam Winter sale is officially starting on December 22nd, 2021, and closing on January 5th, 2022. So if you have someone to buy a gift or just want to drop a few great games in your library at a low price this is the time when you should do it.