Hard drive shows wrong free space

If you are using your computer and you notice that Hard drive shows high space utilization even if you only have a few applications installed on your computer, then you’ve come to the right place as this post will guide you on what you can do to sort this problem.

Upon noticing the odd state of your hard drive and you check the actual volume that’s occupied by the apps in your drive and you see that they are not really occupying a lot of space. This kind of issue could indicate that your hard drive is not showing the correct value for the free storage space of the drive-in your Windows 10 computer.

This kind of problem could be passed off as a system bug, however, it could also be a serious problem. In fact, as you are aware, there are hidden folders and files in your computer that could be occupying space and since most of them are associated with system applications, you might not realize it unless you thoroughly check the folders.

The most common causes of the issue are as follows:

  1. The system information folder might be utilizing a lot of space. If you wonder where the information for the system restore points is stored, they are stored in the system information folder which in turn is stored in the drive as a hidden file.
  2. An issue with system maintenance could cause the problem.
  3. Malware or some other software might have created an undetectable hidden file.
  4. Space could be occupied by the trashbin folder.
  5. These hidden files could occupy significant space in the folder, thus slowing down the system and impacting its performance. If you face this issue, try our suggestions and see if they help you.
  6. Run ChkDsk
  7. Clear all Junk files
  8. Reduce the space occupied by the system restore points
  9. Run the System Maintenance troubleshooter

Option 1 – Run CHKDSK utility to check the drive for errors

When it comes to some issues concerning the hard drive or removable devices, there is a utility in Windows that might help which is called “chkdsk”. To use it, follow the steps below.

  • Tap the Win + S keys to open the Search box.
  • Then type “command prompt” in the field and from the search results that appear, right-click on Command Prompt and select “Run as administrator”.
  • After opening an elevated command prompt, copy and paste the following command and hit Enter:

CHKDSK [volume [[path] filename]] [/F] [/V] [/R] [/X] [/C] [: size]]

Note: In the command given above, “[/F]” will try to fix the system errors while “[/R]” will be the one to fix the bad sectors.

  • Now if you are prompted to run CHKDSK after your reboot your PC, just tap Y and reboot your PC.
  • If CHKDSK is not able to find any errors, tap the Win + E keys and navigate the access window. From there, right-click on the concerned drive and click on Properties.
  • After opening Properties, click on the tab Tools and then click on the “Check” button under the Error-checking section.
  • Wait until the process is completed and then restart your computer.

Option 2 – Try to delete the temporary files

The error could be caused by some temporary or junk files in your computer and so you need to clear them up to fix the problem. You can achieve that using the Storage Sense feature.

  • Open Setting > System > Storage from the WinX Menu.
  • From there, you will see a list of all the local and connected storage devices along with the details on the free space. Make sure that Storage Sense is on.
  • Next, find a link that says “Free Up Space” and click it to open.
  • After that, a screen which is the built-in program in Windows 10 will appear and will scan your computer for the following junk files so you can free up disk space: 
    • Windows Upgrade Log Files
    • The system created Windows Error Reporting Files
    • Thumbnails
    • Temporary Internet Files
    • Previous Windows Installation Files
    • Delivery Optimisation Files
    • DirectX Shader Cache
  • Choose the files you want to get rid of and then click on the remove files option. Note that you’ll have an idea of the total size as you select any of the junk files listed above.
  • Now go to the “Free Up Space Now” section and click the Clean Now button. This will get rid of all the temporary or junk files in your computer and should hopefully fix the error.

Option 3 – Try to reduce the space occupied by the system restore points

In case you don’t know, system restore points actually occupy a significant space in your computer which is stored in the System Information folder. Thus, you need to check the size of this folder and unhide the folders and files and then click on the folder. The size of the folder should be displayed in the right pane of the window. To fix the storage space problem, you could delete all the old System Restore Points as well as Previous versions of files or you could also restrict the disk usage of the System Restore points.

Option 4 – Try to run the System Maintenance troubleshooter

The problem could also be caused by the System Maintenance and to fix it, you have to run the System Maintenance troubleshooter by following these steps:
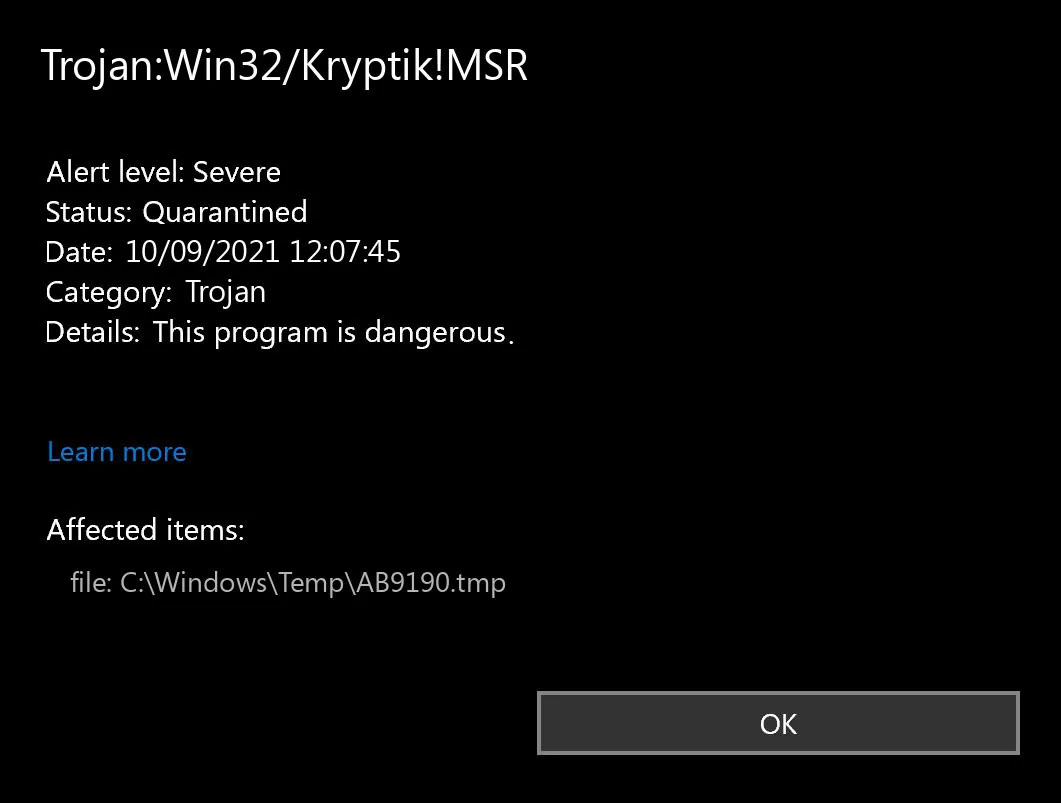
  • In the Windows Search bar, type “control panel” and double click on Control Panel from the search results.
  • Next, go to this path: Control PanelAll Control Panel ItemsTroubleshootingSystem and Security.
  • After that, click on the System Maintenance troubleshooter to run it.
  • Once the process is completed, restart your computer.

Do You Need Help with Your Device?

Our Team of Experts May Help
Troubleshoot.Tech Experts are There for You!
Replace damaged files
Restore performance
Free disk space
Remove Malware
Protects WEB browser
Remove Viruses
Stop PC freezing
GET HELP
Troubleshoot.Tech experts work with all versions of Microsoft Windows including Windows 11, with Android, Mac, and more.

Share this article:

You might also like

How to remove Easy Home Decorating (easyhomedecorating.com) toolbar

Easy Home Decorating is a Browser Extension for Google Chrome. It offers users tips and tricks on how to manage your home decoration, you can find ideas for certain rooms, combine and plan. This might seem useful at the start, however, all this extension does is add a toolbar that links you to the most popular Home Decor Websites that you can find on any Search engine within seconds.

When installed it changes your default search engine and new tab page to MyWay.com or Ask.com (depending on the extension version). It monitors user browsing activity in the background, allowing it to gather visited websites, clicked links, search queries, and other user information. This data is later sent/sold to better target ads.

While using this extension you will see additional ads and sponsored content displaying throughout your browsing sessions. Several anti-virus applications have marked this extension as a Browser Hijacker and a potential security flaw and are therefore not recommended to keep on your computer.

About Browser Hijackers

Browser hijackers (sometimes referred to as hijackware) are a type of malware that modifies web browser configurations without the user’s knowledge or approval. These hijacks happen to be increasing at an alarming rate worldwide, and it could be actually nefarious and sometimes harmful too. Browser hijacker malware is developed for many different reasons. These are generally used to force visitors to a particular website, manipulating web traffic to earn ad revenue. It might seem naive, but the majority of these websites are not legitimate and can present a serious risk to your online safety. Moreover, hijackers could make the whole infected system vulnerable – other destructive malware and viruses would use these opportunities to get into your computer effortlessly.

How one can know if your browser has been hijacked

Here are some signs and symptoms that suggest you’ve been hijacked: your web browser’s home page is suddenly different; if you enter a URL, you find yourself regularly directed to a different site than the one you meant; the default online search engine is modified; unsolicited new toolbars are added to your web browser; you see a lot of pop-up ads on your computer screen; your web browser gets slow, buggy, crashes frequently; you can’t visit specific websites like home pages of security software.

How does a computer get infected with a browser hijacker?

Browser hijackers infect computer systems in numerous ways, including through a drive-by download, a file-share, or an infected email. They can also come from any BHO, extension, add-on, toolbar, or plug-in with malicious purpose. Other times you might have inadvertently accepted a browser hijacker as part of a software bundle (generally freeware or shareware). Examples of well-known browser hijackers are Fireball, GoSave, Ask Toolbar, CoolWebSearch, Babylon Toolbar, and RocketTab. Browser hijackers could affect the user’s web browsing experience significantly, monitor the websites visited by users and steal private information, cause difficulty in connecting to the web, and finally create stability problems, causing programs and systems to freeze.

How you can fix a browser hijack

Certain kinds of browser hijackers can be effortlessly removed from your PC by deleting malicious software applications or any other recently installed shareware. But, many hijackers are very hard to identify or eliminate as they might get themselves associated with some important computer files which allow it to operate as a necessary operating system process. Rookie computer users should never try the manual form of removal methods since it requires comprehensive computer knowledge to carry out repairs on the computer registry and HOSTS file. Anti-malware application is really efficient with regards to picking up and removing browser hijackers that normal anti-virus application has overlooked. To eradicate any kind of browser hijacker from your PC, you can download this certified malware removal program – SafeBytes Anti-Malware. Employ a system optimizer (like Total System Care) together with your antivirus software to solve various registry issues, remove system vulnerabilities, and improve your computer's overall performance.

How To Install Safebytes Anti-Malware On An Infected PC

All malware is bad, but certain kinds of malware do much more damage to your PC than others. Some malware is designed to restrict or prevent things that you wish to do on your personal computer. It may well not permit you to download anything from the net or prevent you from accessing some or all of the websites, especially the anti-virus sites. If you’re reading this article, you probably have got infected by a virus that prevents you from downloading a computer security program such as Safebytes Antimalware on your PC. There are some steps you can take to get around this issue.

Install in Safe Mode

The Windows OS has got a special mode known as “Safe Mode” in which just the bare minimum required programs and services are loaded. If the malware is blocking access to the internet and affecting your PC, running it in Safe Mode allows you to download antivirus and run a scan while limiting possible damage. In order to get into Safe Mode or Safe Mode with Networking, press the F8 key while the computer is starting up or run MSCONFIG and locate the “Safe Boot” options in the “Boot” tab. Once you are in Safe Mode, you can attempt to download and install your antivirus program without the hindrance of the malicious software. Now, you can run the antivirus scan to eliminate viruses and malware without any interference from another application.

Switch to an alternate internet browser

Web-based malware could be environment-specific, aiming for a particular web browser or attacking specific versions of the browser. In case you suspect that your Internet Explorer has been hijacked by a computer virus or otherwise compromised by cybercriminals, the most effective course of action is to switch to a different internet browser such as Chrome, Firefox, or Safari to download your favorite computer security software – Safebytes Anti-Malware.

Run anti-virus from a USB drive

Another solution is to save and operate an antivirus software program entirely from a Thumb drive. To run antivirus using a thumb drive, follow these simple steps: 1) On a clean PC, download and install Safebytes Anti-Malware. 2) Put the USB drive into the uninfected PC. 3) Double-click the Setup icon of the anti-malware program to run the Installation Wizard. 4) When asked, choose the location of the USB drive as the place in which you would like to store the software files. Follow the instructions to finish the installation process. 5) Now, insert the pen drive into the infected PC. 6) Double-click the EXE file to open the Safebytes program right from the flash drive. 7) Click “Scan Now” to run a complete scan on the affected computer for viruses.

SafeBytes Anti-Malware Overview

To help protect your laptop or computer from various internet-based threats, it’s very important to install an anti-malware program on your PC. But with countless numbers of antimalware companies out there, these days it’s challenging to decide which one you should buy for your PC. Some of them are good, some are ok types, while some will harm your PC themselves! You must pick a company that builds industry-best anti-malware and has gained a reputation as reliable. Amongst few good programs, SafeBytes Anti-Malware is the highly recommended software program for the security-conscious user. SafeBytes is a powerful, real-time anti-spyware application that is designed to assist the everyday computer end user in safeguarding their computer from malicious internet threats. With its cutting-edge technology, this application will allow you to remove several types of malware including viruses, trojans, PUPs, worms, ransomware, adware, and browser hijackers.

There are plenty of great features you’ll get with this particular security product. Listed here are a few of the great ones:

Real-time Threat Response: SafeBytes offers real-time active checking and protection from all known viruses and malware. It’ll monitor your PC for suspicious activity continuously and its unparalleled firewall shields your PC from illegal access by the outside world. Antimalware Protection: Built upon a greatly acclaimed anti-virus engine, this malware removal tool can find and get rid of many obstinate malware threats such as browser hijackers, PUPs, and ransomware that other typical anti-virus software will miss. Website Filtering: SafeBytes checks and gives a unique safety rating to every website you visit and block access to webpages known to be phishing sites, thus protecting you against identity theft, or known to contain malicious software. Lowest CPU and RAM Usage: SafeBytes provides complete protection from internet threats at a fraction of the CPU load due to its advanced detection engine and algorithms. Premium Support: For any technical questions or product support, you could get 24/7 expert assistance through chat and email. Overall, SafeBytes Anti-Malware is a solid program as it has lots of features and could detect and remove any potential threats. You can be sure that your PC will be protected in real-time once you put this software program to use. You will get the very best all-around protection for the money you pay on SafeBytes Anti-Malware subscription, there’s no question about it.

Technical Details and Manual Removal (Advanced Users)

If you don’t wish to use an automated tool and prefer to get rid of Easy Home Decorating manually, you might accomplish this by going to the Windows Add/Remove Programs menu in the control panel and removing the offending software; in cases of web browser add-ons, you could remove it by visiting the browser’s Add-on/Extension manager. Additionally, it is suggested to factory reset your web browser settings to their default state. To make sure of complete removal, find the following Windows registry entries on your computer and delete it or reset the values appropriately. Please remember that this is for experienced users only and might be challenging, with incorrect file removal causing additional PC errors. Also, certain malware is capable of replicating itself or preventing deletion. Completing this task in Safe Mode is suggested.
Files: Search and Delete: 73Bar.dll 73bar.dll 73highin.exe 73medint.exe 73regfft.dll 73regiet.dll 73hkstub.dll 73reghk.dll 73barsvc.exe 73bprtct.dll 73datact.dll 73dlghk.dll 73dlghk64.dll 73feedmg.dll 73htmlmu.dll 73httpct.dll 73idle.dll 73mlbtn.dll 73Plugin.dll 73script.dll 73skin.dll 73skplay.exe 73SrcAs.dll APPINTEGRATOR.EXE AppIntegrator64.exe APPINTEGRATORSTUB.DLL AppIntegratorStub64.dll ASSISTMONITOR.DLL ASSISTMONITOR64.DLL CREXT.DLL CrExtP73.exe DPNMNGR.DLL HKFXMGR.DLL HKFXMGR64.DLL HPG.DLL Hpg64.dll T8EPMSUP.DLL T8EXTEX.DLL T8EXTPEX.DLL T8HTML.DLL 73SrchMn.exe 73srchmr.dll NP73Stub.dll 73auxstb.dll 73auxstb64.dll 73ieovr.dll 73radio.dll 73brmon.exe 73brstub.dll
Read More
Guide to Fixing Error 0x800CCC0E

Error Code 0x800CCC0E - What is it?

The error code 0x800CCC0E is an Outlook error that appears while using either Microsoft Outlook or Outlook Express. The error message hampers your ability to send and receive emails.

Solution

Restoro box imageError Causes

0x800CCC0E Outlook error code is triggered by multiple reasons including:
  • Improper connection with SMTP (Simple Mail Transfer Protocol) server
  • Damaged files
  • Registry corruption
In most cases, it’s the registry that gets corrupted which leads to the occurrence of 0x800CCC0E error code display. This typically happens when you try to update your Outlook/Outlook Express version. When updating, you need to remove all the software files of the previous Outlook version which includes the registry too. If the files are not removed from the registry, the new version update will often fail. The junk files of the old version are likely to damage and corrupt the registry.

Further Information and Manual Repair

It is advisable to repair the error code 0x800CC0E right away to avoid inconvenience and system failure and fatal crashes which can lead to valuable data loss.

Cause: Improper connection with SMTP (Simple Mail Transfer Protocol) server

Solution: If the cause of the 0x800CCC0E is SMTP server connection failure, then the best way to resolve the error is to reconfigure your email account settings. Make sure that port 25 is being used in the SMTP area. Port 25 is the standard outgoing mail port. If the SMTP setting is on port 25 then another reason for the error 0x800CCC0E can be your anti-virus or firewall software enabled on your PC. Turn it off for a moment and then try sending emails from your Outlook.

Cause: Damaged Files and Registry Corruption

Solution: If the error code is triggered due to registry corruption and file damage, then the best way to resolve it is to download Restoro. Restoro is a safe, efficient, and highly functional inbox cleaner and a system optimizer embedded with numerous powerful utilities designed to repair multiple PC-related errors including the error code 0x800CCC0E when triggered by registry corruption. This cutting inbox cleaner scans your PC entirely and detects all the unnecessary and malicious files saved in your system’s registry like junk files, internet history, invalid entries, and files of the uninstalled programs. These files take up most of the registry disk space thus causing the registry files to get damaged and corrupt and triggering error codes like 0x800CCC0E. With the help of Restoro,  you can easily wipe out all such files from your system in just one click. After scanning for errors all you need to do is click the repair tab to make your registry disk clutter-free. Once the clutter is removed, update the new version of the Outlook/ Outlook Express again on your system and then try sending emails. You’ll see two noticeable differences after repairing your PC with Restoro. One is that you will be able to install the new version and send emails smoothly from your Outlook account without any 0x800CCC0E error pop-ups. And the second difference you’ll see is the change in your PC performance. This tool optimizing your PC speed and reduces boot time. This tool is very simple and easy to use. It has a neat design layout and a user-friendly interface which makes it easy for all levels of users to use Restoro smoothly with zero complexity. In just a few clicks the error message 0x800CCC0E is resolved. What makes this tool a favorite among users is that it does not require any skills or technical know-how. To get started here’s what you need to do:
  1. Click here to download Restoro software on your PC
  2. Once the download is complete, run it to scan for 0x800CC0E error
  3. After the scanning is successfully complete, click on the Repair button to fix the error right away.
  4. Then install the new version of Outlook/ Outlook Express again on your system
Read More
A Quick Guide to Resolving Error 0x800ccc17

What is error 0x800ccc17?

This is a typical Outlook Express error code. Outlook Express is email software by Microsoft. This error may pop up when sending or receiving emails on your Outlook Express. It cancels email sending and receiving operations. In other others, the 0x800ccc17 error code hampers your email communication via Outlook Express account. This error message is displayed in the following format:
0x800CCC17 - User cancelled operation

Solution

Restoro box imageError Causes

0x800ccc17 error code may appear on your PC due to multiple reasons. These include:
  • Issues with Pop3uid.dbx file (this file supports Outlook Express software on Windows Vista)
  • Viral infection
  • Registry corruption
No matter what the underlying reason for this error code may be, it is advisable to resolve the issue right away without any delay. This error may cause great deal of inconvenience. It may lower your office productivity badly especially if you interact and communicate with people of other office departments via your Outlook Express account.

Further Information and Manual Repair

Here are some of the best and efficient do-it-yourself methods to resolve the 0x800ccc17 error code on your system. These methods are very easy to work around and do not require any kind of technical expertise.

Method 1 - Restart Your PC

Sometimes this might error can be resolved by simply rebooting your system. So, restart your PC and try using your Outlook Express account again. If it works, the error is resolved. However, if it persists then try other methods given below.

Method 2 - Rename pop3uid.dbx File on Your System

If the underlying cause of error 0x800ccc17 is related to pop3uid.dbx file damage, then simply rename it to resolve. This can be done by searching for the file pop3uid.dbx. After locating it rename it to ‘pop3uid.bak’. Now reopen Outlook Express and try sending or receiving emails again. If the operations are executed successfully then the error is resolved.

Method 3 - Remove Viruses

Viruses can infect your PC without you knowing about it. These malicious programs usually enter your system through phishing emails and file downloads. If the error 0x800ccc17 is triggered due to viral infection then it is advisable to install a powerful antivirus and remove all viruses from your PC.

Method 4 - Repair the Registry

If you don’t clean the registry frequently it fills up with unnecessary and obsolete files like junk files, cookies, internet history, and bad registry entries. These files then corrupt and damage the registry thereby generating codes like error 0x800ccc17. To resolve this, you first need to remove all these unnecessary files and repair the registry. Though this can be done manually if you are not technically sound, it may be time-consuming and slightly tricky. Therefore it is advisable to download Restoro. This is a powerful registry cleaner that wipes away all obsolete files instantly, cleans the registry, and repairs it in seconds. Click here to download Restoro and fix error 0x800ccc17 on your PC today.
Read More
Fix Printer driver issue in Windows
The printer can stop working for many various reasons, some of them are however tied to the printer driver itself. In this guide, we will address issues and provide you with advice on how to get your printer back in working order in no time. All of that being said let us fix your Printer driver issue.
  1. Check to see if the printer is plugged and that it has toner or colors and paper in the tray

    The simplest solutions are the best ones, and most of the time simplest issues are overlooked. To eliminate any basic issues check the printer cable does it has paper in the tray and check the status of toner or colors in it.
  2. Check if Windows troubleshooter will resolve the issue

    Bring up settings and choose devices, under devices click on printers and scanners. On the far right top, you have a link to start the troubleshooter, click on it. Windows built-in tools could resolve issues and fix them for you. If by any chance Windows is not able to find or resolve issues move to the next step.
  3. Check if the Device Manager is reporting an error and update the driver

    If the hardware is functioning properly then the issue might be in Windows not detecting device or driver malfunction. In any case, the Device Manager will be the one who will report this problem. In order to check to see if the driver is properly working press ⊞ WINDOWS + X to open the hidden start menu. keyboard with windows and x marked Once it opens, click on Device Manager to open it, If you have a driver device error inside Windows, you should see it immediately when entering the Device Manager, it will have a yellow exclamation mark beside it. Right-click on it and choose update driver.
  4. Reinstall driver

    If driver update failed or you already have the latest drivers, reinstalling them could fix the issue since drivers might have corrupted during installation of some update or application. Follow steps from point 3 to get to the driver in Device Manager, then right-click on it but instead of update choose to uninstall. Reboot Windows once the driver is uninstalled and Windows will install a new one automatically. If you do not want to update drivers automatically install the latest driver for your device, then reboot.
  5. Check Windows update

    Check to see if the latest Windows update is installed, update your Windows if needed
  6. Fix driver issue with DRIVERFIX

    If everything else fails, get DRIVERFIX, a premium solution for your PC issues, and fix driver errors.
Read More
Start Search is not displaying results
If you have just installed the latest Cumulative Update on your Windows 10 computer and you find that since then, the Windows 10 Start Search is not displaying any results when you try to use it to search for something in your computer, then this post might help as it will give you some suggestions to fix the problem. This problem might be caused by some bugs brought in by the new cumulative update you’ve installed. It is also possible that Cortana is having some issues or that the Windows Search service hasn’t been initialized. Whatever the cause is, here are some suggestions you need to follow to fix this issue. You can try running the Search and Indexing troubleshooter or configure the
  1. Run Search and Indexing Troubleshooter
  2. Configure the Windows Firewall
  3. Reinstall Cortana.

Option 1 – Try to run the Search and Indexing troubleshooter

The first thing you can do is to run the Search and Indexing troubleshooter in Windows 10 as it checks whether the settings for Cortana are in place and automatically corrects any issues if the update or software installation has changed the settings. To run it just click on the Start button and select Settings > Updates and Security > Troubleshoot. From there, select the Search and Indexing Troubleshooter.

Option 2 – Restart Cortana’s process in the Task Manager

Restarting Cortana’s process in the Task Manager could also help you resolve the problem. Refer to the steps given below to do so.
  • Tap the Ctrl + Alt + Del keys to open the Security options window.
  • From there, look for the Task Manager in the given list and open it.
  • Next, look for the process of Cortana and right-click on it, and then select the End Task option to end its process.
  • After that, the Cortana process will restart by itself and re-initialize.

Option 3 – Try resetting Cortana

  • Open Cortana and go to the Settings section where you’ll see the “Turning off Cortana clears what Cortana knows on this device, but won’t delete anything from the Notebook. After Cortana is off, you can decide what you’d like to do with anything still stored in the cloud” option. Turn this option off.
  • Restart your PC.
  • After your computer boots, launch Cortana again and check.

Option 4 – Try to configure the Windows Firewall

  • Tap the Win + Fn + Shift (Pause) keys to open Control Panel.
  • From there, open the Windows Defender Firewall applet and click on the Advanced Settings to open the Windows Firewall with the Advanced Security panel.
  • Next, click on the Outbound Rules section and look for Cortana and then double click on it to open its Properties.
  • After that, make sure that the “Allow the connection” is selected although this is the default working setting.

Option 5 – Try to reinstall Cortana

If none of the options given above works, you must consider reinstalling Cortana.
  • First, right-click on the Taskbar and select the Task Manager.
  • Next, select File menu > Run new task and type “Powershell” in the field and then select the “Create this task with administrative privileges” option.
  • Click on OK to open the PowerShell console.
  • After that, type the following command and hit Enter to execute it:
Get-AppXPackage -Name Microsoft.Windows.Cortana | Foreach {Add-AppxPackage -DisableDevelopmentMode -Register "$($_.InstallLocation)AppXManifest.xml"}
  • Restart your computer and check if the Windows Start Search is now working.
Read More
Can’t print a file, it opens Save as option
As you know, Windows 10 supports a variety of peripherals which includes a long list of printers. However, a number of users reported that they encountered a glitch on their Windows 10 computers where they receive Can’t print a file and a prompt to save the Word, PDF file, and so on each time they try to print the file. This kind of issue is not common and could be due to various reasons like the malfunctioning of device drivers, misconfiguration of the printer’s settings, and so on. There are several options you can check out to resolve the problem. You can try to run the built-in troubleshooter or check the configuration of the printer, as well as update or reinstall the driver for printers or reset the printer. For more details, refer to each one of the options provided below and make sure to follow them carefully.

Option 1 – Run the Printer Troubleshooter

One of the first basic troubleshooting you can perform to resolve the printer issue is running the Printer Troubleshooter. This built-in troubleshooter can detect and automatically fix the problem for you. To use it, follow these steps:
  • Tap the Win + R keys to open the Run dialog box.
  • Next, type “exe /id PrinterDiagnostic” in the field and click OK or hit Enter to open the Printer Troubleshooter.
  • Then click the Next button and follow the next on-screen instructions to fix the issue with the printer.

Option 2 – Try checking the printer’s configuration

The next thing you can do to fix the problem is to check the configuration of the printer since there are instances when there could be some misconfiguration with the settings of the printer that may result in several issues like this one.
  • First, you need to open Control Panel and from there, look for the option Devices and printers and open it.
  • After that, right-click on the entry of your printer that you want to use in printing documents and select the Set as a default printer option.
  • You could also try to open PDF and then go to the Print dialog box and uncheck the Print to file option.

Option 3 – Try to update or reinstall the printer driver

The problem with your printer might also be caused by corrupted or outdated drivers. Thus, you can try to either update or reinstall it. How? Follow the steps below.
  • First, click the Start button and type “device manager”.
  • Then click on the “Device Manager” from the search results to open it.
  • From there, look for the USB Composite Device option and right-click on it, and select the Update Driver from the options.
  • Restart your PC and then click the “Search automatically for updated driver software” option.
  • Now uninstall and remove the printer driver software and reinstall it then refresh.

Option 4 – Try to reset the settings of the Printer or reinstall it

If none of the three options given above worked, you can try to either reset the printer settings or reinstall the printer so that it can go back to its default state. However, if it doesn’t work, you can try to uninstall the printer as well as its related drivers. To do so, follow these steps:
  • First, go to Settings > Devices > Printer and Scanners.
  • After that, select the printer and select the Remove Device option.
  • Once done, restart your computer and check again and see if the error is now fixed.
Read More
Quick Fix Guide for STOP 0x00000014 Error

What Is STOP 0x00000014 Error?

0x00000014 error is actually an error that is always displayed on a STOP message.

It is also known as Blue Screen of Death, abbreviated as BSOD. When this error occurs, the message that is displayed to the user either says ‘STOP: 0x00000014’ or states ‘CREATE_DELETE_LOCK_NOT_LOCKED’. It is crucial to fix this error to ensure your program is functioning appropriately. If this error message is not rectified, you might be opened to other error messages, such as error code 0x000000d1

Solution

Restoro box image Error Causes

As far as the causes of STOP 0x00000014 error are concerned, this error usually occurs when a device driver or hardware problem occurs. This error may also occur if users attempt to run some specific application or update or modify an existing application. When a 0x00000014 error occurs, the operating system restarts to disable the PC from performing any further.

Without taking into consideration the causes of its occurrence, it is crucial to make sure that the 0x00000014 error is fixed as soon as possible to eliminate any undesired inconvenience in the future.

Further Information and Manual Repair

A lot of times when an operating system tries to recover from the STOP 0x00000014 error, the user is prompted that Windows has recovered from an unexpected shutdown.

However, if Windows fails to recover on its own, manual repair has to be performed.

While there are several ways this error can be fixed, some of the most effective and efficient ways of troubleshooting the 0x00000014 error are listed below as follows.

  • Restart your computer. Often simply restarting the computer can help eliminate the problem.
  • If restarting the system doesn’t help, find if you have recently modified or altered any hardware or driver. It is possible that the 0x00000014 error has been caused by the recent modification. Undo the changes and find out if the error occurs again. If it doesn’t, it is highly likely the issue has been resolved.

However, if the error persists, some solutions that may work are outlined below.

  • Start your system using the Last Known Good Configuration. This will undo any changes in the driver and recent registry.
  • Another solution is to manually perform System Restore. This will also return the system back to its former state.
  • Another idea that my work is to use roll back the device driver. When the driver will return to its previous version, the problem will easily be resolved.

To keep the 0x00000014 error from occurring in the future, it is advised to unplug any newly installed hardware or reinstall any deleted software.

If you're not tech-savvy and wish to get this error code rectified in a jiffy, download a powerful automated tool and perform a computer scan.

Read More
How to Fix Screen Flickering in Windows 10 Error

Screen flickering in Windows 10 - What Is It?

Screen flickering when you’re using Windows 10 is quite a common problem. It is often caused by apps that are not compatible with the operating system, or faulty display drivers.

There are a lot of possibilities for why this issue occurs. If you are one of the many users that encounter this kind of problem, you might want to check on your task manager to see if everything is working fine. One common sign that something wrong has happened is if the task manager flickers, as well. To fix this, you will need to update an app, uninstall an app, or update your display driver.

Solution

Restoro box imageError Causes

Common causes of the screen flickering when running on Windows 10 are software issues. This is most likely caused by the following:

  • Faulty display driver
  • You have an application installed that is not compatible with your operating system

Further Information and Manual Repair

In order to fix the issue of your screen flickering when you have Windows 10 as your operating system, follow these simple steps.

Note: It is very important to consult with an authorized computer technician if you are not highly confident in solving this issue by yourself. Furthermore, you can also use software to fix this problem.

  • The first method is by checking if your task manager is flickering. To open the task manager, all you have to do is right-click or press and hold the start button, then select task manager.

If you have confirmed that the task manager is the one causing the screen flickers, the display driver can possibly be your problem. To fix it, all you have to do is update your display driver.

How to update the display driver

  1. You have to reset your computer and boot it on Safe Mode.

      -In order to do this, you have to hold the Shift key while selecting Power>Restart. When your computer boots up, you will be greeted by a Choose an option screen. From there, you have to select Troubleshoot, then Advanced Options, then Startup Settings, and then Restart. When your computer restarts, select 4 or hit the F4 key to enter into Safe Mode.

  1. When your computer finally boots up in Safe Mode, right-click or press and hold the Start button. From there, click Device Manager.
  1. From the Device Manager screen, you have to expand the Display Drivers section, right-click on the driver that might be causing the problem then select Uninstall. Don’t forget to tick the Delete the driver software for this device box, press the OK button, and then restart your computer.

            - When you have two, or more, drivers installed on your computer, all you have to do is disable the other drivers. You can do this by right-clicking on the driver in the Device Manager and click the Yes box next to disable. Shut down your PC after this, disconnect the installation, and boot your computer back on.

  1. When your PC boots up after the restart, click on the Start button then click on Settings.
  1. You need to go to Update & Security, then Windows Update, and then check for updates.

            - If you are using multiple drivers and this technique doesn’t work, repeat the process in Step 3 and try to disable a different driver.

Remove an incompatible app

There are two ways to remove an incompatible app to fix the issue of a screen flicker on Windows 10. Apps like Norton AV, iCloud, and IDT Audio are usually the ones causing the problem. Uninstalling these apps could solve the problem. Uninstall the apps by using the methods below:

First Solution: Uninstall an app in Settings

  1. Click Start, and then click Settings.
  2. Click on System, and then click on Apps & Features.
  3. A window will pop up and from there you will need to select the application you wish to uninstall. Click the app, and then click uninstall. Follow the screen prompt to fully uninstall the program.

Second Solution: Uninstall an app in the Start Menu

  1. Click Start, and then click All Apps.
  2. Look for the application you will need to uninstall, right-click the said app, and then click Uninstall. Follow the screen prompt to fully uninstall the program.
[/section]
Read More
Windows Photo Viewer can’t display picture
There are instances when you open a picture or an image in the Windows Photo Viewer and instead of displaying the image, it displays nothing and you’ll see an error message instead that says, “Windows Photo Viewer can’t display this picture because there might not be enough memory available on your computer”. Although this may look like a clear-cut issue of less storage space or low RAM in your computer, that’s not always the case. Security experts noticed that even when your computer has enough resources and disk space, this kind of problem could still occur. So if you experience the same thing, you need to check the Color Profile of your screen. For more information, refer to the detailed instructions provided below but before you proceed, make sure that you close some processes in the Task Manager or restart your computer and see if it helps in fixing the problem. You can also try using the Disk Cleanup tool. To use it, refer to these steps:
  • Tap the Win + R keys to open the Run dialog box and then type “cleanmgr” in the field and hit Enter to open the Disk Cleanup window.
  • After that, select the drive you want to clean.
  • Now click OK to clean the disk and restart your computer.
If the Disk Cleanup tool didn’t help in resolving the issue, refer to the instructions below. Step 1: In the search box, type “color management” and then select the “Change advanced color management settings for display” option from the search results. Or you could simply go to Settings > System > Display, Advanced display settings, and from there, select display and click on the Display adapter properties of Display. Step 2: Next, switch to the Color Management tab and click on the Color Management button. Step 3: Select the monitor where you’re getting the “Windows Photo Viewer can’t display this picture because there might not be enough memory available on your computer” error in the next window. And if you have two displays, make sure that you select the primary display. You also have an option to identify the monitor. Step 4: Once confirmed, select the “Use my settings for this device” checkbox. Step 5: After that, select the Profile listed under the “Profiles associated with this device” option and then click on Remove. Step 6: Next, go to the Advanced tab and make sure that all settings are set to System default which includes a device profile, perceptual images, rendering intent, Relative Colorimetric, and many more. Step 7: Once you’re done, you have to restart your computer and then try to open the same image you were trying to open earlier and then check if you can now open it instead of seeing the error.
Read More
Disabling Security Questions in Windows
We’ve already covered disabling Security Questions If you want to disable Security Questions on your Windows 10 computer then you’ve come to the right place as this post will guide you in doing exactly that. In this post, you will be disabling Security Questions using a PowerShell script. This PowerShell script is called “Update-AllUsersQA”. It is designed to remove or disable the security questions and answers for local users on a Windows 10 computer. It lets administrators take control of the security questions in the environment and at the same time minimizes the risk that comes with them. If a user has a Microsoft account that’s configured to sign in to Windows 10 then he will not probably notice the Password Recovery questions. On the other hand, if he has a chosen local account for installing Windows, he will e prompted to create three security questions that can be used to reset the password and log into the Windows 10 account in case there is any misfortune. However, if you do not have much use for these Security Questions, then you can definitely have them disabled using a simple PowerShell script which you can download from GitHub. For more details on how to disable security questions in a Windows 10 machine, refer to the steps provided below. Step 1: You need to first download the .ps1 file from the GitHub repository. Step 2: Once you’ve downloaded the file, open the PowerShell window with admin privileges. Step 3: After that, navigate to the folder where you had saved the .ps1 file. Then copy the address of the folder location. Step 4: Next, change the directory by using the following command:
cd "folder location address"
Step 5: After that, enter the following script to disable the security questions:
Update-AllUsersQA
Once you’ve completed the steps above, the Security Questions should be disabled and you will be notified with a message stating that the feature has been disabled. On the other hand, if you have a change of heart and you want to enable the Security Questions back, here are some steps you need to take: Step 1: First, open the PowerShell window as admin. Step 2: Next, run the same script with one more parameter such as:
Update-AllUsersQA -answer SecretAnswer
Step 3: And that’s about it. Do not forget to replace the Secret Answer with your preferred one and once you’re done, it will be set as the answer for all the Security Questions. Step 4: Now all that’s left to do is go to the Settings app to change the answer to the questions and you should be good to go.
Read More
1 2 3 171
Logo
Copyright © 2023, ErrorTools. All Rights Reserved
Trademark: Microsoft Windows logos are registered trademarks of Microsoft. Disclaimer: ErrorTools.com is not affiliated with Microsoft, nor claims direct affiliation.
The information on this page is provided for information purposes only.
DMCA.com Protection Status