One of the primary packages that install the Windows Media Player is the Media Feature Pack among other related files that are needed by the associated software products. And one of the essential DLL files in that package is the mfplat.dll file which is needed by various games and streaming services. So if this DLL file goes missing, you will most likely encounter any of the following error messages:
“mfplat.dll missing”
“The application failed to start because mfplat.dll was not found.”
“The program can’t start because mfplat.dll is missing from your computer.”
In other circumstances, the Media Feature Package does not come pre-installed with the main Windows package especially for those who use Windows N, thereby causing the error to pop up. The main cause of this problem is that users who use Windows 10 N do not have the Media Feature pack pre-installed with the installation package. Aside from that, the installation package could go missing after a few Windows Updates or if you have uninstalled it by accident. To resolve this problem, you need to check out each one of the given options below.
Option 1 – Try to enable Media Playback via Command Prompt
If you encounter the mfplat.dll missing error when you attempt to run PLEX or other similar streaming service and you’ve already verified that the Media Feature Pack is indeed installed, you might want to try enabling it using an elevated Command Prompt. There are cases when a particular Windows Update ends up disabling the feature and creates the grounds which results in the mfplat.dll missing error. Thus, you can have to enable the feature via Command Prompt.
Tap the Win + R keys to open the Run dialog box.
Then type “cmd” in the field and hit Enter to open an elevated Command Prompt.
Next, click on Yes if a User Account Control prompt pops up.
After opening Command Prompt, copy and paste the following command and hit Enter to execute it:
Close Command Prompt and then open the app once again to check if the problem is now fixed.
Option 2 – Try installing the Media Feature Pack for Windows 10 N version
As mentioned, the Windows 10 N version does not come with Windows Media Player. Meaning to say, the Media Feature Pack is also not installed by default or won’t be updated by the Windows Update component. So if you are not quite sure what Windows 10 version you currently have installed, refer to these steps:
Tap the Windows key + S and then type “about” in the search box.
From the search results, click on the “About your PC” to open the About tab of the Settings app.
Afterward, scroll down to the Windows specifications and check your Windows version under Edition.
Note: If you have verified that your PC is using the Windows 10 N version, you need to install the appropriate Media Feature Pack for your computer. How? Refer to the steps below:
Click this link to download and install the Media Feature Pack from Microsoft’s official website.
Upon installation, select the edition you want to install using the drop-down menu and then click on Confirm. Take note that there are few reasons why you’d want to install the older version since most streaming services like PLEX and most games usually require version 1803.
After that, wait until the request is validated. The download should begin in a few minutes automatically.
Once the download is completed, open the installation executable file and follow the next on-screen instructions to install the Media Feature Pack on your computer.
Restart your computer. After your computer has rebooted, open the application where you’re getting the mfplat.dll missing error and then check if the problem is now fixed.
Option 3 – Try to extract a copy of the mfplat.dll file from the windows.old directory
If you encounter the error shortly after you just upgraded to Windows 10 from an older version, the best thing you can do to resolve the problem is to use windows.old directory to fetch an old copy of the mfplat.dll file. To do so, follow the steps below.
Go to the Windows drive and then look for the windows.old directory where it preserves a copy of your old operating system as well as associated files in case something goes out of hand during the upgrade process.
After that, open the windows.old folder and then go to the syswow64 folder.
Next, from the syswow64 folder, copy the mfplat.dll file and paste it to C:/windows/syswow64.
Restart your computer and check if the error is now resolved or not.
The newest piece of hardware for PC or console users is not really what anyone has expected and for sure not from a company like Cooler Master.
I going to admit right here that I am a big fan of Cooler Master PC cases, I like them and they are always one of the things that I consider when building a new PC, overall I like their ideas and quality so personal for me it was quite a surprise to see that they are one that is making a new generation gaming chair.
Now truth to be told Orb X is not your typical gaming chair as you can clearly see from the pictures. The chair itself will come in two colors: white or black and RGB lighting looks to be prominently featured throughout.
The chair itself is advertised as both meant and aimed for professional and gaming crowds but I believe the gaming crowd is in general more interested in this hardware piece.
Hardware is enclosed in a fully motorized shuttle dome which aims to maximize your privacy, it supports a single 49inch display or three 27inch monitors along with surround speakers if you do not wish to use headphones.
It offers an adjustable headrest, lumbar support, and footrest so you can spend some time in it and be comfortable. Controls on the chair itself allow you to raise or lower the dome for easier getting in and out of it.
Orb X also has a compartment in its backside, it folds out and has a sliding tray designed to hold your PC or console. Everything is enclosed so wiring is not the issue.
Overall Orb X seems really like the computer chair of the future, Cooler Master expects to release the Orb X by December 2021, priced around $12,000-$14,000.
Hello and welcome everyone, just a few years ago we had FLASH video content on the internet, we had FLASH games, full FLASH website experiences, and more, but then flash was shut down mostly due to security reasons meaning that in just a few months we have lost most of FLASH web content.
However, there is still FLASH content on the internet even today, there are still FLASH videos and flash games, but we can not play any of that content since browsers do not support FLASH and you can not get the FLASH plugin for browsers. So what might be the solution for this situation?
Ruffle and FLASH emulation
Emulation of course. We will not be able to get the flash player working, well at least not the original and official one, but we can make flash content playable again inside our browsers.
The first thing is first, we need to get an emulator package from the internet in order for this trick to work, one we will be using is RUFFLE. It is lightweight, it is free, it is open source and it is reliable, everything we need.
Download RUFFLE from its official website here.
For Chrome and Edge download the ZIP package, for Firefox, go to the Firefox section of the tutorial.
There is also a desktop version of RUFFLE there so if you are keen on playing your flash content on your desktop computer you might well grab that as well, but for the sake of this tutorial where we are enabling flash in our browsers, we will not focus on that part since it is pretty straightforward.
Now once you have downloaded the RUFFLE emulator, please extract it to the desired folder somewhere on your computer.
Once it is extracted, start your browser of choice and follow instructions.
FOR CHROME:
Navigate to: chrome://extensions/
Turn ON developer mode in the top right corner
Click on Load unpacked
Navigate to the folder where you have extracted RUFFLE
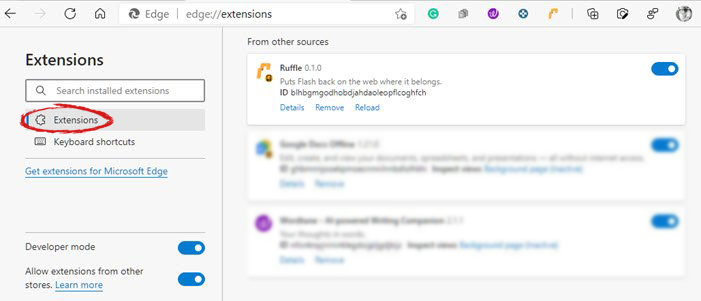
FOR EDGE:
Navigate to: edge://extensions/
Turn ON developer mode on the bottom left corner
Navigate to the folder where you have extracted RUFFLE
Turn RUFFLE ON
FOR FIREFOX:
Go to the RUFFLEdownload page, we can not use the zip package we were using for Chrome and Edge
Right-click on the Firefox download link
Save link by clicking on Save link as...
Navigate to about: debugging
Click on this Firefox
Click Load Temporary Add-on
Select the .xpi that you have downloaded
BONUS:
If you want to enable FLASH content live on your website use: <script src="path_to_ruffle/ruffle.js"></script>
One of the important processes in the Windows operating system is the Setting Synchronization or SettingSyncHost.exe. This process is the one responsible for synchronizing the settings of your computer with other devices. It is the one that replicates settings like OneDrive, Internet Explorer, wallpapers, and so on, to other systems. However, it has been known to cause high CPU usage in Windows 10 and there are times when it causes the system to freeze or system lags. So if you notice that the SettingSyncHost.exe process is causing high CPU usage in your computer, worry not for this post will guide you in fixing them.
You have to be cautious when you notice high CPU usages caused by system processes since cybercriminals mostly set the names of viruses in a way that the system or the user won’t be able to identify them. Cyber crooks could name the virus and malware the same as one of the system processes like SettingSyncHost.exe to make it seem like it’s a legitimate process. Thus, you need to keep in mind that original system processes like the SettingSyncHost.exe file are located in the System32 folder.
The original SettingSyncHost.exe file is located in the System32 folder. To check for the same, right-click on the troublesome process in the Task Manager and select Open file location. If the place is any other than the System32 folder, run a full system anti-virus scan on the system.
The SettingSyncHost.exe causes high CPU usage when it gets stuck in the sync process and is not able to come out of the loop. To fix this problem, you need to follow the solutions offered below but before you proceed, make sure that you create a System Restore point first.
Option 1 – Apply some registry tweak
The first thing you can do is to apply some tweaks to the Windows Registry. To get started, follow these steps:
Tap the Win + R keys to open the Run utility and type “Regedit” in the field and then tap Enter to open the Registry Editor.
Next, navigate to this registry path: HKEY_CURRENT_USERSoftwareMicrosoftInputPersonalizationTrainedDataStore
From there, right-click on the key and select Permissions.
After that, check the box next to “Allow” for Full Permission for every user group.
Now click on the Apply and OK buttons to save the changes made.
Then restart your computer.
Option 2 – Close the Host process for setting synchronization
If the registry tweak didn’t work, you can try to close the host process for setting synchronization, especially if this process continues to hog resources. You can terminate this process by opening the Task Manager. From there, end the process or task of the host process. On the other hand, you can also turn off the Host process for synchronization by opening Settings > Accounts > Sync settings located in the left pane. After that, turn off the Sync setting.
Option 3 – Run the Hardware and Devices Troubleshooter or the Performance Troubleshooter
Hardware and Devices Troubleshooter:
The first thing you need to do is click on Start and then on the gear-like icon to pull up the window for Settings.
After opening Settings, look for the Update and Security option and select it.
From there, go to the Troubleshoot option located on the left-hand side of the list.
Next, select Hardware and Devices from the list and open the Troubleshooter and run it. Once it is doing its job, wait for it to complete the process and then restart the system.
After the system restarts, check if the problem’s now fixed. If not, refer to the next option given below.
Performance Troubleshooter:
Tap the Win + R keys to open the Run dialog box.
Type “exe /id PerformanceDiagnostic” in the field and hit Enter to open the Performance troubleshooter.
Then click on Next to get started. Wait until the process is completed.
Option 4 – Try scanning your computer using Windows Defender
As mentioned, it is possible that the SettingSyncHost.exe could be infected with a virus or malware. To eliminate it, you have to scan your computer using security programs like Windows Defender.
Tap the Win + I keys to open Update & Security.
Then click on the Windows Security option and open Windows Defender Security Center.
Next, click on Virus & threat protection > Run a new advanced scan.
Now make sure that Full Scan is selected from the menu and then click the Scan Now button to get started.
There are instances when the Windows 10 installation needs interaction before it reaches the file process. And so if you suddenly encounter the Windows Update Installation Failure 0x80240020 error under the Windows Update History, then you need to get it fixed.
When you encounter this kind of Windows Update Error, you will see an error message that says, “The operation did not complete because there is no logged-on interactive user”. This error also indicates the “WU_E_NO_INTERACTIVE_USER” code. To resolve this issue, in this post we’ll walk you through a couple of steps but before you get started, know that you don’t have to run any troubleshooter or delete any file just to fix this error since all you have to do is enable one option that can automatically login with your account and complete the installation for you. With that said, just make sure to only try running Windows Update once you’re told to do so.
There are two ways you can enable the option that could resolve the Windows Update Installation Failure 0x80240020 error. One is via Settings while the second one is via Registry Editor.
Option 1 – via Settings
Step 1: Go to Settings > Accounts > Sign-in Options.
Step 2: From there, toggle on the “Use my sign-in info to automatically finish setting up my device and reopen my apps after an update or restart” option.
Step 3: After that, it will make sure that the interaction part is removed from the Windows Update process.
Note: If your device is joined in a domain or if some work or email policies are applied to your device by your company or organization, then you wouldn’t be able to see this option in Settings and that’s where the Registry Editor comes in. Just make sure that you’re logged in as an administrator and that you create a System Restore Point first since registry hacks are sensitive and could highly impact how your computer behaves or functions. Once you have that covered, follow the steps below.
Option 2 – via Registry Editor
Step 1: In the Start search, type “Regedit” and hit Enter to open the Registry Editor.
Step 2: Navigate to the following registry key:
Note: If the above-given registry key does not exist, you can simply create it. All you have to do is right-click on the WindowsUpdate key and then select the New Key option and type “OSUpgrade” as its name. Afterward, create a new DWORD (32-bit) Value and name it “AllowOSUpgrade” and set its value to 0x00000001.
Step 3: Restart your computer and check if the error is now fixed. And then try to update your Windows 10 computer again and while you’re at it, make sure that you’re around your computer to interact with the prompts needed to complete the installation process.
Installing a Windows 10 upgrade is definitely not an easy task since the process is not always smooth sailing and you could encounter some errors when doing so. This isn’t unusual since there are various software configurations and hardware configurations as well as services it depends on in order to properly work. So if any of them malfunctions or becomes corrupted, it will affect the process which will result in errors like the error code 0x80300002. When you encounter this kind of Windows Update error, you will see the following error message on your screen:
“We couldn’t install Windows in the location you choose. Please check your media drive. Here’s more info about what happened: 0x80300002”
You can encounter this kind of error if there is corruption in the partition table of the drive where the installation is in progress. In addition, corruption on the Media device could also cause this problem. So if you encounter this error when running Windows Setup, read on as this post will guide you in fixing it.
There are several ways to resolve this issue. The first thing you can do is to verify the compatibility between the BIOS and the installation media. You could also try recreating all the partitions as well as recreating the bootable USB drive. For more detailed information, follow the given options below.
Option 1 – Check if the BIOS is compatible with the installation media
The first thing you can do to fix the error is to check if there are any compatibility issues between the BIOS and the installation media you’re using. This is actually one of the most likely reasons why you’re getting the error since this is a complicated point for the Windows installation process. If the installation media is based on GPT, then your BIOS must be based on UEFI. So if you have your bootable media with the MBR partitioning, you need to set your BIOS to Legacy.
In the Windows Search box, type “command prompt” and from the search results that appear, right-click on Command Prompt and select the “Run as administrator” option.
After that, execute this command: exe /convert /allowfullOS
Now, wait until the process is completed since you can track its process on your screen.
Once it’s done, go to Settings > Update & Security > Advanced Startup options and from there, click on Restart Now. This will restart your computer and give you advanced options.
Next, select Troubleshoot > Advanced Options where you will see further options including System Restore, Startup Repair, Go back to the previous version, Command Prompt, System Image Recovery, and UEFI Firmware Settings.
Now select the “Legacy” option. This will take you to the BIOS. Boot Mode is typically available under Boot > Boot Configuration. Once you’re there, set it to Legacy and then save the changes you’ve made. After that, your computer will restart.
Option 2 – Try recreating a new bootable drive
Insert your USB drive into your PC.
Tap the Win + R keys to open the Run dialog box and type in “cmd” and tap Enter to open the Command Prompt. Alternatively, you can also search for “cmd” in the Cortana search box to open Command Prompt.
Once you’ve opened CMD, type in this command to open the DISPART utility – diskpart
After that, you should see a new black and white window that would say, “DISKPART>”.
Next, type in “list disk” in the command line and tap Enter to see the list of all the Storage devices as well as your hard disk connected to your PC. Here, you have to identify your disk’s number.
Type in this command where “X” is the disk number you have identified and then tap Enter – disk X
Type in this command and hit Enter to clear the table records and all the visible data on the drive – clean
Now you have to recreate a new primary partition of the drive so you’ll have to type in this command and tap Enter right after – create part pri
A new primary partition has been created so you have to select it by typing this command and tapping Enter – select part 1
Now you have to format it to make it visible to normal users by typing – format fs=ntfs quick
Note: If your platform supports the Unified Extensible Firmware Interface or UEFI, replace the “NTFS” with “FAT32” in the command on Step 10.
After that, type in this command and tap Enter after – active
Finally, type this command and hit Enter to exit the utility – exit
After you prepare the image for the operating system, save it to the root of your USB Storage device.
Option 3 – Try to recreate all the partitions
If none of the first two options given above worked, then you can try to recreate all the partitions instead. All you have to do is restart the Windows installation process and wait until you get to the part that says, “Where do you want to install Windows?”. From there, you will see options like delete, format, extend, create new partitions, and many more. Now you have to select the Delete all the partitions options and then use the “New” button to create new partitions. Just make sure that you have one primary partition at least where you can install Windows 10. After that, continue the installation of Windows on the new partition. Keep in mind that when you create a new partition, it also recreates the partition table configuration which means that the chances of getting an error are very unlikely.
The error code 28 is a driver error. This is one of the many device manager error codes. When this error occurs on your computer, the following message is displayed:
“The drivers for this device are not installed. (Code 28)”
Another driver device error message you might encounter is error code 41.
Error Causes
Error 28 occurs because of unsuccessful device driver installation. This usually happens when you try to update new drive versions on your system. It is advisable to repair this error right away as it can hamper your ability to use certain hardware.
For example, if error 28 occurs due to the unsuccessful installation of the USB driver, then it if not fixed and resolved it may prevent you from using hardware devices.
Unsuccessful driver installation means you either didn’t install it properly or your computer has registry issues. If it’s the registry then you must fix it without any delay because it can expose your PC to serious threats like system crash and failure.
To avoid such inconvenience, repair it.
Further Information and Manual Repair
When it comes to repairing the error code 28, here’s what you can do:
Simply go to the control panel and click on the Device Manager option:
In the details pane with the list of devices, locate the device for which you want to reinstall the driver software.
Double click on it to open the properties dialog box.
Now click on the driver tab and then click update driver.
After updating, try using that device again if it doesn’t work and shows the error code 28 on your computer screen then this means the underlying cause is the registry.
It has been some time since the release of Diablo 2 resurrected and overall reception was pretty good. People are enjoying the old classic game in hi-def. resolution and with new and improved visuals. Sadly some server issues are present still until this day and somewhat spoil the experience for players.
The greatest lag and server crashes are pinpointed to game-creating events. When a player creates a new online game, the server needs to pull a lot of details from the database and make a game, due to some legacy code present this process takes some time and it is demanding a bit on the server-side, and although code was optimized to cater to more modern approach some legacy code still remains.
Another thing that was spotted to affect performance itself is player behavior, to be more specific, modern gamer behavior. Where players find good builds and runs on the internet and then go to farm-specific areas or bosses for loot or experience points, which in return boils down to making plenty and short runs that are made by creating games and after run eliminating them. Now pair that with the previous statement about legacy server and database code and you can add 1 and 1 and see how this might be an issue.
A lot of short games over legacy code are placing games in a state it was not designed for back in 2001 and therefore we have issues. Sadly solutions without completely rewriting the whole code are not very promising and they include rate limiting, which will prevent players to create many games in succession in a short period of time and maybe even login queues to drop a load on servers.
Blizzard reached to people in the whole company, even old diablo 2 developers to ask for advice and they say that they are working on solutions so they could lift limitations and have everything running fine.
Error Code 30088-26 is shown when the user tries to install the MS Office suite to their PC. It is mostly due to several reasons including corrupted Office installation, the remnant of old office installation, or even Windows updates. We will cover all reasons along with provided solutions to each one.
Follow the guide below to address each scenario with the fix for it.
Corrupted Office installation
In order to fix this issue, you will need to repair the installation itself.
Press ⊞ WINDOWS + R to open the run dialog
Inside run dialog type in Control Panel
In the control panel double click on Programs and features
In the list of installed application find MS Office and click on it to select it
On top, just above the application list click on the change
Office dialog will be opened with multiple choices
Click and select Online repair and then click on Repair
Make sure that you have a stable internet connection and leave the process to be finished
Remnants of old office installation
Manually cleaning remnants of old office installation is not an easy task and it can be different from system to system depending on the previous Office version.
Luckily Microsoft has a dedicated office cleaning tool made for purpose of removing old tails and remnants of old office installations.
After the tool has been successfully downloaded, double-click on the .diagcab file to open it
Click on Advanced and make sure that the box associated with Apply repair automatically is checked.
Click the Next button to proceed
Wait until the initial detection phase is complete, then click on Installing at the first prompt
Select the program that you’re encountering issues with (most likely Microsoft Office) and click Next once again
At the next screen, click on Yes, try to uninstall
Wait until the operation is complete, then restart your computer and re-install the Microsoft Office suite
Windows Updates
After digging and trying out various solutions for this issue we came to the conclusion that this error can occur if Windows is not fully updated, and by fully updated we mean fully, not just critical updates, but all available ones. Check-in your setting to see if there are some uninstalled or pending updates waiting to be installed and if that is the case install them all.
After completely updating your Operating system error should vanish and you should be able to install Microsoft office without issues.
Error Code 35 is a typical Device Manager error. It indicates information missing to properly configure your device. Error code 35 is usually displayed in the following format:
“Your computer's system firmware does not include enough information to properly configure and use this device. To use this device, contact your computer manufacturer to obtain a firmware or BIOS update. Code 35”
Solution
Error Causes
The 2 common reasons for Device Manager error code 35 are:
Outdated BIOS
Mis-configured, corrupted, or outdated Drivers
No matter what the reason may be, it is advisable to resolve the problem immediately without any delay otherwise you will be unable to use your hardware device.
Further Information and Manual Repair
Below is the list of the most effective and easy to perform solutions to resolve error code 35 on your PC. These solutions do not require any technical knowledge or understanding. Simply follow the instructions to resolve this error code.
Method 1 - Update the BIOS
BIOS (Basic Input/Output System) is the embedded software on the computer’s motherboard.
Though not all PCs have the same BIOS manufacturer, but the steps for updating the BIOS are similar for all versions.
Before you get started with the updating process, first identify your current BIOS version.
For this, go to the start menu and type msinfo32, and press enter.
Now click System Summary to view your BIOS version. Here you will see the version number and date.
Now check your PC motherboard manufacturer’s website to download the BIOS update for the model you own. Also, download any Read Me Files and documentation. These contain guidelines and precautions that you should know before you update.
Backup all your data and existing BIOS before you update the BIOS version. This will keep your data protected in case the attempt to update BIOS fails.
Also, when updating, make sure to use an uninterruptible power supply. Remember power outage or even a small power fluctuation can corrupt the BIOS which is something you don’t want.
Now it’s time to perform the update. Run the downloaded installer for the BIOS updating software. Double click on the executable file.
Look for a button names Update, Flash, or Run.
Click on it to start updating the new version
After the update is complete, your computer will restart automatically.
This will hopefully resolve the problem. However, if the error still persists then there is a possibility that the error code is related to outdated drivers. To resolve, try method 2.
Method 2 - Download Driver Assist to Update Drivers Automatically
Update drivers to repair error code 35 on your PC by simply downloading DriverFIX. This is a cutting-edge program deployed with an intelligent programming system.
It is compatible with all Windows versions.
It scans your PC for problematic drivers and updates them with the latest and compatible versions automatically and in a few seconds thereby repairing all Device Manager error codes including error code 35 generated due to outdated/corrupted drivers.
In addition to this, it updates all device drivers on a regular basis, so you don’t have to stress over and keep a track of what drivers on your PC need to be updated and when.
Click here to download DriverFIX to resolve Device Manager error code 35 today!
You have probably heard a lot of good things about gaming mice, how they are better feeling, better in any way possible and it is all true, everything you heard is actually true, they are superior in any way to a regular mouse but with one big disadvantage, and that would be the price. While you can find a regular mouse for pocket change, a gaming mouse is in comparison very expensive even for entry-level ones.
In this article we will explore all advantages and compare it with the regular one so you can come up with your own conclusion about do you really need one for yourself or if you are fine with regular.
Price
As stated price is one factor that does not favor gaming mice. Regular mouse for a personal computer goes around 10 or 20 USD, while entry-level in gaming one will be 40 USD and can go up to 250 USD, this large gap in price is usually determining factor why people pick up regular one. If you are on a really tight budget go for the regular one, but if you can afford a gaming one get it without second thoughts.
Software
This is where you will see the big difference between mice. Regular ones when connected are recognized and the driver is automatically installed and you can use it, same goes with gaming ones but with one big difference, you have an option to install additional manufacturers' software specially tailored for your mouse. In the application, you will be able to access some features that are specific to the mouse model that you could not set in typical Windows mouse properties. Beside more options software can also have features like setting your profiles and saving them to be recalled when you need them on the fly.
Sensitivity of mouse
The sensitivity of the mouse is measured in dots per one inch or short DPI, this is directly shown on your screen by how fast your mouse can move, higher sensitivity means your mouse will move faster across the screen and lower means it will move slower. All gaming mice come with buttons and settings that will allow you to change DPI on the fly and you can choose precise DPI settings in the software.
The regular mouse comes with DPI around 800 and goes to 1200 typically and does not have usually the option to change this while gaming mice start at 400 and can go as high as 26000 with the option to change it. Some regular mice can have only 1 option of DPI, usually very cheap ones.
Polling rates in mice
Pooling rate is the measurement of how often your mouse reports where it is positioned on the computer. The higher the pooling rate, the more responsive your mouse will be and vice versa. It is measured in hertz (Hz) and regular mice have them around 125Hz that is enough if you are using a computer for office, internet, and mail work.
If you are working in design or gaming you will need more than 125Hz polling rate, luckily gaming mice come with a minimum of 500Hz as an entry point and some hi-end models are going as far as 8000Hz. This very high pooling rate will get some extra load on your CPU but the mouse itself will be maximally responsive and will respond even to the smallest moves.
Ergonomics
Regular mice are well just mice, they are typical shape and size, gaming mice are made with ergonomics in mind. How they are made for extensive daily use of several hours per day they are constructed in a way to offer a pleasant and pain-free experience.
If you work on a computer for long periods of time consider gaming an ergonomic mouse since it will take the strain from hands and place them in a more natural position.
Macro keys
Gaming mice most of the time come with more keys compared with regular ones and good thing is that via its software you can tie certain actions to these extra keys making work or gaming more pleasant and quicker.
Components and material quality
In order to make regular mice more affordable and cheaper materials and quality of components had to suffer. Gaming mice have millions of guaranteed clicks by companies that make them before they break and regular ones usually do not guarantee a single one. This is due of course quality of materials that have been used in constructing these devices.
In the long term, if you use a gaming mouse for typical daily tasks it will outlive your regular one and on the side offer you more pleasant and responsive use along the way.

 I going to admit right here that I am a big fan of Cooler Master PC cases, I like them and they are always one of the things that I consider when building a new PC, overall I like their ideas and quality so personal for me it was quite a surprise to see that they are one that is making a new generation gaming chair.
Now truth to be told Orb X is not your typical gaming chair as you can clearly see from the pictures. The chair itself will come in two colors: white or black and RGB lighting looks to be prominently featured throughout.
I going to admit right here that I am a big fan of Cooler Master PC cases, I like them and they are always one of the things that I consider when building a new PC, overall I like their ideas and quality so personal for me it was quite a surprise to see that they are one that is making a new generation gaming chair.
Now truth to be told Orb X is not your typical gaming chair as you can clearly see from the pictures. The chair itself will come in two colors: white or black and RGB lighting looks to be prominently featured throughout.
 The chair itself is advertised as both meant and aimed for professional and gaming crowds but I believe the gaming crowd is in general more interested in this hardware piece.
Hardware is enclosed in a fully motorized shuttle dome which aims to maximize your privacy, it supports a single 49inch display or three 27inch monitors along with surround speakers if you do not wish to use headphones.
The chair itself is advertised as both meant and aimed for professional and gaming crowds but I believe the gaming crowd is in general more interested in this hardware piece.
Hardware is enclosed in a fully motorized shuttle dome which aims to maximize your privacy, it supports a single 49inch display or three 27inch monitors along with surround speakers if you do not wish to use headphones.
 It offers an adjustable headrest, lumbar support, and footrest so you can spend some time in it and be comfortable. Controls on the chair itself allow you to raise or lower the dome for easier getting in and out of it.
Orb X also has a compartment in its backside, it folds out and has a sliding tray designed to hold your PC or console. Everything is enclosed so wiring is not the issue.
Overall Orb X seems really like the computer chair of the future, Cooler Master expects to release the Orb X by December 2021, priced around $12,000-$14,000.
It offers an adjustable headrest, lumbar support, and footrest so you can spend some time in it and be comfortable. Controls on the chair itself allow you to raise or lower the dome for easier getting in and out of it.
Orb X also has a compartment in its backside, it folds out and has a sliding tray designed to hold your PC or console. Everything is enclosed so wiring is not the issue.
Overall Orb X seems really like the computer chair of the future, Cooler Master expects to release the Orb X by December 2021, priced around $12,000-$14,000. 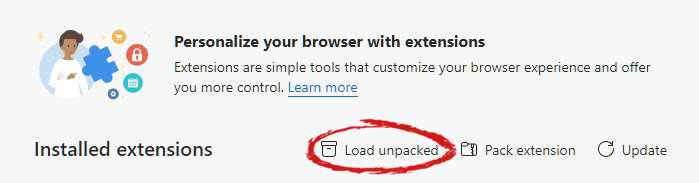
 The greatest lag and server crashes are pinpointed to game-creating events. When a player creates a new online game, the server needs to pull a lot of details from the database and make a game, due to some legacy code present this process takes some time and it is demanding a bit on the server-side, and although code was optimized to cater to more modern approach some legacy code still remains.
Another thing that was spotted to affect performance itself is player behavior, to be more specific, modern gamer behavior. Where players find good builds and runs on the internet and then go to farm-specific areas or bosses for loot or experience points, which in return boils down to making plenty and short runs that are made by creating games and after run eliminating them. Now pair that with the previous statement about legacy server and database code and you can add 1 and 1 and see how this might be an issue.
A lot of short games over legacy code are placing games in a state it was not designed for back in 2001 and therefore we have issues. Sadly solutions without completely rewriting the whole code are not very promising and they include rate limiting, which will prevent players to create many games in succession in a short period of time and maybe even login queues to drop a load on servers.
Blizzard reached to people in the whole company, even old diablo 2 developers to ask for advice and they say that they are working on solutions so they could lift limitations and have everything running fine.
The greatest lag and server crashes are pinpointed to game-creating events. When a player creates a new online game, the server needs to pull a lot of details from the database and make a game, due to some legacy code present this process takes some time and it is demanding a bit on the server-side, and although code was optimized to cater to more modern approach some legacy code still remains.
Another thing that was spotted to affect performance itself is player behavior, to be more specific, modern gamer behavior. Where players find good builds and runs on the internet and then go to farm-specific areas or bosses for loot or experience points, which in return boils down to making plenty and short runs that are made by creating games and after run eliminating them. Now pair that with the previous statement about legacy server and database code and you can add 1 and 1 and see how this might be an issue.
A lot of short games over legacy code are placing games in a state it was not designed for back in 2001 and therefore we have issues. Sadly solutions without completely rewriting the whole code are not very promising and they include rate limiting, which will prevent players to create many games in succession in a short period of time and maybe even login queues to drop a load on servers.
Blizzard reached to people in the whole company, even old diablo 2 developers to ask for advice and they say that they are working on solutions so they could lift limitations and have everything running fine. 


