HDMI which stands for High Definition Multimedia Interface is an audio/video interface that can be used to interconnect various multimedia devices. One of the common use for HDMI is when a CPU is connected to a monitor and a projector. Aside from that, it can also be used in connecting Blu-ray players and laptops to televisions as well as monitors.
One of the main advantages of using HDMI is that it can transmit both audio and video at high qualities such as 4K using only a single connection. However, you may also experience some issues in using it every now and then and one of them is when you find that after connecting the devices using the HDMI port, the screen appears to be black and there is no audio output. In such cases, there are a variety of hardware malfunctions that could be causing the problem with the HDMI connectivity. Although there a lot of potential causes, there are also potential fixes you can try to fix the problem.
Before you troubleshoot the HDMI Port problem, you might want to perform System Restore first as it might help you in fixing the problem. It could be that you’ve made some changes in some of the settings in your computer that triggered the problem. Thus, you can try run System Restore to undo them, refer to these steps:
First, press the Win + R keys to open the Run dialog box.
After that, type in “sysdm.cpl” in the field and tap Enter.
Next, go to the System Protection tab then click the System Restore button. This will open a new window where you have to select your preferred System Restore point.
After that, follow the on-screen instructions to finish the process and then restart your computer and check if the Stop error is fixed or not.
If the problem still persists after System Restore, then follow the given options below to further troubleshoot the problem.
Option 1 – Try to physically check the hardware of your computer
The first thing you can do is to check the physical status of the hardware in your computer. You can clean the dust off the hardware components like the Network Card or Graphics Card of the computer. You might want to use a small blower or you could also use a soft cloth and run the components gently. Make sure that you don’t damage any parts with moisture or cause harm to any circuits while you carry out this task.
Option 2 – Run the Video Playback troubleshooter
You might also want to run the Video Playback troubleshooter. To do so, refer to these steps:
First, open the Windows settings app.
Then navigate to Update & Security > Troubleshoot.
From there, scroll down until you see the Video Playback section and click on it.
After that, you’ll see the Run the troubleshooter button, click on it to run the Video Playback troubleshooter, and follow the next on-screen instructions.
On other hand, you can also run the Hardware and Device troubleshooter if the Video Playback troubleshooter wasn’t able to fix the problem. You can run it from the same page that you run the Video Playback troubleshooter.
Option 3 – Try to rollback, update, or disable the Graphics card drivers
To fix the problem with the HDMI port, you can either roll back, update or disable them depending on your preference in order to resolve the problem.
First, boot your computer into Safe Mode.
After that, tap the Win + R keys to launch Run.
Type in devmgmt.msc into the box and tap Enter or click OK to open the Device Manager.
After that, a list of device drivers will be displayed. From there, look for the Display Adapters and click on them.
After that, right-click on each entry under the Display Adapters. Note that the rollback option is only available if the update was recent. So if it isn’t there, just click on the Update Driver option.
From there, Windows will automatically check for problems and update the Graphics card drivers.
Now restart your computer.
After restarting your computer, go to the Settings app and Check for Updates in the Windows Update section.
Note: You also have the option to go directly to the website of your graphics card manufacturers like NVIDIA, Intel, or AMD and go to the section called Drivers then check if there’s a new available update – if there is, download and install it.
Option 4 – Try to reset the Monitor
You could also try resetting the monitor or television using its hardware keys and see if it can resolve the problem. You can just refer to your TV or monitor’s guide for more information on how to reset them.
Option 5 – Try some miscellaneous fixes
Apart from the four given options above, you can also check out some miscellaneous fixes to fix the HDMI connectivity issue and here they are:
You can try to plug out the HDMI cord/cable from both source and destination and then plug it back in after a couple of minutes.
You can also check if the HDMI cable you are using is still in working condition.
You can also try to change the source and the destination of the video and see if either one of them is in a non-workable state.
Try checking if your settings are how they should be as intended in the “Project my screen” option by tapping the Win + P key combination on your keyboard.
If you are trying to copy large files that are over 4GB to a USB flash drive or SD card, but you suddenly get an error message saying, “File Too Large, The file is too large for the destination file system”, read on as this post will help you fix this problem.
A user recently reported that while trying to copy a 4.8GB zipped file from a Windows 10 PC to a new 8GB USB drive but only got the File Too Large error message instead. If you share the same problem with this user and you know that there is more than enough available space for the file in your USB drive or SD card, continue reading until you get to the instructions provided in this post so that you will be able to copy the file successfully.
It is most likely that the USB drive has been FAT32 formatted which is why you’re unable to copy the file and got an error. The FAT32 file system has a built-in limitation on the size of the individual file that it may contain. For instance, it’s 4GB so even though collectively, it may have files or even 1TB individually it shouldn’t be more than 4GB. Thus, you need to change the file system from FAT32 to NTFS. To do that, carefully follow the instructions provided below.
Step 1: Connect the USB drive and open the Windows File Explorer.
Step 2: Afterwards, right-click on the USB drive letter and select Format from the context menu.
Step 3: Next, select NTFS instead of FAT32 the instant a dialog box appears from the drop-down menu for the file system.
Step 4: Now click on the Quick Format option and then click the Start button to reformat the USB drive.
Note: There is also another way you can change the file system. In this alternative way, you need to open an elevated Command Prompt and type the convert X: /fs:ntfs /nosecurity command, and hit Enter to execute it. Remember that in this command, “X” is the letter of your USB drive so whatever the letter of your drive is, you need to make sure to put it instead of “X”. Once the process is completed, try copying the file again.
You have probably heard a lot of good things about gaming mice, how they are better feeling, better in any way possible and it is all true, everything you heard is actually true, they are superior in any way to a regular mouse but with one big disadvantage, and that would be the price. While you can find a regular mouse for pocket change, a gaming mouse is in comparison very expensive even for entry-level ones.
In this article we will explore all advantages and compare it with the regular one so you can come up with your own conclusion about do you really need one for yourself or if you are fine with regular.
Price
As stated price is one factor that does not favor gaming mice. Regular mouse for a personal computer goes around 10 or 20 USD, while entry-level in gaming one will be 40 USD and can go up to 250 USD, this large gap in price is usually determining factor why people pick up regular one. If you are on a really tight budget go for the regular one, but if you can afford a gaming one get it without second thoughts.
Software
This is where you will see the big difference between mice. Regular ones when connected are recognized and the driver is automatically installed and you can use it, same goes with gaming ones but with one big difference, you have an option to install additional manufacturers' software specially tailored for your mouse. In the application, you will be able to access some features that are specific to the mouse model that you could not set in typical Windows mouse properties. Beside more options software can also have features like setting your profiles and saving them to be recalled when you need them on the fly.
Sensitivity of mouse
The sensitivity of the mouse is measured in dots per one inch or short DPI, this is directly shown on your screen by how fast your mouse can move, higher sensitivity means your mouse will move faster across the screen and lower means it will move slower. All gaming mice come with buttons and settings that will allow you to change DPI on the fly and you can choose precise DPI settings in the software.
The regular mouse comes with DPI around 800 and goes to 1200 typically and does not have usually the option to change this while gaming mice start at 400 and can go as high as 26000 with the option to change it. Some regular mice can have only 1 option of DPI, usually very cheap ones.
Polling rates in mice
Pooling rate is the measurement of how often your mouse reports where it is positioned on the computer. The higher the pooling rate, the more responsive your mouse will be and vice versa. It is measured in hertz (Hz) and regular mice have them around 125Hz that is enough if you are using a computer for office, internet, and mail work.
If you are working in design or gaming you will need more than 125Hz polling rate, luckily gaming mice come with a minimum of 500Hz as an entry point and some hi-end models are going as far as 8000Hz. This very high pooling rate will get some extra load on your CPU but the mouse itself will be maximally responsive and will respond even to the smallest moves.
Ergonomics
Regular mice are well just mice, they are typical shape and size, gaming mice are made with ergonomics in mind. How they are made for extensive daily use of several hours per day they are constructed in a way to offer a pleasant and pain-free experience.
If you work on a computer for long periods of time consider gaming an ergonomic mouse since it will take the strain from hands and place them in a more natural position.
Macro keys
Gaming mice most of the time come with more keys compared with regular ones and good thing is that via its software you can tie certain actions to these extra keys making work or gaming more pleasant and quicker.
Components and material quality
In order to make regular mice more affordable and cheaper materials and quality of components had to suffer. Gaming mice have millions of guaranteed clicks by companies that make them before they break and regular ones usually do not guarantee a single one. This is due of course quality of materials that have been used in constructing these devices.
In the long term, if you use a gaming mouse for typical daily tasks it will outlive your regular one and on the side offer you more pleasant and responsive use along the way.
This post will help you fix the ATTEMPTED_WRITE_TO_READONLY_MEMORY Blue Screen issue with an error code 0x000000BE. If you encounter this kind of BSOD error when you try to boot into your Windows 10 computer, note that there are various possible causes for this error. It could be caused by an error with a device driver, hardware issues, or some error in the BIOS of your computer.
The ATTEMPTED_WRITE_TO_READONLY_MEMORY Blue Screen error with a bug check of 0x000000BE appears when a driver tries to write a read-only memory segment. You’ll be able to see the name of the driver in the Blue Screen error if the driver that’s causing the error can be identified. You can also see it in memory at the location (PUNICODE_STRING) KiBugCheckDriver. In most cases, this kind of error is usually caused by various files such as iusb3hub.sys, ntkrnlpa exe or vhdmp.sys, ntoskrnl.exe, ntfs.sys, dxgkrnl.sys, tcpip.sys, atikmdag.sys, and win32k.sys. There are several possible fixes you can try to fix this issue but the main issue lies within booting into Windows since the error occurs as soon as you boot into your Windows 10 computer.
Refer to each one of the options provided below to resolve the ATTEMPTED_WRITE_TO_READONLY_MEMORY Blue Screen error.
Option 1 – Try to rollback, update or disable drivers
The first thing you can do to fix the ATTEMPTED_WRITE_TO_READONLY_MEMORY Stop error is to roll back, or update, or disable device drivers. It is most likely that after you updated your Windows computer that your driver also needs a refresh. On the other hand, if you have just updated your device drivers then you need to roll back the drivers to their previous versions. Whichever applies to you, refer to the steps below.
Open the Devices Manager from the Win X Menu.
Then locate the device drivers and right-click on them to open the Properties.
After that, switch to the Driver tab and click on the Uninstall Device button.
Follow the screen option to completely uninstall it.
Finally, restart your computer. It will just reinstall the device drivers automatically.
Note: You can install a dedicated driver on your computer in case you have it or you could also look for it directly from the website of the manufacturer.
Option 2 – Try running the Memory Diagnostic Tool
The Memory Diagnostic tool in windows can help resolve the ATTEMPTED_WRITE_TO_READONLY_MEMORY Blue Screen error by checking and automatically fixing any memory-based issues. To run it, refer to these steps:
Tap the Win + R keys to open Run and type exe and hit Enter to open the Windows Memory Diagnostic Tool.
After that, it will give two options such as:
Restart now and check for problems (Recommended)
Check for problems the next time I start my computer
Once your computer has restarted, perform a basic scan or you could also go for the “Advanced” options such as “Test mix” or “Pass count”. Simply tap the F10 key to start the test.
Note: After you select your preferred option, your computer will restart and check for memory-based issues. If it finds any issues, it will automatically fix them and if there’s no issue found, then it’s most likely not a memory-based issue so you should try the other options given below.
Option 3 – Try to update the BIOS
Updating the BIOS can help you fix the ATTEMPTED_WRITE_TO_READONLY_MEMORY BSOD error but as you know, BIOS is a sensitive part of a computer. Even though it is a software component, the functioning of the hardware depends on it largely. Thus, you must be careful when modifying something in the BIOS. So if you don’t know much about it, it’s best if you skip on this option and try the other ones instead. However, if you are well-versed in navigating the BIOS, then follow the steps below.
Tap the Win + R keys to open the Run dialog box.
Next, type “msinfo32” in the field and press Enter to open System Information.
From there, you should find a search field on the bottom where you have to search for the BIOS version and then press Enter.
After that, you should see the developer and version of the BIOS installed on your PC.
Go to your manufacturer’s website and then download the latest version of BIOS on your computer.
If you are using a laptop, make sure that you keep it plugged in until you have updated the BIOS.
Now double click on the downloaded file and install the new BIOS version on your computer.
Now restart your computer to apply the changes made.
Option 4 – Try disabling BIOS Memory Options
Disabling the BIOS Memory options such as Caching and Shadowing can help you in fixing the ATTEMPTED_WRITE_TO_READONLY_MEMORY Stop error. All you have to do is enter the BIOS first and then use the Arrow and Enter keys to select your choices. And if you can’t seem to find it, look for specific instructions from your OEM or you could also look out for instructions from the manufacturer of your motherboard.
Option 5 – Try running the Blue Screen Troubleshooter
The Blue Screen troubleshooter is a built-in tool in Windows 10 that helps users in fixing BSOD errors like ATTEMPTED_WRITE_TO_READONLY_MEMORY. It can be found on the Settings Troubleshooters page. To use it, refer to these steps:
Tap the Win + I keys to open the Settings panel.
Then go to Update & Security > Troubleshoot.
From there, look for the option called “Blue Screen” on your right-hand side and then click the “Run the troubleshooter” button to run the Blue Screen Troubleshooter and then follow the next on-screen options. Note that you might have to boot your PC into Safe Mode.
Windows comes with a built-in backup solution. However, if it failed because of an internal error, you will encounter an error message saying, “The backup application could not start due to an internal error, Server execution failed (0x80080005)”. When you get this kind of error, it means that it did not start and the process failed with a Server execution error. If you got this kind of error worries not for this post will guide you in fixing the problem in your Windows 10 computer.
The Windows Backup service is an excellent feature in Windows that only works on the NTFS file system and if you want to use this make sure that you have formatted your files system to NTFS. It is performed by the Volume Shadow Copy, all you have to do is right-click on any folder and if you see the “Previous versions” option, this means that a backup process runs from time to time and can bring back old files when needed.
To resolve the “The backup application could not start due to an internal error”, here are two suggestions you can check out.
Option 1 – Check if the Volume Shadow Copy service is running and restart it
The first thing you need to do is check if the Volume Shadow Copy service. To do that, refer to the following steps:
Click on Start and type “cmd” and right-click on Command Prompt from the search results.
Then select the “Run as administrator” option to open Command Prompt with admin privileges.
After that, type “net stop sdrsvc” and hit Enter to execute the command in stopping the Volume Shadow Copy service.
Next, type the “net start sdrsvc” command and hit Enter to start the service again.
Note: You can also restart the service using the Windows Services Manager.
In the Cortana search box, type “services” and click on the Services icon to open the Services Manager. Alternatively, you can also tap the Win + R keys to launch the Run prompt and then type “services.msc” in the field and hit Enter to open the Services Manager.
From there, look for the Volume Shadow Service (sdrsv) from the list of services. Its Startup type should be set to Manual by default.
Restart the service and if you don’t encounter any error while you turn it on, re-run the backup service and see if the backup process runs successfully.
Option 2 – Try to run the Volume Shadow Copy Service in a Clean Boot State
If the first option didn’t work and the service still keeps on failing even though the service is running, you can try putting your computer in a Clean Boot State and then try to run Windows Backup again.
Log onto your PC as an administrator.
Type in MSConfig in the Start Search to open the System Configuration utility.
From there, go to the General tab and click “Selective startup”.
Clear the “Load Startup items” check box and make sure that the “Load System Services” and “Use Original boot configuration” options are checked.
Next, click the Services tab and select the “Hide All Microsoft Services” check box.
Click Disable all.
Click on Apply/OK and restart your PC. (This will put your PC into a Clean Boot State. And configure Windows to use the usual startup, just simply undo the changes.)
Now try to run the Volume Shadow Copy service again and see if the process goes smoothly.
Note: You might also want to delete all the files in the backup solution if you want to start fresh with the backup solution. Just go to C:/System/Volume/Information/Windows Backup and take ownership of the folder. After that, make sure to stop the Volume Shadow Copy service and then delete all the files inside it.
Microsoft has implemented a number of small features in Windows 10 to enhance user productivity. These features make a difference in the overall experience and productivity of users. However, there are times that instead of helping users, these small feature causes some issues instead which causes the computer to function in an unusual way. One of the issues caused by these features is where the Mouse automatically scrolls up or down even without any user intervention. This can get really annoying especially when you’re doing an important task on your computer. So if this bug takes place repeatedly, it can make your computer unusable. If you are currently facing this problem, worry not for this post will guide you on what to do to fix the mouse auto-scrolling issue in your Windows 10 computer.
Use the options provided below to fix the mouse auto-scrolling issue.
Option 1 – Try to toggle the appropriate Mouse 10 setting
Tap the Win + I keys to open the Settings app.
After that, navigate to Devices > Mouse.
From there, toggle the “Scroll inactive windows when I hover over them” setting to off.
Now restart your computer and see if the issue is resolved.
Option 2 – Try to uninstall the installed Windows Updates recently
The mouse issue might have something to do with a recent update you have installed on your computer. It is possible that there are some recently installed updates that have messed up some settings in your computer. Thus, you can try to uninstall this recent Windows Update to try and fix the problem. Not that the best way to do this is in Safe Mode.
Boot your computer into Safe Mode first.
Once your computer has restarted, tap the Win + I keys to open the Settings app.
Next, click on Update and Security, and from the left side menu column, select Windows Update.
After that, select the “View installed update history” option on the right-side column.
Then click on Uninstall Updates. This will open a window where you’ll see the list of all the installed updates on your computer.
Select the update you want to uninstall and click on the Uninstall button located in the lower-right corner of the window.
Option 3 – Try to run System Restore
You might have made some adjustments in your computer’s settings that caused the issue with the mouse. You can undo those changes using System Restore.
Tap the Win + R keys to open the Run dialog box.
After that, type in “sysdm.cpl” in the field and tap Enter.
Next, go to the System Protection tab then click the System Restore button. This will open a new window where you have to select your preferred System Restore point.
After that, follow the on-screen instructions to finish the process and then restart your computer and then check if your mouse is now back to its normal state.
If you suddenly noticed that your Onscreen keyboard in Windows 10 has become completely white or transparent for some reason, then you’ve come to the right place as this post will guide you on what you can do to resolve this kind of issue in your computer.
As you know, the on-screen keyboard is included in Windows 10 and has an executable file named “osk.exe”. The on-screen keyboard is a part of the Ease of Access feature in Windows 10 which allows users to navigate the computer with the help of the mouse instead of the physical keyboard. However, there are times when you might encounter some issues when using the on-screen keyboard. One of the issues reported recently is that the on-screen keyboard becomes transparent or it only displays the borders but there is no way for you to access it. You also won’t be able to move it from the view completely. To fix this problem, there are several suggestions you can check out. You can try to check the Fade button or run the Windows Touch Keyboard troubleshooter. You can also restart its process in the Task Manager. For more details, refer to each one of the given options below.
Option 1 – Try to check the Fade button
The first thing you can do is to check the Fade button on the on-screen keyboard. You can find it at the bottom right corner of the keyboard. If it is enabled, then it’s probably the reason why your on-screen keyboard is transparent as it lets it fade in the background. Thus, you have to disable it to resolve the problem.
Option 2 – Try to run the Windows Touch Keyboard troubleshooter
The next option you can check out is running the Windows Touch Keyboard troubleshooter. This troubleshooter will help you identify the problem and would fix them automatically.
Option 3 – Try to restart the process of the on-screen keyboard via Task Manager
The next thing you can do is to restart the on-screen keyboard’s process in the Task Manager. Just follow the steps below.
First, tap the Ctrl + Shift + Esc keys to open the Task Manager.
Next, go to the Processes tab and look for the option that says, “Accessibility On-screen Keyboard”.
Once you found it, click on the drop-down arrow next to it and right click on the “On-screen Keyboard” option, and select End task to end its process.
After that, tap the Win + R keys to launch the Run utility and type “osk.exe” in the field, and then hit Enter to open the on-screen keyboard.
If you are not able to access the Windows 10 Advanced troubleshooting options within Windows then you’ve come to the right place as this post will guide you on how you can repair or boot the Windows 10 installation without losing data using the bootable installation USB or DVD media. To repair or boot Windows 10 using the installation media, you have to download the Windows ISO, create a bootable USB or DVD drive, boot from the media and select “Repair your computer” and then select Startup Repair under Advanced troubleshooting. To get started, follow the given steps below carefully.
Step 1: Frist, download the Windows ISO.
Although this is not necessarily needed, it’s still better if you download the Windows ISO first so make sure that you download the same ISO version as installed on your computer.
Step 2: Next, create a bootable USB or DVD drive.
Insert your USB drive into your PC.
Tap the Win + R keys to open the Run dialog box and type in “cmd” and tap Enter to open the Command Prompt. Alternatively, you can also search for “cmd” in the Cortana search box to open Command Prompt.
Once you’ve opened CMD, type in this command to open the DISPART utility – diskpart
After that, you should see a new black and white window that would say, “DISKPART>”.
Next, type in “list disk” in the command line and tap Enter to see the list of all the Storage devices as well as your hard disk connected to your PC. Here, you have to identify your disk’s number.
Type in this command where “X” is the disk number you have identified and then tap Enter – disk X
Type in this command and hit Enter to clear the table records and all the visible data on the drive – clean
Now you have to recreate a new primary partition of the drive so you’ll have to type in this command and tap Enter right after – create part pri
A new primary partition has been created so you have to select it by typing this command and tapping Enter – select part 1
Now you have to format it to make it visible to normal users by typing – format fs=ntfs quick
Note: If your platform supports the Unified Extensible Firmware Interface or UEFI, replace the “NTFS” with “FAT32” in the command on Step 10.
After that, type in this command and tap Enter after – active
Finally, type this command and hit Enter to exit the utility – exit
After you prepare the image for the operating system, save it to the root of your USB Storage device.
Step 3: After creating a bootable drive, boot from the media and select the “Repair your computer” option.
Once you boot from the USB drive, it will start the Windows 10 installation right away. So you must not keep on clicking Next as you will end up installing Windows. You need to look for the “Repair your computer” link on the first installation screen and click on it and then boot your computer into Advanced Recovery.
Step 4: Select Startup Repair under the Advanced options screen
Once you’re at the Advanced Recovery screen, select Advanced Options and select Troubleshoot.
After that, look for the Startup Repair and click on it and then follow the next on-screen instructions. This solution will help you fix issues that do not allow you to boot into your computer.
On the next screen, you will see the admin account with its name. Click on it and verify using the account password associated with the email.
After verification, it will start to diagnose your computer and automatically resolve any detected issues related to boot.
After the issue is fixed, your computer should reboot normally and you should now be able to use it. Note that your personal files are still intact since the process didn’t delete or wipe them out.
There are times when you install a Windows update to your Windows 10 computer but you only got an error message saying, “The update isn’t applicable to your computer”. This is unusual as Windows was the one that downloaded them in the first place. To understand the reason behind this error, read on as this post will also give you a couple of suggestions you can try to fix the problem.
One of the main reasons why this error occurs is that your computer might not have the required installed updates and many more. Other reasons include:
The update might be replaced. There are instances when a newer Windows version is already available on the computer and that the version you are trying to manually install is an older version which is why the Windows update failed.
The update might already be installed. There are times when the update process is still in progress and the earlier payload might have already been installed.
It could also be that it’s a wrong update for architecture. As you know, updates are designed accordingly based on the architecture of the computer so if the update you are trying to install does not match the architecture of your CPU then it’s no wonder you’re getting an error message.
Your computer might be missing a prerequisite update. There are Windows updates that depend on other updates so if you missed one and you’re installing another one, it could be the reason why you’re getting the error.
To fix the problem, here are some suggestions that might help.
Option 1 – Try verifying the package and the Processor Architecture
As pointed out earlier, updates are made according to the Windows versions. Thus, if one of the updates failed to install, you need to check if it’s applicable or not. The best way to do that is by searching the Windows update name on the official website of Windows.
It could be that the Processor Architecture is not compatible with the Windows Update you are trying to install. If you have an X86-based processor, you can’t install x64-based installations of Windows and vice-versa. This usually happens when you’ve downloaded the update manually and then tried installing it.
Option 2 – Try checking if the update is old
The issue might be because you are trying to install an old Windows update which is why it didn’t work. To check, go to Settings > Update and Security > View Update history. From there, you can look for the update.
Option 3 – Try checking if the update is already installed
To verify the update, just go to the Windows Update history once more as you did in option 2, and then see if the update is already installed or not.
Option 4 – Try checking the prerequisites
AS mentioned earlier, there are some updates that depend on other updates before they get installed on your computer. The best way to verify is by checking the Microsoft Knowledge Base (KB). And to verify if the prerequisite updates are installed or not, just run the command below in PowerShell:
get-hotfix KB1111111, KB2222222, KB3333333
Note: In the command given above, you need to replace “KB1111111, KB2222222, KB3333333” with the actual update KB numbers.
Option 5 – Try running the Windows Update Troubleshooter
As you know, Windows 10 has various auto-repair built-in tools to help users fix small issues which used to get fixed manually. And in this case, you will need the Windows Update Troubleshooter to fix the issue.
Go to Settings and click on Update and Security.
From there, click Troubleshoot and click on Windows Update and then click the “Run the troubleshooter” option.
After that, it will try to detect and automatically fix common issues in the Windows Updates which can be resolved by Windows itself. Note that the process may take several minutes before it completes so you need to wait until it’s done. Once it’s done, in case you have some pending update that wasn’t realized by the system early on, it will apply the fix right away and restart the Windows Update service.
Dxgkrnl.sys is a file related to the Microsoft DirectX driver – a suite of technologies developed by Microsoft to provide hardware acceleration for heavy multimedia applications like 3D games as well as HD videos. However, there are times when you encounter Blue Screen errors for this system file which is quite a lot. So when you encounter a Blue Screen error that’s related to this file, then it could be that the dxgkrnl.sys file is infected with some virus or malware and this might go unnoticed since antivirus programs regard dxgkrnl.sys as a system file. Here are some Blue Screen errors related to the dxgkrnl.sys file:
SYSTEM_SERVICE_EXCEPTION .
BAD_POOL_HEADER
STOP 0x0000000A: IRQL_NOT_LESS_OR_EQUAL.
STOP 0x0000001E:
KMODE_EXCEPTION_NOT_HANDLED
STOP 0x00000050:
PAGE_FAULT_IN_NONPAGED_AREA
To fix the dxgkrnl.sys Blue Screen error, here are some suggestions you have to check out.
Option 1 – Try running the DirectX Diagnostic Tool
Since the dxgkrnl.sys error has something to do with the DirectX Graphics APIs, you can run the DirectX Diagnostic tool to resolve the problem.
Option 2 – Try updating or re-installing DirectX
If the DirectX Diagnostic tool didn’t work, you can try to update or reinstall DirectX instead. This can help in fixing the problem because when you reinstall or update DirectX, it will replace the incompatible or corrupted components of DirectX from your computer.
Option 3 – Try to run the DISM commands
You might want to repair potentially corrupted files in your system as having them could also trigger the dxgkrnl.sys Blue Screen error. To repair these corrupted system files, you can run the DISM commands:
Tap the Win + X keys and click on the “Command Prompt (Admin)” option.
After that, input each one of the commands listed below sequentially to execute them:
Dism /Online /Cleanup-Image /CheckHealth
Dism /Online /Cleanup-Image /ScanHealth
Dism /Online /Cleanup-Image /RestoreHealth
Once you’ve executed the commands given above, restart your computer and check if the dxgkrnl.sys Blue Screen error is now fixed.
Option 4 – Try updating or reinstalling your Graphics drivers
Updating or reinstalling the Graphics drivers in your computer can also help in resolving compatibility issues between the operating system and the driver that also cause this kind of BSOD error.
First, boot your computer into Safe Mode.
After that, tap the Win + R keys to launch Run.
Type in devmgmt.msc into the box and tap Enter or click OK to open the Device Manager.
After that, a list of device drivers will be displayed. From there, look for the Display Adapters and click on them.
After that, right-click on each entry under the Display Adapters and select the “Uninstall Device” option from the menu.
Now restart your computer.
After restarting your computer, go to the Settings app and Check for Updates in the Windows Update section.
Note: You also have the option to go directly to the website of your graphics card manufacturers like NVIDIA, Intel, or AMD and go to the section called Drivers then check if there’s a new available update – if there is, download and install it.
Option 5 – Try to run the Blue Screen Troubleshooter
As you know, the Blue Screen troubleshooter is a built-in tool in Windows 10 that helps users in fixing BSOD errors like dxgkrnl.sys. It can be found on the Settings Troubleshooters page. To use it, refer to these steps:
Tap the Win + I keys to open the Settings panel.
Then go to Update & Security > Troubleshoot.
From there, look for the option called “Blue Screen” on your right-hand side and then click the “Run the troubleshooter” button to run the Blue Screen Troubleshooter and then follow the next on-screen options. Note that you might have to boot your PC into Safe Mode.
Option 6 – Try disabling the SLI Technology in NVIDIA Control Panel
In case you don’t know, there is a technology called SLI that comes with the NVIDIA graphics cards. With the help of this technology, the usage of various GPUs is allowed on a computer and hence helps in triggering the Alternate Frame Rendering and boosts the Graphics Performance directly. This is why this option to disable the SLI technology is suitable in fixing the problem if you are using an NVIDIA Graphics card.
Search for NVIDIA Control Panel in the Cortana Search box and then click on the related search result or you can also right-click on the NIVIA icon located in the system tray and then select the NVIDIA Control Panel to open it.
After that, navigate to the 3D settings section.
Then select the “Set SLI Configuration” option and click on the “Do Not Use SLI Technology” option.
Now click on Apply located at the bottom-right corner of the window to save the changes made.
Restart your computer.
Option 7 – Try turning off NVIDIA Surround
Note that this option is only applicable if your computer is using the NVIDIA Graphics card.
In the Cortana Search box, search for NVIDIA Control Panel and click on the related search result.
After opening the NVIDIA Control Panel, go to 3D Settings > Configure Surround, PhysX.
Now uncheck the “Span displays with Surround” option and then click on the Apply and OK buttons to save the changes made.
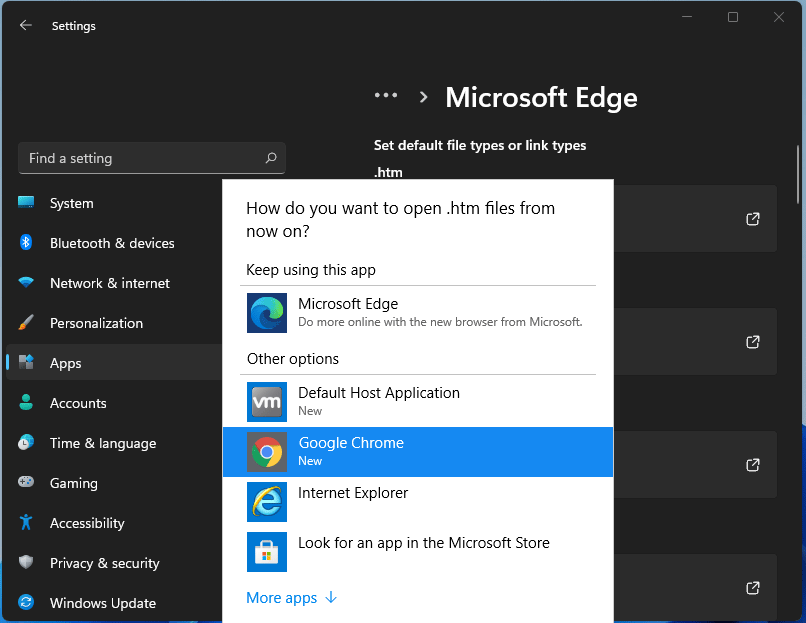
After a lot of backlash about choosing the default Windows browser, Microsoft has officially backed up and brought back a one-click browser change into Windows 11.
For anyone who is not aware, when Windows 11 was released if you wanted to switch to another browser you had to go into the settings app and choose the default browser for different types of file extensions like HTML, HTM, PDF for opening on the web, etc. Of course, this was completely unnecessary and it was not well received by users. So after some time, Microsoft backpedaled to standard one click, choose your default browser solution that existed in the previous version of Windows OS.
Altho sometimes Microsoft knows how to irritate its users base, it is good to know that they can also listen and fix things that are required.


 For anyone who is not aware, when Windows 11 was released if you wanted to switch to another browser you had to go into the settings app and choose the default browser for different types of file extensions like HTML, HTM, PDF for opening on the web, etc. Of course, this was completely unnecessary and it was not well received by users. So after some time, Microsoft backpedaled to standard one click, choose your default browser solution that existed in the previous version of Windows OS.
Altho sometimes Microsoft knows how to irritate its users base, it is good to know that they can also listen and fix things that are required.
For anyone who is not aware, when Windows 11 was released if you wanted to switch to another browser you had to go into the settings app and choose the default browser for different types of file extensions like HTML, HTM, PDF for opening on the web, etc. Of course, this was completely unnecessary and it was not well received by users. So after some time, Microsoft backpedaled to standard one click, choose your default browser solution that existed in the previous version of Windows OS.
Altho sometimes Microsoft knows how to irritate its users base, it is good to know that they can also listen and fix things that are required.