NoteHomepage (by MyWay) is a browser extension that may be bundled with other free software that you download off of the Internet, or delivered via other advertising means. When installed NoteHomepage will set the homepage and search engine for your web browser to http://search.myway.com.
While installing this extension will gather information from your browsing sessions, including website visits, clicked links, and sometimes even private information, that it later sends back to display unwanted ads into your browser.
Several anti-virus scanners have marked this extension as a Browser Hijacker and are therefore not recommended to keep on your computer. It is considered potentially unwanted, and many users wish to remove it, so it is flagged for optional deletion.
About Browser Hijackers
Browser hijacking is a form of unwanted software program, usually a web browser add-on or extension, which then causes modifications in the web browser’s settings. Browser hijacker malware is developed for many different reasons. Generally, browser hijacking is utilized for earning advertising revenue from forced advert mouse clicks and site visits. Even though it might seem harmless, these tools are designed by malicious individuals who always look to take full advantage of you, so that they can earn money from your naivety and distraction. Some browser hijackers are programmed to make certain modifications beyond the browsers, like altering entries on the system registry and letting other malware further damage your machine.
Find out how to identify a browser hijack
Below are some signs and symptoms that suggest your browser has been hijacked: the home page of your browser is changed unexpectedly; your browser is constantly being redirected to adult websites; the default search engine is changed; you are getting browser toolbars you have never noticed before; never-ending pop-up advertisements show up and/or your web browser popup blocker is disabled; your web browser gets sluggish, buggy, crashes regularly; Inability to navigate to certain websites, particularly anti-malware and also other security software websites.
So how exactly does a browser hijacker infect a computer?
Browser hijackers might use drive-by downloads or file-sharing networks or an e-mail attachment in order to reach a targeted PC. They could also come from add-on programs, also called browser helper objects (BHO), web browser plug-ins, or toolbars. Browser hijackers sneak into your computer in addition to free software application downloads also that you unknowingly install alongside the original. A good example of some infamous browser hijackers includes Babylon, Anyprotect, Conduit, SweetPage, DefaultTab, Delta Search, and RocketTab, however, the names are regularly changing.
Browser hijackers will affect the user’s web surfing experience severely, track the websites frequented by users and steal personal information, cause difficulty in connecting to the web, and eventually create stability problems, causing software programs and systems to crash.
Learn how to remove browser hijackers
Some hijackers can be removed by just uninstalling the corresponding freeware or add-ons through the Add or Remove Programs in the Windows control panel. But, many browser hijackers are difficult to get rid of manually. No matter how much you try to get rid of it, it might keep returning again and again. Additionally, manual removals demand in-depth system knowledge and thus can be a very difficult job for novices.
Industry experts always suggest users remove any malicious software including browser hijacker with an automatic malware removal tool, which is easier, safer, and quicker than the manual removal method. Employ a PC optimizer along with your anti-malware software to solve various registry issues, remove computer vulnerabilities, and boost your computer performance.
Download the software in Safe Mode with Networking
If the malware is set to run immediately when Windows starts, stepping into safe mode may block the attempt. Just minimal required applications and services are loaded whenever you start your laptop or computer in Safe Mode. To launch your Windows XP, Vista, or 7 PCs in Safe Mode with Networking, follow the instructions below.
1) At power on, hit the F8 key before the Windows splash screen begins to load. This would invoke the “Advanced Boot Options” menu.
2) Select Safe Mode with Networking with arrow keys and press ENTER.
3) As soon as this mode loads, you should have an internet connection. Now, get the malware removal software you want by utilizing the web browser. To install the program, follow the directions in the installation wizard.
4) Immediately after installation, run a full scan and let the software remove the threats it discovers.
Switch over to an alternate browser
Some viruses may target vulnerabilities of a particular web browser that obstruct the downloading process. If you’re not able to download the anti-virus software program using Internet Explorer, this means malware is targeting IE’s vulnerabilities. Here, you need to switch to a different internet browser such as Firefox or Chrome to download the antivirus program.
Run anti-virus from a pen drive
To successfully get rid of the malware, you have to approach the problem of installing anti-malware software on the affected computer system from a different perspective. Adopt these measures to run the anti-virus on the affected computer system.
1) Download the anti-malware software on a virus-free computer.
2) Plug the USB drive into the clean computer.
3) Double click on the downloaded file to open the installation wizard.
4) Select flash drive as the location when the wizard asks you exactly where you wish to install the application. Follow the on-screen instructions to finish the installation process.
5) Remove the flash drive. Now you can utilize this portable anti-malware on the affected computer.
6) Double-click the anti-malware software EXE file on the USB drive.
7) Press the “Scan” button to run a full computer scan and remove viruses automatically.
Technical Details and Manual Removal (Advanced Users)
To eliminate NoteHomepage manually, navigate to the Add or Remove programs list in the Windows Control Panel and select the program you want to get rid of. For web browser plug-ins, go to your web browser’s Addon/Extension manager and choose the add-on you want to disable or remove. You might also want to reset your home page and search providers, as well as clear your web browser cache and cookies.
Finally, check your hard disk for all of the following and clean your Windows registry manually to remove leftover application entries after uninstalls. Please be aware that this is for professional users only and could be challenging, with incorrect file removal resulting in additional PC errors. In addition to that, certain malware is capable of replicating or preventing deletion. You’re advised to do this procedure in Windows Safe Mode.
 You can prevent starting of app installations files if they have not come from the MS store inside Windows 11.
 In the menu choose device manager and click on it.
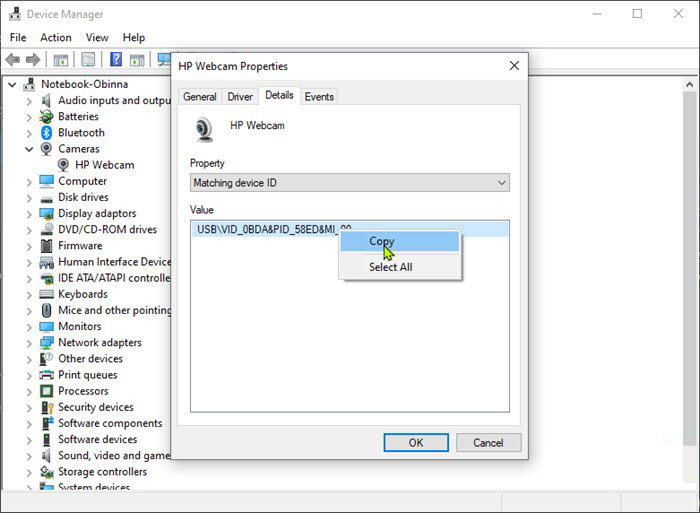
 When the device manager opens, expand the Imaging devices or Cameras section.
Right-click Integrated Camera or the primary webcam, and click Properties.
Go to the Details tab.
Under the Property section, click to select Matching device ID from the drop-down.
Right-click the value and select Copy
When the device manager opens, expand the Imaging devices or Cameras section.
Right-click Integrated Camera or the primary webcam, and click Properties.
Go to the Details tab.
Under the Property section, click to select Matching device ID from the drop-down.
Right-click the value and select Copy
 The next step is to download and install Windows Driver Kit (WDK)
 Install latest driver or reboot so Windows will install the driver automatically
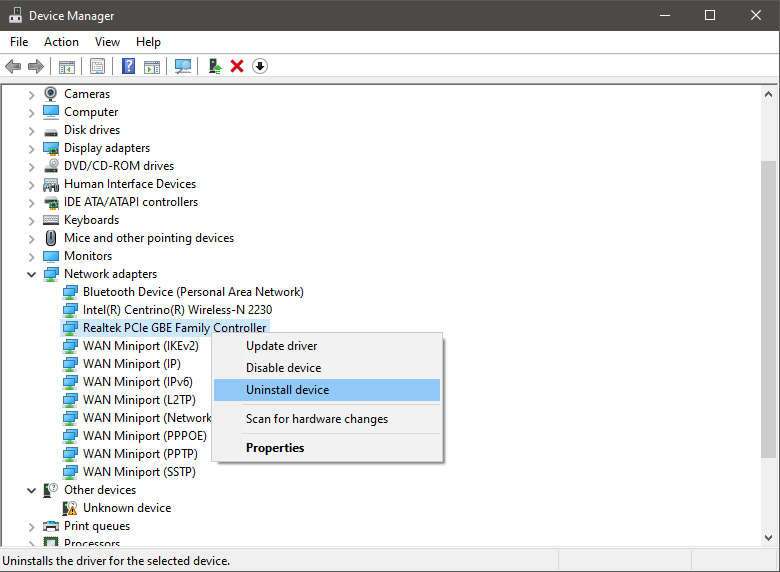
 In command prompt type next line and press ENTERDEL /F /S /Q /A “C:\Windows\System32\drivers\mfewfpk.sys
Reboot the system
In command prompt type next line and press ENTERDEL /F /S /Q /A “C:\Windows\System32\drivers\mfewfpk.sys
Reboot the system
 What is RTX