TPM or Trusted Platform Module version 2.0 is a must-have if you plan on upgrading your system to Windows 11. So what exactly is TPM and do you have it?
What exactly is TPM?
TPM is a tamper-resistant hardware technology tasked with generating and storing encryption keys inside it for better PC security.
It can be remotely used to authenticate hardware and software by utilizing a unique endorsement key placed into the hardware itself.
This technology can be used for example in BitLocker inside Windows in order to have data on a hard drive encrypted so if the mentioned drive is connected to another computer it would not be able to be accessed since the encryption key is stored in the TPM module.
Microsoft is pushing its agenda that Windows 11 must be and must feel like safety first OS which will protect user data and user information and requiring TPM means that each Windows 11 will be secure so no additional software patches will be required for an extra layer of security.
Windows 11 will assume that each user has TPM encryption enabled and will be built upon that.
Do you have TPM on your computer?
If your computer or hardware has been purchased in 2016 or later there are very high chances that you already have the required technology to run Windows 11.
Unfortunately, many gaming motherboards have not been placing TPM in their boards and you might not have it.
Also, there is the option of you having it but it is turned off in motherboard settings making Windows unable to detect it.
As you can clearly see there are a lot of scenarios around required tech and honestly it is a complete mess.
But lucky for you there are ways to find out do you possess the needed module in order to make an upgrade.
On your current computer on which you would like to make an upgrade in your current Windows OS press ⊞ WINDOWS + R to open the run dialog.
Inside run dialog type in TPM.msc and press ENTER to open Trusted Platform Module Management on Local Computer.
You will immediately receive information do you have the required module.
If everything is fine, you are good to go, however, if it says that compatible TPM cannot be found there is a chance that either you do not have needed hardware or it might be turned off inside motherboard settings.
Check motherboard UEFI
If you have a newer motherboard but Windows utility cannot detect TPM there is a chance that it might be turned off directly on your board.
In order to check this, you will have to boot up your PC into UEFI either by pressing the corresponding key when it is turned ON or from Windows reboot options.
Once you are inside UEFI you need to find security options and see if there is an option to turn ON or enable TPM.
Since every motherboard is different and has different UEFI software we cannot cover all of the permutations and the best we can do is hope that provided information is enough.
You can also visit your motherboard manufacturer to see instructions for your specific case.
Conclusion
TPM itself is generally an OK idea and I can surely see good sides of it but there is this lurking feeling that generally, Microsoft is not really concerned about the security of our data and that the real requirement for this is trying to battle software piracy.
I simply cannot trust company which introduced tons of telemetry tracking through ages and which has done everything in their power to battle non-legal use of their software.
I do not promote piracy but I support free choice and besides, who can tell me what will happen if TPM malfunctions, will I lose all of my data forever?
It is not so uncommon that TPM has malfunctioned in the past and it is only logical to presume it can do it again in the future but this time we will not have the choice not to use it, we will be forced into it.
This is a typical system error. This error means the requested operation cannot be performed in full-screen mode. It hampers your ability to run your desired program on Windows PC. It is displayed on computer screens in the following format:
"ERROR_FULLSCREEN_MODE" and/or as the hexadecimal value 0x3EF.”
Solution
Error Causes
The system error code 1007 can be triggered due to several reasons. This includes but is not limited to:
Windows registry damage or corruption
Device driver conflicts
Spyware or viral infection
Hardware malfunction
Software file damage or corruption
Unlike the blue screen of death error codes, this error is not fatal. But it may hamper your ability to run and work on your desired program. To avoid the inconvenience, it is advisable to fix it immediately.
Further Information and Manual Repair
Try these easy and effective do it yourself methods to repair the system error code 1007 on your PC:
Method 1 - Scan Your System for Viruses
If the underlying cause of error 1007 on your system is viral and spyware infection, then it is advisable to download a powerful antivirus and scan your entire PC.
An antivirus not only detects but also removes all types of viruses including spyware, Trojans and adware. Once removed, try running your desired program again, if the program runs successfully, this means the error is resolved.
Method 2 - Update the Drivers
When the error code 1007 occurs due to driver conflict, then it is advisable to update the drivers. To do so simply use the driver update wizard from within Device Manager. The wizard will guide you through the entire driver update process, making it extremely simple for you to update the drivers in minutes.
Method 3 - Clean and Repair the Registry
You may experience the error 1077 because of registry damage or corruption. If this is the reason, then it is suggested you download Restoro.
This is a user-friendly and multi-functional PC Fixer deployed with a powerful registry cleaner. It scans your entire system for registry related errors and issues, removes all unnecessary and obsolete files like cookies, junk files and bad registry entries, notorious for registry corruption.
In addition to this, it also repairs the registry and damaged system files, thereby resolving the system error code 1007 immediately.
Click here to download Restoro on your PC and fix system error code 1007 today!
When your computer boots up or when it just woke up from sleep but it suddenly encounters a Blue Screen of Death error, saying, “HAL INITIALIZATION FAILED error with STOP CODE 0x0000005C”, then read on as this post will give you some fixes that might help in resolving the problem. You will see the following error message on your computer’s screen when this error pops up:
“Your PC ran into a problem and needs to restart. We’re just collecting some error info, and then we’ll restart for you. If you’d like to know more, you can search online later for this error: HAL_INITIALIZATION_FAILEDHAL INITIALIZATION FAILED 0x0000005C”
This kind of Blue Screen error indicates that there is a hardware or device driver problem in your PC. Aside from that, it also signifies that the initialization of the Hardware Abstraction Layer or HAL has failed. This happens only during the relatively short period that the Windows operating system is being initialized, specifically during phase 4 of Windows startup. What’s worse about this kind of Stop error is that it does not just go away after a computer reboot.
You may have to boot your computer into Safe mode with Networking using the Advanced startup options which you can access by tapping the F2 or F8 key. Once you’ve accessed the Advanced startup options, follow the fixes prepared below.
Option 1 – Run CHKDSK command to repair hard disk errors
Running the Chkdsk utility could help you resolve the HAL INITIALIZATION FAILED error with STOP CODE 0x0000005C. If your hard drive has issues with integrity, the update will really fail as the system will think that it’s not healthy and that’s where the Chkdsk utility comes in. The Chkdsk utility repairs hard drive errors that might be causing the problem.
After you access the Advanced Startup options, select Command Prompt by using the arrow keys on your keyboard.
After opening Command Prompt, execute the following command and hit Enter:
chkdsk /f /r
The command you entered will scan the hard disk for any errors and will automatically fix it if it finds some issues. Wait for the process to be completed and then restart your computer.
Option 2 – Run the DISM tool
If the first option didn’t work, then running the Deployment Imaging and Servicing Management tool can help you resolve the HAL INITIALIZATION FAILED error as it will repair the Windows System Image as well as the Windows Component Store in Windows 10.
After you access the Advanced Startup options, select Command Prompt by using the arrow keys on your keyboard.
Next, type in this command: DISM /Online /Cleanup-Image /RestoreHealth
Do not close the window if the process takes a while as it will probably take a few minutes to finish.
Option 3 – Update the Device drivers
Tap the Win + R keys to launch Run.
Type in msc into the box and tap Enter or click OK to open the Device Manager.
After that, a list of device drivers will be displayed. Look for the device driver you and then select either “Update driver” or “Uninstall device”. And if you find any “Unknown device”, you need to update it as well.
Select the “Search automatically for updated driver software” option and then follow the instructions to complete the process.
If you have chosen to uninstall the driver, follow the screen options to complete the process and then restart your PC.
Connect the device and Scan for hardware changes – you can see this option under Device Manager > Action.
Option 4 – Try removing any external hardware
You might also want to remove any connected devices and external hardware in your computer as it might help in fixing the BSOD error.
Option 5 – Disable Fast Start-up
If you want your computer to boot faster, then you might have enabled Fast Start-up. This feature is ideal for computers that are using a hard disk drive. However, turning on this feature also means that when the computer boots, it might lag some drivers that are loaded when it initially boots up. Thus, it might be the potential cause of the UNEXPECTED STORE EXCEPTION BSOD error. Thus, you need to disable Fast Start-up. To do that, follow these steps:
Boot your PC into Safe Mode.
Then tap the Win + R keys to open the Run dialog box.
Next, type in “control” to open Control Panel.
After that, select Hardware and Sound and click on Power Options.
Select “Choose what the power buttons do” from the left side menu pane and click on Change settings that are currently unavailable.
Afterward, uncheck the “Turn on fast startup (Recommended)” entry and click on Save Changes.
Now restart your PC for the changes to take effect and then check if the problem’s fixed afterward.
Option 6 – Disable your antivirus program
There are times when the antivirus program installed in your computer blocks file access and even disk access. Thus, disabling the antivirus program or any security software installed in your computer is always a good idea you can try when the Windows Update process does not go smoothly. So before you try updating your computer again, make sure to disable the antivirus or security program and once the Windows Update is done, don’t forget to enable the antivirus program back again.
Option 7 – Perform a Clean Boot
There are some instances that some conflicting programs installed in your computer might be the one that’s causing the HAL INITIALIZATION FAILED error. To identify which program is causing the problem, you need to put your computer in a Clean Boot State. To do so, follow the steps below.
Log onto your PC as an administrator.
Type in MSConfig in the Start Search to open the System Configuration utility.
From there, go to the General tab and click “Selective startup”.
Clear the “Load Startup items” check box and make sure that the “Load System Services” and “Use Original boot configuration” options are checked.
Next, click the Services tab and select the “Hide All Microsoft Services” check box.
Click Disable all.
Click on Apply/OK and restart your PC. (This will put your PC into a Clean Boot State. And configure Windows to use the usual startup, just simply undo the changes.)
From there, start to isolate the problem by checking which one of the programs you installed recently is the root cause of the problem.
Error Code 0x80240001 usually occurs in Windows 10 and is specific to the process of updating your system. It is similar to an error code found in previous versions of the software during the update process. There are a number of steps that can be taken to solve this error code, most of which are fairly easy for the average user to undertake.
Common symptoms for this particular error code include:
Inability to complete the updating process of your Windows 10 system
A notice that the Windows Update Agent is not able to provide appropriate services through the update module.
While it can be frustrating to have this message appear during the update process, users can resolve the error in a number of ways. However, if you are not confident in your ability to follow the steps below or if the methods listed fail to resolve the problem, contact a certified Windows 10 repair technician to assist you in the process.
Solution
Error Causes
Error Code 0x80240001 occurs when the Windows Update tool is unable to complete its service successfully. This error occurs most often when users attempt to update to Windows 10 from older versions of the software, including Windows 7, 8, or 8.1.
This particular error code can also occur when your system has not been updated in a regular fashion. Stacked updates make it more likely for Error Code 0x80240001 to occur.
In most cases, when Error Code 0x80240001 appears on your screen, the update process will be halted. Sometimes, the screen may display a single color background, removing the appearance of all other windows and applications.
Fortunately, there are several methods that you can use to attempt to circumvent the problem and see the update process through to completion.
Further Information and Manual Repair
While it can be frustrating to deal with an error when you attempt to update your Windows software, there are several ways that you can seek to resolve the issue that causes Error Code 0x80240001. These steps are relatively simple to complete and do not require advanced techniques to be used. However, if you are not confident in your ability to complete the steps listed below, enlist the aid of a qualified Windows technician to help you.
Here are the most common ways that Error Code 0x80240001 can be resolved for Windows 10:
Method One: Download and Use the Windows Repair Tool
From the Windows website, you can download the Windows Repair tool, if it is not already installed on your computer. While there are other tools available through outside sites that claim that they can resolve this error, in many cases, they can be a carrier for viruses and other kinds of malware, so it is inadvisable to use non-Windows tools to fix this particular error code.
Once you have successfully added the Windows Repair tool to your computer, open it up and look for the option to run “Repair Windows Update.” Using this process, your system can search for and resolve the error, allowing you to successfully run the update tool through to completion.
Method Two: Uninstall Recently Added Software
In some cases, software that has been recently added to a non-updated computer can cause the update process to experience issues. If you believe that this may have occurred in your case, simply uninstall the software in question, then attempt to run the Windows 10 Update process again.
The best way to prevent this error from reoccurring when you seek to update your Windows 10 system is to apply updates within a short period of time from their release date. It is recommended that users update regularly, which can allow them to avoid a number of issues that are common to the update process.
If you have any difficulty in resolving Error Code 0x80240001 after you have attempted these steps, you may need to enlist the help of a qualified technician who is familiar with the specific errors related to the Windows 10 Update process. This can especially be helpful if you have recently installed a number of new kinds of software and are unsure of whether or not any specific one may be causing your issues. If you wish to always have at your disposal a utility tool to fix these Windows 10 and other related issues when they do arise, download and install a powerful automated tool.
It is a device driver error that users encounter when they use Windows 2000 operating system and its later versions.
The error occurs when the connected peripheral device, upon removal using the ‘Safe Removal Hardware’ program, hangs up a problem within the process. The error prompt you then see is referred to within the operating system as error code 47.
It usually pops up on your computer screen with the following message:
Windows cannot use this hardware device because it has been prepared for "safe removal", but it has not been removed from the computer. (Code 47)
Solution
Error Causes
There are many factors responsible for the Error Code, the primary ones are listed below:
An incomplete program installation
An incomplete program uninstallation
System recovery from viruses
Corrupted Windows system registry entries
Further Information and Manual Repair
Error Code 47, like other device driver error codes, is relatively easy to solve. You can fix the error code in the following ways:
Method 1 – Reconnect the device to your computer
Unplugging and plugging the USB cable of the device into the computer is the easiest way to resolve the error.
Doing this will help refresh the system and increase the likelihood of the device driver files loading and function properly.
Method 2 – Restart your PC
Another simple method you can use to solve your PC error code is to simply restart your Windows system.
It may be that the error prompted upon connecting the device you have connected is merely a temporary problem, and upon restart, will resume functioning smoothly.
Method 3 – Manually uninstall then reinstall the device driver
If both of the above-listed methods fail to resolve the problem, you may have to resort to manually uninstalling and then reinstalling the device driver causing the problem.
This would be necessary since the remaining incomplete files due to a partial removal or installation of programs is what contributes to the error code. By uninstall and reinstalling the device driver program, it would lead to the completion of the files.
You can do this by firstly logging in as Administrator and open Device Manager. Select the device that is causing the problem and double click it and make sure that the peripheral is connected properly to the PC.
Upon opening, click on the ‘Driver’ tab and then select ‘Update Driver’. Make sure to refer to the system documentation that you received with your PC or computer to check for the motherboard details and driver specifics.
Method 4 – Use software to automatically download the driver
Manually uninstalling and reinstalling the driver will usually do the trick; however, it may be time-consuming especially when you would have to resort to your hardware user manual.
Therefore, using a program such as DriverFIX can save you a lot of time and frustration in having your device work properly on your computer.
DriverFIX, with its user-friendly approach to help you fix your PC issues, comes with an integrated database that detects which drivers you need to reconfigure within just a few seconds and downloads it automatically.
It further ensures that your drivers are installed in their entirety leaving no room for any incomplete files to remain that create Error Code 47.
It also has the added advantage of being able to backup and restores your files should there be the slightest possibility of system file damage.
Thus, registry damage can be averted by letting the software roll back the system files to an earlier healthy checkpoint. DriverFIX is the answer to fixing your PC error codes accurately and quickly.
Click here to download DriverFIX to fix Error Code 47 quickly and effectively!
Manually cleaning your PC registry may be the worst or best thing you ever decide to do. Registry keys that lie around on your computer, unused, can cause your computer to lag. This can end up in your computer not being able to load the easiest of programs and being slow at loading anything, let alone something that would take up a decent amount of memory.
If your computer has slowed to almost an absolute stop, it is most probably the registry’s fault and the only option then is to clean it. You can get programs to do this for you, but they can be riddled with inaccuracies and viruses that could harm your computer even more.
This is why some people choose to manually edit their computer. However, this is not without its flaws.
Registry Keys
Registry keys tend to have really long names.
These names will be full of numbers and hyphens and will most likely give you no indication of what they do. Even some computer experts find it hard to understand what every computer’s registry keys do.
This can make it very hard to see which ones are causing the problem; and if you don’t know what’s causing the problem, then there is no way you will be able to fix it.
Some registry keys will be completely menial in what they do but some could be vital to even allow Windows to work on your computer.
Manual Registry Repair
Registry keys can also cause huge problems if you manually delete the wrong one.
A lot of registry cleaners have the option to revive a key that they have deleted on you, which means that fixing an error that they made would be easy enough to do. However, when you manually delete registry keys, it will be an awful lot harder to get them back to work again afterward.
This can cause your computer many problems and if you delete even one wrong key it is possible your computer will not even start. With the horrid naming system they have as well, it makes it very hard to determine what is important and what is not, which means it is all too likely that you will delete something important.
However, those are the risks you have to take when you are cleaning out your registry. A registry cleaner has the same likelihood of messing with your computer and deleting something wrong that you have, so it is the same either way however a registry cleaner will do it with less hassle.
But, some people say that if you do it yourself, it’s more likely to be right; that is why they prefer to do it manually and that is alright.
Conclusion
So, if you are manually deleting your registry keys that are unused, you’ll have to use a program that comes with Windows known as ‘regedit.exe’ which is incredibly difficult to use but may just be worth the hassle in the end.
So, you don’t really need to put up with a slow computer, but be careful when messing with your registry manually!
To repair and resolve this and other PC-related issues Click Here to download Restoro.
This post will guide you in what to do if the DisplayLink in Windows 10 is not working. There are several users who reported that their DisplayLink device has stopped working with the Windows 20 Anniversary or the Creators update all of a sudden. According to users, this issue occurs right after they finish installing a big Windows Update like the Anniversary Update or the Creators Update or right when the DisplayLink driver is updated using Windows Update.
DisplayLink is a graphics transport technology that allows users to connect to any computer that supports USB or Wi-Fi. Aside from that, it is also an excellent universal docking solution to any platform which makes it a great solution for enabling multiple displays. Thus, it can be quite annoying when DisplayLink suddenly stops working. There really is no actual error message when it happens. The only telltale sign is that all the devices that use the DisplayLink technology will also stop functioning. There could be tons of reasons why DisplayLink stopped working. It could be due to an incompatible driver, or the DisplayLink driver itself is corrupted or is connected to a USB 2.0 port. In addition, the problem could also be due to the Nvidia Share (ShadowPlay) that conflicts with DisplayLink or that the Universal Serial Bus is broken. To resolve the issue, refer to the following options laid out below.
Option 1 – Run the Hardware and Devices troubleshooter
As you know, Windows comes with a built-in tool that you can use to troubleshoot the problem with DisplayLink. You can find it in Settings > Update & Security > Troubleshoot. For further instructions, follow these steps:
The first thing you need to do is click on Start and then on the gear-like icon to pull up the window for Settings.
After opening Settings, look for the Update and Security option and select it.
From there, go to the Troubleshoot option located on the left-hand side of the list.
Next, select Hardware and Devices from the list and open the Troubleshooter and run it. Once it is doing its job, wait for it to complete the process and then restart the system.
After the system restarts, check if the problem’s now fixed. If not, refer to the next option given below.
Option 2 – Try to uninstall DisplayLink and reconnect the docking station
If the Hardware and Device troubleshooter is of no help, you can try uninstalling DisplayLink and reconnecting the docking station. To do so, follow these steps:
Disconnect the docking station or any other device that uses DisplayLink.
Tap the Win + R keys to open the Run dialog box.
Then type “cpl” and hit Enter to open Programs and Features.
From there, look for DisplayLink, right-click on it and click Uninstall.
After that, follow the next on-screen instructions that appear on your screen to completely remove DisplayLink from your computer.
Once you’ve uninstalled DisplayLink, click this link to download and install DisplayLink again.
Now reconnect the docking station as well as other devices that use DisplayLink and follow the next on-screen instructions to reinstall the required drivers in your computer.
Restart your computer and then check if DisplayLink is now working fine or not.
Option 3 – Try using a USB 3.0 port
If you are experiencing this issue with DisplayLink with a monitor that you’re trying to connect using DisplayLink, then you have to make sure that you are using a USB 3.0 port. Based on some reports, there are certain monitors that will not work with DisplayLink while connected to a USB 2.0 port since they have insufficient power to run the monitor.
Like pointed out earlier, the problem with DisplayLink might have something to do with the Nvidia ShadowPlay. This streaming feature was often reported to crash the DisplayLink monitors which is why you might want to try disabling it for a while to check if it’s really true. Once you’ve disabled Nvidia ShadowPlay, restart your computer and check if your DisplayLink monitor now works.
Option 5 – Reinstall the Universal Serial Bus controller
You can also reinstall the Universal Serial Bus controller to fix DisplayLink since a malfunctioning USB port can sometimes cause issues with DisplayLink.
Tap the Win + R keys to open the Run dialog box.
Then type “msc” in the field and hit Enter to open the Device Manager.
From there, look for the Universal Serial Bus controllers and expand its drop-down menu.
Next, right-click on every Host Controller and then click on Uninstall Device.
After uninstalling every entry, restart your computer to force your system to reinstall the drivers you’ve just uninstalled.
Once your computer has rebooted, wait until the drivers are reinstalled and then try opening DisplayLink again.
Option 5 – Reinstall the Universal Serial Bus controller
You can also try to perform a System Restore as it can also help you fix DisplayLink. You can do this option either by booting into Safe Mode or in System Restore. If you are already in the Advanced Startup Options, just directly select System Restore and proceed with the next steps. And if you have just booted your PC into Safe Mode, refer to the steps below.
Tap the Win + R keys to open the Run dialog box.
After that, type in “sysdm.cpl” in the field and tap Enter.
Next, go to the System Protection tab then click the System Restore button. This will open a new window where you have to select your preferred System Restore point.
After that, follow the on-screen instructions to finish the process and then restart your computer and check if the problem is fixed or not.
Anxiety from all these digital threats lurking everywhere? An antivirus program can help put your mind at ease.
What can a virus do to your device?
A virus is malicious software that can affect pretty much any device and does so in a variety of ways. Be it your computer, your phone or your smart lightbulb - as long as there’s access to the internet, malware can get to it.
How exactly does this kind of attack manifest itself? Well, there’s a wide variety of effects ranging from mild to severe. Among other things, they depend on which type of malware attacks your device - a virus, spyware, ransomware, adware or something else.
These are some of the things you can expect to happen:
Slow performance
System crashes
Theft of data and sensitive information
Connectivity issues
Constant browser redirects
Strange messages sent to your contacts
Interference with files
It really can be the stuff of nightmares. So, if you want to sleep peacefully knowing that your devices are completely safe, you should definitely consider getting an antivirus.
P.S. don’t let its name fool you - an antivirus does indeed protect your devices against more than just viruses.
What is antivirus software exactly?
Antivirus software is designed to help you battle and ward off malware. Basically, it scans your device to detect any suspicious activity and offers tools to get rid of the culprit.
At first, antiviruses were developed to fight against viruses only, but nowadays they cover a lot more ground. Here are some of the biggest benefits of getting yourself a powerful defender.
Advantages of antivirus software
1. It fights those pesky ads
Look, constant ads that pop up everywhere aren’t the absolute worst thing that can happen on your computer. If anything, they are annoying, like when you’re trying to sleep but that one fly in your room just won’t stop buzzing.
Now, there’s a free, well-established solution for that - installing an ad blocker. And we’re about a hundred and ten percent sure you’ve already done that on each and every browser you use.
However, “if I can’t see it, it doesn’t exist” isn’t the most ideal approach for your online safety. Ad blockers can’t block everything and they won’t protect you from potential adware. An antivirus on the other hand offers that layer of protection against malware snuck into pop-ups and spammy websites.
2. It protects you from hackers
Hackers don’t target government institutions only. They’ll target regular people too if they have something to gain.
Credit: Clint Patteron (Unsplash)
There are different types of hacking, such as phishing e-mails, transmission of malicious programs, credential reuse, denial of service and more. In any case, they take control of your device and hijack your data.
The good thing is that, as threats evolve, antiviruses evolve too and there are tons of quality programs on the market that can keep you secure for an affordable price.
3. It keeps your files and data safe
When malware enters your device, it can target pretty much any file and get access to any and all data.
Installing an antivirus program will make sure that every single file, new or old, is monitored at all times, warning you against threats immediately. That way, you can make sure to react before your other files become infected and data is lost or stolen.
Another great thing for data protection is that the best antivirus software normally comes with a password manager, so no one can use malware to steal your passwords.
4. It blocks all kinds of malware
As we already stated, malicious attacks can be performed in many ways and malware comes in in different shapes an sizes, such as:
Trojan horse
Spyware
Ransomware
Adware
Rootkit
RAT (remote access Trojan)
Keyloggers
Worms
Botnets
Credit: Growtika (Unsplash)
Nowadays, antivirus software is designed to fight against all of these types. That’s why more often than not we hear the term 'antivirus' used interchangeably with 'anti-malware,' like in this article.
5. It keeps your children protected
You can’t keep your eyes on your kid every second of the day and you can’t protect them from everything. But at least you can limit their exposure to the threats they can encounter at every corner of the digital world.
An antivirus program will block harmful or suspicious websites and ads, which is great both for you and your children. To take it a step further, though, many such programs come with special parental controls and offer monitoring as well. It’s a great solution for keeping your kids safe online without sounding like the irritating, overbearing, controlling parent who “just doesn’t get it!”
How to pick one
There are definitely lots of different antivirus programs out there, both free and paid. We recommend you look for a paid option, since free ones are unfortunately a lot more susceptible to being compromised through malicious attacks.
Now, there are a few factors to consider when choosing the right software. If you use your PC for basic things then a basic antivirus will suffice. However, the more complex your use and the more sensitive the data you deal with, the stronger it needs to be.
It’s also crucial that you take into account the features it includes. As we already mentioned, some programs have additional security options. For example, depending on the package you select, Bitdefender provides:
Some are included in plans and some are separate products, so make sure to check out all the offers.
And don’t worry if you have multiple PCs or you’re looking for protection for your smartphone or tablet as well; Bitdefender has suitable solutions for your needs. Of course, you can also just pick their classic antivirus software if you’re not in need of advanced protection.
Another important point is how regularly the software is updated and enhanced. The more frequent the updates the better, as bugs can make the program more vulnerable. Other things we advise you consider are user-friendliness, impact on performance, reputation (user reviews especially) and, of course, price.
The bottom line
Fact is: anyone can be a malware victim. Don’t let it be you.
You can’t put a price on peace and security, so don’t be reluctant to pay for yours - especially since a lot of options out there are extremely affordable. Is $159.00 a year really too much to pay for cross-platform protection for up to 10 devices? We don’t think so.
Explore your options and protect your files and data before it’s too late.
If you encounter the BAD_SYSTEM_CONFIG_INFO Blue Screen error in your Windows 10 PC, then read on as this post will guide you in fixing this issue. Usually, this kind of Blue Screen error is caused by some issues with the Boot Configuration Data file. The main issue inside of the Boot Configuration Data file is that either some boot order files or older files might be in conflict with the newer ones or the stable ones and thus triggering the BAD SYSTEM CONFIG INFO Blue Screen error.
This kind of Stop error also indicates that there is an error in the Windows Registry which is why you need to update potential culprit drivers as well as edit some entries in the Registry if need be. But before you get started, make sure that you create a System Restore Point first. After creating a System Restore Point, try to boot your computer into Safe Mode and then restart your computer normally. However, if it doesn’t work, proceed to the given options below.
Option 1 – Run System Restore
Performing System Restore might help you in fixing the BAD SYSTEM CONFIG INFO Blue Screen error. You can do this option either by booting into Safe Mode or in System Restore. If you are already in the Advanced Startup Options, just directly select System Restore and proceed with the next steps. And if you have just booted your PC into Safe Mode, refer to the steps below.
Tap the Win + R keys to open the Run dialog box.
After that, type in “sysdm.cpl” in the field and tap Enter.
Next, go to the System Protection tab then click the System Restore button. This will open a new window where you have to select your preferred System Restore point.
After that, follow the on-screen instructions to finish the process and then restart your computer and check if the problem is fixed or not.
Option 2 – Update or rollback your device drivers
If the first option didn’t work for you, then it’s time to either update or roll back the device drivers. It is most likely that after you updated your Windows computer that your driver also needs a refresh. On the other hand, if you have just updated your device drivers then you need to roll back the drivers to their previous versions. Whichever applies to you, refer to the steps below.
Open the Devices Manager from the Win X Menu.
Then locate the device drivers and right-click on them to open the Properties.
After that, switch to the Driver tab and click on the Uninstall Device button.
Follow the screen option to completely uninstall it.
Finally, restart your computer. It will just reinstall the device drivers automatically.
Note: You can install a dedicated driver on your computer in case you have it or you could also look for it directly from the website of the manufacturer.
Option 3 – Try fixing the Windows Registry files
In order to fix the Windows Registry files, you need to make a bootable Windows 10 USB drive and then boot your PC using it. To do so, refer to the steps below.
Once you see the Welcome Screen, click on Next.
Then click on the “Repair your computer” option located on the bottom-left section of the window.
Next, click on Troubleshoot > Advanced Options > Command Prompt.
After opening Command Prompt, execute each one of the commands listed below in the sequence that they are given:
CD C:WindowsSystem32config
ren C:WindowsSystem32configDEFAULT DEFAULT.old
ren C:WindowsSystem32configSAM SAM.old
ren C:WindowsSystem32configSECURITY SECURITY.old
ren C:WindowsSystem32configSOFTWARE SOFTWARE.old
ren C:WindowsSystem32configSYSTEM SYSTEM.old
After executing the commands given above, type in the next ones below and make sure to execute them in the given sequence below.
On the other hand, you can also fix the BAD SYSTEM CONFIG INFO Blue Screen error by running a Memory Check using the Windows Memory Diagnostic. Refer to these steps to do so.
Tap the Win + R keys to open the Run dialog box.
Then type “mdsched.exe” in the field and hit Enter to open the Windows Memory Diagnostic.
After that, the Windows Memory Diagnostic will give out two options such as:
Restart now and check for problems (recommended)
Check for problems the next time I start my computer
Select any of the given options. After that, your computer will restart and check for memory-based issues upon the restart. If there are any issues, it will automatically them.
Option 5 – Rebuild BCD files and repair MBR files
Like what you did on the third option above, you also have to make a bootable Windows 10 USB drive for this option and then boot your Windows 10 PC using it.
Once you get to the Welcome Screen part, click on Next.
Afterward, click on the Repair your computer option located on the bottom-left part of the window.
Then click on Troubleshoot.
Next, select the Advanced Options and then Command Prompt.
Once Command Prompt has been pulled up, enter each one of the following commands and in the sequence that they are given to rebuild BCD files and repair MBR files:
bootrec /repairbcd
bootrec /osscan
bootrec /repairmbr
Now type “exit” to close Command Prompt and then restart your computer to successfully apply the changes made.
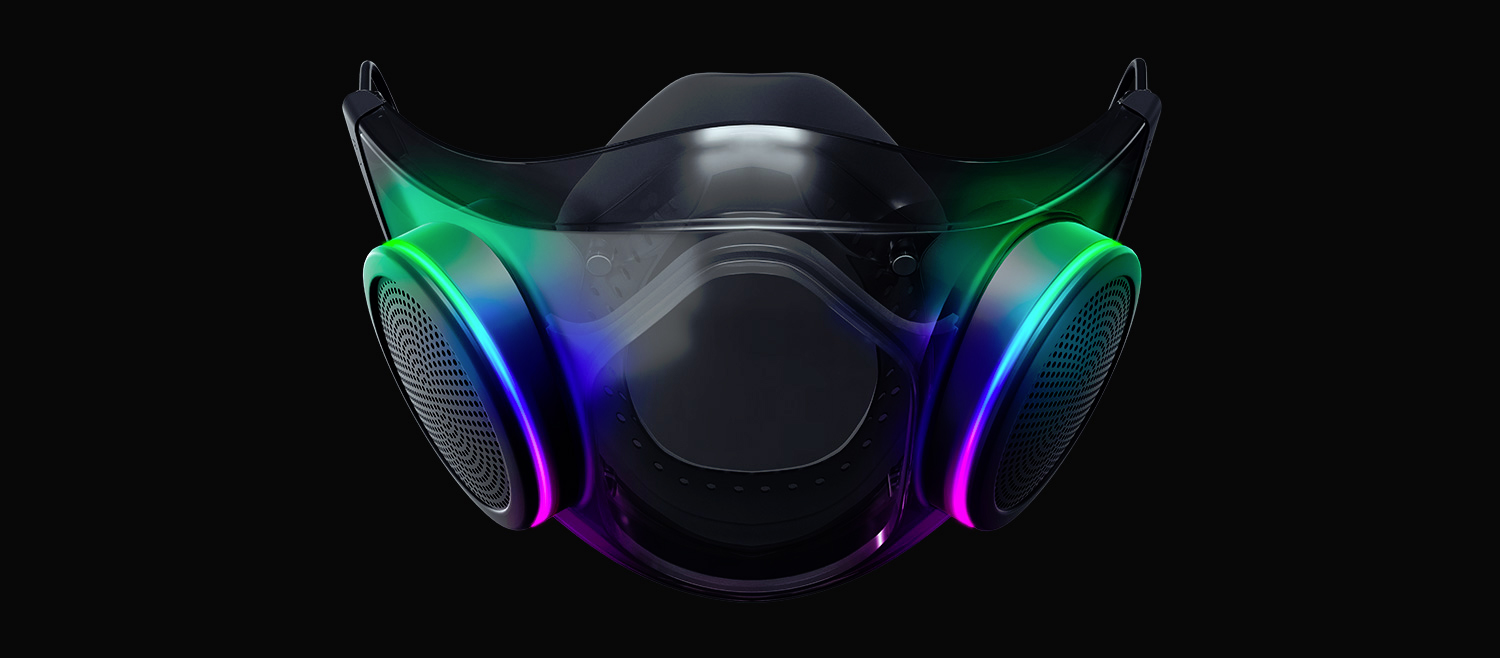
The world today is still sadly under pandemic and by the looks of it, COVID-19 is here to stay, well at least for some time in the near future. Razer seems to think so as well since their upcoming gear is not really what you would expect.
Enter Hazel, a new and upcoming Razer smart mask.
Protection
Hazel mask has a high bacterial surgical N95 filter with fluid resistance that will protect you against large droplets and splashes. A detachable active ventilator regulates airflow and is capable of filtering around 95% of airborne particles. Mask comes with a special charging case that has an auto sterilization UV light that will kill bacteria and viruses inside the case interior while it charges.
When the mask is recharging it will change color from red to green visually showing the level of the current charge. Mask of course has easy to replace filters inside ventilators and Razer is standing by that fully charged mask will last enough for full-day use.
An active ventilation system brings cool air while releasing breathing heat at the same time drastically reducing CO2 inside the mask that could produce dizziness and headache.
Silicon guard is on its edge gluing to around your face in order to prevent exterior air sneaking inside the mask and positioning it firmly so it does not rest on your lips in order for easier and clearer communication.
Hazel personalization and technical features
Hazel has a clear and transparent design making it better for social interaction since other people will be able to see your lips and smiles thus making it more natural. A low light mode that turns on automatically when it is dark outside is also aimed for easier communication.
Speaking of communication, the mask comes with voice Amp technology that has a built-in mic and amplifier thus making your voice lines clear so you are not muffled when wearing the mask itself. Your friends and other people will be able to hear you like you are not wearing a mask at all.
Thicker air loops apply less pressure on ears and can be adjusted for a more secure fit, while the mask itself can be custom-made to fit your face shape.
And of course Hazel comes with 16.8 million colors and a suite of effects with Razer Chroma RBG
If you are trying to run Windows Upgrade on your Windows 10 computer but suddenly interrupted by the error 0x800F081E – 0x20003, worry not for this post will guide you on how you can fix this Windows Upgrade error.
This particular Windows Upgrade error is a Windows status code for CBS_E_NOT_APPLICABLE which indicates that some of the update requirements are missing or the files that are installed are already of a higher version compared to the ones that are still pending. In most cases, this error occurs when you try to upgrade to earlier versions of the Windows 10 N edition to a later version.
Here’s the full content of the error message:
“0x800f081E-0x20003, The installation failed in the SECOND_BOOT phase with an error during BOOT operation”
In case you don’t know, Microsoft distributes special “N” editions of Windows in Europe and the “KN” editions in Korea. These editions are the same as the standard editions of Windows except that they do not have the Windows Media Player as well as the multimedia playback features. Thus, when the Windows Upgrade fails with the error code and error message and it doesn’t provide much information as to why the update couldn’t be installed, there is something you can do about it to fix the error. Since Windows uses generic error codes and so if you see the error code 0x800f081e, you have to check the error log first. For more details, follow the instructions laid out below.
Step_1: You need to navigate to C:$WINDOWS.~BTSourcesPanther and from there look for the text file named “setuperr.log” and open it with a text viewer/editor program like Notepad.
Step_2: After opening the setuperr.log file, you should see content that’s similar to this:
Note: From the content above, it is clear that the Windows Upgrade failed due to complete due to the Windows Media Player. It could be that the log file may contain other error messages and other error codes and if you see the error code 0x800f081e from the list, then you need to uninstall the Media Feature Pack.
Step_3: You have to uninstall the Media Feature Pack.
Tap the Win + R keys to launch the Run dialog box and type “optionalfeatures.exe” in the field and hit Enter to open the Windows Features wizard.
Next, you need to wait until the list of Windows Features populates and then click on the + sign to collapse the folder of the Media Features.
After that, uncheck the “Windows Media Player” option from the Media Features folder.
Now click on the Yes and OK buttons to save the changes made and then close the Windows Features dialog box.
Restart your computer and boot, try to run the Windows Upgrade process again, and check if the error is fixed or not.
Note: If the installation has been successfully completed, you have to go back to the Windows Features and enable the Windows Media Player again. And if you are using the Windows 10 N Edition, then you can just download and install the latest version of the Media Feature Pack for your Windows 10 N edition. On the other hand, running the built-in Windows Update troubleshooter could also help you resolve any Windows Update-related problems, including the error 0x800F081E – 0x20003. To run it, go to Settings and then select Troubleshoot from the options. From there, click on Windows Update and then click the “Run the troubleshooter” button.
 What exactly is TPM?
 Error Causes


 The world today is still sadly under pandemic and by the looks of it, COVID-19 is here to stay, well at least for some time in the near future. Razer seems to think so as well since their upcoming gear is not really what you would expect.
Enter Hazel, a new and upcoming Razer smart mask.
The world today is still sadly under pandemic and by the looks of it, COVID-19 is here to stay, well at least for some time in the near future. Razer seems to think so as well since their upcoming gear is not really what you would expect.
Enter Hazel, a new and upcoming Razer smart mask.