Quick Tips and Tricks for Supreme Windows 11 Performance
Finally upgraded to Microsoft’s newest OS, but the performance is a bit sluggish? Here are a few useful tips you may not have thought about that could significantly transform your experience!
How to speed up Windows 11?
1. Disable startup programs
There are many programs that launch right on startup that really aren’t essential. This, in turn, causes your PC to launch and run more slowly.
To check which programs are enabled on startup, go into the Task Manager and select the Startup tab. Find every program that doesn’t need to launch immediately, right-click on it and press ‘Disable’.
This will not shut down the program in that instant. It’ll just prevent it from running automatically as you turn on your PC. You can always launch it manually when you need it.
2. Expand your memory and storage
If you want your PC to run super smoothly, you need to have enough memory to support that. This is especially significant for those of you who love to multitask. Upgrading your RAM gives your PC more space to store the temporary data it needs to complete processing tasks. In other words, processing takes a lot less time.
Your long-term storage is equally important. Hopefully at this point you’re already using SSD over HDD, since this type of storage offers a faster boot time.
Credit Marc Pezin on Unsplash
In any case, we recommend expanding your storage capacity. The more files and data you store, the more there is to load, significantly influencing your PC’s speed. Larger storage capacity means new data and essential updates can be stored comfortably, preventing any strain on your PC’s performance.
3. Clean up disk space
If you aren’t willing to upgrade your storage just yet, the least you can do is clean up your storage right now.
Aside from manually deleting stuff you no longer need, you can also get rid of temporary files that clutter up your storage and eat up performance for no reason. To get to them, click Windows + X and select ‘Run’ (or just type it in the search bar).
A small window will pop up, where you need to type %temp%. This will take you to a whole folder full of all the temporary files you can remove without thinking twice.
For those who upgraded from Windows 10, there’s a neat trick to get rid of potential leftover files you don’t need on your brand new iteration. Only do this if you’re 100% sticking with Windows 11, though. Go to System > Storage > Temporary files. Make sure to only leave ‘Previous Windows Installation’ and ‘Windows Update Clean-up’ checked and click on ‘Remove files’.
Lastly, make use of Windows 11’s fantastic Storage Sense feature. Turning it on will enable your PC to constantly watch out for junk or unused files to optimize your PC’s performance to the maximum.
4. Install pending updates
This one should go without saying, but pending updates can be detrimental to your Windows 11 performance. The longer you leave them untouched, the more bugs the outdated programs and patches can cause. So, make sure to regularly check for updates and install them as soon as they’re available.
5. Disable visual effects
As cool as visual effects, animations, shadows and transparency are, they can also put quite a toll on your computer’s speed. On a newer setup this generally shouldn’t be a problem, but if you do notice a drop in performance, definitely consider turning off some of these settings.
To do this you can go to the Control Panel, System Properties and click the ‘Advanced’ tab. In the Performance section, choose Settings. If you’d like a quicker way to get to the dialog (Performance Options) with Visual Effects, you can also type sysdm.cpl in the search bar.
Once there, you can either have your PC choose what’s best, choose the best appearance or the best performance. The other option is to manually toggle the effects off and on. The biggest obstacles to speed are taskbar animations, window shadows, control/element animations and animations upon minimizing/maximizing.
Credit Windows on Unsplash
In the same vein, you should go to Settings > Personalization > Colors and disable Transparency, to prevent your computer from doing overtime just to hit the aesthetic appeal.
6. Get rid of bloatware
Bloatware is one of the biggest culprits of slow computer speed.
Pre-installed software that’s pretty much useless but takes up valuable system resources has been around since day one. No matter which device or platform you’re talking about. Luckily, a lot of it is removable, making it easy to lighten the load on your device.
To boost your Windows 11 computer, go to Settings > Apps > Installed apps.You’ll probably see a bunch of apps you don’t want or need. Click on the three dots next to each one you want to remove and press ‘Uninstall’.
Aside from helping optimize performance, removing bloatware has another great benefit. Unfortunately, often this pre-installed software is quite vulnerable, exposing you to great risk of cyberattacks. So, removing it definitely improves your device’s security and gives you at least some peace of mind.
Summary
These are a few of our fastest tips for boosting performance. There are other, more complex and time-consuming ways, of course. If you’ve tried these quick ones and still need advice on how to improve your PC’s speed, feel free to reach out!
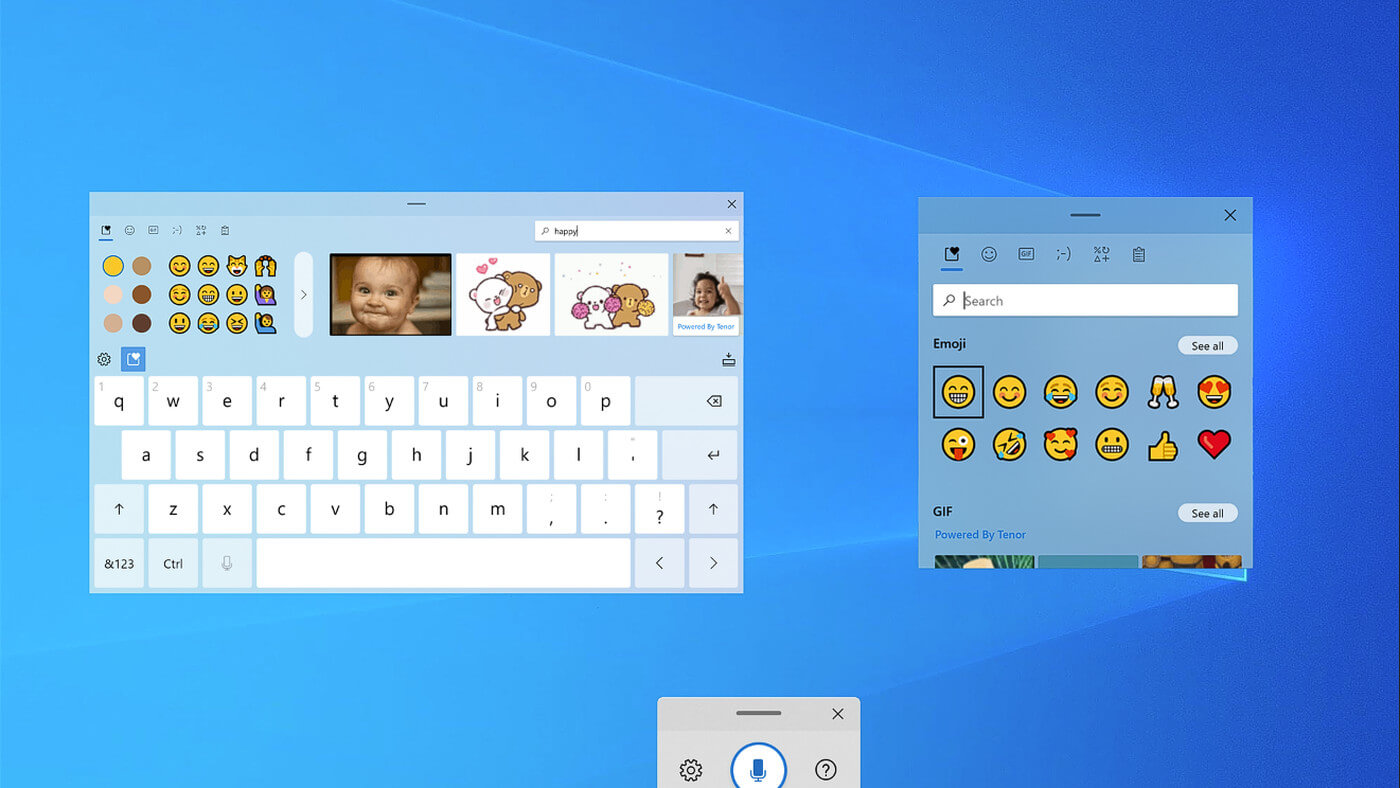
If by any chance you are working on a touchscreen PC, tablet, or any similar device and have no access to a hardware keyboard there is a way to place Touch Keyboard on your screen for easy typing, and you can enable icon on the taskbar for easy access.
Enabling the Touch Keyboard
Right-click on the Taskbar
Select Taskbar Settings
Go to Personalization > Taskbar
Click on Taskbar Corner Icons to expand it
Click on the switch next to Touch Keyboard to turn it ON
Close settings
The icon will immediately appear on the Taskbar in the lower right corner. Clicking the icon virtual keyboard will appear on the lower part of the screen.
You can use this keyboard to type in applications the same as you were typing on hardware one.
By taping on X in the upper right corner, you will hide the keyboard. Tap on the icon in Taskbar to bring it up again.
Hide the Taskbar icon
If you do not want to use Touch Keyboard anymore you can easily hide the icon:
Right-click on the Taskbar
Select Taskbar Settings
Go to Personalization > Taskbar
Click on Taskbar Corner Icons to expand it
Click on the switch next to Touch Keyboard to turn it OFF
The runtime error R6025 can be quite annoying for PC users as it pops up randomly anytime. It is a type of runtime error but typically associated with C++ programming. The error is displayed in the following format:
‘Runtime Error! Program: C:…R6025-Pure Virtual Function Call’
Solution
Error Causes
The runtime error R6025 is triggered due to the following reasons:
Runtime components of Visual C++ libraries are missing
Microsoft.NET framework damaged
Registry corrupted with bad files and data overload
Virus and malware invasion
Further Information and Manual Repair
Try the solutions given below to repair the runtime error R6025 on your system:
Cause: Microsoft.NET framework damaged
Solution: If this is the underlying cause of the error, then it is advisable to reinstall and repair the Microsoft.NET framework on your PC.
To reinstall this framework, go to the start menu, click control panel, programs and then click ‘Turn Windows features on or off’. Here you might be promoted for an administrator password. Insert the password to proceed.
Now locate Microsoft.NET framework 3.5.1 and uncheck this box, press OK and then reboot your system. After that open ‘Turn Windows features on or off’ and check the Microsoft.NET framework 3.5.1 and then restart your PC. This will hopefully resolve the error.
Cause: Runtime components of Visual C++ libraries are missing
Solution: If runtime components of Visual C++ libraries are missing, then you will have to download and install these from different websites. This can be time-consuming and slightly complicated for you if you are not technically sound.
Cause: Malware Attack
Solution: If the runtime error R6025 is triggered due to a malware attack, then you will have to install and run a powerful antivirus on your PC. This will help detect and remove such malicious software affecting your system.
Cause: Registry Issues
Solution: If registry corruption is the underlying cause of the runtime error R6025 on your PC, then you need to clean up the registry and repair it. The best way to clean and repair the registry is to download Restoro.
Restoro is an advanced PC repair tool integrated with powerful and highly functional utilities all in one.
Utilities include a registry cleaner and a system optimizer. It has easy navigation, a user-friendly interface, and is compatible with all Windows versions. Users of all levels can operate it to resolve all kinds of PC errors including the runtime error R6025.
The registry cleaner utility wipes out all the unnecessary, malicious, obsolete files and invalid entries overloading the RAM. It frees up the disk space, repairs the damaged files and the registry.
Furthermore, Restoro also functions as a system optimizer. It detects system instability issues and resolves them while boosting the speed of your PC.
To resolve the runtime Error R6025 on your system in seconds click here to download Restoro PC repair tool now!
We have often talked about the security of your computer, we have been giving you tips and tried to explain how to best protect your computer from various attacks and malicious software. Today we will be talking about antivirus applications.
Antivirus software has become the kind of a must-have in every computer in this day and age. When you think about it, our systems are connected to the internet most of the time if not always, and therefore kind placed in from the line of various cyber-attacks. Here antivirus software comes into focus, especially because it has evolved long from just a simple virus removal tool to full security suites.
We will be going through the best of these applications in order to present both their good and bad sides and hope that we will help you in picking the right one for you. Remember, picking either one of the presented solutions is way better than not having one at all. The list is made from best down in our opinion so number one is highly recommended.
List of Best antivirus applications of 2021
BitDefender
In our opinion the best overall security protection suite for this age and time. Bitdefender has cemented itself as number one a few years back and it holds that status even today. It has top-of-the-game virus protection, an incredible amount of features, safepay banking online protection and it is amazingly cheap. Its downside we could say is that it can be annoying sometimes, especially if you set it to maximum protection and paranoid mode. In this case, it will often ask what to do and how to behave leading to minor annoyances.
Norton antivirus
Norton antivirus is well known to older computer users, this package has been around a long time and it is our pick for closest one to challenge top place because of its packed features. The number of features it has are really stunning and it comes also with great and maybe best-browsing protection of all candidates. It also has a backup tool bundled with it but the reason why it is in the second place is that it is taxing to the system and can have a real impact on computer performance. Great protection is important, but so it is working on it without slowdowns.
Kaspersky
Another one of the old antivirus software on the list. Kaspersky Lab was once top tier antivirus software but it dropped down due to its high prices, later they have changed their pricing to be more in trend with other rival companies but many have switched to something else. Today it still packs one of the best antivirus engines with fast and configurable scans. It also has very impressive anti-ransomware features but sadly most of the things it just simply does for you leaving you to fully trust it since you cannot really configure much. It is not in step with new technologies and it is lacking some features like support for the Chrome browser that places it lower in our ranking.
Trend Micro antivirus
The biggest sell point for this antivirus application is probably its ease of use and user-friendliness. It also packs a great antivirus engine and impressive anti-ransomware performance but sadly it comes with very limited configurability and somewhat lack of features comparing it with the top three entries. Never the less a very user-friendly application that you can configure without knowing any kind of tech talk, everything is laid out in simple English.
Avira
Perhaps best known for its free version, Avira has a premium one that is well better worth than the free version. Strong suites of this software are mostly aimed at the internet with its great anti-phishing and web protection along with a low price for all of its features. Sadly in the domain of virus protection, there are some reports from independent websites that its antivirus engine is not so great, it will offer you moderate protection but not the best.
Webroot Secure Anywhere
If you are on the lookout for software that has a great virus database and plenty of features but is also incredibly light weighted and fast then look no further, Webroot Secure Anywhere is an application for you, incredibly fast and incredibly small is a great solution for older machines. It keeps all of its databases up in the cloud and this feature among its great advantages is also its greatest disadvantage since if you are out of the internet you will not be able to have the latest virus definitions available to you making this tool very situational.
Avast
Avast has many great protection features and it is very highly configurable. The firewall comes also in its premium edition and it offers great virus protection including a file shredder and awesome WI-FI inspector for an extra layer of security. This package would be higher on the list if it was not for its lack of WEB protection and its tool on the system resources.
Sophos home antivirus
Lack of features and somewhat strange user interface are downsides of this software but on its positive side it has good antivirus engine and its user interface is very friendly. Where it shines though is in its price, for one affordable price you get protection for 10 devices making this option a great choice for anyone wanting to protect more devices or just use a single license for the whole family.
ESET antivirus
Greatly configurable antivirus software with tons of options and very light on system resources makes ESET one of the best out there. Virus engine and database is also top tier but some testing labs have reported that protection offering is not really what it is advertised and if we talk about its strong suite of a great many options and configurations it is at the same moment its downside since it is not very friendly to novice and beginner users.
McAfee antivirus
McAfee antivirus comes in its package with unlimited VPN service and if we take look at the top tier pricing plan it is a great investment. Sadly for its entry-level price, it covers only a single device and it was reported that it packs little outdated virus engine if we compare it with its rivals. Nevertheless, it still offers good virus protection and if you take into account the VPN that comes with it, it can find its users.
Conclusion
No matter which antivirus you choose you will not go wrong, after all any protection is way better than none.
One of the useful things you can use on your laptop is touchpads. They help users in achieving tasks through the gestures and multi-finger tap or touch support it brings in the scope for various shortcuts. However, not all times touchpad brings productivity as it can also encounter some issue every now and then. One of these issues has been reported on a couple of Lenovo laptops that use touchpad drivers from the Alps Pointing Device. According to the reports, an error saying, “Set user settings to driver failed” when they use the touchpad.
This type of error on the touchpad usually occurs when a computer boots up and it could be caused by a faulty update on the Alps pointing device driver which is being installed in the background. To fix this error on the touchpad, you could try to disable the Alps pointing device entry from the MSConfig or you could try to get the latest version of the driver or uninstall the driver altogether. Before you proceed with the troubleshooting tips given below, make sure that you create a System Restore point first. Once you have that covered, proceed to the following options.
Option 1 – Try disabling the entry of the Alps pointing device from MSConfig
This first given option was able to fix the problem for many users so to get started, follow these steps:
In the Start Search box, type “MSConfig” and select System Configuration from the search results.
Next, go to the Services tab and look for the Alps pointing device entry from the list that appears, and uncheck it.
Then click the Apply and OK buttons to save the changes made.
Now restart your computer and see if the error in the touchpad is now fixed.
Option 2 – Try to download and install the latest version of the driver
The next option you can check out to fix the error is to download and install the latest version of the driver from the official website of Lenovo support. Note that an updated version of the touchpad driver will most likely get rid of the error. However, you have to make sure that the version you’re going to get is compatible with your existing Windows version.
Option 3 – Try to uninstall the Alps Pointing device driver
If the first two given options didn’t work, you can try uninstalling the Alps Pointing-device driver instead. You can do this under the Mice and other pointing devices section. After you uninstall the driver, restart your computer and delete the driver’s leftover folder inside this location in File Explorer (C:/Program Files). Once you’re done, restart your computer and check if the error is now gone. Keep in mind that after you’ve uninstalled the driver, any extra configuration features that Lenovo drivers offered before the uninstallation will no longer be available.
Recently, a number of users reported not being able to use the Restore, Minimize and Close buttons on their Windows 10 computers. This kind of issue can be quite annoying as you won’t be able to use your computer properly, especially when you navigate between programs and windows. In such cases, the buttons on the right side of the title bar won’t respond to any inputs which could be caused by a number of factors such as different input modes, corrupted system files, and many more. If you are one of the users who are currently facing this problem, worry not for this post will guide you on what you can do to resolve it.
There are several potential fixes you can check out to fix the issue. You can try to check if Tablet Mode is enabled and if it is, you have to disable it. You could also boot your computer in a Clean Boot State to check if a third-party program is the one that’s causing the problem. In addition, you could also reinstall the program where you experience the problem or run built-in utilities like System File Checker and DISM tool.
Option 1 – Make sure that you are not in Tablet Mode
Since Windows 10 is designed to work on both desktop and mobile devices, it could be that your computer has slipped into Tablet Mode which explains why you’re not seeing the Taskbar. To check if your computer is really in Tablet Mode, follow these steps:
Go to the Start menu and select Settings.
Next, select the System setting and from the left pane select the Tablet Mode.
From there, make sure that the buttons next to the options given below are set to the off position:
Hide app icons on the taskbar in tablet mode
Automatically hide the taskbar in tablet mode
Option 2 – Put your computer in a Clean Boot State
As pointed out, it is possible that some third-party program or service is the one that’s behind the problem. To isolate this possibility and to identify the culprit, you have to put your computer into a Clean Boot State. To do so, follow the steps below.
Log onto your PC as an administrator.
Type in MSConfig in the Start Search to open the System Configuration utility.
From there, go to the General tab and click “Selective startup”.
Clear the “Load Startup items” check box and make sure that the “Load System Services” and “Use Original boot configuration” options are checked.
Next, click the Services tab and select the “Hide All Microsoft Services” check box.
Click Disable all.
Click on Apply/OK and restart your PC. (This will put your PC into a Clean Boot State. And configure Windows to use the usual startup, just simply undo the changes.)
Once your computer is in a Clean Boot State, try to open the program where the problem occurred.
Option 3 – Try reinstalling the program
If the first two options didn’t work, then you might want to consider uninstalling the program and then install it back with its latest version. This should resolve the problem.
Option 4 – Try to run System File Checker
System File Checker or SFC is a built-in command utility that helps in restoring corrupted files as well as missing files. It replaces bad and corrupted system files to good system files that might be the cause why the Restore, Minimize and Close buttons don’t work. To run the SFC command, follow the steps given below.
Type “cmd” in the Start search and then right-click on the appropriate search result.
Next, select “Run as administrator” to open Command Prompt with admin privileges.
After opening Command Prompt, type in sfc /scannow
The command will start a system scan which will take a few whiles before it finishes. Once it’s done, you could get the following results:
Windows Resource Protection did not find any integrity violations.
Windows Resource Protection found corrupt files and successfully repaired them.
Windows Resource Protection found corrupt files but was unable to fix some of them.
Now restart your computer and see if the problem is fixed or not.
Option 5 – Run the DISM tool
You can try running the Deployment Imaging and Servicing Management or DISM tool to fix the problem. Using this built-in tool, you have various options such as the “/ScanHealth”, “/CheckHealth”, and “/RestoreHealth”.
Open the Command Prompt with admin privileges.
Then type in the following commands and make sure to hit Enter right after you type each one of them:
Dism /Online /Cleanup-Image /CheckHealth
Dism /Online /Cleanup-Image /ScanHealth
exe /Online /Cleanup-image /Restorehealth
Do not close the window if the process takes a while as it will probably take a few minutes to finish. Once it’s done, restart your computer.
If you suddenly encounter an error message saying, “ File Record Segment is Unreadable ” on a blue screen while booting your PC, it means that your hard drive is in an error state. This particular blue screen of death error might have a lot of bad sectors or might have reached its end.
The workarounds you can try to resolve the issue is by locating the bad sectors or checking your hard drive for any discrepancies in the mapping and fix them. Follow the detailed instructions laid out below for these workarounds.
Option 1 – Try to check for any bad sectors and wrong configurations in your hard drive
The first thing you have to check is the boot files on your PC. As you know, your PC boots from these files and if there is anything wrong with any one of them or if one of them ends up getting corrupted, you will most likely see the blue screen of death error or a prompt with an error message saying, “File record segment is unreadable”. According to some users who reported this issue, new hard drives aren’t exempted from this error. That’s why it is recommended that you carry out this solution no matter what kind of scenario you are in. You will have to launch the Command Prompt in recovery mode and see if you can fix the problem by executing the check disk commands.
Upon booting, restart your PC and tap F11 to go to the recovery environment then select Troubleshoot.
Next, click Advanced from the given options and select Command Prompt.
After opening Command Prompt, execute the commands listed below, and don’t forget to hit Enter right after you type in each one of them and if you have installed Windows to some different directory, you must replace “C” with the name of the drive you’ve installed Windows with.
chkdsk C: /r /x
chkdsk C: /f
Note: The Chkdsk function might take a while before it finishes its operations so you need to be patient and wait until the entire process is completed. And depending on the situation, it might even take a day at most so patience is really the key here.
Option 2 – Try connecting the hard drive to a different computer
If option 1 didn’t work for you and you’re still seeing the error, you can try connecting the hard drive to a different computer and then copy the data first. Make it a priority to salvage the data just in case the hard drive won’t make it in the future.
After replicating your hard drive, you can then try running the chkdsk commands that are listed in option 1 above in the new computer you’re connecting your hard drive to and make sure that you key in the correct drive letter that’s assigned to the hard drive you’re using. After executing the chkdsk commands, plug your hard drive back into the previous computer and then check if you can now boot it without any issues.
Option 4 – Replace the faulty hard drive
If none of the options provided above really worked out then maybe it’s time to consider getting a replacement for your hard drive. In about 50% of the cases about this error, some unfortunate users were left with no choice but to replace the hard drive since the problem is with the hard drive itself. Hard drives have a complex running mechanism which includes a head and the disk that rotates accordingly so you can check if the cables connected to the hard drive are connected properly and if it is in a correct position or not. In addition, you also have to make sure that the SATA adapters where the hard drive is connected are working properly.
If the drive is showing problems in the I/O operation, there is little chance for you to use it as a normal hard drive. If the hard drive is in warranty, get it checked and replace it. If not, you might consider taking it to the service center for the specialists to take a look into it.
One of the most useful utilities for advanced users in Windows is the Windows command line or Command Prompt. It is efficient in fixing system files, checking the disk for errors as well as other intensive tasks that are made convenient using this.
One of the tasks you can carry out using Command Prompt is repairing the Windows bootup process if it encounters any issues. However, if you tried running the “bootrec/fixboot” command and you receive an error message saying, “Element not found”, read on as this post will guide you in fixing this error. This kind of error in the command line could be due to a damaged BCD or MBE, inactive system partition, or it could also be that there is no drive letter being assigned to the EFI partition. Whichever the case is, here are some possible fixes that should help you resolve the problem.
Option 1 – Try to repair BCD
As mentioned the error could be caused by a damaged BCD and so to fix the problem, you need to repair BCD by following these steps:
First, make sure that you have a bootable Windows 10 USB drive with you and use it to boot your computer.
Once you’re on the Welcome Screen, click on Next.
After that, click on Repair your computer located at the bottom-left portion of the window.
Then select Troubleshoot > Advanced Options > Command Prompt.
After you open the Command Prompt window, execute the following command:
bootrec /fixboot
Afterward, enter the next command below to rename the BCD file:
ren BCD BCD.bak
Next, type the following command and make sure to replace “b:” with the letter of your bootable drive attached to your computer.
bcdboot c:Windows /l en-us /s b: /f ALL
Now, wait until the process is completed and restart your computer to successfully apply the changes made.
Option 2 – Try assigning the drive letter to the EFI partition
Tap the Win + X keys or right-click on the Start button and click on Command Prompt (Admin) to open Command Prompt with admin privileges.
Then type the following command to start the Diskpart utility:
diskpart
After that, if you receive a UAC prompt, just click on Yes to proceed.
Next, type the following command to list all the volumes created on your PC including both types of partitions that are visible to a normal user in the File Explorer as well as the ones created by Windows 10 by default which helps it in storing the boot files and other important system files:
list volume
Now type the following command to select the desired volume:
select volume number
Then type the following command to assign a letter to the selected volume:
assign letter=<LETTER>
Note: Make sure to replace “<LETTER>” with the letter you want to allocate to that partition. Afterward, it will assign a letter to the selected volume.
Reboot your PC to apply the changes made.
Option 3 – Try setting the System Partition to Active
Like the first given option, you also have to make sure that you have a bootable Windows 10 USB drive before you proceed to set the System Partition to Active. Once you have it covered, refer to these steps:
Boot your computer using the bootable Windows 10 USB drive.
Next, click Next when you get to the Welcome Screen.
Then click on Repair your computer located at the bottom left part of the window and select Troubleshoot > Advanced Options > Command Prompt.
After opening Command Prompt, type the following command and hit Enter to start the Diskpart utility. It is a command line-based utility just like Command Prompt but has a UAC prompt once you provoke it. So if you encounter a UAC prompt, just click on Yes to proceed.
diskpart
Now type the following command:
list disk
From there, select your primary disk by typing the following command:
select disk number
After that, list all the partitions on the selected disk by entering the following command:
list partition
The command you just entered will list all the partitions created on your PC including both types of partitions that are visible to a normal user in the File Explorer as well as the ones created by Windows 10 by default which helps it in storing the boot files and other important system files.
Now type the following command to select the partition that is usually around 100 MB in size:
select partition number
Finally, type the following command to mark the partition active:
active
Then type the “exit” command to exit the disk part utility.
When you receive Error 0x800704C8 when trying to move a file inside Windows 10 operation is stopped and it can not continue leaving you with the file in its original location without a copy. Several issues can be the cause of this type of behavior and error and after some digging and analyzing we are bringing you various solutions for this error and how to fix it.
Ownership issues
It turns out that not having ownership of fie can cause this error and prevent you from copying it. For some reason, Windows can assume that file is owned or used by another application or process and thus prevents you from making a copy since you do not have ownership of it. Resolving this particular issue will require you to install a third-party application that is tailored for this kind of task.
After some talk and research, we found out that there is a freeware application that can solve this issue quite fastly. Unlocker is the name and the download link is here. Once downloaded, install it and run it. Once inside the application browse to the location where you need to change the ownership, click on it to select it, and click OK.
Use the No Action drop drown menu to select Move, then click OK
Antivirus Issue
As with other file and application issues, this error could also be a product of antivirus marking it inaccessible to Windows and thus preventing copy or move operation on it.
note: Do not turn off Windows defender since it was proven that it is not the cause of this kind of error, so if you are using only Windows defender you can skip this solution.
How temporary turning off each security suite is different and it depends on the application itself we can not cover in detail the procedure here. Go to your security suite manufacturer's website and get information there or if you want, go directly to applications and features inside Windows and uninstall the software.
Visual Studio issue
If the file you are trying to move is part of a Visual Studio project then the issue can be linked directly to Visual Studio itself, luckily the solution is quite easy. All you have to do it to exit Visual Studio and then run it with administrator privileges.
In order to run Visual Studio with elevated privileges locate its executable file and right-click on it.
Choose properties and go to the compatibility tab
Inside compatibility tab check box that says run this program as an administrator
Corrupted system files
If the previous solutions have not provided you with results then you have system file corruption that needs to be fixed. Move from one solution to another as presented below:
Run SFC scan
SFC scan is a built-in Windows tool for solving corrupted system file issues, it is fully automated and does not require from the user any kind of knowledge or information. To run it and scan the system do the following:
Press ⊞ WINDOWS + X to open the secret menu
Left-click on the command prompt (admin)
In command prompt type SFC /SCANNOW and press ENTER
Wait for the process to finish, do not interrupt it and once it is done, restart your computer
Run DISM scan
DISM scan is similar to SFC scan but it tackles different types of system file corruption and it is recommended to run it also after SFC has been completed. Please note that for DISM scan to be successful you will need a stable internet connection since DISM will replace corrupted files with new ones downloaded from Microsoft. To run it do the following:
Press ⊞ WINDOWS + X to open the secret menu
Left-click on the command prompt (admin)
inside command prompt type: exe /online /cleanup-image /scanhealth followed by ENTER, then type: Dism.exe /online /cleanup-image /restorehealth also followed with ENTER.
Leave scan to finish and reboot your PC
Running the Windows Setup does not always go smoothly as you could encounter some errors along the way. One of these errors is the “Something happened, Setup has failed to determine supported install choices” error. The only given option in such cases is to click the Close button and exit the setup.
This kind of error in Windows setup can occur when you try to downgrade to the previous version of Windows using the built-in mechanism. This error could be caused by a corrupted image or it is also possible that the set of files are incomplete. Aside from that, it could also be due to compatibility issues or that the module used to downgrade the Windows operating system is not configured properly. To fix this error, you have to run the Windows Setup program in compatibility mode so that you can downgrade Windows. You could also use the image for the lower version of Windows that’s available on the official site of Microsoft. But before you do any of these, make sure that you’re logged in as an administrator.
To fix the “Something happened, Setup has failed to determine supported install choices” error, follow the given options below sequentially.
Option 1 – Try to run the Installer of the downgraded version in Compatibility Mode
This is the first thing you can try to resolve the issue instead of going right ahead on making a bootable device. So if you are downgrading Windows, you can try to run the installer in the compatibility mode for that specific Windows version.
Look for the setup file.
Once you find it, right-click on it and select Properties from the context menu.
After that, go to the Compatibility tab and mark the checkbox for “Run this program in compatibility mode for:” and from the drop-down list, select either Windows 7 or Windows 8.
You also have to check the “Run as administrator” option.
Now click the Apply button and then click OK to save the changes made and check if it has resolved the issue or not.
Option 2 – Try to troubleshoot compatibility
This option is almost the same as the first one except it is an alternative way of fixing the “Setup has failed to determine supported install choices” error in case the first one didn’t work. In this option, you will troubleshoot the compatibility issue.
Look for the setup file.
Then right-click on it and select the “Troubleshoot compatibility” from the context menu.
After that, click on the “Try recommended setting” option. Once the process is done, the error message should be gone.
Option 3 – Run the DISM tool
You can run the DISM tool as well to help fix the error code 0x80244022 during Windows Update. Using this built-in tool, you have various options such as the “/ScanHealth”, “/CheckHealth”, and “/RestoreHealth”.
Open the Command Prompt with admin privileges.
Then type in the following commands and make sure to hit Enter right after you type each one of them:
Dism /Online /Cleanup-Image /CheckHealth
Dism /Online /Cleanup-Image /ScanHealth
exe /Online /Cleanup-image /Restorehealth
Do not close the window if the process takes a while as it will probably take a few minutes to finish.
Option 4 – Try using the image from the official site of Microsoft
If none of the options given above worked, you can try to use the image from Microsoft’s official site. This would help, especially if the error is caused by a corrupted image or image folder with incomplete files.
0x800ccc13 is an error message related to sending email using Outlook. Many people are receiving this error after making an upgrade from Windows 7 or Windows 8.1 to Windows 10. The error message appears when you try to send an email message with the use of a POP3 account or an IMAP account in an Outlook profile that has an Exchange Server 2010 mailbox configured. A common complaint would be: Since upgrading to Windows 10 I cannot send email from Outlook 2013. Mail stays in the Outbox, and I get: Error 0x800CCC13. Cannot connect to the network.
Symptoms
This problem may arise under the following situations:
You are using Microsoft Office Outlook in online mode to connect to a Microsoft Exchange Server 2010 mailbox
When you add an additional POP3 or IMAP account in the same Microsoft Outlook profile
You are sending an attachment through email.
You try sending an email by selecting POP3 or IMAP account as the sender
During these circumstances, the email message stays in the Outbox and you receive the following error message:
Task '<the POP3 account or the IMAP account> - Sending' reported error (0x800CCC13): 'Unable to connect to the network. Check your network connection or modem.'
Solution
Error Causes
Error Code 0x800ccc13 occurs because the system files in Windows 10 during the upgrade became corrupted and most likely caused authentication issues. It can happen with any version of Outlook. Damaged data files will also cause error code 0x800ccc13 to manifest. Overall, the corruption of the Microsoft Windows System could be a result of an installation partially done (or an incomplete one), deletion of any application or hardware erroneously, and or malware or adware infestation.
Further Information and Manual Repair
Method 1:
Use the Windows System File Checker to repair corrupted files
Verify that your SMTP, username, and password settings are correct. Now, in order to correct missing or corrupt Windows System files, try the following solution by running a command. This is known as the System File Checker. Follow the steps below to invoke the program using a command prompt command:
At first, you need to open the command prompt. To do so, right-click the Windows button in the bottom left of the screen, and select Command Prompt (Admin).
Now, enter the following command
sfc/scannow
When it is done, a message will confirm that Windows found some corrupt or missing files and it has successfully repaired those.
Check the Outlook and see if your emails are sending.
If the problem persists, don’t worry there is another way to solve this. Users have found another command helpful is using the NetShell utility from the command prompt, which is similar to the above solution.
Open the Command prompt by Right-clicking the Windows button in the bottom left of the screen and select Command Prompt (Admin).
Enter the following command
netshwinsosk reset
This helpful command will reset the network adapter to its default settings. Hope this will solve your problem. If not, you may want to try the Method 2 listed below.
Method 2:
For this method, you need to consider the following things:
Are you using POP3, IMAP, or Exchange server for your email account?
How many email accounts have you configured in your Outlook?
Is there an undelivered email stuck in your Outbox?
If you are trying to send an attachment, what is the size of the attachment?
Try the following:
Move or delete any undelivered email that is stuck in the Outbox folder, and then try sending an email and verify the result
Start Outlook in Safe Mode by following the instructions below
Hold down Windows key + R.
Copy this command Outlook /safe Note, there is a space between Outlook and /
Paste it in the open box and press Enter
If Outlook in Safe Mode works, disable the add-ins by following the steps below and determine if the problem is caused by add-ins.
Disable the add-ins one at a time. Now, restart Outlook and repeat the procedure once more. If the problem appears again, it will help you find which add-in is causing the problem.
Start the computer using the clean boot. Now, try to send an email and see the result.
If the problem still lingers, create a new profile and configure the email account.
If you do not possess the technical expertise required to accomplish this yourself or do not feel comfortable doing so, download and install a powerful automated tool to get the job done.


 If by any chance you are working on a touchscreen PC, tablet, or any similar device and have no access to a hardware keyboard there is a way to place Touch Keyboard on your screen for easy typing, and you can enable icon on the taskbar for easy access.

 Antivirus software has become the kind of a must-have in every computer in this day and age. When you think about it, our systems are connected to the internet most of the time if not always, and therefore kind placed in from the line of various cyber-attacks. Here antivirus software comes into focus, especially because it has evolved long from just a simple virus removal tool to full security suites.
We will be going through the best of these applications in order to present both their good and bad sides and hope that we will help you in picking the right one for you. Remember, picking either one of the presented solutions is way better than not having one at all. The list is made from best down in our opinion so number one is highly recommended.
Antivirus software has become the kind of a must-have in every computer in this day and age. When you think about it, our systems are connected to the internet most of the time if not always, and therefore kind placed in from the line of various cyber-attacks. Here antivirus software comes into focus, especially because it has evolved long from just a simple virus removal tool to full security suites.
We will be going through the best of these applications in order to present both their good and bad sides and hope that we will help you in picking the right one for you. Remember, picking either one of the presented solutions is way better than not having one at all. The list is made from best down in our opinion so number one is highly recommended.