Quick Tips and Tricks for Supreme Windows 11 Performance
Finally upgraded to Microsoft’s newest OS, but the performance is a bit sluggish? Here are a few useful tips you may not have thought about that could significantly transform your experience!
How to speed up Windows 11?
1. Disable startup programs
There are many programs that launch right on startup that really aren’t essential. This, in turn, causes your PC to launch and run more slowly.
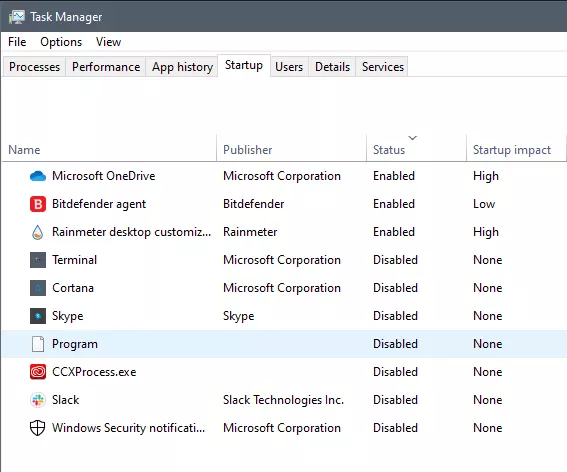
To check which programs are enabled on startup, go into the Task Manager and select the Startup tab. Find every program that doesn’t need to launch immediately, right-click on it and press ‘Disable’.
This will not shut down the program in that instant. It’ll just prevent it from running automatically as you turn on your PC. You can always launch it manually when you need it.
2. Expand your memory and storage
If you want your PC to run super smoothly, you need to have enough memory to support that. This is especially significant for those of you who love to multitask. Upgrading your RAM gives your PC more space to store the temporary data it needs to complete processing tasks. In other words, processing takes a lot less time.
Your long-term storage is equally important. Hopefully at this point you’re already using SSD over HDD, since this type of storage offers a faster boot time.
Credit Marc Pezin on Unsplash
In any case, we recommend expanding your storage capacity. The more files and data you store, the more there is to load, significantly influencing your PC’s speed. Larger storage capacity means new data and essential updates can be stored comfortably, preventing any strain on your PC’s performance.
3. Clean up disk space
If you aren’t willing to upgrade your storage just yet, the least you can do is clean up your storage right now.
Aside from manually deleting stuff you no longer need, you can also get rid of temporary files that clutter up your storage and eat up performance for no reason. To get to them, click Windows + X and select ‘Run’ (or just type it in the search bar).
A small window will pop up, where you need to type %temp%. This will take you to a whole folder full of all the temporary files you can remove without thinking twice.
For those who upgraded from Windows 10, there’s a neat trick to get rid of potential leftover files you don’t need on your brand new iteration. Only do this if you’re 100% sticking with Windows 11, though. Go to System > Storage > Temporary files. Make sure to only leave ‘Previous Windows Installation’ and ‘Windows Update Clean-up’ checked and click on ‘Remove files’.
Lastly, make use of Windows 11’s fantastic Storage Sense feature. Turning it on will enable your PC to constantly watch out for junk or unused files to optimize your PC’s performance to the maximum.
4. Install pending updates
This one should go without saying, but pending updates can be detrimental to your Windows 11 performance. The longer you leave them untouched, the more bugs the outdated programs and patches can cause. So, make sure to regularly check for updates and install them as soon as they’re available.
5. Disable visual effects
As cool as visual effects, animations, shadows and transparency are, they can also put quite a toll on your computer’s speed. On a newer setup this generally shouldn’t be a problem, but if you do notice a drop in performance, definitely consider turning off some of these settings.
To do this you can go to the Control Panel, System Properties and click the ‘Advanced’ tab. In the Performance section, choose Settings. If you’d like a quicker way to get to the dialog (Performance Options) with Visual Effects, you can also type sysdm.cpl in the search bar.
Once there, you can either have your PC choose what’s best, choose the best appearance or the best performance. The other option is to manually toggle the effects off and on. The biggest obstacles to speed are taskbar animations, window shadows, control/element animations and animations upon minimizing/maximizing.
Credit Windows on Unsplash
In the same vein, you should go to Settings > Personalization > Colors and disable Transparency, to prevent your computer from doing overtime just to hit the aesthetic appeal.
6. Get rid of bloatware
Bloatware is one of the biggest culprits of slow computer speed.
Pre-installed software that’s pretty much useless but takes up valuable system resources has been around since day one. No matter which device or platform you’re talking about. Luckily, a lot of it is removable, making it easy to lighten the load on your device.
To boost your Windows 11 computer, go to Settings > Apps > Installed apps.You’ll probably see a bunch of apps you don’t want or need. Click on the three dots next to each one you want to remove and press ‘Uninstall’.
Aside from helping optimize performance, removing bloatware has another great benefit. Unfortunately, often this pre-installed software is quite vulnerable, exposing you to great risk of cyberattacks. So, removing it definitely improves your device’s security and gives you at least some peace of mind.
Summary
These are a few of our fastest tips for boosting performance. There are other, more complex and time-consuming ways, of course. If you’ve tried these quick ones and still need advice on how to improve your PC’s speed, feel free to reach out!
As you know, Microsoft’s Windows Media Creation Tool is a useful tool that helps you download and install the latest version of the Windows 10 operating system. However, there are times when it could encounter some problems during the update process. One of these programs is the following error message:
“0x8007001F-0x20006, The installation failed in the SAFE_OS phase with an error during REPLICATE_OC operation.”
The error pointed out the “Safe OS phase”. It is the phase that’s initiated to install all the required Windows Updates. Thus, the possible cause for this error could have something to do with an interrupted download, internet connection, and many more. Although this error could be caused by a lot of factors, fixing it shouldn’t be that hard. You can try to reset the Windows Update Components or delete the Windows Update cache. You could also disable both the Firewall and your antivirus program temporarily or run the Windows Update in a Clean Boot state, as well as run the Windows Update troubleshooter. To get started troubleshooting the error, follow each one of the suggestions provided below.
Option 1 – Try to reset the Windows Update components
Resetting the Windows Update components could help you resolve the Windows Update error 0x8007001f – 0x20006. How? Refer to the following steps:
Open Command Prompt with admin privileges.
After that, type each one of the following commands and hit Enter after you key in one after the other.
net stop wuauserv
net stop cryptsvc
net stop bits
net stop msiserver
Note: The commands you entered will stop the Windows Update components such as Windows Update service, Cryptographic services, BITS, and MSI Installer.
After disabling WU components, you need to rename both the SoftwareDistribution and Catroot2 folders. To do that, type each one of the following commands below, and don’t forget to hit Enter after you type one command after the other.
Now, restart the services you’ve stopped by entering another series of commands. Don’t forget to hit Enter after you key in one command after the other.
net start wuauserv
net start cryptsvc
net start bits
net start msiserver
Exit Command Prompt and then restart your computer.
Option 2 – Try to delete the Windows Update Cache
You might also want to delete the Windows Update cache since there are times when existing corrupt or incomplete Windows Update files can cause some problems in downloading and installing Windows Updates. To achieve this, simply delete the “$Windows.~BT” & “$Windows.~WS” folders in your computer. Once you’re done, try to run Windows Update again and see if the error is now fixed.
Option 3 – Try to temporarily disable anti-virus and Windows Defender Firewall
As mentioned, the error could be due to the antivirus program or the Windows Defender Firewall installed on your computer. Thus, disabling them or any security software installed in your computer is always a good idea you can try when you’re not able to access the shared drive on your computer. There are times when you encounter problems like error 0x8007001f – 0x20006 due to interference of antivirus or security programs. Thus, you have to disable both your antivirus program and Windows Defender Firewall for the meantime and check if it fixes the error or not
Option 4 – Run the Windows Update in a Clean Boot State
It is possible that some third-party application is the one that’s causing the problem so it’s best if you put your computer in a Clean Boot state. During this state, you can start the system with a minimum number of drivers and startup programs that will surely help you in isolating the root cause of the issue.
Log onto your PC as an administrator.
Type in MSConfig in the Start Search to open the System Configuration utility.
From there, go to the General tab and click “Selective startup”.
Clear the “Load Startup items” check box and make sure that the “Load System Services” and “Use Original boot configuration” options are checked.
Next, click the Services tab and select the “Hide All Microsoft Services” check box.
Click Disable all.
Click on Apply/OK and restart your PC. (This will put your PC into a Clean Boot State. And configure Windows to use the usual startup, just simply undo the changes.)
After that, try to run Windows Update again.
Note: If you are able to install the app without any trouble at all then it means that the error is caused by some third-party application on your computer. You need to look for the culprit and uninstall it once you found it.
Option 5 – Run the Windows Update Troubleshooter
You might also want to run the Windows Update Troubleshooter as it could also help in fixing error 0x8007001f – 0x20006. To run it, go to Settings and then select Troubleshoot from the options. From there, click on Windows Update and then click the “Run the troubleshooter” button. After that, follow the next on-screen instructions and you should be good to go.
As you know, games with good graphics and fast play are definitely resource-intensive and can consume a lot of storage space on your computer. Because of that, they have to be compressed before it gets downloaded to your computer and then unpacked to the hard drive before it gets installed. However, if an error occurs in your computer’s RAM during the installation process or if your hard disk does not have enough memory to handle the process, then you might encounter the isDone.dll error which states:
“An error occurred when unpacking, Unarc.dll returned error code -1, ERROR: archive data corrupted (decompression fails).”
If you encounter the isDone.dll error message on your Windows 10 computer, then read on as this post will show you how you can fix it. This error has something to do with the incomplete installation of PC games or files of larger size.
The ISDone.dll error appears due to faulty
Unarc.dll file residing in the System32 folder on 32-bit operating systems and the SysWOW64 folder on 64-bit systems. So, if you see this error message, then, it means your computer was not able to read installation archive files.
What is Unarc.dll file?
Unarc.dll is a dynamic link library for Windows. Some applications or games require this file to function properly. So, if it goes missing or, an error occurs when you start a game or an application, you may get various kinds of errors.
ISDone.dll error while playing games on PC
Option 1 – Try to reinstall the game
The isDone.dll error could also be caused by the installation of an unknown application. Or it could also be caused by an outdated or corrupted application. In other words, if the game you are trying to install is broken or corrupted, then it’s no wonder why you’re getting the isDone.dll error. To fix this, make sure that you download the latest updated version of the game and then try to install it again and see if the problem is resolved or not.
Option 2 – Try to re-register the .dll file using the Regsvr32 tool
The first thing you have to do is to locate the DLL file named dll on your computer and rename it to Unarc-bak.dll.
Next, copy the Unarc.dll file from another well-functioning computer and save it on your desktop.
After that, move the DLL file you just copied to the System32 folder if you are using a 32-bit operating system, or the SysWOW64 folder if you are using a 64-bit operating system.
Now you have to register the new DLL file and you can do that using Windows PowerShell.
Open Windows PowerShell and then execute this command if you have placed the DLL file in the System32 folder: regsvr32 %systemroot%System32unarc.dll
On the other hand, if you have placed the DLL file in the SysWOW64 folder, then execute this command: regsvr32 %systemroot%SysWOW64unarc.dll
Once you’re done, a message will be displayed saying that the DLL file was registered.
Restart your computer and check if the problem is now fixed.
Option 3 – Troubleshoot the isDone.dll error in a Clean Boot State
You can also troubleshoot the isDone.dll error in a Clean Boot state. It could be that there are some third-party applications in your computer that're preventing the application from getting installed and to isolate this possibility, you need to boot your computer in a Clean Boot State and then try installing the program again. Putting your computer in this state can help you identify which program is the culprit and thus isolates the problem. In a Clean Boot state, your computer will start using only the pre-selected minimal set of drivers and startup programs. Note that you have to disable and enable one process at a time.
Log onto your PC as an administrator.
Type in MSConfig in the Start Search to open the System Configuration utility.
From there, go to the General tab and click “Selective startup”.
Clear the “Load Startup items” check box and make sure that the “Load System Services” and “Use Original boot configuration” options are checked.
Next, click the Services tab and select the “Hide All Microsoft Services” check box.
Click Disable all.
Click on Apply/OK and restart your PC. (This will put your PC into a Clean Boot State. And configure Windows to use the usual startup, just simply undo the changes.)
After you’ve set your computer into a Clean Boot State, make sure that you’re signed in as administrator and then try to install the application again.
Option 4 – Try updating or reinstalling your Graphics drivers
Updating or reinstalling the Graphics drivers in your computer can also help in resolving compatibility issues between the operating system and the driver that might have caused the isDone.dll error.
First, boot your computer into Safe Mode.
After that, tap the Win + R keys to launch Run.
Type in devmgmt.msc into the box and tap Enter or click OK to open the Device Manager.
After that, a list of device drivers will be displayed. From there, look for the Display Adapters and click on them.
After that, right-click on each entry under the Display Adapters and select the “Uninstall Device” option from the menu.
Now restart your computer.
After restarting your computer, go to the Settings app and Check for Updates in the Windows Update section.
Note: You also have the option to go directly to the website of your graphics card manufacturers like NVIDIA, Intel, or AMD and go to the section called Drivers then check if there’s a new available update – if there is, download and install it.
Option 5 – Try scanning your computer using Windows Defender
The isDone.dll error might also be infected with malware or virus and to eliminate it, you have to scan your computer using security programs like Windows Defender.
Tap the Win + I keys to open Update & Security.
Then click on the Windows Security option and open Windows Defender Security Center.
Next, click on Virus & threat protection > Run a new advanced scan.
Now make sure that Full Scan is selected from the menu and then click the Scan Now button to get started.
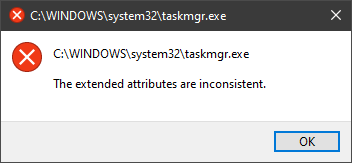
One of the most critical errors inside your Windows operating system is The Extended Attributes Are Inconsistent error. This error means that your operating system has been corrupted and it may produce many annoying issues like for example time lags, random crashes, and even freezing of the system when running multiple applications.
There are a lot of reasons for this error, from the registry to faulty application installations to sometimes even hardware issues like bad RAM memory or bad hard drive. Mostly issue is due to corrupted files inside Windows and most often people only think that resetting the PC or complete reinstallation is the only way to fix this problem.
Although reinstalling the system or resetting the PC will solve this error for sure there are other less time-consuming ways to fix this error.
In this guide, we will show you common ways in fixing Extended Attributes are inconsistent errors inside your Windows that are easy to do and less time-consuming than complete reinstallation of the system.
Fixing Extended Attributes Are Inconsistent error
Run SFC scan
Press ⊞ WINDOWS + X to open the hidden menu
Click on command prompt (admin)
In command prompt type in SFC /scannow and press ENTER
Wait for the operation to complete
Reboot your PC
Use System Image Repair Tool
Press ⊞ WINDOWS + X to open the hidden menu
Click on command prompt (admin)
In command prompt type in Dism /Online /Cleanup-Image /RestoreHealth and press ENTER
Wait for the operation to complete
Reboot your PC
Change all user accounts to the administrator
Press ⊞ WINDOWS + R to open the run dialog
Type in netplwiz and press ENTER
Select a first user account and click on Properties
Click on the Group Membership tab
Choose Others from the options
Select administrator (if all accounts are already administrators change all to users)
Repeat process for all other accounts
Click OK to save settings
Change Windows Sound scheme to default
Right-click on the sound icon in the taskbar
Click on Sound options
Go to the Sounds tab
In Sound Scheme click and choose Windows Default
Under Program Events choose Windows User Account Control
Click on the drop-down menu and choose None
Click on Apply
Click on OK
Downgrade the Sound driver
Press ⊞ WINDOWS + X to open the hidden menu
Click on Device Manager
Find your Audio driver and right-click on it
Click on uninstall and then on OK
Reboot your system
Do System Restore
If none of the provided solutions have worked, perform a system restore to the last point where everything was working fine.
Reset PC
If even system restore has not solved the issue or you do not have valid point in system restore time, perform Reset this PC and hopefully, the error will be finally fixed.
Conclusion
If all of the provided methods have not managed to repair this error that checks your hardware, your computer might have some faulty components if after complete PC reset error persists.
We have talked about gaming on old computers and have covered new and upcoming Steam deck handheld console. Today we are combining old gaming with a handheld console and our target of talk is Retroid pocket 2. This product is packed with really high-quality plastic and with some great features in it.
So let's dive into this cool handheld in more detail and find out why we like it so much.
Good manufacturing quality
Plastic and overall manufacturing quality are really, really good. The battery is great, packing 4000mAh that can hold over 3 hours of nonstop gaming, and all buttons and joysticks are great. The screen is a 640 x 480 60Hz 3.5″ IPS screen (4:3 aspect ratio) that performs really great for its purpose, retro gaming. There is a Digital D-Pad and dual analog joysticks. The right joystick is the lower profile to avoid being accidentally moved when pressing the four gaming buttons. There are three buttons at the bottom which are Home, Start, and Select. On either side are good-quality stereo speakers. On the bottom of the device are a Micro SD Card slot and a 3.5mm headphone port. On the top of the device are Left and Right shoulder and trigger buttons. There are the power button and volume adjustments. There are a USB Type-C OTG port and a Micro HDMI output for connection to a TV.
Good technical statistics
Good, not great but then again since this is retro handheld you cannot really expect some crazy stuff like alder lake inside. So the console is punching ARM Cortex A7 CPU with 2 cores and a clock of 1.5GHz paired with ARM Mali 400-MP2 500MHz GPU. The console has 1GB LPDDR3 RAM memory and 8GB eMMC Storage where 5GB is freely available, the rest is taken for OS. As mentioned before the display is 640x480 resolution with a size of 3.5″. The battery is Lithium-Ion with a power of 4000mAh and on the handheld, there is a USB Type-C connector, 3.5mm headphone jack, and Micro-HDMI. It also has Wifi/Bluetooth 4.0
Retroid Pocket 2 OS and support
Pocket 2 comes with Android 6 but you can update its firmware to the 8.1 version on the official site that I would highly recommend. New versions of the handheld will come with 8.1 on it from the box. Having Android as OS opens many possibilities like you can download Android apps such as Steam Link, allowing you to play actual PC games on your Retroid Pocket 2. Not just that, if it does get a newer version of Android it could even have the ability to use xCloud, Xbox’s cloud gaming service. Of course, hardware will not be able to handle modern games but the option is still there and for some old PC titles available on steam like Commander Keen, for example, this is a great option.
The console can emulate basically everything up to Dreamcast, including N64, PSP, and Playstation 1. It can emulate Nintendo DS also, but it can only do so with one screen. The only problem with this console is you will need to install and update Apps. You’ll need to learn about RetroArch, an app that lets you download emulators or cores to play games.
Retroid price
The last thing on the list is the price of the console itself. Going just under the 100$ mark this really makes it an affordable option for plenty of people that would like to experience retro handheld gaming or for ones like me, nostalgic gamers wanting to relive some era of playing games on the road.
Conclusion
Among Chinese handheld devices for retro gaming, Retroid Pocket 2 is really on top of what the market can offer. If you are looking for a great handheld retro console and are not afraid of little dive-ins into the OS and various configurations, Pocket 2 will reward you with plenty and wide emulation support.
Instaling and removing applications from your Windows can sometimes leave some traces that are unpleasant and can cause annoyances. One of these annoyances is the program in the startup section of the task manager.
If you ever opened task manager and went into the startup section trying to disable some of the startup items on your Windows boot there might be a chance that you have experienced and seen a program without any icon or information about it just sitting there.
This is due to some applications being removed from the system but for some reason, it still shows itself in startup and it is quite annoying. So here we will show you how to get rid of this annoyance so your startup is clean again without junk in it.
Removing a program from startup
Locating the source of the issue
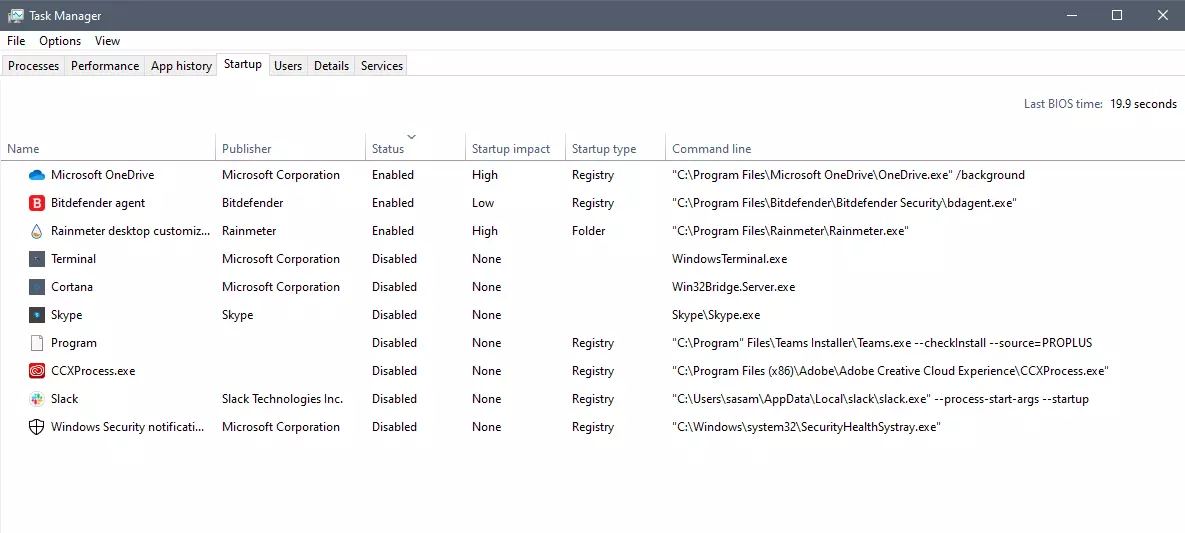
The first thing of course is to open the task manager itself and navigate to the startup tab. Inside the startup tab right-click on the column header and tick or enable Startup type and command line. Now you will see the location of the supposed file (that is missing or you could just go there by right-clicking on the item, but here it is greyed).
99% of the time startup type will be registry since the file is missing, if it was a file fix would be just to simply delete the file in the folder but since it was installed and not properly removed registry key is still present but the file cannot be found. After confirmation that the file is indeed missing and that the startup type is registry open the registry editor by typing Regedit in search and pressing enter.
Removing the key from registry
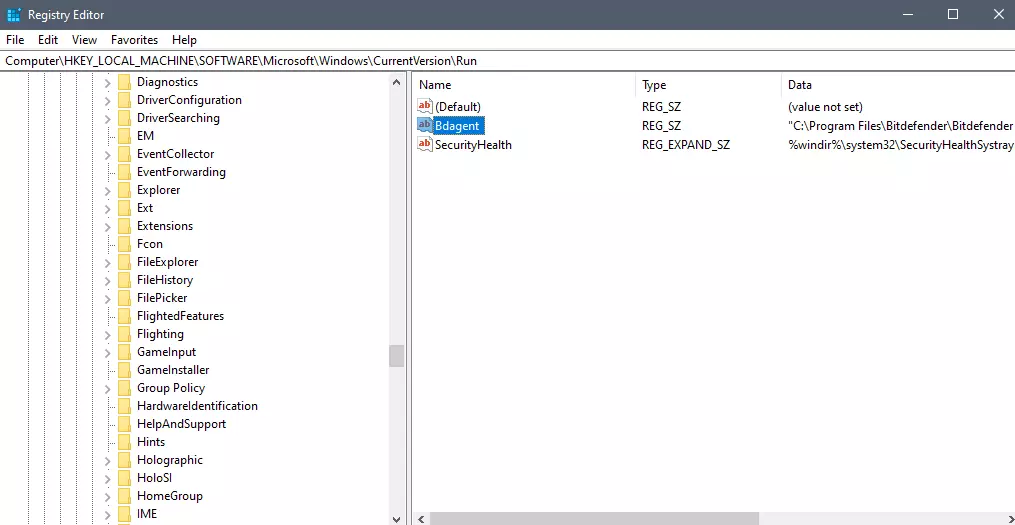
Inside Registry editor navigate to: HKEY_CURRENT_USER\SOFTWARE\Microsoft\Windows\CurrentVersion\Run. Inside on right part, you will see all auto-start entries added by installed applications.
Locate one that is causing issues by comparing its path with the path inside the task manager command line and delete the key. Once the key is deleted right-click on RUN on the left part and choose HKEY_LOCAL_MACHINE to quickly jump on that key location and repeat the process of key deletion if needed. HKEY_LOCAL_MACHINE will delete startup entry for all users and sometimes entry will not be present here since the application is not installed for all users or there are no other users on the machine.
After the procedure is finished, reboot your systems in order to apply changes.
If you are trying to update your Windows 10 computer but are not able to do so since your computer is running low on storage then this obviously indicates that there is not enough disk space available on your drive where Windows 10 has been installed. As you know, when Windows 10 downloads the update packages, it extracts them in a separate folder which means that there should be enough space on that particular folder for the update to begin with. Windows do not really check systems for any adequate space requirements before it even initializes the update or upgrades and you only get to know about it right when the update process starts.
On Windows 10 thin clients or the ones with embedded systems that have limited storage space, when Windows Update runs, the update initialization may fail because as pointed out, Windows does not check systems for adequate space requirements so you may have to do the work for them by making sure that your disk has enough space available. Here are some suggestions you can follow to resolve Windows 10 update issues on computers with low storage space.
Option 1 – Delete the files from the Download folder
Since you are going to delete everything manually, you need to create a backup for all your important files which you may have placed in the Download folder. After you create backup copies of important files, delete the files from this folder or you could simply tap the Shift + Del keys to remove the files permanently after you selected them all.
Option 2 – Change the Windows Update Folder location
You might have to change the Windows Update folder location where Windows download all the files need to update the operating system if you cannot really create some space on your primary driver. So all you have to do is set the drive with enough space available for the update to be completed.
Option 3 – Uninstall apps and programs you no longer use
In some cases, apps and programs take up a lot of space on your drive. So if there are programs or apps that you no longer use, you can uninstall them to save storage space. To do so, follow these steps:
In the search box, type in “control” and then click on Control Panel (desktop app) among the search results.
After that, select Programs and Features from the list which will give you a list of all the programs installed on your computer.
From there, look for the apps and programs that you no longer use and right-click on each one of them and click on Uninstall.
Option 4 – Move files to another drive
This is another thing you can try. You can move files, especially the ones with large sizes, to another drive to make up space on your drive. After that, install the updates once again.
Option 5 – Reduce on-drive files from Cloud services
If you are using tons of cloud backup services such as OneDrive and Dropbox, you might want to consider reducing the number of files you have on those cloud backup services. You can do what you’ve done on option number three and have those files moved to another drive to free up storage space.
Option 6 – Empty the contents in Recycle Bin
As you know, the files that are deleted from your computer goes to the Recycle Bin first. So if you have not emptied Recycle Bin for a long time now, the files you delete are still actually taking up space on your drive. Thus, you need to empty the contents in the Recycle Bin to save storage space.
Option 7 – Clean up temporary files
You can use the Windows 10 Storage Sense feature which can clean all the temporary files from your computer. To use Storage Sense, follow the steps below.
Open Setting > System > Storage from the WinX Menu.
From there, you will see a list of all the local and connected storage devices along with the details on the free space.
Now make sure that the Storage Sense feature is turned On then go find a link that says “Free Up Space” and click it to open.
After that, a screen which is the built-in program in Windows 10 will appear and will scan your computer for the following junk files so you can free up disk space:
Windows Upgrade Log Files
System created Windows Error Reporting Files
Thumbnails
Temporary Internet Files
Previous Windows Installation Files
Delivery Optimisation Files
DirectX Shader Cache
Choose the files you want to get rid of and then click on the remove files option. Note that you’ll have an idea of the total size as you select any of the junk files listed above.
If you suddenly encountered an error that says, “The Task image is corrupt or has been tampered with”, along with an error code of 0x80041321, read on as this post will guide you on what you can do to resolve this problem in your Windows 10 computer. According to security experts, this kind of error has something to do with a corrupt scheduled backup task wherein each time the task service plans to execute a task, it validates a few things. And if it finds any issue with the integrity or corruption in the registry, it will mark those tasks as corrupt and throws the error 0x80041321.
There are several options you can check out to fix the problem. You can try using the Registry Editor to edit and fix the corrupted tasks or you could also delete the schedule keys or the WindowsBackup file, as well as try deleting the task from the Task Scheduler or refresh the User_Feed_Synchronization. But before you of these potential fixes, make sure that you check every option and verify if it’s not associated or trying to run a file which it should not. In addition, make sure that you create a System Restore point as well so that you can undo any changes you will be making if anything goes wrong. Once you have these things covered, refer to each one of the options provided below.
Option 1 – Try to use the Registry Editor to edit and fix corrupted tasks
The first thing you can do to fix the problem is to edit those tasks via Registry Editor, as well as fix the corrupted ones in System32. Before you proceed, keep in mind that since you are dealing with the Backup triggered by the Task Scheduler, you can find the entries for the tasks in different locations. You can find the Task Scheduler at Task Scheduler Library > Microsoft > Windows > Windows Backup, whereas, you can find it in this path in the Registry Editor, HKEY_LOCAL_MACHINE SOFTWARE Microsoft Windows NT CurrentVersion Schedule WindowsBackup AutomaticBackup. On the other hand, you can find the Windows System folder at C:/Windows/System32/Tasks/MicrosoftWindows/WindowsBackup. You need to ensure that the name of the task name is the same as everywhere and take note of the name. Once you have these covered, follow the steps below.
Tap the Win + R keys to open Run and type “Regedit” in the field and hit Enter to open the Registry Editor.
Next, navigate to this key: ComputerHKEY_LOCAL_MACHINESOFTWAREMicrosoftWindows NTCurrentVersionScheduleTaskCacheTreeMicrosoftWindowsWindowsBackup
From there, take note of the GUID value in the ID entry of the task under the AutomaticBackup and Windows Backup Monitor folder.
After that, you have to remove the task registry entries related to the ID from these locations
Once done, you have to create a temporary copy of the corrupted task file by going to this location: C:/Windows/System32/Tasks/MicrosoftWindows/WindowsBackup
From there, look for the AutomaticBackup and Windows Backup Monitor tasks and copy them to a location where you can keep them safe.
Next, you have to fix the corrupted task by deleting it from this location: C:/Windows/System32/Tasks/MicrosoftWindows/WindowsBackup
After that, you have to recreate the task by going to Task Scheduler > Microsoft > Windows> Windows Backup.
Now click on the Action menu and on Import task and navigate to the backup files and import them.
Once you’ve created the tasks, run them manually and see if the error is now fixed.
Option 2 – Try to delete the Schedule keys in the Registry
Launch the Registry Editor and go to this key: HKLMSOFTWAREMicrosoftWindows NTCurrent VersionSchedule
From there, delete all of its sub-keys.
Once done, exit the Registry Editor and check if the Backup Tasks are now working.
Option 3 – Try to remove the WindowsBackup file
The next thing you can do to fix the problem is to remove the WindowsBackup file if the first two options didn’t work. It is possible that the problem has something to do with corrupted Task files. The task files are XML files that include parameters, programs to use, and many more. If any of these files end up getting corrupted, the task scheduler will have trouble running it and will throw the “The Task image is corrupt or has been tampered with” error.
To delete it, go to C:WindowsSystem32TasksMicrosoftWindowsWindowsBackup.
From this location, get rid of all the files. You could also these files via Command Prompt using the DEL command.
Once done, go to the Backup and Restore in the Control Panel and set up the Windows Backup again.
Option 4 – Try to delete the task from the Task Scheduler
If you don’t want to delete the files from Windows Explorer, you can delete them instead via Task Scheduler.
Open the Task Scheduler and go to Task Schedule LibraryMicrosoftWindowsWindowsBackup.
From there, delete both of the tasks and set up Windows Backup again.
Once done, go to the Task Manager and run the AutomaticBackup task again and see if it works.
Option 5 – Try to restart the Task Scheduler service
As mentioned, it is possible that the Task Scheduler service could be disabled. You could have disabled it when trying to enhance your computer’s performance and whatnot. Thus, you need to verify if it’s running or not and then restart it.
First, you need to tap the Win + R keys on your keyboard to open the Run dialog box.
Next, type “services.msc” in the field and click OK or tap Enter to open the Windows Services Manager.
You will see a list of Services and from there, look for the Task Scheduler service and double click on it.
After that, go to the General tab and click on the Startup Type options and then select “Automatically” from the given list.
Click on the “RUN” option and select the “Restart the Service” option.
And click on the “After Second Failure” option and then select the “Restart-Service” option again.
Now click on the “After Subsequent Failures” tab and select the “Restart the Service” option.
Finally, click on the Apply and OK buttons and then run the Task Scheduler and see if the issue is now fixed.
Option 6 – Try refreshing the User_Feed_Synchronization
According to security experts, enabling and disabling the User Feed sync also known as the User_Feed_Synchronization task can help resolve the problem.
Tap the Win + X keys and select the PowerShell (admin) option from the menu.
Next, type the “msfeedssync disable” command and tap Enter.
Repeat the same process but this time run the “msfeedssync enable” command.
Error code 80073712 is one of the dozens of error codes affecting Windows 10 users. It occurs when users attempt to upgrade their operating system but experience a failure. The error code usually results from problems associated with missing or damaged files within Windows Update. Common symptoms of this error code include the following:
The inability of Windows Update to successfully complete the upgrade process
Message box highlighting the presence of error code
Solution
Error Causes
In the case of error code 80073712, the issues preventing Windows Update from completing the upgrade process are most likely due to problems with files within Windows Update. For instance, there may be corruption within the Component-Based Servicing (CBS) manifest.
Further Information and Manual Repair
Manual repair methods offer solutions to Microsoft users who are experiencing Windows error codes like the upgrade error code 80073712 in Windows 10. The manual repair methods in this article are not guaranteed to fix problems unrelated to this error code. Thus, be certain you are experiencing error code 80073712 before you attempt to implement the solutions provided below.
Method One: Run Windows Update Troubleshooter
Since issues related to Windows Update may be causing error code 80073712 to occur, one of the best solutions you can consider is to run the Windows Update Troubleshooter. This troubleshooter will be able to detect and fix corruptions within Windows Update files or any other issues directly related to Windows Update. To implement this manual repair method, follow the steps listed below:
Step one: Open your Internet browser
Step two: Type www.microsoft.com/downloads
Step three: Type Windows Update Troubleshooter in the search bar at the top-right corner of the Microsoft website.
Step four: Select Windows Update Troubleshooter then wait for the webpage to load.
Step five: Select Run troubleshooter
Once you run the troubleshooter, you should be able to verify and fix any errors within Windows Update files. Restart your machine after the troubleshooting process is complete them proceed by checking Windows Update to see if you are able to complete the upgrade. If Windows Update downloads the upgrade and the installation of the upgrade occurs, the problem has been resolved. Otherwise, error code 80073712 will reoccur, in which case you will need to move to manual repair method two.
Method Two: Run DISM Tool
Another option available to Windows users experiencing error code 80073712 is to download and run the Deployment Image Servicing and Management (DISM) tool. This tool checks for inconsistencies or corruptions that may be preventing Windows Update services from functioning correctly. To download and run the tool, follow the instructions below:
Step one: Type Command Prompt in the search box near the Start button
Step two: Right-click Command Prompt, then click Run as administrator, providing administrator password or confirmation where necessary.
Step three: Select Allow
Step four: Press Enter after typing the following command:
DISM.exe /Online /Cleanup-image /Restorehealth
Wait a few minutes to ensure that the process is complete. Once you’ve run the DISM tool, it will detect errors, for instance within registry data, and correct or replace them. Restart your machine after running this tool then check Windows Update. Attempt to download the upgrade to see if you have successfully resolved error code 80073712. If you experience an upgrade failure, move to the next manual repair method mentioned below.
Method Three: Perform a Clean Install of Windows 10
The issues related to error code 80073712 may also be resolved by performing a clean install of Windows 10. This manual repair method ensures that any previous versions of your Windows operating system are removed before you attempt to access an upgrade. This can prove effective as it helps users avoid issues that would otherwise cause error codes or poor PC performance in cases where errors are present on one’s system.
To successfully perform a clean installation of Windows 10, be prepared to follow step-by-step procedures that include the following:
Step two: Click Run, then select Create installation media for another PC
Step three: Select changes to the installation options, then select Next
Step four: Choose USB flash drive or ISO file, then click Next
Step five: Select drive, then Next
Step six: Select Finish, then restart your computer, ensuring that the media option you choose, whether USB flash drive or DVD, is in your machine before you choose to reboot.
Step seven: Press any key then follow the prompts provided to set up Windows 10.
Method Four: Download an Automated Tool
If you wish to always have at your disposal a utility tool to fix these Windows 8 and other related issues when they do arise, download and install a powerful automated tool.
Creating a new Windows 10 account comes with options related to privacy. For instance, you will see the options to disable or enable Speech recognition, Find my device, Location service, Inking & typing, and many more. And if you often have to create a test account in Windows 10 v1809 and you don’t want to give this option, you can just disable the Privacy Settings Experience at sign-in on your Windows 10 PC using a couple of instructions given in this guide.
To disable the Privacy Settings Experience, you can use the Registry Editor and the Group Policy Editor. But before you get started, you need to log in as an administrator. Moreover, it would also be better if you create a backup copy of the Registry files as well as create a System Restore Point before you make any changes. After you have those things covered, refer to the steps given below to disable the Privacy Settings Experience at sign-in on your Windows 10 PC. Since there are two ways to get things done, choose one option that you prefer.
Option 1 – via Registry Editor
Tap the Win + R keys to open the Run dialog box and type “Regedit” in the field and hit Enter to open the Registry Editor.
Next, navigate to this path: HKEY_LOCAL_MACHINESOFTWAREPoliciesMicrosoftWindowsOOBE
From there, look for the OOBE value and if you can’t find it there, you can just create it. To do so, right-click on the Windows key and select New > Key, and then name it “OOBE”.
After that, right-click on the OOBE value and select New > DWORD (32-bit) value, and name it “DisablePrivacyExperience”.
Then double click on DisablePrivacyExperience and set its value to “1”.
Now exit the Registry Editor and restart your PC for the changes to take effect.
Option 2 – via the Group Policy Editor
Tap the Win + R keys to open the Run dialog box.
Then type “gpedit.msc” in the field and hit Enter to open the Group Policy Editor.
After that, navigate to this path: Computer Configuration > Administrative Templates > Windows Components > OOBE
Next, look for a setting named “Don’t launch privacy settings experience on user login” located on your right-hand side and then double click on it and select Enabled.
Now click on the Apply and OK buttons to save the changes made.
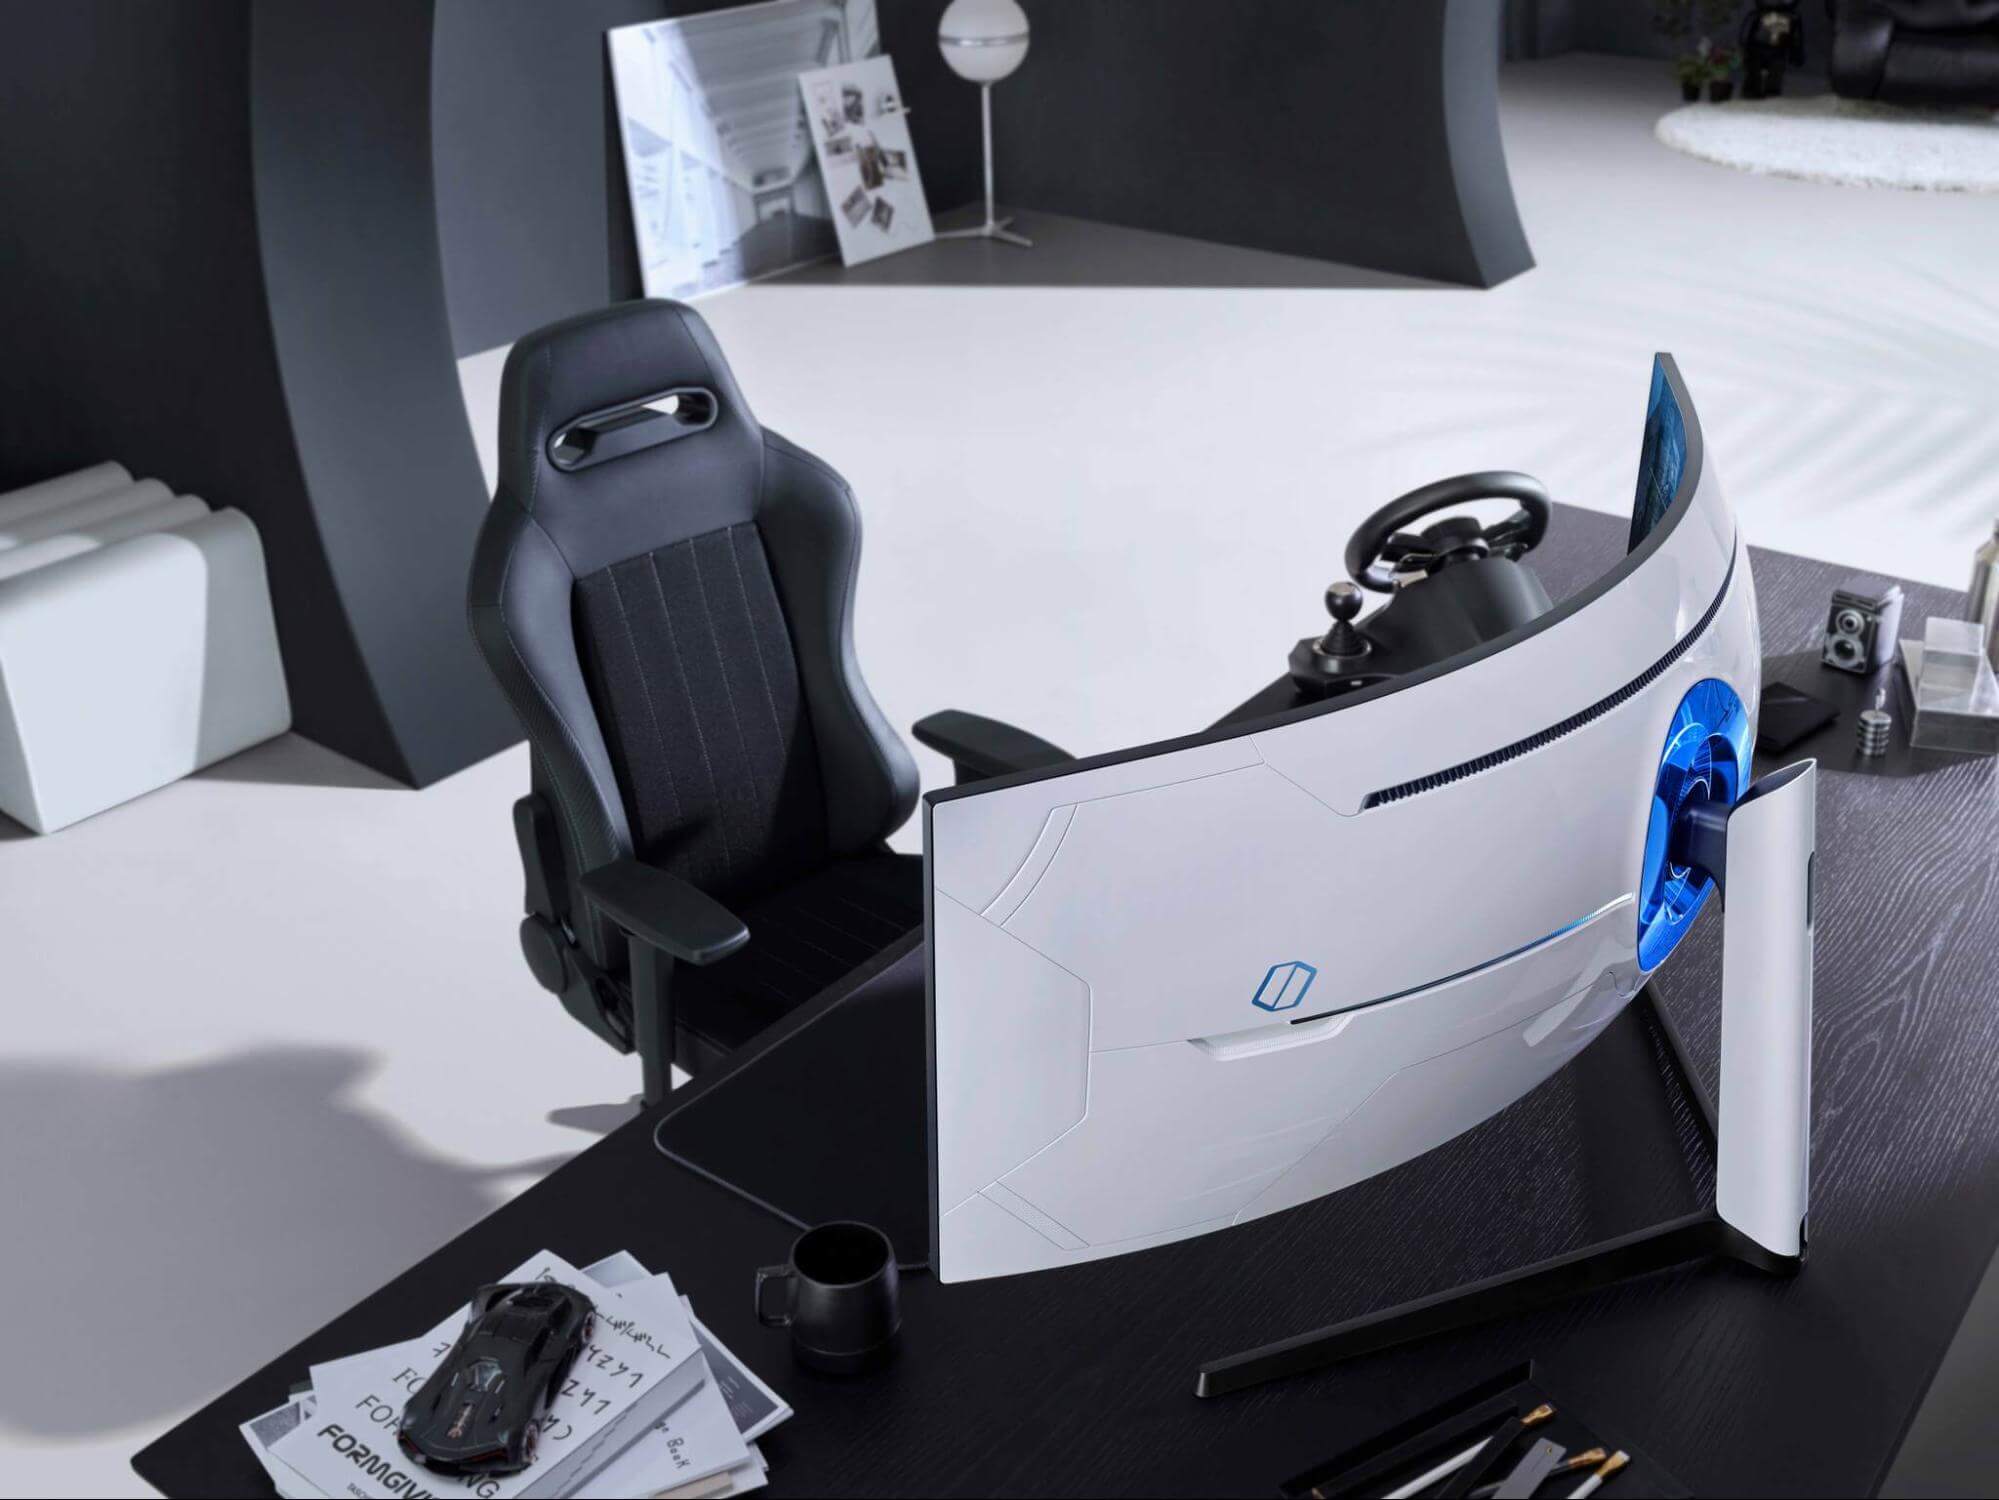
Odyssey Neo G9 is a successor to Odyssey G9 curved gaming monitor and it is aimed again at the gaming community with its specifications but of course, it can be used for work as well.
Gapping at a stunning $2500 USD price it is not really a cheap piece of hardware so it is normal to see what do you get for this kind of price and do features justify it, so let’s dive in.
Size and resolution
The first thing that you can notice about the screen is that it is big and curved, 49 inches big which is pretty big, and with it, I believe you can forget about using 2 or 3 screens because this single one will cover everything you need really.
Going as far as 5120 X 1440 resolution is the strange definition, basically, this is 5K which is kind of nice but I do not see the advantage. Sure it is larger than 4K, but for the price of $2500 I expected an 8K monstrosity so if the resolution is not the main price justification then what is? Let’s move on and find out.
Odyssey tech specs
The monitor comes with HDR and 240Hz refresh rate which is very nice and coupled with 1ms pixel response time, adaptive sync, and Variable Refresh Rate you get pretty good other tech specs.
All of this is very nice but the monitor's strongest selling point is Mini Led tech. Mini Led is a next-gen tech currently found only in high-end TVs. With this technology, monitors can produce truer blacks sort of speak thanks to a greater number of dimming zones.
Odyssey Neo G9 is rated at 2000 nits in the brightness values and local dimming zones go to stunning 2048. It comes also with Quantum HDR that supports 10+, Freesync, and G-Sync capability. In connection, the department monitor comes with a single display 1.4 port and two HDMI 2.1 ports. It also includes a headphone jack along with two USB 3.0 ports.
Conclusion
While the resolution of the monitor is nothing impressive for the given price, its size and the rest of the tech specs surely are. Now I will not lie, the price is still a little too high but if you could afford it easily I think you should.


 In this guide, we will show you common ways in fixing Extended Attributes are inconsistent errors inside your Windows that are easy to do and less time-consuming than complete reinstallation of the system.
 So let's dive into this cool handheld in more detail and find out why we like it so much.

 Odyssey Neo G9 is a successor to Odyssey G9 curved gaming monitor and it is aimed again at the gaming community with its specifications but of course, it can be used for work as well.
Gapping at a stunning $2500 USD price it is not really a cheap piece of hardware so it is normal to see what do you get for this kind of price and do features justify it, so let’s dive in.
Odyssey Neo G9 is a successor to Odyssey G9 curved gaming monitor and it is aimed again at the gaming community with its specifications but of course, it can be used for work as well.
Gapping at a stunning $2500 USD price it is not really a cheap piece of hardware so it is normal to see what do you get for this kind of price and do features justify it, so let’s dive in.