Error Code 0x800F0922 refers to an issue with downloading the newest version of Microsoft Windows, Windows 10. It could mean that your PC doesn't have enough free space in the System Reserved partition, or that it couldn't connect to the Windows Update servers. This issue is not very common, most users will never see this error code. Some, however, will need to follow the below fixes in order to download and upgrade their systems properly.
Common symptoms include:
Dialog box appears with the Error Code 0x800F0922
Microsoft Windows 10 upgrade is unsuccessful and/or incomplete
Users are unable to open applications after attempting the Microsoft Windows 10 upgrade
Solution
Error Causes
There are two standard reasons why this error occurs during the Microsoft Windows 10 upgrade.
There may not be enough free space in the “System Reserved” partition of your hard drive.
Error Code 0x800F0922 could also mean that your PC was not able to successfully connect to the Microsoft Windows update servers due to a VPN (virtual private network) connection in your home or office network.
The .Net framework installation portion of the Windows 10 upgrade fails.
Further Information and Manual Repair
Error Code 0x800F0922 as stated is somewhat rare, but it does occur occasionally. Users who have experienced this error while attempting to upgrade their system to Microsoft Windows 10 have the following options for do-it-yourself fixes.
Method 1:
Use this method if you are operating on a network that uses a VPN connection.
Disconnect from your office or home network.
Turn off your VPN software.
Run the Microsoft Windows 10 upgrade.
Restart your PC.
Reconnect to your home or office network.
Turn your VPN software back on.
Method 2:
This will run the Windows 10 Update troubleshooter that is built into your PC.
Click on the Windows icon on the lower-left corner of your desktop.
Press the “w” key to open the SEARCH function.
Type “troubleshooting” in the search field and press ENTER
When the troubleshooting window opens, select the “view all” option from the left window pane.
Select “Windows update”.
Select “advanced” and then choose the “run as administrator” option.
Click the NEXT button and follow the on-screen prompts.
This troubleshooter will walk you through the steps needed for your specific situation.
Method 3:
This method will run the DISM (deployment image servicing and management) tool built into your PC.
Press the “windows key” on your keyboard followed by the “x” key.
Select the “command prompt admin” option.
Type the command “exe /online /cleanup-image /scanhealth” into the command prompt field and press ENTER.
Wait for the scan to run completely.
When the scan is complete, a message will appear telling you that “the operation completed successfully”.
Type the command “dism.exe /online /cleanup-image /restorehealth” into the command prompt field and press ENTER.
This will take a while to run completely, but it will restore any missing or corrupted files necessary for the Microsoft Windows 10 update.
Restart your computer.
Attempt the Windows 10 upgrade again.
Method 4: Use this option if you believe the issue is a result of the .NET framework being disabled.
Press the “windows” key followed by the “x” key.
Select the “control panel” option.
When the control panel window opens, click your cursor in the search field on the upper right hand corner.
Search for the phrase “windows features”, then select the link “turn Windows features on or off”.
Select the check box (add a check) to the box next to “.Net framework”.
Click the OK button.
Proceed with your Microsoft Windows 10 upgrade.
To resolve this, all you need is third-party software to increase the size of the System Reserved partition.
One of the four methods listed above should fix your Error Code 0x800F0922 issue and allow for a successful Windows 10 upgrade. On an occasion where there isn't enough space, use third-party software to increase the size of the System Reserved partition. If you do not possess the technical expertise required to accomplish this yourself or do not feel comfortable doing so, download and install a powerful automated tool to get the job done.
Connecting to Microsoft’s Windows Update servers does not always go smoothly since you could run into a number of errors. One of these errors is the error code 0x8024402c. You can see this error code when you check for Windows Updates. This kind of Windows Update error occurs when the proxy or the firewall settings are incorrectly configured. As a result, the client’s connection to the Windows Update servers fails.
There are two things you can do to resolve error code 0x8024402c. First, you can try to fix the Proxy Settings. Second, you can set up Automatically Detect the connection settings. In addition, you can also try to perform System Restore as it could also help in fixing the problem. Performing System Restore might help you in fixing the error code 0x8024402C. Refer to the steps below to use System Restore.
Tap the Win + R keys to open the Run dialog box.
After that, type in “sysdm.cpl” in the field and tap Enter.
Next, go to the System Protection tab then click the System Restore button. This will open a new window where you have to select your preferred System Restore point.
After that, follow the on-screen instructions to finish the process and then restart your computer and check if the problem is fixed or not.
If performing System Restore didn’t help in fixing the problem, then try the two given options below.
Option 1 – Try fixing the Proxy Settings
In the Cortana search box, search for Internet Explorer and then click on the related search result.
After that, tap the Win + T keys on your keyboard and click on Internet Options.
Next, navigate to the Connections tab and click on LAN Settings.
Then click on the Advanced button and delete all the entries in the list generated in the Exceptions section. And if the Advanced button is disabled because the “Use a proxy server for your LAN (These settings will not apply to dial-up or VPN connections)” option is disabled then you are good to go. Now proceed to the next step.
Tap the Win + X keys or right-click on the Start button and select Command Prompt (Admin) or you could also search for “cmd” in the Cortana search box and right-click on Command Prompt from the search results and select the “Run as administrator” option.
If a User Account Control appears, click on Yes to proceed. After that, type each one of the commands listed below, and don’t forget to hit Enter after you type each one of them.
netsh winhttp reset proxy
net stop wuauserv
net start wuauserv
Now restart your computer and check if the problem is fixed or not by checking for Windows Updates again.
Option 2 – Try setting up Automatically Detect the connection settings
Type in “internet options” in the Cortana search box and then click on the related search result.
After that, navigate to the Connections tab.
Next, click on the LAN Settings button located under the Local Area Network (LAN) settings section.
Then uncheck the “Use a proxy server for your LAN (These settings will not apply to dial-up or VPN connections)” option under the Proxy Server section and click OK.
Now restart your computer to apply the changes made successfully.
A new update to popular Microsoft PowerToys has brought a few new features that are aimed at speeding up the workflow.
The first new feature that was slid in is Always on top utility. With this cool utility, you can keep the window as the name suggests, always on top of other windows. To enable this cool feature all you have to do is press the key combination of ⊞ WINDOWS + CTRL + T and an active window will be now always on top of all other windows. To reverse and unlock this window from being always on top just press key combination again.
A second new feature is a really great one and my favorite thing to happen in power toys. Often we are making the search in our browsers to find stuff, things, maybe some explanations, information, etc. The newest update in power toys brings this to a whole new dimension. While you are on PC you just simply need to type ?? followed by questions like: ?? When doctor strange 2 is coming out and that will launch your default browser with your chosen search engine and provide you with the answer.
Third and final thing is G-code support in the file explorer preview pane and thumbnails, meaning that if you work with CNC equipment you can now have a thumbnail preview of the code itself inside File Explorer.
And that’s it for now, thank you for coming and reading, Take care and I hope to see you next time.
If by any chance your search result in Windows is misleading, missing, or incorrect then it is a high probability that your search index is out of date. To repair this issue follow this guide step by step.
Please take note that rebuilding the whole search index can take a long time on some systems depending on the size of the index itself, CPU speed, HD speed, etc. Sometimes it can take even hours on large drives.
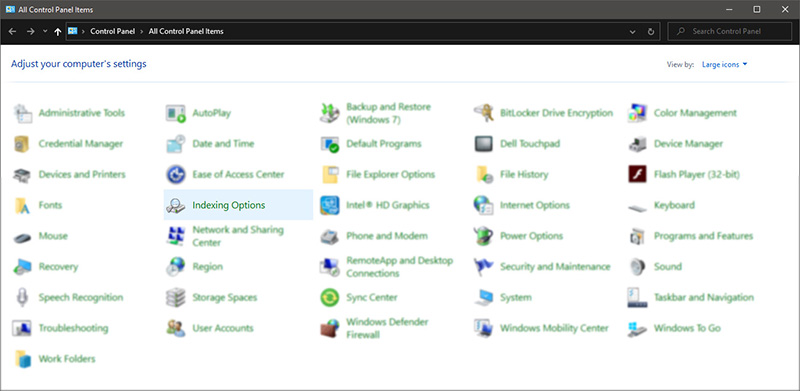
First, press ⊞ WINDOWS + R to open the run dialog and type in it Control panel to open the control panel.
Once you are in the control panel, switch your view to large icons and locate Indexing options.
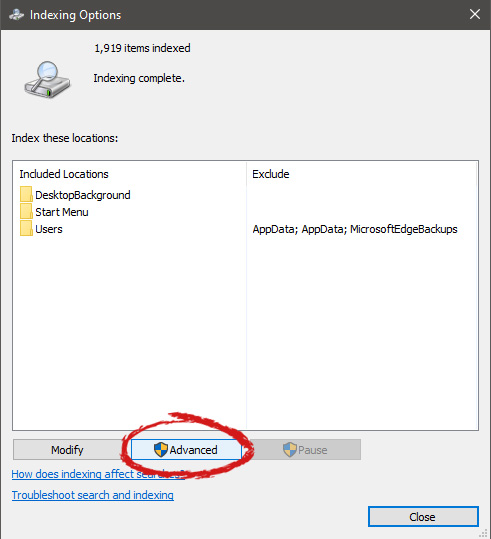
Inside indexing options, click on advanced.
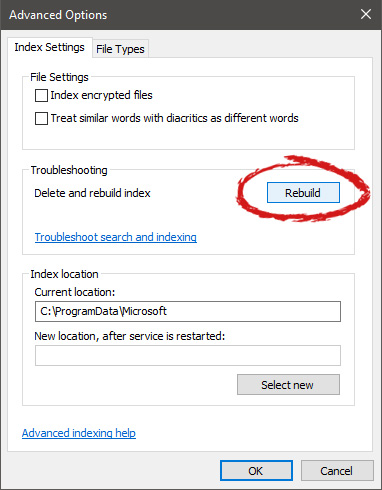
In advanced options click on the rebuild and confirm.
Leave your computer to finish and your searches should be working fine now.
It really sucks when you can’t fully enjoy the newest version of your favorite OS.
Windows 11 is still relatively fresh and consequently has some annoying little bugs that really ruin our experience. The good news is that you’re not alone and most of them are easy to fix.
Here are 5 commonly reported Windows 11 issues and what you can do to get rid of them.
1. Windows 11 audio problems
One of the absolute most irritating things in the world is struggling with the sound on your computer. Windows 11 users have reported facing the issue of low or no sound. If you’re currently experiencing the same frustration, you can be relieved. Chances are fixing it will only take a few minutes.
The first thing to check would be whether you accidentally muted your device by pressing the mute button on your keyboard. Yes, we know it sounds a lot like the old “have you tried turning it off and on again?” But it’s important to leave no stone unturned, and the most obvious things are usually the ones we easily overlook.
Moreover, if you have several audio output sources, check whether the right one is selected. You can do this via the Action Center or through Settings. If you want to use the same source every time, we also recommend you set it as the default one.
It’s also important to have a good, up-to-date audio driver. More often than not, this will be the true cause of your audio struggles. Make sure to update your driver, and if that doesn’t work out, you can always un- and reinstall it or install a different one.
Lastly, if all attempts remain unsuccessful, run the audio troubleshooter to figure out what’s actually going wrong.
2. Unable to find files
Such a powerful new operating system, yet it can’t seem to do the simplest thing imaginable? The File Explorer not responding on Windows 11 is one of the most frustrating and most common problems with Microsoft’s newest iteration of its awesome OS.
However, 9/10 times it can be fixed by simply restarting your PC. You could also try killing the Windows Explorer process in the Task Manager and then rerunning it.
If these don’t help, check whether there are any pending Windows 11 updates. A single missing update can compromise your PC’s functionality, so always make sure to install them all on time.
Should none of that work, then there are other ways to solve the File Explorer problem. However, then the issue is probably a bit deeper and it’s no longer in the ‘easy fix’ territory.
3. Start menu not working
Just like the File Explorer, the Start menu is a fundamental element of your OS. So, it’s only natural that its malfunction grinds your gears. It may be more customizable than on previous Windows versions, but it doesn’t always work smoothly.
If you’re facing the so-called Start menu critical error, there are a few things this could be caused by. Usually it means you turned off your system while an important update was still being installed, there is a corrupt file on your PC, or Windows forcefully stopped a program.
Whatever the reason, the solution should be pretty simple. Try the basic steps: restarting your File Explorer (like we explained above) and signing out and back into your account. If that doesn’t do anything, you may want to try uninstalling third-party start menu apps (if you have any), since they can interfere with your default programs’ functionality.
Now, those are the easy fixes. If you get nowhere with them, you might need to identify the root cause and search for more complex solutions than that.
4. Snipping tool not working
Our beloved screenshot tool was introduced with Windows 10 and Microsoft decided to keep it. However, you were probably just as disappointed as us when you tried to run it and failed.
Normally, this can be fixed by installing the latest Out-of-band (OOB) update, or even pending updates in general. Even if your system appears to be up-to-date, run the checker just in case.
Another cool thing Windows 11 lets you do is ‘Repair’ and ‘Reset’, which is the easiest way to troubleshoot your Snipping tool. If this fails, you can also try the good old un- and reinstall method. Simply uninstall the tool through the Control Panel and reinstall it from the Microsoft Store.
Furthermore, in the case of an upgrade from Windows 10 to 11, it may be that the old Snipping tool version is interfering with the launch of the new one. If you don’t care that much about the additional options available with the enhanced screenshot tool, you can use the old version instead.
Simply go to your C Drive, find the Windows.old folder, search for the tool and open it from there. Make sure to pin it to your taskbar as well, if you know you’re going to use it often.
5. Can’t install the latest update
The latest Windows 11 version, 22H2, has brought tons of enhancements to our dearest operating system. Unfortunately, a lot of users still haven’t had the opportunity to experience it. A mere update of your OS version should be the one thing that goes smoothly, but sometimes that’s not the case.
Failure to install 22H2 can be caused by a few things. Most commonly, the issue is caused by lack of storage space or corrupted files, but there could be other culprits.
There are a couple of things you could try. For example, it’s crucial that your drivers be up-to-date and some important services be enabled. These are: Windows Modules Installer, Background Intelligent Transfer Service, Cryptographic Service, Windows Update services.
To enable them, search ‘Services’, find the service you need and right-click on it. Open ‘Properties’ and select the startup type ‘Automatic’.
It may also be necessary to unplug all peripherals that aren’t crucial and disable third-party antivirus tools until after the update is finished.
Ultimately, you can run the Windows Update troubleshooter to detect and fix other possible issues.
Summary
Tiny bugs like these are nothing out of the ordinary. That said, we still all hate when they happen.
Hopefully some of our solutions have helped you to a smoother Windows 11 experience. But if you’re still struggling, feel free to reach out to us. We’d be happy to help!
A lot of users have experienced various issues either in installing a Feature or a Windows Update. One of these errors is the one with the error code 0x80d02002. If you are one of the users who is facing this problem right now, then the working solutions given in this post will surely help.
The Windows Update error code 0x80d02002 indicates that Windows 10 fails to upgrade or install as there is some issue with the files that have been downloaded and Windows encounters an error in installing them. Thus, the best thing you can do in such a case is to start the installation from scratch but before you do that, here are some suggestions that might help.
Option 1 – Try to rename the SoftwareDistribution folder
The Software Distribution folder in the Windows operating system is a folder that can be found in the Windows directory and is used to store files temporarily which might be required to install the Windows Update on your PC. Thus, it is required by the Windows Update and maintained by WUAgent. Aside from that, it also contains all the Windows Update History files and once you delete them, you will most likely lose the Update history. As a result, the next time you run the Windows Update, it may result in a longer detection time.
Open the WinX Menu.
From there, open Command Prompt as admin.
Then type in the following command – don’t forget to hit Enter right after typing each one of them.
net stop wuauservnet stop bitsrename c:windowsSoftwareDistribution SoftwareDistribution.bak
After entering these commands, it will stop the Windows Update Service, the Background Intelligent Transfer Service, and rename the SoftwareDistribution folder.
Next, got to the C:\Windows\SoftwareDistribution folder and get rid of all the folders and files thereby tapping the Ctrl + A keys to select them all and then click on Delete. Note that if the files are in use, you won’t be able to delete them.
Once all the contents in the Software Distribution folder are deleted, restart your PC and then go back to Command Prompt and input the following commands again.
net start wuauservnet start bits
Since the folder has already been flushed, it will be populated afresh the instant your restart your computer and open Windows Update.
Option 2 – Try to reset the Catroot2 folder
You can also try resetting the catroort2 folder as it is known to fix tons of Windows Update issues including the Windows Update error code 0x80d02002. Both the Catroot and catroot2 are Windows operating system folders that are required for the Windows update process. So when you run the Windows Update, the catroort2 folders stores the signatures of the Windows Update package and helps it in the installation. It makes use of the “%windir%System32catroot2edb.log” file in the updating process. Afterward, the updates are stored in the SoftwareDistribution folder which is used then by the Automatic Updates in order to execute the updating process. Keep in mind that you must not rename or delete the Catroot folder. Although the Catroot2 folder is recreated automatically by Windows, the Catroot folder isn’t.
Option 3 – Try running the DISM tool to fix the broken Windows Update client
The Windows update/upgrade error 0x80d02002 might be caused by some issues in the Windows Update client so you need to run the DISM tool to repair it. Note that you have to use another computer or another Windows from a shared network to fix it.
Option 4 – Try to run the Windows Update Troubleshooter
Running the built-in Windows Update troubleshooter could also help you resolve the Windows Update error 0x80d02002. To run it, go to Settings and then select Troubleshoot from the options. From there, click on Windows Update and then click the “Run the troubleshooter” button.
Option 5 – Try to run Microsoft’s troubleshooter online
You also have the option to run Microsoft’s online troubleshooter which could help you fix Windows Update errors.
Upgrading your computer from Windows 7 or Windows 8 to Windows 10 or even upgrading Windows 10 to a new version is not that simple. The setup initially checks for all the drivers and other software utilities installed on your computer and verifies and blockages or upgrade or upgrade blocks with respect to any of those drivers or any of those software utilities regardless if you use the Windows 10 ISO or the Windows 10 Upgrade Assistant. One of these common errors, when you upgrade or update your computer, is the “The Display is not compatible with Windows 10” error. This kind of Windows Upgrade error is related to the compatibility of the Graphics Driver installed in your computer. But worry not for this post will guide you in fixing this problem.
The “The display is not compatible with Windows 10” error has the same workarounds as the following errors:
These devices aren’t fully compatible with Windows 10.
The display is not compatible with Windows 10. Check with the manufacturer for support.
The display manufacturer hasn’t made your display compatible with Windows 10. Check with the manufacturer for support.
To resolve this Windows Upgrade error, here are some suggestions that could help:
Option 1 – Check for incompatible drivers in your computer
Open the Device Manager from the WinX Menu.
Then expand the list for Display Adapters.
Next, right-click on the NVIDIA Graphics Card list and select Enable.
After that, right-click on it again and click on the “Update Driver Software…” option.
After doing so, a new window will appear and from there, click on the “Search automatically for updated driver software” option.
Then check if Windows is now able to detect your Graphics Card as well as the latest driver for it. If not, proceed to the next step.
Right-click on the driver again and click on the “Update Driver Software…” option.
Now click on the Browse my computer for driver software option and then click on Let me pick from a list of device drivers on my computer.
Afterward, select a compatible driver for your computer named NVIDIA Graphics Card and then proceed.
Wait for the whole process to be completed and restart your computer to successfully apply the changes made.
Option 2 – Get the latest version of Graphics drivers from the manufacturer’s website
In case you don’t know the manufacturer of the Graphics Processing Unit or GPU of your computer, you need to check first. They’re usually NVIDIA, Intel, or AMD. So if your computer’s Graphics Processing Unit is manufactured by NVIDIA, you need to get the latest version from their official website.
Option 3 – Try to install the latest Graphics driver in Compatibility Mode
If you’re not able to install the Graphics drivers you’ve downloaded, you can try installing them again but this time using Compatibility mode. Follow the steps below to do so:
You need to download the driver and place it on your desktop.
After that, right-click on it and select Properties.
Next, switch to the Compatibility tab where you should see two options:
Compatibility troubleshooter, and let Windows figure out what works best for you. If it fails, follow the next.
Manually choose the version of Windows it was correctly working.
You also have the option to change the DPI settings and see if that helps. Then click the Apply and OK buttons.
Now right-click on the file and select the “Run as administrator” option to install. After that, you should now be able to change your screen aspect ratio to what you were using early on.
Note: If you have other programs that won’t work on the existing version of Windows, then make sure to run the program in a Compatibility mode.
Option 4 – Try to run the Program Compatibility Troubleshooter
You might also want to run the Program Compatibility Troubleshooter. This built-in troubleshooter is available in the Windows Update & Security section. From there, select Troubleshoot. This will find a list of programs for you and since you have already downloaded the driver files, just click on Not Listed located at the top of the program list. After that, browse and select the driver files and then let the program do its job.
If you encounter an error message saying, “The ordinal xxx could not be located in the dynamic link library C:/Program Files (x86)/Microsoft VS Code Insiderscode – insiders.exe“ and you see a reference of a missing DLL file, then this indicates that the software is trying to locate the related DLL file, however, it is missing, hence the error.
The error mentioned “Ordinal” which refers to the order of a number mathematically, e.g. 1st, 2nd, etc. And in this error message, the ordinal is referring to an Xth file of an XX.DLL file which is missing which is why you’re getting this kind of error.
When you get this particular error, it means that your computer is missing the Microsoft Visual C++ Redistributable program. As per the error message, XXX is a number that in turn is the Ordinal. There is also another common error related to Ordinal which says, “The ordinal 12404 could not be located in the dynamic link library mfc90u.dl”.
The error message could be referring to any DLL in the message. And since all these DLL files are part of the package, the error changes quite a bit as the Visual Studio looks for that DLL file. To fix this error, here are some suggestions that might be of help.
Option 1 – Try installing Microsoft Visual C++ Redistributable
As pointed out earlier, the error pops up when the Microsoft Visual C++ Redistributable program is missing on your computer. Thus, you need to download it from the official website of Microsoft. Once you’ve downloaded the Microsoft Visual C++ Feature Pack Redistributable Package, install it and then check if the error is now fixed.
Option 2 – Try to install OpenSSL
If you encounter the same error message but it points out that the LIBEAY32.DLL file is missing, then you have to install OpenSSL. In such a case, you will see the following error message:
“Ordinal not found. The Ordinal [Xxxx] could not be located in the Dynamic Link Library Libeay32.dll.”
Make sure that when you install OpenSSL, you do it into the Windows system directory since the Libeay32.dll file is related to security.
Option 3 – Try to check Windows Updates
There are instances when Microsoft rolls out the framework and related updates via Windows Updates. It could be that an update related to DLL is still pending which is why you need to check Windows Updates. To do so, go to Settings > Update and Security and from there check if there is any pending update. If there is, you need to install that update and then restart your computer if needed.
This command is used to register and unregister OLE controls for example the digital link library files and ActiveX controls in the Windows Registry. This command appears as the Regsvr32.exe file and is installed in the Microsoft Windows system file in the %systemroot%System32 folder.
The Regsvr32 command loads the library and tries to call the DllRegister Server and DllUnregister Server. In other words, it helps to register COM-based digital link library files to run different programs on your PC.
However, when the Regsvr32.exe file gets corrupt, you get the Regsvr32 to troubleshoot the error message on your computer screen. It can be displayed in various ways including the following:
“To register a module, you must provide a binary name.”
Error Causes
Generally, Regsvr32.exe becomes corrupt because either the load library, DllRegister Server or DllUnregister Server function fails. This indicates that the dll specified path was missing, incorrect, or couldn’t be found.
Here’s how the error messages are often displayed while registering a dll using Regsvr32.exe:
“The command-flag "%1" is not valid. Please review the command usage and try again.”
If this error message is displayed, it typically means that you entered an invalid combination of command-line arguments or switches when calling upon the Regsvr32.exe application.
“To register a module, you must provide a binary name.”
The cause of this error message is that you called the Regsvr32.exe function with no modules to register located in the command line arguments.
“The module "%1" failed to load.nn Make sure the binary is stored at the specified path or debug it to check for problems with the binary or dependent .DLL files.nn%2.”
This Regsvr32 error message indicates that Windows had problems with loading the modules that you have identified in the command line.
Further Information and Manual Repair
Here are 2 recommended solutions to fix the Regsvr32 error on your PC:
Re-run the command
You must re-run the Regsvr32 command from an elevated command prompt. For this, go to the start menu and type Command Prompt in the search box.
Now right-click the Command Prompt and click the option that says Run as Administrator to run the command on your PC. If it prompts you to enter an administrator password, type the password and then click Allow to run the command.
Register a 32-bit Dll using a 32-bit version of Regsvr32 on a 64-bit version of Windows
This may sound tricky but it is even simpler than the first solution discussed above. To register a 32-bit DLL using a 32-bit version of Regsvr32 on a 64-bit version of Windows, open an elevated command prompt.
After it’s opened, if you see the 32-bit DLL is located in the following path: %systemroot%System32 folder, move it to %systemroot%SysWoW64 folder. Once you change paths, run this command: %systemroot%SysWoW64regsvr32 <full path of the DLL>
Try following these 2 recommended solutions to immediately fix and repair this error on your computer.
The solutions should eliminate the occurrence of error messages such as “To register a module, you must provide a binary name.” It is so easy and effective and you can do it on your own without calling over a professional.
Congratulations, you have just fixed the Regsvr32 Error in Windows 10 all by yourself. If you would like to read more helpful articles and tips about various software and hardware visit errortools.com daily.
Now that’s how you fix Regsvr32 Error in Windows 10 on a computer. On the other hand, if your computer is going through some system-related issues that have to get fixed, there is a one-click solution known as Restoro you could check out to resolve them. This program is a useful tool that could repair corrupted registries and optimize your PC’s overall performance. Aside from that, it also cleans out your computer for any junk or corrupted files that help you eliminate any unwanted files from your system. This is basically a solution that’s within your grasp with just a click. It’s easy to use as it is user-friendly. For a complete set of instructions in downloading and using it, refer to the steps below
Perform a full system scan using Restoro. To do so, follow the instructions below.
Download and install Restoro from the official site.
Once the installation process is completed, run Restoro to perform a full system scan.
After the scan is completed click the “Start Repair” button.
0x Referenced Memory at 0x is an error code that occurs when the random memory addresses conflict.
This error causes running programs or browsers to crash. Referenced memory at error code is considered as a service violation error. It is displayed as the following:
“The instruction at 0xf77041d24 referenced memory at 0×00000000. The memory could not be read.”
Solution
Error Causes
The ‘referenced memory at’ errors is either triggered by:
Hardware failure
Problems with the RAM and the registry
Hardware failure may result if the driver is not installed properly. The problems in the RAM indicate registry issues that occur due to data overload in the hard disk and poor PC maintenance.
The registry saves all the information and activities you perform on your system on the hard disk.
This includes the junk files, temporary files, invalid registry entries, and files of both installed and uninstalled programs. These files accumulate and take over a lot of RAM space.
Also, the referenced memory at error can be considered to be a form of memory leak where unknown third-party software can take up the memory space that has been reserved for a particular program.
For example, if you have toolbars and add-ons installed in your browser, it can also lead to invalid registry storage in the registry.
If you don’t clean the registry, these unnecessary files can overload your data and lead to hard disk/RAM damage and corruption triggering obscure error messages like referenced memory at error.
Further Information and Manual Repair
Referenced memory is a critical error; if not resolved it can lead to serious PC damages like a system failure. To avoid this, it is advisable to fix it right away.
Here are a couple of ways to repair this issue on your system:
Cause: Hardware Failure
Solution: If the referenced memory at error is generated due to hardware failure then to resolve this error you must reinstall the driver that has caused the error to appear.
Let’s say if the error pops up because of the printer driver, reinstall it. For re-installation of the driver, simply go to the control panel and click on the Device Manager option.
Once you click it you will see a detailed page with a list of devices.
Now click on the printer (the problematic driver in this situation) to reinstall the driver software. Double click on it to open the properties dialog box and then click the driver tab and update the driver. Once you have updated the driver, try using the printer. Check if it works.
If it works and the referenced memory at the error code does not appear on the screen, this means the problem was with the hardware. However, if the error still pops up then this means the problem is deeper. It’s related to the registry.
Cause: Problems with the RAM and the registry
Solution: If the problem is with the RAM and the registry, then it is advisable to download Restoro.
Restoro is a new, next-generation, and highly functional registry cleaner.
It detects and removes all the registry issues, unnecessary and obsolete files saved in the hard disk taking up a lot of RAM space. It clears the RAM and cleans up the disk.
Furthermore, it repairs the damaged files, fragmented disk, and the corrupt registry in seconds enabling you to resume the program that you were running before the error occurred.
Restoro has a user-friendly interface and easy navigation.
To run and operate this system you don’t need any kind of technical expertise. In just a few clicks you can resolve the critical referenced memory at error on your PC.
It is compatible with all Windows versions
Click here to download and install Restoro on your PC and fix the referenced memory error code now.
Originally Microsoft has imagined its widgets menu as Microsoft-only widgets but it seems that they have changed their mind.
Due to the latest leak, it seems that Microsoft will open the widgets menu to 3rd party developers as well but at launch, it will be only official widgets. It was hinted that later widgets menu will be open to developers who want to bring their own stuff into it.
Distribution, date, and technology that will need to be used in order to create your widget have not been discussed nor leaked at a given time but in some way, I am very glad that at least some customization will be in Windows 11.
It is funny and amusing how some things that were in Windows Vista are getting back like glass design, round corners, and widgets. Let’s just hope Windows 11 will be a better Windows than Vista was.


 The first new feature that was slid in is Always on top utility. With this cool utility, you can keep the window as the name suggests, always on top of other windows. To enable this cool feature all you have to do is press the key combination of ⊞ WINDOWS + CTRL + T and an active window will be now always on top of all other windows. To reverse and unlock this window from being always on top just press key combination again.
A second new feature is a really great one and my favorite thing to happen in power toys. Often we are making the search in our browsers to find stuff, things, maybe some explanations, information, etc. The newest update in power toys brings this to a whole new dimension. While you are on PC you just simply need to type ?? followed by questions like: ?? When doctor strange 2 is coming out and that will launch your default browser with your chosen search engine and provide you with the answer.
Third and final thing is G-code support in the file explorer preview pane and thumbnails, meaning that if you work with CNC equipment you can now have a thumbnail preview of the code itself inside File Explorer.
And that’s it for now, thank you for coming and reading, Take care and I hope to see you next time.
The first new feature that was slid in is Always on top utility. With this cool utility, you can keep the window as the name suggests, always on top of other windows. To enable this cool feature all you have to do is press the key combination of ⊞ WINDOWS + CTRL + T and an active window will be now always on top of all other windows. To reverse and unlock this window from being always on top just press key combination again.
A second new feature is a really great one and my favorite thing to happen in power toys. Often we are making the search in our browsers to find stuff, things, maybe some explanations, information, etc. The newest update in power toys brings this to a whole new dimension. While you are on PC you just simply need to type ?? followed by questions like: ?? When doctor strange 2 is coming out and that will launch your default browser with your chosen search engine and provide you with the answer.
Third and final thing is G-code support in the file explorer preview pane and thumbnails, meaning that if you work with CNC equipment you can now have a thumbnail preview of the code itself inside File Explorer.
And that’s it for now, thank you for coming and reading, Take care and I hope to see you next time. 
 Once you are in the control panel, switch your view to large icons and locate Indexing options.
 Inside indexing options, click on advanced.
 In advanced options click on the rebuild and confirm.
 Leave your computer to finish and your searches should be working fine now.


 Originally Microsoft has imagined its widgets menu as Microsoft-only widgets but it seems that they have changed their mind.
Due to the latest leak, it seems that Microsoft will open the widgets menu to 3rd party developers as well but at launch, it will be only official widgets. It was hinted that later widgets menu will be open to developers who want to bring their own stuff into it.
Distribution, date, and technology that will need to be used in order to create your widget have not been discussed nor leaked at a given time but in some way, I am very glad that at least some customization will be in Windows 11.
It is funny and amusing how some things that were in Windows Vista are getting back like glass design, round corners, and widgets. Let’s just hope Windows 11 will be a better Windows than Vista was.
Originally Microsoft has imagined its widgets menu as Microsoft-only widgets but it seems that they have changed their mind.
Due to the latest leak, it seems that Microsoft will open the widgets menu to 3rd party developers as well but at launch, it will be only official widgets. It was hinted that later widgets menu will be open to developers who want to bring their own stuff into it.
Distribution, date, and technology that will need to be used in order to create your widget have not been discussed nor leaked at a given time but in some way, I am very glad that at least some customization will be in Windows 11.
It is funny and amusing how some things that were in Windows Vista are getting back like glass design, round corners, and widgets. Let’s just hope Windows 11 will be a better Windows than Vista was.