Hello and welcome everyone, today we will be talking about dreaded keyloggers, why they are dangerous, and how to know if you might have one in your system. Keylogger is a malicious application placed in your system and hidden with only one goal in mind, to get information about what are you typing and by that means for a person who infected you to get information about your credit card information or other sensitive data. They can be introduced into your systems in various ways and often can not be detected easily. Modern antivirus applications have ways of detecting them and removing but this tutorial aims to teach you how to spot them all by yourself since new keyloggers are produced daily and sometimes relying on antivirus alone is not enough.
Unlike viruses and trojans, keyloggers are not heavy on system resources and you will not feel slow down on your computer if you have one which makes them harder to sport with regular work. Some of them can be even tracking you on the website and not even be physically present on your computer. Generally, we could categorize keylogger into 4 categories:
Web browser-based keylogger. Some websites would have CSS scripts, input web forms, or so-called man in the middle keylogger. Lucky for us even Windows defenders with the latest update can detect this type of keylogger and successfully deal with it and how keylogger itself is not present on our system we are safe.
General spyware keylogger. This keylogger is present in your system, usually, it infected it via email attachment, social media download, torrent download, some malicious so-called fixer application, etc. Most antivirus applications and windows defenders can detect these types as well and remove them successfully.
Kernel-level keylogger. This keylogger is a more dangerous type they tend to operate underneath Windows as a rootkit and can go undetected by antivirus and windows defenders.
Hypervisor-based keylogger. This is the most dangerous keylogger, they use virtualization techniques to hide and mask themselves as a replica of the operating system and they scan all keystrokes by the user. These are very rare keyloggers but they do exist.
If you suspect that you have a keylogger or just want to check your system for precaution reasons follow these tips and guides and luckily you will solve your issue in no time and your data will be safe.
Use Task Manager to find suspicious entries.
Task manager is a great application implemented in Windows that is constantly monitoring and showing all services, applications, and processes currently running on your system and thus a great tool to monitor your system if you know how to use it.
First, open task manager by pressing CTRL + SHIFT + ESC
Then take a good look into it, try to find suspicious names, probably duplicate of running application, something like Windows logon application, or keylog or anything similar which seems out of ordinary. If you manage to find a suspicious running application right-click on it and close it. Also while you are in task manager jump into the startup tab and check to see are there some unusual applications starting with your Windows, if you find anything, disable it right away.
This is the most simple and quickest way to get some information right away if you suspect to have some simpler keylogger in your system.
Use the command prompt to monitor your network.
In order to check connections to your computer and find potential suspicious ones start the command prompt in administrator mode, press ⊞ Win + X, and choose command prompt (administrator).
type in netstat -b and press ENTER. All website and application connections to your computer are now visible. ignore svchost, edge browser, windows store, etc ad check the IP of the remaining ones using the internet.
Use keystroke encryption.
Install encrypting software and even if you have a keylogger, the application will encrypt each stroke and all that attacker will get is gibberish
Please remember to always download files from trusted sources, do not open unknown emails, and do not share your information publicly. Take common protection steps in order to protect yourself in the digital world.
Error 0x0000001e is when you start the Windows XP Setup and you see a message which says something like:
STOP: 0x0000001E (0x80000003, 0xBFC0304, 0x0000000, 0x0000001)
Solution
Error Causes
You are most likely to face this error if you restart your PC while the Windows Setup is still under process and yet to complete.
Other causes of this error include any of the following conditions:
The drive on which you are installing Windows has insufficient disk space to accommodate the installation.
An incompatible or outdated third-party driver (or more) is installed on your PC which is conflicting with the installation. For instance, this could be a problematic video driver.
The system BIOS has incompatibilities with the installation.
Further Information and Manual Repair
This error is also called the “Bug check code”.
The STOP 0x1E signifies that there was an unknown or illegal processor instruction detected by the Windows XP kernel. You will see the exception address which shows up to indicate the root of the problem which is usually a driver or faulty hardware.
You should note this address down as well as the link date of the faulty driver or image which includes it.
If at any point it becomes impossible for you to handle and you end up contacting the Windows support center to help you out with the process then this information will help you out in making things a lot easier while the support team tries to troubleshoot the problem.
The parameters included in the STOP 0x1E error message are the following:
is the exception code which couldn’t be handled.
shows the module’s address where the exception took place.
signifies the exception’s parameter 0.
represents the exception’s parameter 1.
You can use this information which usually is provided in error 0x0000001e message to pinpoint the root cause of the problem and troubleshoot it.
In order to fix this error, you need to follow either one of the following procedures as needed according to your situation.
Clean Up Your Disk
If your disk doesn’t have ample space to accommodate the installation then you should free up some of the space on your disk to make sure the Windows can be installed on it.
You can also reinstall the Windows on another disk that has sufficient space.
Get Rid of the Third Party Driver
If the error 0x0000001e message gives you the name of the driver due to which the installation process is being halted, then get rid of that driver by disabling it or removing it.
If the problem is resolved by this then you should contact the manufacturer of the third-party driver and ask them about any newer versions of the driver that wouldn’t conflict with the installation of Windows.
Upgrade System BIOS
Upgrading your system BIOS is something that you can’t do on your own. You will need to find out more about how you can upgrade. For this, you should contact either your PC’s manufacturer or your motherboard’s manufacturer.
If nothing else works, you can always make use of the Microsoft Debugging Tools which will provide you ample information about the error message.
You will find the Debugging Tools and further information about them including the downloading and installation process on Microsoft’s website.
One of the preferred ways to upgrade Windows 10 is by creating a bootable USB drive. However, you might change your mind when you encounter an error during the Windows 10 Setup that says, “We can’t find a USB flash drive”. Worry not for this error can be fixed using some suggestions that will be provided in this post.
The funning thing about this error in Windows setup is that the computer says it’s not there when it’s clearly there. To fix this problem, you need to check if the USB device is accessible on your computer or you can also try a different USB device. In addition, you could check if there are any issues with both the USB 3.0 and USB 2.0 ports as it could be the reason why you’re getting the error or fix the bad sectors in the USB drive as well as see if the USB drive is set as the primary drive.
Option 1 – Try to check if the USB is accessible on your PC
The first thing you can do to resolve the problem is to check if you can access your USB device from your computer. All you have to do is open File Explorer and check if the USB device is listed there or not.
Option 2 – Try to connect a different USB device
The next thing you can do to fix the error is to try connecting a different USB device, specifically the one that has more significant storage space. You also have to make sure that it’s working on a different PC.
Option 3 – Fix any issues with the USB 3.0 and 2.0 ports
Although the USB 3.0 ports are compatible with the USB 2.0 ports, it does not necessarily mean that there wouldn’t be any problem when you use them which is why it’s best to fix any issues in them or better yet, use a compatible drive.
Option 4 – Try to fix the bad sectors in the USB drive via CHKDSK
When it comes to some issues concerning the hard drive or removable devices, there is a utility in Windows that might help which is called “chkdsk”. To use it, follow the steps below.
Tap the Win + S keys to open the Search box.
Then type “command prompt” in the field and from the search results that appear, right-click on Command Prompt and select “Run as administrator”.
After opening an elevated command prompt, copy and paste the following command and hit Enter:
Note: In the command given above, “[/F]” will try to fix the system errors while “[/R]” will be the one to fix the bad sectors.
Now if you are prompted to run CHKDSK after your reboot your PC, just tap Y and reboot your PC.
If CHKDSK is not able to find any errors, tap the Win + E keys and navigate the access window. From there, right-click on the concerned drive and click on Properties.
After opening Properties, click on the tab Tools and then click on the “Check” button under the Error-checking section.
Wait until the process is completed and then restart your computer.
Option 5 – Try checking if the USB is set as the primary drive
You might also want to check if the USB drive is set as the primary drive because if it is, then it won’t appear on the list. It could also be that the USB drive has a primary disk in it. To undo it, you need to use the DISKPART utility.
In the Start Search, type “command prompt” and right-click on Command Prompt from the search results, and then select the “Run as administrator” option.
Next, execute the “diskpart” command to initiate the DISKPART utility.
After that, type the “list disk” command and tap Enter to display the list of disks on the computer. You have to take note of the drive number or letter of the concerned USB drive.
Once done, type the “select disk <X>” command where X is the drive letter or number and tap Enter.
Then execute the “list partition” command to see the list of all the partitions in your computer. It should be listed as 0, 1, or 2. 0 is the primary partition.
Now type the “select partition 0” command and tap Enter and then type “delete partition” to delete the selected partition.
You can do the same to the other partitions as well and when you’re done, execute the format command to turn the USB drive into a standard one.
What software are you using to keep your information and all your files and memories safe?
None? Yikes. Let’s hope no damage has been done to your data yet then. Because with how the digital world has evolved, your data might be getting leaked and you have no idea.
Why do you need to invest in security software?
There’s really no good excuse not to purchase a quality platform for PC protection. Especially since top security solutions are available at such affordable prices nowadays, your wallet would barely even notice it.
At this point, only people who barely use their PCs and have zero sensitive information on them can get away with simply using the built-in Windows 10/11 security software. But we guarantee that those people are extremely hard to find and that you’re not one of them, and here’s why.
Even if you don’t use your computer for things that are very obviously sensitive, such as internet banking, you still have some personal data at risk of being stolen. How so? Well, think about the data you enter into your social media profiles, for example. How devastating would it be if somebody got a hold of any of it? Yep, that’s what we thought.
Credit: FLY:D on Unsplash
In the hands of a skilled cybercriminal, your phone number alone could put you at risk of scams, ransomware, identity theft and more. Also think about the stuff you share in texts and social media chats. Think about the websites you visit and how many times you may have accidentally clicked on an ad, which could very well contain malicious software. Those all seem harmless until someone’s actually used them against you.
Now imagine the dangers involved when you actually store truly confidential data on your PC and browsers. Sends shivers down your spine, doesn’t it?
In the case of a successful cyberattack of whatever type (virus, phishing, worms, etc.), there’s so much that is at stake. Businesses/legal persons will suffer from financial loss and damaged reputation, at the very least. Natural persons may be threatened or exploited, get their banking or medical information and even their identity stolen, etc. And that’s just the tip of the iceberg.
These are our biggest reasons for investing in Windows PC protection software:
Cyberthreats are constantly evolving to the point where built-in or free software won’t cut it anymore.
Those working remotely can have peace of mind knowing both personal and business data is completely secure.
Businesses using top security solutions ensure their customers trust them.
Data breaches are a pain in the you-know-what to handle. Fighting a cyberattack and going back to normal is a demanding process, and not to mention the stress it’ll cause. We’d rather prevent all that by using trustworthy security products!
It helps parents worry a little less about their children’s safety in the online world.
Added bonus: with most products, you get an ad-free browsing experience!
Obviously, there are a lot more reasons to get your PC secured. But we think you get it. So let’s cut to the chase and take a look at our 6 favorite protection solutions and the wonders they can do for you.
*Note that in this article we’re looking at products primarily suited for households and home offices, some for small businesses. No enterprise solutions will make the list today, but stay tuned for a future article on those.
Top 6 best PC protection solutions
1. Bitdefender Total & Internet Security\
One of the biggest security product vendors out there, Bitdefender offers several awesome solutions. We want to introduce two of our favorites, Bitdefender Total Security and Bitdefender Internet Security.
Bitdefender Total Security is great for both households and smaller offices. You can choose to protect 5 or 10 devices, and not necessarily just Windows devices. It also works for macOS, Android and iOS. It offers a range of powerful features, such as:
Real-time data protection
Webcam and microphone protection
Device optimization options
Anti-phishing/-fraud/-spam technology
Ransomware protection
Anti-loss and anti-theft tools
VPN and privacy firewall
Anti-tracking technology
Parental controls
24/7 support
Bitdefender Internet Security shares almost all of these features, but there are a few important differences to note. Unlike Total Security, Internet Security has more options in terms of the number of protected devices: 1, 3, 5 or 10. However it’s only compatible with the Windows platform and it doesn’t offer device optimization tools or anti-theft options. Whether or not this is a deal-breaker depends on your needs alone - we still find it a great security tool.
Credit: Firmbee.com on Unsplash
2. ESET Internet Security
An award-winning Windows security product, ESET Internet Security is essential on this list. It has an outstanding protection rate of 99.9% and a range of amazing options you’ll definitely want to make use of. It can be installed on up to 10 devices, making it an awesome tool for your household, home office or a small business. It’s also compatible with macOS and Android.
These are ESET Internet Security’s best features:
Protection against ransomware and spyware
Protection against malware specifically designed to avoid detection
In-depth scans when the computer is not in use
Firewall to prevent unauthorized access to your PC
Anti-spam tool
Anti-phishing and botnet protection technologies
Tool to scan your router and smart devices for vulnerabilities
Special browser for secure internet banking
Parental controls
Prevention of unauthorized webcam access
If you ask us, ESET has it all!
Credit: rupixen.com on Unsplash
3. Kaspersky Total & Internet Security
Having a deja vu? Didn’t you just read Total Security and Internet Security somewhere? Oh, that’s right - the first entry on our list! But here we’re talking about Kaspersky, a vendor you’ve also definitely heard about before.
Just like Bitdefender, Kaspersky is another one of those renowned names in the cybersecurity world that always make it to every ‘best of’ list. And for good reason - its products really fulfill their purpose. So let’s take a closer look at the two we chose.
These are the features both Kaspersky Total Security and Kaspersky Internet Security have in common:
Real-time virus and spyware blocking
Webcam protection
Wi-Fi security notifications
Advanced identity theft protection
Free technical support on several channels
Remote security management
Multiple devices (up to 10)
The main difference between Kaspersky Total Security and Internet Security is that the former offers more capabilities. These are the features KTS offers that KIS does not:
System cleanup
File shredding
Password management
Data backup and encryption
Both are excellent security tools, though we do prefer KTS a little more because of these additional options.
4. Norton 360 Deluxe
Of course one of the industry-leading solutions makes the list. Norton 360 Deluxe can protect up to 5 devices, be it Windows, iOS, macOS or Android. It’s worth noting that its features are best developed for Windows. Here’s what you get with Norton 360 Deluxe:
Protection against viruses, hackers, malware
100% virus protection promise
VPN included for all devices
Unlimited VPN on Windows
Password manager
Parental controls
So is there anything aside from these standard protection features that makes it such a favorite among us techies? Let us tell you! Norton added a little bit of spice here with two really powerful capabilities. The Deluxe product offers 50GB of cloud backup and dark web monitoring. The latter means the software notifies you if any of your personal information is found on the dark web, which helps protect you against identity theft.
Credit: Luke Peters on Unsplash
5. McAfee Antivirus
Don’t be misled by the name of this product. Antivirus software may have started as protection against viruses only, but it’s developed quite a lot. The name simply stuck. All that to say that McAfee Antivirus - another award-winning security solution - protects you against several different threats.
The basic and essential plan allow 1 and 5 devices respectively, while McAfee+ Premium and Advanced work on an unlimited number of devices. The latter two also offer more capabilities, as you can imagine. Here’s what you can expect from all of them:
Secure unlimited VPN
File shredder to delete sensitive files completely
Ultimate safety while browsing
Protection against hackers
100% virus protection promise
Advanced firewall to block dangerous traffic
Online support from specialists
Protection score (shows how safe you are and detects vulnerabilities)
Identity monitoring (notifies you if any of your information is on the dark web)
Password management
Unlike the previous products, McAfee Antivirus does not offer parental controls. Otherwise it’s a pretty strong and comprehensive protection tool and might just be the right choice for you!
6. Trend Micro Maximum Security
Last but definitely not least, we’ve got Maximum Security by Trend Micro. And yes, you guessed it, Trend Micro is also an award winner in terms of cybersecurity. Its products have been recognized as industry-leading security solutions by AV-Test since 2003. Among all its fantastic solutions, our favorite for households or small offices is Maximum Security.
You can use Trend Micro Maximum Security to protect 3-5 devices for a year or two years before needing to renew your license. Aside from Windows, it’s compatible with iOS, Android, Mac and Chromebook devices. Here’s what you can expect from this protection software:
Powerful malware protection
Phishing detection and prevention (email)
Password management and protection
Maximum security for online banking and shopping
System optimization
Social media privacy protection
Parental controls
24/7 technical support
No notifications during gaming
It’s truly one of the most effective platforms out there dedicated to protecting your digital life. Using this product, ransomware, identity thieves and malicious websites don’t stand a chance.
The bottom line
If you’ve made it all the way here, congratulations, you’ve made the right choice: to invest in securing your valuable data! Now the question is: which one of these 6 awesome antivirus/antimalware products to select?
The paradox of choice is a very real thing - we feel you. As mentioned, it comes down to what your specific needs are. So before you go ahead and purchase your security software, make sure to explore all options.
And if you really can’t handle the decision-making anxiety, feel free to reach out. We’ll happily assist you in finding the right product to keep your digital life secure!
If you would like your computer to be discoverable on your network and use print and file sharing you will have to change your network profile on your computer from public to private.
Follow the provided guide step by step to change your network profile setting:
Switch to private profile in Windows 10
Locate the Wi-Fi icon in your system tray and click on it. Click on properties on your WI-FI network to open the network menu. Inside the menu in the Network profile section enable the Private option.
Your changes will be automatically saved.
Switch profile to private in Windows 11
Find the WI-FI icon in the system tray and right-click on it, then choose Network and Internet Settings. Network & Internet page with open, find your network name at the top and select properties.
On the WI-FI page, in the Network Profile Type section choose Private. As in Windows 10, your changes will be automatically charged, and you can start using them immediately.
Another way around
If you want to switch back to a public profile follow provided steps but disable the private option.
For PC users that are blind or have low vision, the Narrator accessibility feature in Windows 10, lets you use your PC without a display or mouse to complete common tasks – it reads and interacts with things on the screen, like text and buttons. The narrator can be used to read and write an email, browse the internet, and work with documents.
In Windows 10, there are a lot of options for Narrator that you can customize. You can change its keyboard shortcuts, personalize Narrator’s voice, enable Caps Lock warnings, and more. You can choose the voice for the Narrator, adjust the speaking rate, pitch, and volume.
To change the default audio output device used to play the voice of the Narrator in Windows 10:
Press the ⊞ WINDOWS + I
From the Settings menu, click Ease of Access.
Click Narrator on the left pane.
In the Narrator window, on the right pane, toggle the button to On to enable Narrator if required.
Scroll down to the Personalize Narrator’s voice section.
For the Select where you hear Narrator’s voice option, click the drop-down and select the audio output device you want from the list. Please know that you will not be able to choose if you do not have multiple audio output devices connected to your Windows 10 computer.
Exit Settings when done.
If you would like to read more helpful articles and tips about various software and hardware visit errortools.com daily.
This specific Windows 8.1 or Windows 10 error code has to do with the number of times you can use your license number to install windows programs on computers. All windows activation codes are licensed to be used one time for a device, to control piracy, but what happens when your PC crashes, or you have to change a hard drive component and are forced to re-install Windows Operating System. Luckily, there is an easy fix for this issue.
Solution
Error Causes
Basically, when you need to re-install the Windows operating system that you have previously bought and installed on another computer an error code will be displayed with a message telling you that the activation server determined that the specific key could not be used for activation. This occurs because the key has already been used on that computer, or a different one, to install operating systems. There are a few easy fixes for this issue, and most of them should be easily completed on your own.
Further Information and Manual Repair
There aren’t many explanatory ways to repair Error Code 0xc004c008. Below are two methods to go about addressing this issue.
Methods 1:
The first step is to open the “Run” Window. You can do this in two ways. First, press the “Window” key and press the “R” key simultaneously. This will open the “Run” menu. Or you can start the “run” window by going to the Start menu and selecting Run.
In the Run window type “SLUI 4” and click enter.
A Phone Activation window will open up, after which you'll need to select a few options.
First chose the country in which you registered the product for the first time.
Choose your country and a phone number will be displayed specific to your choice. You will now need to call the number provided.
After you’ve dialed you will be prompted to write your “Installation ID”. Type your “Installation ID” on the phone.
After that step, you will be asked how many copies of Windows have been installed using this license. Choose “1”, should anything else be chosen but “1”, this will not work.
After the process is completed, you will be given a confirmation ID and should be able to proceed as normal with installation. You will have a workable product key again.
Install whatever copy of the Windows Operating System you are attempting to with the new product key.
Method 2:
If the first method did not work, the only other option is to call Microsoft and walk through the process with a technician. To do this, dial “1-800-936-5700”. Explain the error that you received and the steps in the update process during which it was displayed. The technician will be able to walk through the steps from getting a new product key to finishing the installation.
If you're not a tech-savvy individual but would like to solve this problem without the aid of a technician, download a powerful automated tool to fix error code 0xc004c008.
Have you ever deleted a file by mistake? Do not feel bad, we all have, but what if you deleted the file by mistake and then you went to Recycle bin to restore it only to find out that the bin is empty?
If you experienced this kind of issue then you know how unpleasant and frustrating it is but do not worry, we are here to help and provide you with solutions to this problem and hopefully get your file back.
Follow the next steps from first to last since they are organized in a way to minimalize the permanent deletion of lost files.
Refresh Recycle bin view
If you spend any amount of time on this site reading through articles, you know I am a big fan of simple and effective solutions and there is nothing simpler than a single press of a button. Open your recycle bin and press F5 to refresh view or right-click anywhere inside and choose refresh. If your file does not appear with this method go to the next step.
Set Windows to show hidden system files
In order for this to work first, you will need to open File Explorer by pressing ⊞ WINDOWS + EWhen File Explorer opens go to VIEW > OPTIONS. Inside options select “Show hidden files, folders, and drives”, uncheck “Hide protected operating system files (Recommended)”, and click APPLY > OK
Go to the recycle bin and check to see if files have managed to show up.
Check if Don't move the file to the recycle bin is enabled
Right-click on recycle bin and choose properties, under properties, there is the option that says Don’t move files to the Recycle Bin, Remove files immediately when deleted. This option is not selected by default, but it could be turned on by someone else or by mistake. If you see that this option is enabled sadly your file is gone and you will have to get the file back by using some third-party undelete application, uncheck this option to prevent future deletion of files by mistake.
Increase recycle bin size
This will not help you to get your file back sadly but it will help you in storing more files in recycle bin. This is helpful since if you reach your recycle bin limit all further files will be permanently deleted and not been able to get them back. So by increasing bin size you will have more space for deleted files to be saved. To do that, right-click on Recycle Bin, select Properties. Now, increase the Maximum size from the Custom size option, and click Apply and OK.
Reset recycle bin
To reset and fix corrupted recycle bin do the following:
Press ⊞ WINDOWS + X to open the secret Windows menu and click on command prompt (admin)In the command prompt type in the following: rd /s /q C:\$Recycle.binReboot your system
This post will walk you through fixing the rtwlane.sys Blue Screen error. This kind of BSOD error belongs under the category of the “DRIVER IRQL NOT LESS OR EQUAL” Stop errors. If you encounter this kind of Stop error then it means that a kernel-mode driver tried to access pageable memory at a process IRQL that was too high.
The main issue with the rtwlane.sys Blue Screen error has something to do with the Realtek PCI-E Wireless LAN PCI-E NIC driver. In other words, it has some issues with the wireless card of your computer which is built by Realtek. And since it this error concerns your wireless card, you might also experience some connectivity problems with your computer as the wireless card refuses to find any network connections and even randomly disconnects. To resolve this problem, you need to refer to the given options below.
Option 1 – Run the Blue Screen Troubleshooter
The Blue Screen troubleshooter is a built-in tool in Windows 10 that helps users in fixing BSOD errors like rtwlane.sys Blue Screen error. It can be found on the Settings Troubleshooters page. To use it, refer to these steps:
Tap the Win + I keys to open the Settings panel.
Then go to Update & Security > Troubleshoot.
From there, look for the option called “Blue Screen” on your right-hand side and then click the “Run the troubleshooter” button to run the Blue Screen Troubleshooter and then follow the next on-screen options. Note that you might have to boot your PC into Safe Mode.
Option 2 – Try to update or rollback your Network driver
If you have updated the driver software as of late and you suddenly got this BSOD error, you might have to roll back the device driver – in other words, switch back to the previous working version. To do that, follow these steps:
Tap the Win + R keys to launch the Run window and then type in the “MSC” command and hit Enter to open the Device Manager window.
Under the Device Manager, you will see a list of drivers. From there, look for the Network Adapters and expand it.
From the list of Network Drivers, look for “Realtek <Model> Wireless LAN 802.11n PCI-E NIC” and then right-click on it and select Update Driver.
Restart your PC and see if it helped in fixing the BSOD error.
Note: If you see any of the following entries under the Network drivers, you might want to download their latest available versions from each one of their manufacturer’s websites.
Realtek High-Definition (HD) Audio Driver
Realtek Card Reader Driver
Realtek Local Area Network (LAN) Driver
On the other hand, if updating the Network driver didn’t help, you can also try to roll back to its previous version.
Open the Device Manager again and then look for Network Drivers.
Next, select Realtek <Model> Wireless LAN 802.11n PCI-E NIC from the list of Network Drivers and then double click to open a new mini window.
After that, make sure that you’re on the Driver tab and if you are not, just navigate to it then click the Roll Back Driver button to switch back to the previous version of the Realtek driver.
Now restart your computer to successfully apply the changes made.
Option 3 – Try running the System File Checker Scan
The SFC or System File Checker scan could detect and automatically repair damaged system files that could be causing the Netwtw04.sys failed BSOD error. SFC is a built-in command utility that helps in restoring corrupted files as well as missing files. It replaces bad and corrupted system files with good system files. To run the SFC command, follow the steps given below.
Tap Win + R to launch Run.
Type in cmd in the field and tap Enter.
After opening Command Prompt, type in sfc /scannow
The command will start a system scan which will take a few whiles before it finishes. Once it’s done, you could get the following results:
Windows Resource Protection did not find any integrity violations.
Windows Resource Protection found corrupt files and successfully repaired them.
Windows Resource Protection found corrupt files but was unable to fix some of them.
Cortana is your personal digital assistant fully integrated into Windows 10 designed to help you make your life easier. The more you use it, the more Cortana can learn about you, and the experience becomes more personalized and accurate. It can perform a variety of tasks, and it's full of handy tricks, but perhaps one of the best features is the advanced speech recognition that enables Cortana to understand the context of a natural voice conversation.
On Windows 10, and across platforms with the Cortana app on iPhone and Android, the assistant can understand virtually any voice command and perform tasks. For example, by just speaking you can find facts, create reminders and manage your calendar, launch applications, change settings, and a lot more.
Now, if you're looking for an official list of all the voice commands Cortana supports, you'll never find it because it doesn't exist. Cortana can understand natural language and context, there's no particular set of commands to make things happen. In a sort of way, you are speaking to Cortana as you would to any other person.
Invoking Cortana
Before using voice commands, it's important to know the ways in which you can invoke Cortana using natural language:
You can click the microphone icon in the taskbar next to the Start menu.
You can use the Shift + ⊞ Windows + C keyboard shortcut to open Cortana in listening mode.
You can use the Hey Cortana feature, which lets you invoke the assistant by simply saying Hey Cortana followed by the command. For example, Hey Cortana: How's the weather?.
On Windows 10 Mobile devices, you can press and hold the search button to open Cortana in listening mode.
Comprehensive list of Cortana voice commands
The following list of commands are examples you can use to learn how to control Cortana with voice commands. Keep in mind that there isn't a specific way to speak the commands. For example, Hey Cortana: Let me listen to some tunes is the same as asking for a more systematic command like Hey Cortana: Play music.
Cortana basic voice commands:
Getting the time for any location:
"What time is it?"
"What time is in New York?" or "What time is in Greece?"
Getting weather information for any location:
"What's the weather like?"
"What's the weather in Madrid?" or "What's the weather in Slovakia?"
"When does the sun set?"
"Is it hot in Hawaii?"
"How's the weather looking for tomorrow/next week?"
Opening (Store and desktop) apps and websites:
"Open Photoshop" or "Go to Firefox"
"Open errortools.com."
Getting news information:
"Show me top headlines."
"Show me the latest news."
"Show me weather news."
"Show me Blizzard stock."
"Show me bitcoin exchange rate."
"What was the score of the last Brazil football game."
Creating a note:
"Create a note."
"Create Shopping note."
"Create Shopping note: Buy a basket of eggs"
"Take a note."
"Draft a note."
"Write a note."
Translating to a different language:
"Translate."
"Translate Hello to German"
"Translate Where is the nearest park? to Spain"
Doing math:
"What's 34% or $764.89?"
"What's 43 times 59?"
"What the square root of 26509?"
"What's 29 times 6 divided by 12?"
"Convert 6.9 cups to fluid ounces."
"How many miles are in 89 Kilometers?"
Defining a word:
"Define Space."
Tracking packages:
"Where is my package?"
"Show me my packages."
Cortana search voice commands:
Finding documents, photos, videos:
"Find photos from August 1998."
"Find cat videos."
"Find document called Collection of poems."
Searching the web:
"Search the web for Heroes of Might and magic."
Finding facts:
"How tall is Mount Everest?"
"Who is Steve Jobs?"
"When Arnold Schwarzenegger was born?"
"Who is Mercedes CEO?"
"When does spring begin?"
"What's the capital of Zimbabwe?"
"When is Thanksgiving?"
It's important to note that Cortana is capable of conversational understanding, which means that you can also ask follow-up questions without having to be very specific.
For example, if you ask Cortana: "Who is the president of the United States", you can then ask a follow-up question, such as "Who is his wife?" or "When was he born?" and the assistant should be able to answer those questions accurately.
Discovering food places nearby:
"Find food places near me."
"Find restaurants near me."
"Find bars near me."
"What's a good restaurant near me?"
"What's interesting nearby?"
"Show me Chinese restaurants near me."
"Show me Italians restaurants in Los Angeles."
Cortana health and fitness voice commands:
"How was my sleep last night?"
"What was my step count yesterday?"
"How many calories did I burn today?"
These commands require a tracking device, such as the Microsoft Band 2 to enable your fitness and health activities, and you need to connect Cortana with the Microsoft Health (Microsoft Band) service.
Cortana settings voice commands:
Opening the Settings app:
"Open Settings."
"Open Action Center."
Controlling settings:
"Turn on/off Bluetooth"
"Turn on/off Wi-Fi"
"Turn on/off Airplane Mode"
Cortana reminders voice commands:
Creating reminders:
"Remind me to wash the car."
Creating location-based reminders:
"Remind me to buy CDs next time I go to Walmart."
Creating person-based reminders:
"Remind me to ask for vacation time next time I talk to Goran."
Creating time-based reminders:
"Remind me to watch the basketball game at 6 PM."
"Remind me to buy the food for the d&d session on Sunday at 3 PM."
Viewing reminders:
"Show me my reminders."
Cortana calendar voice commands:
Viewing calendar events:
"How's my schedule looking today?"
"Show me my appointments for next week."
"When is my dentist appointment?"
Adding new calendar events:
"Add dental appointment for Monday at 2 PM."
Moving calendar events:
"Move dental appointment to Friday at 5 PM."
Cortana alarms voice commands:
Creating alarms:
"Set an alarm for next Monday at 5:30 AM."
"Set an alarm for Saturdays at 9 AM."
Viewing alarms:
"Show my alarms"
Removing alarms:
"Cancel alarm for Saturdays at 9 AM."
Cortana timer voice commands:
Creating a timer:
"Set a timer for 5 minutes."
You can only start a one-timer at one point in time. If there is a timer already running, Cortana will ask you to restart it at a new time.
Viewing timer:
"Show timer."
"How much time is left on the timer?"
Canceling timer:
"Stop timer."
Cortana location voice commands:
Knowing your exact location:
"Tell me where am I?"
Cortana messaging voice commands:
Sending text messages:
"Send a text to Milan: I'll be late for lunch today."
Sending quick emails:
"Send email to Milena: See you later tonight."
"Send email to John and Claudia: How is the project coming along?"
Cortana location voice commands:
Getting directions:
"What's the traffic like on the way home?"
"How do I get home."
"How long would it take to drive to Madison Square Garden?"
"Get me directions to Port Authority."
"How do I get from my location to Long Beach, New York?"
"How far away is the moon?"
"Show me walking directions to the nearest gas station."
"Show me public transit to 11 Times Sq, New York, NY 10036."
"Show me the map of San Francisco."
Tracking flights:
"Track flight 1056."
"Is my flight delayed?"
"Is my flight on time?"
Cortana entertainment voice commands:
Controlling music:
"Play Metallica."
"Put some Symphonic music."
"Shuffle music."
"Play and Justice for all by Metallica."
"Stop music"
"Pause music"
"Pause song."
"Play next"
"Next track"
"Skip track."
Identifying what's playing:
"What is this song?"
"What's playing?"
Movies & TV:
"What's Blade Runner run time?"
"Who was the director of Gladiator?"
"What movies are playing near me?"
"What are the showtimes for Star Trek lower decks?"
Cortana technical support voice commands:
"How do I install a printer?"
"How do I project my screen?"
"How do I change my background?"
"How do I update Windows?"
"How do I make a backup?"
"How do I change default apps?"
"How do I change Privacy?"
"How do I connect a wireless device?"
Sometimes asking a "How to do I" question will result in a web search response.
Page Fault in Non-Paged Area is a blue screen error usually happening with faulty drivers but it can come from different issues like faulty RAM.
In this short article, we will cover usual ways on how to approach and solve this error.
Solving Page fault in Non-Paged Area
Rollback using system restore
Simple and easy solution, roll back to the previous system restore point where Windows was stable and working.
Fix Page Fault in Non-Paged Area using device manager
Press ⊞ WINDOWS + X to open the hidden menu
Click on device manager
Find a device with a question mark and right-click on it
Click on the rollback driver button
Fix via command prompt
Press ⊞ WINDOWS + X to open the hidden menu
Click on command prompt (admin)
Inside command prompt type in SFC / scannow and press ENTER
Wait for the process to be finished and then reboot the PC
Fix via DISM tool
Press ⊞ WINDOWS + X to open the hidden menu
Click on command prompt (admin)
Inside command prompt type in DISM /Online /Cleanup-image /Restorehealth and press ENTER
Wait for the process to be finished and then reboot the PC
Page fault in Non-Paged Area via a dedicated tool
Sometimes manual and provided solutions just simply cannot cut it because the issue is triggered also with something else and not just a single issue.
Use DRIVERFIX to fix this specific issue with a single click.

 Error Causes
 If your disk doesn’t have ample space to accommodate the installation then you should free up some of the space on your disk to make sure the Windows can be installed on it.
You can also reinstall the Windows on another disk that has sufficient space.
If your disk doesn’t have ample space to accommodate the installation then you should free up some of the space on your disk to make sure the Windows can be installed on it.
You can also reinstall the Windows on another disk that has sufficient space.


 When File Explorer opens go to VIEW > OPTIONS. Inside options select “Show hidden files, folders, and drives”, uncheck “Hide protected operating system files (Recommended)”, and click APPLY > OK
Go to the recycle bin and check to see if files have managed to show up.
When File Explorer opens go to VIEW > OPTIONS. Inside options select “Show hidden files, folders, and drives”, uncheck “Hide protected operating system files (Recommended)”, and click APPLY > OK
Go to the recycle bin and check to see if files have managed to show up. In the command prompt type in the following: rd /s /q C:\$Recycle.bin
Reboot your system
In the command prompt type in the following: rd /s /q C:\$Recycle.bin
Reboot your system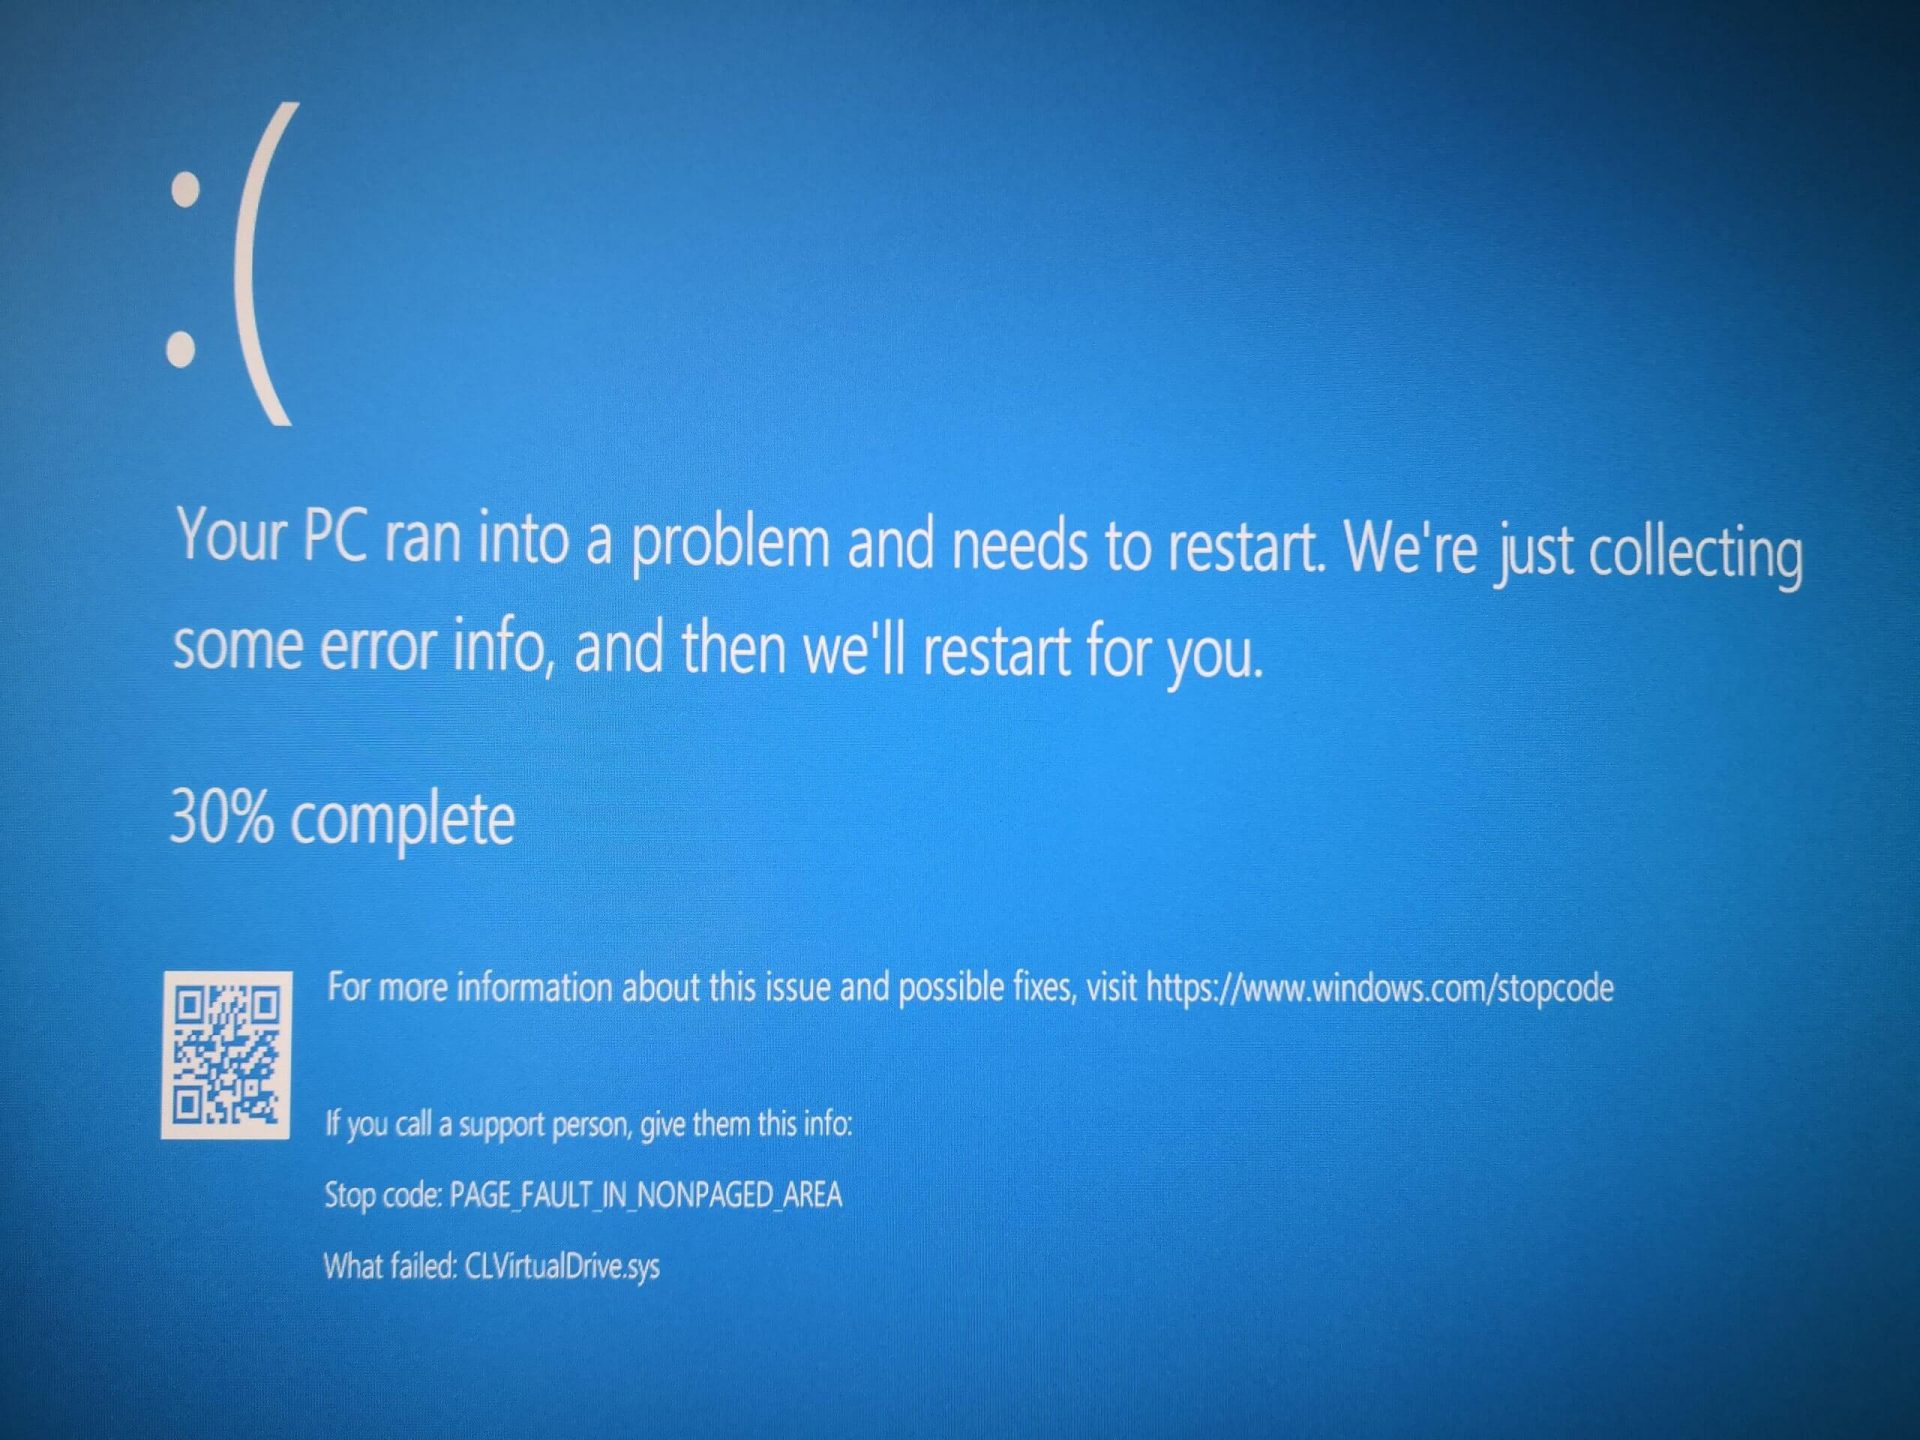 Rollback using system restore