Hello and welcome everyone, today we will be talking about dreaded keyloggers, why they are dangerous, and how to know if you might have one in your system. Keylogger is a malicious application placed in your system and hidden with only one goal in mind, to get information about what are you typing and by that means for a person who infected you to get information about your credit card information or other sensitive data. They can be introduced into your systems in various ways and often can not be detected easily. Modern antivirus applications have ways of detecting them and removing but this tutorial aims to teach you how to spot them all by yourself since new keyloggers are produced daily and sometimes relying on antivirus alone is not enough.
Unlike viruses and trojans, keyloggers are not heavy on system resources and you will not feel slow down on your computer if you have one which makes them harder to sport with regular work. Some of them can be even tracking you on the website and not even be physically present on your computer. Generally, we could categorize keylogger into 4 categories:
Web browser-based keylogger. Some websites would have CSS scripts, input web forms, or so-called man in the middle keylogger. Lucky for us even Windows defenders with the latest update can detect this type of keylogger and successfully deal with it and how keylogger itself is not present on our system we are safe.
General spyware keylogger. This keylogger is present in your system, usually, it infected it via email attachment, social media download, torrent download, some malicious so-called fixer application, etc. Most antivirus applications and windows defenders can detect these types as well and remove them successfully.
Kernel-level keylogger. This keylogger is a more dangerous type they tend to operate underneath Windows as a rootkit and can go undetected by antivirus and windows defenders.
Hypervisor-based keylogger. This is the most dangerous keylogger, they use virtualization techniques to hide and mask themselves as a replica of the operating system and they scan all keystrokes by the user. These are very rare keyloggers but they do exist.
If you suspect that you have a keylogger or just want to check your system for precaution reasons follow these tips and guides and luckily you will solve your issue in no time and your data will be safe.
Use Task Manager to find suspicious entries.
Task manager is a great application implemented in Windows that is constantly monitoring and showing all services, applications, and processes currently running on your system and thus a great tool to monitor your system if you know how to use it.
First, open task manager by pressing CTRL + SHIFT + ESC
Then take a good look into it, try to find suspicious names, probably duplicate of running application, something like Windows logon application, or keylog or anything similar which seems out of ordinary. If you manage to find a suspicious running application right-click on it and close it. Also while you are in task manager jump into the startup tab and check to see are there some unusual applications starting with your Windows, if you find anything, disable it right away.
This is the most simple and quickest way to get some information right away if you suspect to have some simpler keylogger in your system.
Use the command prompt to monitor your network.
In order to check connections to your computer and find potential suspicious ones start the command prompt in administrator mode, press ⊞ Win + X, and choose command prompt (administrator).
type in netstat -b and press ENTER. All website and application connections to your computer are now visible. ignore svchost, edge browser, windows store, etc ad check the IP of the remaining ones using the internet.
Use keystroke encryption.
Install encrypting software and even if you have a keylogger, the application will encrypt each stroke and all that attacker will get is gibberish
Please remember to always download files from trusted sources, do not open unknown emails, and do not share your information publicly. Take common protection steps in order to protect yourself in the digital world.
Can you use an MS-Outlook e-mail account to send and get workplace e-mails on a daily basis? Are you using the exact same Outlook e-mail account for a long time? Are you getting PST Mailbox Errors?
Then you have developed awareness and knowledge about Outlook PST Errors. Ms-outlook essentially stores the email items in a PST record. This includes all attachments, contacts, calendar items, your e-mails and records.
You might encounter various kinds of Outlook Inbox error messages exhibited on the display in extended formats eg. 0x80040600 0x8004060c or 0x80040116.
All all these are Outlook mailbox malfunctions that stop the Outlook program from executing jobs correctly and thus restricting your capacity to gain access to your e-mail account, see attachments, contacts, and calendar items that are significant.
Error Causes
There's not a single particular trigger for Outlook email malfunctions. A few causes can trigger these, but, the most frequent are virus contamination, 2 GB limit is exceeded by PST file and broken.
There are no specific signals which will help help you identify but some pointers to look at include the following:-
You cannot access certain parts of your Outlook interface
Obscure error messages start popping on your screen
You can’t add new contacts or change entry data in your calendar
Further Information and Manual Repair
When you experience these signs related to PST Inbox errors, it is advisable to repair the problem immediately to ensure it does not cause inconvenience for you and hampers your communication via Outlook emails. Remember this error not only inconveniences you but also hinders proper communication between various business partners.
Determining the ultimate reason for distinct Outlook email malfunctions could be tricky, time-consuming, and might need specialized knowledge to nail it down with regards to fixing the Outlook mailbox malfunctions.
In case you are not a specialist, working out and fixing this problem is an uphill process. To simplify this process, obtain and install an Outlook PST Repair Tool!
This is an intelligent solution to fix all kinds of Outlook errors. You do not have to go deeper into the technical details of the problem.
The Outlook PST Repair tool does it for you. An inbox repair tool identifies and also repairs all sorts of MS Outlook errors in seconds. It is easy to use, highly functional, safe and efficient.
By installing an Outlook repair tool, Outlook errors can be easily removed from your computer and keep the errors from happening again. It also fixes damaged PST files and damaged e-mails can help regain data.
Whatever you should do is to begin:
Updating your Windows 10 computer isn’t always as easy as it should be since there are times when you might encounter some errors along the way. One of these errors is the error code 0x80246017 that comes with the error message “WU_E_DM_UNAUTHORIZED_LOCAL_USER”.
According to Microsoft, the cause of this particular Windows Update error is that “The download failed because the local user was denied authorization to download the content”. So if you got this error when you tried updating your computer, read on as this post will provide you some suggestions on how you can fix it.
Before you troubleshoot the problem using the options given below, make sure that you are logged in as administrator. If you are already logged in as an administrator, follow each one of the options carefully.
Option 1 – Try to check the status of some Windows Update Services
Tap the Win + R keys to open the Run dialog box.
Next, type “services.msc” in the field and hit Enter or click OK to open Services.
From the list of Services, look for the following services and make sure that their Startup type is as follows:
Windows Update – Manual (Triggered)
Background Intelligent Transfer Service – Manual
After that, check if the Service status of the listed services above is set to Running. If they’re not, click on the Start button to start these services and then check if you can now enable the Windows Update service or not.
Option 2 – Try to grant Full Control of the System Volume Information directory
First, tap the Win + X key combination and then select Command Prompt (Admin) from the given menu.
After opening Command Prompt with admin privileges, type the following command and tap Enter to execute it:
Once the command is executed, it will run a batch of tasks and will show each one of their statuses on the command line window and once they’re done, exit Command Prompt.
Now restart your computer and see if it fixed the problem or not.
Option 3 – Try to disable your antivirus program or Firewall
Disabling the antivirus program or Firewall or any other security software installed in your computer is always a good idea you can try when the Windows Update process does not go smoothly. So before you try updating your computer again, make sure to disable the antivirus or security program and once the Windows Update is done, don’t forget to enable the antivirus program back again.
Option 4 – Try running the DISM tool
You can try running the Deployment Imaging and Servicing Management or DISM tool to fix the Windows Update error. Using this built-in tool, you have various options such as the “/ScanHealth”, “/CheckHealth”, and “/RestoreHealth”.
Open the Command Prompt with admin privileges.
Then type in the following commands and make sure to hit Enter right after you type each one of them:
Dism /Online /Cleanup-Image /CheckHealth
Dism /Online /Cleanup-Image /ScanHealth
exe /Online /Cleanup-image /Restorehealth
After that, wait until the process is finished and do not close the window as the process will probably take a couple of minutes.
Once it’s done, restart your computer.
Option 5– Run the Windows Update Troubleshooter
If the DISM tool didn’t work in fixing the error, you could also try running the Windows Update Troubleshooter as it could also help in fixing any issues related to Windows Update including the Windows Update error code 0x80246017. To run it, go to Settings and then select Troubleshoot from the options. From there, click on Windows Update and then click the “Run the troubleshooter” button. After that, follow the next on-screen instructions and you should be good to go.
Option 6 – Run Microsoft’s online troubleshooter
Running Microsoft’s online troubleshooter might also help you fix the Windows Update error code 0x80246017. This online troubleshooter is known to help in fixing Windows Update errors, it scans your computer for issues that might be causing the problem and then fixes them automatically.
169 IP address error can stop your computer from connecting to the internet which could be a very frustrating experience. In this guide, we will cover simple but effective tips on how to fix this error so you can continue with internet use.
Reconnect your Modem or Router
Simple and sometimes effective solution, unplug and plug back in modem or router so IP is fetched again, it is very likely that computer will pick right IP address with this stunt.
Use built-in Windows Network troubleshooter
Press ⊞ WINDOWS + X top open secret menu
Go to settings
Go to Network & Internet
Inside click on Network troubleshooter
Follow onscreen instructions
After the troubleshooter ends reboot your PC
Reconfigure IP address
Press ⊞ WINDOWS + R to open the run dialog
Inside run dialog type ncpa.clp and press ENTER
Right-click on your network adapter and select properties
Uncheck Internet Protocol Version 6 (TCP/IPv6) and click on OK
Now press ⊞ WINDOWS + X and click on Command prompt (admin)
In command prompt type and after each line press ENTERnetsh winsock reset catalognetsh int ip reset reset.logipconfig /releaseipconfig /renewReboot your computer
Restart DHCP client
Press ⊞ WINDOWS + R to open the run dialog
In run dialog type services.msc and click on OK
Find DHCP client
Right-click on it and choose RestartReboot PC
Reinstall Network Adapter
Press ⊞ WINDOWS + X to open the windows menu
Click on Device Manager
Expand Network Adapter and right-click on wireless or ethernet adapter, click on Uninstall deviceReboot the computer to automatically reinstall the device driver
Reset IP and subnet mask
Press ⊞ WINDOWS + R to open the run dialog
In run dialog type in ncpa.cpl and press OK
Right-click on your network adapter and select properties
Uncheck Internet Protocol Version 6 (TCP/IPv6)
Double click on Internet Protocol Version 4 (TCP/IPv4)
Select Use the following IP address and change it to 192.168.0.1
Change Subnet mask to 255.255.255.0
Leave default gateway blank
Click OK to save changes
Anxiety from all these digital threats lurking everywhere? An antivirus program can help put your mind at ease.
What can a virus do to your device?
A virus is malicious software that can affect pretty much any device and does so in a variety of ways. Be it your computer, your phone or your smart lightbulb - as long as there’s access to the internet, malware can get to it.
How exactly does this kind of attack manifest itself? Well, there’s a wide variety of effects ranging from mild to severe. Among other things, they depend on which type of malware attacks your device - a virus, spyware, ransomware, adware or something else.
These are some of the things you can expect to happen:
Slow performance
System crashes
Theft of data and sensitive information
Connectivity issues
Constant browser redirects
Strange messages sent to your contacts
Interference with files
It really can be the stuff of nightmares. So, if you want to sleep peacefully knowing that your devices are completely safe, you should definitely consider getting an antivirus.
P.S. don’t let its name fool you - an antivirus does indeed protect your devices against more than just viruses.
What is antivirus software exactly?
Antivirus software is designed to help you battle and ward off malware. Basically, it scans your device to detect any suspicious activity and offers tools to get rid of the culprit.
At first, antiviruses were developed to fight against viruses only, but nowadays they cover a lot more ground. Here are some of the biggest benefits of getting yourself a powerful defender.
Advantages of antivirus software
1. It fights those pesky ads
Look, constant ads that pop up everywhere aren’t the absolute worst thing that can happen on your computer. If anything, they are annoying, like when you’re trying to sleep but that one fly in your room just won’t stop buzzing.
Now, there’s a free, well-established solution for that - installing an ad blocker. And we’re about a hundred and ten percent sure you’ve already done that on each and every browser you use.
However, “if I can’t see it, it doesn’t exist” isn’t the most ideal approach for your online safety. Ad blockers can’t block everything and they won’t protect you from potential adware. An antivirus on the other hand offers that layer of protection against malware snuck into pop-ups and spammy websites.
2. It protects you from hackers
Hackers don’t target government institutions only. They’ll target regular people too if they have something to gain.
Credit: Clint Patteron (Unsplash)
There are different types of hacking, such as phishing e-mails, transmission of malicious programs, credential reuse, denial of service and more. In any case, they take control of your device and hijack your data.
The good thing is that, as threats evolve, antiviruses evolve too and there are tons of quality programs on the market that can keep you secure for an affordable price.
3. It keeps your files and data safe
When malware enters your device, it can target pretty much any file and get access to any and all data.
Installing an antivirus program will make sure that every single file, new or old, is monitored at all times, warning you against threats immediately. That way, you can make sure to react before your other files become infected and data is lost or stolen.
Another great thing for data protection is that the best antivirus software normally comes with a password manager, so no one can use malware to steal your passwords.
4. It blocks all kinds of malware
As we already stated, malicious attacks can be performed in many ways and malware comes in in different shapes an sizes, such as:
Trojan horse
Spyware
Ransomware
Adware
Rootkit
RAT (remote access Trojan)
Keyloggers
Worms
Botnets
Credit: Growtika (Unsplash)
Nowadays, antivirus software is designed to fight against all of these types. That’s why more often than not we hear the term 'antivirus' used interchangeably with 'anti-malware,' like in this article.
5. It keeps your children protected
You can’t keep your eyes on your kid every second of the day and you can’t protect them from everything. But at least you can limit their exposure to the threats they can encounter at every corner of the digital world.
An antivirus program will block harmful or suspicious websites and ads, which is great both for you and your children. To take it a step further, though, many such programs come with special parental controls and offer monitoring as well. It’s a great solution for keeping your kids safe online without sounding like the irritating, overbearing, controlling parent who “just doesn’t get it!”
How to pick one
There are definitely lots of different antivirus programs out there, both free and paid. We recommend you look for a paid option, since free ones are unfortunately a lot more susceptible to being compromised through malicious attacks.
Now, there are a few factors to consider when choosing the right software. If you use your PC for basic things then a basic antivirus will suffice. However, the more complex your use and the more sensitive the data you deal with, the stronger it needs to be.
It’s also crucial that you take into account the features it includes. As we already mentioned, some programs have additional security options. For example, depending on the package you select, Bitdefender provides:
Some are included in plans and some are separate products, so make sure to check out all the offers.
And don’t worry if you have multiple PCs or you’re looking for protection for your smartphone or tablet as well; Bitdefender has suitable solutions for your needs. Of course, you can also just pick their classic antivirus software if you’re not in need of advanced protection.
Another important point is how regularly the software is updated and enhanced. The more frequent the updates the better, as bugs can make the program more vulnerable. Other things we advise you consider are user-friendliness, impact on performance, reputation (user reviews especially) and, of course, price.
The bottom line
Fact is: anyone can be a malware victim. Don’t let it be you.
You can’t put a price on peace and security, so don’t be reluctant to pay for yours - especially since a lot of options out there are extremely affordable. Is $159.00 a year really too much to pay for cross-platform protection for up to 10 devices? We don’t think so.
Explore your options and protect your files and data before it’s too late.
If you are experiencing a Low Wi-Fi signal strength on your Windows 10 PC after you’ve updated or reinstalled it, read on as this post will guide you on what you can do to fix the problem.
The way devices connect these days has evolved with our cognitive revolution. Various devices use some or other wireless technology to connect with other devices. However, all wireless technology has some kind of limitation when it comes to range and signal strength. From time to time, you might have faced several Wi-Fi issues. Low Wi-Fi signal strength usually happens after you update or reinstall your Windows 10 system. This issue can be identified easily by looking at the signal bars in the Wi-Fi icon or by measuring its strength. Since this problem is wide scope, there are tons of possibilities which is why this post covers the most generic situations that could help most users. Refer to the options given below to fix the low Wi-Fi signal strength of your Windows 10 PC.
Option 1 – Try running the Network Adapter Troubleshooter
If a few days ago the range and signal of the Wi-Fi was perfectly fine before you did an update or reinstall, it is possible that there were some changes made in the configuration as well. In most cases, the latest configuration that came with the update has not aligned the config in your computer or laptop. The easiest and simplest way to fix this is by using the Network Adapter Troubleshooter. How? Follow the steps below.
Right-click on the Wi-Fi icon from the system tray to start troubleshooting.
After that, select Troubleshoot problems. Note that it might take a while to run it but once it’s finished, it will show you all the problems with the network adapter.
Note: The Network Adapter Troubleshooter will also fix the issues in the background but there might be some issues that will require manual action. And if the troubleshooter wasn’t able to identify and fix the problem for you, proceed to the next given option below.
Option 2 – Try using the Device Manager
If the problem is related to hardware, you need to seek out the help of the Device Manager. To do so, follow the steps below.
Pull up the Device Manager.
Next, look for your Wi-Fi adapter under the Network Adapters.
Once you found it, right-click on it and open Properties.
After that, you will see all the actions related to drivers under the driver tab.
You can either update or roll back the selected driver or you could also disable and re-enable it to see if the problem’s fixed.
Note: If updating the driver didn’t help, you might have to dig into the advanced settings. From this post on, it can get a bit complicated as there are terms that you might not understand as well as some configuration. To make it easier for you, you can search for your Wi-Fi adapter online and try following the instructions from there. And before you make any further changes to your computer’s settings, make sure that you create a system restore point first.
Option 3 – Try changing the Wi-Fi Roaming Sensitivity
If you want to enhance the Wi-Fi reception as well as the performance on your Windows 10 PC, you might want to change the Wi-Fi Roaming Sensitivity or Aggressiveness. Roaming Sensitivity is the rate at which your computer chooses and switches to the nearest available point of access which offers a better signal. It is based on the strength and quality of the Wi-Fi and not on the distance to the Wi-Fi point.
Option 4 – Try adjusting the Wi-Fi range
The issue could also be caused by the position of your computer with respect to the Wi-Fi router instead of your hardware or drivers. It could be that your physical location might be a factor for the low signal strength of your Wi-Fi so you might want to adjust the Wi-Fi range to fix the problem.
BringMeSports is a browser extension developed by Mindspark Inc. that lets you watch live sports streams, follow sports scores, and catch up on the latest news from the sports world.
BringMeSports installs an extension into your browser that replaces your default home page with the MyWebSearch starting page, it also replaces your default search engine, shows additional ads, and while running, collects personal and web browsing data that is later sent back to be Sold / Forwarded to serve ads. While browsing the internet with this extension installed, you will see additional ads and sponsored links appear in your search results. It may even show pop-up ads.
Several anti-virus scanners have marked this extension as a Browser Hijacker and are therefore not recommended to keep on your computer.
About Browser Hijackers
Browser hijacking is a type of unwanted software, commonly a web browser add-on or extension, which causes modifications in web browser’s settings. Browser hijacker malware is created for many different reasons. The idea would be to force users to visit particular websites that are trying to increase their website visitor traffic and produce higher ad income. Although it might appear naive, all browser hijackers are damaging and therefore always regarded as security risks. Browser hijackers can even allow other harmful programs without your knowledge to further damage your personal computer.
Signs of browser hijack
There are various symptoms of browser hijacking. Here are a few of them:
1. you notice unauthorized changes to your Internet browser’s homepage2. you find re-directed to websites you never meant to visit3. the default search engine is changed and the web browser security settings have been lowered without your knowledge4. you’re finding new toolbars you have never seen before5. you observe numerous ads pop up on the browsers or computer screen6. your web browser gets slow, buggy crashes frequently7. you are blocked to access those sites of computer security solution providers.
Precisely how browser hijacker infects computers
Browser hijackers attack computer systems through malicious email attachments, downloaded infected computer files, or by going to infected internet sites. They could also come from add-on programs, also called browser helper objects (BHO), web browser extensions, or toolbars. A browser hijacker could also be installed as a part of freeware, shareware, demoware, and pirated programs. Common examples of browser hijackers include CoolWebSearch, Conduit, Coupon Server, OneWebSearch, RocketTab, Snap.do, Delta Search, and Searchult.com.
The existence of any browser hijacker malware on your computer might drastically diminish the web browsing experience, track your online activities that result in troublesome privacy concerns, create system stability problems and eventually cause your computer to slow down or to a practically unusable state.
How you can remove browser hijackers
Some hijackers could be removed by deleting the free software they were included with or by removing any extension you have recently added to your system. Having said that, many hijackers are quite tenacious and need specialized tools to eliminate them. And there’s no denying the very fact that the manual fixes and removal methods can certainly be a complicated job for a novice PC user. Also, there are plenty of risks associated with fiddling around with the system registry files.
What To Do If You Cannot Install Any Anti-Malware?
Every malware is bad and the consequences of the damage could vary based on the specific kind of malware. Certain malware variants alter internet browser settings by including a proxy server or modify the computer’s DNS configurations. In these instances, you will be unable to visit certain or all of the websites, and therefore unable to download or install the required security software to remove the infection. If you are reading this, odds are you’re stuck with a malware infection that is preventing you to download or install Safebytes Anti-Malware software on your system. Although this type of issue will be difficult to circumvent, there are a few actions you can take.
Install in Safe Mode
In Safe Mode, you could change Windows settings, uninstall or install some programs, and remove hard-to-delete malware. If the malicious software is set to load automatically when the computer starts, switching to this particular mode may prevent it from doing so. To enter into Safe Mode or Safe Mode with Networking, press F8 while the PC is starting up or run MSCONFIG and look for the “Safe Boot” options in the “Boot” tab. Once you are in Safe Mode, you can try to install your antivirus software application without the hindrance of the malware. After installation, run the malware scanner to get rid of most standard infections.
Utilize an alternate internet browser to download the anti-malware application
Web-based viruses could be environment-specific, aiming for a particular browser or attacking particular versions of the browser. The most effective way to overcome this issue is to select a web browser that is renowned for its security features. Firefox comprises built-in Malware and Phishing Protection to keep you safe online.
Create a portable anti-malware for removing viruses
Another option is to create a portable anti-malware program onto your USB stick. To run anti-virus using a USB flash drive, follow these simple steps:
1) Download the anti-malware on a virus-free PC.2) Insert the USB drive on the same system.3) Run the setup program by double-clicking the executable file of the downloaded software, which has a .exe file format.4) Select the drive letter of the pen drive as the place when the wizard asks you exactly where you want to install the anti-malware. Do as instructed on the screen to complete the installation process.5) Transfer the flash drive from the uninfected PC to the infected PC.6) Run the Safebytes Anti-malware directly from the flash drive by double-clicking the icon.7) Click the “Scan” button to run a full system scan and remove malware automatically.
Protect Your PC & Privacy With SafeBytes Anti-Malware
If you are looking to buy anti-malware for your PC, there are lots of brands and packages for you to consider. A few of them do a great job in getting rid of malware threats while some will affect your PC themselves. You need to be careful not to pick the wrong product, especially if you buy a premium program. One of the recommended software is SafeBytes AntiMalware. SafeBytes carries a very good reputation for top-quality service, and clients appear to be very happy with it.
Safebytes is among the well-established computer solutions firms, which provide this complete anti-malware application. Using its cutting-edge technology, this application will assist you to eliminate multiples types of malware such as viruses, PUPs, trojans, worms, ransomware, adware, and browser hijackers.
SafeBytes has got a variety of features that can help you protect your computer from malware attacks and damage. Let’s check out a few of them below:
Robust Anti-malware Protection: With a critically acclaimed malware engine, SafeBytes offers multilayered protection which is intended to catch and get rid of viruses and malware which are hidden deep in your computer system.
Active Protection: SafeBytes provides real-time active checking and protection against all known viruses and malware. It’ll continuously monitor your laptop or computer for hacker activity and also provides users with superior firewall protection.
“Fast Scan” Abilities: SafeBytes Anti-Malware has a multi-thread scan algorithm that works up to 5 times faster than any other anti-malware software.
Internet Security: Safebytes assigns all sites a unique safety score that helps you to have an idea of whether the webpage you are going to visit is safe to view or known to be a phishing site.
Lightweight Utility: SafeBytes is a lightweight and user-friendly anti-virus and anti-malware solution. Since it utilizes negligible computer resources, this application leaves the computer’s power exactly where it belongs: with you actually.
Premium Support: Support service is available for 24 x 7 x 365 days via email and chats to answer your queries.
Technical Details and Manual Removal (Advanced Users)
If you wish to manually remove BringMeSports without the use of an automated tool, it may be possible to do so by removing the program from the Windows Add/Remove Programs menu, or in cases of browser extensions, going to the browsers AddOn/Extension manager and removing it. You will likely also want to reset your browser.
To ensure the complete removal, manually check your hard drive and registry for all of the following and remove or reset the values accordingly. Please note that this is for advanced users only and may be difficult, with incorrect file removal causing additional PC errors. In addition, some malware is capable of replicating or preventing deletion. Doing this in Safe Mode is advised.
The following files, folders, and registry entries are created or modified by BringMeSports
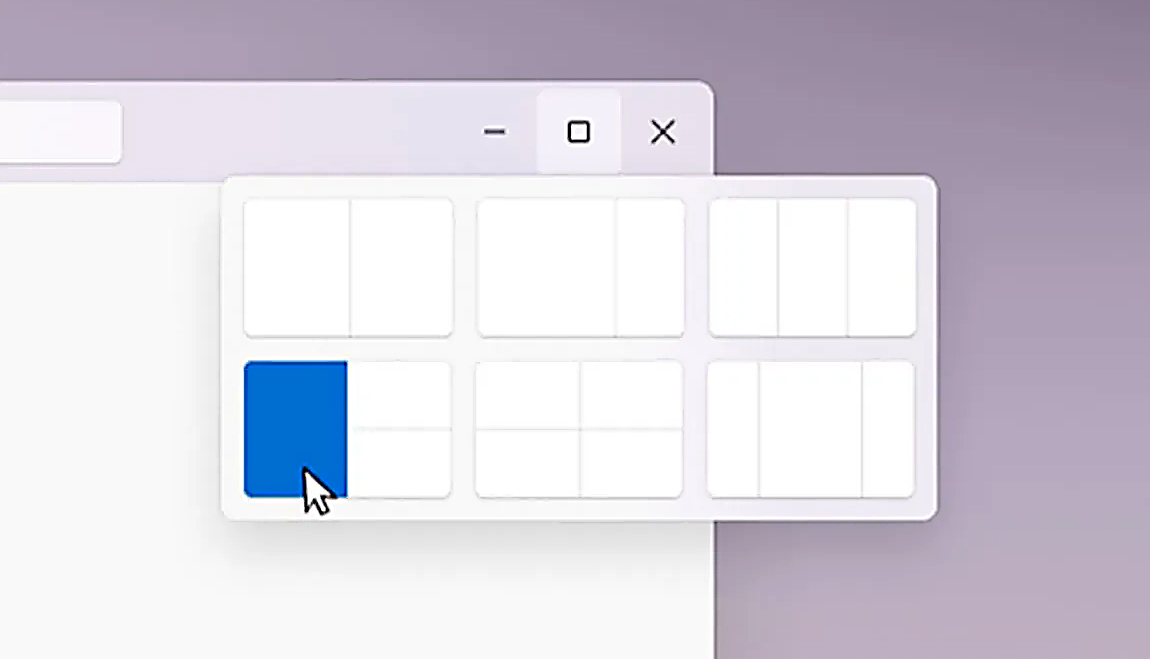
The Snapping feature was introduced as an essential part of Windows 11 and I like it very much, it lets you organize your opened windows much faster and with more control. However, some people do not like the feature, worry not because you can turn it off, or if you prefer you can just remove the showing layout option that is shown when hovering over Minimize/Maximize button.
Removing options all together
To completely turn off Snap layout in Windows 11 follow these steps
Open Windows 11 settings by pressing ⊞ Windows + I
Select System on the left part of the screen
In System options select Multitasking
At the top of Multitasking Click on the switch next to Snap Windows
Close settings
Changes will be automatically applied and you will no longer have Snap layout functionality.
Removing layout graphic from Snapping feature
If you like the snap Layouts feature but are not very fond of the layout graphic that is popping up each time you hover over Minimize/Maximize button do not worry, there is an option to turn just that off and keep the feature itself.
Open Windows 11 settings by pressing ⊞ Windows + I
Select System on the left part of the screen
In System options select Multitasking
Click on the Snap Windows menu
Deactivate Show Snap Layouts When I Hover over a Window’s Maximize button
Close settings
Now you will be able to use the Snap Layout feature without layout graphics showing. If you want to reverse any of these options and go back to standard-setting, just follow the steps and turn features ON.
Magcore.dll is a type of Dynamic Link Library. This file is associated with software developed by ArcSoft, a renowned multimedia application developer.
Magcore.dll consists of small programs that help load and run software developed by ArcSoft on your system smoothly.
This file virtually comes into function when you use certain audio and video features incorporated in ArcSoft programs for example ArcSoft Media converter.
However, you may experience Magcore.dll error code on when this DLL file fails to run and load programs. The error may hamper your ability to access ArcSoft programs on your system and cause you a great deal of inconvenience.
Magcore.dll error is often displayed in any one of the following formats:
“The file magcore.dll is missing”“MagCore.dll cannot be found”"Cannot find [PATH]magcore.dll"“This application has failed to start because MagCore.dll was not found. Reinstalling the application may fix the error.”
Solution
Error Causes
This DLL file is known to be prone to errors. MagCore.dll error occurs due to several reasons such as:
Missing or damaged MagCore.dll file
Hardware failure
Viral infection
Registry issues
If you experience MagCore.dll error on your system, it is advisable to fix it right away. Though it is not fatal, but if you don’t repair it, you may not be able to access practically all ArcSoft programs on your PC.
Further Information and Manual Repair
Here are some of the efficient and easy manual methods to resolve error MagCore.dll on your PC:
Method 1 - Scan and Remove Malware
MagCore.dll error can be triggered by viral or other malware infection. Malware can easily damage DLL files and masquerade as the MagCore.dll file. To resolve, simply download a powerful antivirus on your system.
Run it to scan your entire PC for viruses and remove them right away.
Method 2 - Update the Drivers for Hardware Devices
As we mentioned above the error may be related to hardware failure too. In times like these, it is advisable to update the drivers for hardware devices.
For example if you try to play a 3D video game and it fails to run showing you MagCore.dll error message, then simply try updating the drivers for your video card. Drivers can be updated in Windows by using a driver update wizard from within Device Manager.
Method 3 - Use System Restore to Undo Recent System Changes
After trying method 1 and 2, if the error code still persists, then it is opt for method 3.
Use Windows System Restore utility to undo recent system changes and bring your PC to its normal previous condition before the error occurred. To restore, simply go to the start menu, type System Restore.
Now click on System Restore and just pick a point in the past called a restore point to return important Windows files and settings.
Method 4 - Repair the Registry
If the underlying cause of the MagCore.dll error code is related to registry issues, then simply repair the registry. You can fix it manually but it is a little complicated and time-consuming. You may find it difficult if you are not a technical whiz.
Nonetheless to resolve and repair it in seconds, download Restoro. This is a powerful and a user-friendly PC Fixer embedded with a registry cleaner and several other highly functional scanners.
Run it to scan your entire PC for registry problems. The registry cleaner utility removes all bad and invalid entries, cleans up the registry space, and repairs the damaged files.
Click here to download Restoro and repair MagCore.dll error code on your PC.
Windows Setup in Continuous Reboot Loop – What is it?
After upgrading to Windows 10 operating system from Windows 7 or Windows 8/8.1, a lot of Windows users are complaining about the Windows setup in a continuous reboot loop. The computer would just keep on rebooting every time the machine is booted and this incites frustration for a lot of Windows users.
Solution
Error Causes
When Windows launched the third update for Windows 10, users trying to upgrade to Windows 10 encountered an endless reboot loop problem. The computer will crash repeatedly. The KB3081424, which is a roll-up of bug fixes of Windows 10, continuously fails once you start the update process and then triggers a message showing: “We couldn’t complete the updates, undoing the changes.” The undoing process will then cause a system reboot mandatorily.
Once you log back on your computer again, the Windows 10 update will try to reinstall KB3081424. You will not be able to stop the update which will cause your Windows setup in a continuous reboot loop.
The KB3081424 will not be successfully installed since if it fails for the first time, that initial failure can be detected to create a bad entry in your Windows 10 registry. This will then prevent your subsequent attempts to reinstall KB3081424 to make it work correctly.
Further Information and Manual Repair
In order to fix the problem of Windows 10 setup in a continuous reboot loop, there are a few methods you can try. Try following these simple steps and you’ll be able to get rid of the problem.
Note: If you’re not highly confident to solve this issue on your own, it is highly recommended to consult an authorized computer technician who would be knowledgeable enough to fix the issue for you. In addition, you can also use a system optimizer to resolve the issue.
Method One: Check For Windows Update
Microsoft Windows released an updated fix for the Windows setup in continuous reboot loop problem. You can try fixing the issue through Windows Update.
Open Settings
Go to Update & Security
Select Windows Update then choose Check for updates
At this point, an additional update will be installed and downloaded to your operating system to resolve the continuous reboot loop problem.
Method Two: Eliminate Bad Registry Entry
Before KB3081424 attempts to install again, you can try doing this solution:
Click on the Start menu then type regedit
Once the window opens, go to HKEY_LOCAL_MACHINESOFTWAREMicrosoftWindows NTCurrentVersionProfileList
Create a backup for your registry key (since this process is a bit risky). Select ProfileList then click on File and Export then choose your backup name.
From the ProfileList IDs, remove anything with ProfileImagePath in it.
Close Regedit then reboot. By this time, the KB3081424 should properly install.
Method Three: Perform A Startup Repair
Another thing you can try to solve the Windows setup in continuous reboot loop problem is to perform a startup repair from a working computer.
Ensure that all unnecessary devices are disconnected from your computer as your computer might detect them.
If you are connected to a network, you need to disconnect from this as well.
On a working computer, download the Windows 10 ISO then you can perform a startup repair.
Boot your computer from the Windows 10 DVD.
To change your BIOS option to boot from the Windows 10 DVD, follow these steps:
Boot your computer then press the F2 function key to enter setup.
NOTE: You must do this quickly since the BIOS loads rapidly.
Once you’re inside the BIOS, navigate to the Boot Configuration screen. On this screen, you’ll be able to change the first device to be loaded.
Go to Removable Devices then hit Enter. Removable devices could either be a thumb drive or DVD. Select DVD to put it at the top and be the first boot device.
Save your changes by pressing on the F10 function key. A setup confirmation box will appear with a message Save configuration changes and exit now. Select Yes.
Exit BIOS by pressing on the ESC key. You should be prompted to boot from the Windows 10 DVD at this point.
If you're not able to execute the aforementioned processes on your own, get help or download and install a powerful system optimizerto assist with the windows continuous reboot loop process and other Windows 10 error messages.
From their infant stages to modern days, computer viruses were always kind of here. From simple ones that were annoying with playing speaker sounds and throwing messages on screen to more malicious ones capable of deleting and encrypting files. In today's modern world it is very important to protect yourself, modern viruses are not a joke anymore and they are aimed to create serious damage to computer systems.
They can encrypt files in order to make you pay for a decrypter, they can straight up delete files or even cause some hardware damage. Like mentioned before protecting yourself is important, but protecting does not mean only having antivirus software installed, information, where are common places in which they lurk and could be picked up, is also very important. That is why we are exploring in this article the most common place where you can pick viruses or other malware.
Downloading Programs
Programs that contain the downloadable files are the commonest source of malware such as freeware, worms, and other executable files. Whether you download an image editing software, a music file, or an e-book, it is important to ensure the reliability of the source of the media. Unknown, new, or less popular sources should be avoided.
Pirated or Cracked Software
Are you aware of software cracking? Well, every time you open cracked software, your antivirus software might flag it as malware as the cracks consist of malicious scripts. Always say “No” to cracks as they can inject malicious script into your PC.
Email Attachments
Anyone can send you an email attachment whether you know them or not. Clicking on unknown links or attachments can harm your device. Think twice before clicking anything and make sure that file type is not ‘.exe’.
Internet
One of the easiest ways to get a virus on your device is through the Internet. Make sure to check the URL before accessing any website. For a secured URL always look for ‘HTTPS in it. For example, when you click videos published on social media websites, they may require you to install a particular type of plug-in to watch that video. But in reality, these plug-ins might be malicious software that can steal your sensitive information.
Booting Data from Unknown CDs
Malicious software can get into your device through an unknown CD. A good practice to be safe from malicious infection is to remove CD when your device is not working at all. Your system could reboot the CD if it is not removed before switching off the computer.
Bluetooth
Bluetooth transfers can also infect your system, so it is crucial to know what type of media file is being sent to your computer whenever a transfer takes place. An effective armor would be to allow Bluetooth connectivity with only known devices and activate it only when required.
Unpatched Software
Often overlooked, unpatched software is also a leading source of virus infection. Security holes in software are exploited by attackers and are unknown to software makers until the attackers release them in the form of zero-day attacks. It is therefore recommended to install software updates as soon as they are available on your PC.


 Removing options all together
 They can encrypt files in order to make you pay for a decrypter, they can straight up delete files or even cause some hardware damage. Like mentioned before protecting yourself is important, but protecting does not mean only having antivirus software installed, information, where are common places in which they lurk and could be picked up, is also very important. That is why we are exploring in this article the most common place where you can pick viruses or other malware.