Logo

How to Fix the Low Disk Space Notification on Windows 10

As you know, Microsoft constantly releases new updates with the main goal of fixing bugs as well as deliver users with new and exciting features. However, there are times when the latest update comes with an unwanted bug. One of these bugs is an error message saying, “Low Disk Space. You are running out of disk space on Local Disk (G:). Click here to see if you can free space on this drive.” So if you have recently installed a Windows 10 update, then you’ll most likely see a completely new drive on your computer which will appear right after the installation of the update and you’ll also start seeing the aforementioned error message.

It gets irritating as this error message keeps on popping up even if you still have a lot of free space on your other drivers. Obviously, the main reason why this error message pops up all the time is the bug brought along by the Windows Update. This bug unhides the recovery partition drive and allocates it a drive letter which is why you are seeing a new drive in your computer. Thus, you can get rid of the pesky error message by simply removing the letter of the new drive. Just remember that you must not delete anything from the recovery partition drive nor format the drive. Formatting or deleting the recovery partition drive can heavily affect the recovery of Windows since the data on the drive is used by the Windows Recovery Environment or your system’s manufacturer.

A lot of users have reported that removing the drive letter has resolved the issue. And if you worry that removing the drive letter will delete the drive, you are mistaken. This solution is basically harmless and is proven effective to make the notifications go away.

Carefully follow the instructions below to get rid of the Low Disk Space notification by removing the drive letter.

  • Step 1: Tap the Windows key once.
  • Step 2: Next. In the Windows Start Search, type in “command prompt” and right-click on Command Prompt from the search results and select the “Run as administrator” option or you could simply tap Win + R keys and then input “cmd” and hit Enter to open Command Prompt.
  • Step 3: After opening Command Prompt, type in “diskpart” and tap Enter.
  • Step 4: Next, type in “list volume” and tap Enter. After that, you will see a list of drives.
  • Step 5: Take note of the letter associated with the newly created drive.
  • Step 6: Afterwards, type in “select volume <drive letter>” and tap Enter. Take note that you must replace the <drive letter> with the drive letter you’ve found in Step 5.
  • Step 7: Now type in “remove letter=<drive letter>” and then tap Enter. Once again, replace the <drive letter> with the letter you took note of in Step 5.

Do You Need Help with Your Device?

Our Team of Experts May Help
Troubleshoot.Tech Experts are There for You!
Replace damaged files
Restore performance
Free disk space
Remove Malware
Protects WEB browser
Remove Viruses
Stop PC freezing
GET HELP
Troubleshoot.Tech experts work with all versions of Microsoft Windows including Windows 11, with Android, Mac, and more.

Share this article:

You might also like

VirtualBox FATAL:No bootable medium found!
If you continuously encountered the “VirtualBox FATAL: No bootable medium found, System halted” error when you try to install Windows 10 in VirtualBox, read on as this post will give you some potential fixes to resolve the problem – you will be guided on how to choose the ISO image to fix this error in VirtualBox. This kind of error is a very common one especially if you have a corrupted ISO file or if you have not selected an ISO file for your virtual machine. Like pointed out, this error pops up when you have a corrupted ISO file or if the ISO file is not attached to the virtual machine. You have to select the ISO file while you create the virtual hard disk, else, you will most likely face this problem, and to fix it, you need to download fresh Windows ISO, create a new IDE Controller, assign Windows ISO to the IDE Controller and then boot your virtual machine. For detailed steps, follow the instructions below but before you start, make sure that you have a valid and uncorrupted Windows ISO. Step 1: First, you need to open the VirtualBox program on your computer and select the virtual machine. Step 2: Next, click on the Settings button or you can also right-click on the virtual machine and select Settings from the context menu. Step 3: Once you’re in the Settings panel, go to the Storage section and from there, create a Controller: IDE. Step 4: To create a Controller: IDE, click the Add new storage controller icon and select the “Add IDE Controller” option. Step 5: After that, click the Add optical drive icon and click on the Choose disk button. You will then see all the attached and non-attached ISO files. However, you have to add the new ISO file that you just downloaded. Step 6: To add the new ISO file, click the Add button and select the ISO file and then select the .iso file from the Non Attached section. Step 7: Now click the Choose button and afterward, make a checkmark in the Live CD/DVD checkbox and then select the IDE Primary Master from the drop-down menu of the Optical Drive. Step 8: Once you’re done, save the changes made and try booting into your virtual machine again.
Read More
Can’t pair Bluetooth keyboard, Check the PIN
If you have suddenly run into a problem when trying to connect or pair your Bluetooth keyboard with your Windows 10 computer, read on as this post will guide you on how exactly you can resolve the problem. This kind of problem typically occurs when you’ve disabled the Bluetooth option. However, this option is already enabled and you still encountered the same error message saying, “Check the PIN and try connecting again”, then you need to troubleshoot the problem further. In most cases, this kind of issue can be fixed when you restart your computer and go to the Windows Settings and select the “Add Bluetooth or other devices” option and then put the keyboard into pairing mode. And when the keyboard appears in the “Add a device” dialog box, just select it. On the other hand, if your Bluetooth keyboard won’t get connected to your Windows 10 computer and you encounter an error that says, “Can’t pair Bluetooth keyboard, Check the PIN and try connecting again”, then you need to check out the options provided below but before you do so, make sure that you create a System Restore point first as some of the troubleshooting options provided involves the Windows Registry.

Option 1 – Try to use the Device Pairing Wizard

The Device Pairing Wizard is the one that allows your computer to look for any new devices and display them underneath it. All you have to do to use this wizard is to follow its instructions to connect your Bluetooth device to Windows 10. To get started, follow these steps:
  • First, tap the Win + R keys to launch the Run utility and type “devicepairingwizard” in the field, and then hit Enter to run the Device Pairing Wizard.
  • After that, wait for a couple of seconds until the devices appear. Once they do, select the Bluetooth device you wish to add.
  • A new screen with a passcode should appear instantly. You need to take note of the given passcode and type them on your Bluetooth keyboard.
  • Once done, tap Enter. This should help in pairing your computer to your Bluetooth keyboard.

Option 2 – Try to use the Registry Editor

The next thing you can do to resolve the pairing issue with your Bluetooth keyboard is to use the Registry Editor by following these steps:
  • Tap the Win + R keys to open the Run utility and type “Regedit” in the field and then hit Enter to open the Registry Editor.
  • Next, navigate to this registry path: HKEY_USERS/.DEFAULT/Software/Microsoft/Windows/CurrentVersion/Bluetooth/ExceptionDB
  • From there, look for the folder named “Addrs” and expand it. If you see any folders or keys under it, select them and delete them. These keys represent the MAC address of your Bluetooth devices.
  • Once you’re done, restart your computer and try to pair your Bluetooth keyboard once more.

Option 3 – Try running the Bluetooth Troubleshooter

As you know, Windows 10 has various troubleshooters with user-friendly interfaces where you can utilize them to fix issues in your PC. And since you’re dealing with some Bluetooth problem, you have to run the Bluetooth Troubleshooter.
  • Open the Windows 10 Settings.
  • Then go to Update & Security > Troubleshoot.
  • You should find the option for Bluetooth on your right-hand side – click on it then click on the “Run the troubleshooter” option.
  • Now follow the next screen options.

Option 4 – Try to reinstall or update the Bluetooth driver

The issue might have something to do with the Bluetooth drivers. It could be that it is outdated and needs to be updated or that you recently updated it and since you have trouble pairing your Bluetooth keyboard, you can update, rollback, or uninstall the Bluetooth drivers. How? Follow the steps below.
  • Tap the Win + X keys to open the Device Manager.
  • Next, look for the Bluetooth device and right-click on it.
  • Select the option “Update driver”.
  • After that, a new popup window will appear. In there, select the option, “Search automatically for updated driver software”.
Note: Checking the update may take a few minutes so you’ll have to wait until it finishes. If it is able to find an update, you must install it.
Read More
How to Repair Missing MSVCR100.dll Error

What is MSVCR100.dll Error?

Msvcr100.dll is a dynamic link library file. This file is loaded into the memory at runtime for successful program execution. This process is also referred to as runtime dynamic linking. The Msvcr100.dll belongs to the Microsoft Visual C++ Runtime Library. It is a core Windows component used by numerous Windows-based applications to load and run smoothly on Windows PC. Msvcr100.dll error occurs when the process of runtime dynamic linking fails. Due to this error, you are unable to access the desired application. The error code is displayed in either of the following formats:
  • “Msvcr100.dll Not Found"
  • "This application failed to start because msvcr100.dll was not found. Re-installing the application may fix this problem."
  • "Cannot find [PATH]msvcr100.dll"
  • "msvcr100.dll  is missing from your computer"
  • "XXX.exe - System Error - MSVCR100.dll is missing from your computer."

Solution

Restoro box imageError Causes

Narrowing down the cause of the Msvcr100.dll error is not possible as this error can occur on your PC due to multiple reasons. However, here are some of the most common causes of Msvcr100.dll error code on Windows PC:
  • Msvcr100.dll file corrupt and damaged
  • Missing Msvcr100.dll file
  • Corrupt runtime code library
  • Registry issues
  • Malware attack and viral infection

Further Information and Manual Repair

Here are some of the best ways to resolve this error on your system:

Reinstall the application causing the error

As dll are shared files used by multiple programs to load and run, there is the possibility of it getting deleted when uninstalling a certain program. If so, then the best way to fix it is to reinstall the application that is causing the error to pop up on your screen. This way you’ll be able to set up the program again and install the Msvcr100.dll file back on your system.

Download Microsoft Visual C++ 2010 Redistributable Package

Another way to resolve this error is to download Microsoft Visual C++ 2010 Redistributable Package. To do this, first, see if you are running a 32 bit or 64-bit copy of Windows. XP users go to the start menu and click run then type winver and press enter. In Vista and Windows 7, go to the start menu and type computer and click properties. The information you require is under Windows Edition. Once you find out whether you are using a 32 bit or a 64-bit version, accordingly, download the correct version of Microsoft Visual C++ 2010 Redistributable Package directly from Microsoft’s official website. Simply download and install the software. Then follow the prompts to add the toolbox to your PC. After that, restart your computer; most likely the error message will be gone. If it still persists, then this means the error is either related to the registry or malware.

Download and Run Restoro

Restoro can be used to resolve both malware infection and registry issues on your PC that could be triggering Msvcr100.dll errors. Restoro is a next-generation and multi-functional PC repair tool embedded with powerful utilities like an antivirus, a registry cleaner, and a system optimizer. The registry cleaning feature detects all registry issues and Msvcr100.dll errors. It removes unnecessary and obsolete files on the disk, like junk files, cookies, internet history, and temporary files cluttering the disk and damaging dll files. It repairs the damaged and corrupt dll files and restores the registry. Simultaneously the antivirus feature scans and removes all malicious software on your system. These include spyware, viruses, Trojans, adware, and malware that can damage dll files. This software is efficient and resolves the Msvcr100.dll error in seconds. It is easy to use and has a simple navigation. It is compatible with all Windows versions. Click here to download Restoro on your PC and resolve the Msvcr100.dll error today!
Read More
Windows 10 Power Toys detailed guide
Hello and welcome everyone, today we will be talking about power toys, a great, completely free, open-source, Microsoft-supported Windows project which aims to provide Windows itself with powerful features not found natively in it. We will explore power toys completely here and explain each module and its features. The first thing is of course to download power toys themselves. You can find them here. After you download them, double click on the downloaded file and install. Start power toys, you will find them at the bottom of the taskbar, note that power toys need to be active in order to use their features. power toys
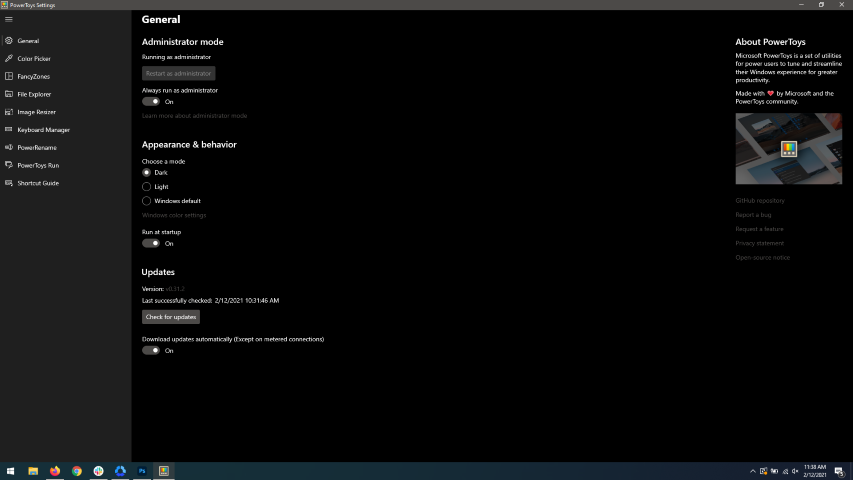
When opened you will be greeted with general settings window. These are settings for power toys themselves, Here you can check for updates, change the looks of power toys, run it on system startup and run them as administrator. Set them up so they best suit your needs.

Color Picker

Moving down next tab we have is Color picker. power toys colorpicker hex editor
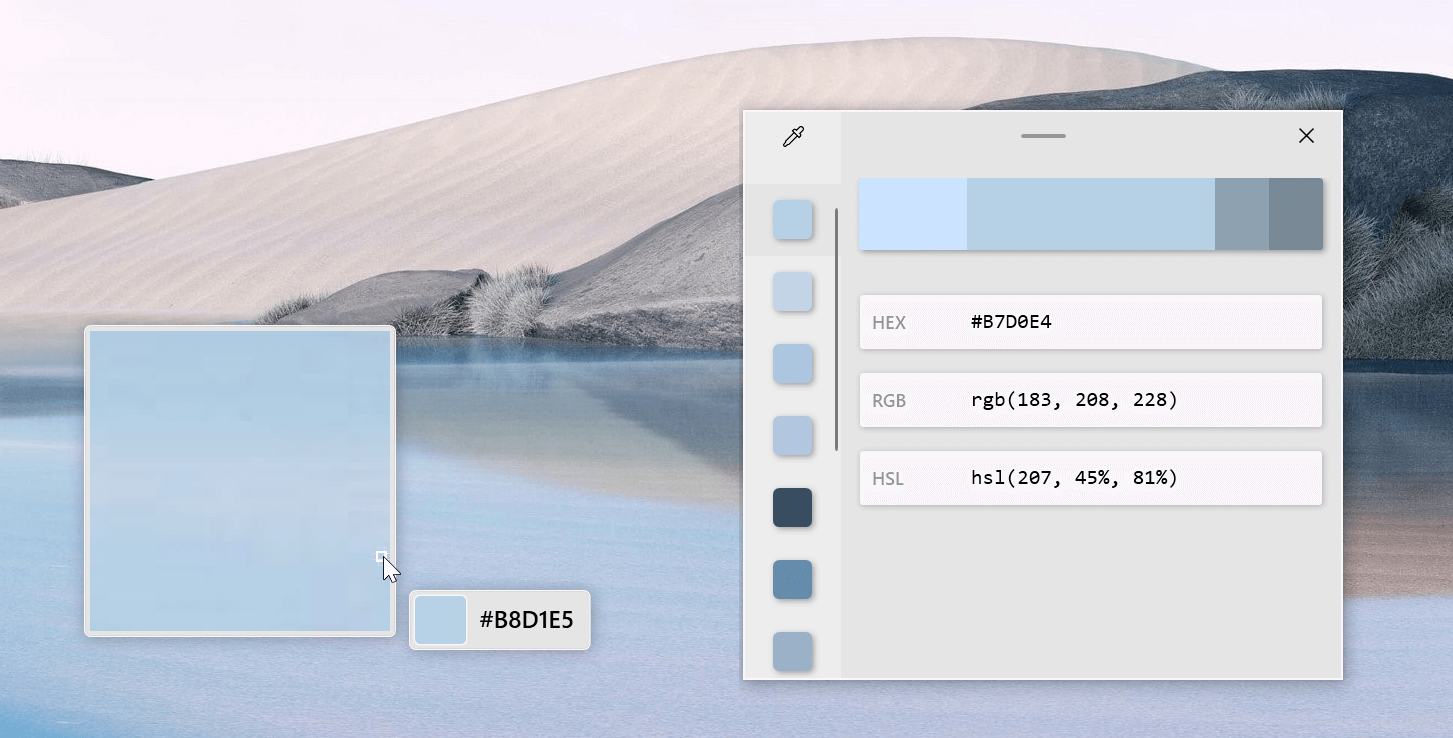
The color picker will let you as the name suggests pick colors, it will sample colors from running applications and windows, snap their values, and place them in the clipboard. A useful application if you are working as a graphic designer, want to create some cool word document, or just want to compare the difference between colors. After the Color Picker is activated, hover your mouse cursor over the color you would like to copy and left-click the mouse button to select a color. If you want to see the area around your cursor in more detail, scroll up to zoom in. The copied color will be stored in your clipboard in the format that is configured in the settings (HEX by default). The editor lets you see the history of picked colors (up to 20) and copy their representation in any predefined string format. You can configure what color formats are visible in the editor, along with the order that they appear. This configuration can be found in PowerToys settings. The editor also allows you to fine-tune any picked color or get a new similar color. Editor previews different shades of currently selected color - 2 lighter and 2 darker ones. Clicking on any of those alternative color shades will add the selection to the history of picked colors (appears on the top of the colors history list). Color in the middle represents your currently selected color from the history of the colors. By clicking on it, the fine-tuning configuration control will appear, which will let you change the HUE or RGB values of the current color. Pressing OK will add newly configured color into the history of the colors.

Fancy Zones

Moving down, we have fancy zones. power toys fancy zonesFancyZones is a window manager utility for arranging and snapping windows into efficient layouts to improve the speed of your workflow and restore layouts quickly. FancyZones allows the user to define a set of window locations for a desktop that are drag targets for windows. When the user drags a window into a zone, the window is resized and repositioned to fill that zone. When first launched, the zones editor presents a list of layouts that can be adjusted by how many windows are on the monitor. Choosing a layout shows a preview of that layout on the monitor. The selected layout is applied automatically.

File Explorer

Next, File Explorer. power toys settings file explorer
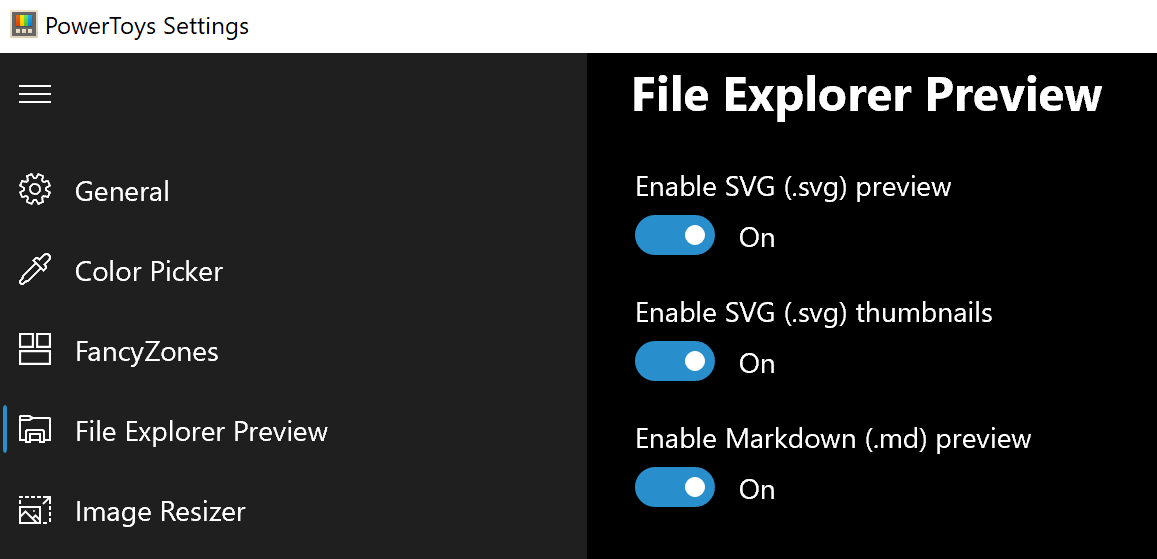
Only 3 options here but maybe some are important to you. This extension lets you enable SVG file preview in File Explorer, enable Markdown preview, and enable SVG thumbnails. Turn on each one you might need.

Image Resize

Next down the line, we have Image resize. power toys image resize
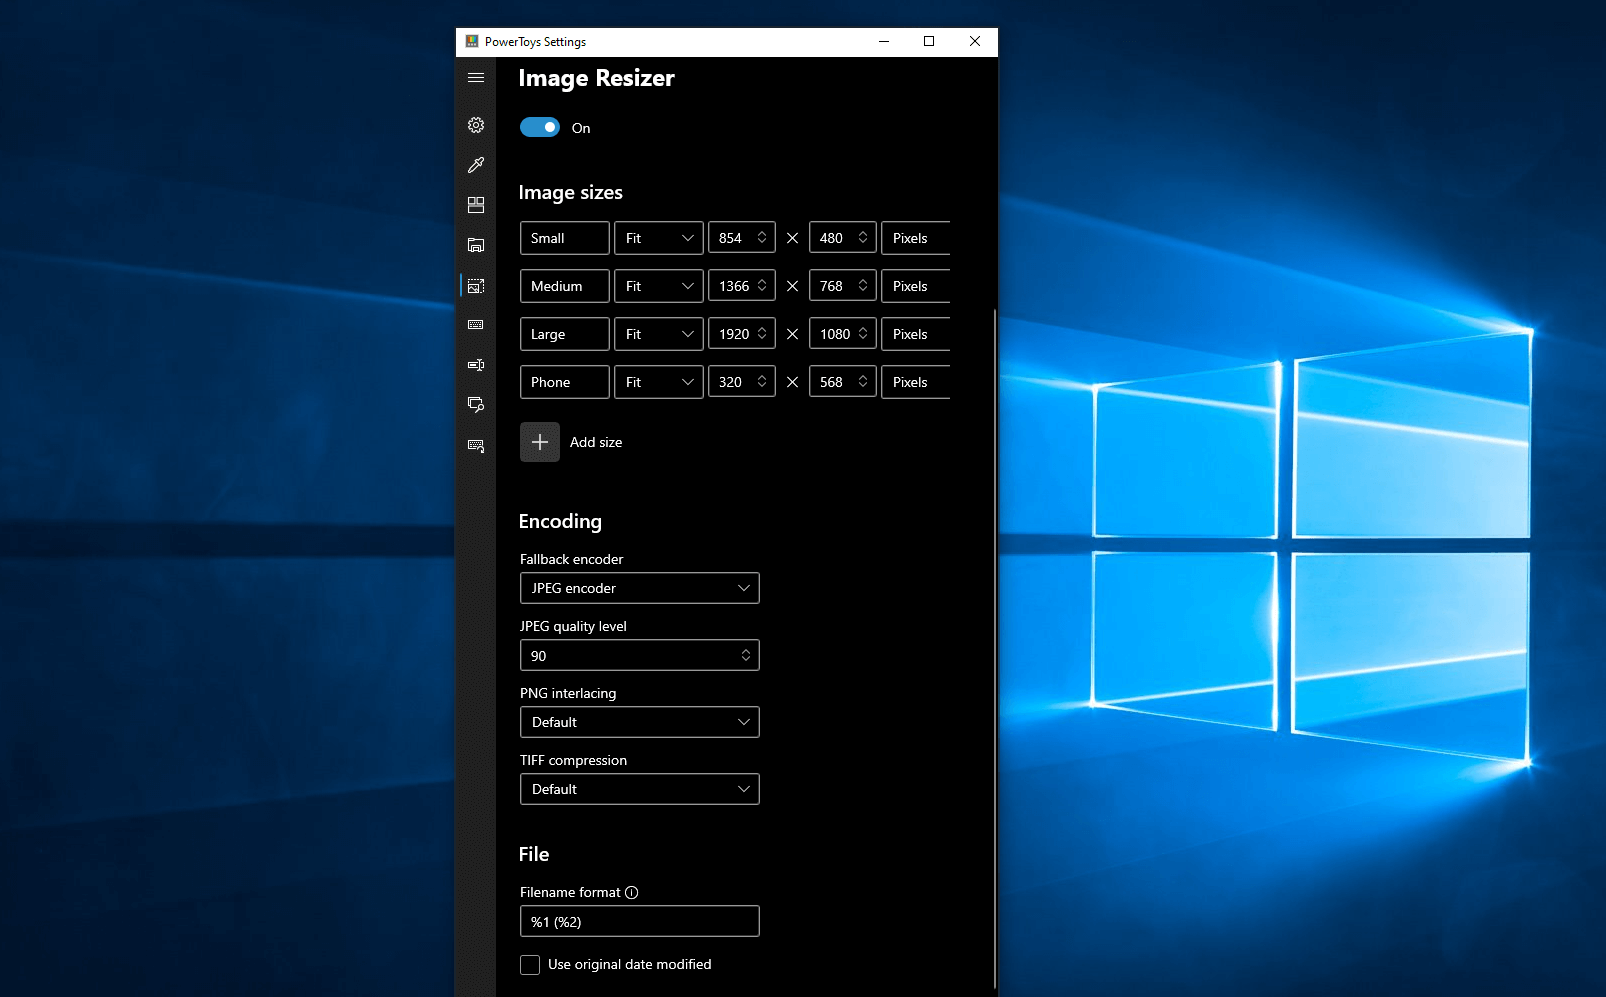
Image Resizer is a Windows shell extension for bulk image-resizing. After installing PowerToys, right-click on one or more selected image files in File Explorer, and then select Resize pictures from the menu. You can specify your own sizes if you want, you can resize when dragging files, you can overwrite files or make new copies of new sizes, and many more options. A very useful tool I am sure plenty of users can use since this eliminates the need for pictures or any other image application for common resizing tasks.

Keyboard Manager

The keyboard manager is the next tab in power toys. power toys keyboard shortcuts
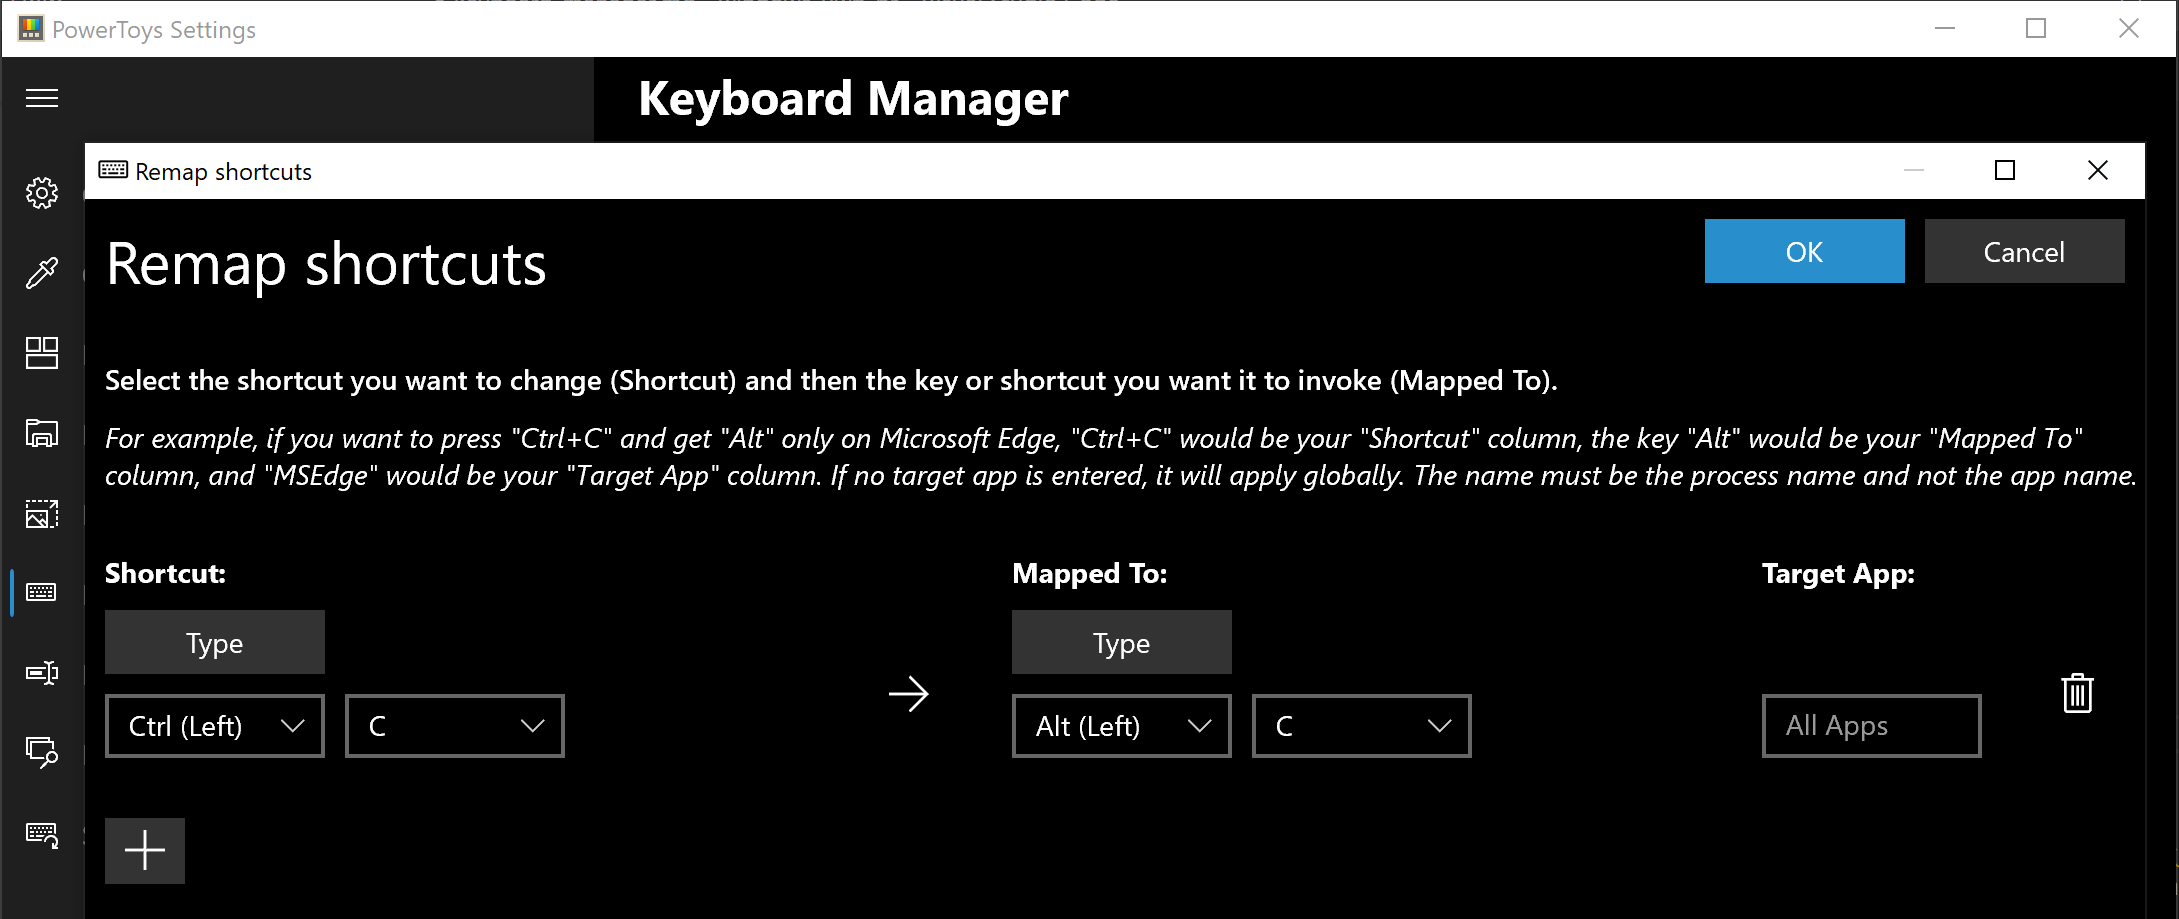
The PowerToys Keyboard Manager enables you to redefine keys on your keyboard. For example, you can exchange the letter A for the letter D on your keyboard. When you select the A key, a D will display. You can also exchange shortcut key combinations. For example, the shortcut key, Ctrl+C, will copy the text in Microsoft Word. With the PowerToys Keyboard Manager utility, you can exchange that shortcut for ⊞ Win+C). Now, ⊞ Win+C) will copy text. If you do not specify a targeted application in PowerToys Keyboard Manager, the shortcut exchange will be applied globally across Windows. PowerToys Keyboard Manager must be enabled (with PowerToys running in the background) for remapped keys and shortcuts to be applied. If PowerToys is not running, key remapping will no longer be applied.

Power Rename

Nex we have a very cool and powerful Power Rename power toys power rename
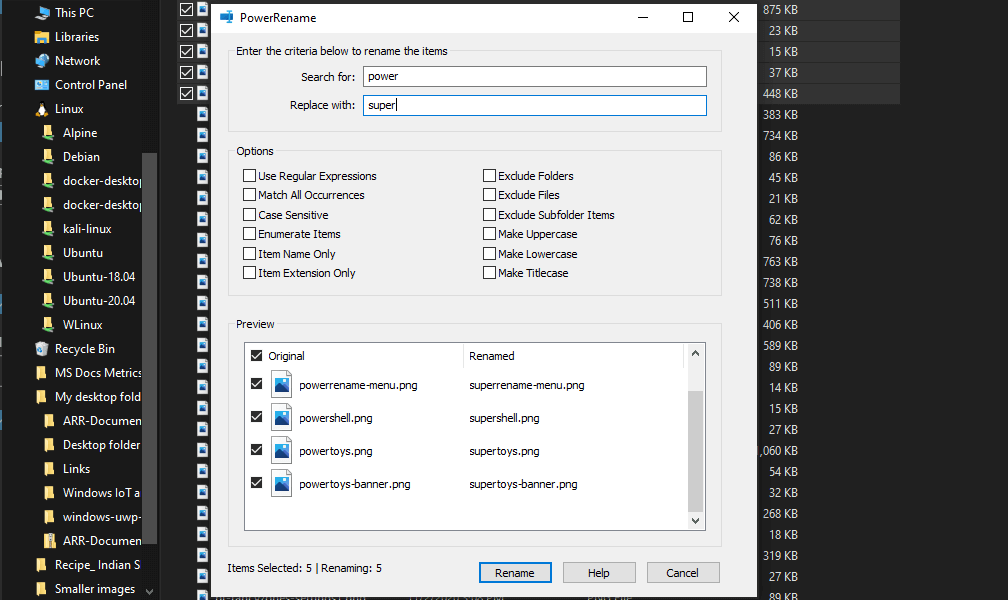
PowerRename is a bulk renaming tool that enables you to:
  • Modify the file names of a large number of files (without renaming all of the files with the same name).
  • Perform a search and replace on a targeted section of file names.
  • Perform a regular expression rename on multiple files.
  • Check expected rename results in a preview window before finalizing a bulk rename.
  • Undo a rename operation after it is completed.

Run Utility

Power Toys Run utility follows next. power toys run warning
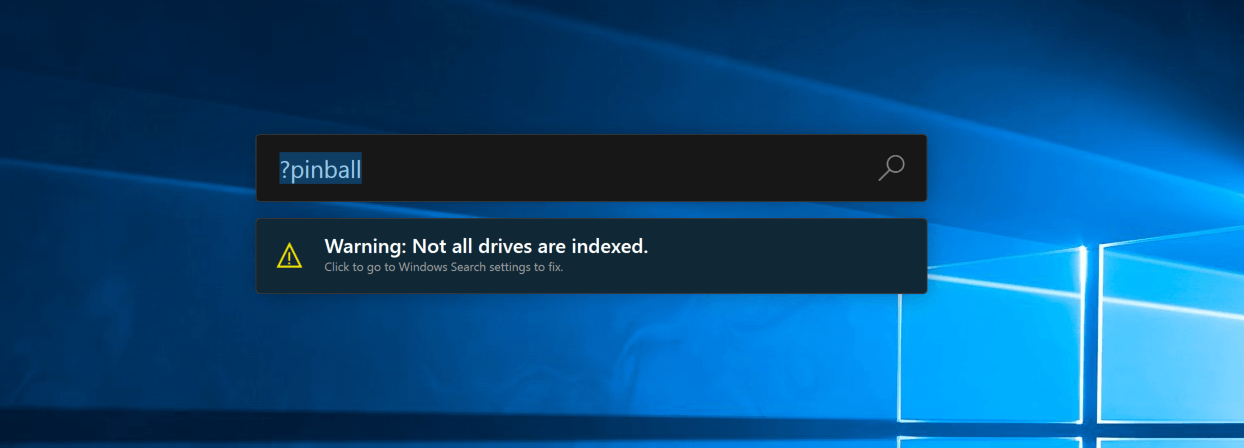
PowerToys Run is a quick launcher for power users that contains some additional features without sacrificing performance. PowerToys Run features include:
  • Search for applications, folders, or files
  • Search for running processes (previously known as WindowWalker)
  • Clickable buttons with keyboard shortcuts (such as Open as the administrator or Open containing folder)
  • Invoke Shell Plugin using > (for example, > Shell:startup will open the Windows startup folder)
  • Do a simple calculation using the calculator

Shortcut Guide

Last but not least we have a Shortcut guide. power toys shortcut guide large
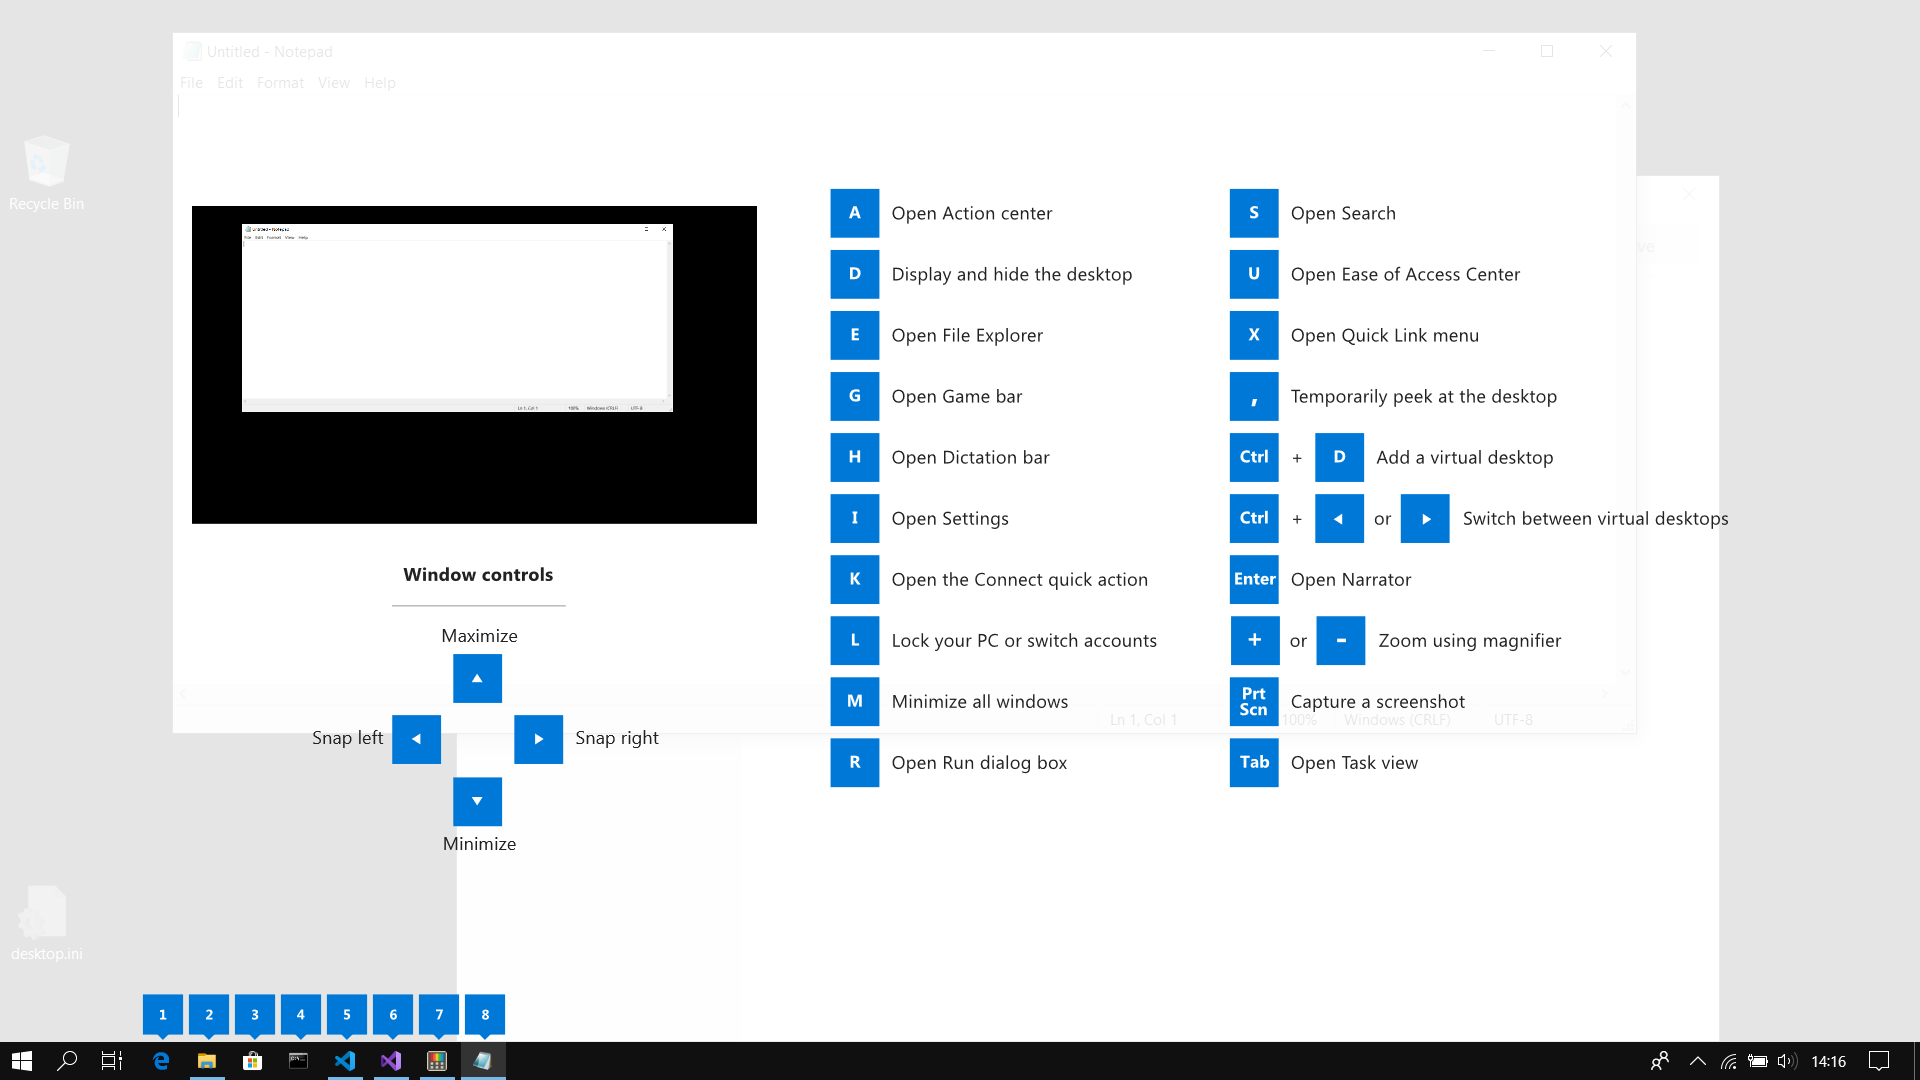
This guide uses PowerToys to display common keyboard shortcuts that use the Windows ⊞ key. Windows key keyboard shortcuts can be used while the guide is being shown and the result of those shortcuts (active window moved, arrow shortcut behavior changes, etc) will be displayed in the guide. Releasing the Windows ⊞ key will make the overlay disappear. Tapping the Windows ⊞ key will display the Windows Start menu. Hey, you made it till the end, thank you for reading and I hope to see you soon.
Read More
Best fitness trackers for your health needs
fitness trackerIf this unfortunate COVID-19 worldwide pandemic has managed to teach us, I would argue it is that our health is the most important thing. So in that spirit, we will continue in this article reviewing some of the best fitness trackers that can be found in the time of writing this article in 2021. Now the market for fitness trackers is not small by any means and offerings are also not small, from no-name manufacturers costing only a few bucks to more serious one’s going slightly over 100 USD there is a fitness tracker for everyone. In this particular article, we will not focus on cheap few dollars no-name ones, instead, we will be offering top ones in the field among some in the middle range simply because we can stand behind them considering quality and precision.

Fitbit Charge 4 fitness and activity tracker

Fitbit is not a pioneer company in the world of fitness trackers and it shows. Charge 4 model offers maybe the best quality, performance, and features for its price. It stands out with implemented GPS meaning that you will need your phone for tracking workouts. It also offers step tracking, sleep tracking, automatic workout-tracking, active zone minutes, etc. It weighs 30g and has 1 inch grayscale OLED. Battery life is said to hold up to 4 days if you use built-in GPS regularly, if you decide to use GPS constantly device will last only 5 hours. Without GPS it can last up to 7 days and it is water-resistant and waterproof up to 50 meters.

Amazfit Band 5

Amazon’s offering of fitness tracker is aimed at beginners and as such, it is lacking some advanced features including an automated working tracker or GPS, also the model does not have replaceable bands so customization is not an option. It does however offer activity and sleep tracking, heart rate monitoring and it is the only model that integrates with Alexa. The manufacturer states that the battery can last up to 15 days depending on usage which places Amazfit Band 5 as a device that has a longer life of use. The device itself is packed with a 1.1-inch color OLED and it weights 12g. It is splash-resistant, not water-resistant.

Xiaomi Mi Band 6

Xiaomi tracker is the best budget version on this list including in it 30 sport modes like running, cycling, yoga, swimming, and more. Battery life is not bad also packing up to 14 days of life but only if the device is not used constantly. It has activity and sleep tracking, a heart rate monitor, sleep tracking, customizable replicable bands and it is water-resistant up to 50m. It comes in a 1.56 inch AMOLED color display and it weighs 63g. The device also has menstrual health tracking making it a great device for women.

Samsung Galaxy Fit 2 fitness tracker

Now we are getting into serious and little more expensive ones. Galaxy Fit 2 is among the top-notch trackers currently on the market. It of course can work along with Samsung’s smartwatches and mobile phones. Packed in the military-grade 1.1-inch casing with color AMOLED and weighing 91g with battery life up to 21 days and water resistance up to 50m this bracelet is an absolute beast. It comes packed with features from standard sleep tracking to automated workout-tracking but it also has a connection to Samsung’s Health mobile app to choose from over 90 workouts, it monitors heart rate and stress levels making it really one of the complete solutions for serious fitness enthusiasts.

Garmin Vivosmart 4 fitness tracker

Last on our list is Garmin vivosmart 4. The device itself is not very impressive, 7 days battery life with 0.7 inch OLED display and 17g weight packed with 50m water resistance is nothing spectacular, Samsung’s model is packing better hardware and way more battery life but all of the mentioned devices fall flat if we compare software to Garvin. Garvin’s Vivosmart 4 software is best on the list, it keeps track of your steps, sleep, calories burned, floors climbed, various exercises, and heart rate as standard features but you'll have advanced sleep tracking with REM sleep. It can also gauge blood oxygen saturation levels during the night with its wrist-based Pulse Ox sensor. In addition, a relaxation breathing timer complements the all-day stress tracking feature. Lastly, the "Body Battery" monitor helps optimize your daily activities based on your energy levels making it truly the only complete tracking solution on this list. That's it for our review of fitness trackers of today, be sure to come back each day to find more interesting articles and tips for your everyday digital life.
Read More
Some Steam tips and tricks for easy life
steamSteam has cemented itself as the largest digital game shop in the World. First, release all the way back on September 12th, 2003, it was meant to be a standalone software client aimed to deliver updates to Valve’s games. It was soon expanded to include titles from third parties. The greatest Steam expansion and its popularity started in 2004 with the release of Half-life 2. Steam allowed prepurchased editions to be downloaded before the official release of the game making it available for play the moment it was officially out. Very soon after Steam gained its popularity, Valve has opened doors to other developers and offered them to use Steam as means for a digital distribution platform. Today it hosts over 30000 different game titles, not including DLC or applications. And how soon Valve’s steam deck is coming out soon we would like to share some great tips and tricks about Steam itself for easy everyday gaming.

Steam guard account security

Security of any of your accounts should be something that you really take seriously. So as always use a strong password for Steam but if you want an extra layer of security for it, and you should, use the Steam built-in feature: Guard Account Security. In order to activate Security Guard go to Steam>Settings>Account>Manage Steam Guard Account Security. Once enabled you will be able to use the Steam mobile application for special code when opening Steam or your email address.

Use Steam beta feature

Once a Steam account is created by default you will download and install the client. In the client, you will have the latest features available but there are more Steam features than default ones, beta features that can offer some improved and new functionality, and do not worry, they are stable and bug-free. I have been in Steam beta for years and not even once have I had any issues with the client itself but I have always had the latest features that will come to regular users later. To enable beta participation to go to Steam>Settings>Account, open the drop-down Beta participation menu, and choose Steam Beta Update. Confirm on OK and restart the Steam client. You will now get all the latest features first.

Manage your library via Collections

The collection is a neat idea for organizing your large game library into different collections or sections easily expanded and contracted for easier navigation and organization. To add the game to a collection just right-click on it and select Add To>New Collection, make a name for a collection like action, RPG, or whatever rocks your boat, and you are done. Once the collection is created other games can be added to it simply just by dragging it into the desired collection.

Make shelves

Shelves are ways to see your collections in the larger areas of the Steam clients. By clicking Add Shelf>Choose a Shelf, you can now add your collection to a shelf on the larger part of the client as a horizontal scrolling container with your chosen games. There are also some predefined shelves like All Games, Recent friend activity, and more.

Hide Game from Library

By right-clicking on a game and selecting Manage>Hide This Game you will remove the game from the active view of your Steam library. Note that the game will still be owned and a part of your library, you will just not be able to see it. This is a great feature when for example you have some things that came as a part of the game pack you are not really interested in when you have 2 different versions of the same game as for example standard and deluxe edition or just by simply not wanting to have game visible in the library. You can find a hidden game by typing its name in the search box and from there you can unhide it.

Play game soundtracks inside Steam

Some games offer you to purchase their soundtracks if you like music from them and some even include OST with a regular purchase. Steam lets you play these soundtracks and even lets you import your own music library folder into it in order to play all of your music inside the client itself. It has even options to automatically stop music playing once the game is run and you can make playlists as well. Your purchased game soundtracks are automatically included, the rest you will need to add by pointing Steam to the folder where you keep music in.

Configure gamepad

Inside Steam, you can configure your gamepad’s general settings, big picture settings, desktop settings, etc. Steam embraced the idea that many OC users these days own and play with gamepads so it has implemented configuration options inside it. To configure your pad go to Steam>Settings>Controller.

Use big picture Steam mode

Big picture mode is Steam's idea of making Steam an entertainment center. Once it is activated it switches from the application into full-screen mode aimed at large TV screens or monitors. You can easily navigate through it via gamepad, mouse, keyboard, or other devices. You have access to the store, your game library, etc. Same as your typical steam app but a little different. You can easily activate it via View> Big Picture Mode and see for yourself is this something you prefer over a standard application layout.

Enable Steam Cloud

Steam Cloud is a great feature that uses cloud storage to save your game progress meaning that you can easily switch to another PC, install games there and continue where you have left off. Many games support this feature instead of keeping saves locally and it is a great feature worth turning it ON. To turn and use Steam Cloud service go to Steam>Settings>Cloud>Enable Steam Cloud Synchronization. Just remember to check does game you are playing supports this option.

Share your Games via Family sharing

Family sharing is a Steam feature allowing you to share your game library with up to 5 accounts on up to 10 different devices. This is a great way to let other members of your family or even close friends enjoy some games you have or vice versa. They will get as well their own save games so you can sleep safe knowing that your progress can not be changed or hindered. Family sharing can be turned ON by logging into PC Steam client where you would like to share your library and navigate to Steam>Settings>Family and then clicking on Authorize Library Sharing On This Computer.

Refund a game

Sometimes the game is not the same as advertised, sometimes it will not work on your PC, sometimes hardware specifications are too high making the game unplayable, etc. For whatever reason, you might have Steam offers you a full game price refund if you wish to do so, you only need to meet 2 criteria, the game must have been purchased within 2 weeks period, older purchases cannot be refunded, and your game playtime must not be over 2 hours of game time. If you fit into this category all you need to do in order to get the full money back is going to Help>Steam Support, pick a recent game from the eligible list, and ask for a refund.

Gift a game

As you can buy gifts for your friends or loved ones in real life, Valve made sure you can do it in digital as well. Gifting game via Steam is simple and straightforward. Choose a game you wish to gift, go to your shopping cart and instead of clicking Purchase for myself, click on Purchase As a Gift, from there you will be taken to your friend list to choose to whom you would like to gift a game along with the option to write a little note to the receiver like happy birthday, enjoy or whatever.

Stream games in Steam itself

Although Steam is not there yet in streaming as Twitch or Facebook gaming is, there is an option to stream your game sessions on it. Click on Steam>Settings>Broadcast to make all adjustments and start streaming. You can also watch streams from your friend list and Steam is now broadcasting popular streams directly to its client if you want to watch it.

Take a game screenshot

By pressing F12, you can take a screenshot from any game and save it inside your Steam cloud library. You can change of course this default screenshot key via Settings>In-Game and if you would like to see your screenshots you can always do it under View Screenshot Library on a game’s page. That’s it, our Steam tips and tricks for easy and good gaming life, I hope to see you soon on errortools.com for your daily articles, tips, and tricks.
Read More
Windows 11 slows down some SSD drives
In the latest Windows 11 fiasco, it is reported that the operating system is slowing down some SSD drives. Good thing is that it does not affect all of SSD on the market but the ones which it is affecting can see even a 45% of speed drop. ssd driveMicrosoft has not published a solution to this issue, but users point out two potential problems. The first is a security mechanism based on disk virtualization, which is supposed to slow down the performance of SSDs. The second, in turn, is related to the place of installation of Windows 11 – users indicate that if the performance test is performed on a medium with no files associated with the system, its performance results are similar to the parameters given by the manufacturer. Transfer speeds were to be slightly improved with the latest Windows 11 update 22000.348. However, users are still waiting for a solution to the problem that significantly reduces the efficiency of SSD media.

More information

The details described leading to speculation that the problem could be related to drivers that Microsoft is providing. On further tests, all Nvme drives that use the Microsoft driver have this problem, but Intel 905P, which has its own driver provided by Intel, is working at full power,”.
Read More
Fix Windows Activation error code 0xC004F078
As you know, Windows 10 has a complicated mechanism for Activation which helps in the verification of a genuine copy of Windows 10. However, there are times when you might encounter some errors during the activation process. One of these errors is the error code 0xc000f074. This kind of error could be due to the Key Management Service or KMS which is unreachable by the client computer or if the key used in the SLSetAuthenticationData function call is incorrect. This kind of error mostly affects surfaces on computers that are upgraded from either Windows 7 or Windows 8.1 to Windows 10. In such cases, you may encounter any of the following error messages:
“Windows is unable to reach your company’s activation service. Please connect to your corporate network. If you are connected and continue to see the error, contact your system administrator. You can also click on the error detail to find the exact error. Error code: 0xC004F074.” “Activating Windows(R), (Key hash)… Error: 0xC004F074 The Software Licensing Service reported that the computer could not be activated. No Key Management Service (KMS) could be contacted. Please see the Application Event Log for additional information.” “Error 0xC004F074, SL_E_AUTHN_MISMATCHED_KEY, The Software Licensing Service reported that the key is mismatched.”
To fix the Windows 10 Activation error 0xC004F078, you have to use the correct key for your type of Windows copy or use Command Prompt to reinstall the key or you could also try running the Activation troubleshooter.

Option 1 – Try running the Windows 10 Activation Troubleshooter

The first thing you can do to resolve the Activation error code 0xc000f074 is to run the Windows 10 Activation Troubleshooter. To do so, follow these steps:
  • Go to Settings and then select Activation.
  • After that, click on the Windows Activation and then troubleshoot. This will help you address most of the commonly found activation issues in Windows devices.
The Windows 10 Activation Troubleshooter will determine if your license key is a valid Windows 10 digital license for an edition that is not currently installed. If it turns out that it’s not, then the troubleshooter will show you how to install the correct edition.

Option 2 – Try to use the correct key for the type of Windows version you have

If the Windows Activation troubleshooter wasn’t able to resolve the error, then you can try using the correct key for your type of Windows version. All you have to do so is check the type of your Windows copy if it’s OEM, retail, or volume. And make sure that you have the correct, valid product key for your operating system.

Option 3 – Try to use Command Prompt to reinstall the key

  • In the Start Search, type “command prompt” and right-click on Command Prompt from the search results, and then select “Run as administrator”.
  • After that, execute this command to uninstall the existing key: vbs /upk
  • Next, you need to install the KMS product key by executing this command: vbs /ipk <The KMS Product Key>
  • Once you’re done, you will see a prompt that’ll tell you whether the operation was either successful or not.
  • To active, the KMS product key online, use this command: vbs /ato
  • Use this command to activate the key using the telephone: exe 4
  • After you’ve activated the KMS product key, restart the Software Protection Service. You can also verify the Activation Status to check if your fix was successful or not.

Option 4 – Contact Microsoft Support for assistance

If you’re at your wits’ end in trying to upgrade your computer, you should consider contacting Microsoft Support for help as they can offer you various options that would make fixing Windows Activation error code 0xc000f074 a lot easier and faster.
Read More
Easy Remove PCPerformer From Windows

PC Performer is a registry cleaner made by PerformerSoft. The purpose of this program is to remove redundant items from the Windows registry. Registry cleaners remove broken links, missing references within the Windows registry. PC performer is designed to automatically optimize your registry and clean it up.

PC Performer adds registry entries for the current user that allow it to run automatically each time the system is rebooted. It adds a scheduled task to Windows Task Scheduler in order to run at various times. The software connects to the internet, therefore it creates a Windows Firewall exception that allows it to connect without interference. Multiple anti-virus programs detected this software as Malware, it typically comes bundled with other software or is distributed through a pay-per-install bundle.

About Potentially Unwanted Applications

People have encountered it – you download and install a piece of free software application, you then see some unwanted applications on your computer or discover a strange toolbar has been added to your browser. You didn’t install them, so how did they turn up? These unwanted programs, technically known as Potentially Unwanted Programs (PUPs), often come bundled along with other software and install themselves on user’s PC without their knowledge. They perhaps might not look like viruses to some individuals, but they can produce major annoyances and bring about serious trouble for users. The idea of PUP was coined to define this downloadable crapware as something other than malicious software. Much like malware, PUPs create problems when downloaded and placed on your computer, but what makes a PUP different is that you provide consent to download it – the fact is vastly different – the software installation bundle actually tricks you into agreeing to the installation. Still, there isn’t any doubt that PUPs are still bad news for computer users as they can be incredibly damaging to your computer in lots of ways.

What do PUPs look like?

The unwanted software programs after installation display loads of annoying pop-up adverts, create fake alerts, and quite often it even pushes the user to buy the software. Likewise, the majority of free software applications these days come with quite a few unwanted add-ons; in most cases a web browser toolbar or browser modification such as a homepage hijacker. Not only they needlessly use up space on your screen, but toolbars can also manipulate search engine results, watch your browsing activities, decrease your web browser’s performance, and decelerate your net connection to a crawl. PUPs employ aggressive distribution techniques to get in your computer. Some might include information gathering program code that could collect and send your private information back to third parties. Due to this unwanted program, your application may freeze, your security protections may get disabled that might leave the computer susceptible, your system may get ruined, and the list goes on and on.

Tips on how to prevent ‘crapware’

• Read cautiously before agreeing to the license agreement as it may have a clause about PUPs. • Usually, when setting up a program you will get two options, ‘Standard Installation (recommended)’ and ‘Custom Installation’. Don’t select ‘Standard’ as PUPs could be installed that way! • Use good anti-malware software. Try Safebytes Anti-Malware which will find PUPs and handle them as malware by flagging them for removal. • Be alert when you install freeware, open-source software, or shareware. Avoid downloading browser extensions and programs you are not familiar with. • Only download applications from the original providers’ sites. Avoid download portals as they use their own download manager to pack additional programs with the initial download.

What you can do if Virus Stops You From Downloading Or Installing Anything?

Malware could potentially cause several kinds of damage to computer systems, networks, and data. Certain malware goes to great lengths to stop you from installing anything on your PC, especially antivirus applications. If you’re reading this right now, you have perhaps recognized that a malware infection is a reason for your blocked web traffic. So what to do if you need to install an antivirus program like Safebytes? There are a few actions you can take to get around this problem.

Eliminate malware in Safe Mode

If the virus is set to load automatically when Microsoft Windows starts, getting into Safe Mode could very well block the attempt. Since just the bare minimum programs and services start-up in safe mode, there are hardly any reasons for issues to happen. The following are the steps you should follow to remove malware in Safemode. 1) At power on/start-up, hit the F8 key in 1-second intervals. This will bring up the Advanced Boot Options menu. 2) Select Safe Mode with Networking using arrow keys and hit ENTER. 3) Once you get into this mode, you should have an internet connection again. Now, obtain the malware removal application you need by using the browser. To install the software, follow the directions in the installation wizard. 4) After installation, do a complete scan and let the software delete the threats it detects.

Switch to an alternate browser

Web-based viruses can be environment-specific, targeting a particular web browser or attacking particular versions of the browser. The best solution to overcome this issue is to opt for a browser that is well known for its security features. Firefox contains built-in Phishing and Malware Protection to keep you safe online.

Install and run anti-virus from a USB drive

To successfully eliminate the malware, you will need to approach the issue of installing an anti-virus program on the infected PC from a different angle. Adopt these measures to employ a USB flash drive to fix your corrupted computer. 1) Use another virus-free computer to download Safebytes Anti-Malware. 2) Insert the pen drive into the clean computer. 3) Double-click the Setup icon of the antivirus program to run the Installation Wizard. 4) When asked, choose the location of the pen drive as the place where you would like to put the software files. Follow the on-screen instructions to complete the installation process. 5) Now, insert the pen drive into the infected computer. 6) Double-click the EXE file to open the Safebytes program right from the flash drive. 7) Click “Scan Now” to run a scan on the infected computer for malware.

Highlights of SafeBytes Anti-Malware

Do you want to install the best anti-malware software program for your computer system? There are various applications in the market that comes in paid and free versions for Microsoft Windows systems. A few of them are great and some are scamware applications that pretend as legit anti-malware software waiting around to wreak havoc on your computer. While looking for anti-malware software, select one which gives dependable, efficient, and full protection against all known computer viruses and malware. On the list of recommended software is SafeBytes Anti-Malware. SafeBytes carries a really good track record of top-quality service, and clients are happy with it. SafeBytes anti-malware is a highly effective and easy-to-use protection tool that is suitable for users of all levels of computer literacy. With its cutting-edge technology, this application will let you remove multiples types of malware which include viruses, worms, PUPs, trojans, ransomware, adware, and browser hijackers. SafeBytes anti-malware provides an array of advanced features which sets it apart from all others. Listed here are a few of the great ones: Anti-Malware Protection: Built on a highly acclaimed anti-virus engine, this malware removal tool is able to detect and remove many obstinate malware threats such as browser hijackers, potentially unwanted programs, and ransomware that other typical anti-virus programs will miss. Real-time Active Protection: SafeBytes offers an entirely hands-free real-time protection that is set to check, prevent and remove all threats at its first encounter. It’ll check your PC for suspicious activity continuously and shields your PC from unauthorized access. Faster Scan: SafeBytes’s virus scan engine is one of the quickest and most efficient in the industry. Its targeted scanning seriously increases the catch rate for malware that is embedded in various computer files. Safe Browsing: Safebytes assigns all sites a unique safety ranking that helps you to have an idea of whether the webpage you’re going to visit is safe to view or known to be a phishing site. Low CPU Usage: SafeBytes is renowned for its minimal influence on processing power and great detection rate of countless threats. It runs silently and efficiently in the background so you’re free to use your computer at full power all the time. 24/7 Customer Support: SafeBytes provides 24/7 technical support, automatic maintenance, and software upgrades for the best user experience.

Technical Details and Manual Removal (Advanced Users)

If you wish to manually remove PCPerformer without the use of an automated tool, it may be possible to do so by removing the program from the Windows Add/Remove Programs menu, or in cases of browser extensions, going to the browsers AddOn/Extension manager and removing it. You will likely also want to reset your browser. To ensure the complete removal, manually check your hard drive and registry for all of the following and remove or reset the values accordingly. Please note that this is for advanced users only and may be difficult, with incorrect file removal causing additional PC errors. In addition, some malware is capable of replicating or preventing deletion. Doing this in Safe Mode is advised.

The following files, folders, and registry entries are created or modified by PCPerformer

Files: File at LOCALAPPDATAPCPerformerSetupPCPerformerSetup.exe. File at PROGRAMFILESPC PerformerPCPerformer.exe. File at PROGRAMFILESPC PerformerPSCheckUp.exe. File at PROGRAMFILESPC PerformerRegistryDefrag.exe. File at WINDIRTasksPC Performer Daily Check.job. File at WINDIRTasksPC Performer Scheduled Scan.job. Registry: Key PC Performer at HKEY_CURRENT_USERSoftwarePerformerSoft. Key PC Performer at HKEY_LOCAL_MACHINESOFTWAREPerformerSoft. Key PCPerformer_is1 at HKEY_LOCAL_MACHINESoftwareMicrosoftWindowsCurrentVersionUninstall.
Read More
Sites for COVID-19 information
Living in today's world sadly is still living in the COVID-19 pandemic. It has been more than a year and sadly pandemic is still very strong and we are battling it on a daily basis. Governments all over the world are trying to battle pandemics in their own way with their own ideas and prevention measures. We as individuals can not very much influence how will the pandemic itself go but fortunately in this modern age of information we can at least follow and be in the loop at the current state of the situation regarding it. Today instead of having a troubleshooting article or tips and trick for your PC we are doing something else but in the domain of internet technology, you know, just to keep everything still IT related ???? Below you will find websites with small descriptions of what they do to keep yourself informed and hope to get over this dreadful pandemic.
  1. The WHO’s COVID-19 Dashboard

    If you are interested in real-time COVID-19 information about active cases, death tool so far, new cases and the number of vaccines administrated so far I would recommend WHO's dashboard. How WHO is a non-government institution composed of doctors from all over the world with just a single goal in mind, to help and put an end to this pandemic is a great non-biased source of information on the current state of virus spread.
  2. Vaccine Finder

    Please be aware that Vaccinefinder is working only on the territory of the United States of America. The reason why it was included in this list is that basically it is a great idea and I hope to see this site expand on other world regions or at least that inspires the emergence of another worldwide website with this type of content. If you live in the USA, this site will be a great help since you can track where and how many shots are distributed to states and even towns in America.
  3. COVID tracking project

    This site is also for U.S. residents, this time it is about tracking cases in each state with details and statistics. If you are interested in more detailed statistics of hospitalized patients per state or overall you are just interested in statistics about the pandemic in the U.S. this site might provide all the information about your needs.
  4. NPR

    On national public radio or NPR for short, there is a special section devoted to the coronavirus where new articles about pandemic are released daily with new information and new findings on how to battle it and the current state of things. A great informational site to keep up with the current state of things.
  5. Google's COVID-19 page

    Google has not been inactive during this pandemic and on its page specially dedicated to the COVID-19 virus you can find a lot of free information updated daily. From safety and prevention tips to data about pandemics there is a lot of ground covered on-page and we recommend at least going through the prevention section to inform yourself how to keep yourself and others safe.
  6. Coronavirus tracker

    This daily updated chart can show how many cases and deaths are from chosen time period all in form of a chart, you can see charts for each country in the world how COVID cases rose or dropped along with the death tool it brought.
There you go, 6 websites to track and inform yourself about this dreaded pandemic which has managed to change the world and people's lives forever, sadly on the bad side.
Read More
1 2 3 171
Logo
Copyright © 2023, ErrorTools. All Rights Reserved
Trademark: Microsoft Windows logos are registered trademarks of Microsoft. Disclaimer: ErrorTools.com is not affiliated with Microsoft, nor claims direct affiliation.
The information on this page is provided for information purposes only.
DMCA.com Protection Status