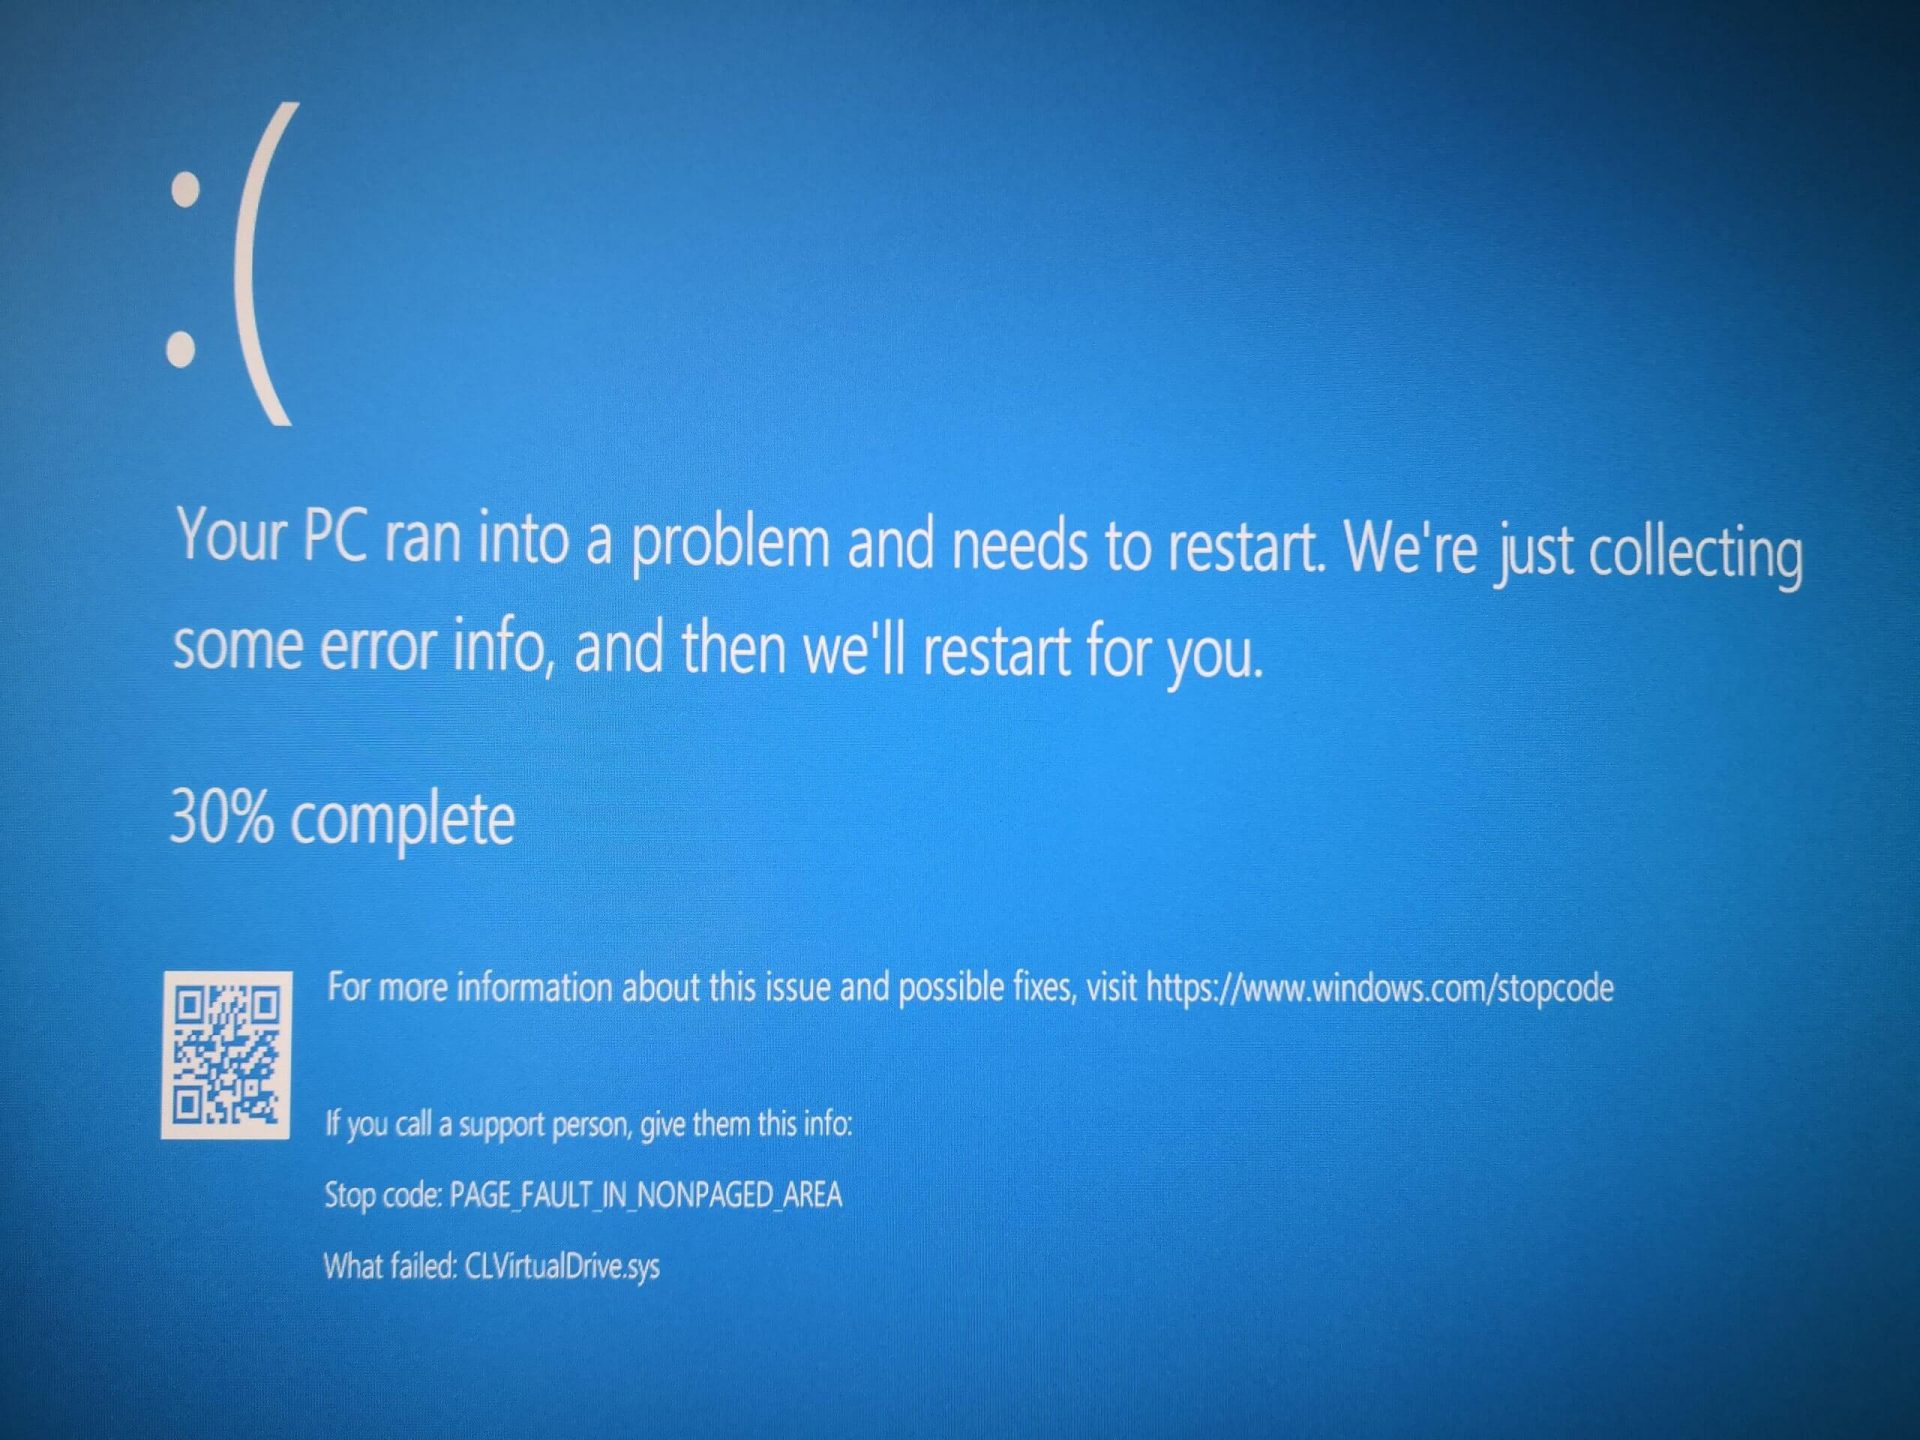
Windows 11 slows down some SSD drives

In the latest Windows 11 fiasco, it is reported that the operating system is slowing down some SSD drives. Good thing is that it does not affect all of SSD on the market but the ones which it is affecting can see even a 45% of speed drop.

ssd driveMicrosoft has not published a solution to this issue, but users point out two potential problems. The first is a security mechanism based on disk virtualization, which is supposed to slow down the performance of SSDs.

The second, in turn, is related to the place of installation of Windows 11 – users indicate that if the performance test is performed on a medium with no files associated with the system, its performance results are similar to the parameters given by the manufacturer.
Transfer speeds were to be slightly improved with the latest Windows 11 update 22000.348. However, users are still waiting for a solution to the problem that significantly reduces the efficiency of SSD media.

More information

The details described leading to speculation that the problem could be related to drivers that Microsoft is providing. On further tests, all Nvme drives that use the Microsoft driver have this problem, but Intel 905P, which has its own driver provided by Intel, is working at full power,”.

Do You Need Help with Your Device?

Our Team of Experts May Help
Troubleshoot.Tech Experts are There for You!
Replace damaged files
Restore performance
Free disk space
Remove Malware
Protects WEB browser
Remove Viruses
Stop PC freezing
GET HELP
Troubleshoot.Tech experts work with all versions of Microsoft Windows including Windows 11, with Android, Mac, and more.

Share this article:

You might also like

Setup Voice control in Windows11

Computer voice control has moved a long way from its beginning routes and in today's age controlling your PC with voice is truly a reality and fully possible. Voice control is taking up the steam in everyday life, from simple commands in cars, Alexa, smartphones, TVs, etc. to modern computers.

voice control

Windows 10 has introduced voice control into PC with Cortana even during the installation process but a lot has changed from having a virtual assistant in begging days and in today's modern Windows 11 OS. You can now freely open apps, move, copy delete files, and even dictate in order to create a word document.

However, in order to take this advantage, you will need to turn it off first since it is disabled by default. Of course, you will need a microphone and some spare time to train Windows in understanding you properly.

Setting up Voice Control

Just like in Windows 10, in Windows 11 voice control is also in accessibility options and the first step is to turn ON Windows Speech Recognition.

Click on the Start button and type Settings into the search bar, click on Open, or press ENTER. On the left side of the settings, window locate and click on Accessibility. On the right part once Accessibility is selected scroll down and find a section titled Interaction and click on Speech. Turn on the switch next to Windows Speech Recognition.

A pop-up will appear that will lead you through the rest of the setup and that's it.

Improving Voice Control

In order to make your voice control better, if you are not satisfied with the results, you can sample more of your voice into the algorithm to tune it more to your liking. Sadly this option is still deep in Control Panel.

Click the Start button and type in Speech recognition into the search bar, look for the search result with Control Panel displayed under it, and click on Open. Click on Train Your Computer to Better Understand You and follow the instructions.

The process will probably take a few minutes. The more data you provide to the speech recognition model, the more accurate it will be when interpreting your instructions. You can train the model multiple times, and each time you do, it should improve the accuracy.

Read More
Fix Windows Update Error 0x80242006
If you are trying to update your Windows 10 computer using Windows Update but encounter an error code 0x80242006, then you’ve come to the right place as this post will guide you in fixing this particular Windows Update error. This kind of error might be due to mishandling by the operating system. It could also be caused by the antivirus program or security software installed in your computer. When you encounter this error, you will see the following error message on your screen as you try to run Windows Update:
“0x80242006, WU_E_UH_INVALIDMETADATA. A handler operation could not be completed because the update contains invalid metadata.”
Here are some troubleshooting tips you can try to fix Windows Update Error 0x80242006.

Option 1 – Try to reset the Windows Update components

If by any chance that the second option didn’t work, resetting the Windows Update components could also help you resolve the problem. How? Refer to the following steps:
  • Open Command Prompt with admin privileges.
  • After that, type each one of the following command and hit Enter after you key in one after the other.
    • net stop wuauserv
    • net stop cryptsvc
    • net stop bits
    • net stop msiserver
Note: The commands you entered will stop the Windows Update components such as Windows Update service, Cryptographic services, BITS and MSI Installer.
  • After disabling WU components, you need to rename both the SoftwareDistribution and Catroot2 folders. To do that, type each one of the following commands below and don’t forget to hit Enter after you type one command after the other.
    • ren C:WindowsSoftwareDistribution SoftwareDistribution.old
    • ren C:WindowsSystem32catroot2 Catroot2.old
  • Next, restart the services you’ve stopped by entering another series of commands. Don’t forget to hit Enter after you key in one command after the other.
    • net start wuauserv
    • net start cryptsvc
    • net start bits
    • net start msiserver
  • Close Command Prompt and reboot your PC.

Option 2 – Run the Windows Update Troubleshooter

If resetting the Windows Update components didn’t work, you could also try running the Windows Update Troubleshooter as it could also help in fixing any issues related to Windows Update including this one. To run it, go to Settings and then select Troubleshoot from the options. From there, click on Windows Update and then click the “Run the troubleshooter” button. After that, follow the next on-screen instructions and you should be good to go.

Option 3 – Try to disable your antivirus program

Disabling the antivirus program or any security software installed in your computer is always a good idea you can try when the Windows Update process does not go smoothly. So before you try updating your computer again, make sure to disable the antivirus or security program and once the Windows Update is done, don’t forget to enable the antivirus program back again.

Option 4 – Check the Background Intelligent Service and the Cryptographic Service

  • Tap the Win + R keys to open the Run dialog box.
  • Next, type “services.msc” in the field and hit Enter or click OK to open Services.
  • From the list of Services, look for the following services and make sure that their Startup type is as follows:
    • Background Intelligent Transfer Service – Manual
    • Cryptographic Service ­– Automatic
  • After that, check if the Service status of the listed services above are set to Running. If they’re not, click on the Start button to start these services and then check if you can now enable the Windows Update service or not.

Option 5 – Run the System File Checker Scan

System File Checker or SFC is a built-in command utility that helps in restoring corrupted files as well as missing files. It replaces bad and corrupted system files to good system files. To run the SFC command, follow the steps given below.
  • Tap Win + R to launch Run.
  • Type in cmd in the field and tap Enter.
  • After opening Command Prompt, type in sfc /scannow
The command will start a system scan which will take a few while before it finishes. Once it’s done, you could get the following results:
  1. Windows Resource Protection did not find any integrity violations.
  2. Windows Resource Protection found corrupt files and successfully repaired them.
  3. Windows Resource Protection found corrupt files but was unable to fix some of them.
  • Restart your computer.

Option 6 – Try running the DISM tool

You can try running the Deployment Imaging and Servicing Management or DISM tool to fix the Windows Update error 0x80242006. Using this built-in tool, you have various options such as the “/ScanHealth”, “/CheckHealth”, and “/RestoreHealth”.
  • Open the Command Prompt with admin privileges.
  • Then type in the following commands and make sure to hit Enter right after you type each one of them:
    • Dism /Online /Cleanup-Image /CheckHealth
    • Dism /Online /Cleanup-Image /ScanHealth
    • exe /Online /Cleanup-image /Restorehealth
  • After that, wait until the process is finished and do not close the window as the process will probably take a couple of minutes.
  • Once it’s done, restart your computer.
Read More
Onscreen keyboard becomes transparent
If you suddenly noticed that your Onscreen keyboard in Windows 10 has become completely white or transparent for some reason, then you’ve come to the right place as this post will guide you on what you can do to resolve this kind of issue in your computer. As you know, the on-screen keyboard is included in Windows 10 and has an executable file named “osk.exe”. The on-screen keyboard is a part of the Ease of Access feature in Windows 10 which allows users to navigate the computer with the help of the mouse instead of the physical keyboard. However, there are times when you might encounter some issues when using the on-screen keyboard. One of the issues reported recently is that the on-screen keyboard becomes transparent or it only displays the borders but there is no way for you to access it. You also won’t be able to move it from the view completely. To fix this problem, there are several suggestions you can check out. You can try to check the Fade button or run the Windows Touch Keyboard troubleshooter. You can also restart its process in the Task Manager. For more details, refer to each one of the given options below.

Option 1 – Try to check the Fade button

The first thing you can do is to check the Fade button on the on-screen keyboard. You can find it at the bottom right corner of the keyboard. If it is enabled, then it’s probably the reason why your on-screen keyboard is transparent as it lets it fade in the background. Thus, you have to disable it to resolve the problem.

Option 2 – Try to run the Windows Touch Keyboard troubleshooter

The next option you can check out is running the Windows Touch Keyboard troubleshooter. This troubleshooter will help you identify the problem and would fix them automatically.

Option 3 – Try to restart the process of the on-screen keyboard via Task Manager

The next thing you can do is to restart the on-screen keyboard’s process in the Task Manager. Just follow the steps below.
  • First, tap the Ctrl + Shift + Esc keys to open the Task Manager.
  • Next, go to the Processes tab and look for the option that says, “Accessibility On-screen Keyboard”.
  • Once you found it, click on the drop-down arrow next to it and right click on the “On-screen Keyboard” option, and select End task to end its process.
  • After that, tap the Win + R keys to launch the Run utility and type “osk.exe” in the field, and then hit Enter to open the on-screen keyboard.
Read More
Your account has been disabled error
If you are trying to log into your user account on your Windows 10 computer but encountered an error message instead that says, “Your account has been disabled, Please see your system administrator”, read on as this post will guide you on how you can fix this problem. In this kind of scenario, you won’t be able to access your data unless you have access to the administrator account. This problem could be caused by several problems. It is possible that malware has infected your computer and has changed some settings in your computer, especially if your system has been under a malware attack not too long ago. The malware could’ve changed the “Account is disabled” option. The only thing you can do to resolve this kind of problem is to log into your computer using another administrator account and then change the setting. However, if you don’t have a second administrator account, you can just enable the built-in hidden administrator account on your computer. You shouldn’t have any problem enabling the hidden administrator account as it is quite easy when you can log into your account. And in this post, you will be guided on how you can enable the hidden administrator account using the Registry Editor to fix the “Your account has been disabled, Please see your system administrator” error.

To get started, follow the instructions given below.

  1. First, you need to start your computer and ensure that you are on the error screen. From there, you will see the Power options located on the right-hand side.
  2. Click on the Power options and tap and hold the Shift key and then select Restart.
  3. After that, the Advanced Boot Options will appear and from there select Troubleshoot > Command Prompt.
  4. Next, you have to select your user account and enter the user account’s password to open Command Prompt.
  5. After opening Command Prompt, open your screen and type “Regedit” and then tap Enter on your keyboard.
  6. Now select the HKEY_LOCAL_MACHINE in the Registry Editor and go to File > Load Hive.
  7. Afterward, you have to open the Windows installation drive and go to the location – WindowsSystem32Config
  8. From there, you should find a file named “SAM” – select this file and click the Open button.
  9. Next, you have to enter a key name. You can just input whatever you prefer.
  10. Once done, navigate to this path: HKEY_LOCAL_MACHINEkey_nameSAMDomainsAccountUsers
  11. From this path, you will see a key named “000001F4” – select this key and double click on the “F” entry that you can find on the right-hand side of the screen.
  12. After that, look for the value data line labeled “0038” which should show 11 in the first column. You have to replace it with 10.
  13. Once done, click on the OK button and close the Registry Editor and the Command Prompt to restart your computer.
  14. Now once your computer has restarted, sign in to the Administrator account and open the Computer Management window. You can just search for it using the search bar in the Taskbar.
  15. After you open Computer Management, go to Local Users and Groups > Users – where you can find all the user accounts. Look for your deleted user account and right-click on it and select Properties and then unmark the checkbox that says “Account is disabled”. This should fix the problem.
Read More
The server did not register with DCOM
There are times when after you upgrade your Windows operating system, the System Logs under the Event Viewer will display an error message saying, “Event ID 10010 error – The server did not register with DCOM within the required timeout”. What is DCOM? DCOM stands for “Distributed Component Object Model”. It is a proprietary Microsoft technology that allows the Component Object Model or COM software to communicate across a network. You can consider it as an extension of COM which is equipped with the capability of solving a couple of inherent problems related to the COM model to the better use over a network. COM is a tool that’s used for advanced configuration and troubleshooting in Windows 10. Developers usually use it to configure routine components and application behavior like participation in transactions and object pooling and so on. The Component Services needs the DCOM wire protocol in order to communicate with the Component Object Model components on other computers. By default, in a Windows-based system, the network computers are configured initially to enable DCOM. There are also some components in Windows that might require registering themselves with DCOM. However, if they fail to do so, you will encounter the “The server did not register with DCOM within the required timeout” error. To fix this, here are some suggestions you can check out.

Option 1 – Try to use the Component Services

  • Tap the Win + R keys to open the Run dialog box.
  • Then type “dcomcnfg” in the field and tap Enter to pull up Component Services.
  • Next, double click on the Computers folder located in the right pane and right-click on My Computer, and select the Properties option.
  • After that, switch to the COM Security tab under My Computer Properties and then go to the Access Permissions section.
  • From there, click the Edit Default button and in the new window that appears, apply the correct permission to objects under the Group or user names section.
  • Once you’re done, click OK and exit. This should fix the error.

Option 2 – Make sure that Function Discovery Resource Publication Properties Services is running

  • In the Cortana search box, type “services” and click on the Services icon to open the Services Manager. Alternatively, you can also tap the Win + R keys to launch the Run prompt and then type “services.msc” in the field and hit Enter to open the Services Manager.
  • Next, scroll down and look for the “Function Discovery Resource Publication” entry and double click on it.
  • Then switch to the General tab and from there, make sure that the Startup Type is set to “Manual (Triggered).
  • You also have to make sure that the service is running so if it’s not, just click on the Start button to start the service.
  • Now click on Apply to save the changes made.

Option 3 – Try resetting the default DCOM permissions

  • Tap the Win + R keys to open the Run dialog box.
  • Then type “dcomcnfg” in the field and tap Enter to pull up Component Services.
  • After that, expand Component Services > Computers and right-click on My Computer, and then select Properties.
  • Next, go to the Default Properties tab, and in the Default Distributed COM Communication Properties section, make sure that:
    • Default Authentication Level is set to Connect
    • Default Impersonation Level is set to Identify.
Read More
How to Fix Ehshell.exe Application Error Code

Ehshell.exe Application Error - What is it?

Ehshell.exe is a type of .exe (executable file). This file functions as an essential component of the Microsoft Media Center.  By default, it is located in a subfolder of C:\Windows. Ehshell.exe application error is an error code that pops up when tasks in the Media Center freezes. The Ehshell.exe application error is usually displayed on the screen in the following format:
“ehshell.exe – Common Language Runtime Debugging Services Application has generated an exception that could not be handled. Process id=0xa18 (2584), Thread id=0xa24 (2596).”

Solution

Restoro box imageError Causes

Ehshell.exe application error is triggered when PC users perform repetitive tasks in Media Center on a Windows XP Media Center Edition. The computer stops to respond and the error message is displayed. This error occurs if users perform one or more of the following repetitive tasks in the Media Center:
  • Repeated resize, restore and minimize the Media Center Window
  • Schedule TV shows to record
  • Repeatedly change the channel while Media Center is in a window
  • Ehshell.exe file corruption due to malware infection or registry issues
Though this is not a fatal error, to avoid any kind of inconvenience, it is advisable to fix the error right away.

Further Information and Manual Repair

To fix the ehshell.exe application error on your system, you don’t have to hire a professional and spend hundreds of dollars on repair. Here are some of the best and most effective do-it-yourself methods that you can try to resolve this issue on your PC immediately.

Method 1 - Install the Latest Service Pack for Microsoft Windows

To repair the issue, install the latest Windows service pack. A service pack is basically a Windows update, often combines previously released updates that help make Windows more reliable. These are offered free of charge on Microsoft’s official website.  To get started, simply log on to Microsoft’s official website and download the latest service pack compatible with your Windows version. The installation process may take 30 minutes to install. And you will be prompted to restart your PC about halfway through the installation process. Once the Windows Service Pack is installed, the ehshell.exe application error will be fixed. If the error still persists, then try method 2.

Method 2 - Scan for Malware

Ehshell.exe application error may also appear on your PC due to malware infection. Malware programs like viruses, Trojans, and worms deliberately give their malicious processes similar .exe file names, so it is hard to identify the malware. In such an event, it is advisable to download a powerful antivirus and scan your entire PC. Run it to remove all the hidden malware programs on your system. Once malware is removed, the ehshell.exe application error will be resolved.

Method 3 - Clean Registry

Sometimes .exe files can also get corrupt when the registry gets overloaded with unnecessary and obsolete files. If this is the underlying reason for the error code occurrence then it is advisable to download Restoro. This is a multi-functional and user-friendly PC Fixer deployed with a registry cleaner. It removed all the unnecessary files, cleans and repairs the registry in seconds thereby fixing all registry-related errors. Click here to download Total System Care and resolve the Ehshell.exe application error on your PC.
Read More
Fixing corrupted system files in Windows
Windows has a lot of built-in tools that help you fix tons of system-related issues. One of them is the System File Check which is the tool you can use to conveniently replace potentially corrupted or missing system files with good ones. But what happens when it does not work? Well, you’ve come to the right place as in this post, you will be guided on how you can replace a corrupted single Windows system file manually with a known good copy of the file if the System File Checker scan is not working. When you encounter this issue with the System File Checker, it will be unable to replace the corrupted system files and returns an error message instead. And so to fix and replace corrupted system files in your Windows 10 computer without the help of System File Checker, you can refer to the instructions provided below. Step 1: First, you need to open the log files listed below and identify which particular file has been corrupted:
  • %userprofile%Desktopsfcdetails.txt
  • Log %WinDir%LogsCBSCBS.log
Step 2: You will see all the details on the given log files. Once you find out the name and the path of the file, you have to take ownership of this corrupted system file. Step 3: To take ownership of the corrupted file, you need to pull up Command Prompt by tapping Win + R keys on your keyboard and then type “cmd” and tap Enter. Step 4: After opening Command Prompt, type and enter the command below to execute it:
takeown /f FileNameAndPath
Note: In the given command, “FileNameAndPath” represents the name and the path of the corrupted file. For instance, the corrupted file is named “wuapi.dll”, then you need to type “takeown /f C:/Windows/System32/wuapi.dll” Step 5: Next, you need to grant administrators full access & control to the corrupted file and you can do that via Command Prompt again. Step 6: In the elevated Command Prompt, type and enter the following command to execute it:
icacls FileNameAndPath /GRANT ADMINISTRATORS:F
Note: We’re going to use the wuapi.dll again as an example. So the command should be like this: icacls “C:/Windows/System32/wuapi.dll /grant administrators: F”. Step 7: Now all that’s left to do is replace the corrupted system file with a good copy from a trusted source. Once you have a copy, open an elevated Command Prompt again and execute the following command:
copy NewFileLocation FileNameAndPath
Note: In the command given above, the “NewFileLocation” is the location where you have saved the copy of the file. For instance, if you’ve saved it on your desktop, this is how it should look: “copy C:/Users/<username>/Desktop/wuapi.dll C:/windows/system32/wuapi.dll”
Read More
Computer won’t upload Pictures to websites
Windows 10 is undeniably one of the great operating systems and the same thing can be said about a lot of computers that are running it. However, there are instances when things don’t go as you expect them to be. One of the many issues you might face when using Windows 10 is the inability to upload any pictures over the web. If you are facing this issue right now, you are not alone for a lot of users have suffered from the same problem at least once. Even though it might seem like a minor problem, some users find it inconvenient especially the ones who often upload pictures online. Worry not though for this post will guide you on what you can do if you aren’t able to upload any images to websites on your Windows 10 computer. To get started in troubleshooting the problem, here are some suggestions that might help:

Option 1 – Try to clear browser cache and try downloading again

There are times when some data in the browser is conflicting with the loading of the website and triggers some problems like not being able to upload pictures to websites. And so you can try to clear your browser’s data. This might be a very basic solution but oftentimes it works in fixing this kind of odd problem in your browser.

Option 2 – Open your browser in Incognito Mode

The next thing you can do to fix the problem is to try opening the web page in Incognito Mode. When your browser is in this mode, it will work without extensions. This would help in fixing the problem especially if it was caused by some extension or toolbar in your browser. All you have to do is open any web page in Chrome and tap the Ctrl + Shift + N key combination to open a window in Incognito Mode.

Option 3 – Try to disable and get rid of the problematic extension

The next thing you can do after trying the Incognito mode in your browser is to see if a browser extension is the one that’s causing the problem. And if you have installed a lot of browser extensions, then identifying which one is the culprit may take a while but not too long. Once you’ve identified the culprit, you can get rid of that browser extension and see if you can now upload pictures on websites.

Option 4 – Try to reset your browser

You might also want to reset your browser as it could also help in resolving the issue. To reset your browser, here’s what you have to do:

Google Chrome

  • Open Google Chrome, then tap the Alt + F keys.
  • After that, click on Settings.
  • Next, scroll down until you see the Advanced option, once you see it, click on it.
  • After clicking the Advanced option, go to the “Restore and clean up option and click on the “Restore settings to their original defaults” option to reset Google Chrome.
  • Now restart Google Chrome.

Mozilla Firefox

  • Open Mozilla Firefox and tap Ctrl + Shift + A to access the Add-ons Manager.
  • In the Extensions, menu Remove the unwanted extension.
  • Restart the browser and tap keys Alt + T.
  • Select Options and then move to the General menu.
  • Overwrite the URL in the Home Page section and then restart the browser.

Internet Explorer

  • Launch Internet Explorer.
  • Next, click the wrench icon for Settings.
  • Then click Internet Options.
  • After that, go to the Advanced tab.
  • From there, click the Reset button. This will reset Internet Explorer’s settings to their default condition.
  • Now click OK to save the changes made.
  • Restart your computer.

Option 5 – Update your browser or switch to another one

The last option you can try is to update your browser. You can do it by checking for any available updates from its official site and then install it. However, if updating the browser did not help, you might want to consider switching to another browser.
Read More
Removing Default Taskbar Buttons in Windows 11
Windows 11 taskbarI do not know about you, but I prefer to set my Windows to be more to my liking and not how Microsoft thinks it should be. Let’s face it, not all users feel comfortable whit Microsoft settings and idea how things should be. One of the things I particularly did not like even in Windows 10 is icons that come by default on my taskbar, now so far, well until the latest Windows 11 update you could remove default taskbar icons the same way as in Windows 10, just right-click on them and unpin, sadly with latest update build on Windows 11 this option has been removed. In order to remove default icons from the taskbar, one must go now to Windows 11 settings and choose from there which one you would like to be placed on it. Of course, this is nothing game-breaking but it still feels strange why the standard option has been removed, it just makes no sense but lately not many things that come from Microsoft do. I do not know about you, but I prefer to set my Windows to be more to my liking and not how Microsoft thinks it should be. Let’s face it, not all users feel comfortable whit Microsoft settings and idea how things should be. One of the things I particularly did not like even in Windows 10 is icons that come by default on my taskbar, now so far, well until the latest Windows 11 update you could remove default taskbar icons the same way as in Windows 10, just right-click on them and unpin, sadly with latest update build on Windows 11 this option has been removed. In order to remove default icons from the taskbar, one must go now to Windows 11 settings and choose from there which one you would like to be placed on it. Of course, this is nothing game-breaking but it still feels strange why the standard option has been removed, it just makes no sense but lately not many things that come from Microsoft do.
Read More
Fix Windows Updates and MS Store, 0x80240438
If you were trying to update your Windows 10 computer and failed due to Error Code 0x80240438, then you’ve come to the right place as this post will give you a couple of suggestions you can check out to resolve this error. You can encounter Error Code 0x80240438 not just in Windows Updates but also in Microsoft Store. This is due to the fact that the delivery mechanism for both Windows Updates and Microsoft Store is common and interdependent. This is why a lot of Windows Update and Microsoft Store error codes are similar. And so fixing them won’t be that hard as well since most methods are basically the same. When you encounter this kind of error in Windows Update or Microsoft Store, you will see the following error message on your screen:
“There were some problems installing updates, but we’ll try again later. If you keep seeing this and want to search the web or contact support for information, this may help – (0x80240438).”
To resolve Error Code 0x80240438, here are some potential fixes you need to check out:

Option 1 – Try to run the Windows Update Troubleshooter

The Windows 10 Store Apps Troubleshooter will help you in fixing the Error Code 0x80240438. This is a great built-in tool from Microsoft that helps users fix any app installation issues. So this is worth a try to solve the problem. This built-in tool also helps you fix the Windows 10 Store if it isn’t working. To use the Windows Store Troubleshooter, follow the steps below.
  • Tap Win + I keys again to open the Windows Settings panel.
  • Go to Update & Security and then go to Troubleshoot.
  • Under the Troubleshoot section, on your left-hand side, scroll down to find Windows Update and then click on Run the troubleshooter option and follow the on-screen instructions and then see if it fixes the problem.

Option 2 – Try to temporarily disable anti-virus and Windows Defender Firewall

As mentioned, the error could be due to the antivirus program or the Windows Defender Firewall installed on your computer. Thus, disabling them or any security software installed in your computer is always a good idea you can try when you’re not able to access the shared drive on your computer. There are times when you encounter problems like Error Code 0x80240438 due to interference of antivirus or security programs. Thus, you have to disable both your antivirus program and Windows Defender Firewall for the meantime and check if it fixes the error or not.

Option 3 – Disable the Proxy server

You can also try to disable the Proxy server for your LAN to fix Error Code 0x80240438 especially if your computer was attacked by some malware or adware recently. In such cases, there is a chance that the malware or adware has changed your network settings in order to generate intrusive advertisements. Thus, you have to disable the proxy server and you can do that by following these steps:
  • Tap the Win + R keys to open the Run dialog box.
  • Then type “inetcpl.cpl” in the field and hit Enter to pull up the Internet Properties.
  • After that, go to the Connections tab and select the LAN settings.
  • From there. Uncheck the “Use a Proxy Server” option for your LAN and then make sure that the “Automatically detect settings” option is checked.
  • Now click the OK and the Apply buttons.
  • Restart your PC.
Note: If you are using a third-party proxy service, you have to disable it.

Option 4 – Try modifying the “Remove access to use all the Windows Update features” Policy

  • Start by tapping the Win + R key combination to open the Run utility.
  • Then type “gpedit.msc” in the field and tap Enter to open the Group Policy Editor.
  • Once you’ve pulled up the Group Policy Editor, navigate to this setting: User Configuration > Administrative Templates > Windows Components > Windows Update
  • Next, double click on the “Remove access to use all the Windows Update features” policy and set its radio button to “Not Configured”. As you can see, this policy setting has the following description:
“This setting allows you to remove access to Windows Update. If you enable this setting, all Windows Update features are removed. This includes blocking access to the Windows Update Web site at http://windowsupdate.microsoft.com, from the Windows Update hyperlink on the Start menu, and also on the Tools menu in Internet Explorer. Windows automatic updating is also disabled; you will neither be notified about nor will you receive critical updates from Windows Update. This setting also prevents Device Manager from automatically installing driver updates from the Windows Update Web site.”
If you enable this policy setting, you can configure one of the following notification options:
  • 0 = Do not show any notifications: This setting will remove all access to Windows Update features, and no notifications will be shown.
  • 1 = Show restart required notifications – This setting will show notifications about restarts that are required to complete an installation.
  • Now you need to exit the Group Policy Editor and restart your computer for the changes to take effect.

Option 5 – Try resetting the Windows Update folders

Resetting the Windows Update folders can also help in fixing the error in both Windows Update and Microsoft Store. All you have to do is delete the contents in both the SoftwareDistribution folder and reset the Catroot2 folder as well.

Option 6 – Try downloading and installing the Windows Updates manually

Error Code 0x80240438 might be due to a Windows Update that has failed. So if it is not a feature update and only a cumulative update, you can download the Windows Update and install it manually. But first, you need to find out which update has failed, and to do so, refer to the following steps:
  • Go to Settings and from there go to Update and Security > View Update History.
  • Next, check which particular update has failed. Note that Updates that have failed to install will be displayed under the Status column which has a label of “Failed”.
  • After that, go to the Microsoft Download Center and look for that update using its KB number and once you find it, download and then install it manually.
Note: You can also use the Microsoft Update Catalog, a service from Microsoft that provides a list of software updates that can be distributed over a corporate network. With the help of this service, it can be easier for you to find Microsoft software updates, drivers as well as fixes.
Read More
1 2 3 171
Logo
Copyright © 2023, ErrorTools. All Rights Reserved
Trademark: Microsoft Windows logos are registered trademarks of Microsoft. Disclaimer: ErrorTools.com is not affiliated with Microsoft, nor claims direct affiliation.
The information on this page is provided for information purposes only.
DMCA.com Protection Status