Msvcr100.dll is a dynamic link library file. This file is loaded into the memory at runtime for successful program execution.
This process is also referred to as runtime dynamic linking. The Msvcr100.dll belongs to the Microsoft Visual C++ Runtime Library.
It is a core Windows component used by numerous Windows-based applications to load and run smoothly on Windows PC.
Msvcr100.dll error occurs when the process of runtime dynamic linking fails. Due to this error, you are unable to access the desired application. The error code is displayed in either of the following formats:
“Msvcr100.dll Not Found"
"This application failed to start because msvcr100.dll was not found. Re-installing the application may fix this problem."
"Cannot find [PATH]msvcr100.dll"
"msvcr100.dll is missing from your computer"
"XXX.exe - System Error - MSVCR100.dll is missing from your computer."
Solution
Error Causes
Narrowing down the cause of the Msvcr100.dll error is not possible as this error can occur on your PC due to multiple reasons. However, here are some of the most common causes of Msvcr100.dll error code on Windows PC:
Msvcr100.dll file corrupt and damaged
Missing Msvcr100.dll file
Corrupt runtime code library
Registry issues
Malware attack and viral infection
Further Information and Manual Repair
Here are some of the best ways to resolve this error on your system:
Reinstall the application causing the error
As dll are shared files used by multiple programs to load and run, there is the possibility of it getting deleted when uninstalling a certain program.
If so, then the best way to fix it is to reinstall the application that is causing the error to pop up on your screen. This way you’ll be able to set up the program again and install the Msvcr100.dll file back on your system.
Download Microsoft Visual C++ 2010 Redistributable Package
Another way to resolve this error is to download Microsoft Visual C++ 2010 Redistributable Package. To do this, first, see if you are running a 32 bit or 64-bit copy of Windows. XP users go to the start menu and click run then type winver and press enter.
In Vista and Windows 7, go to the start menu and type computer and click properties. The information you require is under Windows Edition.
Once you find out whether you are using a 32 bit or a 64-bit version, accordingly, download the correct version of Microsoft Visual C++ 2010 Redistributable Package directly from Microsoft’s official website. Simply download and install the software.
Then follow the prompts to add the toolbox to your PC. After that, restart your computer; most likely the error message will be gone. If it still persists, then this means the error is either related to the registry or malware.
Download and Run Restoro
Restoro can be used to resolve both malware infection and registry issues on your PC that could be triggering Msvcr100.dll errors.
Restoro is a next-generation and multi-functional PC repair tool embedded with powerful utilities like an antivirus, a registry cleaner, and a system optimizer. The registry cleaning feature detects all registry issues and Msvcr100.dll errors.
It removes unnecessary and obsolete files on the disk, like junk files, cookies, internet history, and temporary files cluttering the disk and damaging dll files. It repairs the damaged and corrupt dll files and restores the registry.
Simultaneously the antivirus feature scans and removes all malicious software on your system. These include spyware, viruses, Trojans, adware, and malware that can damage dll files.
This software is efficient and resolves the Msvcr100.dll error in seconds. It is easy to use and has a simple navigation. It is compatible with all Windows versions.
Click here to download Restoro on your PC and resolve the Msvcr100.dll error today!
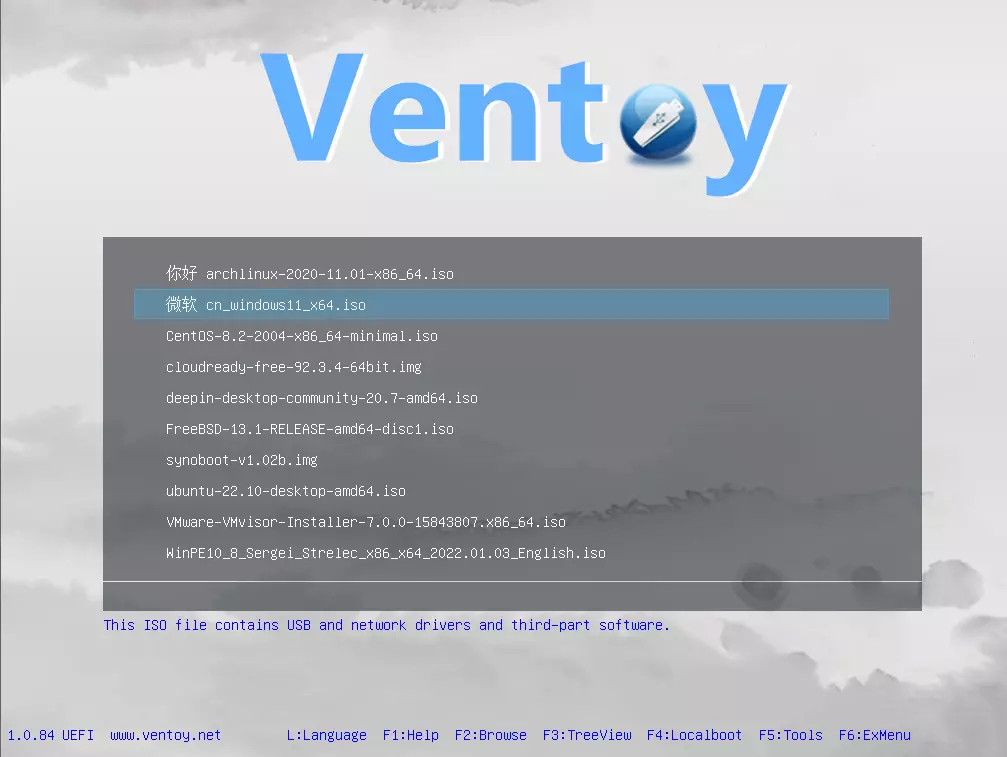
There is a lot of software on the market today, but from time to time we discover something extraordinary and unique worth sharing and today we have a threat for you. Ventoy is a tool that will help you with system reinstallations and system maintenance once and for all.
If you are a computer user that has multiple operating systems or you are installing and maintaining different hardware via different OS there is a high chance that you have multiple USB sticks with different operating systems on them.
Now the problem with that is that there are probably too many unlabeled sticks around or you do not have enough so you keep making system USBs depending on which one you might need.
Ventoy solves all of these problems by letting you have as many operating systems images as your USB has capacity. The only thing you need to do is get the software here: https://www.ventoy.net/en/index.html and make a USB with it, then you can freely just copy your ISO images onto the USB and once it is inserted into the computer you will be given a menu to choose which one you would like to start with, simple as that.
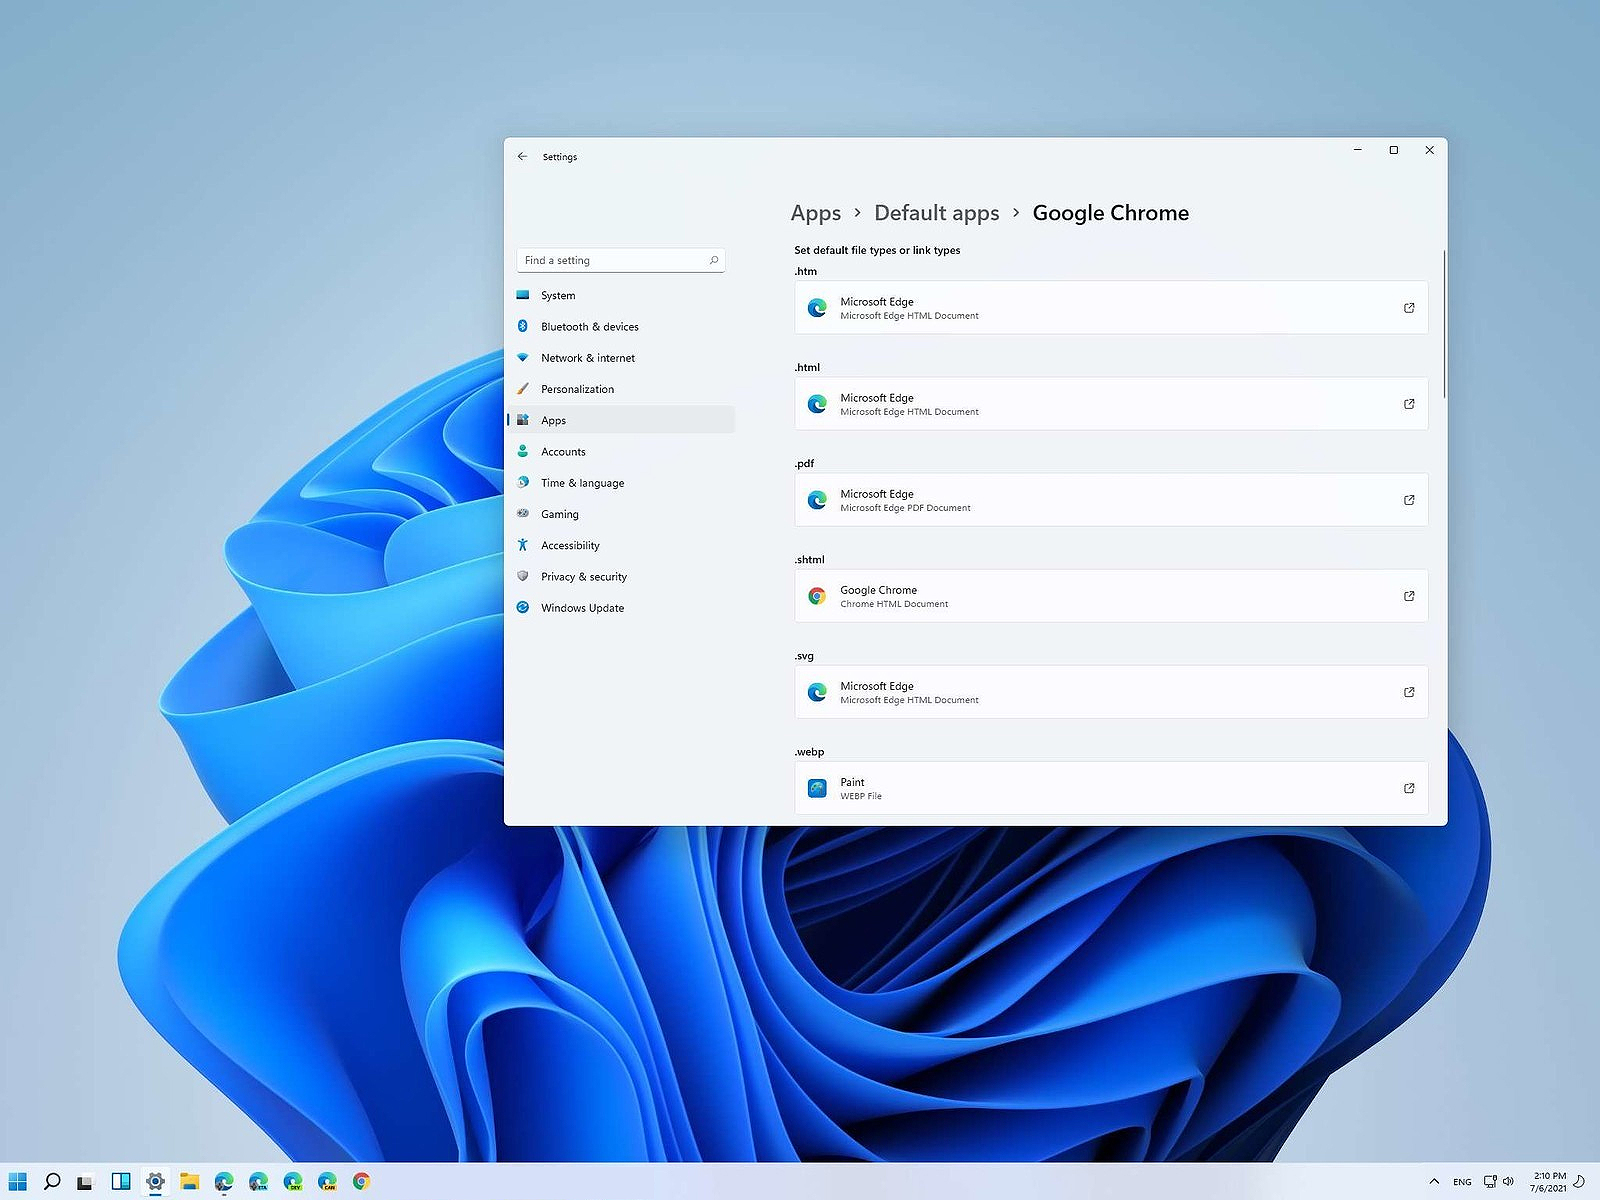
Same as in previous Windows versions, Windows 11 will also use certain applications as default ones for opening certain file types and file extensions. And yes, same as in previous versions it will come preconfigured for certain file types and associated applications like for example photos for pictures.
Of course, users usually have their own favorite applications for certain file types and much more prefer to open them inside the application of their choice instead of the default one.
We can change the default application like in previous Windows versions but this time there are two ways and overall more control of this process. Windows 11 has settings for choosing default file type applications and default file extension applications giving you more control of this process.
The opening setting for apps
Whatever you wish to change default application or default extension application you will need to open settings for default application. Follow steps to quickly go into it.
Press ⊞ WINDOWS + I to open settings
Select Apps on left
On the right part select Default Apps
Now you are in settings for choosing default applications
Choosing default application by file type extension
This is considering by Microsoft as a typical way to set default applications inside Windows 11. Once you are inside the settings app there is a box labeled Enter a file type or link type. Inside the search box, type in file extension that you wish to associate the application with like .JPG, .TXT, or other.
If the file extension is not associated with any application you will be presented with a Choose a Default button, if however, the file extension is already associated with the app, you will need to click on the app box itself.
In any case, a pop-up will appear and ask How do you want to open YOUR FILE EXTENSION files from now on? Choose Application from the list of presented ones and click on OK.
Choosing default file type
Another method is to select the default application by file type selecting application for it. In the settings screen, under the search box, you will have a list of installed applications. Choose the application that you would like to associate a file type with and click on it. On the next details screen scroll down and select the file type that you want to associate with the selected application and click on OK.
Other/third method
There is also the third method for choosing the default application for file type but it includes some surfing on your hard drive and it can be more time-consuming for first-time settings. But it is fairly quick when you need to only use it once on some new file type (for example you have a new application installed and want to switch just one file type extension to that application).
Locate the file that you want to associate with the application and right-click on it. Select Open With from the menu and then Choose Another App. Pop up will appear, select the application that you would like to use, and check the box beside Always use this app to open CHOOSEN EXTENSION files followed by clicking on the OK button.
One of the most useful utilities on a Windows 10 computer is the Windows File Explorer. It is undeniably one of the File Managers out there full of features on all the platforms. However, it is not without its issues and one of the most common ones most users encounter is when you are trying to open a folder or a location on File Explorer and it displays a message saying, “Working on it…” as it tries to load the content of that location or folder. This kind of issue mainly occurs to computers that run on an HDD although that doesn’t mean that it can’t happen to other computers that run an SDD.
And so if the File Explorer on your Windows 10 computer keeps getting stuck on the “Working on it…” message along with a green animation bar moving very slowly while loading the contents of the folder, then it’s best if you follow the options given below to resolve this problem.
Option 1 – Try deleting the contents of the Automatic Destinations folder
Tap the Win + R keys on your keyboard to open the Run utility.
And then type “%AppData%MicrosoftWindowsRecentAutomaticDestinations” and hit Enter to open this location.
From there, select all the files and tap the Shift + Delete key combination.
After that, you will get a prompt that will ask you if you want to delete all the files permanently, just click on Yes. This will delete all the Quick Access cache.
Now check if you can now open a folder or a location without the “Working on it…” message.
Option 2 – Try to rebuild the Search Index
First, open the Indexing Options using the Search bar.
Next, click on the appropriate listing, e.g. Users folder.
After that, click on the Advanced button. This will open a mini-sized window and from there, go to the Index Settings tab.
Then click on the “Rebuild” option under the Troubleshooting section.
Now click on OK after the rebuilding is completed. This should rebuild the search index for all the files and thus, fix the File Explorer stuck on the “Working on it…” message.
Option 3 – Try to optimize the folder for General Items
You might also want to try optimizing the folder for General Items as it can help the File Explorer to load the contents faster.
Just right click on the folder that takes time to load the contents in it and is showing the “Working on it…” message.
After that, click on Properties to open the Properties mini window.
From there, go to the Customize tab and click on the drop-down menu to “Optimize this folder for” under the “What kind of folder do you want?” section and then select General Items.
Then check the checkbox with a label that says, “Also apply this template to all subfolders” and click on the OK button to save the changes.
Restart File Explorer and check if the problem is now fixed or not.
Option 4 – Try performing a System Restore
Running System Restore can also help you resolve whatever issue that’s causing the “Working on it…” message. You can do this option either by booting into Safe Mode or in System Restore. If you are already in the Advanced Startup Options, just directly select System Restore and proceed with the next steps. And if you have just booted your PC into Safe Mode, refer to the steps below.
Tap the Win + R keys to open the Run dialog box.
After that, type in “sysdm.cpl” in the field and tap Enter.
Next, go to the System Protection tab then click the System Restore button. This will open a new window where you have to select your preferred System Restore point.
After that, follow the on-screen instructions to finish the process and then restart your computer and check if the problem is fixed or not.
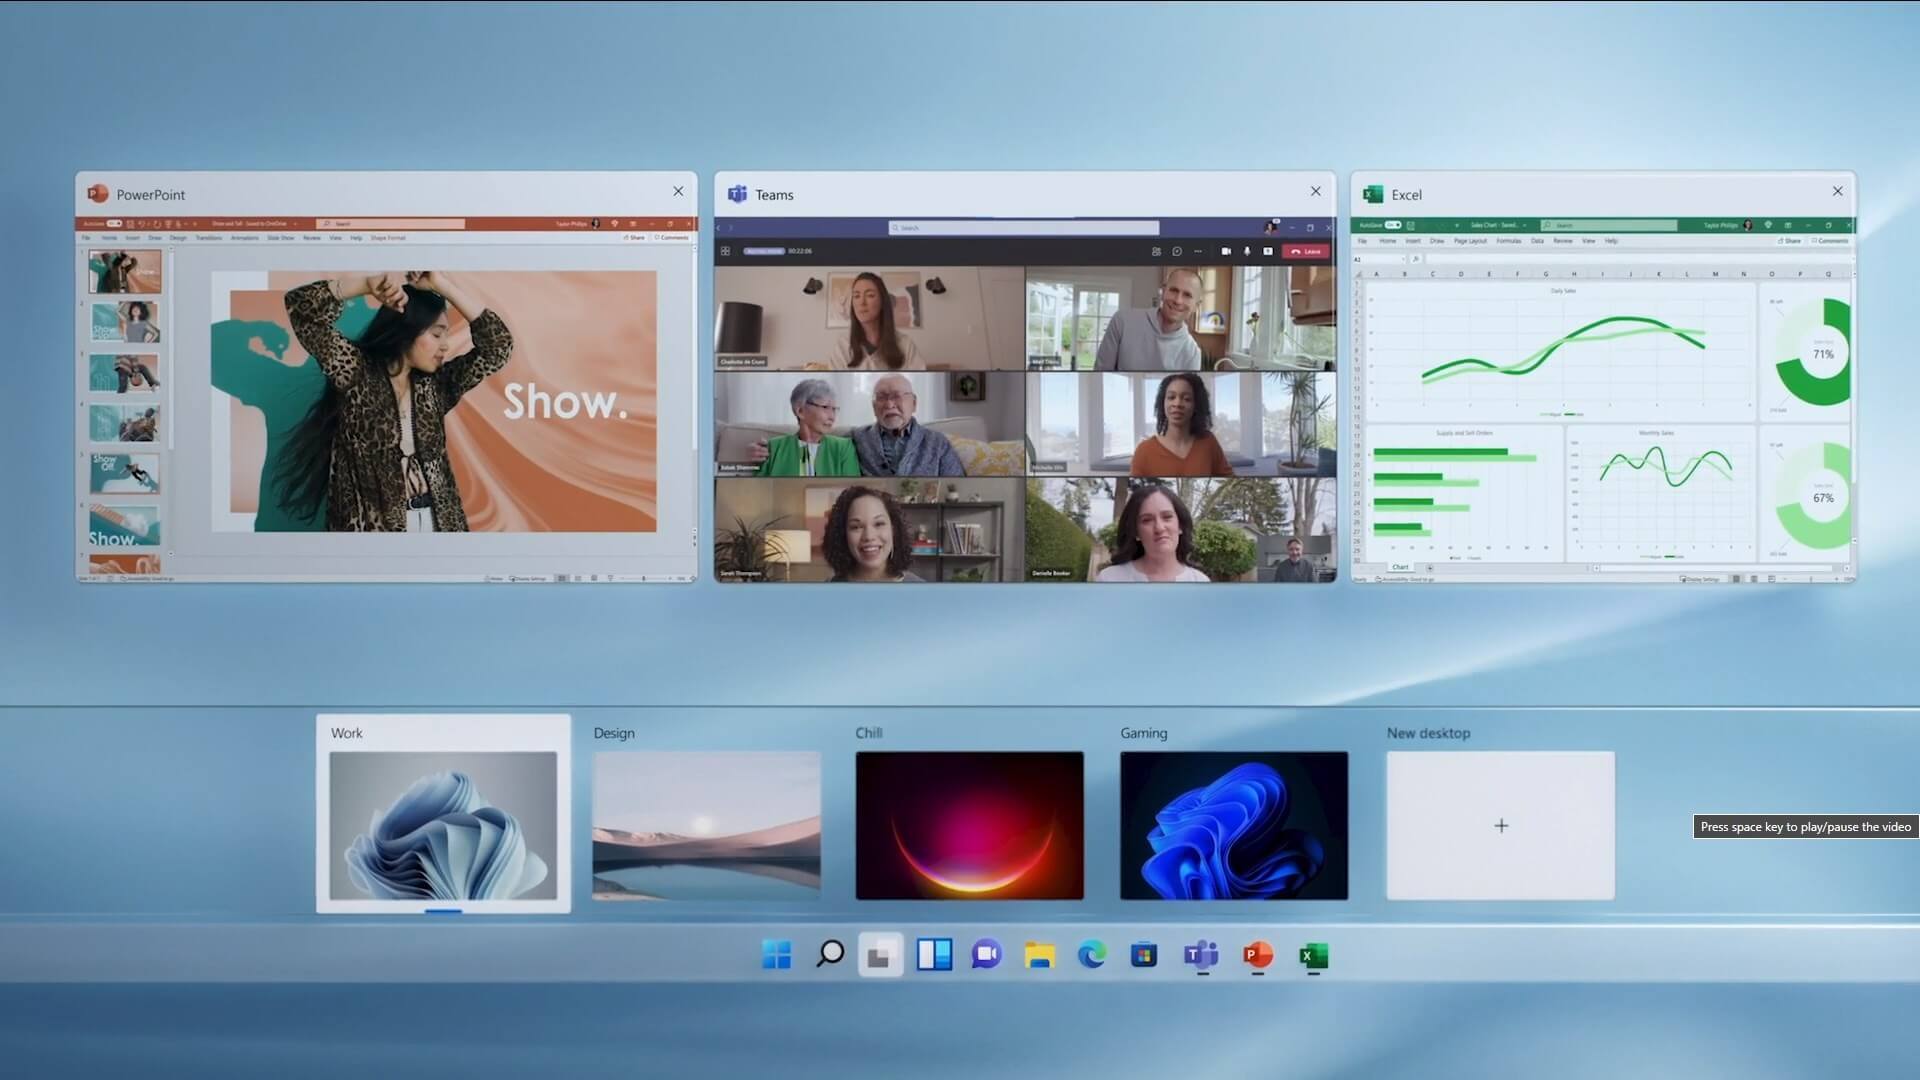
The feature that was originally planned for now scrapped Windows 10X is included in Windows 11. You will be able to customize your Virtual desktop with different wallpapers for each screen.
In order to fully customize your virtual desktops with different wallpapers follow this easy step-by-step guide.
Click on the Task View button in the taskbar
When the Task View opens, select the desktop on which you want to set wallpaper
The view will switch to the selected desktop. Right-click anywhere on the desktop and select personalize
In personalization settings, click on the background
Select wallpaper which you would like to have on the desktop by clicking on browse and navigating to the desired one
Close the settings
Repeat for each virtual desktop you would like to customize
I do not know about you, but I prefer to set my Windows to be more to my liking and not how Microsoft thinks it should be. Let’s face it, not all users feel comfortable whit Microsoft settings and idea how things should be.
One of the things I particularly did not like even in Windows 10 is icons that come by default on my taskbar, now so far, well until the latest Windows 11 update you could remove default taskbar icons the same way as in Windows 10, just right-click on them and unpin, sadly with latest update build on Windows 11 this option has been removed.
In order to remove default icons from the taskbar, one must go now to Windows 11 settings and choose from there which one you would like to be placed on it. Of course, this is nothing game-breaking but it still feels strange why the standard option has been removed, it just makes no sense but lately not many things that come from Microsoft do.
Finding files via File Explorer can be a really slow and tedious process and if you are searching often it can accumulate a lot of time loss.
I am a person which often has assets for projects in several different folders and altho I am trying my best to be tidy and organized sometimes I can not remember where I have placed certain assets that I need, in this case in order for me to find a required asset I usually search it via command prompt because it is lightning fast and gives results in second not minutes compared to File Explorer.
If you are in a similar position and you need fast results please read on as we dive deeper into the command prompt and its usage.
To quickly open the command prompt press ⊞ WINDOWS + X to bring Windows secret menu and choose the command prompt, you can also choose the admin version but for sake of this specific task, there is no difference.
in the command prompt you need to type the next command:
dir \search term* /s
where search term* is well, what are you searching for.
Now if you are looking for a specific file this command is straightforward, you just change search term* with file_name.extension and there you go, but know that this command can be used to be more powerful, for example, you can find all JPG files in your drive by typing dir \*.jpg /s or all files named work by typing dir \work.* /s
" * " is a so-called joker sign, it replaces several characters with any in a given string, meaning that dr*s will give you all results with the first 2 letters dr and last one s. Use this to specify better search results and you will get your files in no time.
This is a typical SMTP error code. SMTP is the abbreviation for Simple Mail Transfer Protocol.
It is an internet standard for email transmission. In other words, SMTP is a text-based protocol in which the sender communicates with the mail receiver by issuing commands and receiving a response code.
The SMTP error 451 is displayed in the following format:
‘451 Requested action aborted: local error in processing’
This error message indicates that the program cannot send more messages and the server has hit the limit. This is because some mail servers have limits. The sever stops the task of sending and receiving emails when this limit is achieved.
Solution
Error Causes
The causes of error 451 include:
Server limit reached
Email rejection due to a remote anti-spam filter
Request denied by the server
Viral infection
If you heavily rely on email communication with your business partners and colleagues, then it is advisable to immediately resolve this issue without any delays.
Though this error is not fatal, you should repair it right away to avoid inconvenience. SMTP error code 451 can hamper your ability to communicate via email.
Further Information and Manual Repair
Here are some of the best, easy, and effective DIY methods that you can try to repair error code 451 on your PC.
Method 1
To fix this error, simply follow these steps:
login to Linux SSH
Open the file /etc/localdomains
Nano/etc/localdomains and then add the domain name that is triggering email sending error
Now reboot your PC
This will hopefully resolve the issue. Nonetheless, if the error code still persists, then try other methods given below.
Method 2 - Configure List Settings to change the server limit.
This can be done by accessing the List Settings then Outgoing Mail Server (SMTP) and then the Limit Feature. By accessing the limit feature, you can easily adjust the program to any limit of your choice. Configure the limit and save changes. Reboot PC to activate the changes made.
Method 3 - Scan and Remove Viruses.
This error code can also be triggered due to viral infection. If this is the cause, then simply download an anti-virus on your PC.
Scan the entire system and remove all detected malicious programs like Trojans, malware, adware, viruses, and spyware. This will repair the error 451 on your system.
Method 4
If the error still persists, then contact your SMTP provider to check the situation and resolve it. There is a possibility the error is generated from the SMTP provider’s end.
You might be trying to play music files using the Windows Media Player, but were unable to do so since you encountered an error saying, “Windows Media Player Error – Server Execution Failed” error. If you encountered this error, worry not for this post will guide you on how to fix it using some potential fixes.
In the error message, the “Server execution failed” indicates that the “wmplayer.exe” is still running or shutting down at that point and it is possible that it is stuck which is not able to close properly. To fix this error, there are several potential fixes you can try. The first one is to run the Video Playback troubleshooter. While you could also try to disable the WMP Network Sharing Service or register both the jscript.dll and vbscript.dll files. For more information, refer to the options provided below.
Option 1 – Try to run the Video Playback troubleshooter
The first thing you can do to fix the problem, you can try to run the Video Playback troubleshooter instead. To run it, simply go to Settings > Update & security > Troubleshoot. From there, scroll down until you see the Video Playback option and then click on the “Run the troubleshooter” button to get started. This troubleshooter will detect and automatically fix any problems related to video playback so it should help fix the error.
Option 2 – Try to disable the WMP Network Sharing Service
If the Video Playback troubleshooter didn’t work in fixing the problem, the next thing you need to do is disable the Windows Media Player Network Sharing Service. The WMP Network Sharing Service is used to share the libraries of the Windows Media Player to other users on the network as well as media devices using the Universal Plug and Play. And since you are not using any network here, then you can disable this service to fix the problem. How? Refer to the given steps below.
Tap the Win + R keys to open the Run dialog box and type “services.msc” in the field and tap Enter to open the Services Manager.
Next, look for the Windows Media Player Network Sharing Service from the list of Services and right-click on it.
After that, click on the Stop option and see if it fixes the Windows Media Player error.
Option 3 – Try to register the jscript.dll and vbscript.dll files
Tap the Win + X keys and from the menu select the Windows PowerShell (Admin) option to open an elevated Command Prompt.
Next, type this command to register the jscript.dll file and click on the confirmation box: regsvr32 jscript.dll
After that, execute the regsvr32 vbscript.dll command to register the vbscript.dll file.
Once you’re done, these DLL files will be re-registered and should fix the Windows Media Player error.
Error code 0x803f7001 results when users fail to update their Windows operating system. This often occurs when they seek to update from Windows 8 or 8.1 to Windows 10. Users will be able to identify error code 0x803f7001 because of the following common symptoms which occur:
Inability to upgrade your Windows operating system to Windows 10
Message box with error code 0x803f7001
Solution
Error Causes
The causes for error code 0x803f7001 are usually associated with the use of an unlicensed version of Windows 8 when upgrading to Windows 10. In such cases, the error code occurs when there is no valid Windows license or product key on your device.
Further Information and Manual Repair
To fix error code 0x803f7001, users may not necessarily need technical knowledge or the help of a Windows repair technician. Usually, the process is simple and can be resolved with the use of a valid product key. However, if users have trouble implementing the instructions found in the manual repair methods listed below, contact a Windows repair specialist for help or use an automated tool that provides the best solutions for problems like error code 0x803f7001.
Method One: Use a Valid Product Key
A product key is a 25-character code that enables users to activate their Windows operating system. To successfully activate your operating system and resolve error code 0x803f7001, enter the product key in the correct order. Once you have a valid product key in your possession, begin to resolve the error code by following the instructions below:
Step one: Click the Start button then select Settings
Step two: Select Update & security then Activation
Step three: Click the Change product key
Step four: Type in your valid product key. (Ensure you include the 25 characters of your product key in the correct order.)
Once you type in the valid product key, you should be able to successfully upgrade to the latest version of Windows. However, this method is only effective if the error code 0x803f7001 on your device is caused by issues related to the product key.
If the error code reappears after attempting manual repair method one, move to the next manual method suggested below.
Method Two: Reinstall Genuine Version of Windows 8
This method is crucial for you to perform if method one was not successful. Begin the reinstallation process by ensuring you have a genuine version of Windows 8. After reinstalling this version of your Windows operating system, attempt to upgrade to Windows 10 by following the instructions below:
Step one: Type Settings in the search box near the Start button or click the Start button and select Settings
Step two: After clicking Settings, select Update & Security
Step three: Select Windows Update then the Check for updates tab
Step four: Activate Windows 10 update
If this method is successful, you will no longer see error code 0x803f7001 pop up in a message box. You will also be able to access Windows 10, and all the benefits it provides users, on your device.
Method Three: Install an Automated Tool
Automated tools help PC users eliminate common issues such as Windows error codes. To address or rectify error codes like error code 0x803f7001 download a powerful automated tool on your machine. This tool enables users to access quick solutions. It also scans for and corrects issues that may result in error codes or poor PC performance.
As we near the end of 2022 we look at the current best antivirus software for popular platforms, why they are the best, and why you should get them.
Avira, a great free Antivirus
Avira has been around a long time with its free antivirus version of the larger protection suite. It had its ups and downs but the latest versions are really great. With high-speed scans and low system impact, Avira antivirus is really one of the best free antivirus software currently on the market.
The software itself has also received UI & UX updates making it straightforward and easy to use. The virus scanning engine is the same as in paid version that ranks among the top engines in the world for this type of work. The package also gives you some great browser protection and a good firewall as well, there is really no excuse to skip on this if you want a free solution.
The only thing that we would say is not so great in Avira is reporting some false positives, sometimes even for MS updates, it is rare but it can happen.
Malwarebytes, a powerful Windows antivirus
Malwarebytes Premium is easy to use, simple antivirus solution that shies away from complicated UI, and simply put, it just works. Its scanning engine is well-known and places among the top and best in the world often finding some malware that other can miss.
Another great thing is its integration with Windows itself, it is one of the rare applications that can and will work incredibly well beside your typical Windows protection tools so you can have both of them running at the same time.
Installation and running are really simple and every typical PC user will find it as easy as walking in the park. On the other hand, sadly system impact is a little high and it will have issues running on lower-end systems due to its memory requirements.
Intego MAC Internet Security X9, the best Mac antivirus
Gone are the days when MAC had no virus issues, since MAC rose in popularity among the users, also rose the number of viruses and malware. The system itself has some great protection built it inside but for more security and better control of it, you will need a third-party dedicated solution.
Intego was made by Mac antivirus experts who have been building this kind of software last 25 years. The interface is easy to use and premade presets are really helpful, but the security suite can also be customized to fit your needs and desires.
Since this is only available as a security suite, you are getting a firewall and some other security tools along with your antivirus that will run as a part of it.
The bad side is that scans can sometimes run slow, most of the time they are OK in terms of speed but occasionally they can switch to slower speeds and impact scanning time to some annoying times. Also, there is no webcam protection nor VPN service included where others on this list have them.
Bitdefender mobile security: best Android protection
While protection is not only needed for your gaming or workstation, software suites that are dealing with mobile and tablet security exist. The best of them is the Bitdefender antivirus mobile suite. Low on system resources and low on performance impact with the really great virus detection rate Bitdefender is at the top of suites for your phone.
Consistent high virus detection packed with low battery impact is great but the suite comes with tons of other tools as well like browser security tools, email protection, and real-time link and notification protection.
The application will always scan each file and newly installed application in the background and alert and cut off any found threat. App itself is easy to install and use and most of the time it will do everything in the background for you but offer you customization if you need it.
The package also includes VPN and application lock that will let you protect the critical applications from being accessed as well as an online account scanner. Anti-theft and anti-loss tools, which allow you to find, remotely lock or wipe a stolen or lost device, add yet another layer of protection.
One thing that is missing from this great package is fraudulent call protection. Newer Android phones have this feature inside but it would be nice if Bitdefender had it as well.
Bitdefender, the best antivirus software
Now that we have covered specific cases of each platform, there is one player that has all of them covered and with a quality product, that player is BitDefender and it is great. Personally, this is my protection suite of choice and as I type this it is running in the background.
Bitdefender has it all, low system impact, as a matter of fact, it is one, if not, the lowest performance impact engine on the market currently and that is packed with a great and highly consistent virus & malware detection suite. Along with real-time malware protection, browser security, and anti-spam tools, you also get anti-phishing defenses, ransomware protection, and a strong firewall.
Bitdefender scores are very high in both the zero-day threat and real-world protection tests at AV-Test, an established organization that tests antivirus software. Despite being tested against tens of thousands of well-known and widespread malware threats, the software consistently achieves a 100% blocking rate.
The suite also comes with a restricted free VPN and with parental controls as well. Webcam and microphone protection are also included in the suite and on top of all, it has great pricing plans and constant discounts.
BitDefender is really a great package and it might sound too good, but after years and years of personally using it I have not had single malware or virus issue, the only thing that I would put as a negative is that system is severely slowed down when system scans are performed so be sure to run or schedule them when you are not using your computer. This, of course, can put some people off and I will admit it is a serious drawback but for me, the security of my workstation is more important than leaving the computer for 20 or so minutes in order to perform a full scan of the system.


 Same as in previous Windows versions, Windows 11 will also use certain applications as default ones for opening certain file types and file extensions. And yes, same as in previous versions it will come preconfigured for certain file types and associated applications like for example photos for pictures.
Of course, users usually have their own favorite applications for certain file types and much more prefer to open them inside the application of their choice instead of the default one.
We can change the default application like in previous Windows versions but this time there are two ways and overall more control of this process. Windows 11 has settings for choosing default file type applications and default file extension applications giving you more control of this process.
Same as in previous Windows versions, Windows 11 will also use certain applications as default ones for opening certain file types and file extensions. And yes, same as in previous versions it will come preconfigured for certain file types and associated applications like for example photos for pictures.
Of course, users usually have their own favorite applications for certain file types and much more prefer to open them inside the application of their choice instead of the default one.
We can change the default application like in previous Windows versions but this time there are two ways and overall more control of this process. Windows 11 has settings for choosing default file type applications and default file extension applications giving you more control of this process.
 The feature that was originally planned for now scrapped Windows 10X is included in Windows 11. You will be able to customize your Virtual desktop with different wallpapers for each screen.
In order to fully customize your virtual desktops with different wallpapers follow this easy step-by-step guide.
The feature that was originally planned for now scrapped Windows 10X is included in Windows 11. You will be able to customize your Virtual desktop with different wallpapers for each screen.
In order to fully customize your virtual desktops with different wallpapers follow this easy step-by-step guide.
 I do not know about you, but I prefer to set my Windows to be more to my liking and not how Microsoft thinks it should be. Let’s face it, not all users feel comfortable whit Microsoft settings and idea how things should be.
One of the things I particularly did not like even in Windows 10 is icons that come by default on my taskbar, now so far, well until the latest Windows 11 update you could remove default taskbar icons the same way as in Windows 10, just right-click on them and unpin, sadly with latest update build on Windows 11 this option has been removed.
In order to remove default icons from the taskbar, one must go now to Windows 11 settings and choose from there which one you would like to be placed on it. Of course, this is nothing game-breaking but it still feels strange why the standard option has been removed, it just makes no sense but lately not many things that come from Microsoft do.
I do not know about you, but I prefer to set my Windows to be more to my liking and not how Microsoft thinks it should be. Let’s face it, not all users feel comfortable whit Microsoft settings and idea how things should be.
One of the things I particularly did not like even in Windows 10 is icons that come by default on my taskbar, now so far, well until the latest Windows 11 update you could remove default taskbar icons the same way as in Windows 10, just right-click on them and unpin, sadly with latest update build on Windows 11 this option has been removed.
In order to remove default icons from the taskbar, one must go now to Windows 11 settings and choose from there which one you would like to be placed on it. Of course, this is nothing game-breaking but it still feels strange why the standard option has been removed, it just makes no sense but lately not many things that come from Microsoft do.
I do not know about you, but I prefer to set my Windows to be more to my liking and not how Microsoft thinks it should be. Let’s face it, not all users feel comfortable whit Microsoft settings and idea how things should be.
One of the things I particularly did not like even in Windows 10 is icons that come by default on my taskbar, now so far, well until the latest Windows 11 update you could remove default taskbar icons the same way as in Windows 10, just right-click on them and unpin, sadly with latest update build on Windows 11 this option has been removed.
In order to remove default icons from the taskbar, one must go now to Windows 11 settings and choose from there which one you would like to be placed on it. Of course, this is nothing game-breaking but it still feels strange why the standard option has been removed, it just makes no sense but lately not many things that come from Microsoft do.  in the command prompt you need to type the next command:


