If you encounter an error message saying, “ERR SSL VERSION OR CIPHER MISMATCH” while visiting a website, then it is not primarily your fault as an end-user. In fact, it can happen on any website like Chrome, Edge, Firefox, and even Internet Explorer. Getting this error means that the website you are visiting is using an SSL certificate which your browser seems to be rejected because there is some issue with the certificate. It is also possible that the certificate that’s downloaded on your computer is corrupted or that your computer configuration for TSL/SSL is misconfigured.
Here are the complete details of the error message:
“A secure connection cannot be established because this site uses an unsupported protocol, Error code ERR_SSL_VERSION_OR_CIPHER_MISMATCH”
To resolve the ERR_SSL_VERSION_OR_CIPHER_MISMATCH error, refer to the options given below and see which one works for you.
The first thing you can do is to try accessing the website using HTTP instead of HTTPS. If you can open the website using HTTP then it means that the problem is in the website itself. And if you are the website owner, you can check the following:
On the other hand, you may also check if your CDN also supports SSL since most of the CDN nowadays supports SSL. All you have to do is configure it correctly and it should be good to go.
If you were using Google Chrome when you got the ERR SSL VERSION OR CIPHER MISMATCH error, then you need to follow the protocol fixes for SSL3/TLS and QUIC which are usually some of the reasons that cause the SSL version / Cipher Mismatch. It also has a few fixes for Windows 10 computer where you can clear the certificates and make sure that your computer date and time is in sync with your time zone and so on.
If you were using Edge or Internet Explorer when you got the error, then you have to follow the steps below.
On the other hand, if you were using Firefox when you go the error, here’s what you have to do.

CHKDSK [volume [[path] filename]] [/F] [/V] [/R] [/X] [/C] [: size]]Note: In the command given above, “[/F]” will try to fix the system errors while “[/R]” will be the one to fix the bad sectors.
netsh int ip reset
Digital Signature/Publisher: Bandoo Media, Inc. Product Version: 5.0.2.4762 Entry Point: 0x000038AF
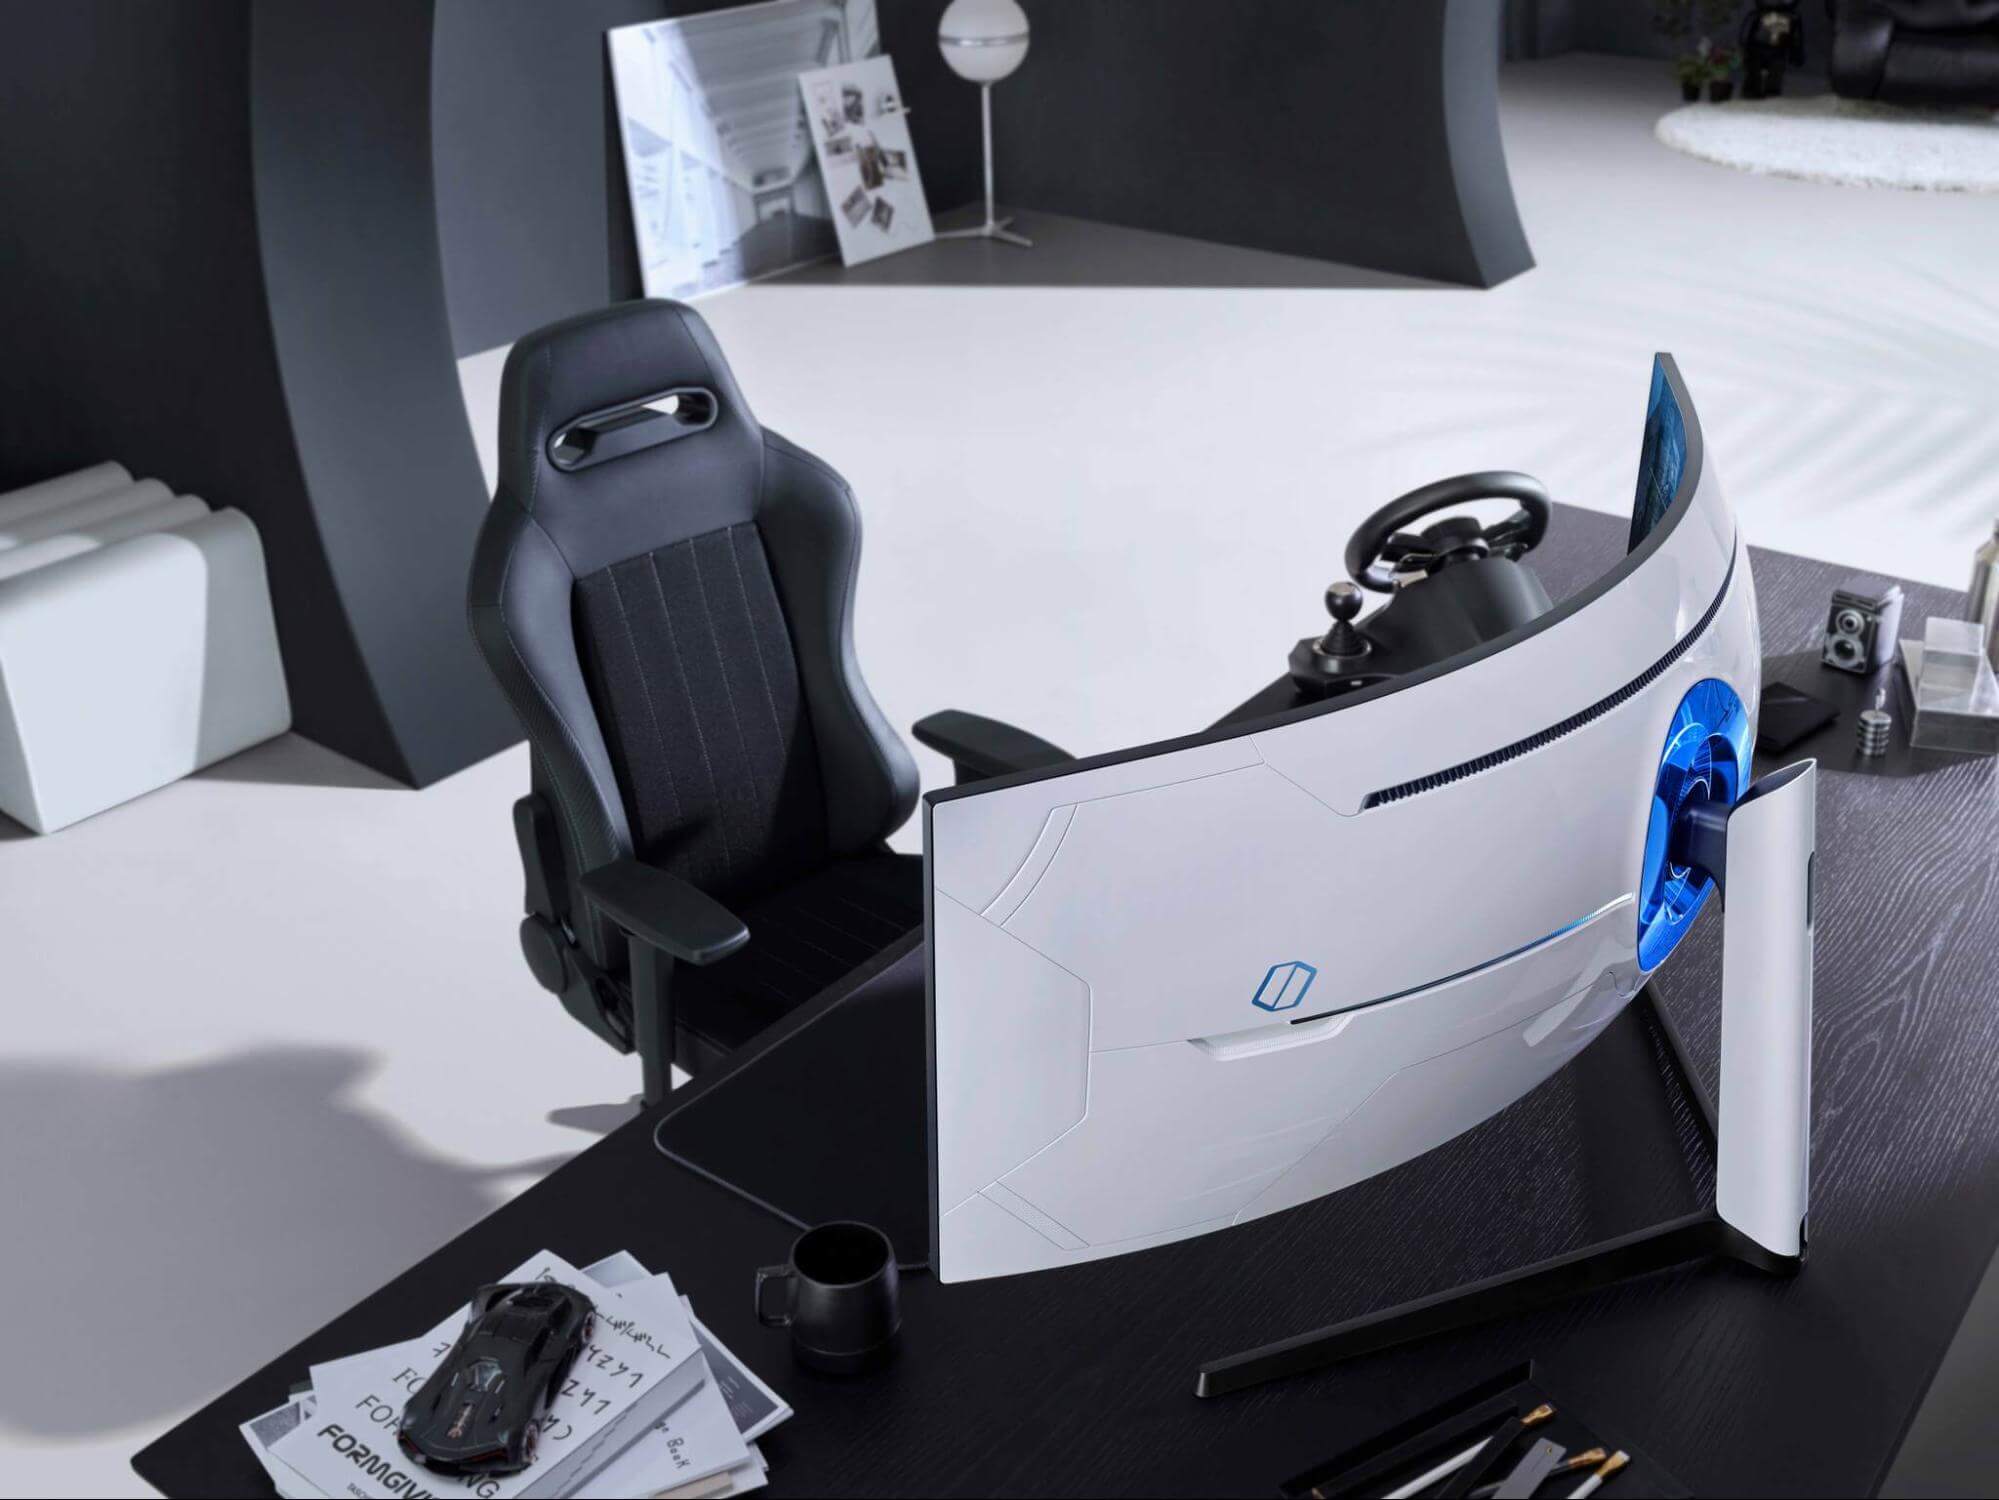 Odyssey Neo G9 is a successor to Odyssey G9 curved gaming monitor and it is aimed again at the gaming community with its specifications but of course, it can be used for work as well.
Gapping at a stunning $2500 USD price it is not really a cheap piece of hardware so it is normal to see what do you get for this kind of price and do features justify it, so let’s dive in.
Odyssey Neo G9 is a successor to Odyssey G9 curved gaming monitor and it is aimed again at the gaming community with its specifications but of course, it can be used for work as well.
Gapping at a stunning $2500 USD price it is not really a cheap piece of hardware so it is normal to see what do you get for this kind of price and do features justify it, so let’s dive in.
DiscoverAncestry is a Browser Extension for Google Chrome developed by Mindspark Inc that presents itself as a web tool to discover the origins or meanings of particular family names. When installed this extension changes your default new tab page to search by MyWay, as well as your default search engine to Search.MyWay.com
While active, DiscoverAncestry logs user browsing information, recording clicked links, visited websites and viewed products. This information is later used to better target personal ads. Browsing the internet with this extension active will result in injection of additional ads, sponsored content and even pop-up ads throughout the browsing sessions.
DiscoverAncestry is usually found bundled with other potentially unwanted software, this combined alongside its aggressive ad injection is why DiscoverAncestry has been marked as a Browser Hijacker, and it is recommended to remove it from your computer.
Windows 11 has come a long way from its infant stage. Today it is incredibly good and stable operating system that also looks good and modern. Unfortunately, fancy animations and good graphics come with a price, in this case, slower performance on some little older and weaker computers.

Animations itself which include also fading effects can sometimes feel slugging and laggy and have a general overall feeling of delay. For a more old-school instant experience, you can turn off animations.
In order to turn animations inside Windows 11 follow this simple guide:
First thing is to open Settings by pressing Windows + i key combination or you could open Start and in the search box type in Settings and then click on its icon.
Once inside settings on the left side find Accessibility and click on it to select it. Once it is selected on the right side choose Visual effects. Inside the visual effects section click on the switch next to Animation effects to OFF. You can also turn off transparency effects in this section if you wish if you have an older GPU in order to speed it up a little.
That is all you need to do, settings will be automatically saved and all animations will be turned off for a quicker and more responsive feeling when working inside W11
PC Performer is a registry cleaner made by PerformerSoft. The purpose of this program is to remove redundant items from the Windows registry. Registry cleaners remove broken links, missing references within the Windows registry. PC performer is designed to automatically optimize your registry and clean it up.
PC Performer adds registry entries for the current user that allow it to run automatically each time the system is rebooted. It adds a scheduled task to Windows Task Scheduler in order to run at various times. The software connects to the internet, therefore it creates a Windows Firewall exception that allows it to connect without interference. Multiple anti-virus programs detected this software as Malware, it typically comes bundled with other software or is distributed through a pay-per-install bundle.
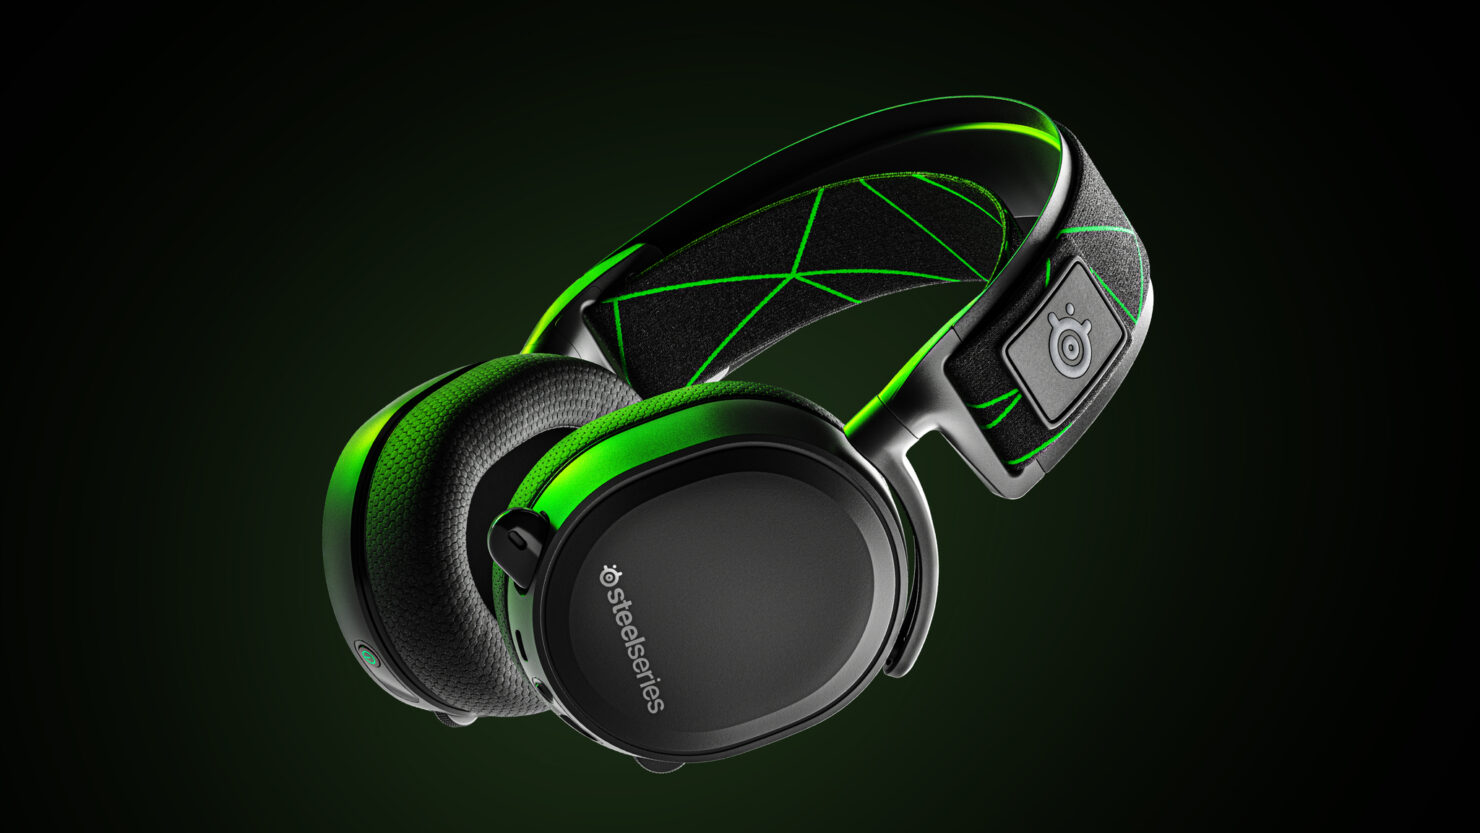 The best gaming headset overall for PC, PS5, PS4, Xbox Series X/S, Xbox One, Switch, Android
The SteelSeries Arctis 7P/7X is the best gaming headset overall, offering great sound, consistent wireless performance, and a comfy, attractive design at a reasonable price. The headset’s 2.4-GHz wireless connectivity keeps you glued to your game without any lag or interference. Even better: Thanks to its USB-C dongle and USB-A adapter, you can enjoy wireless performance with any system, from a PS5 to a Nintendo Switch in handheld mode, to an Android phone.
The best gaming headset overall for PC, PS5, PS4, Xbox Series X/S, Xbox One, Switch, Android
The SteelSeries Arctis 7P/7X is the best gaming headset overall, offering great sound, consistent wireless performance, and a comfy, attractive design at a reasonable price. The headset’s 2.4-GHz wireless connectivity keeps you glued to your game without any lag or interference. Even better: Thanks to its USB-C dongle and USB-A adapter, you can enjoy wireless performance with any system, from a PS5 to a Nintendo Switch in handheld mode, to an Android phone.
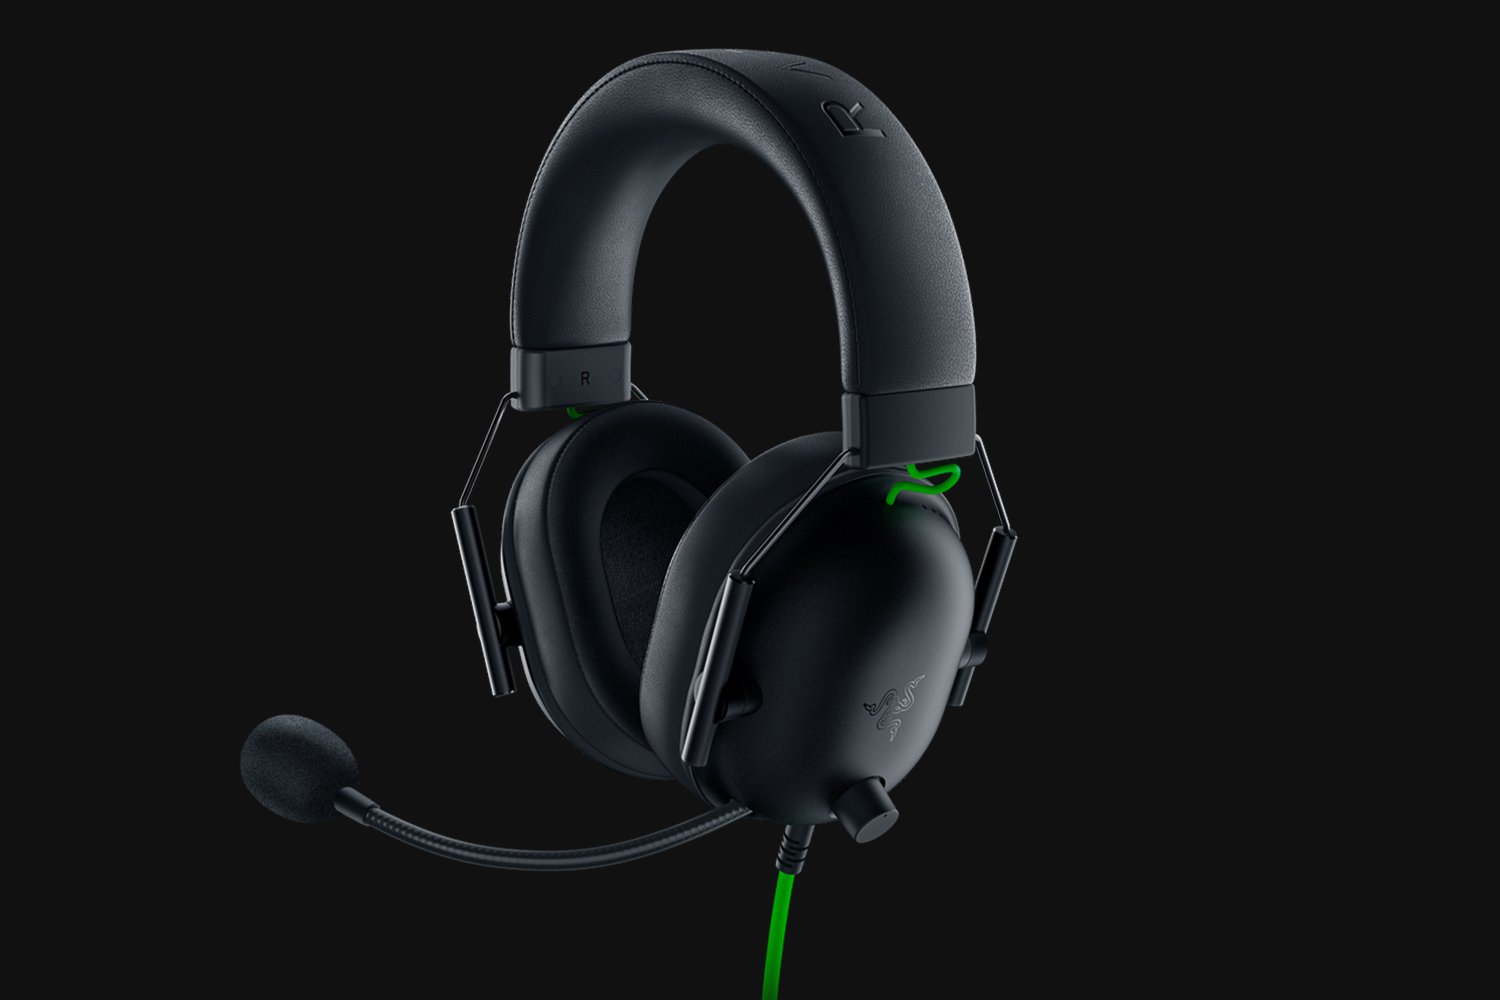 Razer's best headset yet for PC, PS5, PS4, Switch, Xbox One
The Razer Blackshark V2 is probably the best headset that Razer has ever made. This mid-range wired headset provides fantastic sound for both games and music, particularly thanks to its innovative THX profiles. The famous film audio company has lent its expertise to make the Blackshark V2's surround sound realistic and nuanced, especially for a handful of games like Apex Legends and Sekiro: Shadows Die Twice, which have their own optimized profiles.
Razer's best headset yet for PC, PS5, PS4, Switch, Xbox One
The Razer Blackshark V2 is probably the best headset that Razer has ever made. This mid-range wired headset provides fantastic sound for both games and music, particularly thanks to its innovative THX profiles. The famous film audio company has lent its expertise to make the Blackshark V2's surround sound realistic and nuanced, especially for a handful of games like Apex Legends and Sekiro: Shadows Die Twice, which have their own optimized profiles.
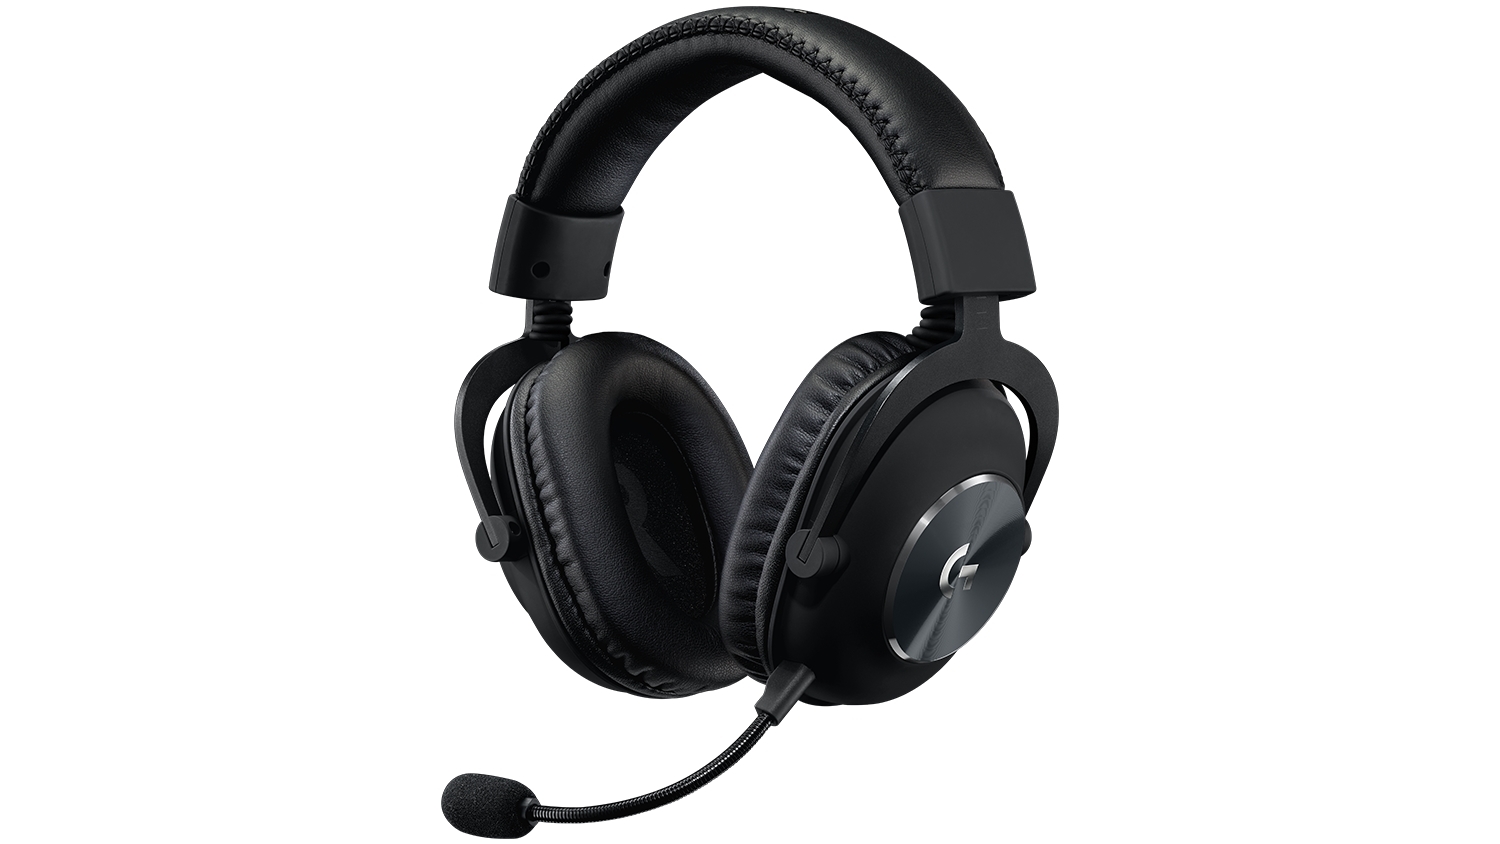 Built for tournament play for PC, PS5, PS4, Xbox One, Switch
The Logitech G Pro X delivers tournament-grade performance for a reasonable price. The headset's distinguished black design sets itself apart from the competition, in no small part thanks to its flexible headband and supremely comfortable foam and leatherette earcup options. The Go Pro X delivers rich, direction-accurate sound out of the box whether you're playing on PC or console. It's also the first gaming headset to sport a built-in Blue microphone, allowing for extra-crisp voice chat whether you're practicing with your Apex Legends squad or streaming to your online fans
Built for tournament play for PC, PS5, PS4, Xbox One, Switch
The Logitech G Pro X delivers tournament-grade performance for a reasonable price. The headset's distinguished black design sets itself apart from the competition, in no small part thanks to its flexible headband and supremely comfortable foam and leatherette earcup options. The Go Pro X delivers rich, direction-accurate sound out of the box whether you're playing on PC or console. It's also the first gaming headset to sport a built-in Blue microphone, allowing for extra-crisp voice chat whether you're practicing with your Apex Legends squad or streaming to your online fans
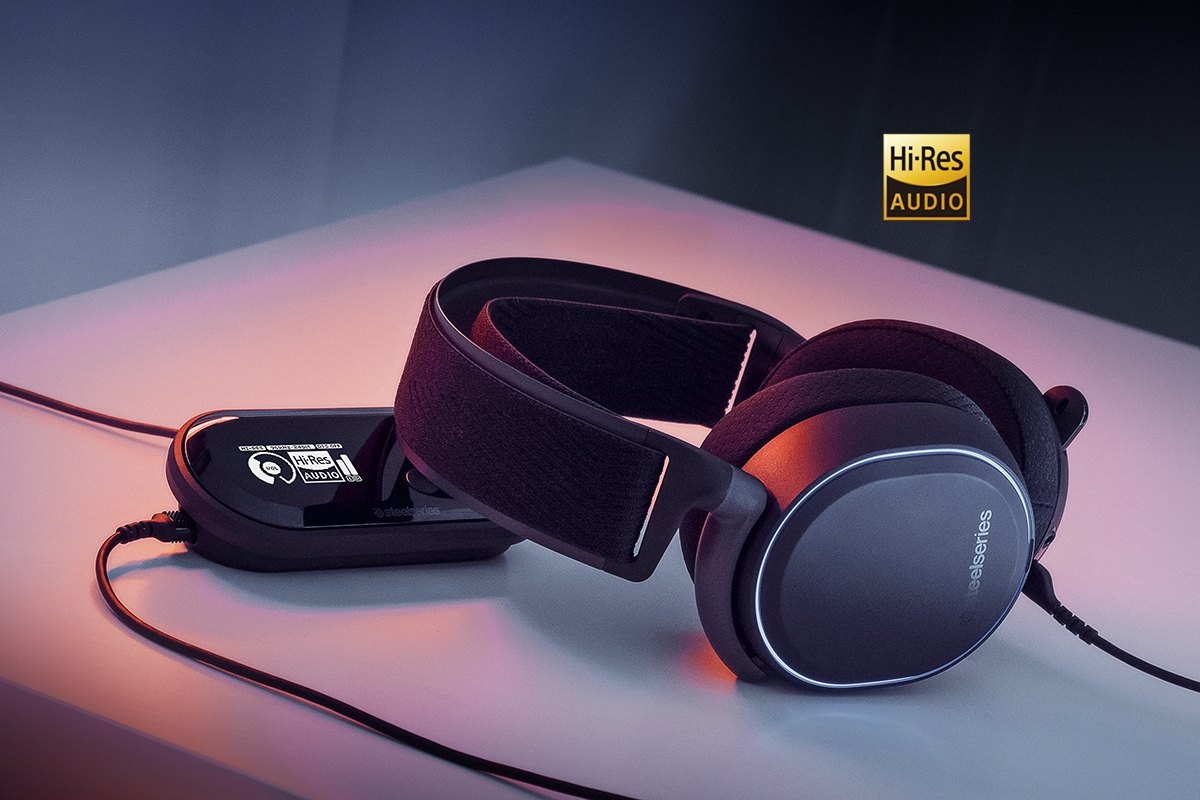 Audiophile sound for gamers made for PS4, PC (with GameDAC), Xbox One, Switch, mobile (analog)
SteelSeries’ Arctis Pro + GameDAC brings audiophile-grade features to the already excellent Arctis design. This headset includes a DAC (digital-to-analog converter), which allows it to deliver high-resolution 96-kHz/24-bit audio. The GameDAC also allows for a wealth of customization options, whether you want to fine-tune sound via an equalizer or customize the headset’s subtle RGB lighting.
Audiophile sound for gamers made for PS4, PC (with GameDAC), Xbox One, Switch, mobile (analog)
SteelSeries’ Arctis Pro + GameDAC brings audiophile-grade features to the already excellent Arctis design. This headset includes a DAC (digital-to-analog converter), which allows it to deliver high-resolution 96-kHz/24-bit audio. The GameDAC also allows for a wealth of customization options, whether you want to fine-tune sound via an equalizer or customize the headset’s subtle RGB lighting.
 Big sound on a budget for PS, PS5, PS4, Xbox Series X/S, Xbox One, Switch, mobile
The Stinger’s sturdy, feather-light frame and soft, faux-leather earcups make for one of the best gaming headsets on a budget, and its handy on-ear controls and solid microphone certainly don’t hurt either. Finding a comfortable fit is arguably the most important thing you can look for in a gaming headset, and the Cloud Stinger doesn’t disappoint on that front. The Stinger also offers very solid audio quality for the price, though things can get a bit blown out at max volume
Big sound on a budget for PS, PS5, PS4, Xbox Series X/S, Xbox One, Switch, mobile
The Stinger’s sturdy, feather-light frame and soft, faux-leather earcups make for one of the best gaming headsets on a budget, and its handy on-ear controls and solid microphone certainly don’t hurt either. Finding a comfortable fit is arguably the most important thing you can look for in a gaming headset, and the Cloud Stinger doesn’t disappoint on that front. The Stinger also offers very solid audio quality for the price, though things can get a bit blown out at max volume
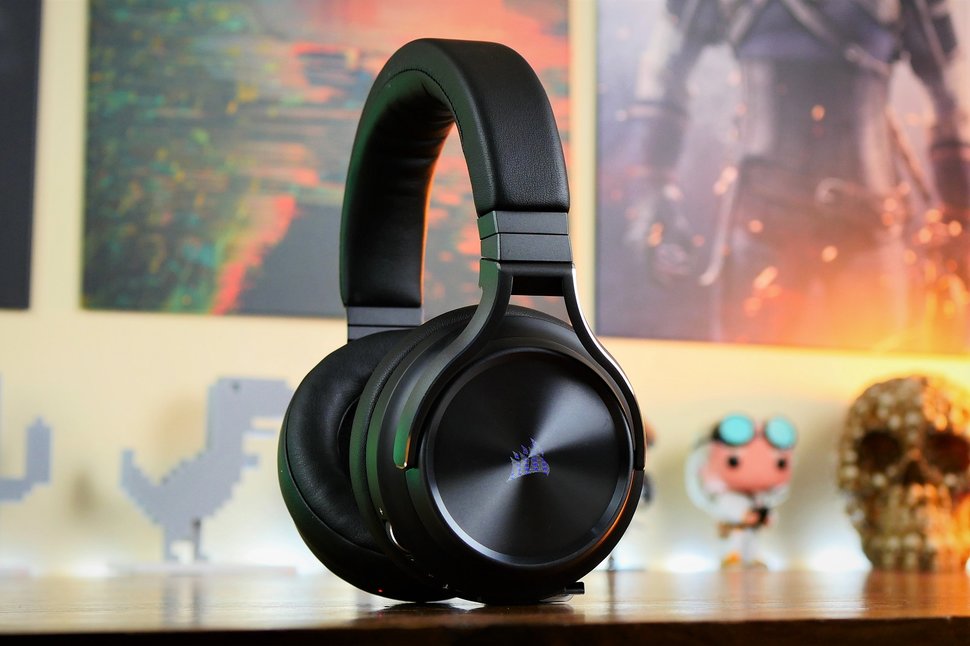 The best gaming headset with Bluetooth for PC, PS4, PS5, Xbox One, Xbox Series X/S, Switch (handheld), mobile
The Corsair Virtuoso RGB Wireless XT is one of the best gaming headsets that Corsair has ever made. Not only is this headset extremely comfortable, but it also provides excellent sound quality. It works wirelessly with PCs and PlayStation consoles via USB, as well as mobile devices, streaming players, and smart TVs via Bluetooth. You can connect it to a Switch, Xbox controller, or older system via a 3.5 mm audio cable. There's very little that the Virtuoso RGB Wireless XT can't do.
The best gaming headset with Bluetooth for PC, PS4, PS5, Xbox One, Xbox Series X/S, Switch (handheld), mobile
The Corsair Virtuoso RGB Wireless XT is one of the best gaming headsets that Corsair has ever made. Not only is this headset extremely comfortable, but it also provides excellent sound quality. It works wirelessly with PCs and PlayStation consoles via USB, as well as mobile devices, streaming players, and smart TVs via Bluetooth. You can connect it to a Switch, Xbox controller, or older system via a 3.5 mm audio cable. There's very little that the Virtuoso RGB Wireless XT can't do.
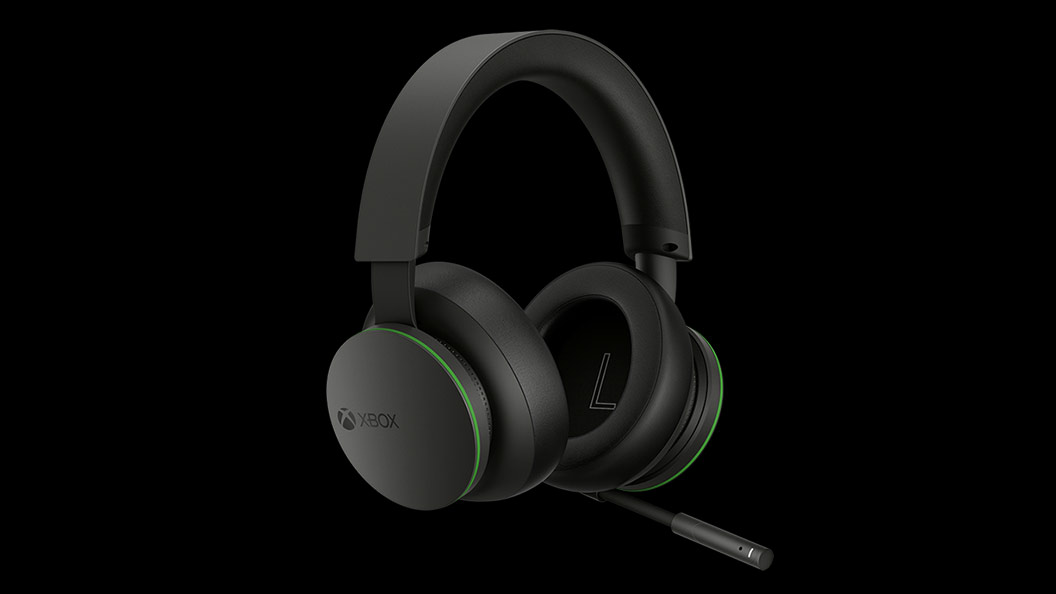 The best Xbox affordable headset for Xbox Series X/S, Xbox One, PC, mobile
The Xbox Wireless Headset is exactly what the name suggests: a wireless headset that works particularly well with Xbox consoles. Whether you have an Xbox Series X, an Xbox Series S, an Xbox One, or a Windows 10 PC with an Xbox controller adapter, this headset can provide fantastic sound with a simple pairing procedure. Not only that: the Xbox Wireless Headset supports Bluetooth as well, meaning that you can listen to music or take calls on your phone while you game.
The best Xbox affordable headset for Xbox Series X/S, Xbox One, PC, mobile
The Xbox Wireless Headset is exactly what the name suggests: a wireless headset that works particularly well with Xbox consoles. Whether you have an Xbox Series X, an Xbox Series S, an Xbox One, or a Windows 10 PC with an Xbox controller adapter, this headset can provide fantastic sound with a simple pairing procedure. Not only that: the Xbox Wireless Headset supports Bluetooth as well, meaning that you can listen to music or take calls on your phone while you game.
 The best Xbox Series X wireless headset for Xbox Series X/S, Xbox One, PC, mobile
Debuting alongside the Xbox Series X, the Razer Kaira Pro is arguably one of the best gaming headsets for Microsoft's next-gen console. This sleek, lightweight wireless headset pairs with Xbox consoles right out of the box. But you can also use it with PCs and mobile devices, thanks to built-in Bluetooth capabilities. The Kaira Pro is not terribly expensive, and the sound quality is excellent, particularly for video games.
The best Xbox Series X wireless headset for Xbox Series X/S, Xbox One, PC, mobile
Debuting alongside the Xbox Series X, the Razer Kaira Pro is arguably one of the best gaming headsets for Microsoft's next-gen console. This sleek, lightweight wireless headset pairs with Xbox consoles right out of the box. But you can also use it with PCs and mobile devices, thanks to built-in Bluetooth capabilities. The Kaira Pro is not terribly expensive, and the sound quality is excellent, particularly for video games.
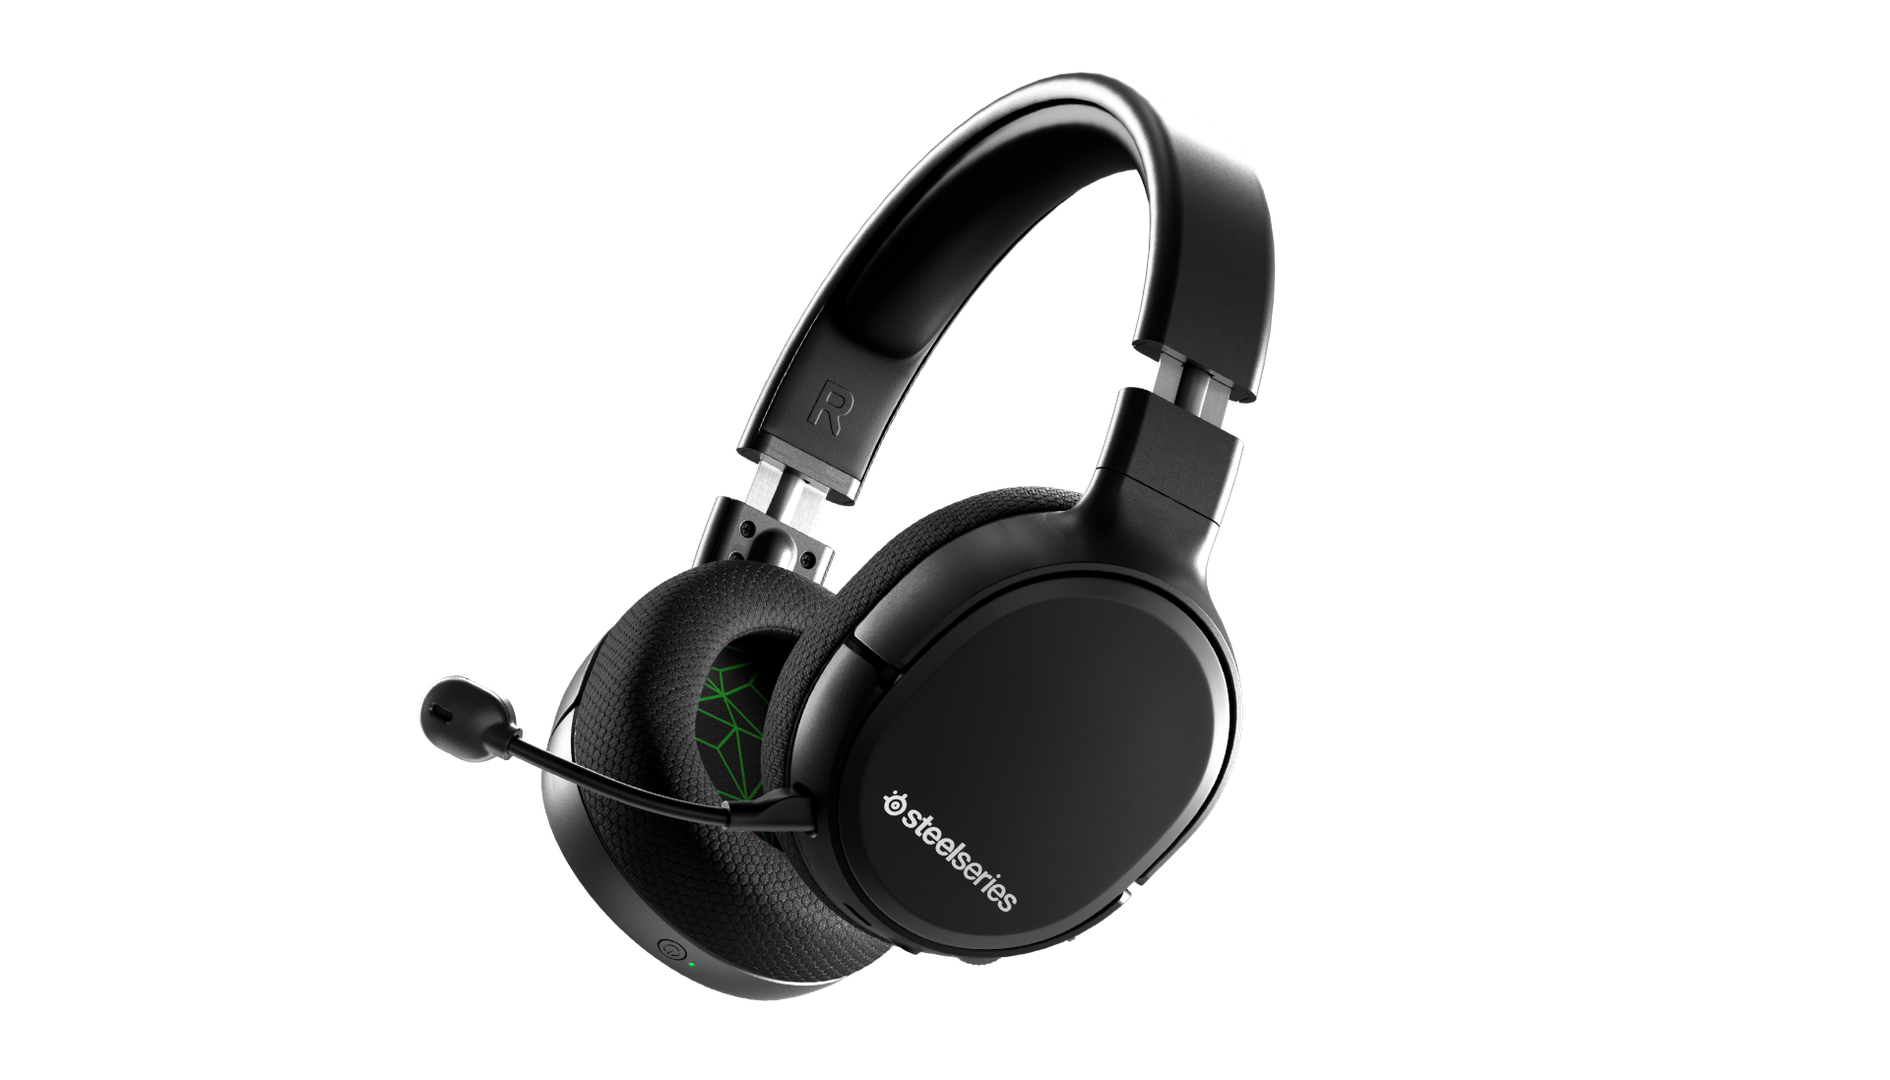 Affordable wireless for PC, PS5, PS4, Switch, Mobile (USB-C wireless), Xbox One (wired)
Getting good wireless performance has never been this seamless, or affordable. Thanks to its high-speed, discrete USB-C dongle, the SteelSeries 1 Arctis Wireless allows you to instantly enjoy wireless game audio from your Nintendo Switch, Android phone, PS4, or gaming PC, with none of the convoluted pairing or interference that comes with Bluetooth-based headsets. It’s worth mentioning the Nintendo Switch functionality again, as it’s hard to get a wireless headset for Nintendo’s handheld hybrid.
Affordable wireless for PC, PS5, PS4, Switch, Mobile (USB-C wireless), Xbox One (wired)
Getting good wireless performance has never been this seamless, or affordable. Thanks to its high-speed, discrete USB-C dongle, the SteelSeries 1 Arctis Wireless allows you to instantly enjoy wireless game audio from your Nintendo Switch, Android phone, PS4, or gaming PC, with none of the convoluted pairing or interference that comes with Bluetooth-based headsets. It’s worth mentioning the Nintendo Switch functionality again, as it’s hard to get a wireless headset for Nintendo’s handheld hybrid.
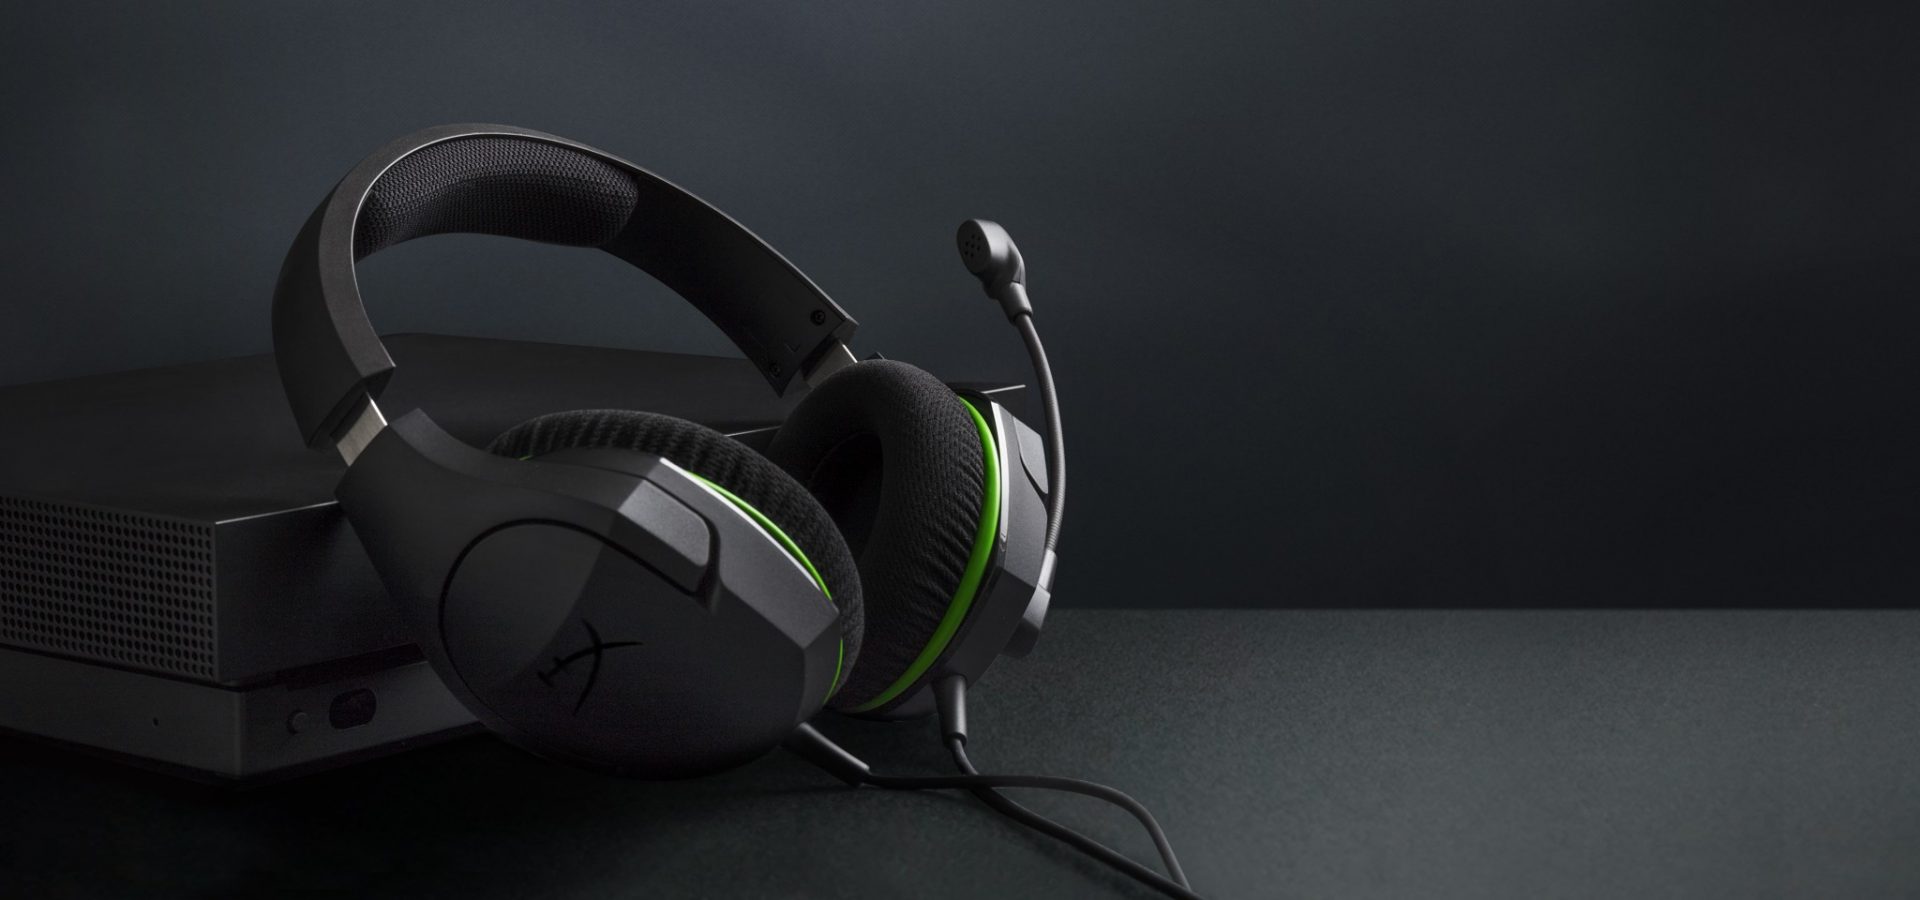
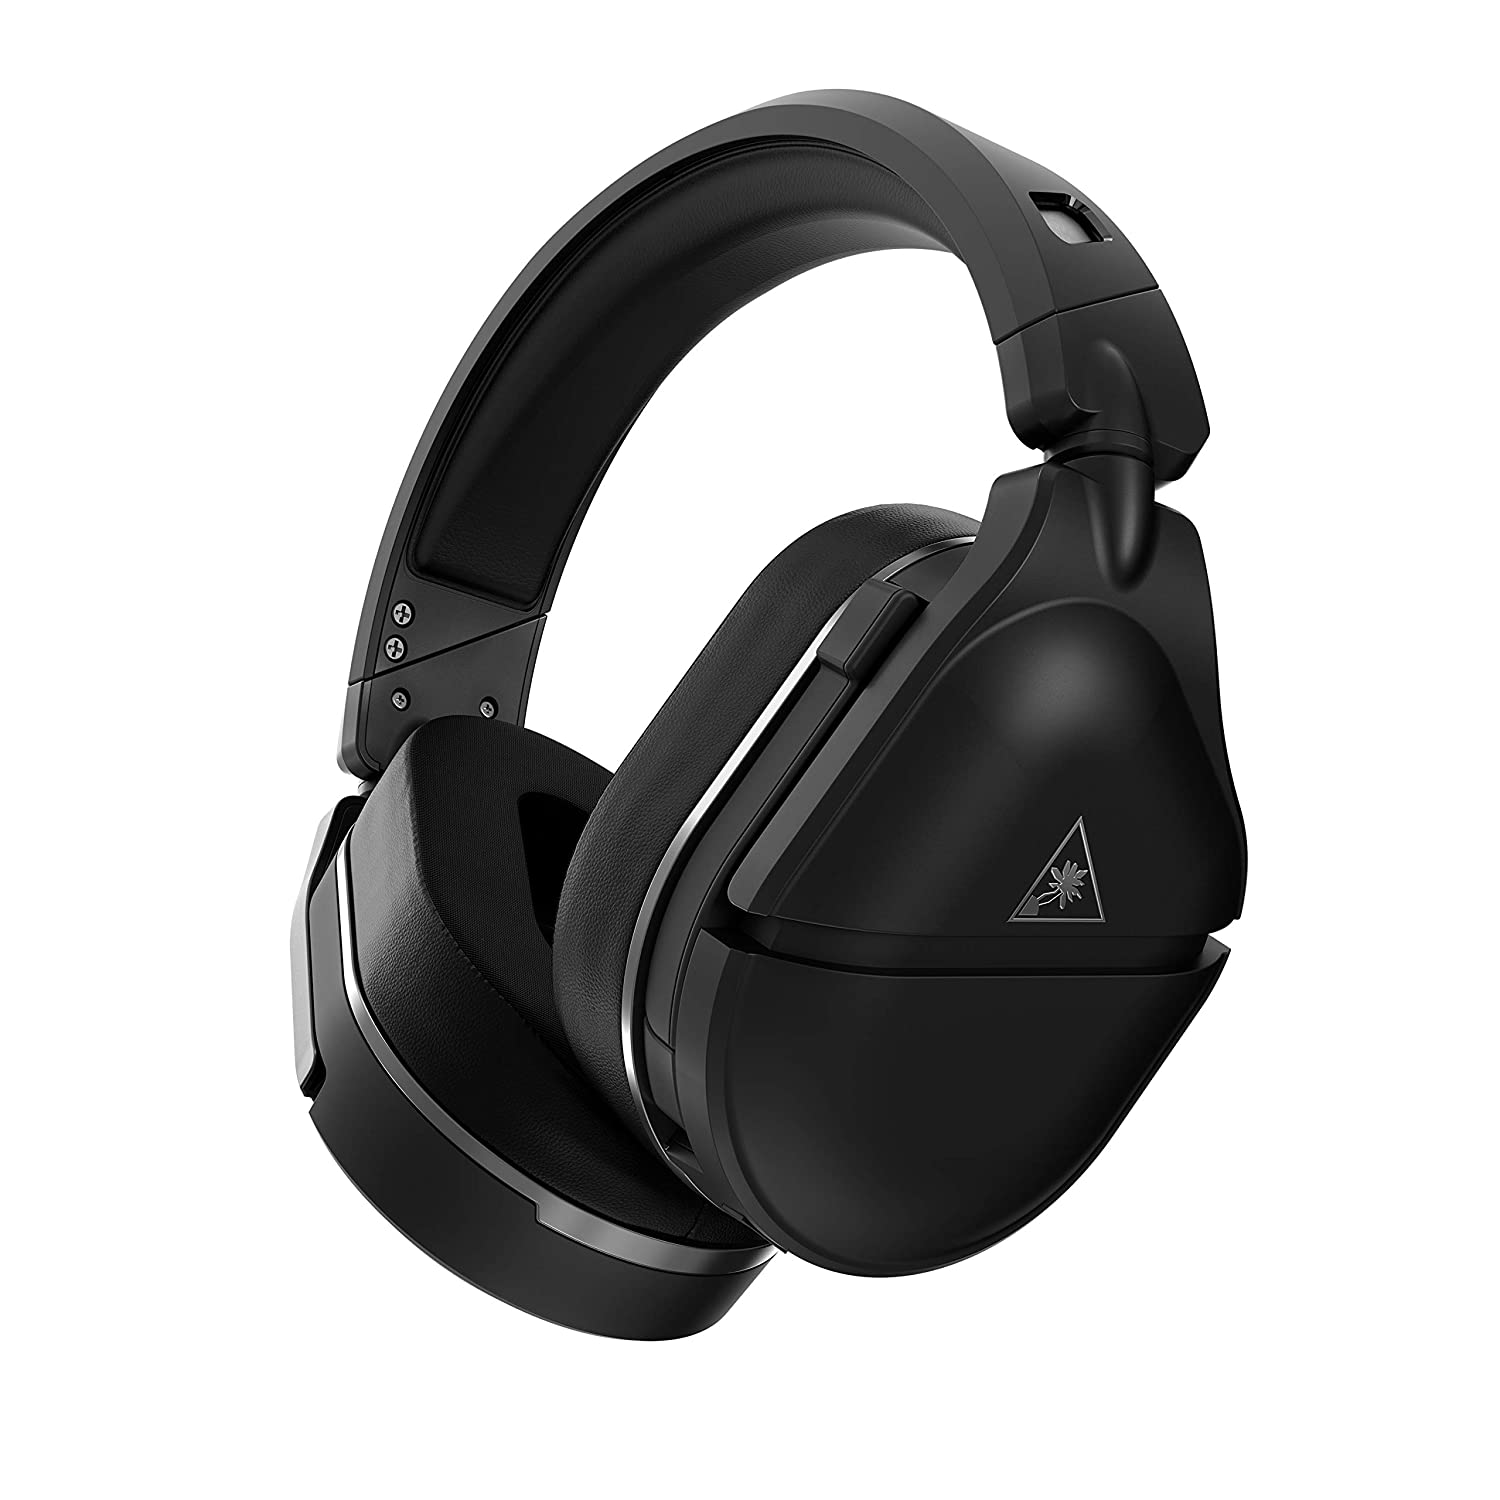
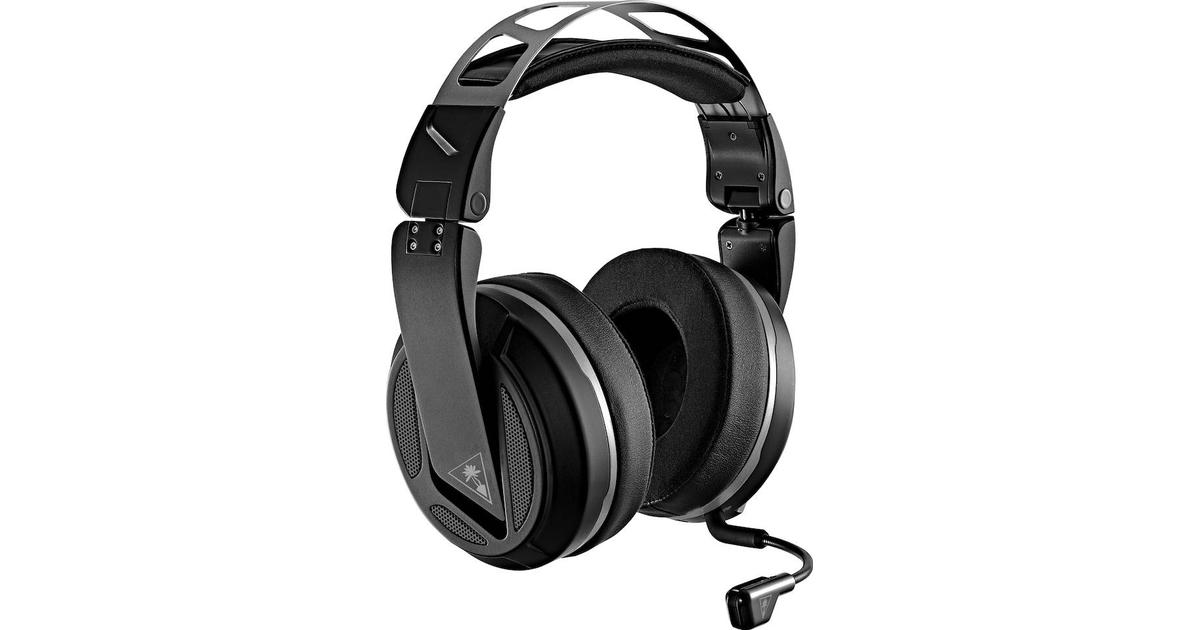 Absolute best in wireless for PC, PS4 (Wireless); Xbox One, Nintendo Switch, Mobile (Wired)
The highly customizable high-end headset that's especially ideal for PC, the new Turtle Beach Elite Atlas Aero is one of the best gaming headsets out there. This premium headset packs an incredibly comfortable pair of gel-infused ear cushions, which are also designed to play well with glasses. The Aero's 50mm speakers sound great out of the box, and it comes with a solid noise-canceling microphone to boot.
Absolute best in wireless for PC, PS4 (Wireless); Xbox One, Nintendo Switch, Mobile (Wired)
The highly customizable high-end headset that's especially ideal for PC, the new Turtle Beach Elite Atlas Aero is one of the best gaming headsets out there. This premium headset packs an incredibly comfortable pair of gel-infused ear cushions, which are also designed to play well with glasses. The Aero's 50mm speakers sound great out of the box, and it comes with a solid noise-canceling microphone to boot.
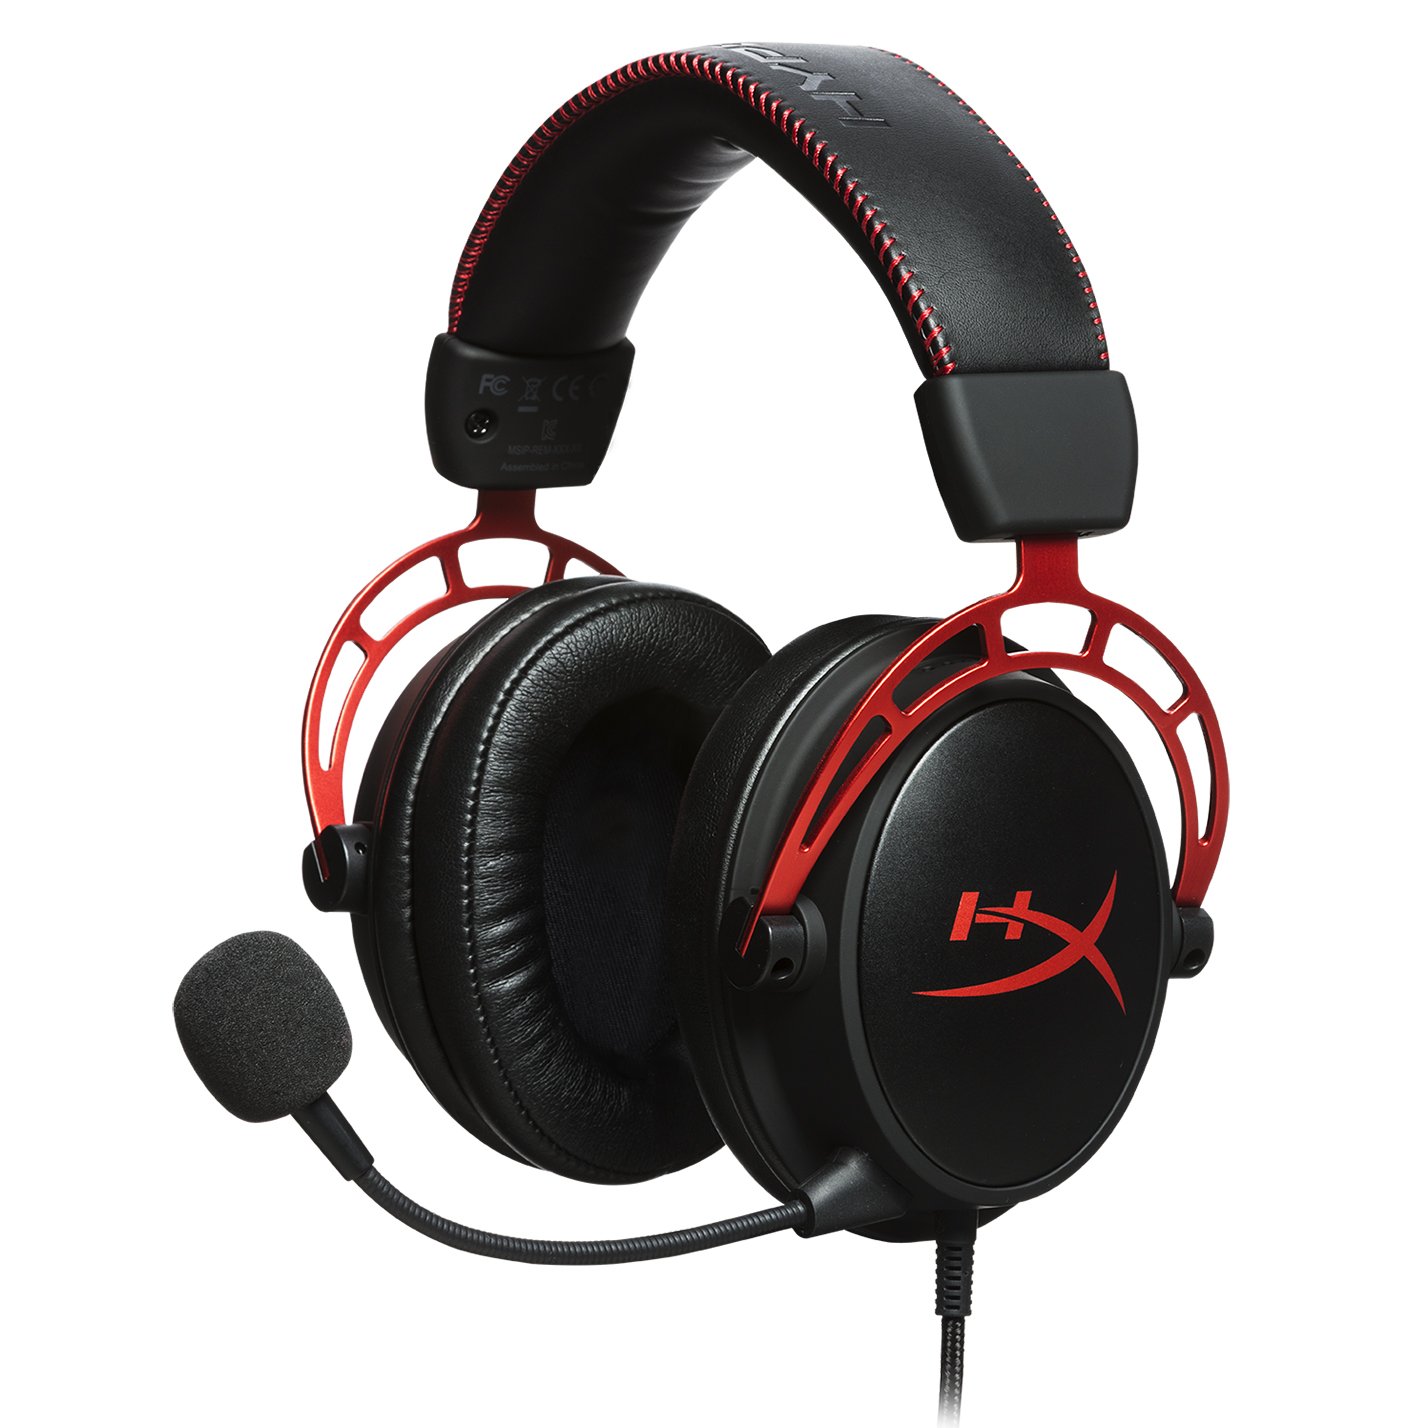 Superior style, sound, and value for PC, PS4, PS5, Xbox One, Switch, mobile
Thanks to a sturdy metal frame, a slick red-and-black paint job, and some of the most comfortable leatherette earcups this headset is really a steal for its price. This is a headset that you can transport with you anywhere and connect to almost any system, without ever having to worry about it breaking.
Superior style, sound, and value for PC, PS4, PS5, Xbox One, Switch, mobile
Thanks to a sturdy metal frame, a slick red-and-black paint job, and some of the most comfortable leatherette earcups this headset is really a steal for its price. This is a headset that you can transport with you anywhere and connect to almost any system, without ever having to worry about it breaking.
 Console-centric wireless sound with Bluetooth for PC, PS4, Switch, Xbox One, mobile
The Turtle Beach Stealth 700 Gen 2 is one of the best console headsets on the market, particularly if you want a wireless model. This peripheral boasts great sound, plush earcups, and two kinds of wireless functionality. The PS4 version can connect to either PS4 or PC via a USB dongle; the Xbox One version can connect to the Xbox One right out of the box. Both versions can connect to mobile devices and PCs via Bluetooth. It's an extremely convenient feature, especially since very few gaming headsets offer Bluetooth functionality.
Console-centric wireless sound with Bluetooth for PC, PS4, Switch, Xbox One, mobile
The Turtle Beach Stealth 700 Gen 2 is one of the best console headsets on the market, particularly if you want a wireless model. This peripheral boasts great sound, plush earcups, and two kinds of wireless functionality. The PS4 version can connect to either PS4 or PC via a USB dongle; the Xbox One version can connect to the Xbox One right out of the box. Both versions can connect to mobile devices and PCs via Bluetooth. It's an extremely convenient feature, especially since very few gaming headsets offer Bluetooth functionality.
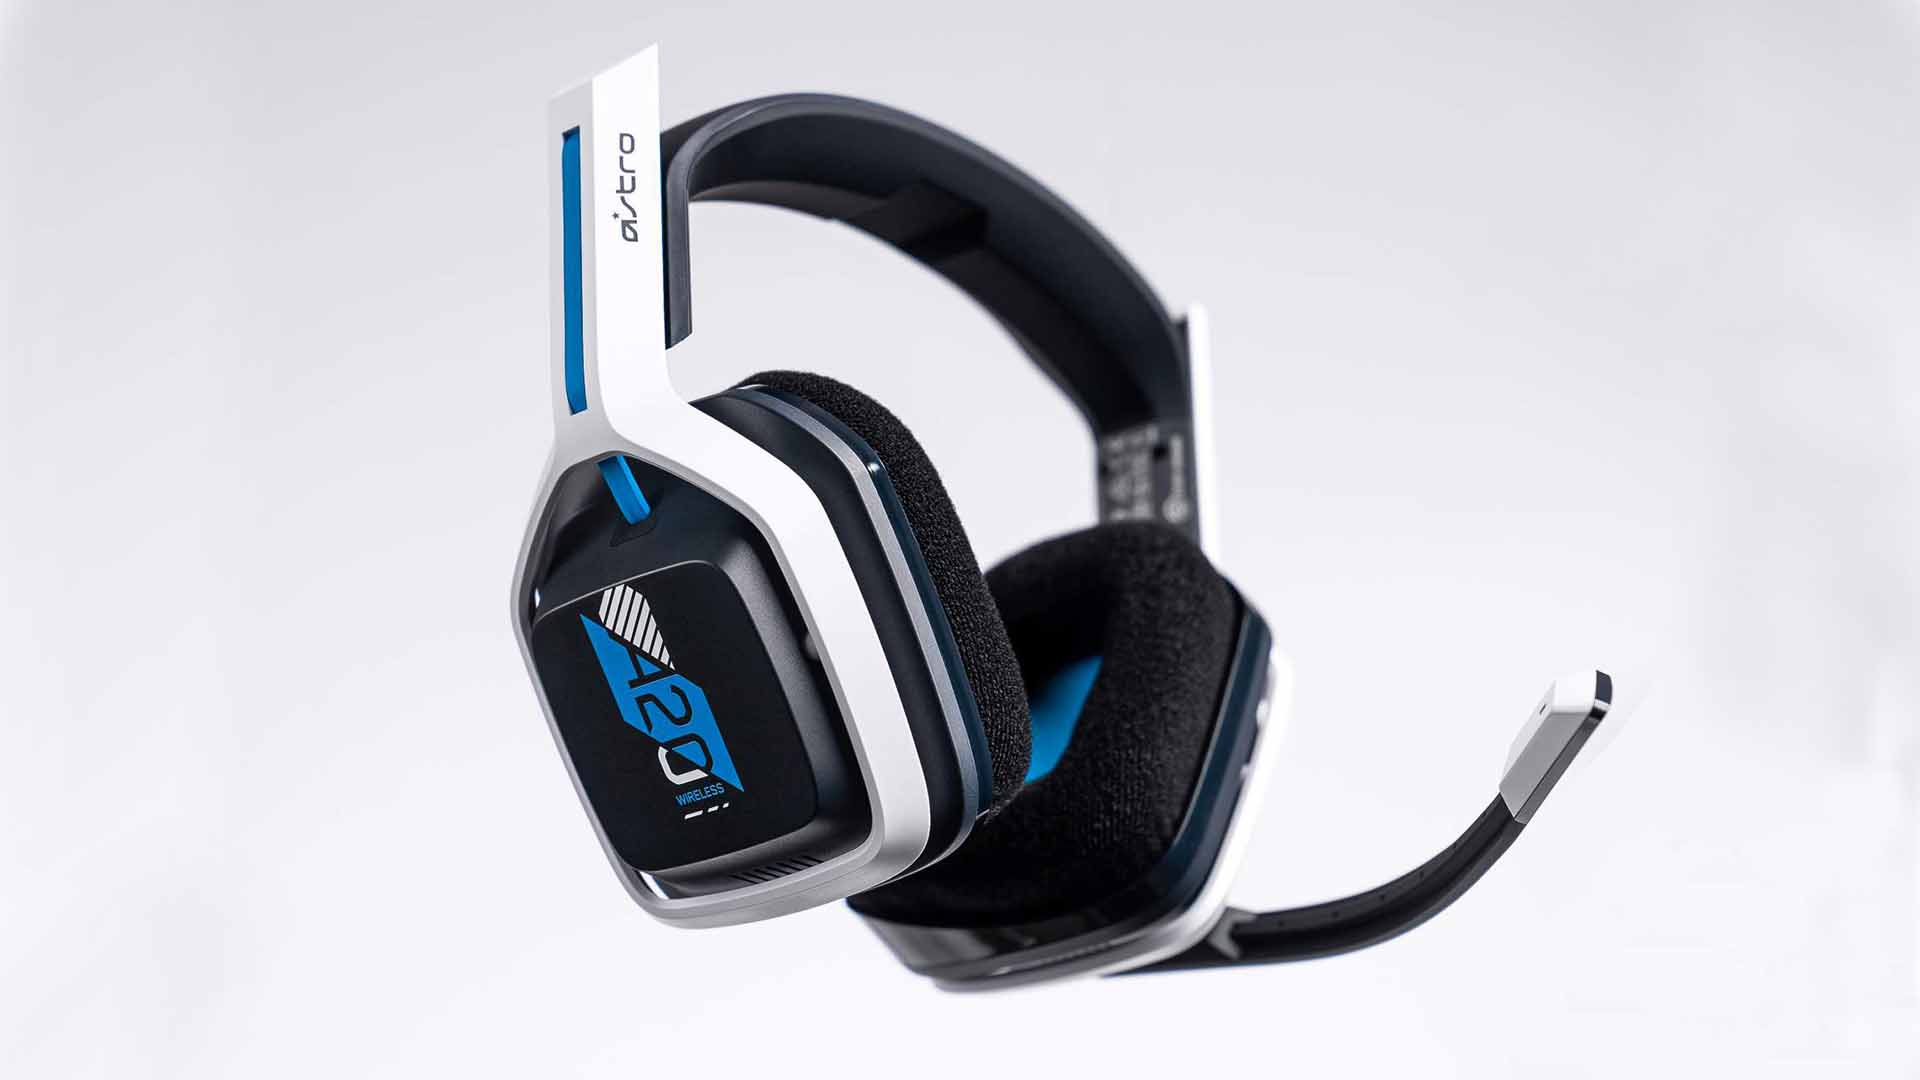 Wireless headset for both PS5 and Xbox Series X and PC, PlayStation, Xbox, Switch, mobile
The Astro A20 Gaming Headset Gen 2 is an ambitious and full-featured headset from one of the most trusted manufacturers on the market. This wireless peripheral offers excellent sound quality and a comfortable fit. More than that, though, the Astro A20 can also connect wirelessly to both the PS5 and the Xbox Series X, which is a rare feat, even among the best gaming headsets.
Wireless headset for both PS5 and Xbox Series X and PC, PlayStation, Xbox, Switch, mobile
The Astro A20 Gaming Headset Gen 2 is an ambitious and full-featured headset from one of the most trusted manufacturers on the market. This wireless peripheral offers excellent sound quality and a comfortable fit. More than that, though, the Astro A20 can also connect wirelessly to both the PS5 and the Xbox Series X, which is a rare feat, even among the best gaming headsets.
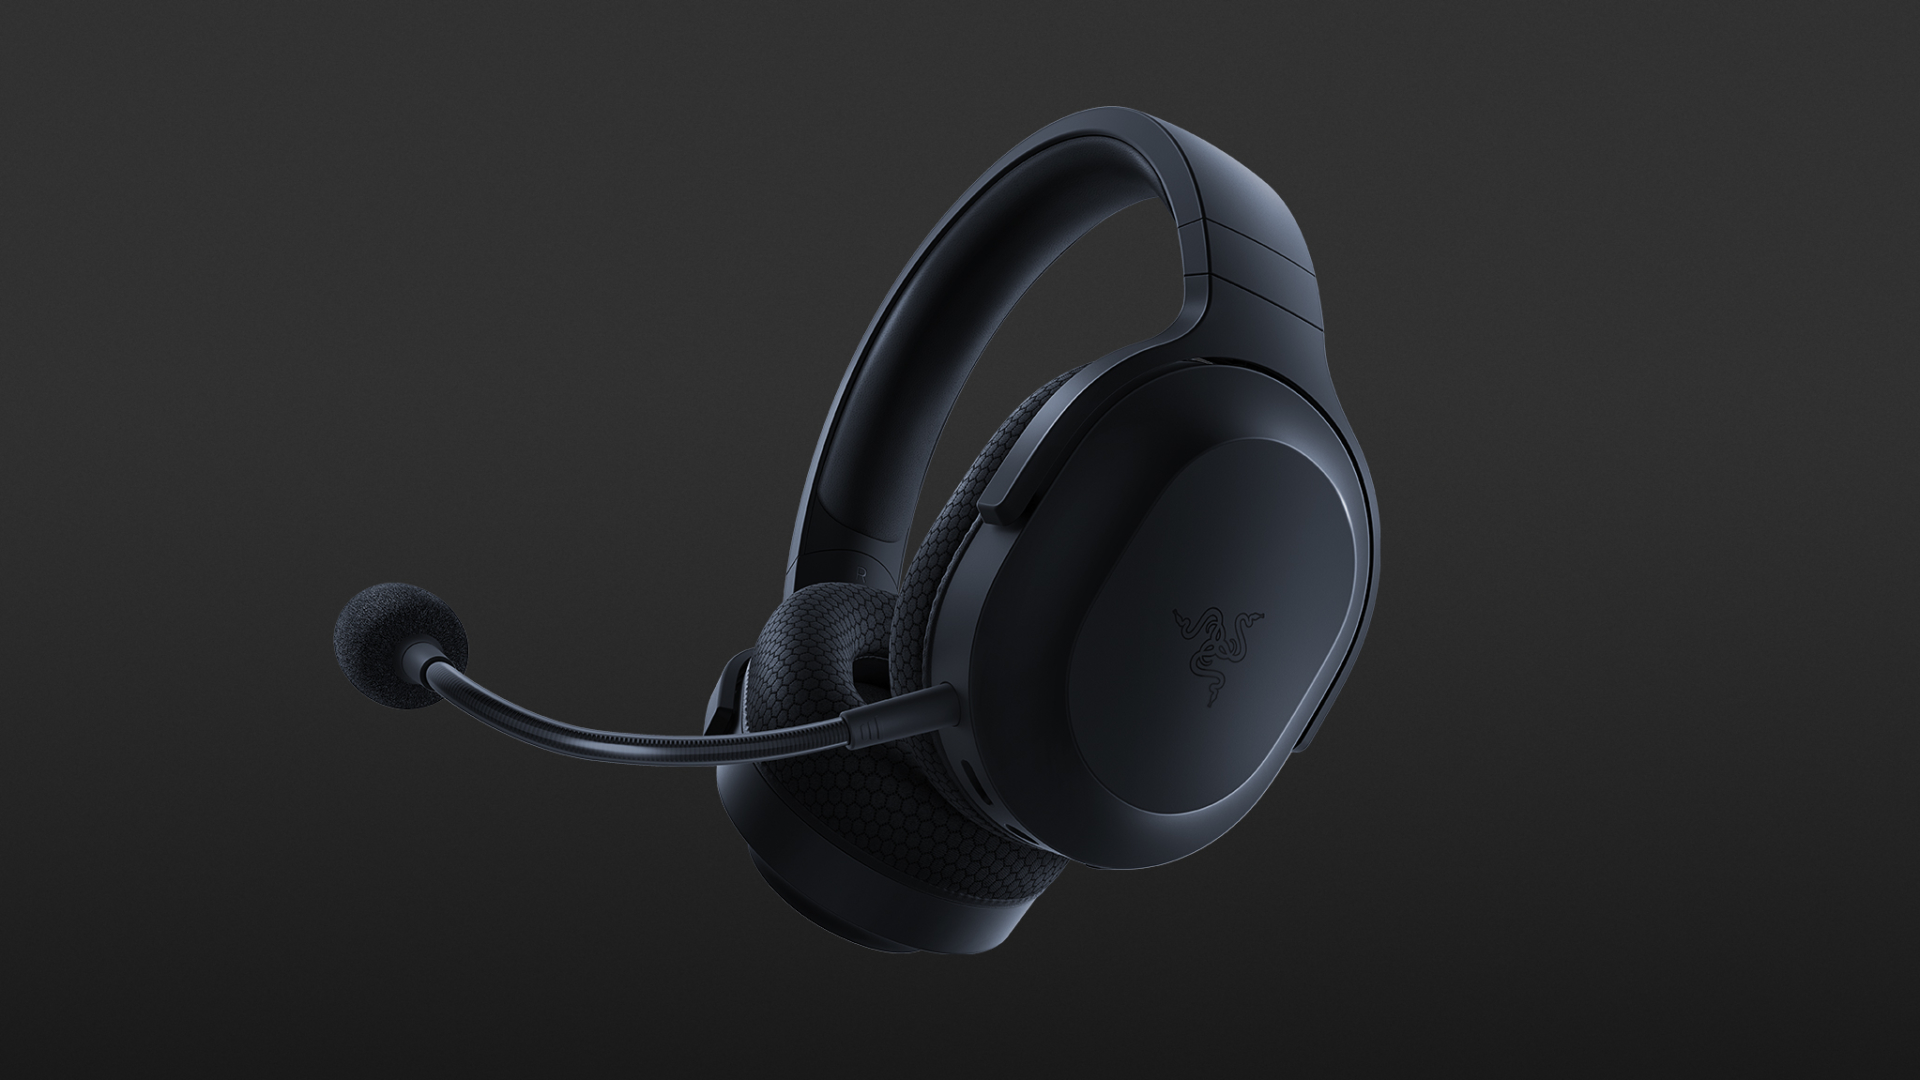 The best wireless Switch headset also for PC, PS4, PS5, Switch, mobile
The Razer Barracuda X is a wireless gaming headset that's ideal for the Nintendo Switch and mobile platforms. Thanks to its small USB-C dongle, it can connect wirelessly o the Switch in handheld mode, a rarity among gaming headsets. However, it also comes with a USB-A adapter, which means you can connect it to just about any other system you like, from PC to PS4, to Switch in docked mode. The USB-C dongle also fits neatly into a PS5.
The best wireless Switch headset also for PC, PS4, PS5, Switch, mobile
The Razer Barracuda X is a wireless gaming headset that's ideal for the Nintendo Switch and mobile platforms. Thanks to its small USB-C dongle, it can connect wirelessly o the Switch in handheld mode, a rarity among gaming headsets. However, it also comes with a USB-A adapter, which means you can connect it to just about any other system you like, from PC to PS4, to Switch in docked mode. The USB-C dongle also fits neatly into a PS5.