MSI.chm error is a common Windows Error code that occurs when the Windows OS becomes overloaded with invalid system references.
Solution
 Error Causes
The MSI.chm error is normally triggered by the following causes:
You may experience the MSI.chm error if you don’t pay attention to its maintenance. This usually happens when you don’t run antivirus software or update programs and drivers frequently.
-
Registry files get corrupt and damaged
This error may also occur when the registry files of your PC get corrupt and damaged. This normally happens due to continuous writing, editing and deleting of information from your PCs registry over time as programs are installed, modified and deleted.
Other causes include: malware and system conflicts.
Further Information and Manual Repair
When you come across the MSI.chm error on your PC, it is advisable to repair it immediately without any delays. If you procrastinate in repairing this error, your PC is likely to be exposed to risks like:
- Slow PC performance
- System failure and crashes
Nonetheless, to resolve this error you don’t have to get the assistance of an IT professional. The MSI.chm is easy to repair and you can resolve it in no time even if you aren’t technically adept.
Here are some of the best ways to repair the MSI.chm error on your PC successfully in the shortest time:-
Cause: Corrupt and Damaged Registry Files
Quick Fix: If you think the MSI.chm Windows error on your system is related to Windows registry issues, then the best way to resolve this error is to download and install a Registry cleaner tool. A word of advice here is to always download such tools from a reliable and a trusted website.
Once you download the Restoro, run it on your PC to scan for errors. The scanning will usually take a couple of minutes. So, it is advisable to be patient. After the scanning is complete, you will see a detailed scanning report highlighting the registry errors on your PC.
Now to resolve the MSI.chm error that has occurred on your PC due to registry issues, click on the ‘Repair’ button to fix the error.
Once the repairing process is complete, restart your PC.
Restoro helps you not only fix the MSI.chm error but it also helps improve the speed of your PC, and protects it from failure and crashes.
Cause: Poor PC Maintenance
Quick Fix: If the cause of the MSI.chm error is poor PC maintenance, then the best way to resolve the error is to update the drivers. You can do this by installing the latest drivers for the devices that you think are now old and need to be updated.
Here’s what you need to do:
First find which devices don’t have drivers installed. For this go to the start menu and then click on the Control Panel. Now open the Device Manager. The Device Manager will list down all the devices that don’t have drivers installed with yellow exclamation point icons next to the device name.
As for the updates, the general rule of thumb if the driver does not support the program you are trying to run, then this means that you probably need to update the driver to ensure compatibility. For example your video card driver does not support a newly launched game, then you definitely need a driver update to play the game on your PC.
To install or update drivers on your PC, you can either get CDs from the market or you can download updated versions of the drivers from the main manufacturer’s website for free.
You can also use automated solution for all of your driver issues:
 So, next time when you or your friends encounter this problem, try these quick fixes to repair the error without any hassle.

 Many times we were talking and writing here on Errortools.com about security, privacy, hacking, identity theft, etc. We tried to raise important security questions and I hope I have managed to at least shed some light and change maybe some bad behaviors for some, helping them embrace better routines about their security on their PC.
In this light, I will today present you with one neat and awesome piece of software, a password manager worth your time and money (if you want premium features): BitWarden.
Many times we were talking and writing here on Errortools.com about security, privacy, hacking, identity theft, etc. We tried to raise important security questions and I hope I have managed to at least shed some light and change maybe some bad behaviors for some, helping them embrace better routines about their security on their PC.
In this light, I will today present you with one neat and awesome piece of software, a password manager worth your time and money (if you want premium features): BitWarden.
 In the menu choose device manager and click on it.
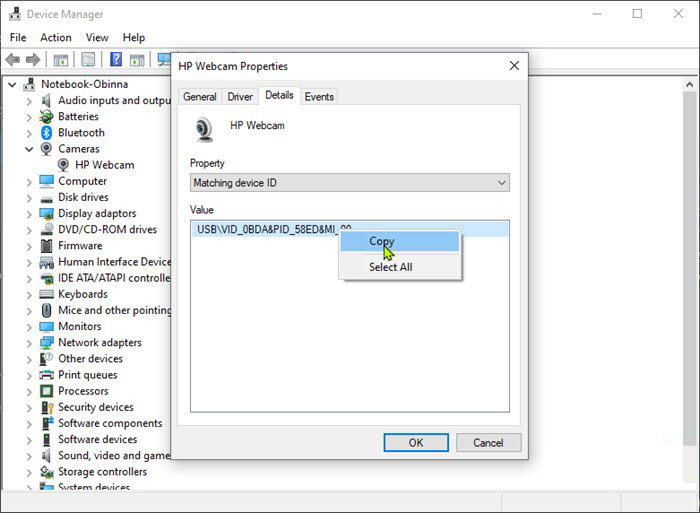
 When the device manager opens, expand the Imaging devices or Cameras section.
Right-click Integrated Camera or the primary webcam, and click Properties.
Go to the Details tab.
Under the Property section, click to select Matching device ID from the drop-down.
Right-click the value and select Copy
When the device manager opens, expand the Imaging devices or Cameras section.
Right-click Integrated Camera or the primary webcam, and click Properties.
Go to the Details tab.
Under the Property section, click to select Matching device ID from the drop-down.
Right-click the value and select Copy
 The next step is to download and install