Kernel Mode Heap Corruption Error in Windows

Kernel Mode Heap Corruption is the error message that the Windows operating system throws when it encounters a blue screen of death or BSOD error during PC startup or launching specific programs such as video games. It is mainly caused due to software conflicts, driver issues (especially graphics card driver), and computer hardware malfunctioning.

The good news is that this error is easily fixable.

Follow the next steps in order to fix the error:

  1. Rollback graphic card driver

    Press ⊞ WINDOWS + X to open Windows secret menu and click on device manager
    Expand Display adapters section
    Right-click on your GPU and choose properties
    In properties window go to the driver tab and click on Roll back driver
    Select the reason for operation and click on YES
    Reboot your PC

  2. Update corrupted and outdated drivers

    How is this error mostly driver issue, updating and fixing bad drivers can fix it very easily. As in the previous step, you will need to open the device manager and go through all drivers and manually check for updates for each one, update as necessary or reinstall ones you might think have gone rogue. If you are not experienced enough with this kind of task install some automatic solution for this task like DriverFix

  3. Check for software issues

    If this error started happening after the installation of new software it is very likely that the application is causing problems. Try uninstalling or disabling the application to see if it will fix the issue. You can also boot Windows in safe mode to see if the error will happen there, if Windows is working fine in safe mode, it is likely that issue is on the software side.

  4. Run SFC scan

    Press ⊞ WINDOWS + X and choose Command prompt (admin)
    In command prompt type in sfc /scannow and press ENTER
    Wait for the process to be finished and Reboot the system

Do You Need Help with Your Device?

Our Team of Experts May Help
Troubleshoot.Tech Experts are There for You!
Replace damaged files
Restore performance
Free disk space
Remove Malware
Protects WEB browser
Remove Viruses
Stop PC freezing
GET HELP
Troubleshoot.Tech experts work with all versions of Microsoft Windows including Windows 11, with Android, Mac, and more.

Share this article:

You might also like

Disable Windows print spooler in PowerShell
The third time is charm saying goes but not when we are talking about Microsoft. Print spooler is again in focus, in a bad way. This is the third print spooler vulnerability to emerge in just five weeks. While a critical flaw was originally identified and patched in June, a similar flaw came to light shortly after and was subsequently patched (with mixed success). print spoolerMicrosoft is once again advising its customers to disable Windows print spooler after a new vulnerability that allows hackers to execute malicious code on machines has emerged. While a patch fixing the flaw will be released in due course, the most effective workaround currently on the table is to stop and disable the print spooler service entirely.
"An elevation of privilege vulnerability exists when the Windows Print Spooler service improperly performs privileged file operations. An attacker who successfully exploited this vulnerability could run arbitrary code with SYSTEM privileges. An attacker could then install programs; view, change, or delete data; or create new accounts with full user rights."

Stop this service right away or you are risking a potential attack.

  1. Press ⊞ WINDOWS + X to open the hidden menu
  2. Click on Power Shell (admin)
  3. In Power Shell type in the following command to check if spool service is running: Get-Service -Name Spooler followed by ENTER
  4. If spooler service is running type in the next command to stop it: Stop-Service -Name Spooler –Force and press ENTER
  5. Then follow with this command to disable it at startup: Set-Service -Name Spooler -StartupType Disabled followed with ENTER
That’s it, we hope a patch will come soon for all the people that are using network printing and indeed need this service running in order to do work.
Read More
Instagram posts available now on computer
Instagram posting has been reserved for mobile phones for a very long time but in October 2021 that privilege has come to an end. Instagram added the long-awaited ability to post to Instagram from the website. You get nearly all of the same filters and editing tools that you can find in the iPhone and Android app, too. Instagram logoIn order to post via computer on your Instagram account all you need is a browser. The first step, of course, is to go to instagram.com and login into your account, if you do not have an account, you can make one for free. Next, click on the + icon in the upper right corner. Create a new post screen will open, in this screen click on the Select from computer blue button on the bottom. The file manager will open, choose your desired photo and confirm. After that, you will be presented will an adjustment screen for a photo, here you can crop the photo, zoom in, adjust the aspect ratio, or if you wish add more photos to create a slide show. Once you are done will all of these adjustments, click on Next in the upper right. From there you will be taken into a filter screen where you can apply one of many filters or if you want, you can adjust brightness, contrast, saturation, temperature, etc. just like in the application on your phone. Once you have the desired result, again click on Next in the upper right part of the screen. Lastly, you will be given an option to write a caption for the photo if you wish and add a location. Once this step is finished you can post the feed by clicking on share in the upper right part. That is all to it, just like in a mobile application you can now use your computer for Instagram posting.
Read More
Webpage was blocked (ERR_BLOCKED_BY_CLIENT)
If you are browsing the web but suddenly encountered the ERR_BLOCKED_BY_CLIENT error on your Chrome browser in Windows 10, read on as this post will guide you in fixing this problem. This kind of error has already been reported by a number of Chrome users and it seems that the problem has something to do with a plugin or extension. Here’s the exact content of the error:
“This webpage was blocked by an extension (ERR_BLOCKED_BY_CLIENT)”
This kind of error, as pointed out, could be caused by an extension or plugin on Chrome that is blocking the web page. It is also possible that the version of Chrome is obsolete or that there could be more than 100 bookmarks in the Bookmark Manager. Before you troubleshoot the problem, make sure that you download the latest version of Google Chrome and see if it fixes the error. If it didn’t, then you can try opening a web page in Incognito Mode or disable and remove the extension that’s causing the problem. You could also try to remove any surplus bookmarks.

Option 1 – Try to open the web page in Incognito Mode

The first thing you can do to fix the problem is to try opening the web page in Incognito Mode. When your browser is in this mode, it will work without extensions. This would help in fixing the problem especially if it was caused by some extension or toolbar in your browser. All you have to do is open any web page in Chrome and tap the Ctrl + Shift + N key combination to open a window in Incognito Mode.

Option 2 – Try to disable and get rid of the problematic extension

After you’ve isolated the problem and have determined that an extension is the one that’s causing it, then the next thing you have to do is to disable or get rid of that extension.
  • Open Chrome and press Alt + F keys.
  • Go to More tools and click Extensions to look for any suspicious browser extensions or toolbars.
  • Click the Recycle bin and select Remove.
  • Restart Chrome and press Alt + F keys again.
  • Proceed to On Startup and mark Open a specific page or set of pages.
  • To check if the browser hijacker is still active, click Set pages, if it is active, overwrite the URL.
Note: If removing the browser extensions or toolbars didn’t work, you can also try to reset your Google Chrome browser.
  • Open Google Chrome, then tap the Alt + F keys.
  • After that, click on Settings.
  • Next, scroll down until you see the Advanced option, once you see it, click on it.
  • After clicking the Advanced option, go to the “Restore and clean up option and click on the “Restore settings to their original defaults” option to reset Google Chrome.
  • Now restart Google Chrome.

Option 3 – Try removing surplus bookmarks

If your Chrome browser is already supporting more than 100 bookmarks, you might want to consider deleting them as it could also be one of the reasons why you’re getting the ERR_BLOCKED_BY_CLIENT error. To remove these bookmarks, just open the bookmark library by typing this address “chrome://bookmarks/” in the address bar of Chrome and tap Enter and press Shift and then select the surplus bookmarks by using the arrow keys. After that, click Delete to get rid of them.

Option 4 – Try clearing browser data

There are times when some data in the browser is conflicting with the loading of the website and triggers errors like ERR_BLOCKED_BY_CLIENT. And so you can try to clear your browser’s data. This might be a very basic solution but oftentimes it works in fixing this kind of error in Google Chrome. Follow the steps below to clear the data in your browser.
  • Open your Google Chrome browser.
  • After that, tap the Ctrl + H keys. Doing so will open a new panel that allows you to delete the browsing history and other data in your browser.
  • Now select every checkbox that you see and click on the Clear browsing data button.
  • Then restart your Chrome browser and check if you can now open any website or not.
Read More
The procedure entry point could not be located
If you receive an error message that says, “Entry point not found, The procedure entry point could not be located in the dynamic link library” on your Windows 10 PC, then you will find this post useful for this will provide you some potential fixes to fix the error. This kind of error can occur if a program fails to locate the DLL library that it needs in order to run. It can also occur if the library is not in the specified directory in the path or if the DLL file has gone missing or has become corrupted. To fix the “The procedure entry point could not be located in the dynamic link library” error, check out the following options given below.

Option 1 – Try to reinstall the program

The first thing you can do to resolve the error is to uninstall the program that throws the error and download its latest version from its official site and then install it again.

Option 2 – Run System File Checker scan

If reinstalling the program didn’t work, you can also try running the System File Checker or SFC scan to fix the error. System File Checker is a command utility built into your computer that helps restore corrupted files and missing files. Refer to the following steps to run it:
  • Hit the Win + R keys to launch Run.
  • Type in cmd in the field and tap Enter.
  • After opening Command Prompt, type in sfc /scannow
The command will start a system scan which will take a few whiles before it finishes. Once it’s done, you could get the following results:
  1. Windows Resource Protection did not find any integrity violations.
  2. Windows Resource Protection found corrupt files and successfully repaired them.
  3. Windows Resource Protection found corrupt files but was unable to fix some of them.
 Reboot your computer.

Option 3 – Try checking the details in the Event Viewer

The Event Viewer can also help you resolve the error as it contains detailed information about the error that could help you pinpoint its root cause and resolve it.

Option 4 – Try to re-register the problematic DLL file

You may have to re-register the ntdll.dll file using the regsvr32.exe before you can successfully install the program and fix the error. The Regsvr32 tool is a command-line utility that can be used to register and unregister OLE controls like DLL and ActiveX (OCX) controls in the Windows operating system. Follow the steps below to use it.
  • Open Command Prompt as admin from the WinX menu.
  • Next, type the following commands in the elevated Command Prompt and hit Enter to execute the command. This will re-register the affected DLL file using the Windows operating system tool, regsvr32.exe.
    • exe /[DLL file]
    • exe [DLL file]
Note: Replace “[DLL file]” with the name of the DLL file that was pointed out in the error.
  • After you execute the given commands, you should see a message saying, “DllRegisterServer in vbscript.dll succeeded” if the Regsvr32 tool was able to run successfully. After that, try to install the program again and see if it now works.

Option 5 – Try to replace the DLL file with a trusted source

  • First, you need to get the new DLL file from another computer with preferably the same file version number.
  • After that, you need to boot your PC into Safe Mode and navigate to the paths listed below and then replace the file using a USB drive or other external storage devices.
    • x86: This PC > C:/Windows/System32
    • x64: This PC > C:/Windows/SysWOW64
  • Next, type “cmd” in the Cortana search box and right click on Command Prompt, and select “Run as administrator” to open it with administrator privileges.
  • Now type the “regsvr32 ntdll.dll” command and hit Enter.
  • Restart your PC and check if the error is now fixed.

Option 6– Try to scan your computer using Windows Defender

It is also possible that the DLL file might be infected with malware or virus which could explain why you’re getting the error. Thus, you have to scan your computer using security programs like Windows Defender.
  • Tap the Win + I keys to open Update & Security.
  • Then click on the Windows Security option and open Windows Defender Security Center.
  • Next, click on Virus & threat protection > Run a new advanced scan.
  • Now make sure that Full Scan is selected from the menu and then click the Scan Now button to get started.
Read More
How to remove myBrowser

myBrowser is a Potentially Unwanted Program that allows users to access the internet. This browser suggests users install other PUP like myfiles, myemail, and others. This application claims to be a good reliable portable internet browser, however during our test use of the program several website scripts crashed and were not able to open up all the website assets required, leaving the users with a mediocre browsing experience.

While browsing the internet through this program, you might see additional ads and sponsored links injected into your search results and/or websites.

About Potentially Unwanted Applications

What is a Potentially Unwanted Program (PUP)?

Everyone has experienced it – you download and install a free application, you then notice some unwanted programs on your computer system, come across a strange toolbar on your web browser, or find your default search engine has been changed to something else. You didn’t set them up, so how did they turn up? Potentially Unwanted Programs (PUP), also referred to as Potentially Unwanted Applications (PUA), are programs that you never wanted in the first place and often come bundled with freeware software. Once installed, most of these applications can be difficult to eliminate and become much more of an annoyance rather than a necessity. PUP doesn’t involve malware in the traditional sense. A basic difference between PUP and malware is distribution. Malware is commonly dropped by silent installation vectors such as drive-by downloads while PUP gets installed with the consent of the user, who knowingly or unintentionally authorizes the PUP installation on their PC. PUP developers may argue that their programs aren’t malicious software but they can still be dangerous software and put the computer at risk much the same way a computer virus does.

What do PUPs do on your PC, precisely?

Unwanted programs can be found in various forms. Usually, they will be found in adware bundlers that are known to utilize aggressive and misleading advertising. The majority of bundlers install many adware applications from several vendors, each of which features its own EULA policy. Safebytes Anti-malware entirely removes this threat and protects your PC against unwanted programs or malware infection. PUPS also appear in the form of undesirable toolbars or web browser add-ons. They may change your internet browser settings, monitor your surfing activities and online searches, take up a large amount of space on your monitor, and degrade your web browsing experience. Potentially Unwanted Programs at times act quite similarly to computer viruses or spyware. They will often carry keyloggers, dialers, and other programs built inside them that may track you or send your sensitive details to third parties. Even if the PUPs aren’t basically malicious, these programs still do absolutely nothing good on your computer – they will take precious resources, slow down your PC, weaken your device’s security, making your PC more vulnerable to trojans.

Protect yourself from PUPs

• Read very carefully before you install anything. Do not click accept till you have read the fine print. There will probably be a clause about PUPs. • Always select “Custom” or “Advanced” installation and never blindly click the Next button, which will let you uncheck any foistware software programs you do not want. • Use an anti-PUP program. Security software like Safebytes Anti-malware provides the very best real-time protection against PUPs and also other malware. • Be alert if you install freeware, open-source software, or shareware. Don’t install programs that appear suspicious or malicious. • Always download software from reliable sources like official websites instead of untrustworthy sharing space. Stay away from file-hosting sites where/when possible. Comply with these guidelines and you should more or less never get potentially unwanted programs on your PC

What To Do When You Cannot Install Safebytes Anti-Malware?

Malware could cause all kinds of damage once they invade your PC, from stealing your private details to deleting files on your computer. Some malware is designed to restrict or prevent things that you wish to do on your computer. It may well not let you download anything from the internet or stop you from accessing a few or all of the internet sites, particularly the anti-malware sites. So what you should do if malware prevents you from downloading or installing Safebytes Anti-Malware? Follow the instructions below to eliminate malware by alternate methods.

Make use of Safe Mode to fix the problem

If any virus is set to run automatically when Microsoft Windows starts, stepping into safe mode could very well block this attempt. Since only the minimal programs and services launch in Safe Mode, there are hardly any reasons for issues to occur. Below are the steps you need to follow to start into the Safe Mode of your Windows XP, Vista, or 7 computers (check out the Microsoft website for instructions on Windows 8 and 10 computers). 1) Hit the F8 key repeatedly as soon as your PC boots, but before the big Windows logo comes up. This will bring up the Advanced Boot Options menu. 2) Make use of the arrow keys to select Safe Mode with Networking and press ENTER. 3) When this mode loads, you should have the internet. Now, make use of your internet browser to download and install an anti-malware application. 4) Right after the software is installed, let the scan run to remove viruses and other threats automatically.

Obtain the antivirus software using a different browser

Some malware mainly targets specific web browsers. If this sounds like your case, make use of another internet browser as it might circumvent the virus. If you’re not able to download the security application using Internet Explorer, this means the virus is targeting IE’s vulnerabilities. Here, you should switch to another internet browser such as Chrome or Firefox to download the Safebytes program.

Create a bootable USB antivirus drive

Here’s another solution which is creating a portable USB anti-virus software package that can scan your system for malware without needing installation. Adopt these measures to run the anti-virus on the affected PC. 1) Download Safebytes Anti-Malware or Microsoft Windows Defender Offline onto a clean PC. 2) Plug in the pen drive into the uninfected computer. 3) Double click on the exe file to open the installation wizard. 4) When asked, choose the location of the USB drive as the place in which you want to store the software files. Follow the directions to finish the installation process. 5) Now, transfer the flash drive to the infected computer. 6) Double-click the EXE file to open the Safebytes tool right from the flash drive. 7) Click the “Scan” button to run a full computer scan and remove malware automatically.

SafeBytes Anti-Malware: Lightweight Malware Protection for Windows Computer

If you’re looking to download the anti-malware program for your computer, there are numerous tools on the market to consider however, you should not trust blindly anyone, irrespective of whether it is a paid or free program. Some of them do a good job in removing threats while some will ruin your computer themselves. You have to select one that is reliable, practical and has a good reputation for its malware source protection. On the list of strongly recommended tool by industry experts is SafeBytes Anti-Malware, a well known security software for Microsoft Windows. SafeBytes is a powerful, real-time anti-malware application that is designed to assist the common computer user in safeguarding their computer from malicious threats. With its outstanding protection system, this tool will quickly detect and eliminate the majority of the security threats, which includes adware, viruses, browser hijackers, ransomware, trojans, worms, and PUPs.

SafeBytes anti-malware takes computer protection to a whole new level with its enhanced features. The following are some of the great features included in the software.

Live Protection: SafeBytes offers real-time active checking and protection against all known viruses and malware. It will continuously monitor your pc for hacker activity and also gives end-users superior firewall protection. Best AntiMalware Protection: This deep-cleaning anti-malware application goes much deeper than most antivirus tools to clean your computer. Its critically acclaimed virus engine locates and disables hard to remove malware that hides deep within your computer. Website Filtering: SafeBytes provides instant safety rating to the webpages you’re going to visit, automatically blocking unsafe sites and to make sure that you are certain of your safety while browsing the internet. Lightweight Utility: SafeBytes is a light-weight application. It consumes a very small amount of processing power as it works in the background so you are free to use your Windows-based computer the way you really want. Premium Support: You will get 24/7 technical assistance to quickly resolve any concern with your security application. SafeBytes can keep your PC protected from the latest malware threats automatically, thus keeping your online experience secure and safe. Now you may realize that this tool does more than just scan and delete threats in your computer. If you’re looking for the very best malware removal tool out there, and if you don’t mind spending some dollars for it, opt for SafeBytes Anti-Malware.

Technical Details and Manual Removal (Advanced Users)

If you want to carry out the removal of myBrowser manually instead of using an automated software tool, you can follow these simple steps: Proceed to the Windows Control Panel, click on the “Add/Remove Programs” and there, choose the offending application to remove. In cases of suspicious versions of browser extensions, you can easily remove them through your web browser’s extension manager. You will most probably also want to totally reset your internet browser to its default settings. Lastly, check your hard disk for all of the following and clean your Windows registry manually to remove leftover application entries after uninstalls. Please remember that only advanced computer users should try to manually edit the registry because incorrect file deletion leads to a major problem or even a PC crash. Moreover, some malicious programs have the capability to defend against its deletion. Carrying out this in Safe Mode is advised.
Read More
Fix SPECIAL POOL DETECTED MEMORY CORRUPTION
If you suddenly encounter the SPECIAL POOL DETECTED MEMORY CORRUPTION Blue Screen error with a bug check value of “0x000000C1” while you are using your computer then it might be due to some problem with the hardware of your Windows 10 computer. According to security experts, it is most likely caused by the physical RAM which could be due to some error in the Realtek driver for Wireless USB 2.0 as well as corruption of the files inside the RAM, and so on. This kind of problem indicates that the driver wrote to an invalid section of the special pool. On the other hand, system files like the rtwlanu.sys or nvlddmkm.sys can also trigger the SPECIAL_POOL_DETECTED_MEMORY_CORRUPTION Blue Screen error. To resolve this Blue Screen error, you can use the options provided below as reference but before you do that, make sure to create a System Restore point first. After you have that covered, proceed to the given options below.

Option 1 – Delete the settings of the Driver Verifier Manager

  • Open the Driver Verifier Manager using the Start search.
  • After that, select or click on the “Delete existing settings” option and then click on Finish.
  • Reboot your computer and see if it fixes the Blue Screen error or not.

Option 2 – Try to update or rollback your Network driver

If you have updated the driver software as of late and you suddenly got this BSOD error, you might have to roll back the device driver – in other words, switch back to the previous working version. To do that, follow these steps:
  • Tap the Win + R keys to launch the Run window and then type in the “msc” command and hit Enter to open the Device Manager window.
  • Under the Device Manager, you will see a list of drivers. From there, look for the Network Adapters and expand it.
  • From the list of Network Drivers, look for “Realtek <Model> Wireless LAN 802.11n PCI-E NIC” and then right-click on it and select Update Driver.
  • Restart your PC and see if it helped in fixing the BSOD error.
Note: If you see any of the following entries under the Network drivers, you might want to download their latest available versions from each one of their manufacturer’s websites.
  • Realtek High-Definition (HD) Audio Driver
  • Realtek Card Reader Driver
  • Realtek Local Area Network (LAN) Driver
On the other hand, if updating the Network driver didn’t help, you can also try to roll back to its previous version.
  • Open the Device Manager again and then look for Network Drivers.
  • Next, select Realtek <Model> Wireless LAN 802.11n PCI-E NIC from the list of Network Drivers and then double click to open a new mini window.
  • After that, make sure that you’re on the Driver tab and if you are not, just navigate to it then click the Roll Back Driver button to switch back to the previous version of the Realtek driver.
  • Now restart your computer to successfully apply the changes made.

Option 3 – Try running the ChkDsk utility

You can also run the ChkDsk utility to fix the SPECIAL_POOL_DETECTED_MEMORY_CORRUPTION Blue Screen error.
  • First, open This PC and right-click on your operating system partition for Windows.
  • Next, click on Properties and navigate to the Tools tab.
  • Then click on Check under the Error Checking section.
  • After that, a new mini window will be opened and from there click on Scan drive and let it scan your disk drive partition for any errors and then restart your computer.

Option 4 – Use the Windows Memory Diagnostics

Since the problem has something to do with the physical RAM, you need to use Windows Memory Diagnostics. To run it, refer to these steps:
  • Tap the Win + R keys to open Run and type exe and hit Enter to open the Windows Memory Diagnostic Tool.
  • After that, it will give two options such as:
    • Restart now and check for problems (Recommended)
    • Check for problems the next time I start my computer
  • Once your computer has restarted, perform a basic scan or you could also go for the “Advanced” options such as “Test mix” or “Pass count”. Simply tap the F10 key to start the test.
Note: After you select the option, your PC will restart and check for memory-based issues. If it finds any issues, it will automatically fix them.

Option 5 – Run the Blue Screen Troubleshooter

The Blue Screen troubleshooter is a built-in tool in Windows 10 that helps users in fixing BSOD errors like SPECIAL_POOL_DETECTED_MEMORY_CORRUPTION. It can be found in the Settings Troubleshooters page. To use it, refer to these steps:
  • Tap the Win + I keys to open the Settings panel.
  • Then go to Update & Security > Troubleshoot.
  • From there, look for the option called “Blue Screen” on your right-hand side and then click the “Run the troubleshooter” button to run the Blue Screen Troubleshooter and then follow the next on-screen options. Note that you might have to boot your PC into Safe Mode.
Read More
Desktop widgets in Windows 10
Windows 7 was an operating system that had one thing which no other Windows had, even today. Official Microsoft desktop widgets. With an attractive design, users loved to exploit the adequacy and neatness of these gadgets. However, Microsoft had to discontinue these gadgets as they posed a serious security threat to the Operating System. It was believed that a potential attacker could even use a gadget to take complete control of your PC. With Windows 10, things have changed big time. You have all the fantastic apps and live tiles at your disposal providing a more native experience. Despite all this, if you still have a fondness for fancy gadgets, we have just the right tool for you to get started with similar “Widgets” on Windows 10. Win10 Widgets is a tool that places the most important information right in front of you, on your desktop.

Win10 Widgets

Win10 Widgets is a desktop app package provided by Rainmeter which is an effective system customization engine for Windows. It brings some informative widgets to Windows 10 which look almost native with their intuitive and sleek design. You can pin them on your desktop to keep an eye on various system figures like CPU usage, data storage, battery usage, detailed computer performance, etc.

Native looking Widgets for Windows 10

These widgets are designed in such a way that it looks totally indigenous to the Windows 10 UI. With a similar design language, visual style, accent color, and even font settings, these widgets almost look like an inseparable system component. You can choose between different size variants to pin on your desktop and arrange them in an orderly fashion to make the most of it.

Highly customizable desktop gadgets

Apart from the default size variants, you can configure several other parameters pertaining to the look and appearance of any widget. As Rainmeter is an open-source program, you are provided with the .ini configuration files which you can customize as per your wish. You can make adjustments to the widget coordinates, position and transparency as well. You can even create your own skins (.rmskin package) using the built-in Skin Packager and publish them for general usage through Rainmeter.

Illustro Skins

Over and above the cool widgets, Rainmeter also contains Illustro, a simple collection of skins that shows the range of Rainmeter’s capabilities. You can load the skins on your desktop for a brief look at your system internals. You can also start editing these skins to make them yours by taking advantage of the Rainmeter manual and forum link provided on the Welcome screen. Win10 Widgets is a great tool if you like widgets or gadgets on your Desktop. It blends into the background and puts the important piece of information right on your desktop without you having to look somewhere else. If you already have the Rainmeter application, you can download the Win10 Widgets .rmskin file from here, else you can download the combined bundle for both Rainmeter and Win10 Widgets from here.
Read More
A Quick Guide to Resolving Uncdms.dll Error Code

Uncdms.dll Error Code - What is it?

Uncdms.dll is a Dynamic Link Library file and a crucial part of the Windows Desktop Search Software. It is used to search emails, documents, photos, videos, and folders instantly. However, the Uncdms.dll error pops on the screen, when the Windows Desktop Search Software fails to start. The error message is displayed in one of the following formats:
  • “Uncdms.dll cannot be found.”
  • “Windowssearch.exe – cannot find the component. This application has failed to start because uncdms.dll was not found. Reinstalling the application may fix the problem.”
  • “The file uncdms.dll is missing.”

Solution

Restoro box imageError Causes

Uncdms.dll error code may pop on your screen due to multiple reasons. These usually include but are not limited to:
  • Viral infection
  • Issues with Windows Desktop Search
  • Registry corruption
  • Uncdms.dll accidentally deleted during program un-installation

Further Information and Manual Repair

If you experience an Uncdms.dll error code on your system, fix it right away. This error is easy to resolve. You don’t have to be technically sound to resolve the uncdms.dll error code. Try the methods listed below to resolve without any hassle:

Method 1 - Check Your Recycle Bin and Restore the Deleted Uncdms.dll File

Since DLL files are shared files, there is a possibility that you accidentally deleted them while uninstalling some other program. To fix the issue, simply go to the recycle bin and look for the file. If you locate it, reinstall it. If you can’t, then it is advisable to download the Uncdms.dll file from a trusted DLL file website.

Method 2 - Uninstall and Then Re-install Windows Desktop Search

If the error code is related to issues with the Window Desktop Search application, then simply uninstall this software and re-install to resolve. To do this, click the start button, go to the control panel and then add/ remove programs. Now choose Windows Desktop Search from the list of programs and click Remove. After that, reboot your PC to activate changes. Now download the software and follow the same process and reinstall the Windows Desktop Search program on your PC. To activate changes, reboot. This will hopefully resolve the issue.

Method 3 - Update Windows

As this file is included in the service pack, try updating the Windows Utility to resolve the Uncdms.dll error code. To get started, click start and then go to the control panel, now choose Windows update. Follow the instructions to install Active X and then click install to update Windows Utility. Restart your system to bring the changes into effect.

Method 4 - Scan for Viruses and Repair the Registry

Whether the underlying cause of the Uncdms.dll error code is viral infection or registry corruption, it is advisable to download Restoro. It is an advanced and multi-functional PC Repair Tool integrated with 6 powerful utilities including antivirus and a registry cleaner. It scans and removes all types of viruses. The registry cleaning utility works simultaneously and removes all the unnecessary files corrupting the registry including cookies, temporary files, internet history, and junk files, and repairs it in seconds, thereby resolving the Uncdms.dll error immediately. Click here to download Restoro - PC Fixer
Read More
How to Fix the Low Disk Space Notification on Windows 10
As you know, Microsoft constantly releases new updates with the main goal of fixing bugs as well as deliver users with new and exciting features. However, there are times when the latest update comes with an unwanted bug. One of these bugs is an error message saying, “Low Disk Space. You are running out of disk space on Local Disk (G:). Click here to see if you can free space on this drive.” So if you have recently installed a Windows 10 update, then you’ll most likely see a completely new drive on your computer which will appear right after the installation of the update and you’ll also start seeing the aforementioned error message. It gets irritating as this error message keeps on popping up even if you still have a lot of free space on your other drivers. Obviously, the main reason why this error message pops up all the time is the bug brought along by the Windows Update. This bug unhides the recovery partition drive and allocates it a drive letter which is why you are seeing a new drive in your computer. Thus, you can get rid of the pesky error message by simply removing the letter of the new drive. Just remember that you must not delete anything from the recovery partition drive nor format the drive. Formatting or deleting the recovery partition drive can heavily affect the recovery of Windows since the data on the drive is used by the Windows Recovery Environment or your system’s manufacturer. A lot of users have reported that removing the drive letter has resolved the issue. And if you worry that removing the drive letter will delete the drive, you are mistaken. This solution is basically harmless and is proven effective to make the notifications go away. Carefully follow the instructions below to get rid of the Low Disk Space notification by removing the drive letter.
  • Step 1: Tap the Windows key once.
  • Step 2: Next. In the Windows Start Search, type in “command prompt” and right-click on Command Prompt from the search results and select the “Run as administrator” option or you could simply tap Win + R keys and then input “cmd” and hit Enter to open Command Prompt.
  • Step 3: After opening Command Prompt, type in “diskpart” and tap Enter.
  • Step 4: Next, type in “list volume” and tap Enter. After that, you will see a list of drives.
  • Step 5: Take note of the letter associated with the newly created drive.
  • Step 6: Afterwards, type in “select volume <drive letter>” and tap Enter. Take note that you must replace the <drive letter> with the drive letter you’ve found in Step 5.
  • Step 7: Now type in “remove letter=<drive letter>” and then tap Enter. Once again, replace the <drive letter> with the letter you took note of in Step 5.
Read More
MS Mariner, new OS for servers based on Linux
mariner installerWell if anyone told me just a few years ago that I will see the day when Microsoft releases a new OS based on Linux I would be very amused, but that day has come. Mariner is the newest OS out of nowhere. Microsoft’s new Linux Distro, dubbed Common Base Linux (CBL)-Mariner, isn’t the type of distro you’d want to install directly on any old machine. It’s primarily meant for cloud infrastructure and edge products. Specifically Microsoft’s Cloud and Edge products. But if you are curious, it’s possible to run. Juan Manuel Rey, a Microsoft Senior Program Manager for Azure VMware, recently published a guide to ISO CBL-Mariner image. With that, you can easily get it up and running. And you can build CBL-Mariner on an Ubuntu 18.04 desktop. So you can try it out since it is free. You can get it from here:
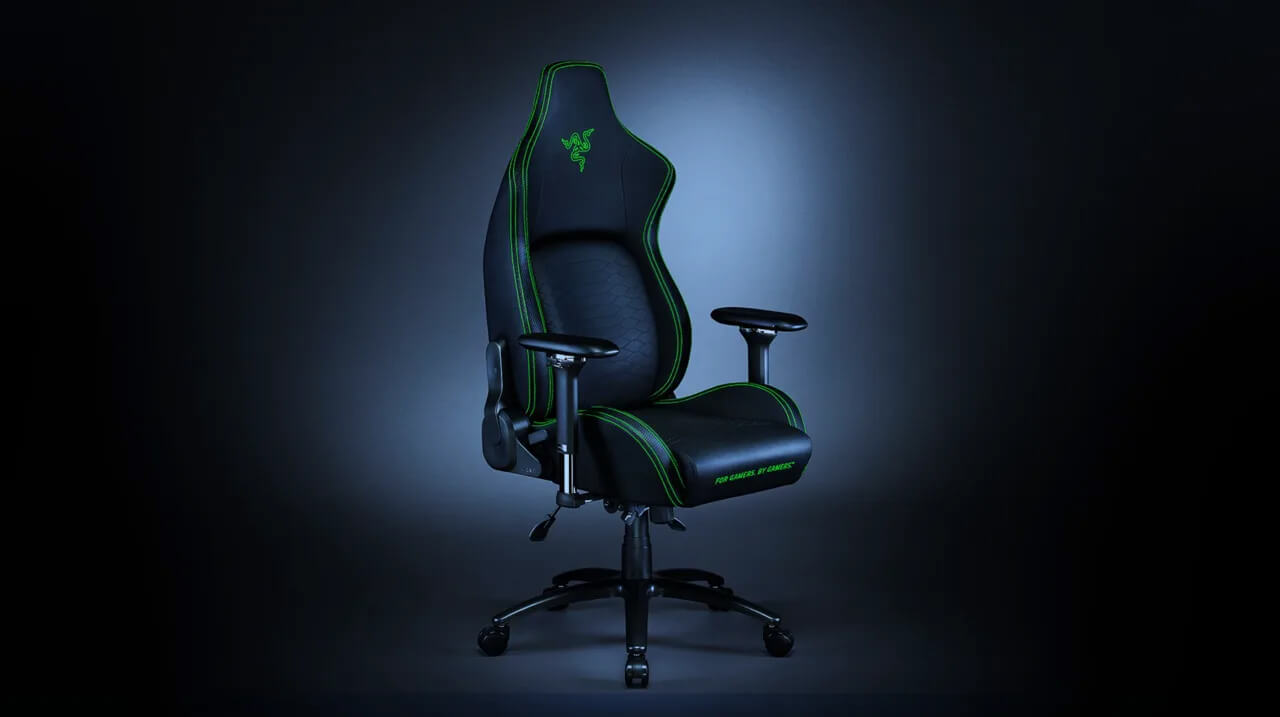
 https://github.com/microsoft/CBL-Mariner It is obvious that Microsoft aims to set itself as a leader in enterprise server environments with this move and it is very likely that it may succeed or at least give a good shake to its competitors, mainly red hat and Suse which are two dominant distros in that field. Many believe that they can win over by providing regular updates and package delivery via their already established system and that feature could be a turning point for some. In any case, time will tell and we shall see.
Read More
1 2 3 171
Logo
Copyright © 2023, ErrorTools. All Rights Reserved
Trademark: Microsoft Windows logos are registered trademarks of Microsoft. Disclaimer: ErrorTools.com is not affiliated with Microsoft, nor claims direct affiliation.
The information on this page is provided for information purposes only.
DMCA.com Protection Status