What is 0x3D55? As you know, Windows 10 is loaded with various Universal Windows Platform or UWP apps such as the Microsoft News, Weather, Calculator, Windows Mail, and many other applications that are based on the modern UWP platform of Microsoft that was introduced in Windows 10.
Each one of these apps has a shared piece of code in the kernel for them to be able to get executed across any device that runs the Windows 10 OS which includes laptops, PCs, 2-in-1 devices, mobile phones, mixed reality headsets, and many more. However, there are times when the runtime information for these apps ends up getting corrupted which causes them not to function as expected and throws errors like the error 0x3D55.
This kind of error can be pinned down when the UWP app malfunctions and you can also find an error message in the Event Log that reads, “0x3D55: Package family <App name with ID> runtime information is corrupted”. So if you encounter this error, read on for this post will walk you through fixing it. There are three suggestions you need to check out to fix this error – first, you can try to reset the Microsoft Store cache, second, you can try to re-register or reinstall the problematic app and lastly, run the Windows Store App troubleshooter.
Option 1 – Try to reset the Microsoft Store cache
Just like browsers, Microsoft Store also caches as you view apps and games so it is most likely that the cache is no longer valid and must be removed. To do so, follow the steps below.
Right-click on the start button and click on Command Prompt (administrator).
Next, type in the command, “wsreset.exe” and tap Enter. Once you do, the command will clear the cache for the Windows Store app.
Now restart your PC and afterward, try opening Microsoft Store again and then try to install your app or update your computer again.
Option 2 – Run the Microsoft Store Apps troubleshooter
The Microsoft Store Apps Troubleshooter will help you in fixing the error 0x3D55. This is a great built-in tool from Microsoft that helps users fix any app installation issues. So this is worth a try to solve the problem. This built-in tool also helps you fix the Windows 10 Store if it isn’t working.
To use the Windows Store Troubleshooter, follow the steps below.
Tap Win + I keys again to open the Windows Settings panel.
Go to Update & Security and then go to Troubleshoot.
On your right-hand side, scroll down to find the Windows Store Apps and then click on the Run the troubleshooter option and see if it fixes the problem.
Option 3 – Try to re-register the UWP app via PowerShell
First, type “command prompt” in the Start Search and right-click on Command Prompt and then select the “Run as administrator” option.
Next, navigate to this location in the command line utility: C:/Users/<Insert Username>/AppData/Local/Packages
After that, execute the “DIR” command to view the list of all the directories in the given location.
Once the list appears, look for the ID of the problematic app and take note of it.
Now tap the Win + X key combination or right-click on the Start button and click on the Windows PowerShell (Admin) option.
If a User Account Control or UAC prompt appears, just click on Yes to proceed and open the Windows PowerShell window.
Next, type in or copy-paste the following command to re-register the Microsoft Store app and tap Enter:
Recently, a number of users reported that they weren’t able to download anything from the internet after they’ve updated their Windows 10 computers. This kind of problem occurs because of some Internet options settings located in the Control Panel. Based on the reports, this issue has been known to occur in all kinds of browsers and not only on Microsoft Edge.
Not being able to download anything from the internet is a huge problem since almost everything is wrapped around the internet. To resolve this problem, here are some suggestions that you can try.
Option 1 – Temporarily disable Firewall and third-party antivirus
Firewall and antivirus programs are known to block files the instant it detects a threat to the system. However, there are some cases when it can also block a file even when it’s a safe one. Thus, your antivirus or firewall programs might be the reason why you can’t download anything on your Windows 10 computer. To isolate the issue, you need to temporarily disable both the Firewall and antivirus programs and then check if you can now download anything from the internet. Do not forget to enable them again as disabling them can leave your computer vulnerable to cyber threats.
Option 2 – Try changing the Internet Options settings
According to users, changing the Internet Options settings helped them resolve the problem. There are times when the drive location in your Internet Options settings is not the system drive, chances are, it will cause the error to pop up which is why you need to make sure that it’s correct.
Go to Control Panel and search for Internet Options and open it.
Next, go to the General tab and click on Settings.
From there, check if the drive location is “C:”. If it is, close the window, otherwise, click on the “Move folder…” option, and then select your preferred folder under drive C: and click OK.
Now restart your computer and check if changing the Internet Options settings helped in fixing the problem.
Option 3 – Try clearing browser data
There are instances when browser data can cause issues in downloading files online. And so you can try to clear your browser’s data. This might be a very basic solution but oftentimes it works in fixing this kind of error. Follow the steps below to clear the data in your browser.
Open your Google Chrome browser.
After that, tap the Ctrl + H keys. Doing so will open a new panel that allows you to delete the browsing history and other data in your browser.
Now select every checkbox that you see and click on the Clear browsing data button.
Then restart your Chrome browser and check if you can now open any website or not.
Option 4 – Get rid of any conflicting browser extensions
Open Chrome and press Alt + F keys.
Go to More tools and click Extensions to look for any suspicious browser extensions or toolbars.
Click the Recycle bin and select Remove.
Restart Chrome and press Alt + F keys again.
Proceed to On Startup and mark Open a specific page or set of pages.
To check if the browser hijacker is still active, click Set pages, if it is active, overwrite the URL.
Option 5 – Try to remove Proxy
Removing the Proxy might also help you in fixing the connection issue in Cortana. Here’s how you can do it:
Tap the Win + R keys to open the Run dialog box.
Then type “inetcpl.cpl” in the field and hit Enter to pull up the Internet Properties.
After that, go to the Connections tab and select the LAN settings.
From there. Uncheck the “Use a Proxy Server” option for your LAN and then make sure that the “Automatically detect settings” option is checked.
Now click the OK and the Apply buttons.
Restart your PC.
Note: If you are using a third-party proxy service, you have to disable it.
Option 6 – Try reinstalling your browser
If none of the options given above worked in fixing the problem, you can try to reinstall your browser. There are times when the browser wasn’t installed properly which can cause several issues like not being able to download anything from the web. Thus, reinstall your browser and see if that helps.
Windows PowerShell is a powerful tool inside the Windows environment often overlooked by typical users which is a great mistake since it can offer a large array of functionality and usability and if used well can offer a unique working experience.
Today we will be using PowerShell to turn the WEB camera off so it can not be accessed, completely disabling it for use. You might want to do this for security reasons or just want to learn few new things. Whatever your reason might be, I am welcoming you to this tutorial and please do keep reading.
Finding device ID
In order to disable the WEB camera first thing we need to do is to find a matching device ID. We will find this value inside the device manager, so press ⊞ WINDOWS + X to open the secret menu.
In the menu choose device manager and click on it.
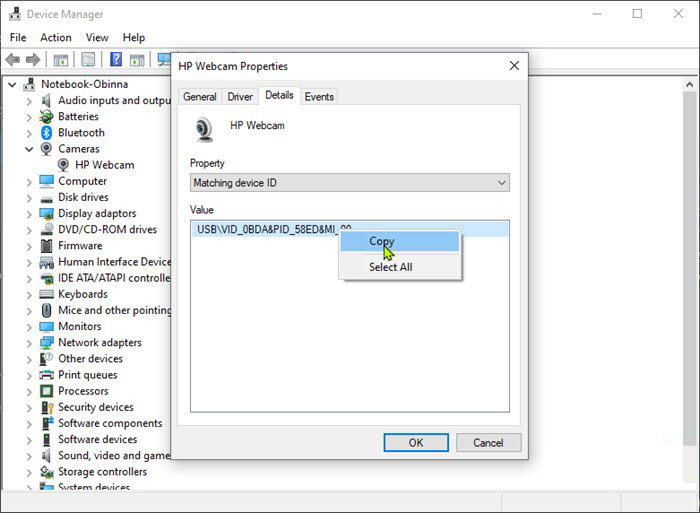
When the device manager opens, expand the Imaging devices or Cameras section.
Right-click Integrated Camera or the primary webcam, and click Properties.
Go to the Details tab.
Under the Property section, click to select Matching device ID from the drop-down.
Right-click the value and select CopyThe next step is to download and install Windows Driver Kit (WDK)
PowerShell script
Create and run a PowerShell script with the following parameters/values to disable the camera. Substitute the <FOLDER> placeholder with the actual name of the folder where your copy of Devcon is residing
$id = (Get-CimInstance Win32_PnPEntity |

where caption -match '<PRIMARY CAMERA>').pnpDeviceID

$ppid = "{0}{1}" -f '@',$id

Set-Location c:\<FOLDER>

Devcon status $ppid

Devcon disable $ppid

Devcon status $ppid
To enable the camera device, run the command below in PowerShell:
As you know, the USB security keys are a secure medium to validate a lot of components in a computer. They can be used to log in to Windows 10. Now with the advancement of APIs, you can authenticate across the website as well using the same key. However, there are times when it may not work and it could be caused by several factors. It could be due to corrupted or incompatible drivers or it could also be due to compromised integrity of the key, and many more.
So if you happen to encounter an issue with the USB security key on your Windows 10 computer, then there are several potential fixes you can try. You can try toggling the Internet Options settings or reinstall the respective USB drivers. You could also try changing the PIN of the security key or disable the antivirus program on your computer or troubleshoot the web browser. Refer to the potential fixes provided below to fix the problem.
Option 1 – Try to toggle the settings of the Internet Options
In the Windows Search box, search for Internet Options to open it.
Next, go to the Security tab and drag the security slider to the lowest possible security for all the given zones.
After that, click on OK to save the changes made and close the Internet Options.
Note that this option is only a temporary measure as it can make your computer vulnerable. Make sure to press the Reset all zones to default level button.
Option 2 – Try to update or reinstall the respective drivers
If updating the drivers of the device did not fix the problem with the USB security key, you can try to update or reinstall the Universal Serial Bus Controller drivers instead of using the Device Manager. Refer to the following steps:
First, click the Start button and type “device manager”.
Then click on the “Device Manager” from the search results to open it.
From there, look for the “Universal Serial Bus controllers” option and then right-click on each one of the USB drivers and select the Update Driver from the menu.
Note: If it is a regular USB drive, then it will be listed as a USB Mass Storage Device but if you have a USB 3.0 device, then look for a USB 3.0 Extensible Host Controller.
Restart your PC and then click the “Search automatically for updated driver software” option.
Note: If updating the USB Controller drivers didn’t work, you can try to reinstall them instead.
Option 3 – Try to change the PIN of the security key
If the first two options didn’t work, you can try changing the PIN of the security key. There are instances when the PIN for the security key might have been corrupted. Thus, resetting it can help you resolve the problem.
Option 4 – Temporarily disable Firewall and third-party antivirus
Firewall and antivirus programs are known to block the proper functioning of the USB security key. Thus, your antivirus or firewall programs might be the reason why you can’t download anything on your Windows 10 computer. To isolate the issue, you need to temporarily disable both the Firewall and antivirus programs and then check if you can now download anything from the internet. Do not forget to enable them again as disabling them can leave your computer vulnerable to cyber threats.
Option 5 – Try to troubleshoot the web browser
Troubleshooting your web browser can also help you fix the USB security key problem. You can do that by checking if your web browser supports the security key and you can do that by checking on the official website of your browser. You can also try to update your web browser to its latest version but if it didn’t help, you can try to reinstall it or switch to another web browser.
What is Out of Memory error while copying files? As you know, both the hard drive and RAM play a major role in performing any operation on a computer since every process or task that takes place in the system requires some RAM storage as well as hard drive storage to be executed. However, there are times when you may receive the following error messages when you try to copy files from one location to another:
“Out of memory or system resources, Close some windows or programs and try again.”“There is not enough memory to complete this operation – copying files.”
These errors are caused by the Desktop Heap limitation when there is no longer enough memory to complete the operation while copying the files. If you encounter any of these errors, you will be guided in this post with the help of some potential fixes that can increase its limit and will hopefully fix this error on your Windows 10 computer.
You may try to close all the open windows and programs and then try copying the file again and see if that helps. If not, then proceed to the instructions given below. But before you do that, make sure that you create a System Restore point first. This way, you can undo the changes you’ve made any time in case there are some unwanted changes you want to reverse. After you create a System Restore point, refer to the steps provided below.
Step 1: Tap the Win + R keys to open the Run utility and type “Regedit” in the field and tap Enter to open the Registry Editor.
Step 2: Next, navigate to this registry key: ComputerHKEY_LOCAL_MACHINESYSTEMCurrentControlSetControlSession ManagerSubSystems
Step 3: Now double click on the DWORD named Windows to modify it.
Step 4: Change the values for SharedSection in the Value Data field. It should be in the format of “SharedSection=aaaa,bbbb,cccc”. Note that you have to change the value of “bbbb” and “cccc”. So in case you are using an x86 operating system, set the value of bbbb to 12288 and then set the value for cccc to 1024. On the other hand, if you are using an x64 operating system, set the bbbb value to 20480 and the cccc value to 1024.
Step 5: Exit the Registry Editor and restart your computer to successfully apply the changes made.
Note: The bbbb value in the SharedSection registry is the size of the desktop heap for each interactive window station while the cccc section of the SharedSection value is the size of the desktop heap for each non-interactive window station. In addition, you must keep in mind that setting the value of bbbb to more than 20480 KB is not really recommended.
On the other hand, there is another tool that could help in resolving the Out of Memory error. This tool is called the Memory Diagnostic tool in windows can help resolve the Out of Memory error by checking and automatically fixing any memory-based issues. To run it, refer to these steps:
Tap the Win + R keys to open Run and type mdsched.exe and hit Enter to open the Windows Memory Diagnostic Tool.
After that, it will give two options such as:
Restart now and check for problems (Recommended)
Check for problems the next time I start my computer
Once your computer has restarted, perform a basic scan or you could also go for the “Advanced” options such as “Test mix” or “Pass count”. Simply tap the F10 key to start the test.
Note: After you select your preferred option, your computer will restart and check for memory-based issues. If it finds any issues, it will automatically fix them.
Hello and welcome to our software series review. Weel this time we could say this is more of a service review since the application we are going through today is online and you can use it freely without ever needing to install it.
When we choose software that we are going to review and recommend we really try to recommend something that is worth your time and money, Cartoonize fits in both categories in my opinion.
First of all basic plan of this graphic software is completely free and as mentioned it is working online, also as one more feature basic plan does not even require you to have an account of any kind, all you need to do is go to the website of the application and you can start using it right away. There is also paid plan for extra features if you need them billed monthly or annually.
Features
First things first, this is not Photoshop or GIMP and it does not aim nor want to be. This is something else, directed and pointed at the different types of users. This application is aimed at people that want to make some quick graphics and post them on social media and it does that very well. Even without knowledge to use graphic software this one is so well designed and straightforward that even a complete newcomer can do something right away.
So as the application that wants to be used by people that want to place some cool pictures or ads on their social media what it offers. For starters simplicity and ease of use, every option that you can use is on the left side of the screen nicely packed into the vertical toolbox. Inside the toolbox, you have access to various tools, effects, and filters that you can apply to your image.
Tools explained
Image manager
The first section on the tool panel is the image manager, here you can upload your images, delete them, search stock images, and so forth. nothing more to say about this one as it is only a basic file manager.
Edit
In this tool panel, there are a lot of basic settings for your image manipulations divided into 3 sections: Basics, Enhance, and Creative. In the basic section, you can crop, resize and rotate your image. Enhance panel will let you set exposure, color, vibrance, tint, and details (sharpen). Finally, the Creative part will let you remove the background with AI in a single click, replace colors in the image, and add a vignette and round image.
Effects
In the effects panel, you will be given 4 options to choose from Cartoonizer, Digital art, Sketcher, and painting. Each option once clicked will open another set of options tied to chosen preset where you will be able to choose a different style from chosen template. Once you click on the desired template it will be applied to your image and in the upright corner, you will have edit options to tweak it to your liking. You can play around as much as you want because only once you click on the apply button, the effect will be applied to your image.
Filters
Same as in the effects tool panel here you will also get a series of different filters that you can apply to your image. As in the previous tool once clicked on the chosen filter, you will be given options for its variations and details edits. How there is really plenty of filters options and combined with its own presets I will not focus on explaining what each one is doing since picture thumbnails are pretty accurate and just one look at them will explain to you everything you need to know.
Overlays
In the overlays panel, you can as the name says overlay different kinds of effects on your image. You can add snow, fog, sun flares rain, and many more. Presets work identically to previous effects and filters.
Masks
If you want to place your image in a certain shape or in-text this is the section for you. You will be presented with sections as custom text, shapes, brushes, floral, animals, and patterns. Each section will once again lead to plenty of variations on the chosen subject where you can pick one that you like the most and tweak its options.
Text
As the name suggests, this section is to add text to your picture or design. If you are making some cool ad for Facebook, Instagram, or other social media I believe that you will spend most of your time in this section adding text and tweaking it so it looks best. You have all the tools that you will need to make a catchy title or smaller block of text and you can add multiple texts to your picture tweaking their own visual appearance, the font used, color, and some effects like a drop shadow.
Draw
In the draw section, you will be able to freely draw whatever you like with your mouse or pen if you have one. you have basic options for a brush and eraser so you can erase stuff. Pretty basic tool but it gives a nice touch to underline something, circle it, etc.
Graphics
This panel will let you place various already made graphic assets into a picture. You have hearts, hats, glasses, etc. There really are tons of premade graphics along with thematic ones like new year, st. Patric day and more.
Frames
As the name suggests this section will place a frame of your choice around your picture. You can choose the style of frame, position, color, and many more. There are various styles and each style has its own options.
Conclusion
Cartoonize is a great online application that will let you quickly and easily do cool and nice image edits. As mentioned you can also add various effects, text, and graphics and use this app to make some quick and nice ads for social media. You have the option to publish to your social media right from the app in the save dialog but you can also of course download your image or design to your local computer.
Please note that for this review we used the pro, paid version so all of the features were unlocked. We wanted to give you a full overview of the full potential of the app. In my opinion, the small monthly fee that they charge is well worth it when you see all things that you can do with it.
Go to the cartoonize website and check it out, basic option is completely free and it does not even require making an account. Have fun, be creative and take care, I hope to see you again tomorrow.
A PC that turns on by itself every so often can get quite annoying. Many users have faced this problem countless times. There are lots of possible reasons why your Windows 10 PC turns on by itself, wakes up from sleep, standby, or even when it’s shut down.
To find out what exactly woke your computer, simply open Command Prompt as admin and type the following command:
powercfg –lastwake
Once you enter the command given above, it will show you the last device that woke your PC up. After that, you need to type in the next command:
powercfg –devicequery wake_armed
After entering the command, it will show you a list of all the devices that could wake your PC up. The goal in running these commands is to understand the reason what’s really causing your PC to turn on and see the reason is on the hardware level or not. Here are a couple of options you can try if your Windows 10 PC turns on by itself.
Option 1 – Try disabling Fast Startup
As you know, Windows 10 comes with a mode called Fast Startup which does not turn off the computer in the usual manner. This mode keeps your computer in a mixed state so that when you turn it on again, it will be a lot faster. However, as useful as this feature appear to be, some security experts find this an issue, for numerous reasons – for one, it can turn on your Windows 10 PC by itself. Thus, you need to disable this feature to fix the problem.
Option 2 – You need to stop the Task Scheduler from waking up your computer
There are times when the issue has something more to do with the software than hardware. It could be that you are using a Scheduled Task to get some work done on your computer at a particular time of the day or many times a day. That’s why if you really are using Task Scheduler, you need to change the Power settings of Windows to make sure that it ignores those tasks rather than deleting them instead when your computer is either on Hybrid or Standby mode.
Open the Power Options and then click on “Change Plan Settings”.
After that, make sure to choose the correct power plan and then select the “Change advanced power settings” option.
Next, look for the Sleep tree and expand it to view the “Allow Wake Timers” option and then disable it. Disabling this option will make sure that none of the program that could wake your PC up when it’s either on shutdown or sleep mode. However, this only applies to laptops.
Option 3 – Try to disable Automatic Restart
There are instances when the computer crashes and the system restarts itself. This is actually by design – when your computer has been left on standby, the computer will restart and if the program repeats, it will keep on waking your PC up.
In the Search bar, type in “system”.
Once it appears from the search results, click on it.
Next, select Advanced system settings on the left side and then go to the Advanced tab.
From there, click on Settings under Startup and Recovery.
Then unmark “Automatically Restart” and click on OK.
Option 4 – Adjust the Power Management option of both the Keyboard and Mouse
As you know, two of the culprits in waking your PC up are the keyboard and the mouse. If they’re slightly moved or hit, your PC turns on. To prevent these two from waking your computer up, you need to make some adjustments to their power management option since they have one. You can disable this option to ensure that they won’t wake your PC up unless you really want it to.
Tap the Win + X keys and then tap M to open the Device Manager and list all the hardware on your computer. From there, select your keyboard or mouse.
Next, right-click and then go to Properties and go to the Power Management tab.
In this tab, uncheck the “Allow this device to wake the computer” box.
Note: Aside from the keyboard and mouse, if you are also using any gaming rig to play games on your computer, then you might have to disable their power options as well as they could also wake your computer. Just make sure that either the keyboard or the mouse has the ability to wake your computer up at the very least as it can be quite inconvenient to tap the Power button every time you want to turn on your computer.
Option 5 – Modify Wake On Lan
The Wake On Lan feature can bring back your computer online if it is connected to a network. This feature is useful especially when a computer wants to communicate or to send data or files to a network computer which should come online only when it’s requested. Wake On Lan is built into the hardware, i.e. network adapter so it is one of the possible reasons why your PC turns on by itself.
Tap the Win + x keys then hit M to open the Device Manager and then under the Network adapters, look for the one that was listed above. Take note that you must not change anything with the ones that are listed as Miniport.
Next, right-click and select Properties and then go to Power management and from there, uncheck the “Allow this device to wake up the computer” option. This will ensure that no PC on the network can ever wake your computer up.
Option 6 – Prevent any scheduled Windows Update and Automatic maintenance
It is also possible that the Windows Update has restarted your PC to complete the update. This depends on your active hours or a predefined schedule. AS you know Windows has a built-in Automatic Maintenance mode which wakes the computer up at the scheduled time and performs the system update. This could be one of the possible reasons why your computer turns on by itself. so to prevent any scheduled updates and maintenance, you can simply change the time for Automatic maintenance. How? Follow these steps:
Open Settings then go to Windows Update and Security >Windows Update and select Active Hours.
After that, type in “Automatic maintenance” in the search bar to change the time for Automatic maintenance.
From there, you can adjust the timing or just uncheck the “Allow scheduled maintenance to wake up my computer at the scheduled time” box.
There are a lot of home users that often get a computer that comes installed with the Windows 10 Home. And since Windows 10 Pro offers more features and utilities compared to Windows 10 Home, a lot of users also prefer to upgrade their Windows 10 Home computers to Windows 10 Pro. However, while doing so, a number of users reported that they encountered error 0xc03f6506 and they were not able to proceed with the upgrade.
If you are one of these users, when you encounter error 0xc03f6506, you will see the following error message on your screen:
“The last product key you entered can’t be used on this copy of Windows (0xc03f6506).”
This particular error tends to occur when you go on to activate Windows 10 although it can also appear during the upgrade process. In such cases, you will see the following error message:
“Unable to upgrade your edition, We can’t upgrade your edition of Windows. Try upgrading your edition of Windows again. (0xc03f6506).”
To fix the Activation Error Code 0xc03f6506 in Windows 10, use the options provided below as references but before you proceed, make sure that you create a System Restore point first.
Option 1 – Try to use the Registry Editor
If you have already upgraded from Windows 10 Home to Windows 10 Pro and you’re having trouble with its Activation, then you might want to apply some registry tweaks to fix the problem. How? Refer to these steps:
Tap the Win + R key combination to open the Run dialog box.
Then type “Regedit” in the field and click OK or tap Enter to open the Registry Editor.
Next, navigate to this registry key: ComputerHKEY_LOCAL_MACHINESOFTWAREMicrosoftWindows NTCurrentVersion
From there, look for a DWORD named “EditionID” and once you found it, double click on it and change its Value data to Windows 10 Professional.
After that, look for another DWORD named “ProductName” and double click on it to change its Value data to Windows 10 Professional.
Once you’re done, restart your computer to apply the changes made successfully.
Option 2 – Try to use Command Prompt
If the registry tweaks you applied didn’t fix the Activation error, then you can try using Command Prompt instead. Note that you can use this option in both scenarios pointed out above.
First, you have to insert a bootable drive of the Windows10 installer.
Next, tap the Win + X keys and select Command Prompt (Admin) from the menu.
After opening Command Prompt as admin, navigate to the root location of the bootable drive inside the Command Prompt command line.
Once you’re already there, type the following command and tap Enter:
setup.exe /auto upgrade /pkey <YOUR WINDOWS 10 PRO EDITION PRODUCT KEY>
After entering the command, check if it was able to fix the Windows Upgrade or Activation error 0xc03f6506. If not, refer to the next given option below.
Option 3 – Try to disable the Network Adapter
Just like the second option, you can also use this option for both the given scenarios above.
Tap the Win + X keys and select Network Connections from the menu.
This will open the settings for your network and on the left side panel, click on the “Change adapter settings” link. This will open Control Panel.
From there, click on the network your computer is connected to, and then right-click on the Network Adapter that you are using and select Disable.
After disabling the Network Adapter, try to switch to the edition of your copy of Windows 10 again and see if the problem is now fixed and don’t forget to double click on the disabled Network Adapter to get back on the Network.
A solid reason to switch to Mac from Windows PC is Mac OS. Based on Linux, offers more stability and better security than Windows but you will not be able to find a vast array of applications on it.
Even when Mac OS X (the first big one) was first introduced, it looked and felt like ages beyond Windows (Microsoft just recently made a slick and modern design with Windows 11). Under the hood, it turned out that the operating system itself is stable and incredibly fast & responsive. If you value stability and easiness of use, Mac OS is the Operating system for you.
Apple ecosystem
This one is easy, if you are already invested in apple devices like iPhone and iPad, having an apple computer is one step forward into the apple ecosystem and one more step into easy sharing of documents and data between devices.
Calendars, emails, photos, videos, documents, and many more can easily be shared and synched between devices with a single apple ID making workflows much easier than on other operating systems.
Development
Developers all around the world say that developing on Mac is much better and smoother than on PC, this has probably to do something with OS being based on Linux but whatever the case is, it is much smoother and it just feels better. Apple laptops are often the go-to choice of developers for a reason.
Also if you are in the development business for applications and services aimed at iPhone or iPod then there is no really another way than to be into the apple ecosystem and own apple hardware.
Professional software
A lot of professional-grade software exists for both the Windows platform and Mac OS but there is some software that exists exclusively for Apple hardware like Final Cut Pro or Logic Pro. Both applications are used by professionals and are industry-standard software.
Logic pro is used by industrial audio specialists all around the world and is used in professional studios. Final Cut Pro is also used worldwide by video editors and if you are specializing in any of these two fields Mac seems like a very reasonable platform since the software can not be found on Windows. These two are examples, there are other similar applications that are only available on Mac OS
Longevity
Apple hardware is made of high-quality materials and components and it is proven over time that it lasts longer than usual. There are iPhones out there that have 13 years and they are still working, G3 and G4 Macs that are still functional.
When buying Apple products they will outlive other ones if treated properly so in the end you could be saving money by purchasing them.
Google Chrome is the most used browser in the world with the most user downloads. Most users are using browsers how it is, open it up and just surf but Chrome offers more than just plain surfing. Here we are presenting you with some interesting features that most users do not use but should.
Use Omnibox to search inside websites
Chrome's Omnibox, also known as the address bar got its name because it can do much more than just search the internet. You already probably know that just by typing any word you will search the internet with Google or another search engine of choice.
You can also set specific keywords inside Chrome settings to tie them with specific websites, for example, you can tie the letter E with errortools, and then just by typing E windows error you will search term windows error on website errortools. There are some already predefined things and you can add anything you want so this is a great feature in order to speed up your work skipping part of actually opening the site.
Search the internet for selected text
On any webpage, you can simply select any text and right-click on it to get a new menu entry that will say search Google for "your selected text" and by clicking on it you will automatically search the net for the selected term.
Grouping tabs
When we surf the internet some of us tend to have plenty of open tabs and over time they can clutter and shrink in width making the surfing experience an unpleasant one.
Chrome has tab groups and you really need to start using them since you can organize much better all the tabs, even color-code them.
Search all open tabs
On top right part on title bar right next to minimize button there is small arrow pointing down, once you clik on it all opened tabs will be displayed by name as a listand by clicking on it you will automatically switch to it.
Change download location
Google Chrome has its default download destination but you can change that destination and even turn on option to be asked where you would like your download to be saved each time.
Live Captions
YouTube has cations for its videos but Chrome itself has live caption option in order to provide you with automatic AI captions for any type of video or audio on any website. If you are struggling with following what is being said try this awesome option.
Extensions
Using extensions in Chrome is awesome, specialy if extensions are usefull but if you go incognito they are not active. There is an option in Chrome to turn on the extensions even in incognito mode and even better, you can even choose which ones you want to be active, you do not need to turn all of them.
If you get an Error Code 15 or Error Code 16 while you are browsing the web and you notice that your access is blocked to a particular website, then read on as this post will guide you in resolving this problem. Both Error Code 15 and Error Code 16 have the same message that states, “Access Denied: This request was blocked by the security rules”.
Note that the error depends on what kind of browser you are using, as well as the operating system and network that you are using. On the other hand, the fixes for this error are the same and there is a handful of them that you can check out just make sure to follow each one of them carefully.
Option 1 – Sync Date and Time
The first thing you can try is to sync the Date and Time of your computer as the wrong Date and Time settings are one of the most common causes of connection problems like Error code 15 or Error code 16. This is because of the incompatibility between the SSL Certificate validation date and the System Clock. Thus, you have to sync your System Clock. Refer to the steps below to do so.
Right-click on the Taskbar and click on the Adjust Date and Time option.
Next, click on the Sync Now button to synchronize the Date and Time with the Microsoft Servers.
Now make sure that the Time Zone that’s set on the same page is correct.
Option 2 – Try to reset the affected browser
Resetting the affected browser might help in fixing Error Code 15 or Error Code 16.
Mozilla Firefox
Open Firefox and click the icon that looks like three stacked lines located at the top-right section of the browser.
Next, select the question mark icon from the drop-down menu.
Then select “Troubleshooting information” from the slide-out menu.
After that, click on the “Reset Firefox” button located at the top-right section of the newly opened web page.
Now select “Reset Firefox” in the confirmation pop-up window that appears.
Google Chrome
Open Google Chrome, then tap the Alt + F keys.
After that, click on Settings.
Next, scroll down until you see the Advanced option, once you see it, click on it.
After clicking the Advanced option, go to the “Restore and clean up option and click on the “Restore settings to their original defaults” option to reset Google Chrome.
Now restart Google Chrome.
Internet Explorer
Launch Internet Explorer.
Next, click the wrench icon for Settings.
Then click Internet Options.
After that, go to the Advanced tab.
From there, click the Reset button. This will reset Internet Explorer’s settings to their default condition.
Now click OK to save the changes made.
Option 3 – Temporarily disable Firewall and third-party antivirus
Firewall and antivirus programs are known to block files the instant it detects a threat to the system. However, there are some cases when it can also block a file even when it’s a safe one. Thus, your antivirus or firewall programs might be the reason why you can’t download anything on your Windows 10 computer. To isolate the issue, you need to temporarily disable both the Firewall and antivirus programs and then check if you can now download anything from the internet. Do not forget to enable them again as disabling them can leave your computer vulnerable to cyber threats.
Option 4 – Disable the Proxy server
You can also try to disable the Proxy server for your LAN to fix Error code 15 or Error code 16 especially if your computer was attacked by some malware or adware recently. In such cases, there is a chance that the malware or adware has changed your network settings in order to generate intrusive advertisements. Thus, you have to disable the proxy server and you can do that by following these steps:
Tap the Win + R keys to open the Run dialog box.
Then type “inetcpl.cpl” in the field and hit Enter to pull up the Internet Properties.
After that, go to the Connections tab and select the LAN settings.
From there. Uncheck the “Use a Proxy Server” option for your LAN and then make sure that the “Automatically detect settings” option is checked.
Now click the OK and the Apply buttons.
Restart your PC.
Note: If you are using a third-party proxy service, you have to disable it.
Option 5 – Check your VPN
If you are using a VPN application, there are times when it causes some issues like this error. If that’s the case, you can try to disable your VPN temporarily and see if the error is resolved or not and if turns out that your VPN is the culprit, you have to uninstall it and install a new one or its latest version. To uninstall it, follow the steps below.
Tap the Win + R keys to open the Run dialog box
Then type “appwiz.cpl” in the field and hit Enter to open the Programs and Features in Control Panel.
From there, look for the VPN service you are using, select it and then click on Uninstall to remove it.
After that, restart your computer and try to install the latest version of the program again. It should work now. If not, proceed to the next available option below.

 In the menu choose device manager and click on it.
 When the device manager opens, expand the Imaging devices or Cameras section.
Right-click Integrated Camera or the primary webcam, and click Properties.
Go to the Details tab.
Under the Property section, click to select Matching device ID from the drop-down.
Right-click the value and select Copy
When the device manager opens, expand the Imaging devices or Cameras section.
Right-click Integrated Camera or the primary webcam, and click Properties.
Go to the Details tab.
Under the Property section, click to select Matching device ID from the drop-down.
Right-click the value and select Copy
 The next step is to download and install

