Error 0xe0434f4d displays when a remote computer runs an instance of the SQL Server 2005 but it fails to initialize. When the plan is started, this error displays in a status window on the SQL Server. Also, when the Update-OffilineAddressBook cmdlet is started in Microsoft Exchange Server, this error can occur.
Solution
Error Causes
Error 0xe0434f4d can occur for possibly two main reasons. The first one is when the System Attendant Service is not properly running, and the second when you don’t have the permission to run the update. Other causes are when the .NET Framework 2.0 security does not allow sqlplanlaunch access to run from a shared network. Another cause is when the Offline Address Book (OAB) is not found in the Configuration Domain Controller server that the server of OAB generation uses.
Further Information and Manual Repair
In case you didn’t know, the Offline Address Book generation server is a mailbox server, and in order to resolve error 0xe0434f4d, you will have to replicate the OAB object to the Configuration Domain Controller server. In order to do so, follow steps:
Go to start and click on All Programs, then go and click on Microsoft Exchange Server 2010. Click on Exchange Management Console
In Exchange Management Console, go to Server Configuration and click on Mailbox
In the details, go to mailbox server that generates Offline Address Book and right-click it, then go to Properties
In the Properties, click on System Setting and locate the domain controller name in the box that reads Domain controller servers being used by Exchange
Go to Start and click on Run. Type Adsiedit.msc in Open box and press Enter. Right-click on ADSI Edit and click on Connect to
Locate a list reading Select a well-known naming context, and from there select Default naming context. In a Select or type a domain or server window, type FQDN (fully qualified domain name) of the Configuration Domain Controller server which was determined in step 1, and click OK
Click on CN=Offline Address Lists and make sure the OAB object is listed on the details pane
When the OAB generation server receives this, then it will connect to the Configuration Domain Controller server and will locate the OAB object. If the OAB generation server is unable to find the OAB object, then the error will return on the cmdlet.
On SQL Server, you should change the .NET permissions to allow sqlplanlaunch application access to run from shared administration. For that, follow these steps:
On ArchiveIQ Server, open System from the Control Panel and note down the computer name
On SQL Server, log in as administrator and open the command prompt
On the command prompt type, ‘C:windowsmicrosoft.netframeworkv2.0.50727caspol.ece –m –ag l – url file:\[Archive IQServer Computer Name]AlQRemote$*FullTrust and Press Enter. Type yes and press Enter again to confirm the permission changes.
If you are trying to start a service using the Windows Services Manager but you got an error message stating, “The executable program that this service is configured to run in does not implement the service”, then you’ve come to the right place as this post will provide you instructions on how you can fix this error.
Since almost all program requires service to run on your computer, if the service is not listed in the corresponding registry key, then you will most likely encounter this error on your Windows 10 computer. Here’s the entire content of the error message:
“Windows could not start the service on Local Computer. Error 1083: The executable program that this service is configured to run in does not implement the service.”
To fix this error, you have to add the service name in the respective host in the Registry Editor, and to do that, here are some steps you need to take on.
Step 1: The first thing you have to do is to take note of the service name that’s given in the error message. For instance, you get the “Windows Management Service.
Step 2: Next, you need to open the Services Manager by tapping the Win + R keys and typing “services.msc” in the Run dialog box, and then tapping Enter.
Step 3: After opening the Services Manager, look for the Windows Management Service and once you see it, double click on it. This will open a new mini window.
Step 4: From the newly opened window, copy the Service name and the Path to executable under the General tab. If the path to the executable is displayed as “C:/Windows/system32/svchost.exe -k netsvcs –p”, you need the “netsvcs” part only. Note that it can be different for different services and you need the part that comes after “-k”.
Step 5: Now tap the Win + R keys again to open Run utility and type “Regedit” in the field and click OK to open the Registry Editor.
Step 6: After that, navigate to the following registry path:
Step 7: From the given registry path, look for a key named “REG_MULTI_SZ” located on your right-hand side. This key is named after the “Path to executable” part. For instance, you should see “netsvcs”.
Step 8: Double click on the REG_MULTI_SZ key and enter the Service name that you’ve copied earlier and then write it down at the end of the preset list.
Step 9: Now save the changes you’ve made and try to open the program or run the service again.
If you recently made some changes in your Windows 10 computer using the Group Policy Editor but they were not reflected and you got errors instead, it could be that your Windows computer wasn’t able to read the Group Policy file (registry.pol). To resolve this kind of issue, you have to repair the potentially corrupted Group Policy using the options given in this post.
.As you know, Group Policy is a feature in the Microsoft Windows Active Directory which allows an admin to make changes in the features on Windows PCs that are on the network. So if the modifications you just made weren’t successfully applied, then there could be something wrong with the registry.pol file on the client or it could also be that the Group Policy folder is missing.
To fix this issue in the Group Policy, you need to refer to the given suggestions below and make sure that you have admin privileges as you execute them.
Option 1 – Try to delete or recreate the missing registry.pol file
The entire settings of the Group Policy are stored in the registry.pol file so if it went missing, all the changes you make will not be reflected. The good thing is that you can recreate it but if the file exists and is corrupted, you need to delete it first before you recreate it.
First, go to the C:/Windows/System32/GroupPolicy/Machine location.
And from there, check if the registry.pol file exists or not. If it’s there, just delete it permanently by tapping the Shift + Delete keys.
Now it’s time to recreate the file. Just open Windows PowerShell with admin privileges by tapping Win + X + A keys.
After opening PowerShell, type this command: gpupdate /force
The command you entered will recreate the registry.pol file and will refresh the Group Policy. Restart your computer.
Option 2 – Try recreating the secedit.sdb file
The security settings of Group Policy are stored in the secedit.sdb file so if you made some changes to security and they weren’t reflected, you can try to delete and recreate the secedit.sdb file instead of deleting the Group Policy file. All you have to do is navigate to the C:/WINDOWS/security/Database folder and look for the secedit.sdb file and rename it or move it to another folder. After that, restart your computer. Once your computer has restarted, the secedit.sdb file will be created again.
Option 3 – Try to reset the Group Policy to default
You can also try to reset the Group Policy back to its default state. There are several ways you can do that. You can either use the gpupdate or the secedit command in the Windows PowerShell to do that. Resetting the Group Policy will resolve any issues that could be caused by its current settings.
Option 4 – Try to perform System Restore
System Restore can also help resolve the Group Policy issue. It could be that prior to the issue, you’ve made some changes in the system that might have affected the Group Policy. To undo these changes, perform System Restore.
First, tap the Win + R keys to open the Run dialog box.
After that, type in “sysdm.cpl” in the field and tap Enter.
Next, go to the System Protection tab then click the System Restore button. This will open a new window where you have to select your preferred System Restore point.
After that, follow the on-screen instructions to finish the process and then restart your computer and check if the problem is fixed or not.
Option 5 – Use the DISM tool
You can also try running the Deployment Imaging and Servicing Management or DISM tool. This tool will repair the Windows System Image as well as the Windows Component Store in your Windows 10 computer. So if there are any missing or corrupted folders and files, the DISM tool can restore and repair them. As a result, any system consistencies and corruptions will be fixed. To run this tool, follow these steps:
Tap the Win + X keys and click on the “Command Prompt (Admin)” option.
After that, input each one of the commands listed below sequentially to execute them:
Dism /Online /Cleanup-Image /CheckHealth
Dism /Online /Cleanup-Image /ScanHealth
Dism /Online /Cleanup-Image /RestoreHealth
Once you’ve executed the commands given above, restart your computer.
Error 12031 indicates that the connection with the server has been reset or is not properly connected.
In other words, it signifies that the File Transfer Protocol which is the standard network protocol that is used to transfer files from one host to another over the internet is either reset or not working properly.
For example, if you are using a wireless adapter, then you may experience this error code when the adapter loses its association with the access point.
The error code is often displayed in the following format:
"ERROR_INTERNET_CONNECTION_RESET"
"Cannot Connect to the FTP Server"
Solution
Error Causes
Though the error 12031 is largely caused by poor internet connection and failure to obtain files from the FTP server, however, sometimes the error may be caused by invalid registry entries and outdated drivers. Furthermore, it may also be a Firewall issue.
Further Information and Manual Repair
To resolve this issue on your system, we have listed down the best and easy DIY solutions. These solutions are simple to perform and do not require any kind of technical expertise or knowledge. Just follow the steps and you will be able to resolve it in a couple of minutes.
Solution 1: Disable Firewall
If you are unable to connect to the server and you encounter the error code 12031 on your system, then to resolve this issue, disable the Firewall on your PC.
Solution 2: Reset IE (Internet Explorer) Settings
This error is typically experienced by IE7 users. If you can’t access some websites in Internet Explorer and you come across a 12031 error code, then try resetting your IE settings.
To do this, open Internet Explorer, click on tools, and then click on Internet Options. Now go to the advanced tab and select Use Passive FTP. After checking the box, exit and then try accessing those sites that were not accessible before.
If after modifying IE settings you are able to access the sites without any error message display, then this means the error is resolved. Nonetheless, if the error still persists, then the error could be generated due to invalid registry entries.
Solution3: Download and Run Restoro
To remove invalid registry entries from your system and resolve the 12031 error immediately, it is advisable to download and run Restoro. This is a new, cutting-edge, and multi-functional PC repair tool integrated with multiple utilities like a powerful registry cleaner, an antivirus, and a system optimizer.
The registry cleaning utility scans your PC for all registry errors. It wipes out unnecessary files, bad and invalid registry entries, repairs damaged files, and restores the registry thereby resolving the 12031 error on your PC.
This error tool has a user-friendly interface and simple navigations. It is easy to use and compatible with all Windows versions.
In addition to this, you can also use it to scan for malicious software and remove malware. It also functions as a system optimizer and boosts your computer’s speed dramatically.
Click here to download Restoro on your PC and resolve error 12031 right away!
In today's modern world many households have internet access, most of the connection nowadays is done via Wi-Fi or wireless but there is a high probability that you have also a few devices connected via cable. There are of course many disadvantages and advantages between cable connection and wireless connection.
The main advantages of a hard cable connection are of course faster speed and stability compared to Wi-Fi. But if we look into the cables themselves there is also a big difference between them. Not all cables are the same and quality as well as speed vary a lot between them. Choosing the right cable is essential in order to make a maximum of your internet and we have some great tips and explanations of what cables do so you can make the right choice and enjoy your full internet potential.
Not all cables are the same
Cheap cables and expensive ones are not the same no matter what everyone tells you. The old proverb you get what you pay is true and more expensive cables will be made from better materials and will have a higher transfer rate.
Quality network cables are separated into different categories with proper markings and when buying one you should always look for these markings on the cables themselves, do not buy cables that do not have markings since they will often provide lower transfer rates or will not be shielded from outside influences resulting in packet drops and instability in a network.
Categories and what they mean are:
Cat-5 with a maximum speed of 100Mbps, typically unshielded.
Cat-5e with a maximum speed of 1Gbps, available in both shielded and unshielded varieties.
Cat-6 with a maximum speed of 10Gbps for runs under 55 meters (around 180ft), available in both shielded and unshielded varieties.
Cat-6a with a maximum speed of 10Gbps, shielded.
Cat-7 uses a proprietary GG45 connector rather than the standard RJ-45 connector seen on other cables for speeds of 10Gbps, shielded.
Cat-8 with a maximum speed of 25Gbps (Cat-8.1) or 40Gbps (Cat-8.2) at a distance of around 30 meters (around 100ft), shielded.
Unless stated, these standards are typically rated at their quoted speeds for a run of around 100 meters (around 330 ft) and use a standard RJ-45 Ethernet connector. Each generation of cable is designed to be compatible with the generations that came before it, so it’s possible (for example) to use a Cat-6a cable with a router that only supports speeds of 1Gbps.
Shielded cables
When purchasing higher quality cable you might not be able to choose if you have shielding or not since some standards like Cat-6a, Cat-7, and Cat-8 are always shielded. But if you do not have the need for these and you are satisfied with Cat-5e for example you can choose.
Shielded cables are a little more expensive but they will provide you with a coating that will eliminate interference from outside waves making cables more reliable. Of course, if the cable will go through a room that does not have many radio waves or some other interferences then buying a shielded cable is a waste of money.
Cable platings
Usually, there are two types of connector platings on connectors, silver, and gold, and people usually think that gold is much better but there are major differences between silver and gold platings and truth to be told there is no better one, both are different and should be considered depending on your need.
Silver plating will provide you with faster speed since its conductivity is larger than gold, but gold is slower on the oxidation front so its life span is longer. On the other hand, if your cables are always connecting and disconnecting gold will be first to be scrubbed off from the surface since the gold coating is much thinner.
Overall if you would only connect cable once and have slower internet than cable capacity gold is the way to go, in another case if you would use the cable as always connecting and switching and your internet plan is the same as cable transfer capacity you might want to go with silver one.
Cable material quality
Network cables are made from copper, your standard conduction material but even here there are differences in quality and therefore the chance of pocket losses over it. More quality less loss and more stable connection and this will depend on the purity of copper that is used in the cable itself. More purity in copper, more stability, simple as that.
Conclusion
So as you can see, there are a lot of different things that will influence your pick of proper network cable but the overall best advice is to get one that will fit well into your needs and setup. pair it up with your router and your internet plan since just simply buying something that you can not use is really a waste of money.
As we near the end of 2022 we look at the current best antivirus software for popular platforms, why they are the best, and why you should get them.
Avira, a great free Antivirus
Avira has been around a long time with its free antivirus version of the larger protection suite. It had its ups and downs but the latest versions are really great. With high-speed scans and low system impact, Avira antivirus is really one of the best free antivirus software currently on the market.
The software itself has also received UI & UX updates making it straightforward and easy to use. The virus scanning engine is the same as in paid version that ranks among the top engines in the world for this type of work. The package also gives you some great browser protection and a good firewall as well, there is really no excuse to skip on this if you want a free solution.
The only thing that we would say is not so great in Avira is reporting some false positives, sometimes even for MS updates, it is rare but it can happen.
Malwarebytes, a powerful Windows antivirus
Malwarebytes Premium is easy to use, simple antivirus solution that shies away from complicated UI, and simply put, it just works. Its scanning engine is well-known and places among the top and best in the world often finding some malware that other can miss.
Another great thing is its integration with Windows itself, it is one of the rare applications that can and will work incredibly well beside your typical Windows protection tools so you can have both of them running at the same time.
Installation and running are really simple and every typical PC user will find it as easy as walking in the park. On the other hand, sadly system impact is a little high and it will have issues running on lower-end systems due to its memory requirements.
Intego MAC Internet Security X9, the best Mac antivirus
Gone are the days when MAC had no virus issues, since MAC rose in popularity among the users, also rose the number of viruses and malware. The system itself has some great protection built it inside but for more security and better control of it, you will need a third-party dedicated solution.
Intego was made by Mac antivirus experts who have been building this kind of software last 25 years. The interface is easy to use and premade presets are really helpful, but the security suite can also be customized to fit your needs and desires.
Since this is only available as a security suite, you are getting a firewall and some other security tools along with your antivirus that will run as a part of it.
The bad side is that scans can sometimes run slow, most of the time they are OK in terms of speed but occasionally they can switch to slower speeds and impact scanning time to some annoying times. Also, there is no webcam protection nor VPN service included where others on this list have them.
Bitdefender mobile security: best Android protection
While protection is not only needed for your gaming or workstation, software suites that are dealing with mobile and tablet security exist. The best of them is the Bitdefender antivirus mobile suite. Low on system resources and low on performance impact with the really great virus detection rate Bitdefender is at the top of suites for your phone.
Consistent high virus detection packed with low battery impact is great but the suite comes with tons of other tools as well like browser security tools, email protection, and real-time link and notification protection.
The application will always scan each file and newly installed application in the background and alert and cut off any found threat. App itself is easy to install and use and most of the time it will do everything in the background for you but offer you customization if you need it.
The package also includes VPN and application lock that will let you protect the critical applications from being accessed as well as an online account scanner. Anti-theft and anti-loss tools, which allow you to find, remotely lock or wipe a stolen or lost device, add yet another layer of protection.
One thing that is missing from this great package is fraudulent call protection. Newer Android phones have this feature inside but it would be nice if Bitdefender had it as well.
Bitdefender, the best antivirus software
Now that we have covered specific cases of each platform, there is one player that has all of them covered and with a quality product, that player is BitDefender and it is great. Personally, this is my protection suite of choice and as I type this it is running in the background.
Bitdefender has it all, low system impact, as a matter of fact, it is one, if not, the lowest performance impact engine on the market currently and that is packed with a great and highly consistent virus & malware detection suite. Along with real-time malware protection, browser security, and anti-spam tools, you also get anti-phishing defenses, ransomware protection, and a strong firewall.
Bitdefender scores are very high in both the zero-day threat and real-world protection tests at AV-Test, an established organization that tests antivirus software. Despite being tested against tens of thousands of well-known and widespread malware threats, the software consistently achieves a 100% blocking rate.
The suite also comes with a restricted free VPN and with parental controls as well. Webcam and microphone protection are also included in the suite and on top of all, it has great pricing plans and constant discounts.
BitDefender is really a great package and it might sound too good, but after years and years of personally using it I have not had single malware or virus issue, the only thing that I would put as a negative is that system is severely slowed down when system scans are performed so be sure to run or schedule them when you are not using your computer. This, of course, can put some people off and I will admit it is a serious drawback but for me, the security of my workstation is more important than leaving the computer for 20 or so minutes in order to perform a full scan of the system.
Hello and welcome everyone, today we will be talking about power toys, a great, completely free, open-source, Microsoft-supported Windows project which aims to provide Windows itself with powerful features not found natively in it.
We will explore power toys completely here and explain each module and its features.
The first thing is of course to download power toys themselves. You can find themhere. After you download them, double click on the downloaded file and install. Start power toys, you will find them at the bottom of the taskbar, note that power toys need to be active in order to use their features.
When opened you will be greeted with general settings window. These are settings for power toys themselves, Here you can check for updates, change the looks of power toys, run it on system startup and run them as administrator. Set them up so they best suit your needs.
Color Picker
Moving down next tab we have is Color picker.The color picker will let you as the name suggests pick colors, it will sample colors from running applications and windows, snap their values, and place them in the clipboard. A useful application if you are working as a graphic designer, want to create some cool word document, or just want to compare the difference between colors.
After the Color Picker is activated, hover your mouse cursor over the color you would like to copy and left-click the mouse button to select a color. If you want to see the area around your cursor in more detail, scroll up to zoom in. The copied color will be stored in your clipboard in the format that is configured in the settings (HEX by default). The editor lets you see the history of picked colors (up to 20) and copy their representation in any predefined string format. You can configure what color formats are visible in the editor, along with the order that they appear. This configuration can be found in PowerToys settings. The editor also allows you to fine-tune any picked color or get a new similar color. Editor previews different shades of currently selected color - 2 lighter and 2 darker ones. Clicking on any of those alternative color shades will add the selection to the history of picked colors (appears on the top of the colors history list). Color in the middle represents your currently selected color from the history of the colors. By clicking on it, the fine-tuning configuration control will appear, which will let you change the HUE or RGB values of the current color. Pressing OK will add newly configured color into the history of the colors.
Fancy Zones
Moving down, we have fancy zones.FancyZones is a window manager utility for arranging and snapping windows into efficient layouts to improve the speed of your workflow and restore layouts quickly. FancyZones allows the user to define a set of window locations for a desktop that are drag targets for windows. When the user drags a window into a zone, the window is resized and repositioned to fill that zone. When first launched, the zones editor presents a list of layouts that can be adjusted by how many windows are on the monitor. Choosing a layout shows a preview of that layout on the monitor. The selected layout is applied automatically.
File Explorer
Next, File Explorer.Only 3 options here but maybe some are important to you. This extension lets you enable SVG file preview in File Explorer, enable Markdown preview, and enable SVG thumbnails. Turn on each one you might need.
Image Resize
Next down the line, we have Image resize.Image Resizer is a Windows shell extension for bulk image-resizing. After installing PowerToys, right-click on one or more selected image files in File Explorer, and then select Resize pictures from the menu. You can specify your own sizes if you want, you can resize when dragging files, you can overwrite files or make new copies of new sizes, and many more options. A very useful tool I am sure plenty of users can use since this eliminates the need for pictures or any other image application for common resizing tasks.
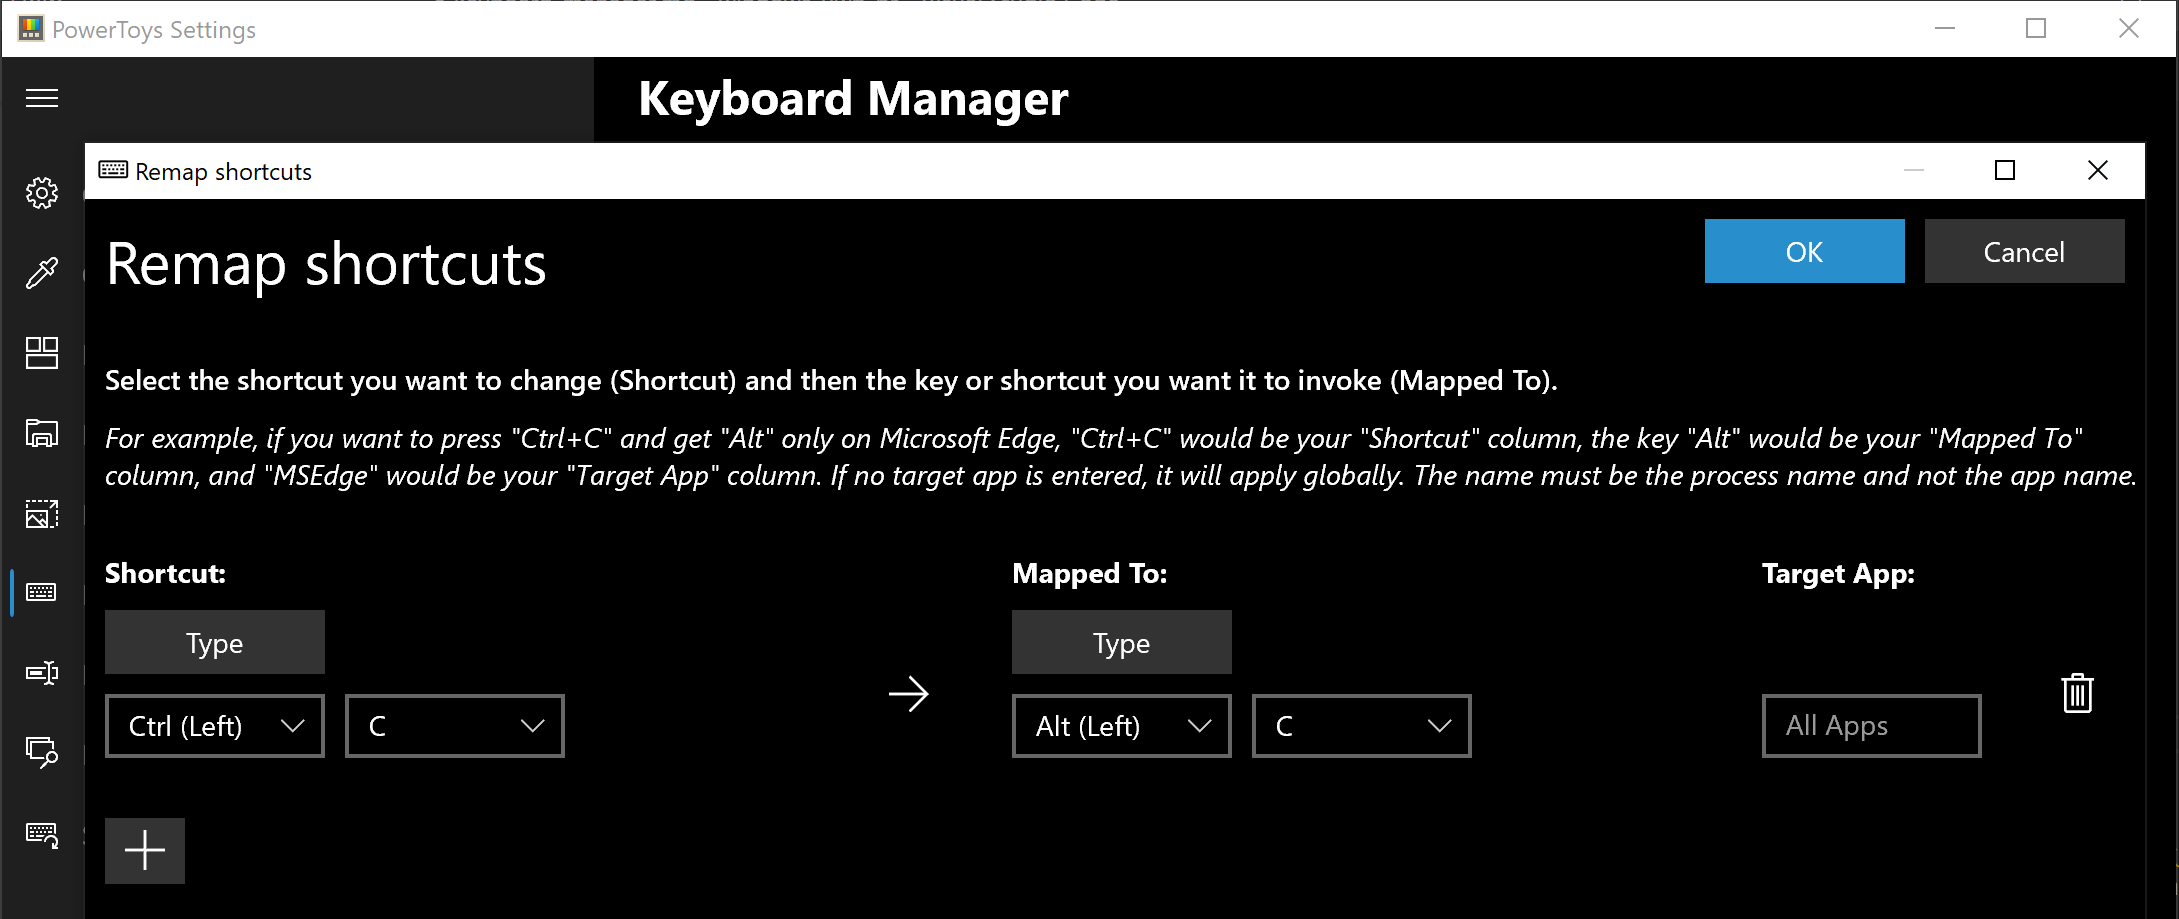
Keyboard Manager
The keyboard manager is the next tab in power toys.
The PowerToys Keyboard Manager enables you to redefine keys on your keyboard. For example, you can exchange the letter A for the letter D on your keyboard. When you select the A key, a D will display. You can also exchange shortcut key combinations. For example, the shortcut key, Ctrl+C, will copy the text in Microsoft Word. With the PowerToys Keyboard Manager utility, you can exchange that shortcut for ⊞ Win+C). Now, ⊞ Win+C) will copy text. If you do not specify a targeted application in PowerToys Keyboard Manager, the shortcut exchange will be applied globally across Windows. PowerToys Keyboard Manager must be enabled (with PowerToys running in the background) for remapped keys and shortcuts to be applied. If PowerToys is not running, key remapping will no longer be applied.
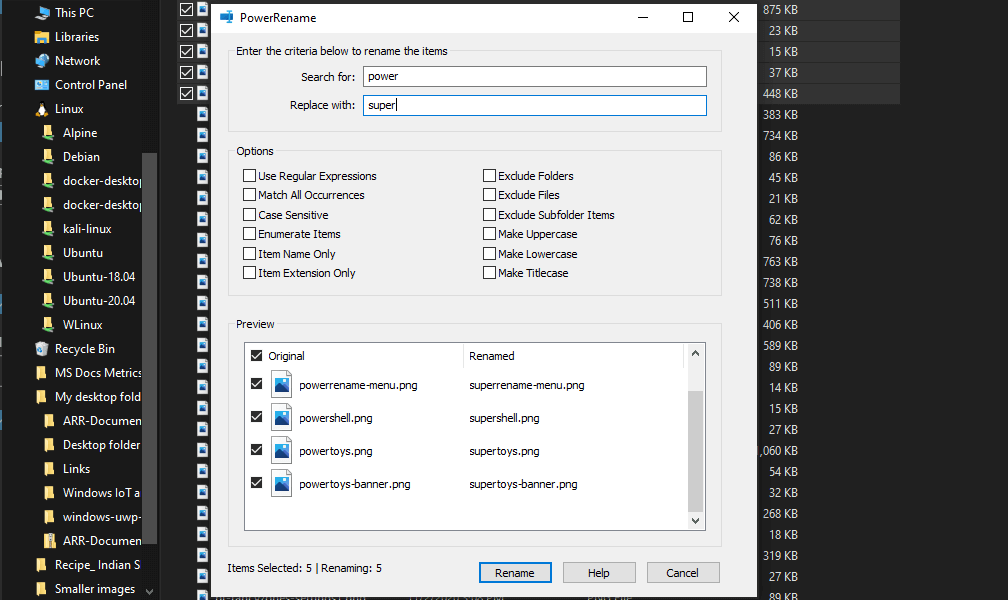
Power Rename
Nex we have a very cool and powerful Power RenamePowerRename is a bulk renaming tool that enables you to:
Modify the file names of a large number of files (without renaming all of the files with the same name).
Perform a search and replace on a targeted section of file names.
Perform a regular expression rename on multiple files.
Check expected rename results in a preview window before finalizing a bulk rename.
Undo a rename operation after it is completed.
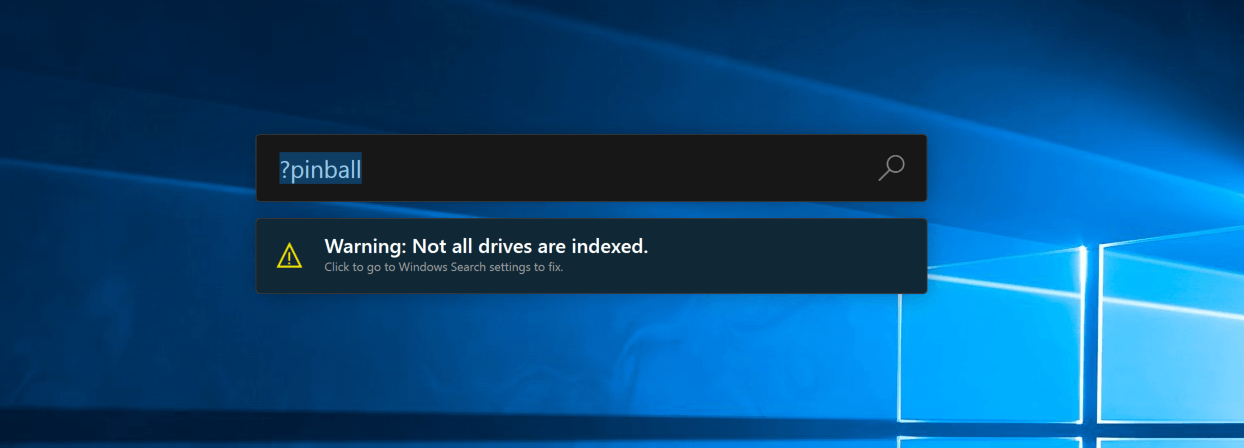
Run Utility
Power Toys Run utility follows next.
PowerToys Run is a quick launcher for power users that contains some additional features without sacrificing performance.
PowerToys Run features include:
Search for applications, folders, or files
Search for running processes (previously known as WindowWalker)
Clickable buttons with keyboard shortcuts (such as Open as the administrator or Open containing folder)
Invoke Shell Plugin using > (for example, > Shell:startup will open the Windows startup folder)
Do a simple calculation using the calculator
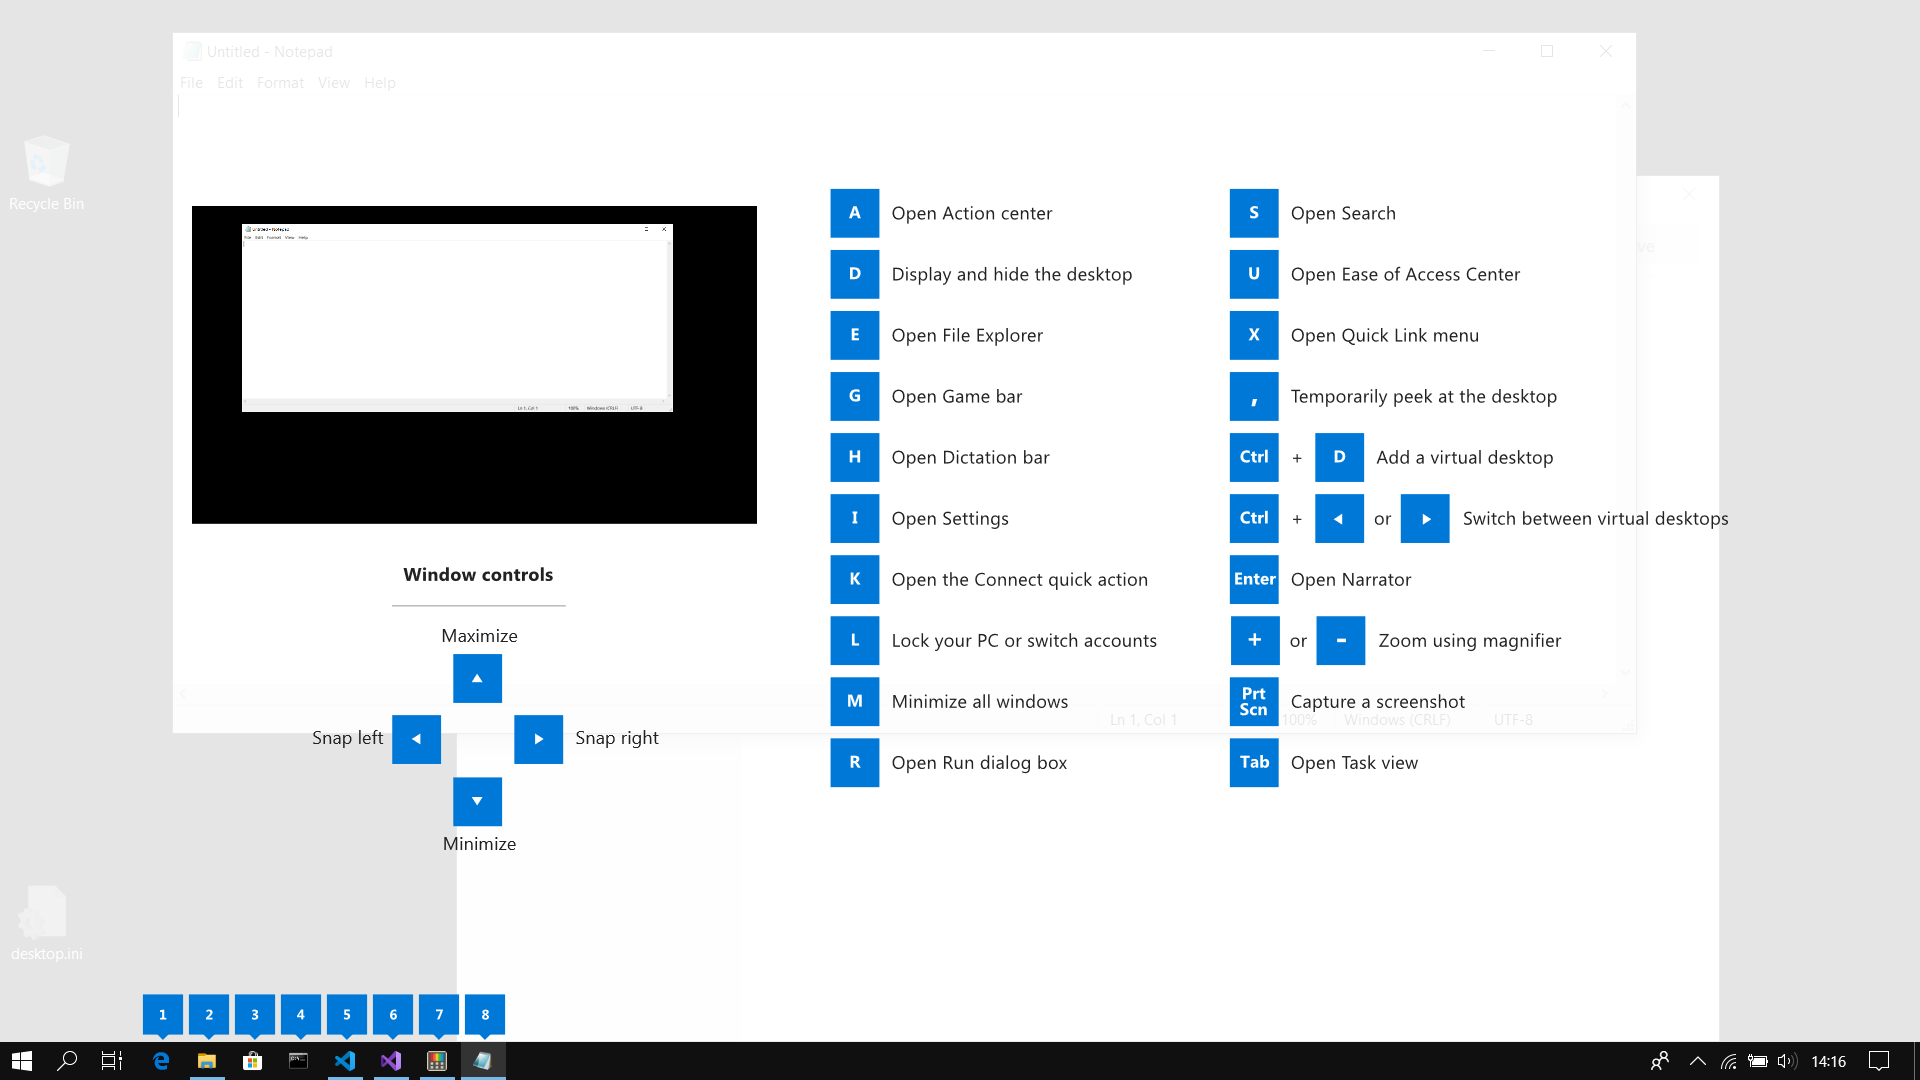
Shortcut Guide
Last but not least we have a Shortcut guide.This guide uses PowerToys to display common keyboard shortcuts that use the Windows ⊞ key. Windows key keyboard shortcuts can be used while the guide is being shown and the result of those shortcuts (active window moved, arrow shortcut behavior changes, etc) will be displayed in the guide. Releasing the Windows ⊞ key will make the overlay disappear. Tapping the Windows ⊞ key will display the Windows Start menu.
Hey, you made it till the end, thank you for reading and I hope to see you soon.
One of the most common Blue Screen of Death errors you can encounter on your Windows 10 computer is the Tcpip.sys Blue Screen error. The Tcpip.sys file is a driver file that is associated with the Transmission Control Protocol over Internet Protocol. When you see this kind of BSOD error, you may see any of the following error descriptions:
IRQL_NOT_LESS_EQUAL
KMODE_EXCEPTION_NOT_HANDLED
PAGE_FAULT_IN_NONPAGED_AREA
Whichever error description you got, you need to do use the following instructions below as a reference to obliterate the Tcpip.sys Blue Screen error.
Option 1 – Run the Blue Screen Troubleshooter
The Blue Screen troubleshooter is a built-in tool in Windows 10 that helps users in fixing BSOD errors like Tcpip.sys Blue Screen error. It can be found on the Settings Troubleshooters page. To use it, refer to these steps:
Tap the Win + I keys to open the Settings panel.
Then go to Update & Security > Troubleshoot.
From there, look for the option called “Blue Screen” on your right-hand side and then click the “Run the troubleshooter” button to run the Blue Screen Troubleshooter and then follow the next on-screen options. Note that you might have to boot your PC into Safe Mode.
Option 2 – Try resetting TCP/IP
In case you didn’t notice, the Tcpip.sys file is associated with the TCP/IP protocols in your computer system which is why resetting TCP/IP can help in resolving the Tcpip.sys Blue Screen of Death error especially when the TCP/IP has been modified.
First, you need to type “command prompt” in the Windows Search bar and then right-click on the related search result and select the “Run as administrator” option to open Command Prompt.
After that, type the following command in the elevated cmd window and hit Enter:
netsh int ip reset
Now reboot your computer after the command has been executed and check if it helped to fix the Blue Screen error.
Option 3 – Try to rollback your Network driver
If you have updated the driver software as of late and you suddenly got this BSOD error, you might have to roll back the device driver – in other words, switch back to the previous working version. To do that, follow these steps:
Tap the Win + R keys to launch the Run window and then type in the “devmgmt.msc” command and hit Enter to open the Device Manager window.
Under the Device Manager, you will see a list of drivers. From there, look for the Network Adapters and expand it.
Next, select the driver entries that are labeled appropriately other than anything in the context of the WAN Miniport.
Then select each one of them and double click to open a new mini window.
After that, make sure that you’re on the Driver tab and if you are not, just navigate to it then click the Roll Back Driver button to switch back to the previous version of your Network adapters.
Now restart your computer to successfully apply the changes made.
Option 4 – Try to update the Network drivers
You might also want to try updating all your network drivers in order to fix the Tcpip.sys Blue Screen error. To do so, here’s what you have to do:
Tap the Win + R keys to launch the Run window and then type in the “MSC” command and hit Enter to open the Device Manager window.
Under the Device Manager, you will see a list of drivers. From there, look for the Network Adapters and expand it.
Then right-click on each one of the Network drivers and update them all.
Restart your PC and see if it helped in fixing the BSOD error.
Note: If updating the network drivers didn’t help in fixing the problem, you can also try to uninstall the very same drivers and restart your Windows 10 PC. After that, the system itself will reinstall the drivers you just uninstalled. Alternatively, you can also download and install the drivers from the manufacturer’s website directly.
Option 5 – Try to disable both the Antivirus program and Firewall temporarily
There are times when antivirus programs and the firewall blocks a website that they consider to be malicious or even because of false-positive effects which is why you have to disable these programs temporarily as it might be the reason why you’ve encountered the error when trying to browse the internet.
Windows Updates are important and though it is not recommended for any user to turn it off completely, there are just some remote cases where you might have to keep it off. Such are the cases when you want to use your Windows 10 computer just for gaming and you don’t want Windows Update to interrupt it because of some messy driver update. A lot of users have in fact want to disable Windows 10 updates completely. Although you can always use the built-in option to delay Windows Updates or make Windows 10 inform you before downloading the updates, however, there are instances when Windows 10 Update may enable itself even after you turn it off or delay it. To resolve this issue, read on.
You may have to disable the Windows Update Medic Service if Windows Update just keeps on starting and turning itself back on even after turning it off in Windows 10 on top of turning off the Automatic Windows Update Service or wuauserv and setting a Guest Log on. To get started, refer to the instructions prepared below.
Option 1 – Change the Log on account of the Windows Update Service
It appears that one of the major upgrades in Windows 10 has made sure that Windows 10 enables back the Windows Update Service all on its own even if the service has been set to disable by the administrator. And that’s the important thing here, Windows 10 uses admin credentials in order to ensure that it can re-enable the Windows Update Service each time it is in a disabled state. So in this fix, you can prevent the Windows Update Service from changing the account credentials used to run it.
Tap the Win + R keys to open the Run prompt with admin privileges.
Then type “services.msc” and click OK or hit Enter to open Services.
After that, locate the Windows Update Service from the list. Once you see it, double-click on it to open its Properties.
From there, click the Stop button to stop the service.
Next, go to the Log On tab and select the “Log on as ‘Guest” option which is the Guest account.
Just leave the password blank and then click Apply to save the changes made.
Note: After you made the changes, every time the Windows 10 Update Service attempts to run, you might get an error message that states, “Windows could not start the Service” or “The account specified for this service is different from the account specified for other services running in the same process”.
This is what makes this fix a lot better compared to other software or batch file to keep turning off the Windows Update Service. You did not exactly disable the service but you just changed the account used to run the Windows Update service and since there is a password, the service never really works. On the other hand, Windows Defender can’t be stopped using this trick as it will keep getting an update.
Option 2 – Try to disable the Windows Update Medic Service using the Windows Update Blocker
Aside from changing the Log on account of the Windows Update Service, there is also another way you can prevent the service from enabling itself after you disable it. This alternative you can use is the Windows Update Blocker. This is a new Windows Service that was introduced in the recent Windows 10 versions. You can use this service to disable the service.
If Error Code 0xc00000e9 appears on your screen, there is no cause to panic yet as there are different ways to fix this. Here, I will list down different methods to get your computer back on track:
Check peripheral connections
Check your SATA cables
Check your hard drive
Check your BIOS settings
Quick Fix 1. Check Peripheral Connections
Turn off your computer.
After the computer has been shut down, take off all the peripherals or the USB cables that are connected to your USB ports. This includes even the keyboard and the mouse. We just need to have only the monitor plugged in for this one.
Turn on your computer and see if it starts as it normally does.
If it does, try connecting back your external devices or peripherals one by one until you find the one that causes the error.
Once you trace the device that’s causing the error, you will have to change its USB cable and update its driver to support your operating system.
Quick Fix 2. Check your SATA cables
It is possible that what causes a barrier between your operating system and your hard drive from communicating is the SATA cable used. For example, if you’re using an older SATA with a SATA III port, there might not be adequate support for the transfer of data from one another. Or, the problem might be a loose SATA cable which would still require you to buy a new one to replace your loose or damaged cable. To check if your SATA cables are causing the error, simply follow these steps:
Turn off your computer.
Carefully open its case.
Check the hard drive and the SATA port where it’s connected.
Try to use a newer cable and connect it to your SATA port. (If you used a SATA II cable, you can see if a SATA III cable is more compatible.)
Replace your SATA cable with a newer one if Step 4 proves to be successful.
Quick Fix 3. Check your hard drive.
Try to use a different hard drive and see if error code 0xc00000e9 still appears.
If it works out just fine, then the problem might be physical damage to your hard drive and would need to be repaired depending on the case. Just simply take it to a technician and let him know about the issue.
Quick Fix 4. Check your BIOS settings
Restart your computer.
Once your computer starts, press and hold the ESC, F2, F12, or DEL key to go to BIOS settings.
You will then be redirected to the BIOS Setup Utility screen. From here, go to Boot options.
In the Boot Options, see if your first boot device is your hard drive. If it isn’t, press the arrow key to select the hard drive and move it to the top of the boot device list.
Save the settings.
Reboot your computer.
Note: If all the methods above do not work, the problem might be on your drivers and you might need to update them. You can update your driver in two ways: Manual driver update and Automatic driver update. You can find procedures online in updating your drivers.
There are cases when you want to undo some changes you’ve made to your computer and to do that you have to perform the System Restore task. However, if you encounter an error that states “To use System Restore you must specify which Windows installation to restore”, when doing so, read on as this post will help you fix the problem.
This kind of error in System Restore could be due to corrupted files in the system. There are also situations where you are not able to boot up once you encounter this error which could be a big problem. On the other hand, this error might have something to do with corrupted BCD files. Whatever the cause is, here are some potential fixes you have to try.
Option 1 – Try to run System File Checker offline
Like pointed out, since the error might be due to corrupted system files, you can try to run System File Checker offline. How? Refer to these steps:
You need to go to the Advanced Startup Options and from there select Troubleshoot.
Next, select the Advanced Options and then Command Prompt.
After opening Command Prompt, type the commands given below and tap Enter right after you type each one of them.
Cd /
Dir
If you can see the “Users” folder, that is your system’s drive. However, if you can’t see it, you can just change the drive-by assigning “D” as its alphabet volume.
Then execute this command where “C” is the system drive: sfc /scannow /offbootdir=C: /offwindir=C:Windows
Now repeat the given steps sequentially.
Option 2 – Try to run DISM tool
You can also run the DISM tool to repair the potentially corrupted system image. First, you have to check the health of the system like checking the integrity of the system files and Windows services. To run DISM, follow the given steps below sequentially.
Open Command Prompt from the Advanced Startup options.
After that, execute this command where “C:” is the system volume: DISM /Image:C:Windows /Cleanup-Image /RestoreHealth /Source:C:WindowsWinSxS
If you encounter an error after executing the given command, insert the Windows USB or DVD and then execute this next command where “E:” is the USB or DVD drive: DISM /Image:C:Windows /Cleanup-Image /RestoreHealth /Source:esd:E:SourcesInstall.esd:1 /limitaccess
In some cases, “install.esd” would be “install.wim” and in such case, you have to modify and execute this command: DISM /Image:C:Windows /Cleanup-Image /RestoreHealth /Source:wim:E:SourcesInstall.wim /limitaccess
Option 3 – Try to repair corrupted BCD
As mentioned, the error could also be due to corruption in BCD, and to fix it, you can use Bootrec.exe – a built-in command-line tool used to troubleshot issues related to boot up and Windows Startup. Before you run this tool, make sure that you have inserted a bootable USB or DVD into your computer. Once you have that covered, follow these steps:
You need to go to the Advanced Startup Options.
Then click on Troubleshoot.
Next, select the Advanced Options and then Command Prompt.
Once Command Prompt has been pulled up, enter each one of the following commands and in the sequence that they are given to rebuild BCD files and repair MBR files:
Bootrec /Fixmbr
Bootrec /FixBoot
After you execute the commands given above, you should see a confirmation message that says, “The operation completed successfully”.
Now type the “Bootrec /RebuildBCD” command to rebuild BCD.
Finally, close Command Prompt and then restart your computer to successfully apply the changes made.
Option 4 – Try to run the Automatic Repair Utility
You might also want to use Automatic Repair in fixing the error. To do so, follow the steps below.
You can start by creating and booting from a bootable Windows 10 USB Stick.
After that, click on Repair your computer located in the bottom left corner when you are on the initial Windows Startup screen.
Next, click on Troubleshoot, and then on the other screen, click the Startup Repair option.
Now select the operating system you want to repair. Once you do that, it will start to repair your operating system. Wait until the process is completed and then check if the problem’s now fixed.
Option 5 – Try to use the Windows Recovery Environment
If the four options given above didn’t help fix the problem, you could try running Windows Repair and a Windows bootable USB or DVD.
First, insert the bootable USB or DVD and boot into it, and select the “Repair your computer” option.
Next, once you see the manufacturer logo on your computer, tap the key to enter into Windows Recovery Environment.
After that, change the Boot sequence to DVD drive under the UEFI Firmware settings and restart your computer.
Once your computer has restarted, select the boot order and make changes accordingly as displayed in the BIOS.
Option 6 – Try running System Restore in Advanced Startup Options
Since you probably can’t boot into your Windows 10 computer, you can try to run System Restore again in the Advanced Startup Options.
Boot your computer into the Advanced Startup Options screen.
From there, you will see some options to troubleshoot when you can’t log in to Windows in the usual way.
Now select Troubleshoot > Advanced Options > Command Prompt.
After that, type “exe /OFFLINE:C:Windows” and hit Enter to execute the command which will start the System Restore process.
Note: You need to replace “C” with the drive where Windows Installation is located.


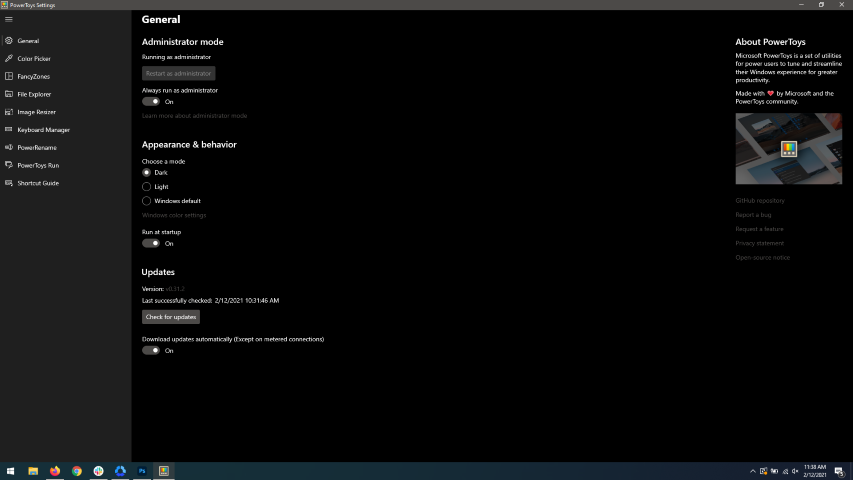 When opened you will be greeted with general settings window. These are settings for power toys themselves, Here you can check for updates, change the looks of power toys, run it on system startup and run them as administrator. Set them up so they best suit your needs.
 The color picker will let you as the name suggests pick colors, it will sample colors from running applications and windows, snap their values, and place them in the clipboard. A useful application if you are working as a graphic designer, want to create some cool word document, or just want to compare the difference between colors.
After the Color Picker is activated, hover your mouse cursor over the color you would like to copy and left-click the mouse button to select a color. If you want to see the area around your cursor in more detail, scroll up to zoom in. The copied color will be stored in your clipboard in the format that is configured in the settings (HEX by default). The editor lets you see the history of picked colors (up to 20) and copy their representation in any predefined string format. You can configure what color formats are visible in the editor, along with the order that they appear. This configuration can be found in PowerToys settings. The editor also allows you to fine-tune any picked color or get a new similar color. Editor previews different shades of currently selected color - 2 lighter and 2 darker ones. Clicking on any of those alternative color shades will add the selection to the history of picked colors (appears on the top of the colors history list). Color in the middle represents your currently selected color from the history of the colors. By clicking on it, the fine-tuning configuration control will appear, which will let you change the HUE or RGB values of the current color. Pressing OK will add newly configured color into the history of the colors.
The color picker will let you as the name suggests pick colors, it will sample colors from running applications and windows, snap their values, and place them in the clipboard. A useful application if you are working as a graphic designer, want to create some cool word document, or just want to compare the difference between colors.
After the Color Picker is activated, hover your mouse cursor over the color you would like to copy and left-click the mouse button to select a color. If you want to see the area around your cursor in more detail, scroll up to zoom in. The copied color will be stored in your clipboard in the format that is configured in the settings (HEX by default). The editor lets you see the history of picked colors (up to 20) and copy their representation in any predefined string format. You can configure what color formats are visible in the editor, along with the order that they appear. This configuration can be found in PowerToys settings. The editor also allows you to fine-tune any picked color or get a new similar color. Editor previews different shades of currently selected color - 2 lighter and 2 darker ones. Clicking on any of those alternative color shades will add the selection to the history of picked colors (appears on the top of the colors history list). Color in the middle represents your currently selected color from the history of the colors. By clicking on it, the fine-tuning configuration control will appear, which will let you change the HUE or RGB values of the current color. Pressing OK will add newly configured color into the history of the colors.
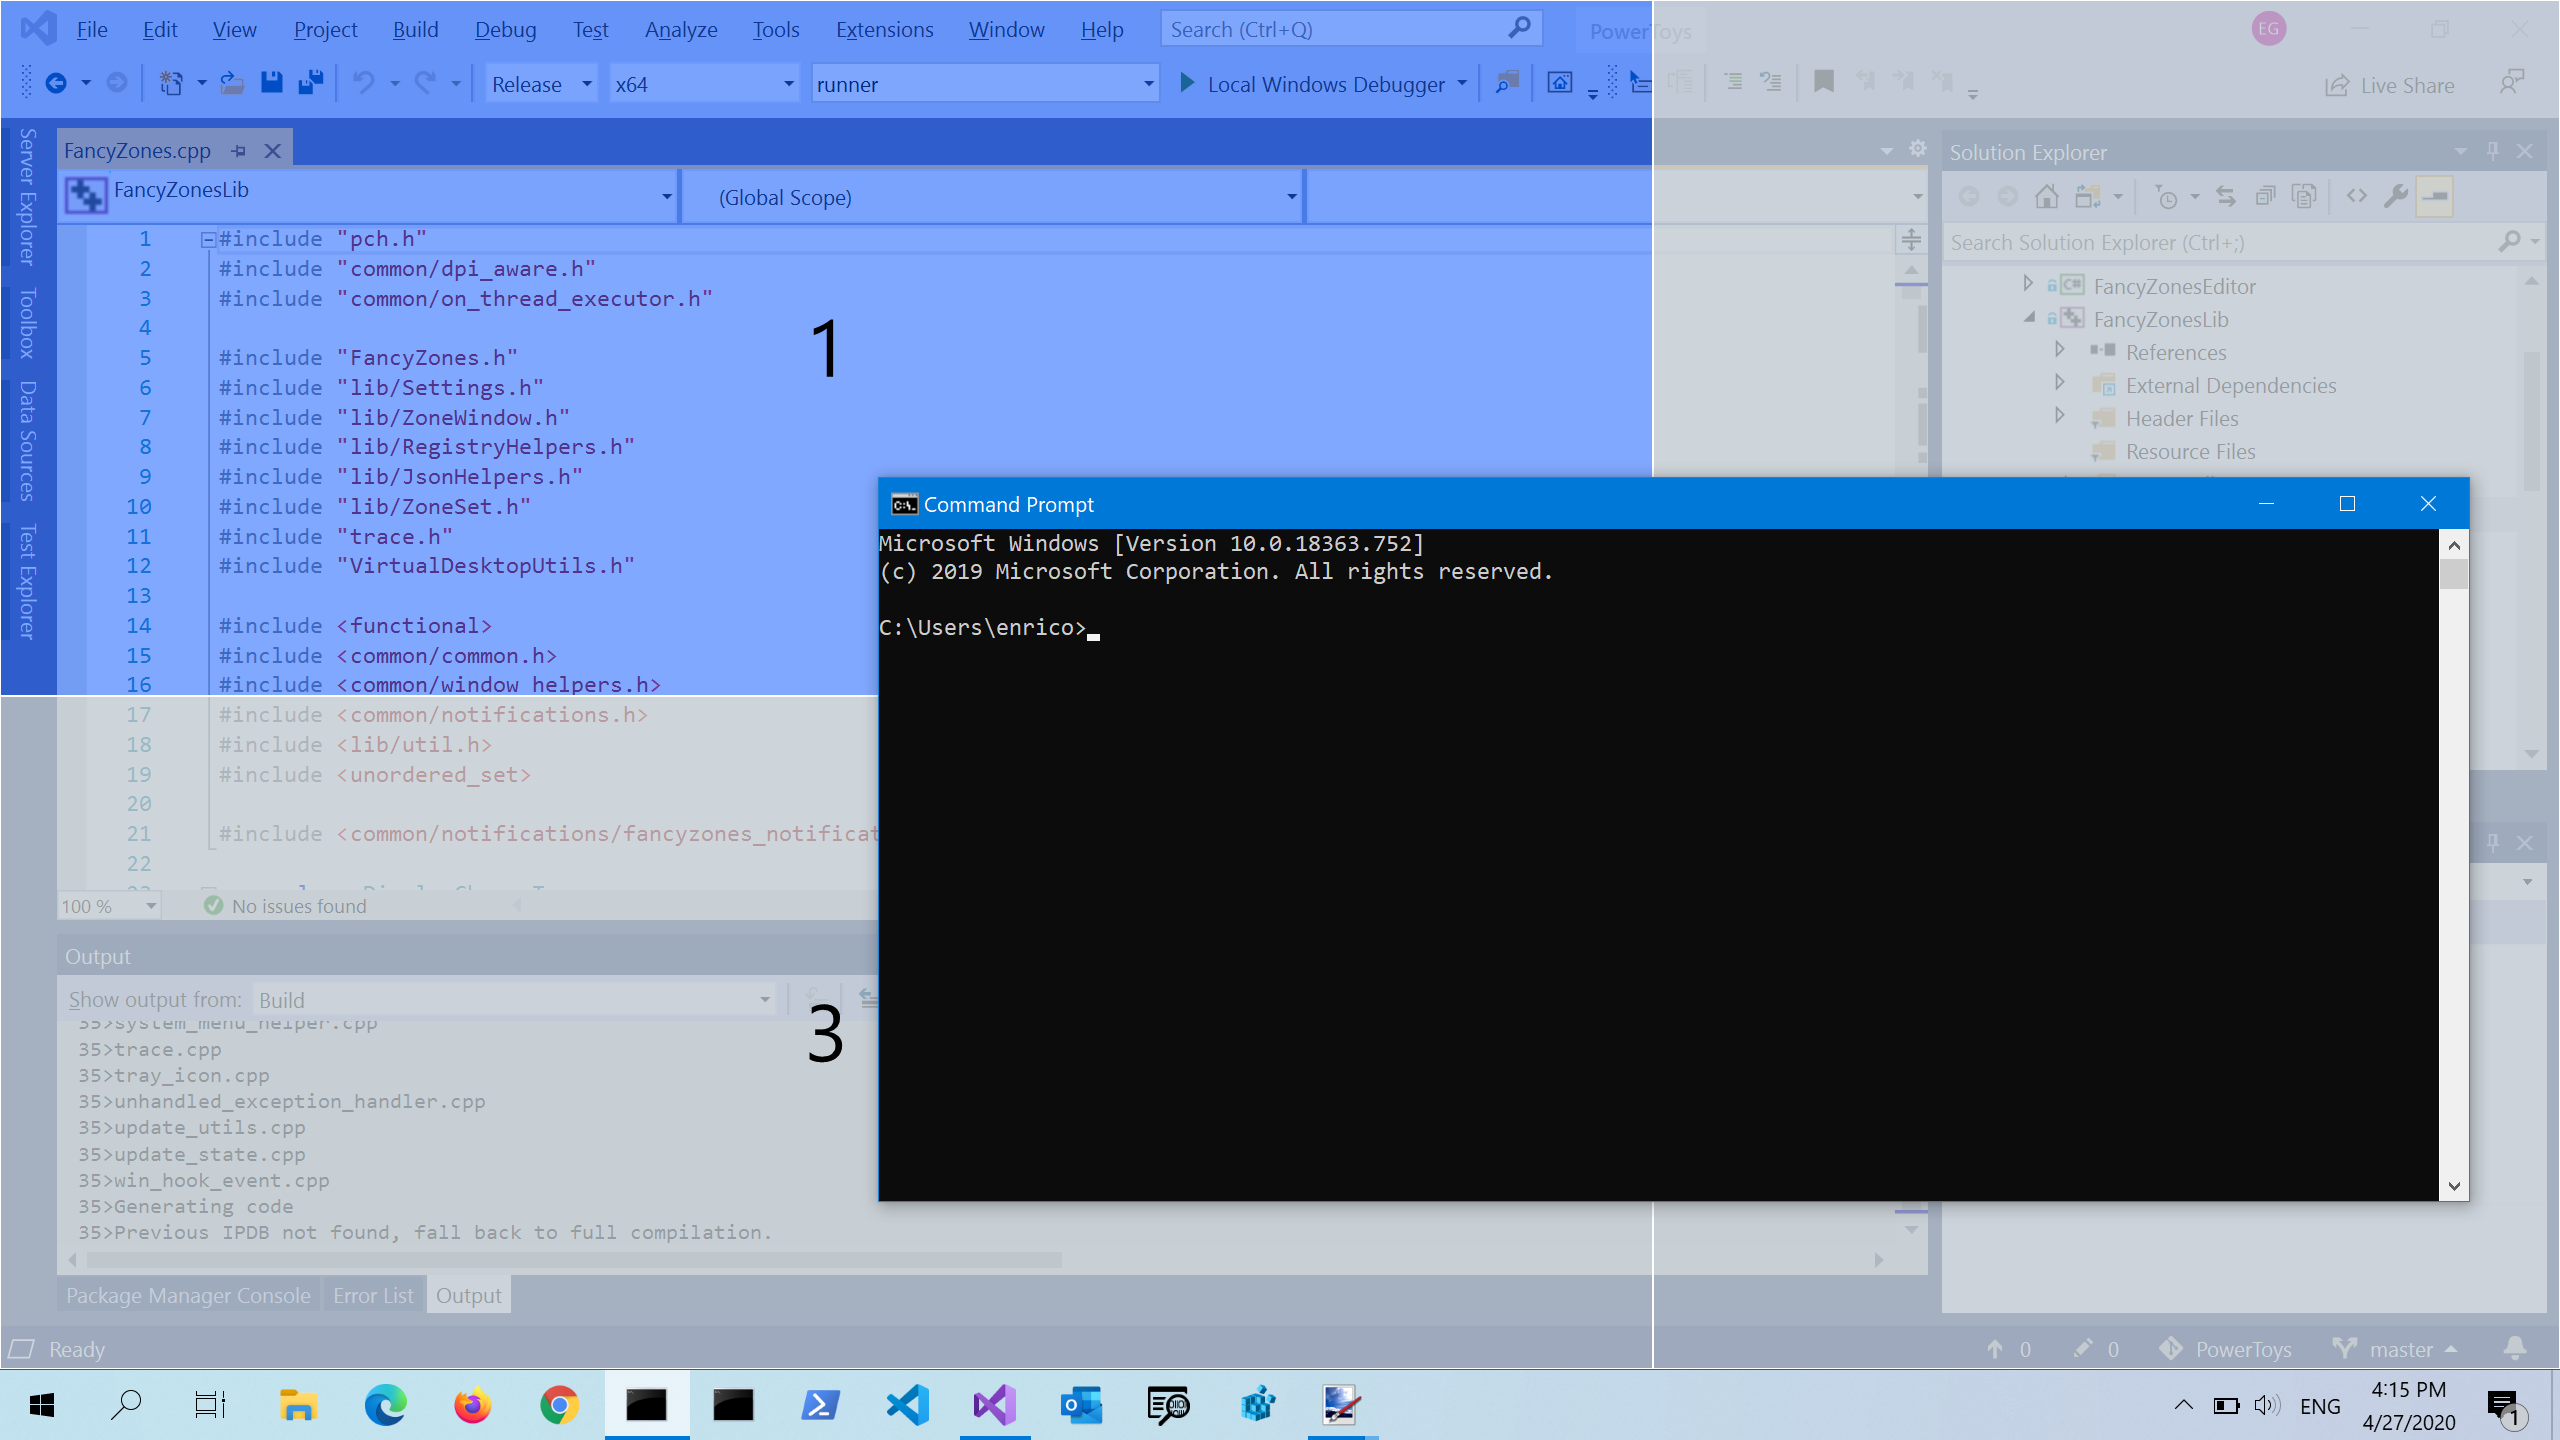 FancyZones is a window manager utility for arranging and snapping windows into efficient layouts to improve the speed of your workflow and restore layouts quickly. FancyZones allows the user to define a set of window locations for a desktop that are drag targets for windows. When the user drags a window into a zone, the window is resized and repositioned to fill that zone. When first launched, the zones editor presents a list of layouts that can be adjusted by how many windows are on the monitor. Choosing a layout shows a preview of that layout on the monitor. The selected layout is applied automatically.
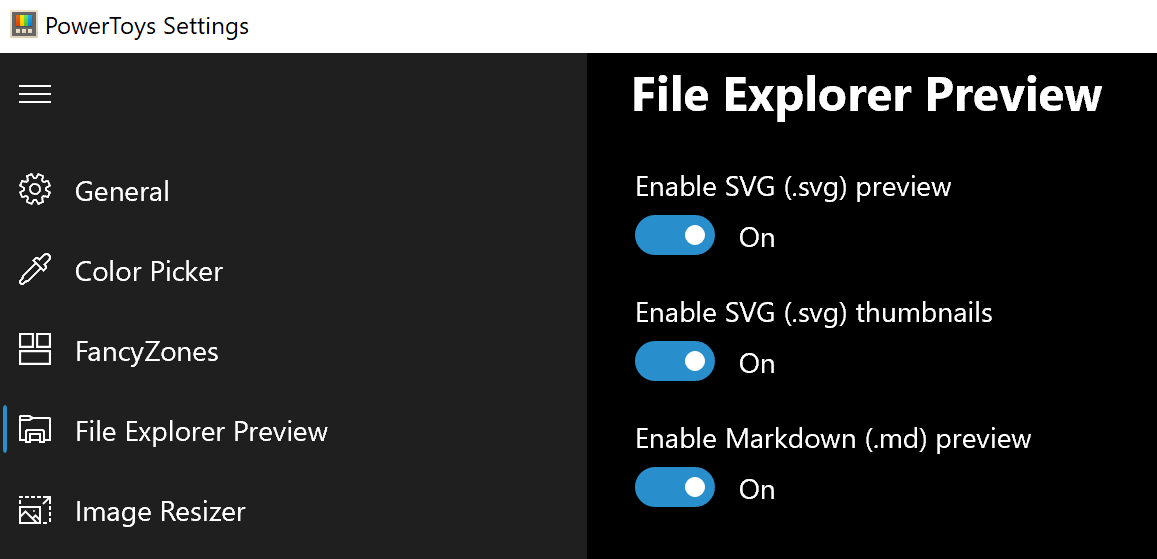 Only 3 options here but maybe some are important to you. This extension lets you enable SVG file preview in File Explorer, enable Markdown preview, and enable SVG thumbnails. Turn on each one you might need.
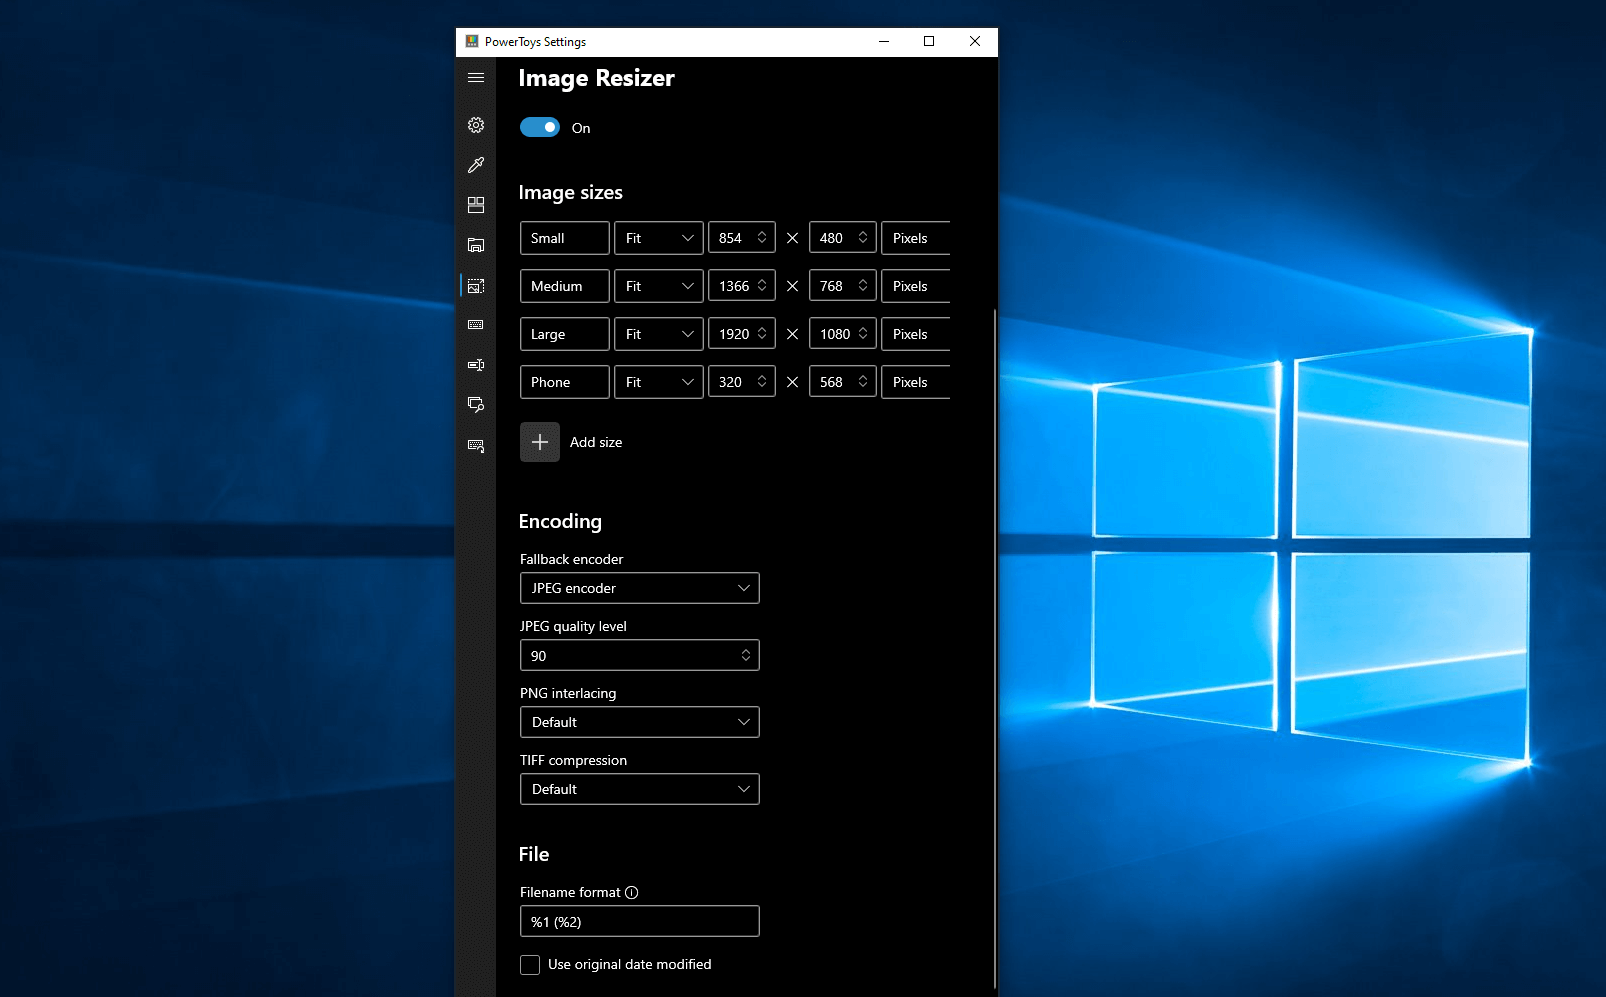 Image Resizer is a Windows shell extension for bulk image-resizing. After installing PowerToys, right-click on one or more selected image files in File Explorer, and then select Resize pictures from the menu. You can specify your own sizes if you want, you can resize when dragging files, you can overwrite files or make new copies of new sizes, and many more options. A very useful tool I am sure plenty of users can use since this eliminates the need for pictures or any other image application for common resizing tasks.
 The PowerToys Keyboard Manager enables you to redefine keys on your keyboard. For example, you can exchange the letter A for the letter D on your keyboard. When you select the A key, a D will display. You can also exchange shortcut key combinations. For example, the shortcut key, Ctrl+C, will copy the text in Microsoft Word. With the PowerToys Keyboard Manager utility, you can exchange that shortcut for ⊞ Win+C). Now, ⊞ Win+C) will copy text. If you do not specify a targeted application in PowerToys Keyboard Manager, the shortcut exchange will be applied globally across Windows. PowerToys Keyboard Manager must be enabled (with PowerToys running in the background) for remapped keys and shortcuts to be applied. If PowerToys is not running, key remapping will no longer be applied.
 PowerRename is a bulk renaming tool that enables you to:
 PowerToys Run is a quick launcher for power users that contains some additional features without sacrificing performance.
PowerToys Run features include:
PowerToys Run is a quick launcher for power users that contains some additional features without sacrificing performance.
PowerToys Run features include:
 This guide uses PowerToys to display common keyboard shortcuts that use the Windows ⊞ key. Windows key keyboard shortcuts can be used while the guide is being shown and the result of those shortcuts (active window moved, arrow shortcut behavior changes, etc) will be displayed in the guide. Releasing the Windows ⊞ key will make the overlay disappear. Tapping the Windows ⊞ key will display the Windows Start menu.
Hey, you made it till the end, thank you for reading and I hope to see you soon.
This guide uses PowerToys to display common keyboard shortcuts that use the Windows ⊞ key. Windows key keyboard shortcuts can be used while the guide is being shown and the result of those shortcuts (active window moved, arrow shortcut behavior changes, etc) will be displayed in the guide. Releasing the Windows ⊞ key will make the overlay disappear. Tapping the Windows ⊞ key will display the Windows Start menu.
Hey, you made it till the end, thank you for reading and I hope to see you soon.