Error Fmod.dll - What is it?
This is a type of DLL error code. DLL is the abbreviation of Dynamic Link Library. DLL files contain small programs which are similar to executable files. One DLL file may be used to load and run several programs.
Fmod.dll is created by Electronic Arts Inc. and associated with Crysis. This file is developed for the Windows OS. This error code occurs when you are unable to access, run and load programs supported by Crysis on your PC.
Fmod.dll error code message is displayed in different formats such as:
- "Fmod_event.dll not found."
- "The file fmod_event.dll is missing."
- "This application failed to start because fmod_event.dll was not found. Re-installing the application may fix this problem."
- "Cannot start Crysis. A required component is missing: fmod_event.dll. Please install Crysis again."
- "Fmod_event.dll Access Violation."
- "Cannot register fmod_event.dll."
- "Cannot find C:\Windows\System32\fmod_event.dll."
Error Fmod.dll may pop up when you start-up or shut down the PC or even during the installation of a program.
Solution
 Error Causes
Narrowing down to one cause for Fmod.dll error code is impossible virtually because this error may result due to different reasons on your system. Some of the common causes associated with this error code are:
- Viral Infection
- Hardware failure
- Missing, Corrupt, or Deleted Fmod.dll file
- Improper program installation
- Registry issues
No matter what the underlying cause of the reason may be, it is recommended to resolve the issue immediately to avoid serious PC threats.
Further Information and Manual Repair
To resolve this error on your system, try the methods discussed below:
Method 1 - Check the Recycle Bin
As mentioned above, Fmod.dll is a DLL file that is used to run and load a variety of programs on your system. There is a possibility that you uninstalled a program that was supported by the Fmod.dll file and accidentally deleted it.
In such a scenario, the easiest way to resolve the Fmod.dll error code is to re-install the deleted file from the recycle bin. For this, go to the
recycle bin and search for the file. If you find it reinstall if you can’t then simply download the Fmod.dll file from a reliable website.
Method 2 - Scan for Malware
Malware usually enters through phishing emails and downloads. These malicious programs then hide in your system disguising as either DLL or EXE files.
The occurrence of fmod.dll file error may be due to malicious programs hiding in your system. Therefore scan your entire PC with a powerful anti-virus. An antivirus detects and removes all malicious software programs such as viruses, malware, Trojans, spyware, and adware.
Try this, to resolve error code Fmod.dll and see the results.
Method 3 - Fix Hardware Problems
Fmod.dll file error may also pop on your screen due to hardware failure. If this is the reason, then we advise you to use the Device Manager an in-built tool in Windows 7 and 8 to fix hardware failures.
For this go to the start menu then control panel. Now click on the ‘hardware and sound link’ and then click on the Device Manager. If you find any devices in red exclamation point, then this means this device is problematic.
Uninstall the driver for that hardware device and then update the driver. Install the latest version to resolve. Remember, hardware problems are mostly related to outdated drivers.
Method 4 - Restore Points
Use System Restore, an in-built utility also known as the recovery tool, to restore points and ensure your PC is back to its previous working condition before the error code occurred.
Simply put, it helps undo recent changes. You can find the
System Restore tool in the System Tools folder.
Method 5 - Clean and Repair the Registry
The registry is that part of your PC that stores all the information, activities performed, and files including the junk files, invalid keys, bad entries, and cookies.
When these files accumulate on your PC, they take up all the registry space and corrupt the important system and DLL files also stored in the registry, thereby generating such errors. Now you can clean the registry manually.
But this process can be time-consuming and slightly technical, hence we advise you to download Restoro. This is a PC Fixer integrated with a registry cleaner.
It is easy to use deployed with an intuitive interface. The registry cleaner scans the entire PC and removes all registry errors. It wipes out all the obsolete files and repairs the damaged DLL and system files.
Click here to download Restoro.

 The 2021 CLUVENS BRAND newly issued model UNICORN has fully electrical tilting capabilities to 160 degrees, Reading light-two LED & RGB illumination lighting, manual open/close keyboard tray, and armrests. This model is suitable for home and office, and also gaming computer work environments.
It offers functions that enable the user to experience unprecedented comfort and quasi total immersion through strategically positioned 1-3 monitors, audio systems, and accessories. The result is a complete computer office, ergonomically optimized, with a minimal footprint that improves overall performance and productivity and health and comfort.
Sitting on a chair can help a lot for relieving health problems like lower back pain, herniated discs, sciatica, and neck pain and also enhance performance and viewing effects.
The 2021 CLUVENS BRAND newly issued model UNICORN has fully electrical tilting capabilities to 160 degrees, Reading light-two LED & RGB illumination lighting, manual open/close keyboard tray, and armrests. This model is suitable for home and office, and also gaming computer work environments.
It offers functions that enable the user to experience unprecedented comfort and quasi total immersion through strategically positioned 1-3 monitors, audio systems, and accessories. The result is a complete computer office, ergonomically optimized, with a minimal footprint that improves overall performance and productivity and health and comfort.
Sitting on a chair can help a lot for relieving health problems like lower back pain, herniated discs, sciatica, and neck pain and also enhance performance and viewing effects.
 Scorpion is basically a premium version of Unicorn with being able to hold more weight, having cup holders on the armrest, etc.
The look is also similar with Scorpion being more sinister-looking but overall Steel frame and chair are the same.
Scorpion is basically a premium version of Unicorn with being able to hold more weight, having cup holders on the armrest, etc.
The look is also similar with Scorpion being more sinister-looking but overall Steel frame and chair are the same.
 Before we move on to the discussion of fixing the underlying causes for error 103, it is important to understand all those programs that are most likely to generate this error. A list of all such programs is outlined below as follows.
 In the dialog, type in netplwiz and press ENTER.
 You will find yourself in the User Accounts window, inside deselect Users must enter a user name and password to use this computer. Press OK
 Sign in the window will pop up where you will have to type in your password and confirm it in order to start the feature.
 After typing in your password and confirming it, press OK. That's it, next time you wake your computer from hibernation or turn it ON, you will automatically be greeted with a desktop instead of a Windows login screen.
 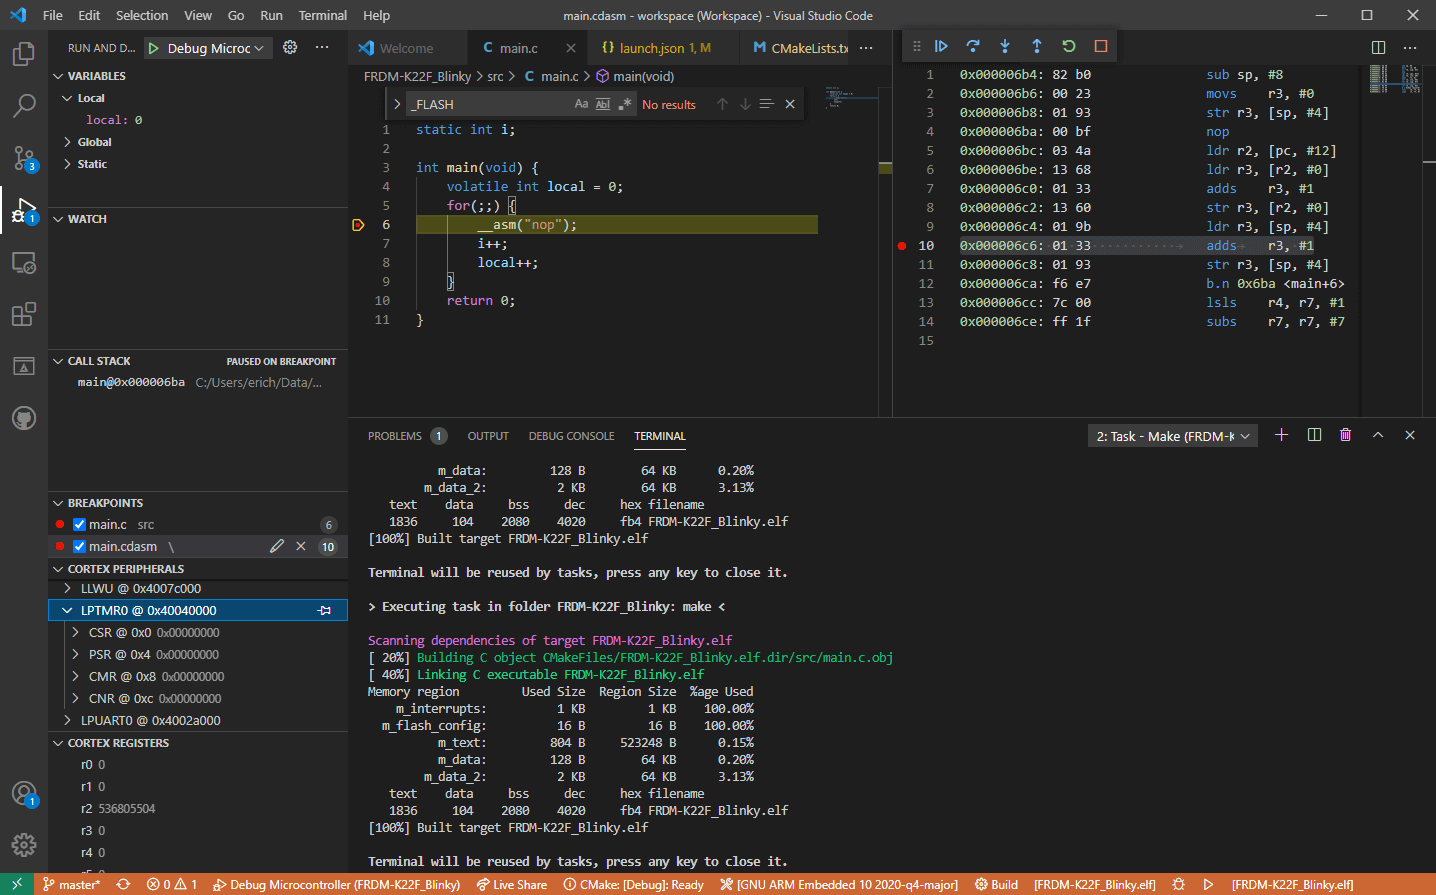 Visual studio code is a code editor available for Windows, Linux, and macOS. It is a completely free tool offering you to code in any language without the need to switch to another editor.
Visual Studio Code is part of Microsoft Visual Studio which is a complete integrated development environment (IDE). Take notice that Visual studio itself has more advanced tools for developing and testing, it has 24/7 support, training, and Azure for WEB apps.
Visual Studio Code is an editor lacking in some advanced features Visual Studio offers.
Visual studio code is a code editor available for Windows, Linux, and macOS. It is a completely free tool offering you to code in any language without the need to switch to another editor.
Visual Studio Code is part of Microsoft Visual Studio which is a complete integrated development environment (IDE). Take notice that Visual studio itself has more advanced tools for developing and testing, it has 24/7 support, training, and Azure for WEB apps.
Visual Studio Code is an editor lacking in some advanced features Visual Studio offers.