Changing color of START menu in Windows 10

The new Windows 10 update has brought some fixes, improvements, and little things to personalize our computer more. One of these personalization updates we have received is that we can now finally change the color of our START menu and taskbar and it is easy as 1,2,3.

In order to change and personalize your START menu and/or title bars all you have to do is click on your windows icon to bring the start menu up and then click on settings.

Windows 10 Start menu with marked settings iconOnce you are in setting windows go to personalization settings.

Windows 10 settings menu with marked Personalization groupWhen the personalization setting opens go-to color tab on left and scroll down until you find 2 checkboxes under "show accent color on the following surfaces:"

Windows 10 Color settings marked with optionscheck ones you wish to apply the effect to and you are done. Now your START menu and/or title bars are using the color scheme of your choice.
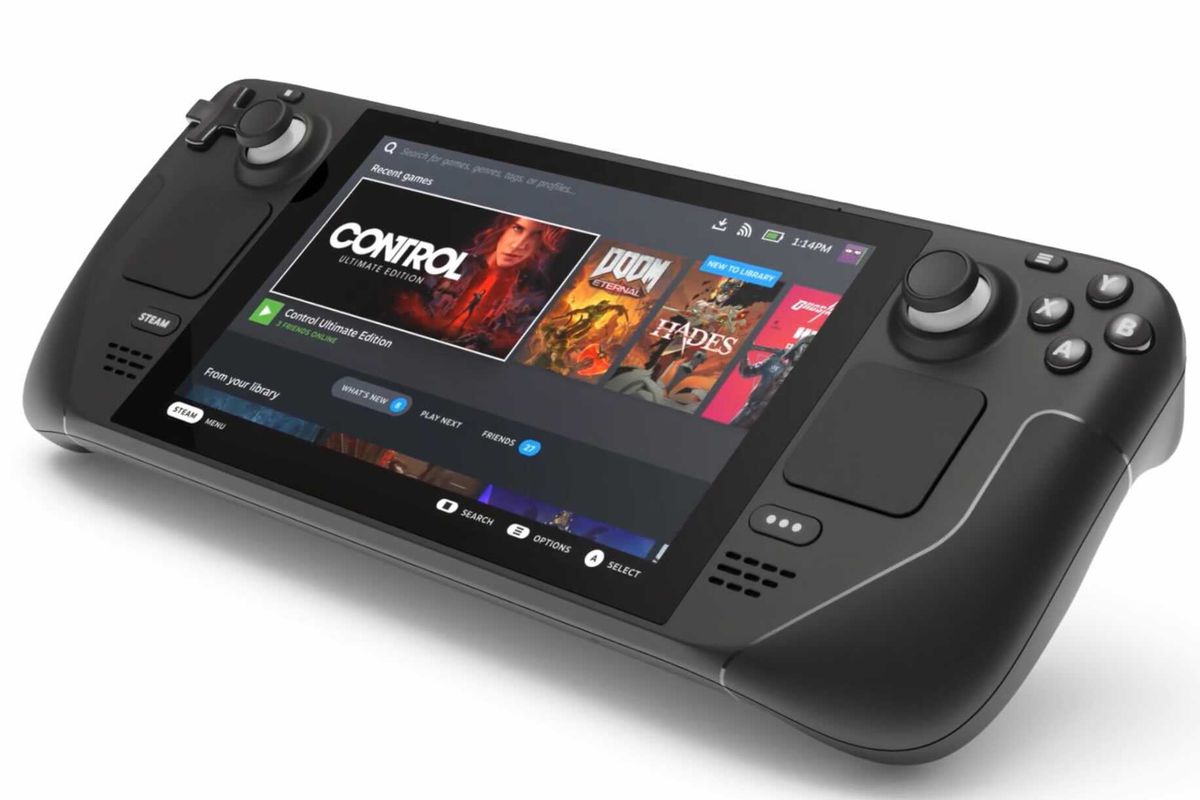
Do You Need Help with Your Device?

Our Team of Experts May Help
Troubleshoot.Tech Experts are There for You!
Replace damaged files
Restore performance
Free disk space
Remove Malware
Protects WEB browser
Remove Viruses
Stop PC freezing
GET HELP
Troubleshoot.Tech experts work with all versions of Microsoft Windows including Windows 11, with Android, Mac, and more.

Share this article:

You might also like

What is Windows 10X and do you need it

What is Windows 10X

Windows 10X is a new version of Windows that has been built from the ground up for new PCs and will begin shipping on hardware in 2021. It's built on top of a new modern version of Windows called 'Windows Core OS' that guts legacy components and features in favor of contemporary user experiences and enhanced security. This means everything from the Windows Shell to the underlying OS has been rebuilt with modern technologies.

As a result, Windows 10X does not support legacy Win32 applications at launch. Windows 10X PCs in 2021 will be able to run Microsoft Edge, UWP, and web apps. Legacy Win32 application support will arrive at a later date, however. When it does, Win32 applications will run in a secure container by default, meaning those legacy applications cannot affect system performance and battery life when closed. Windows 10X is a much more secure and stable OS as a result of this, as there's no opportunity for legacy apps to cause bitrot.

Windows 10X features a new shell of the user interface that has been built with modern technologies. It's an adaptive user experience that can adjust depending on the "posture" of your device. For example, with a foldable PC, the user might want to use it in several different ways; as a laptop, or tablet, or in tent mode for movies. Because of this, the user interface must adapt to provide the best experience no matter which way your device is being used. This also means that legacy shell elements, such as the Control Panel, File Explorer, and error dialogs and icons are gone on Windows 10X. As Microsoft has rebuilt the entire shell, it doesn't include any of the legacy things that make Windows 10 so inconsistent when it comes to UI. The Windows Shell on Windows 10X should be much more consistent. At launch, Windows 10X will only be available on traditional clamshell PCs aimed primarily at the education and enterprise markets. The platform will eventually ship on the new devices from factors such as foldable PCs, but that won't be happening in 2021.

Start menu

Microsoft is redesigning the Start menu experience on Windows 10X with a focus on productivity. It features a system-wide search bar along the top that can also search the web and a grid of installed apps below that in place of live tiles. It also has a "recent activities" area that dynamically updates with things the user might want to jump straight into, such as recent Office documents and visited websites. The apps list can be customized, with the ability for users to rearrange which apps show up in the first few rows.

Taskbar

Windows 10X also has a new adaptive Taskbar that features a centered design. The Start and Task View buttons appear in the center, with running and pinned apps appearing between the two. When you open an app, the Start and Task View buttons gently spread apart, giving the Taskbar a much more fluid appearance. There are some new animations; the Start and Task View buttons have their own animations when clicked on, and there's a subtle bounce to app icons when you minimize running apps to the Taskbar. In addition to the new design, there are also up to three different Taskbar sizes: Small, medium, and large. Large is great for tablets, while medium and small mimic the usual sizes we already have today on Windows 10. On tablets, users can now swipe up anywhere on the Taskbar to access the Start menu, making it easier for touch users to access their apps list. You no longer have to hit the specific Start button to access your Start menu.

Action center

In addition to the new Start and Taskbar experiences, there's also a new Action Center to compliment them. This new Action Center puts more emphasis on quick actions, with the ability to jump into specific quick actions for further control without leaving the Action Center at all. It's also designed in such a way that mimics a control center, with notifications housed above it in a separate box. This new Action Center includes things like volume controls, power options, and battery percentage. There's also a new music control UI that appears in the Action Center when music is playing from a supported app.

State separation feature

Unlike Windows 10, Windows 10X features something called "state separation" which is how the OS lays itself out on a drive. Windows 10 today installs everything into a single partition, which means the user can access system files, as can apps and potential attackers. On Windows 10X, everything goes into its own read-only partition. So OS files are locked away, as are app files, as are drivers, and the registry. The only thing the user and applications can access is the user partition. This means that malware or viruses can't get in and affect the system because those programs are only able to operate in a single partition, and that assumes they're able to get outside of the app container system Microsoft has built. All apps on Windows 10X run in a container and need explicit permissions to access things that are outside that container. This is already how UWP apps work on Windows 10, and Microsoft will be extending that to Win32 apps on Windows 10X when support for Win32 apps arrives.

Launch date and info

Windows 10X will launch this spring first for commercial markets. Commercial markets include education and enterprise industries looking for sub-$600 PCs for students in the classroom or first-line workers. Windows 10X won't be launching on consumer PCs in 2021, meaning you won't find it on a flagship Dell or HP device. It's also only for clamshell PCs, with foldable, tablets, and other form factor support coming in 2022 and beyond. Windows 10X will launch without an in-box Mail and Calendar app. It's been removed from the first version of Windows 10X because the platform is aimed at commercial markets that will likely use Outlook Web or stream Outlook via Windows Virtual Desktop. Users can opt to reinstall the Mail and Calendar apps from the Microsoft Store if they wish. Windows 10X for mainstream markets won't happen until 2022 when Win32 app support among other features comes to the OS as part of the Windows 10 "Nickel" release scheduled for the first half of 2022. Because Windows 10X is a new operating system, it will not be released as an update for existing Windows 10 PCs. Users won't be able to install Windows 10X on a device that didn't come with Windows 10X, to begin with. There won't be any official ISO media and you won't be able to buy Windows 10X on its own to install on your existing device. It's for new PCs only. If you would like to read more helpful articles and tips about various software and hardware visit errortools.com daily.
Read More
New vulnerability found in Windows
Windows users need to be on high alert. Microsoft has confirmed a critical vulnerability has been found in all versions of Windows which presents an immediate threat, and you need to act now. A critical new zero-day hack has been found which affects all Windows versions. windows vulnerabilityTracked as CVE-2021-34484, the “zero-day” flaw enables hackers to breach all versions of Windows (including Windows 10, Windows 11, and Windows Server 2022) and take control of your computer. Microsoft mistakenly thought it had patched the vulnerability (which was first found in August) when it was publicly disclosed in October. But the fix itself was found to be flawed, something the company admitted, and this drew even more attention to the vulnerability. Microsoft subsequently promised to “take appropriate action to keep customers protected” but two weeks later, a new fix has still not arrived. Luckily the third-party security specialist 0patch has beaten Microsoft to the punch with a ‘micropatch that it has now made available for all Windows users “Micropatches for this vulnerability will be free until Microsoft has issued an official fix," 0patch confirmed. You will need to register for a 0patch account and install its download agent before the fix can be applied, but with 0patch fast becoming a go-to destination for hot fixes which beat software companies to the punch this is a no brainer. Hopes will be high that Microsoft can release an effective patch sooner rather than later but, until then, all Windows users must act now if they want to be safe. Download 0patch here: https://blog.0patch.com/2021/11/micropatching-incompletely-patched.html
Read More
Windows computer shuts down instead of Sleep
As you know the Windows 10 operating system is has a lot of features and some of them are related to turning off your computer in different ways in order to save power at different levels. These particular features are Shut down, Restart, Hibernate, and Sleep. However, there are times when you might encounter some issues when using any of the aforementioned features. One of these issues is when your computer shuts down instead of going to Sleep. This issue could be caused by several factors including a bug related to the Intel Management Engine Interface or IMEI driver as well as any misconfiguration in the power settings of the BIOS or UEFI. If your computer is going through this problem, read on as this post will guide you in fixing it. There are several potential fixes you can try to fix the problem. You can try to check the Sleep Advanced Settings or run the built-in Power troubleshooter or run the Power Efficiency Diagnostic Report. In addition, you can also try to troubleshoot the problem in a Clean Boot State or reset or update the BIOS.

Option 1 – Check the Sleep Advanced Settings

  • Click on the Windows key and type “control panel” in the field and select the related search result.
  • Next, select the Security and Maintenance option and click on the Power Options.
  • After that, you have to select the Change Plan Settings but keep in mind that this option is barely readable so you need to read each option carefully.
  • Now click on the Change advanced power settings button and a new window will appear.
  • Then look for the “Sleep” option and expand it. Make sure that the “Allow hybrid sleep” option is on.
  • Reboot your computer and check if your computer now functions properly. If it still didn’t work, you may have to reverse the changes you’ve made.

Option 2 – Try to run the Power troubleshooter

The next thing you can do is to run the Power troubleshooter. To do so, follow these steps:
  • Go to Settings and navigate to Update & Security > Troubleshoot.
  • After that, look for the “Power” option from the given list of built-in troubleshooters and click on it.
  • Next, click on the “Run the troubleshooter” button to run the Power troubleshooter.
  • Once the troubleshooter is done identifying the problems, follow the next on-screen instructions to resolve the problem.

Option 3 – Troubleshoot Sleep Mode issue in a Clean Boot State

The issue with Sleep Mode might be caused by some third-party programs installed on your computer. This program might be the one that puts your computer to sleep and so to isolate this possibility, you have to put your PC in a Clean Boot State using the steps below.
  • Log onto your PC as an administrator.
  • Type in MSConfig in the Start Search to open the System Configuration utility.
  • From there, go to the General tab and click “Selective startup”.
  • Clear the “Load Startup items” check box and make sure that the “Load System Services” and “Use Original boot configuration” options are checked.
  • Next, click the Services tab and select the “Hide All Microsoft Services” check box.
  • Click Disable all.
  • Click on Apply/OK and restart your PC. (This will put your PC into a Clean Boot State. And configure Windows to use the usual startup, just simply undo the changes.)
  • After that, try to put your computer to sleep again.

Option 4 – Try to run the Power Efficiency Diagnostics Report

You could also try to run the Power Efficiency Diagnostics Report to fix the problem. This tool is helpful and will help you analyze the status of the battery but note that this can be quite overwhelming especially if you’re not well-versed in this matter.

Option 5 – Try to update the BIOS

Updating the BIOS can help you fix the ATTEMPTED_WRITE_TO_READONLY_MEMORY BSOD error but as you know, BIOS is a sensitive part of a computer. Even though it is a software component, the functioning of the hardware depends on it largely. Thus, you must be careful when modifying something in the BIOS. So if you don’t know much about it, it’s best if you skip on this option and try the other ones instead. However, if you are well-versed in navigating the BIOS, then follow the steps below.
  • Tap the Win + R keys to open the Run dialog box.
  • Next, type “msinfo32” in the field and press Enter to open System Information.
  • From there, you should find a search field on the bottom where you have to search for the BIOS version and then press Enter.
  • After that, you should see the developer and version of the BIOS installed on your PC.
  • Go to your manufacturer’s website and then download the latest version of BIOS on your computer.
  • If you are using a laptop, make sure that you keep it plugged in until you have updated the BIOS.
  • Now double click on the downloaded file and install the new BIOS version on your computer.
  • Now restart your computer to apply the changes made.
Note: If updating the BIOS didn’t help, you might want to consider resetting it instead.
Read More
Enumerating user sessions to generate ...
There are times when the Windows Search doesn’t work and you wouldn’t have a clue as to why it happened since it does not give any error codes. In such cases, you have to check the error logs in the Event Viewer to find out more about the problem. From there, look for an error with the Event ID 3104 in the Windows error logs and if you see an error message that says, “Enumerating user sessions to generate filter pools failed”, read on as this post will guide you in fixing the problem. Apart from the error message, you might also see more information in the details section of the log that says, “(HRESULT: 0x80040210) (0x80040210)”. This kind of error is most likely caused by something that prohibits the search function from initializing. A lot of users assumed that it could be due to Cortana but it’s actually not. While some users also reported that they encounter the issue after they restarted their computers. This error was also reported with the same event ID 3104 on the Windows Server. According to security researchers, this error could be caused by problems in the Registry entry of Windows search. It could also be due to an issue with the SYSTEM account where it hasn’t been added to the DCOM Security. It is also possible that the Windows Search function has not been initialized. To fix this error, you can try to rebuild the Search Index manually or run the Search and Indexing troubleshooter. You can also check the startup type of the Windows Search service or try some registry tweak.

Option 1 – Try to rebuild the Search Index manually

The first thing you can do to fix the problem is to manually rebuild the Search Index. You can do that by going to Control Panel > Indexing Options and from there, click on Advanced. After that, go to the Index Settings tab and then click on Rebuild > OK. Once you’re done, check if it fixed the problem.

Option 2 – Try running the Search and Indexing troubleshooter

You could also run the Search and Indexing troubleshooter in Windows 10 as it checks whether the settings are in place and automatically corrects any issues with the Windows 10 search function. To run this troubleshooter, just click on the Start button and select Settings > Updates and Security > Troubleshoot. From there, select the Search and Indexing Troubleshooter. Once the troubleshooter is done, restart your computer and see if it fixed the error.

Option 3 – Try checking the startup type of the Windows Search Service

In this option, you have to check the startup type of the Windows Search service since the service won’t start. To do so, refer to these steps:
  • Tap the Win + R keys to open the Run utility and type “services.msc” in the field and then tap Enter to open the Services Manager.
  • Next, from the list of services, look for the Windows Search Service or WSearch. Once you find it, right-click on it and select Properties.
  • After that, change the Startup type to Automatic and click on the Start button if the service is in the Stop state.
  • Now click on the Apply and OK buttons to save the changes made and then restart your computer.

Option 4 – Try changing the Registry entry for Windows Search

Before you apply some registry tweak, you need to create a System Restore point first. Once you have that covered, follow these steps:
  • Tap the Win + R keys to open the Run utility and type “Regedit” in the field and tap Enter to open the Registry Editor.
  • If a User Account Control prompt appears, just click Yes to proceed.
  • After opening the Registry Editor, navigate to this registry path: HKEY_LOCAL_MACHINESOFTWAREMicrosoftWindows Search
  • From there, click on Windows Search and look for the key named “SetupCompletedSuccessfully” and change its value to “0”. Just right-click on it and select Modify.
  • Then input “0” as its value data and click on OK to save the changes made.
  • Exit the Registry Editor and restart your computer.
  • Now check if the Enumerating user sessions to generate filter pools failed is fixed or not.
Read More
Fix can not open EXE file in Windows 10
Can not open and run EXE file in Windows is not a new issue and sadly it can still happen from time to time, luckily this step by step solution will help you to resolve this problem fast and effective in no time. Try the below solutions in no particular order and I hope that you will solve the issue fast and be able to return to using the computer like it never happened
  1. Run SFC scan

    As the EXE file not opening issue lies in the Windows OS, the SFC tool will be able to identify the cause and fix this issue. Press ⊞ WINDOWS + X and choose command prompt (admin) in command prompt type: sfc /scannow Press ENTER
  2. Check registry and modify if needed

    Sometimes value in the registry key is wrong and can cause this error, in order to check if this is the case, we will open the registry editor and find out Press ⊞ WINDOWS + R to bring run dialog up type in it: RegEdit and press ENTER In the left pane of the Registry Editor window, click on the HKEY_CLASSES_ROOT to expand the section Scroll down to find out the .exe registry and click on it Go to the right pane of the window and double-click on the Default and set the Value Data as exefile Click on the OK button Next, located the given in the window: HKEY_CLASSES_ROOT>exefile>shell>open>command Click on the “Command” in the left pane of the window In the right pane of the window double-click on the Default and set Value Data as “%1” %* Click on the OK button Restart your computer and check if the issue persists
  3. Turn off Firewall and defender

    If you have a firewall and antivirus active there might be a chance of a conflict and that firewall or antivirus is preventing the EXE file from starting, disable your firewall and anti-virus and try again to open the EXE file.
  4. Turn off user account control

    User account control can also like a firewall prevent some files from executing, go into accounts and turn off user account control to see if this might be an issue preventing you from opening the file.
Read More
How to Fix Hal.dll Error Code

Hal.dll Error - What is it?

Hal.dll error is a type of dynamic link library error that is common in Windows. Hal.dll is the critical file in all Windows installations and the error occurs when this file cannot be correctly loaded. Hal is the abbreviation for ‘Hardware Abstraction Layer’. Communication between Windows and different PC hardware is facilitated with this file. The error causes inconvenience and hampers your ability to use the hardware. The error message is displayed in either one of the following formats:
  • "Windows could not start because the following file is missing or corrupt: C:Windowssystem32hal.dll. Please re-install a copy of the above file."
  • "Cannot find WindowsSystem32hal.dll"
  • "C:WindowsSystem32Hal.dll missing or corrupt: Please re-install a copy of the above file."

Solution

Restoro box imageError Causes

Hal.dll error occurs due to multiple reasons. These include:
  • BIOS are not configured properly
  • Damaged hard drive
  • Hal.dll file is missing, damaged, or corrupt
  • Viral Infection

Further Information and Manual Repair

To fix and resolve the Hal.dll error code on your system, you don’t always have to hire a professional technician for the job. Though Hal.dll error is critical but easy to resolve, here are some solutions that you can try to fix it right away even if you don’t have any technical expertise.

1) Restart Your PC

Sometimes this can be a temporary error, so try restarting your PC. If the error is resolved then that’s great. However, if it still persists, then try other solutions.

2) Change the Boot Order

The underlying cause for the Hal.dll error is often not properly configured BIOS; if this is the cause, simply change the boot order of the bootable devices like your hard drive. The BIOS setup utility is used to change boot order settings. This can be done by restarting your PC. Once you restart, press F2 to enter the setup. Now go to SATA operation and change RAID AHCI to RAID ATA. Save changes and then exit. By doing so, you will be able to re-configure the BIOS and resolve the error.

3) Use BOOTMGR

Another way to resolve is to update the volume boot code to use BOOTMGR. To do this, access advanced startup options, open the command prompt and type bootsect command and then press Enter. Run the command and then you’ll get the following message: C: (\?Volume{37a450c8-2331-11e0-9019-806e6f6e6963}) Successfully updated NTFS filesystem bootcode. Bootcode was successfully updated on all targeted volumes. After that close the command prompt. This is most likely to resolve the error.

4) Repair Registry With Restoro.

In case the error is still not fixed, then this means that the problem is bigger than you thought. It may be due to hard drive failure, viral infection, or sometimes because of hal.dll file corruption. In the event of these error causes, it is recommended to download Restoro. Restoro is an advanced, next-generation, and multi-functional PC repair tool embedded with numerous utilities like a registry cleaner, an antivirus, and a system optimizer. The registry cleaner utility:
  • Scans for all registry issues
  • Wipes out the unnecessary files saved in the hard drive like the junk files, cookies, internet history, and temporary files
  • Cleans the disk
  • Repairs damaged and corrupt files
  • Restores the registry
The antivirus utility scans and removes all malicious software from your PC including viruses, Trojans, malware, adware, and spyware. Simultaneously, it also boosts the speed of your system. It is safe and efficient PC repair software. It has simple navigation and a user-friendly interface. Whether you are using Windows 7, 8 or Vista, it is compatible with all. It can also be used on Windows XP. Click here to download Restoro and resolve the Hal.dll error today!
Read More
Guide to Fixing Error 0x800CCC0E

Error Code 0x800CCC0E - What is it?

The error code 0x800CCC0E is an Outlook error that appears while using either Microsoft Outlook or Outlook Express. The error message hampers your ability to send and receive emails.

Solution

Restoro box imageError Causes

0x800CCC0E Outlook error code is triggered by multiple reasons including:
  • Improper connection with SMTP (Simple Mail Transfer Protocol) server
  • Damaged files
  • Registry corruption
In most cases, it’s the registry that gets corrupted which leads to the occurrence of 0x800CCC0E error code display. This typically happens when you try to update your Outlook/Outlook Express version. When updating, you need to remove all the software files of the previous Outlook version which includes the registry too. If the files are not removed from the registry, the new version update will often fail. The junk files of the old version are likely to damage and corrupt the registry.

Further Information and Manual Repair

It is advisable to repair the error code 0x800CC0E right away to avoid inconvenience and system failure and fatal crashes which can lead to valuable data loss.

Cause: Improper connection with SMTP (Simple Mail Transfer Protocol) server

Solution: If the cause of the 0x800CCC0E is SMTP server connection failure, then the best way to resolve the error is to reconfigure your email account settings. Make sure that port 25 is being used in the SMTP area. Port 25 is the standard outgoing mail port. If the SMTP setting is on port 25 then another reason for the error 0x800CCC0E can be your anti-virus or firewall software enabled on your PC. Turn it off for a moment and then try sending emails from your Outlook.

Cause: Damaged Files and Registry Corruption

Solution: If the error code is triggered due to registry corruption and file damage, then the best way to resolve it is to download Restoro. Restoro is a safe, efficient, and highly functional inbox cleaner and a system optimizer embedded with numerous powerful utilities designed to repair multiple PC-related errors including the error code 0x800CCC0E when triggered by registry corruption. This cutting inbox cleaner scans your PC entirely and detects all the unnecessary and malicious files saved in your system’s registry like junk files, internet history, invalid entries, and files of the uninstalled programs. These files take up most of the registry disk space thus causing the registry files to get damaged and corrupt and triggering error codes like 0x800CCC0E. With the help of Restoro,  you can easily wipe out all such files from your system in just one click. After scanning for errors all you need to do is click the repair tab to make your registry disk clutter-free. Once the clutter is removed, update the new version of the Outlook/ Outlook Express again on your system and then try sending emails. You’ll see two noticeable differences after repairing your PC with Restoro. One is that you will be able to install the new version and send emails smoothly from your Outlook account without any 0x800CCC0E error pop-ups. And the second difference you’ll see is the change in your PC performance. This tool optimizing your PC speed and reduces boot time. This tool is very simple and easy to use. It has a neat design layout and a user-friendly interface which makes it easy for all levels of users to use Restoro smoothly with zero complexity. In just a few clicks the error message 0x800CCC0E is resolved. What makes this tool a favorite among users is that it does not require any skills or technical know-how. To get started here’s what you need to do:
  1. Click here to download Restoro software on your PC
  2. Once the download is complete, run it to scan for 0x800CC0E error
  3. After the scanning is successfully complete, click on the Repair button to fix the error right away.
  4. Then install the new version of Outlook/ Outlook Express again on your system
Read More
Your computer is running low on resources
Signing in to a computer that runs a Windows 10 version OS is usually fast and straightforward. However, there are instances when signing in takes too long especially if there are a lot of programs in the Startup. So if many things are loading as soon as you log into your computer, it will slow down the sign-in process. Aside from programs in Startup, it is also possible that there are too many users that are logged in to the account. In such a case, you will most likely encounter an error that says, “Your computer is running low on resources, so no new users can sign in. Please use an account that has already been signed in”. If you’ve encountered such an error when you try to log into your computer, read on as this post will be guiding you on how you can fix it. Each time a user signs in to Windows 10, it will allocate resources in order to work smoothly. But, in many cases, the system is running low on resources which is why this error pops up and blocks a sign-in of a new user. To fix it, you can try to log out the existing users, or perform a Cold Boot, as well as run both the DISM tool and System File Checker scan.

Option 1 - Try to logout existing users

The first thing you can do is to log out the existing users. If you have a shared Windows 10 computer, you have to check if someone hasn’t logged out. It could be that some background task or there is an existing program that is still running under that account. So you have to make sure to ask the same user to log out in case there is some unsaved work. On the other hand, if that user is not around, then you reboot the computer right away.

Option 2 - Try Performing a Cold Boot

You could also try to perform a Cold Boot to fix the problem. A Cold Boot is a process that makes sure that the Windows 10 Kernel shuts down properly and releases all the resources held by any account. To perform a Cold Boot, just press and hold the physical power button on your CPU until it goes off. After that, boot your computer regularly and see if you can now log into your account without any error.

Option 3 - Try to run a System File Checker scan

System File Checker is a built-in command utility in Windows that helps in restoring corrupted files as well as missing files. It replaces bad and corrupted system files to good system files that might be the cause why you’re getting the error when you log into your computer. To run the SFC command, follow the steps given below.
  • Boot your computer into the Advanced Recovery mode and from there open Command Prompt.
  • After opening Command Prompt, type in sfc /scannow
The command will start a system scan which will take a few whiles before it finishes. Once it’s done, you could get the following results:
  1. Windows Resource Protection did not find any integrity violations.
  2. Windows Resource Protection found corrupt files and successfully repaired them.
  3. Windows Resource Protection found corrupt files but was unable to fix some of them.
 Now restart your computer and see if the problem is fixed or not.

Option 4 - run the dism tool

You might also want to run the DISM tool. This tool is known to repair potentially corrupted files in your system as having them could also system issues like the “Your computer is running low on resources, so no new users can sign in” error. To repair these corrupted system files, you can run the DISM commands:
  • Go to the Advanced Recovery mode and select Command Prompt.
  • After that, input each one of the commands listed below sequentially to execute them:
    • Dism /Online /Cleanup-Image /CheckHealth
    • Dism /Online /Cleanup-Image /ScanHealth
    • Dism /Online /Cleanup-Image /RestoreHealth
  • Once you’ve executed the commands given above, restart your computer and check if the problem is now fixed.
Read More
SoftwareUpdater Malware Removal Guide

Software Updater is an ad-supported browser extension hijacker that claims to update your PC programs and drivers. In addition to managing the installation of your selected software, this install manager will make recommendations for additional free software that you may be interested in. Additional software may include toolbars, browser add-ons, game applications, anti-virus applications, and other types of applications. The hijacked homepage, softwareupdater.com, did not have valid legal privacy and disclaimer policies on its website as of publication date.

This software adds a Windows Task Scheduler in order to launch the program at various times, including system startup. The software has access to all installed applications on your PC and can install bundled products with unwanted malware. It is also commonly distributed in bundles with unwanted software. Several anti-virus programs have classified this software as malware and are therefore not recommended.

About Browser Hijackers

Browser hijacking means that a malicious code has control over and modified the settings of your internet browser, without your consent. They’re made to interfere with browser programs for several purposes. The idea is to force users to visit specific sites that are trying to increase their visitor traffic and produce higher ad revenue. It may appear harmless, but most of these sites are not legitimate and could present a severe threat to your online safety. Browser hijackers can even allow other malicious programs without your knowledge to further damage your computer.

How to determine if your web browser is hijacked

The common symptoms that indicate having this malicious software on your computer are: 1. home page is changed 2. you find new unwanted bookmarks or favorites added, typically directed to advertisement-filled or pornography websites 3. the default search engine has been changed and your browser security settings have been lowered without your knowledge 4. you find unwanted new toolbars added 5. you may find many pop-up ads on your computer screen 6. your internet browser has become unstable or starts running sluggishly 7. you can’t go to specific websites such as home pages of anti-malware software.

Exactly how browser hijacker infects computers

Browser hijackers infect PCs in numerous ways, including via a drive-by download, a file-share, or an infected email. Many web browser hijackings come from add-on software, i.e., browser helper objects (BHO), toolbars, or extensions added to web browsers to provide them additional functionality. Also, certain freeware and shareware can put the hijacker in your PC through the “bundling” technique. Some of the well-known hijackers are SoftwareUpdater, Conduit Search, Babylon Toolbar, OneWebSearch, Sweet Page, and CoolWebSearch. Browser hijackers may record user keystrokes to collect potentially valuable information leading to privacy issues, cause instability on systems, drastically disrupt user’s browsing experience, and eventually slow down the computer to a point where it will become unusable.

Browser Hijacker Malware – Removal

Certain hijackers could be removed by just uninstalling the related free software or add-ons through the Add or Remove Programs in the Windows Control Panel. In some cases, it can be a tough task to identify and get rid of the malicious piece because the associated file could be running as part of the operating system process. Besides, browser hijackers might modify the Computer registry so it can be extremely tough to fix manually, especially when you are not a very tech-savvy person.

How To Get Rid Of Malware That Is Preventing Anti-Malware Installation?

Malware can cause many different types of damage to PCs, networks, and data. Some malware is meant to restrict or prevent things that you want to do on your computer system. It may not permit you to download anything from the net or stop you from accessing some or all of the internet sites, especially the anti-virus websites. If you’re reading this now, you’ve perhaps recognized that a malware infection is a reason for your blocked internet traffic. So how to proceed if you need to install an anti-virus software like Safebytes? Even though this type of problem can be difficult to circumvent, there are a few actions you can take.

Install the anti-virus in Safe Mode

In Safe Mode, you can change Windows settings, un-install or install some software, and eliminate hard-to-delete viruses and malware. In the event, the virus is set to load immediately when PC boots, shifting into this particular mode can prevent it from doing so. To start the computer into Safe Mode, hit the “F8” key on your keyboard right before the Windows boot screen comes up; Or after normal Windows boot up, run MSCONFIG, check “Safe Boot” under Boot tab, and click Apply. As soon as you restart into Safe Mode with Networking, you could download, install, as well as update the anti-malware program from there. At this point, you could run the antivirus scan to remove viruses and malware without hindrance from another malicious application.

Switch to an alternate browser

Some malware only targets certain internet browsers. If this sounds like your situation, utilize another browser as it might circumvent the virus. The best solution to avoid this problem is to select a web browser that is well known for its security measures. Firefox contains built-in Malware and Phishing Protection to help keep you secure online.

Install and run anti-malware from your flash drive

To effectively remove the malware, you might want to approach the issue of running anti-virus software on the affected computer system from a different perspective. Adopt these measures to run the antivirus on the affected PC. 1) Download the anti-malware program on a virus-free PC. 2) Mount the USB drive onto the same computer. 3) Run the setup program by double-clicking the executable file of the downloaded application, which has a .exe file extension. 4) Pick a thumb drive as the place when the wizard asks you exactly where you want to install the program. Follow the on-screen instructions to complete the installation. 5) Disconnect the pen drive. You can now use this portable anti-malware on the infected computer. 6) Double-click the anti-malware program EXE file on the flash drive. 7) Run Full System Scan to detect and get rid of all types of malware.

Features of SafeBytes Anti-Malware

Want to install the best anti-malware software for your computer system? You can find many applications available that come in paid and free versions for Windows systems. Some of them do a great job in getting rid of threats while some will affect your PC themselves. You must be careful not to choose the wrong application, especially if you purchase a paid software. Among few good programs, SafeBytes Anti-Malware is the strongly recommended software for the security-conscious individual. SafeBytes anti-malware is really a powerful, highly effective protection application made to assist users of all levels of IT literacy in identifying and eliminating harmful threats from their computers. Through its cutting-edge technology, this software protects your PC against infections brought on by different types of malware and similar threats, including spyware, adware, computer viruses, worms, trojan horses, keyloggers, ransomware, and potentially unwanted program (PUPs). SafeBytes possesses a plethora of great features that can help you protect your laptop or computer from malware attack and damage. The following are some of the best ones: Real-time Active Protection: SafeBytes delivers complete and real-time security for your laptop or computer. They are very efficient in screening and getting rid of different threats because they are constantly revised with new updates and safety measures. Best AntiMalware Protection: This deep-cleaning anti-malware application goes much deeper than most antivirus tools to clean your personal computer. Its critically acclaimed virus engine finds and disables hard to remove malware that conceals deep inside your computer. Safe Browsing: SafeBytes gives an instant safety rating about the web pages you’re about to check out, automatically blocking unsafe sites and make sure that you’re certain of your online safety while browsing the net. Lightweight Tool: SafeBytes is a lightweight and easy-to-use antivirus and antimalware solution. As it uses minimal computer resources, this application leaves the computer’s power exactly where it belongs: with you actually. Premium Support: You may get absolutely free 24/7 technical support from their computer experts on any product queries or computer security issues.

Technical Details and Manual Removal (Advanced Users)

If you wish to manually remove SoftwareUpdater without the use of an automated tool, it may be possible to do so by removing the program from the Windows Add/Remove Programs menu, or in cases of browser extensions, going to the browsers AddOn/Extension manager and removing it. You will likely also want to reset your browser. To ensure the complete removal, manually check your hard drive and registry for all of the following and remove or reset the values accordingly. Please note that this is for advanced users only and may be difficult, with incorrect file removal causing additional PC errors. In addition, some malware is capable of replicating or preventing deletion. Doing this in Safe Mode is advised.

The following files, folders, and registry entries are created or modified by SoftwareUpdater

Files: C:Program FilesSoftware UpdaterSoftwareUpdater.exe C:Program FilesSoftware Updatersuscan.exe C:Program FilesSoftware Updater C:Program FilesSoftware Updater cpprest120_xp_1_4.dll C:Program FilesSoftware Updater cpuidsdk.dll C:Program FilesSoftware Updater DriversHQ.SDK.REST.Win32.dll C:Program FilesSoftware Updater msvcp120.dll
Read More
Download and Install Google Fonts on Windows
Google fonts are a free open-source font library made to enrich web content and present end-user with a smooth web experience while surfing. Fonts are completely free for both commercial and personal use and they are not limited to use in WEB only, you can use them also in other projects like business cards, flyers, etc. In order to use google fonts first thing of course you will need to download them. In this guide, we will show you how to download and install google fonts.
  • Go to the Google Fonts page.
  • Select the font family that you wish to use. You can preview each font style to make double-sure it is the right one.
  • When you are ready, click on the Download family button.
Roboto Font
  • A File Explorer window will pop up, asking you where to save the font family.
  • The downloaded file will be compressed in .zip format to save bandwidth, so you will first need to uncompress/unzip it. Right-click on the file and select Extract all.
Extract All
  • You will then be asked where to unzip/extract the file. File Explorer will automatically create a new subfolder, named as the file name, so all you need to do is confirm it by clicking Extract.
Extract Files
  • Click on the Windows icon in the bottom-left corner of your desktop
Settings
  • Select the Personalization category and Fonts.
Available Fonts
  • Split the screen between File Explorer and Settings by dragging the windows to either the left or right edge of the screen. Select all the font files by pressing CTRL + A and drag them into the Add fonts box.
Add Fonts New
Read More
1 2 3 171
Logo
Copyright © 2023, ErrorTools. All Rights Reserved
Trademark: Microsoft Windows logos are registered trademarks of Microsoft. Disclaimer: ErrorTools.com is not affiliated with Microsoft, nor claims direct affiliation.
The information on this page is provided for information purposes only.
DMCA.com Protection Status