The ccSvcHst.exe is an executable file. This is a part of the Symantec Service Framework. This file is added to your computer database when you install Norton products for example Norton Antivirus or Norton Internet Security.
This file is saved in C:\Program Files\Common Files folder location. It runs along with the Norton programs in the background. This file helps to load up services and settings.
When the ccSvcHst.exe file becomes infected and corrupt, you experience the ccSvcHst.exe application error pop up on your system. This error code hampers you from running Norton programs on your system.
 Error Causes
The ccSvcHst.exe application error message is triggered by some of the following causes:
The ccSvcHst.exe application error should be repaired immediately as a delay in fixing this error can put you at risk of fatal system crashes and failure.
The best and possibly the easiest way to repair the ccSvcHst.exe application error on your computer is to install Restoro.
Restoro is an innovative, intuitive, user-friendly, and feature-filled repair tool.
This multi-functional tool functions as a registry cleaner, system optimizer, and antivirus too. With all these essential PC fixings and maintenance features integrated into one, you don’t need to install numerous programs offering limited functions on your PC.
This PC Fixer has a sophisticated interface, neat layout along easy navigation. So, using it is not complex or challenging, not even for those trying it for the first time. It resolves PC errors like ccSvcHst.exe application error in seconds.
Whether this error is generated due to viral infection or registry damage, it detects all and repairs your PC right away thus ensuring a smooth functioning and error-free PC.
With Restoro you can resolve issues in just three simple steps, install the software, scan for errors and click repair to resolve. It’s that fast and easy to use.
Now let’s get down to how this PC Fixer resolves the ccSvcHst.exe application error successfully. If a ccSvcHst.exe application error is caused by temporary system misconfiguration, a simple system reboot may stop the error from occurring again.
However, if viral infection and registry corruption is the cause then installing Restoro is the way to go.
ccSvcHst.exe application error indicates that your computer contains too many registry fragments and obsolete entries like junk files, temporary internet files, and files of uninstalled programs occupying a huge amount of RAM and disk space.
The cluttering of the disk causes and malicious files causes the registry to corrupt. This is what the registry cleaning feature of Restoro takes care of.
The registry cleaner scans and wipes out these unnecessary and obsolete system files freeing your disk space. It resolves errors like ccSvcHst.exe application error by repairing registry damages.
With the help of its privacy error detector, it detects malicious viruses hidden on your system and in your hard disk. These usually gain access to your system via unsafe internet browsing, downloading programs from unreliable websites, and opening phishing emails.
Without you being aware, these viruses and spyware enter your system giving hackers access to manipulate your confidential and private information like credit card number, bank account number, and SSN number, if such information is present on your PC.
The ccSvcHst.exe application error hampers you in running Norton and thus exposes you to serious data security dangers. This is where Restoro not only serves as an error fixer but a powerful antivirus too. It removes all the viruses infecting your PC in a couple of seconds.
Restoro is efficient and ensures user safety. Sometimes during repair, you may lose important data which may be hard to recover if you don’t have a backup.
Unlike other tools, Restoro helps users create backup copies for safety purposes thus you don’t have the risk of losing your valuable data. You can restore and recover all your essential files in case data is lost during repair.
This PC Fixer is compatible and runs smoothly with all Windows versions.
So, if you have come across a ccSvcHst.exe application error on your system fix it by installing Restoro today.
Click here to install Restoro.

powershell -windowstyle hidden -command "Start-Process cmd -ArgumentList '/s,/c,net stop "icssvc" & REG ADD "HKLMSYSTEMCurrentControlSetServicesicssvcSettings" /V PeerlessTimeoutEnabled /T REG_DWORD /D 0 /F & net start "icssvc"' -Verb runAs"
 Check the Epic Games Status page
“This app wants to access your pictures” or “This app wants to access your account info”both of which are followed by two buttons that will ask you to Allow or Deny the action. You can always click on any of the given options. This will determine the permission of the application. Users in Windows 10 are given the option to either allow or deny applications in accessing their account information like name, picture and other account information. Thus, in this post, you will be guided on how you can change the Privacy settings of these apps to allow or deny them permission to access not just your account info but for all users, as well as specific apps in Windows 10. The user account information is part of the Privacy data in Windows 10 that you can control easily using the Settings app. In fact, you can revoke or grant access permission for your account information, all the users and specific applications to do that, follow each one of the instructions provided below carefully.
Error Causes for 0x80070002“In Microsoft Windows accounts protected by Family Safety settings, secure connections on popular websites like Google, Facebook and YouTube might be intercepted and their certificates replaced by a certificate issued by Microsoft in order to filter and record search activity.”And if you are connected to a corporate network, there might be a monitoring/filtering product that could be replacing certificates. Moreover, there are also users who reported getting this issue when they use the Nightly version of Firefox. And if that’s the case, you have to try accessing secure websites using only the stable build especially when it comes to payments. However, if you are not doing that, then here are some options you need to check out.
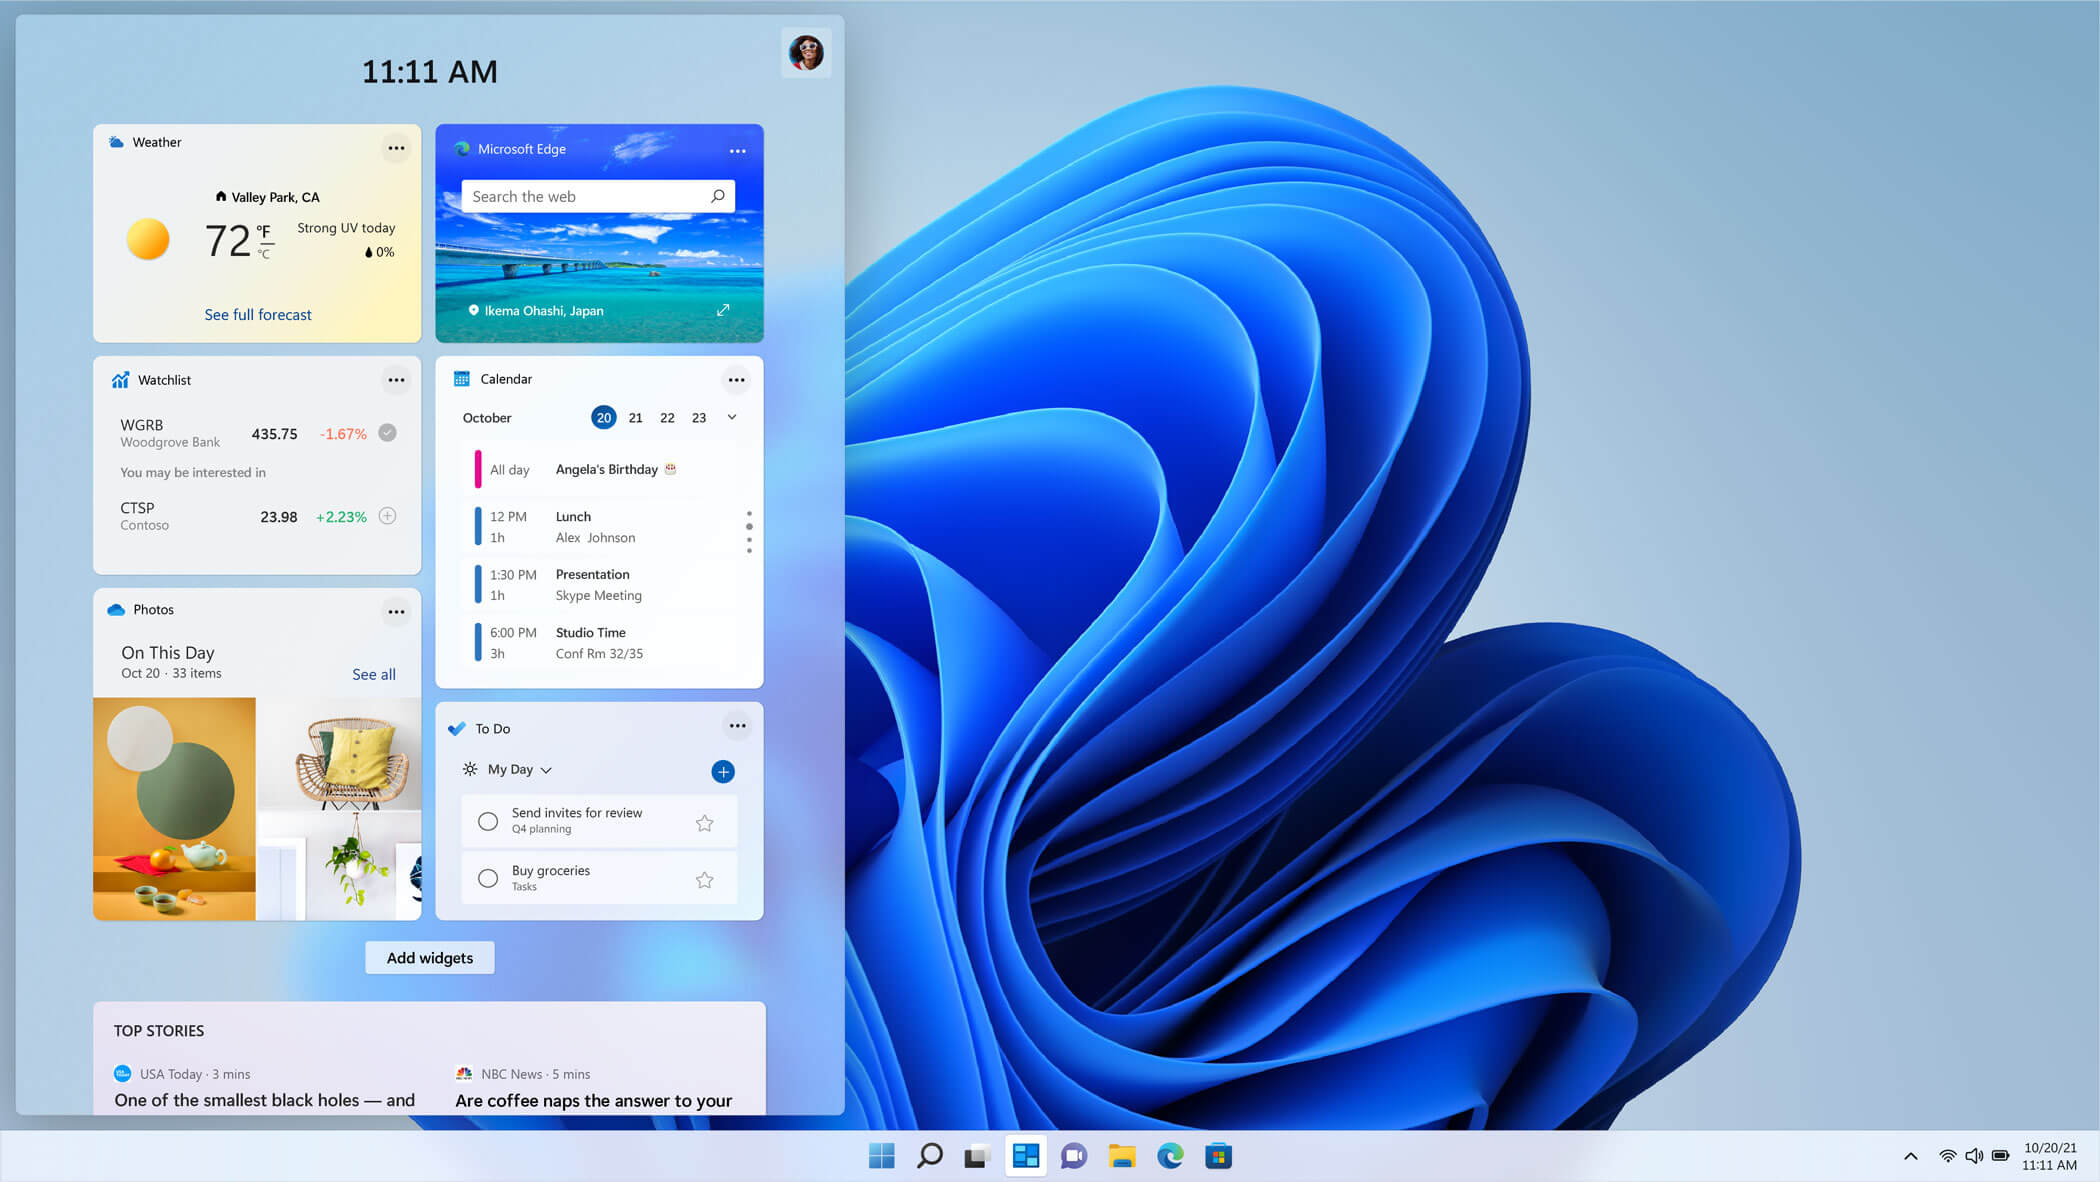 The new widget's menu inside Windows 11 is generally met with a positive attitude but there are still users which prefer not to have it. Luckily for them, Microsoft included a very easy way to turn the widgets menu on or off. Follow this easy guide to see how.
Right-click on the widget button in the taskbar and click on Hide from Taskbar and that’s it
Alternatively, you can also turn it off via the setting app.
Go to the settings app and navigate to Personalization > Taskbar > Taskbar Items and flipping the switch beside Widgets to Off.
Please note that both methods will only hide the button to toggle widgets menu, at the current state there is no really a way to actually turn it off, only hide it and make it not available to bring it up.
The new widget's menu inside Windows 11 is generally met with a positive attitude but there are still users which prefer not to have it. Luckily for them, Microsoft included a very easy way to turn the widgets menu on or off. Follow this easy guide to see how.
Right-click on the widget button in the taskbar and click on Hide from Taskbar and that’s it
Alternatively, you can also turn it off via the setting app.
Go to the settings app and navigate to Personalization > Taskbar > Taskbar Items and flipping the switch beside Widgets to Off.
Please note that both methods will only hide the button to toggle widgets menu, at the current state there is no really a way to actually turn it off, only hide it and make it not available to bring it up. AtoZManuals is a Browser Extension developed by MindSpark Inc. This extension offers users an easy way to search Customer Manuals for Products. This extension may seem handy at first, however, this extension hijacks your browser home page, and changes your default search engine to MyWay.
While browsing the internet with this extension you will see additional ads, sponsored links, and pop-up ads in your browser. Additionally, this extension monitors your browser activity, including search words, visited links, shopping information, and sometimes even personal information, which is later used to display better-targeted ads.
Multiple anti-virus scanners have marked this extension as a Browser Hijacker, and due to its rogue behavior, it is not recommended to keep it on your computer.