The best Antivirus software of 2021

We have often talked about the security of your computer, we have been giving you tips and tried to explain how to best protect your computer from various attacks and malicious software. Today we will be talking about antivirus applications.

antivirusAntivirus software has become the kind of a must-have in every computer in this day and age. When you think about it, our systems are connected to the internet most of the time if not always, and therefore kind placed in from the line of various cyber-attacks. Here antivirus software comes into focus, especially because it has evolved long from just a simple virus removal tool to full security suites.

We will be going through the best of these applications in order to present both their good and bad sides and hope that we will help you in picking the right one for you. Remember, picking either one of the presented solutions is way better than not having one at all. The list is made from best down in our opinion so number one is highly recommended.

List of Best antivirus applications of 2021

  1. BitDefender

    In our opinion the best overall security protection suite for this age and time. Bitdefender has cemented itself as number one a few years back and it holds that status even today. It has top-of-the-game virus protection, an incredible amount of features, safepay banking online protection and it is amazingly cheap. Its downside we could say is that it can be annoying sometimes, especially if you set it to maximum protection and paranoid mode. In this case, it will often ask what to do and how to behave leading to minor annoyances.

  2. Norton antivirus

    Norton antivirus is well known to older computer users, this package has been around a long time and it is our pick for closest one to challenge top place because of its packed features. The number of features it has are really stunning and it comes also with great and maybe best-browsing protection of all candidates. It also has a backup tool bundled with it but the reason why it is in the second place is that it is taxing to the system and can have a real impact on computer performance. Great protection is important, but so it is working on it without slowdowns.

  3. Kaspersky

    Another one of the old antivirus software on the list. Kaspersky Lab was once top tier antivirus software but it dropped down due to its high prices, later they have changed their pricing to be more in trend with other rival companies but many have switched to something else. Today it still packs one of the best antivirus engines with fast and configurable scans. It also has very impressive anti-ransomware features but sadly most of the things it just simply does for you leaving you to fully trust it since you cannot really configure much. It is not in step with new technologies and it is lacking some features like support for the Chrome browser that places it lower in our ranking.

  4. Trend Micro antivirus

    The biggest sell point for this antivirus application is probably its ease of use and user-friendliness. It also packs a great antivirus engine and impressive anti-ransomware performance but sadly it comes with very limited configurability and somewhat lack of features comparing it with the top three entries. Never the less a very user-friendly application that you can configure without knowing any kind of tech talk, everything is laid out in simple English.

  5. Avira

    Perhaps best known for its free version, Avira has a premium one that is well better worth than the free version. Strong suites of this software are mostly aimed at the internet with its great anti-phishing and web protection along with a low price for all of its features. Sadly in the domain of virus protection, there are some reports from independent websites that its antivirus engine is not so great, it will offer you moderate protection but not the best.

  6. Webroot Secure Anywhere

    If you are on the lookout for software that has a great virus database and plenty of features but is also incredibly light weighted and fast then look no further, Webroot Secure Anywhere is an application for you, incredibly fast and incredibly small is a great solution for older machines. It keeps all of its databases up in the cloud and this feature among its great advantages is also its greatest disadvantage since if you are out of the internet you will not be able to have the latest virus definitions available to you making this tool very situational.

  7. Avast

    Avast has many great protection features and it is very highly configurable. The firewall comes also in its premium edition and it offers great virus protection including a file shredder and awesome WI-FI inspector for an extra layer of security. This package would be higher on the list if it was not for its lack of WEB protection and its tool on the system resources.

  8. Sophos home antivirus

    Lack of features and somewhat strange user interface are downsides of this software but on its positive side it has good antivirus engine and its user interface is very friendly. Where it shines though is in its price, for one affordable price you get protection for 10 devices making this option a great choice for anyone wanting to protect more devices or just use a single license for the whole family.

  9. ESET antivirus

    Greatly configurable antivirus software with tons of options and very light on system resources makes ESET one of the best out there. Virus engine and database is also top tier but some testing labs have reported that protection offering is not really what it is advertised and if we talk about its strong suite of a great many options and configurations it is at the same moment its downside since it is not very friendly to novice and beginner users.

  10. McAfee antivirus

    McAfee antivirus comes in its package with unlimited VPN service and if we take look at the top tier pricing plan it is a great investment. Sadly for its entry-level price, it covers only a single device and it was reported that it packs little outdated virus engine if we compare it with its rivals. Nevertheless, it still offers good virus protection and if you take into account the VPN that comes with it, it can find its users.

Conclusion

No matter which antivirus you choose you will not go wrong, after all any protection is way better than none.

Do You Need Help with Your Device?

Our Team of Experts May Help
Troubleshoot.Tech Experts are There for You!
Replace damaged files
Restore performance
Free disk space
Remove Malware
Protects WEB browser
Remove Viruses
Stop PC freezing
GET HELP
Troubleshoot.Tech experts work with all versions of Microsoft Windows including Windows 11, with Android, Mac, and more.

Share this article:

You might also like

Desktop widgets in Windows 10
Windows 7 was an operating system that had one thing which no other Windows had, even today. Official Microsoft desktop widgets. With an attractive design, users loved to exploit the adequacy and neatness of these gadgets. However, Microsoft had to discontinue these gadgets as they posed a serious security threat to the Operating System. It was believed that a potential attacker could even use a gadget to take complete control of your PC. With Windows 10, things have changed big time. You have all the fantastic apps and live tiles at your disposal providing a more native experience. Despite all this, if you still have a fondness for fancy gadgets, we have just the right tool for you to get started with similar “Widgets” on Windows 10. Win10 Widgets is a tool that places the most important information right in front of you, on your desktop.

Win10 Widgets

Win10 Widgets is a desktop app package provided by Rainmeter which is an effective system customization engine for Windows. It brings some informative widgets to Windows 10 which look almost native with their intuitive and sleek design. You can pin them on your desktop to keep an eye on various system figures like CPU usage, data storage, battery usage, detailed computer performance, etc.

Native looking Widgets for Windows 10

These widgets are designed in such a way that it looks totally indigenous to the Windows 10 UI. With a similar design language, visual style, accent color, and even font settings, these widgets almost look like an inseparable system component. You can choose between different size variants to pin on your desktop and arrange them in an orderly fashion to make the most of it.

Highly customizable desktop gadgets

Apart from the default size variants, you can configure several other parameters pertaining to the look and appearance of any widget. As Rainmeter is an open-source program, you are provided with the .ini configuration files which you can customize as per your wish. You can make adjustments to the widget coordinates, position and transparency as well. You can even create your own skins (.rmskin package) using the built-in Skin Packager and publish them for general usage through Rainmeter.

Illustro Skins

Over and above the cool widgets, Rainmeter also contains Illustro, a simple collection of skins that shows the range of Rainmeter’s capabilities. You can load the skins on your desktop for a brief look at your system internals. You can also start editing these skins to make them yours by taking advantage of the Rainmeter manual and forum link provided on the Welcome screen. Win10 Widgets is a great tool if you like widgets or gadgets on your Desktop. It blends into the background and puts the important piece of information right on your desktop without you having to look somewhere else. If you already have the Rainmeter application, you can download the Win10 Widgets .rmskin file from here, else you can download the combined bundle for both Rainmeter and Win10 Widgets from here.
Read More
Communication with service process failed
The Intel Driver and Support Assistant automatically identifies, finds, and installs drivers in a computer and is pre-installed in newer Intel-supported systems. If you are using one of those newer Intel supported systems but encountered an error that says, “Communication with service process failed, Tray cannot start” when you launch a program, read on as this post will guide you in fixing this problem. This kind of issue in Intel supported system could be due to some third party application that’s meant to update drivers could be interfering. It is also possible that the Intel Driver and Support Assistant application is corrupted. Whatever the cause may be, here are some suggestions you have to check out to resolve the problem.

Option 1 – Try to uninstall all the third party driver update applications

One of the reasons why some users install third-party driver update software is that it is kind of tiresome to update each one of the drivers manually. However, as tiresome as it might be, it is still better than using a third-party driver update application as these kinds of applications could mess up the drivers, and the Intel Driver and Support Assistant is still much better. To fix the error, you have to uninstall the previously installed third-party driver update application on your computer.
  • Tap the Win + R keys to open the Run dialog box
  • Then type “appwiz.cpl” in the field and hit Enter to open the Programs and Features in Control Panel.
  • From there, look for the third-party driver update application you are using, select it and then click on Uninstall to remove it.
  • After that, restart your computer and try to install the latest version of the program again. It should work now. If not, proceed to the next available option below.

Option 2 – Try to disable the DSATray in Startup

Another thing about the “Communication with service process failed, Tray cannot start” error is that it keeps on popping up each time you boot your computer. And so to resolve this bug, you can just disable the DSATray from Startup. How? Refer to these steps:
  • Tap the Ctrl + Alt + Del to pull up the Security options window.
  • From there, select the option to open the Task Manager.
  • Once you’re in the Task Manager, go to the Startup tab and look for “DSATray” and right-click on it and then select the Disable option.
  • Now restart your computer and you should be good to go.

Option 3 – Try to reinstall the Intel Driver and Support Assistant

If the Intel Driver and Support Assistant is corrupted, you need to uninstall it from your computer. All you have to do is go to Programs and Features like what you did in the first option to uninstall the program. Once you’ve uninstalled it, download the newer or latest version of the Intel Driver and Support Assistant from the official site of Intel and then install it.
Read More
How to Resolve HP Printer Spooler Not Running Error

HP Printer Spooler Not Running - What is it?

If you have the HP printer, then you may come across this error. HP Printer Spooler not running errors does not mean there is anything wrong with your printer. It indicates printer driver issues.

Solution

Restoro box imageError Causes

There can be multiple causes behind the HP printer Spooler not running error code such as:
  • The poor or unsuccessful printer driver installation
  • Invalid registry entries
Though this is not a critical error code as it does not pose serious damage threats to your PC, however, it is advisable to resolve it as it can cause you a great deal of inconvenience especially if you want to take out printouts every now and then.

Further Information and Manual Repair

Here are some ways you can try to resolve HP Printer Spooler Not Running Error on your system: 1. Reinstall the HP Printer driver on Your System
  • Simply go to the control panel and then click on the Device Manager option
  • Once you click it you will see details pane with a list of devices. Now simply click on the printer, to reinstall the driver software.
  • Double click on it to open the properties dialog box
  • After that click on the driver tab and then click update driver
Once you update the driver, try using the Printer to see if it works. Sometimes you may come across a pop-up displaying the following message: ‘Driver installed correctly, Device is ready to use however, you may not see the printer under the printer’s pane. This triggers registry issues. 2. To resolve registry issues, install Restoro on your system. This is a highly functional registry cleaner integrated with a powerful antivirus. It helps resolve registry issues, malware, and guarantees system optimization. This feature-filled tool is the answer to all your PC-related issues. Restoro is a next-generation PC repair software that extends outstanding usability and helps PC users resolve errors efficiently. Its simple navigation and user-friendly interface make it so easy to use that even novice users can also work around it and repair issues without any hassle or difficulty. It’s a smart and intuitive in-built registry cleaner that wipes out all the unnecessary and obsolete files on your hard disk. This includes junk files, internet history, invalid registry keys, and files from the uninstalled old program versions. Sometimes the files from the uninstalled programs hamper your ability to update new program versions thus leading to unsuccessful driver installation. Nonetheless, all such files are removed in seconds with this helper and you are then ready to reinstall the driver. This registry cleaner cleans the clutter from your hard disk and optimizes your system's speed, lowering your PC boot time significantly. Total System Care can be used on all Windows versions To fix the HP printer spooler not running error on your computer, simply click here to install Restoro. Run it to scan for the error and fix it in seconds. Once the issue is resolved, update the printer driver. You’ll see the driver will be updated successfully and the HP printer will also appear in the printer’s panel. By installing Restoro on your system, you can also resolve several other issues like privacy errors triggered by malware and virus infections. With this tool, you will not have to download and run a separate anti-virus on your system.
Read More
Expand right-click menu in Windows 11
Windows 11 brought with it a simplified right-click menu that has limited options. If you would like to bring the old Windows 10 right-click menu you will have to do some registry tweaking but it is doable. right click menuSince this requires registry tweak, please follow given solution step by step
  1. Press Start and type RegEdit
  2. Click on Registry Editor
  3. Inside registry editor find next key: Computer\H_KEY_CURRENT_USER\SOFTWARE\CLASSES\CLSID\
  4. Right click in the right part of editor window and select New > Key
  5. Type in as a name: {86ca1aa0-34aa-4e8b-a509-50c905bae2a2}
  6. Right click on {86ca1aa0-34aa-4e8b-a509-50c905bae2a2} key and select New > Key again to create new key inside this one
  7. Name inside key InprocServer32
  8. Double click the “(Default)” key in InprocServer32 to open it
  9. When the Default key opens close it without making any changes by clicking on OK. This will make its value property Blank instead of value not set
  10. Close Registry Editor
  11. Restart your PC
Once the system is up if the followed solution is applied you will now have an old school menu once right-click is used.
Read More
Fix ERR TUNNEL CONNECTION FAILED error
One of the errors you can encounter while browsing the web using your Google Chrome browser is the ERR_TUNNEL_CONNECTION_FAILED error. If you happen to encounter this error, then this post could help you resolve it. This kind of error in Chrome can occur due to incorrect website domain configuration, conflicting browser data, incorrect proxy settings, and DNS connection issues. To resolve the ERR_TUNNEL_CONNECTION_FAILED error in Chrome, here are some suggestions you can check out.

Option 1 – Try disabling the proxy server for your LAN

If your PC was just attacked by some adware or malware as of late, it is possible that it has changed the network settings in the system and might display spam advertisements. Thus, you have to disable the proxy server for your LAN. To do that, refer to these steps:
  • Tap the Win + R keys to open the Run dialog box.
  • Then type “inetcpl.cpl” in the field and hit Enter to pull up the Internet Properties.
  • After that, go to the Connections tab and select the LAN settings.
  • From there. Uncheck the “Use a Proxy Server” option for your LAN and then make sure that the “Automatically detect settings” option is checked.
  • Now click the OK and the Apply buttons.
  • Restart your PC.
Note: If you are using a third-party proxy service, you have to disable it.

Option 2 – Try to reset Winsock, TCP/IP & Flush DNS

Resetting Winsock, TCP/IP, and flushing DNS might help you resolve the ERR_TUNNEL_CONNECTION_FAILED error. To do so, follow these steps:
  • Right-click on the Start button and click on Command Prompt (administrator) so you can pull up an elevated Command Prompt.
  • After that, execute each one of the commands listed below. And after you typed in one after the other, you have to hit Enter.
  1. netsh winsock reset – type in this command to reset Winsock
  2. netsh int ip reset resettcpip.txt – type in this command to reset TCP/IP
  3. ipconfig /flushdns – type in this command to flush the DNS cache
  • Next, restart your PC and check if the problem’s fixed.

Option 3 – Try using a VPN connection

There are instances when the network that your computer is logged on might have blocked your access to the website you are trying to open and so to fix it, you can try to use a VPN connection. Once you’ve connected using VPN, try to open the website again and see if you can now access it.

Option 4 – Try clearing browser data

There are times when some data in the browser is conflicting with the loading of the website and triggers errors like ERR_TUNNEL_CONNECTION_FAILED. And so you can try to clear your browser’s data. This might be a very basic solution but oftentimes it works in fixing this kind of error in Google Chrome. Follow the steps below to clear the data in your browser.
  • Open your Google Chrome browser.
  • After that, tap the Ctrl + H keys. Doing so will open a new panel that allows you to delete the browsing history and other data in your browser.
  • Now select every checkbox that you see and click on the Clear browsing data button.
  • Then restart your Chrome browser and check if you can now open any website or not.

Option 5 – Get rid of any conflicting browser extensions

  • Open Chrome and press Alt + F keys.
  • Go to More tools and click Extensions to look for any suspicious browser extensions or toolbars.
  • Click the Recycle bin and select Remove.
  • Restart Chrome and press Alt + F keys again.
  • Proceed to On Startup and mark Open a specific page or set of pages.
  • To check if the browser hijacker is still active, click Set pages, if it is active, overwrite the URL.
Note: If removing the browser extensions or toolbars didn’t work, you can also try to reset your Google Chrome browser.
  • Open Google Chrome, then tap the Alt + F keys.
  • After that, click on Settings.
  • Next, scroll down until you see the Advanced option, once you see it, click on it.
  • After clicking the Advanced option, go to the “Restore and clean up option and click on the “Restore settings to their original defaults” option to reset Google Chrome.
  • Now restart Google Chrome.
Read More
How to Fix Windows 10 Error 0x8000ffff

Error Code 0x8000ffff - What is it?

Error Code 0x8000ffff is an error that is often experienced while attempting to install updates on a Windows machine. It has been found in Windows 10, although the error has been present in the Windows operating systems dating back to Windows Vista.

Common symptoms include:

  • Inability to download updates for the operating system
  • Inability to successfully run updates for the operating system through to completion

There are several basic Windows tools that can be used to attempt to resolve Error Code 0x8000ffff on your machine. While some of these tools may be familiar for basic users, others may require advanced competency in order to be used correctly. If you are unsure of your ability to complete the methods listed below in order to resolve this error code on your system, you may need to get in touch with a computer repair technician who is competent in dealing with Windows Update repairs.

Solution

Restoro box imageError Causes

The most common cause of Error Code 0x8000ffff is that there is a problem within one of the system files or the registry entries on the computer. There are a number of reasons why a device could have an error in these places, from conflicting software commands to updates that were not installed correctly, to bugs within the system, to viruses or malware that have corrupted the necessary files.

Further Information and Manual Repair

There are several common ways that users can attempt to resolve the appearance of Error Code 0x8000ffff on their Windows devices. If you are not sure that you can follow these steps through to completion, you would be well advised to get in touch with a qualified computer repair technician to help you to finish out the repair process.

Here are the best methods to resolve Error Code 0x8000ffff on your Windows machine:

Method One:  Restart Your Computer

It may sound obvious, but one of the most effective ways to resolve Error Code 0x8000ffff on your machine is to simply reboot your computer. In some cases, the error shows up because there are processes that the system believes are still running when they really aren’t. Restarting your machine also allows your system to apply any previous changes that have been made and to mark any installations that have been undertaken as being complete.

Reattempt your update installations after you have restarted your computer to see if you are able to finish them out successfully.

Method Two:  Run the Windows Registry Repair Tool

The Windows Registry Repair tool is an asset that can make it easy for your system to scan for potential problems in the registry and notify you as to their status. In many cases, the Registry Repair tool can fix the problems that it finds all on its own, although in some cases, you may receive a message that states an error was found that could not be resolved through the program.

The simplest way to access the Windows Registry Repair tool is to do a search for it within the search bar in the Start menu. Once you begin to run the Registry Repair tool, it can take a while to complete its scan, so be prepared to wait for some time once you start it.

Once the tool has completed its scan of your system, it’s always a good idea to reboot your computer so that all of the changes that have been made to the system can be applied successfully to the operating system.

Method Three:  Run the Windows Fix It Tool

Another great tool to help in the resolution is the Windows Fix It tool. You can download it directly from the Microsoft website. Once you run it, it will complete a scan of your system to find any potential hang-ups and to attempt to resolve them. After you run the scan, it is a good idea to reboot your computer to allow all changes to be recognized and applied properly.

Method Four: Use An Automated Tool

If you wish to always have at your disposal a utility tool to fix these Windows 10 and other related issues when they do arise, download and install a powerful automated tool.
Read More
Open specific pages each time Chrome starts
When we are working on our computer, we have tendencies to make it look and behave to our best needs and however, best suits us. The Internet has crawled into our lives and made itself a must-have in modern society, internet browsers as a crucial piece of software for viewing the web have also grown and made themselves to be more open for user settings and personalization, Chrome, one of the most popular browser has the option to open a specific set of pages one it is opened and that is what we will cover today in this tutorial. No matter would you like to by default open some online store, maybe an email or news website, you can open each of them or all of them once Chrome is run, making your daily routine more enjoyable and stress-free. The first thing, of course, is to start Chrome itself, once Chrome is up, click on three dots in the upper right corner of the Chrome window and select settings. Google chrome settingsWhen you are in settings, on the left side move toward the bottom until you run into a tab that says On Startup and click on it. On right, a new section will open, click on Open a specific page or set of pages. Chrome startup pages
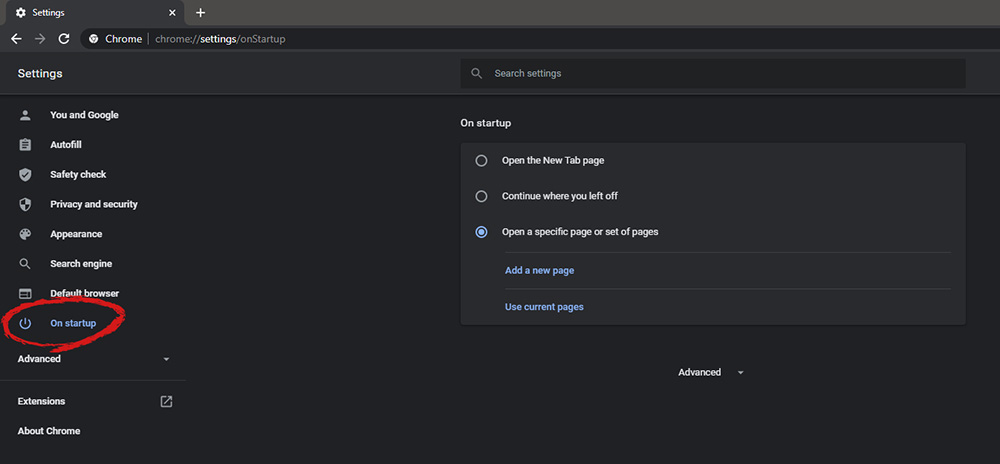
You will be presented with the option to add a new page by typing its URL or getting it from bookmarks or using a specific opened one. You can repeat this process until you have added all pages that you wish to be automatically opened once Chrome is opened for the first time.

BONUS:

If you have noticed right above the setting that we have used for opening a specific set of pages there is the option Continue where you left off, this option will open each page exactly where it was when Chrome was shut down letting you keep viewing where you have left off. This is useful if by any chance your battery ran out or you had to quickly turn the computer off for whatever reason.
Read More
Install Remote Server Administration Tools
RSAT or Remote Server Administration Tools for Windows 10 is a collection of programs for IT experts. It helps in managing Servers from a Windows 10 PC and starting with the Windows 10 v1809 or the October 2018 update, users have to install the Remote Server Administration Tools for Windows 10 as Features on Demand or as Optional Features. The program includes the Microsoft Management Console or MMC snap-ins, Server Manager, consoles, Windows PowerShell cmdlets, and providers as well as command-line tools for managing roles and features that run on the Windows Server. So if you have updated your Windows 10 pc to v1809 or later then the RSAT tool has to be installed as a set of Features on Demand right from Windows 10. You can install RSAT Tools on Windows 10 Enterprise or Windows 10 Professional and once you install it, make sure that you do not install RSAT tools from the Microsoft Download page directly. Step 1: Open Settings and then go to Apps > Apps & Features. Step 2: Next, click on Manage Optional Features. Step 3: After that, click on Add a Feature which will load all the optional features one can install. Step 4: Now scroll to find the listing of all 18 RSAT tools and depending on what you need, click and install them. Step 5: Then go back to where you should see the progress of the installation. Click on the Manage Optional Features page to check the status. Note: If you are well-versed with the command line or automation, you can also install Remote Server Administration Tools for Windows 10 via DISM /add-capability. And when you install anything via Features on Demand, they stay across Windows 10 version upgrades. On the other hand, if you feel that you don’t need a particular RSAT feature, you have the option to uninstall it using the Manage Option Features. However, bear in mind that some tools depend on one another which means that if you uninstall anything that has a dependency, it will only fail that’s why you need to be careful.

To uninstall an RSAT feature, here’s what you have to do:

Step 1: Go to Settings > Apps > Manage Optional Features. Step 2: After that, look for the list of installed feature that appears before this. Step 3: Now select the feature you want to uninstall and go back. If you have some system-related issues that need to get fixed, there is a one-click solution known as [product-name] you could check out to resolve them. This program is a useful and efficient tool that could repair corrupted registries and optimize your PC’s overall performance. Aside from that, it also cleans out your computer for any junk or corrupted files that help you eliminate any unwanted files from your system. This is basically a solution that’s within your grasp with just a click. It’s easy to use as it is user-friendly. For the complete set of instructions in downloading and using it, refer to the steps below.
Read More
Windows computer shuts down instead of Sleep
As you know the Windows 10 operating system is has a lot of features and some of them are related to turning off your computer in different ways in order to save power at different levels. These particular features are Shut down, Restart, Hibernate, and Sleep. However, there are times when you might encounter some issues when using any of the aforementioned features. One of these issues is when your computer shuts down instead of going to Sleep. This issue could be caused by several factors including a bug related to the Intel Management Engine Interface or IMEI driver as well as any misconfiguration in the power settings of the BIOS or UEFI. If your computer is going through this problem, read on as this post will guide you in fixing it. There are several potential fixes you can try to fix the problem. You can try to check the Sleep Advanced Settings or run the built-in Power troubleshooter or run the Power Efficiency Diagnostic Report. In addition, you can also try to troubleshoot the problem in a Clean Boot State or reset or update the BIOS.

Option 1 – Check the Sleep Advanced Settings

  • Click on the Windows key and type “control panel” in the field and select the related search result.
  • Next, select the Security and Maintenance option and click on the Power Options.
  • After that, you have to select the Change Plan Settings but keep in mind that this option is barely readable so you need to read each option carefully.
  • Now click on the Change advanced power settings button and a new window will appear.
  • Then look for the “Sleep” option and expand it. Make sure that the “Allow hybrid sleep” option is on.
  • Reboot your computer and check if your computer now functions properly. If it still didn’t work, you may have to reverse the changes you’ve made.

Option 2 – Try to run the Power troubleshooter

The next thing you can do is to run the Power troubleshooter. To do so, follow these steps:
  • Go to Settings and navigate to Update & Security > Troubleshoot.
  • After that, look for the “Power” option from the given list of built-in troubleshooters and click on it.
  • Next, click on the “Run the troubleshooter” button to run the Power troubleshooter.
  • Once the troubleshooter is done identifying the problems, follow the next on-screen instructions to resolve the problem.

Option 3 – Troubleshoot Sleep Mode issue in a Clean Boot State

The issue with Sleep Mode might be caused by some third-party programs installed on your computer. This program might be the one that puts your computer to sleep and so to isolate this possibility, you have to put your PC in a Clean Boot State using the steps below.
  • Log onto your PC as an administrator.
  • Type in MSConfig in the Start Search to open the System Configuration utility.
  • From there, go to the General tab and click “Selective startup”.
  • Clear the “Load Startup items” check box and make sure that the “Load System Services” and “Use Original boot configuration” options are checked.
  • Next, click the Services tab and select the “Hide All Microsoft Services” check box.
  • Click Disable all.
  • Click on Apply/OK and restart your PC. (This will put your PC into a Clean Boot State. And configure Windows to use the usual startup, just simply undo the changes.)
  • After that, try to put your computer to sleep again.

Option 4 – Try to run the Power Efficiency Diagnostics Report

You could also try to run the Power Efficiency Diagnostics Report to fix the problem. This tool is helpful and will help you analyze the status of the battery but note that this can be quite overwhelming especially if you’re not well-versed in this matter.

Option 5 – Try to update the BIOS

Updating the BIOS can help you fix the ATTEMPTED_WRITE_TO_READONLY_MEMORY BSOD error but as you know, BIOS is a sensitive part of a computer. Even though it is a software component, the functioning of the hardware depends on it largely. Thus, you must be careful when modifying something in the BIOS. So if you don’t know much about it, it’s best if you skip on this option and try the other ones instead. However, if you are well-versed in navigating the BIOS, then follow the steps below.
  • Tap the Win + R keys to open the Run dialog box.
  • Next, type “msinfo32” in the field and press Enter to open System Information.
  • From there, you should find a search field on the bottom where you have to search for the BIOS version and then press Enter.
  • After that, you should see the developer and version of the BIOS installed on your PC.
  • Go to your manufacturer’s website and then download the latest version of BIOS on your computer.
  • If you are using a laptop, make sure that you keep it plugged in until you have updated the BIOS.
  • Now double click on the downloaded file and install the new BIOS version on your computer.
  • Now restart your computer to apply the changes made.
Note: If updating the BIOS didn’t help, you might want to consider resetting it instead.
Read More
Fix 0x8000ffff error in Windows 11
Error 0x8000ffff prevents you from using the Microsoft store. Altho it is not a critical error that will break Windows, it is annoying enough that will require fixing so we can use the store once again and install apps when we want to. Interesting thing is that this error was present inside Windows 10 as well causing some annoyance, you think Microsoft would learn, and then you see reality. Anyway, we have not come here to bash Microsoft, we came to solve errors. 0x8000ffff errorSo there are several problems that can cause this error like issues with accessing the Microsoft servers, corrupt system files, settings being misconfigured, malware infections, or conflicting applications. We will cover all solutions for each scenario taking approaches from most simple solutions to more complex ones. Follow the guide and let's fix this annoyance.

Wait for Microsoft's servers to become accessible

Yes, just wait. If the problem is tied to Microsoft servers having heavy load or being temporarily down there is not much you can do except for their tech team to resolve the issue. Go to Twitter or Facebook and check the Microsoft page to see if anyone else has this issue, if several people are reporting the same error then it is due to server problems. In this case, the only thing you can do is to wait.

Run troubleshooter

If servers are working fine then the issue is within your system so let's get down to fixing. Most simple and easiest solution is to let Windows try and resolve the problem by itself. We will use troubleshooter for this, Windows's integrated fixing solution: Press ⊞ WINDOWS + I to open the settings app Click on System in the left panel, then on Troubleshoot on the right Click on Other troubleshooters In most Frequent section find Windows Update and click on the Run button Wait for the troubleshooter to finish and follow on-screen instructions

Clear Store cache

If the troubleshooter has not found the issue or was unable to repair it, the next step is cleaning the Microsoft store cache in order to eliminate corrupted or partial cache files. Press ⊞ WINDOWS + R to open the run dialog In run dialog type in: wsreset and press OK or press ENTER A black screen will appear and it will not give any kind of feedback about progress, so it might seem like Windows has frozen, but do not panic nor try to do anything, this kind of behavior is normal, just wait for the process to finish and once it is done Microsoft store will launch with the cleared cache.

Disable Proxy

Proxy setting can interfere with establishing a connection to the store servers and if previous solutions have not worked we will check proxy next. Press ⊞ WINDOWS + R to open the run dialog Inside run dialog type: inetcpl.cpl and hit ENTER or press OK button Inside Internet Properties click on the Connections tab and then on LAN settings Uncheck the box next to Use a proxy server for your LAN and click on OK

Turn off antivirus

If nothing worked so far, turn off your anti-virus software, there is a slight possibility that your antivirus is misconfigured or preventing the system from accessing the store. Turn off antivirus and firewall to make sure that this is not an issue.

Delete the software distribution folder

So, we have tried a lot of things, and the error still persists? Let's then go to the next step and delete the software distribution folder in order to be remade new so we can eliminate corruption in the folder itself. To do this follow the guide: Press ⊞ WINDOWS + S to open the search menu Inside search type in Windows terminal, right-click on the terminal and click on Run as administrator. Confirm with YES on UAC prompt pop up Inside terminal press CTRL + SHIFT + 2 to open command prompt inside command prompt type in: net stop wuauserv and press ENTER Then type in: net stop bits followed with ENTER Next press ⊞ WINDOWS + R to open the run dialog Inside run dialog type in C:\Windows\SoftwareDistribution and press the OK button or ENTER File Explorer will open and you will find yourself inside SoftwareDistribution folder. Press CTRL + A to select all files inside Press on the delete icon or press DEL, confirm with YES Once all files are deleted, the system will redownload new ones.

Enable Cryptographic service

Windows 11 has come with a cryptographic service that aims to make your computer more secure but if the service is turned off it can be the cause of 0x8000ffff error. In order to turn this service back ON, follow the guide: Press ⊞ WINDOWS + R to open the run dialog In run dialog type in services.msc and press ENTER or click on the OK button In the list find Cryptographic Services and double click on it Inside properties click on Startup type dropdown menu and select Automatic from the list Click on the Start button to run service and then on the OK button to save the changes

Run SFC scan

SFC is an internal Windows tool for fixing corrupt system files, application will scan all system files and repair ones that are corrupted. To run an SFC scan do the following: Press ⊞ WINDOWS + S to open the search menu Inside search type in Windows terminal, right-click on the terminal and click on Run as administrator. Confirm with YES on UAC prompt pop up Inside terminal press CTRL + SHIFT + 2 to open command prompt inside command prompt type in: SFC /scannow and press ENTER Wait for the whole process to finish and reboot your system

Run DISM scan

Similar to SFC, DISM scan will scan your system Windows image and if required it will repair it. Press ⊞ WINDOWS + S to open the search menu Inside search type in Windows terminal, right-click on the terminal and click on Run as administrator. Confirm with YES on UAC prompt pop up Inside terminal press CTRL + SHIFT + 2 to open command prompt inside command prompt type in: DISM /Online /Cleanup-Image /RestoreHealth and press ENTER Wait for the whole process to finish and restart your computer
Read More
1 2 3 171
Logo
Copyright © 2023, ErrorTools. All Rights Reserved
Trademark: Microsoft Windows logos are registered trademarks of Microsoft. Disclaimer: ErrorTools.com is not affiliated with Microsoft, nor claims direct affiliation.
The information on this page is provided for information purposes only.
DMCA.com Protection Status