Afraid of the growing threats online? As you should be. But we’re here to show you what kinds of malware are out there and what you can do to keep them at bay.
Malware definition
Malware comes from the term malicious software. It’s software designed to attack and exploit devices and networks to the advantage of the hacker who made it.
Malware can be transmitted in different ways. Most commonly this happens via infected USB drives, downloadable files or malicious websites. Depending on the type and ultimate goal, the consequences of a malware attack can range from negligible to catastrophic.
Credit Ed Hardie on Unsplash
What kinds of malware are there?
1. Virus
A virus is typically spread via infected files, websites or links. It’s one of the oldest malware types and one of the most difficult to get rid of. That’s because, once activated, it replicates itself - hence the name.
It can perform different kinds of attacks, depending on what the creator wants to achieve. The main characteristic of a virus is that it really doesn’t show itself until you activate the host. So that’s a scary thought for sure.
2. Adware
Sometimes an ad blocker isn’t enough to fight off unwanted ads. And some of them can, unfortunately, be malicious. They may redirect you to infected sites or prompt downloads of risky files. Even just opening a malicious site can lead to data theft.
So, definitely be careful when clicking around. Even if an ad seems completely legitimate, you can never be too sure.
3. Ransomware
Through ransomware, cybercriminals gain access to a user’s data and use it to extort them for money. Basically, the user is threatened with data deletion or even exposure if a ransom isn’t paid by a specific deadline.
This is a particularly nerve-wracking type of malware. If it targets an individual, it preys upon their sense of anxiety, fear, guilt and even shame. If it targets a business (which is a lot more common), it preys upon not only that business’s profit but also every single one of their customers and their data.
4. Trojans
This type of malware disguises itself very well as a legitimate-looking program. Once you download it, hackers can get full access and control of your device, data and network. They can even be hidden in games, apps and attachments. They cannot self-replicate, though, so we guess that’s… good news?
5. Worms
Worms can replicate, just like viruses, but you don’t need to actually activate the infected program for them to get going. They can be used for various purposes, ranging from data deletion to file encryption to support a ransomware attack.
Credit Growtika on Unsplash
6. Spyware
Spyware refers to malicious software that stays hidden on your computer and monitors your activity. The best-known type is keyloggers. This can be used to steal sensitive data like passwords and banking information.
7. Rootkits
Rootkits are among the most dangerous types of malware. They allow administrative access and full control of a device, which lets hackers continue hijacking all your data and monitoring your activity without your knowledge.
8. Botnets
Botnets are networks made up of bots - computers that cybercriminals have infected with malicious software. Bots and botnets give hackers remote access to users’ devices and allow them to spy on your camera, take screenshots, memorize passwords and launch Distributed Denial of Service attacks. This one truly makes your hair stand on end.
What can you do about it?
You know the old adage - better safe than sorry. And trust us, malware attacks are such a pain in the you-know-what that you really don’t want to be sorry.
Luckily, there are simple solutions that can shield you from most digital threats these days. What you want to be looking at is a solid antivirus program. Well, technically, you need an antimalware program, but since the latter evolved from the former, we still mostly refer to them as antivirus software. The majority of antimalware programs these days don’t just shield you from potential risks online, but include additional features as well. For example, some Bitdefender antivirus packages also include parental control and a VPN. And Bitdefender is not just for PCs either - it offers protection for your beloved iPhone or Android as well. You can throw in a password manager in there too, for an additional layer of security.
Credit Dan Nelson on Unsplash
If you aren’t too concerned about all these various threats or feel like you don’t need extra security, you can at least take a step to protect your information from being exposed to lurking cybercriminals as you’re browsing. This can be done through a good VPN like Surfshark, which hides your identity in the digital space and prevents your data from being tracked.
Choosing the right protective software is especially important if you have children with access to the Internet, since they’re unfortunately even more vulnerable to malicious attacks. If you aren’t sure what the right kind of antimalware program is right for you, you can reach out to us and we’ll be happy to help keep your entire household or office digitally secure.
The bottom line
The truth is that there’s no way to be 100% protected in the online world. Hackers are constantly coming up with new ways to infiltrate our devices. But malware-battling software evolves along with them and there’s still plenty you can do to keep risks away. Stay safe!
If you always use the Google Chrome browser in browsing the internet, then you might have come across an error message saying, “He’s dead, Jim!” along with a funny looking face that’s peeking its tongue out and another detailed message saying, “Either Chrome Ran out of memory or process for the webpage has terminated for some other reason. To continue, reload the webpage or go to another page”.
This error message in Google Chrome is actually quite famous and it appears for various reasons but it may have something to do with a memory issue. The Google Chrome browser is known to consume a lot of memory and the more web pages you open and load, it takes up more resources. Thus, the first thing you need to do when you encounter this error is to simply click the Reload button to continue browsing the internet or close the browser and then open it again. On the other hand, if you keep seeing this error message, then that’s a whole different story as you have to take some action to prevent it from popping up again, for good. Follow the instructions given below to fix the error in Chrome.
Option 1 – Reduce Google Chrome’s memory usage
The first thing you can try is reducing the memory usage of the Chrome browser. However, this option has a bit of a disadvantage. If a website crashes, all the instances of that website will also crash although other open tabs and websites won’t be affected. This process is referred to as “Process-per-site” mode which you will have to launch Chrome within this parameter.
Option 2 – Run Google Chrome with Strict Site Isolation
Aside from reducing Chrome’s memory usage, you can also run the browser with the Strict Site Isolation which makes sure that the crashing of one tab in the browser won’t affect the entire Windows as this feature will run every website you open on its own isolated process.
Option 3 – Run the built-in Malware Scanner and Cleanup tool in Chrome
In case you don’t know, there is actually a built-in malware scanner and cleanup tool in Chrome that helps you get rid of any unwanted ads, pop-ups, and even malware, as well as unusual startup pages, toolbars, and other things that could affect the performance of the browser.
Option 4 – Reset Google Chrome
Resetting Chrome can also help you get rid of the “He’s dead, Jim!” error message for good. Resetting Chrome means restoring its default settings, disabling all the extensions, add-ons, and themes. Aside from that, the content settings will be reset as well and the cookies, cache, and site data will also be deleted. To reset Chrome, here’s what you have to do:
Open Google Chrome, then tap the Alt + F keys.
After that, click on Settings.
Next, scroll down until you see the Advanced option, once you see it, click on it.
After clicking the Advanced option, go to the “Restore and clean up the option and click on the “Restore settings to their original defaults” option to reset Google Chrome.
Now restart Google Chrome.
Option 5 – Perform a clean reinstall on the Chrome browser
Although reinstalling any program is easy, not so much for Google Chrome as you need to make sure that the User Data folder is deleted before you reinstall it.
Tap the Win + R keys to open the Run prompt.
Then type %LOCALAPPDATA%GoogleChromeUser Data in the field and hit Enter.
Next, rename the “Default” folder inside the path you were redirected to. For instance, you can rename it to “Default-old”.
After that, install the Chrome browser again.
Option 6 – Try to flush the DNS and reset the TCP/IP
There are instances when a network goes into haywire because of a bad DNS. Thus, a bad DNS might be the one that’s causing this headache so it’s time for you to reset the entire network to resolve the issue. To reset the network, here’s what you have to do:
Click the Start button and type in “command prompt” in the field.
From the search results that appear, right-click on Command Prompt and select the “Run as administrator” option.
After opening Command Prompt, you have to type each one of the commands listed below. Just make sure that after you type each command, you hit Enter
ipconfig /release
ipconfig /all
ipconfig /flushdns
ipconfig /renew
netsh int ip set dns
netsh winsock reset
After you key in the commands listed above, the DNS cache will be flushed and the Winsock, as well as the TCP/IP, will reset.
Now restart your computer and open Google Chrome then try opening the website you were trying to open earlier.
Note: You can also try changing the DNS server to the Google Server, i.e. 8.8.8.8, and then see if it works for you or not.
Option 7 – Disable both the antivirus and firewall temporarily
As you know, both the firewall and antivirus programs are there to protect the operating system from any malicious threats. So if they find that there is some malicious content in a website you are visiting, they will block the site right away. Thus, it could also be the reason why you’re getting the “He’s dead, Jim!” error so you need to disable both the firewall and antivirus program temporarily and then try opening the website again. If you are able to open the website, you need to add this site as an exception and then enable the firewall and antivirus program back.
Logitech announced the Logitech G CLOUD gaming handheld, somewhat of a STEAM Deck competitor. Somewhat, because the reason is that not like Deck this device is not packing huge power in order to run locally PC games, instead it is made with one goal in mind to connect to Cloud gaming and let you play games in that way.
The device is packed with a 7-inch display featuring 1080p resolution in a 16:9 ratio with a refresh rate of 60Hz, an analog thumbstick, a D-pad, 4 action buttons, and triggers. Inside the device beats Snapdragon 720G (CPU used in most Android phones), 4GB of LPDDR4X RAM & 64GB of internal storage. As seen hardware is way less impressive than one that is packed inside the STEAM deck but as stated this handheld is not meant to run natively PC games so this hardware will suffice for its purpose.
Logitech has partnered with both Nvidia and Microsoft to add GeForce now and Xbox Cloud Gaming access to its device. If you have an account on either one of these services you can fully use them on the Logitech G Cloud gaming handheld. You can also play some Android games via the Google play store but the main goal is Cloud gaming.
The price of 350$ USD is not very impressive since STEAM Deck which is a way more capable device is running for 400$ USD, for the difference of only 50$ USD Deck has an advantage, and the price itself is a hard point for selling and if we place into this mix som retro handhelds that go as low as 100$ USD Logitech is in an awkward position. Note that Nintendo Switch is 300$ USD.
D3dx9_43.dll is a type of dynamic link library. This is one of the many files contained in the DirectX software collection which is used to load and run most of the Windows PC based games and advanced graphics programs.
D3dx9_43.dll error message is displayed when any one of the Microsoft games fails to load.
The error message is displayed in either of the following formats:
“D3dx9_43.DLL Not Found""The file d3dx9_43.dll is missing""File d3dx9_43.dll not found""D3dx9_43.dll not found. Reinstalling might help fix this."
Solution
Error Causes
D3dx9_43.dll error may occur due to multiple reasons. These include:
D3dx9_43.dll files get corrupt or damaged
Missing Microsoft DirectX file
Viruses and malware on your system
Driver issues
Registry overloaded with invalid entries
If the D3dx9_43.dll error is not fixed timely, it not only causes you a great deal of inconvenience as it hampers your ability to play Microsoft games but since the underlying causes of the error are critical, it can result in serious PC damages like system failure, system crash, and data loss.
Therefore to avoid it, it is advisable to resolve the error code immediately.
Further Information and Manual Repair
Though this is a critical PC error but the good thing is that it is easy to resolve. To fix it, you don’t always have to pay hundreds of dollars to a professional technician or be technically sound.
Here are some of the best ways to repair and resolve D3dx9_43.dll error on your system:
Check the Recycle Bin
If you get the error message "The file d3dx9_43.dll is missing" then the best method to resolve this error from your system is to check your recycle bin.
The Microsoft Direct X file could be there especially if you recently uninstalled a gaming program.
Here’s why: dll files are shared by multiple programs. So, it is possible that the program you deleted from your PC also shared the same file to load and run.
And because of this reason, the file also got removed from your PC when you uninstalled that particular program. Therefore, check your recycle bin. If you find the d3dx9_43.dll in there, restore it and try running the desired Microsoft game again. See if it works.
Re-Download DirectX
Nonetheless, if you can’t relocate it, try installing the latest version of DirectX on your system. This can be done by downloading the DirectX End-User Runtimes Web Installer on your system from the official Microsoft website.
Update Your Drivers
If the error is related to video card driver, then it is advisable to update the driver. By updating the driver for your video card you can fix the D3dx9_43.dll error instantly.
Repair the Registry
Other reasons for the D3dx9_43.dll error could be corrupt and damaged dll files. It triggers registry issues and sometimes even malware infections.
DLL files often get corrupt when the registry overloads with too many files these include mostly unnecessary and obsolete files like junk files, cookies, temporary internet history, invalid and bad registry entries.
As the clutter and overload the registry, the important files like dynamic link libraries get damaged.
Here cleaning and restoring of the registry is the best way to resolve the error pop-ups like D3dx9_43.dll. You can repair the registry manually however, it is time consuming and somewhat technical. But if you are looking for a simple and a quick fix, then download Restoro.
Try Restoro.
Restoro is a next-generation and multi-functional PC repair tool. It is embedded with a variety of PC fixing and performance-boosting utilities all in one.
It includes a registry cleaner with an intuitive algorithm that detects all types of registry issues on your system and resolves them in seconds. It cleans the registry, restores the damaged D3dx9_43.dll files, and repairs the registry.
Furthermore, Restoro also includes utilities like an antivirus, Active X controls and class detector. With the help of the in-built antivirus you can scan for viruses and malware infecting your system and remove them right away.
It also functions as a system optimizer boosting the speed of your PC dramatically. It is safe, efficient, and compatible with all Windows versions.
Click here to download Restoro, resolve the D3dx9_43.dll error, and resume enjoying Microsoft games on your PC.
Code 18 is a typical Device Manager error code that occurs when the device driver is damaged. Device Manager is an important tool that allows Windows PC users to have an overall look at the connected hardware.
Furthermore, it also allows diagnostic testing. It is vital too and errors associated with the Device Manager such as error code 18 should and must be resolved quickly.
Error code 18 is usually presented in the following formats:
“The drivers for this device are not installed. (Code 18)”Or“Reinstall the drivers for this device.”
Solution
Error Causes
Error code 18 may be triggered due to several reasons such as:
Outdated drivers
Corrupted drivers
Improperly configured drivers
Error code 18 may cause a great deal of inconvenience. It may hamper your ability to use certain devices on your PC.
For example, if code 18 pops up due to a corrupted or improperly configured keyboard driver, then it may hamper your ability to use your keyboard and work on your PC.
Further Information and Manual Repair
The good news is that Device Manager error codes like error code 18 are easy to resolve. Below are some of the easiest and effective methods to repair error code 18 on your PC. Try one of these methods to repair error code 18 in no time:
Method 1 - Uninstall and Reinstall Device Drivers
One of the easiest ways to repair error code 18 and to ensure that this error doesn’t pop up on your PC again is to uninstall the problematic driver. For this, simply:
Now click on the device whose driver you want to uninstall.
Press right-click and then click on uninstall. Windows will prompt you to confirm the removal of the driver.
Click OK to confirm and then reboot your PC to activate changes.
Now scan for new hardware and follow the same process to reinstall the uninstalled device driver.
Method 2 - Update Drivers Automatically
Finding problematic drivers and then updating them individually can be frustrating and a time-consuming process. It can take a lot of time to perform updates and resolve the error code on your PC.
If you have projects to work on with pressing deadlines, then updating drivers on your PC separately can cause you a great deal of inconvenience and waste your precious time.
However, to avoid this situation, we advise you to set your drivers to update automatically. Automatic update installation requires only a few seconds.
And to update drivers automatically, it is recommended you download DriverFIX.
As the name suggests, this software is designed to assist programmers to upgrade device drivers automatically. In just a few clicks, you can update all your outdated drivers and repair error code 18.
DriverFIX is easy to use and an advanced program that is smoothly integrated with an intelligent programming system. This system identifies and detects all the problematic drivers on your PC and then updates each driver automatically to their latest versions.
It continues to update drivers regularly ensuring that you never come across device driver problems on your system.
Click here to download DriverFIX and repair error code 18 today!
If you encounter the NMI_HARDWARE_FAILURE Blue Screen error while using your Windows 10 computer, then read on as this post will guide you in resolving this kind of Blue Screen of Death error.
NMI HARDWARE FAILURE or “Non-Maskable Interrupt” Blue Screen error occurs when there is some hardware malfunction in your computer. When you encounter this Blue Screen error, you may get a stop code of 0x00000080 which can randomly occur while you use your computer. However, a lot of users reported encountering this error while they were trying to update or install their Graphics Card drivers.
The stop code that you may get for this BSOD error is 0x00000080. The error can occur randomly during your usage of the computer – but a large number of users have reported this error while they are updating or installing their Graphics Card drivers. In this post, we will be covering all the possible fixes for this error.
NMI_HARDWARE_FAILURE error on Windows
The NMI_HARDWARE_FAILURE bug check has a value of 0x00000080. This bug check indicates that a hardware malfunction has occurred. There are various hardware malfunctions that can cause this kind of Blue Screen error. However, pinpointing the exact cause is quite difficult. Worry no more for the following fixes provided below can help you resolve the NMI_HARDWARE_FAILURE Blue Screen error no matter what the cause of the problem is.
Option 1 – Try removing hardware or drivers that you’ve installed recently
If you have recently installed some hardware or drivers, you might want to disable or remove them since external devices are proven to be one of the factors that trigger Blue Screen errors like NMI_HARDWARE_FAILURE. All you have to do is physically disconnect any external devices that are connected to your computer and then check if it fixes the BSOD error or not.
Option 2 – Try to rollback, update, or disable the Graphics card drivers
Since the NMI_HARDWARE_FAILURE Blue Screen error has something to do with Graphics card drivers, you can either roll back, update or disable them depending on your preference in order to resolve the error.
First, boot your computer into Safe Mode.
After that, tap the Win + R keys to launch Run.
Type in devmgmt.msc into the box and tap Enter or click OK to open the Device Manager.
After that, a list of device drivers will be displayed. From there, look for the Display Adapters and click on them.
After that, right-click on each entry under the Display Adapters and select the “Uninstall Device” option from the menu.
Now restart your computer.
After restarting your computer, go to the Settings app and Check for Updates in the Windows Update section.
Note: You also have the option to go directly to the website of your graphics card manufacturers like NVIDIA, Intel, or AMD and go to the section called Drivers then check if there’s a new available update – if there is, download and install it.
Option 3 – Make sure that all memory modules have the same type
This third option is quite technical and tricky. If you often use multiple physical RAMS on your Windows 10 computer, then you have to check first if they are of the same frequency. After that, the first thing you should verify is if the chip is properly compatible or not. And if the sockets are attached using some kind of adapter or non-recommended device, it could cause some issues while giving a performance hit to your computer. If you were able to find such a setup, you have to undo it or install the proper and recommended as well as compatible hardware.
Option 4 – Try to run the Blue Screen Troubleshooter
As you know, the Blue Screen troubleshooter is a built-in tool in Windows 10 that helps users in fixing BSOD errors like the NMI_HARDWARE_FAILURE error. It can be found on the Settings Troubleshooters page. To use it, refer to these steps:
Tap the Win + I keys to open the Settings panel.
Then go to Update & Security > Troubleshoot.
From there, look for the option called “Blue Screen” on your right-hand side and then click the “Run the troubleshooter” button to run the Blue Screen Troubleshooter and then follow the next on-screen options. Note that you might have to boot your PC into Safe Mode.
If you’ve been experiencing a 0x0000007E error code pop message on your PC frequently then you need to get it fixed before it causes serious damage to your system. 0x0000007E is a Stop error or Blue Screen of Death error code.
This error message turns your computer screen blue and locks you out of the program running on your computer. It freezes your system and hampers your ability to perform any type of task on your PC.
Solution
Error Causes
Error 0x0000007E, a blue screen of death error triggers registry issues. It’s not easy to narrow down the cause of 0x0000007E as it results due to many reasons like memory overload, cluttered disk space, viral infection, malware attack, and if the hardware malfunctions.
Ignoring 0x0000007E error pop up is not wise. It is more like a warning of the serious damage that can happen to your PC if it is not fixed timely. It also leads to slowing down the system and increases boot time.
This error message exposes you to dangerous Windows PC threats like registry corruption and damage. Registry corruption can lead to system crash and failure and you may also lose all your important data saved on your PC.
Further Information and Manual Repair
Install Restoro
You don’t always have to spend hundreds of dollars to hire a technician to fix error pop-ups on your PC try using Restoro
Restoro is an advanced and multi-functional PC repair tool with a comprehensive suite of powerful features designed to resolve almost all types of PC errors in seconds including 0x0000007E error code.
It is a next-generation PC repair tool that serves as a system optimizer, anti-virus, and quality registry cleaner. Its built-in intuitive technology enables Restoro to scan, identify and repair the ultimate cause of the error code 0x0000007E in just a few seconds.
Eventually, it spares you from the hassle of finding the root cause of the 0x0000007E error message and then selecting a tool specifically designed to resolve only that particular cause with limited features. This highly functional PC error tool is the answer for all your registry issues.
By running Restoro on your PC, you can fix the 0x0000007E BSOD error code and avoid registry corruption.
Why Restoro?
The smart registry cleaner utility embedded in this tool enables it to scan for registry errors and clear up disk space accumulated by junk files, internet temporary files, invalid entries, and other types of unnecessary files taking up a good chunk of your disk space.
This clutter also slows down your PC performance as it requires more power than it has to run the system because of the excess load on the RAM.
However, by wiping out the clutter with this helper, you can optimize the speed of your PC and see a significant difference in its performance.
Restoro backup feature enables you to create backup files for safety purposes. Furthermore, it has several other built-in value-adding features like privacy error utility and system stability utility for enhanced functionality.
To resolve the error code 0x0000007E in seconds, all you need to do is download and install Restoro on your system and run it to scan for errors. In a few seconds, you will see a scanning report with comprehensive details of the types of PC damages.
To fix the issue right away, create backups and click ‘fix’ to resolve. In just a few clicks you can repair your PC.
Download Restoro Today!
When you encounter an error message that says, Chassis Intruded…Fatal Error…System Halted on your monitor then it indicates that the Chassis or the cabinet that holds the CPU, GPU, motherboard, and many more is open. It is a security feature offered by OEMs wherein a connector that is found in the motherboard can detect if the chassis component has been replaced or removed. There are a few OEMs that offer onboard speaker or PC chassis speaker which goes off in this kind of situation.
Obviously, the problem has something to do with the hardware and in most cases, you have to put the jumper back on the motherboard with the pin-labeled chassis signal and ground. There are times when some OEMs offer a simple switch that is armed automatically when you properly close the chassis. Thus, you need to check if this switch has something to do with the error. If there is no switch or if it doesn’t resolve the issue, although you may be able to get into Windows with a warm boot, the normal Windows boot won’t really work unless you fix the problem. It is rather false positive and has something to do with the RTC RAM state or the BIOS. You might need to completely disable the Chassis intrusion feature to fix the error.
Refer to the suggestions given below to try and fix the “Chassis Intruded, Fatal Error … System Halted” error.
Option 1 – Try to clear CMOS
You can easily clear CMOS by shorting two pins which can be found side by side on the motherboard. Keep in mind that it may vary from OEM to OEM although the basics are still the same to clear CMOS. In addition, you might also have to download the manual from the OEM’s website so that you’ll know its exact location.
Option 2 – Try booting into the BIOS
You can also try booting into the BIOS. All you have to do is tap either the DEL or F2 keys to get there. Note that everything will be set back to their default setting after you reset the CMOS.
Option 3 – Try disabling Chassis intrusion
In this option, you have to look for the Chassis intrusion feature in your BIOS. It might be located under security. From there, disable it and check if the problem’s fixed.
Option 4 – Try to reconfigure the BIOS
Once you have disabled the Chassis feature, you need to reconfigure the BIOS the way you expect it to be or to what it was before the reset.
Device Manager Error Code31 pops up when Windows prevents the driver for a particular hardware device from loading. The error code 31 is almost always presented in the following format:
“This device is not working properly because Windows cannot load the drivers required for this device.” Code 31
This error can occur with any hardware device; however, in most cases, it occurs with Ethernet cards. The good news is that it belongs in the easy-to-resolve category. So repairing it should not be difficult.
Solution
Error Causes
Error code 31 is related to driver problems, and the most common causes include:
Outdated drivers
Missing drivers
Mis-configured drivers
Corrupt drivers
Further Information and Manual Repair
To resolve error code 31 on your system, try the methods given below. We have listed down some of the most effective and easy-to-perform DIY methods for fixing Device Manager code 31 on your PC.
Method 1 - Rollback the Driver to its Previous State
This simply means to return the driver back to its previous state - to the version last installed. Try this method to resolve error code 31. This is probably the easiest way to return your PC to its previous working state.
However, by doing so, you will not be able to update your drivers and run new driver versions on your system. In other words, this is a temporary method to fix this issue.
You may still want to try other methods given below to ensure you have the latest drivers installed on your system.
You can roll back the driver to its previous version by accessing the Driver Rollback feature located in the driver settings within the Device Manager. Or another way to perform a rollback is to use the Windows System Restore Utility.
It is a recovery tool built-in the new Windows versions. To access it, simply go to the start menu and type System Restore Utility in the search menu.
Access it and pick a point in the past, also referred to as the restore point, to return your PC to its previous state before the error code 31 occurred.
However, to resolve the problem permanently, try method 2.
Method 2 - Update the Driver
Error code 31, as discussed above, may occur due to outdated, misconfigured, or corrupted drivers. Whatever the reason may be, to ensure the proper functioning of your hardware device, it is important to update the drivers on your system frequently.
To start driver updates, first, it is important to find out and identify problematic drivers. You need to identify the drivers that are corrupt, misconfigured, and outdated. For this, go to the Device Manager and then look for devices with yellow exclamation marks.
The yellow exclamation marks next to the devices show that these device drivers are problematic. Once you’ve identified the problematic drivers, simply update them by finding the latest and compatible versions on the manufacturer’s website.
This process is time-consuming and can be frustrating at times, especially when doing it for the first time.
Also, once you’ve updated the drivers, you need to update them from time to time to ensure they don’t get outdated, or else you will have to encounter Device Manager error codes again.
Method 3 - Download DriverFIX to Update Drivers Automatically
To avoid the hassle and stress involved in updating drivers manually, it is advisable to download and install DriverFIX.
DriverFIX is a smart, innovative, and feature-filled software embedded with an intelligent algorithm that quickly detects problematic drivers, matches them with the latest and compatible versions, and updates them immediately and automatically in just a few seconds and a couple of clicks.
It’s as simple as it can be. Furthermore, with this software installed on your PC, you don’t have to stress and worry about when your drivers need to be updated again.
DriverFIX ensures all drivers are continuously and regularly updated before they become outdated.
Click here to download DriverFIX to repair Device Manager error code 31 and update drivers automatically and regularly.
Quest 2 has been crowned as the best overall VR headset by many websites, and to be honest it is really a great piece of equipment deserving of every praise it gets. It seems that Meta feels that it can do better so the new upcoming Quest Pro is upgraded and a new line of VR sets from this company. The economic standard Quest line will not be shut down and it will still remain as an economic version of Meta's VR product line.
Quest Pro will be added as a new line of the better product line with better performance and better quality. It is the first VR headset that is packing Qualcomm Snapdragon XR3+ Gen 1 chipset, 12GB of RAM, 256GB of internal storage, and 10 high-resolution sensors. Of course, this much power and improvement come with a higher price tag, this time that price tag is $1,499.99.
The new VR headset promises industry-leading visuals with a new optical stack instead of Fresnel lenses in Meta Quest 2 with thin-layer pancake optics that fold light reducing the depth of the optical module by 40% and at the same provides clear and sharp visuals.
The headset will give display more vivid colors, richer colors, and higher contrast by incorporating local dimming and quantum dot technology. It composes of specialized backlight hardware accompanied by software algorithms that can control more than individual LED blocks independently.
The Quest Pro will also come packed with new Meta Quest Touch Pro controllers. They will feature three built-in sensors to track the controller's position completely independent of the headset which means that tracking and range of motion will be improved. These new controllers will also be sold separately at the cost of $299.99 and they can be used with Quest 2.
The headset is available for preorder and it will start shipping in late October on the Meta website
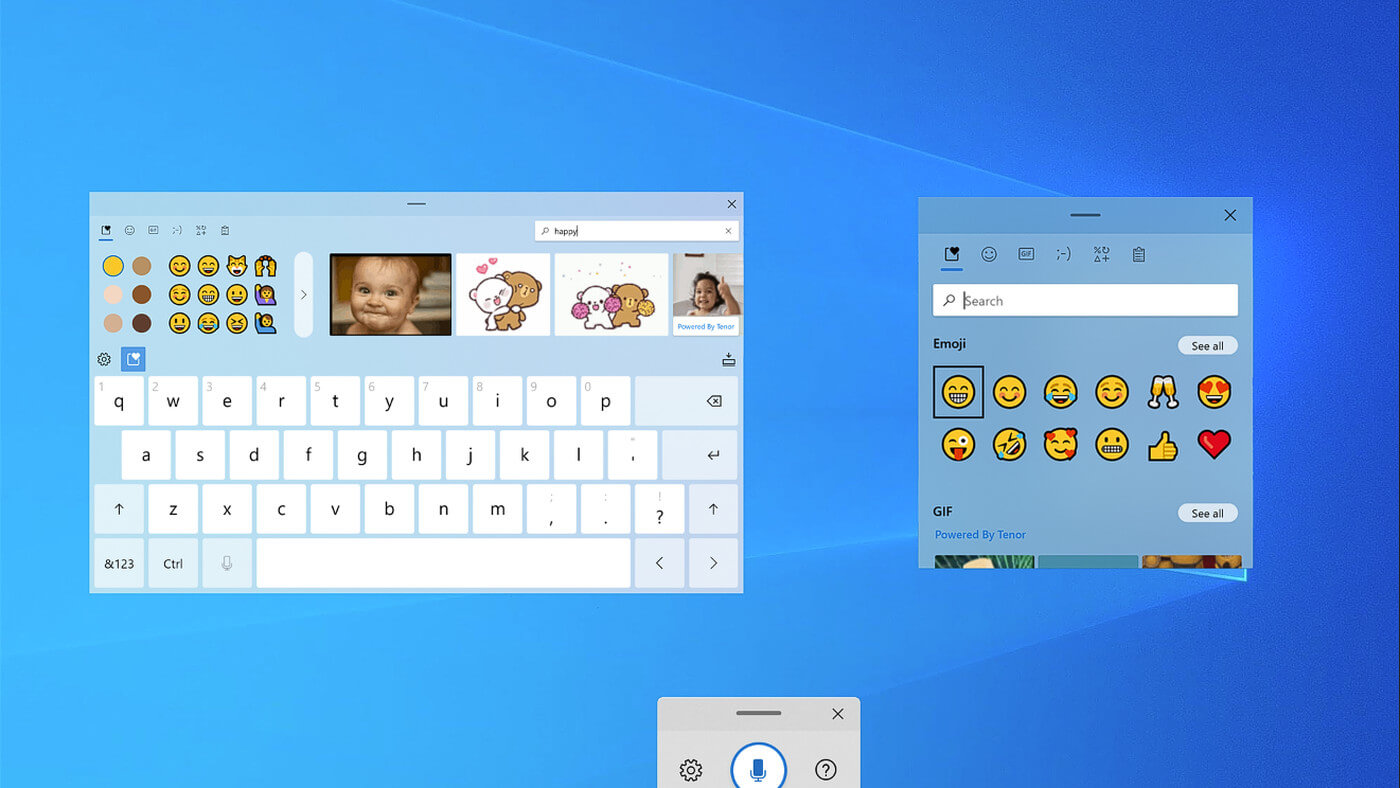
If by any chance you are working on a touchscreen PC, tablet, or any similar device and have no access to a hardware keyboard there is a way to place Touch Keyboard on your screen for easy typing, and you can enable icon on the taskbar for easy access.
Enabling the Touch Keyboard
Right-click on the Taskbar
Select Taskbar Settings
Go to Personalization > Taskbar
Click on Taskbar Corner Icons to expand it
Click on the switch next to Touch Keyboard to turn it ON
Close settings
The icon will immediately appear on the Taskbar in the lower right corner. Clicking the icon virtual keyboard will appear on the lower part of the screen.
You can use this keyboard to type in applications the same as you were typing on hardware one.
By taping on X in the upper right corner, you will hide the keyboard. Tap on the icon in Taskbar to bring it up again.
Hide the Taskbar icon
If you do not want to use Touch Keyboard anymore you can easily hide the icon:
Right-click on the Taskbar
Select Taskbar Settings
Go to Personalization > Taskbar
Click on Taskbar Corner Icons to expand it
Click on the switch next to Touch Keyboard to turn it OFF


 If by any chance you are working on a touchscreen PC, tablet, or any similar device and have no access to a hardware keyboard there is a way to place Touch Keyboard on your screen for easy typing, and you can enable icon on the taskbar for easy access.