FileShareFanatic is a browser extension developed by Mindspark Inc. This extension offers users the ability to quickly access some of the most popular file-sharing websites. While this may sound tempting and useful at start, using this extension might prove more annoying then useful.
When installed FileShareFanatic hijacks your new tab page changing your default search engine to search.myway.com. Additionally it monitors user activity, recording visited websites, clicked links, viewed products, and whatever other information that can be used by the Ad network to display targeted Ads.
While browsing the internet with this extension you will notice an increase of ads on pages, especially in search results. This extension injects additional ads, sponsored links, and even displays pop-up ads in order to gain revenue.
FileShareFanatic has been marked as a Browser Hijacker by several top anti-virus scanners, and is scheduled for deletion.
About Browser Hijackers
Browser hijacking is considered the web’s constant danger that targets browsers. It is a kind of malicious software that modifies your internet browser’s configuration settings so that you are redirected to websites or pages that you had no intention of visiting. Browser hijackers can do more than simply modifying homepages. It redirects you to the sponsored sites and inserts advertisements on your browser which helps its developer generate earnings. It might appear naive, but most of these websites are not legitimate and will pose a major risk to your online safety. Browser hijackers can even let other vicious programs without your knowledge to further damage your PC.
Symptoms of browser hijack
There are numerous symptoms of browser hijacking:
1. you see unauthorized modifications to your internet browser’s homepage
2. you get re-directed to internet sites you never meant to visit
3. default online search engine is modified
4. discover new toolbars which you did not add
5. you observe lots of pop-ups on your screen
6. your web browser gets slow, buggy, and crashes frequently
7. Inability to navigate to certain sites, especially anti-malware as well as other security software webpages.
How they infect computers
Browser hijackers attack computers via malicious email attachments, downloaded infected documents, or by visiting infected internet sites. Many internet browser hijackings originate from add-on software, i.e., browser helper objects (BHO), toolbars, or extensions added to browsers to give them extra features. A browser hijacker could also be installed as a part of freeware, demoware, shareware and pirated programs.
Browser hijackers can interrupt the user’s web browsing experience significantly, track the websites visited by users and steal sensitive information, cause difficulty in connecting to the internet, and eventually create stability problems, making software programs and computer to crash.
Removal
The one thing you can try to get rid of a browser hijacker is to find the malware within the “Add or Remove Programs” list in the Microsoft Windows Control Panel. It may or may not be there. If it is, try to uninstall it. But, most hijacking codes aren’t very easy to eliminate manually, as they go deeper into your operating system. Besides, browser hijackers could modify the Computer registry so that it could be very hard to repair manually, especially when you’re not a very tech-savvy individual.
You can choose automatic browser hijacker removal by just installing and running reliable anti-malware software. If you need to get rid of persistent browser hijackers effectively, install the top-rated Anti-Malware software Safebytes Anti-Malware.
Find Out How To Install Safebytes Anti-Malware On An Infected PC
Malware can cause a lot of damage to your PC. Some malware types alter internet browser settings by including a proxy server or change the PC’s DNS configuration settings. When this happens, you’ll be unable to visit certain or all of the sites, and thus unable to download or install the required security software to remove the infection. If you are reading this, you may have infected by a virus that prevents you from downloading a security program such as Safebytes Antimalware on your PC. There are some actions you can take to circumvent this issue.
Download the application in Safe Mode with Networking
If the virus is set to load immediately when Microsoft Windows starts, entering Safe Mode could very well block the attempt. Since only the bare minimum programs and services launch in safe mode, there are hardly any reasons for conflicts to occur. To start your Windows XP, Vista or 7 computer in Safe Mode with Networking, please do as instructed below.
1) At power on, hit the F8 key before the Windows splash screen starts to load. This will bring up the Advanced Boot Options menu.
2) Choose Safe Mode with Networking with arrow keys and hit ENTER.
3) Once this mode loads, you will have the internet. Now, utilize your browser to download and install Safebytes Anti-malware.
4) As soon as the application is installed, allow the scan run to eliminate viruses and other malware automatically.
Switch to an alternate internet browser
Web-based viruses can be environment-specific, aiming for a particular web browser or attacking specific versions of the browser. The best solution to avoid this problem is to opt for a browser that is known for their security measures. Firefox comprises built-in Phishing and Malware Protection to keep you safe online.
Run antivirus from a USB drive
Another option is to make a portable antivirus program onto your USB thumb drive. To run antivirus from a thumb drive, follow these simple steps:
1) Download Safebytes Anti-Malware or Microsoft Windows Defender Offline onto a clean computer system.
2) Plug the Thumb drive into the uninfected computer.
3) Double-click the Setup icon of the anti-malware software to run the Installation Wizard.
4) Select the drive letter of the USB drive as the place when the wizard asks you exactly where you would like to install the anti-virus. Follow the directions to finish the installation process.
5) Unplug the pen drive. Now you can utilize this portable antivirus on the affected computer.
6) Double-click the anti-malware program EXE file on the thumb drive.
7) Simply click “Scan Now” to run a complete scan on the infected computer for malware.
SafeBytes Anti-Malware Features
To protect your personal computer from many different internet-based threats, it’s important to install an anti-malware application on your computer system. However, with countless numbers of anti-malware companies in the marketplace, nowadays it is challenging to decide which one you should purchase for your PC. Some are good ones, some are decent, and some are simply just fake anti-malware applications that could harm your personal computer themselves! You should choose one that is trustworthy, practical and has a strong reputation for its malware source protection. On the list of strongly recommended software by industry analysts is SafeBytes Anti-Malware, the most dependable program for Windows computers.
SafeBytes anti-malware is a powerful, very effective protection application made to help users of all levels of computer literacy in finding and eliminating malicious threats from their computer. Once you’ve installed this program, SafeBytes state-of-the-art protection system will ensure that absolutely no viruses or malware can seep through your PC.
SafeBytes anti-malware takes PC protection to a totally new level with its enhanced features. These are some of the highlighted features included in the software.
World-class AntiMalware Protection: Built on a greatly acclaimed anti-virus engine, this malware removal tool can identify and get rid of several obstinate malware threats such as browser hijackers, potentially unwanted programs, and ransomware that other typical antivirus programs will miss.
Real-time Threat Response: Malware programs attempting to get into the computer are discovered and stopped as and when detected by the SafeBytes active protection shields. It’ll examine your PC for suspicious activity at all times and its unrivaled firewall protects your computer from unauthorized access by the outside world.
Safe Browsing: Safebytes assigns all sites a unique safety ranking that helps you to get an idea of whether the webpage you’re just about to visit is safe to browse or known to be a phishing site.
Lowest Memory/CPU Usage: SafeBytes is a lightweight tool. It consumes a really small amount of processing power as it operates in the background therefore you will not see any computer performance difficulties.
24/7 Guidance: SafeBytes provides 24/7 technical support, automatic maintenance and updates for best user experience.
All in all, SafeBytes Anti-Malware is a solid program as it has lots of features and could identify and remove any potential threats. Once you have downloaded and installed this software, you no longer need to worry about malware or any other security worries. So if you’re searching for the best anti-malware subscription for your Windows-based computer, we recommend SafeBytes Anti-Malware tool.
Technical Details and Manual Removal (Advanced Users)
If you wish to carry out the removal of FileShareFanatic manually instead of using an automated software tool, you may follow these measures: Proceed to the Windows Control Panel, click the “Add or Remove Programs” and there, choose the offending application to uninstall. In cases of suspicious versions of web browser plug-ins, you can easily get rid of it via your web browser’s extension manager. You’ll probably also want to reset your browser.
To be certain of complete removal, find the following registry entries on your computer and remove it or reset the values appropriately. Having said that, editing the registry can be a complicated job that only advanced users and professionals should try to fix it. Furthermore, some malware is capable of replicating or preventing removal. It is advisable that you carry out the removal process in Windows Safe Mode.

 Error Causes
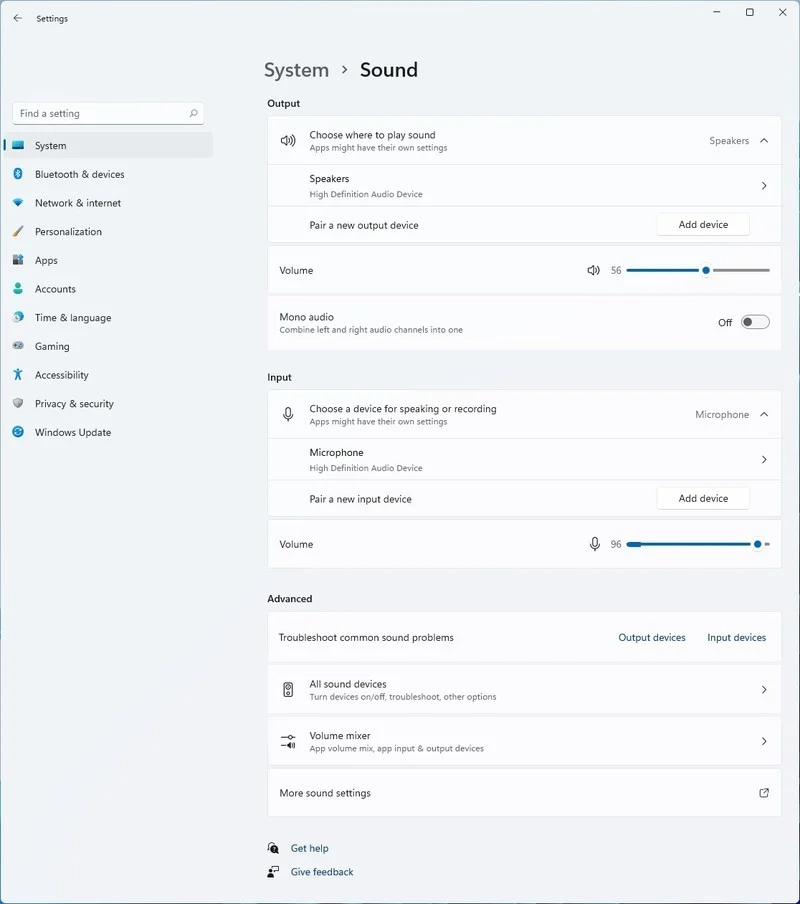 Windows 11 has brought some new features and changed some of the existing ones. One of these changes includes quick switching of audio devices which will play audio.
Audio switching can still be done under the taskbar, it is just a little different and one could say even hidden. Follow this quick guide and you will be switching from your headphones to speakers as an example in a matter of seconds.
Windows 11 has brought some new features and changed some of the existing ones. One of these changes includes quick switching of audio devices which will play audio.
Audio switching can still be done under the taskbar, it is just a little different and one could say even hidden. Follow this quick guide and you will be switching from your headphones to speakers as an example in a matter of seconds.