EasyPDFCombine is a browser extension by Mindspark Inc. This extension claims to offer users an easy and fast way to combine different PDF documents into a single file for easy access and sharing.
When installed this extension changes your default search engine to MyWay.com, it also hijacks your home page and new tab page, also changing it to search powered by MyWay.
While browsing the internet with this extension you will see additional pop-up ads, injected ads in search results, and sponsored content throughout your browsing sessions.
This extension has been marked as a Browser Hijacker by several anti-virus programs and it is not recommended to keep on your computer.
About Browser Hijackers
Browser hijack is a common type of internet fraud where your web browser settings are altered to allow it to carry out things you do not intend. Browser hijacker malware is developed for a variety of reasons. In general, browser hijacking is used for earning ad revenue from forced advert clicks and website visits. While it may seem harmless, these tools were created by malicious individuals who always look to take full advantage of you, so that hackers could make money from your naivety and distraction. They not only screw up your web browsers, but browser hijackers can also modify the system registry, making your computer susceptible to other malicious programs.
How to know whether the web browser is hijacked?
There are many symptoms of browser hijacking. Here are a few of them:
1. the browser’s homepage is modified
2. you find yourself regularly directed to a different webpage than the one you intended
3. the main web browser settings are modified and undesirable or insecure resources are put into the trusted sites list
4. you are finding new toolbars you haven’t witnessed before
5. you see a lot of pop-up ads on your computer screen
6. your web browser gets sluggish, buggy crashes often
7. Inability to navigate to certain websites, especially antivirus as well as other security software websites.
How browser hijacker infects computers
Browser hijackers attack computers via malicious email attachments, downloaded infected computer files, or by checking out infected sites. They may also originate from any BHO, browser extension, add-on, toolbar, or plug-in with the malicious objectives. Also, certain shareware and freeware can put the hijacker in your computer through the “bundling” technique. A good example of a well-known browser hijacker is the most recent Chinese malicious software known as “Fireball”, which has infected 250 million computers around the world. It acts as a hijacker but can be turned into a fully functioning malware downloader later on.
The presence of any browser hijacker malware on your system can drastically diminish the web browsing experience, monitor your internet activities that result in severe privacy concerns, develop system stability issues and ultimately cause your PC to slow down or to a practically unusable condition.
How you can remove browser hijackers
Certain browser hijacking can be easily stopped by finding and removing the corresponding malware program from your control panel. At times, it could be a challenging job to identify and delete the malicious program because the associated file will be running as part of the operating system process. You should think of doing manual repairs only if you’re a tech-savvy individual since there are risks associated with tinkering around with the system registry and HOSTS file.
Browser hijackers could be effectively removed by installing and running anti-malware software on the affected PC. Among the best tools for fixing browser hijacker infections is SafeBytes Anti-Malware. It helps you remove any pre-existing malicious software in your computer and gives you real-time monitoring and protection from the latest threats.
What you can do if Virus Stops You From Downloading Or Installing Antivirus?
Malware could potentially cause all kinds of damage when they invade your system, starting from stealing your personal details to erasing data files on your PC. Some malware is meant to hinder or prevent things that you’d like to do on your PC. It may not allow you to download anything from the web or prevent you from accessing a few or all websites, especially antivirus sites. If you’re reading this, odds are you’re stuck with a malware infection that is preventing you to download and/or install Safebytes Anti-Malware software on your PC. Follow the instructions below to remove malware through alternate ways.
Download the anti-virus in Safe Mode with Networking
If the malware is set to run automatically when Windows starts, entering Safe Mode may block this attempt. Since only the minimal programs and services launch in safe mode, there are rarely any reasons for issues to occur. The following are the steps you need to follow to start into the Safe Mode of your Windows XP, Vista, or 7 computers (check out Microsoft site for instructions on Windows 8 and 10 computers).
1) At power-on/startup, hit the F8 key in 1-second intervals. This would conjure up the Advanced Boot Options menu.
2) Choose Safe Mode with Networking using arrow keys and hit ENTER.
3) When this mode loads, you will have an internet connection. Now, get the malware removal application you need by using the web browser. To install the program, follow the directions in the setup wizard.
4) After installation, do a complete scan and let the software program delete the threats it discovers.
Utilize an alternate internet browser to download antivirus software
Some viruses might target vulnerabilities of a specific browser that block the downloading process. If you appear to have a virus attached to Internet Explorer, then switch to an alternate web browser with built-in security features, such as Firefox or Chrome, to download your favorite anti-malware program – Safebytes.
Install anti-malware on a USB drive
To successfully remove the malware, you should approach the problem of installing anti-virus software on the affected PC from a different angle. To run antivirus using a USB pen drive, follow these simple measures:
1) Download Safebytes Anti-Malware or MS Windows Defender Offline onto a virus-free PC.
2) Insert the USB drive onto the same computer.
3) Run the setup program by double-clicking the executable file of the downloaded application, with a .exe file format.
4) When asked, choose the location of the USB drive as the place where you would like to store the software files. Do as instructed on the screen to finish up the installation process.
5) Unplug the USB drive. Now you can utilize this portable anti-malware on the affected computer.
6) Double click the Safebytes Anti-malware icon on the pen drive to run the program.
7) Click on the “Scan Now” button to start the virus scan.
SafeBytes Anti-Malware - More Protection For You
In order to protect your PC from various internet-based threats, it is important to install an anti-malware program on your computer system. But with countless numbers anti-malware companies in the market, these days it is hard to decide which one you should purchase for your personal computer. A few are really worth your money, but many aren’t. While looking for anti-malware software, choose one that offers solid, efficient, and complete protection against all known viruses and malware. Among few good applications, SafeBytes Anti-Malware is the highly recommended program for the security-conscious individual.
SafeBytes is a powerful, real-time antivirus application that is made to assist the common computer end user in safeguarding their PC from malicious internet threats. This program could easily detect, remove, and protect your personal computer from the most advanced malware threats including adware, spyware, trojan horses, ransomware, PUPs, worms, parasites as well as other potentially harmful software applications.
There are lots of great features you will get with this security product. Below are some of the features you may like in SafeBytes.
Live Protection: SafeBytes offers 100 % hands-free live protection and is set to observe, prevent and eliminate all threats at its very first encounter. It will continuously monitor your computer for hacker activity and also gives users superior firewall protection.
World-class AntiMalware Protection: Using its enhanced and sophisticated algorithm, this malware removal tool can find and remove the malware threats hiding in your computer effectively.
“Fast Scan” Abilities: This software has got one of the fastest and most efficient virus scanning engines in the industry. The scans are very accurate and take a little time to complete.
Web Security: SafeBytes checks and gives a unique safety rating to every single website you visit and block access to web pages known to be phishing sites, thus protecting you against identity theft, or known to contain malware.
Very Low CPU and RAM Usage: SafeBytes gives total protection from internet threats at a fraction of the CPU load because of its advanced detection engine and algorithms.
Premium Support: SafeBytes gives you 24/7 technical support, automatic maintenance, and upgrades for the best user experience.
SafeBytes can keep your personal computer protected from most advanced malware threats automatically with little or no input needed from you again. There is no doubt that your computer system will be protected in real-time as soon as you put this software program to use. So if you are looking for the best anti-malware subscription for your Windows-based PC, we suggest the SafeBytes Anti-Malware application.
Technical Details and Manual Removal (Advanced Users)
If you’d like to manually remove EasyPDFCombine without the use of an automated tool, it might be possible to do so by deleting the program from the Microsoft Windows Add/Remove Programs menu, or in cases of browser extensions, going to the browser’s AddOn/Extension manager and removing it. You’ll probably also want to reset your internet browser.
Finally, check your hard drive for all of the following and clean your Windows registry manually to get rid of leftover application entries following an uninstallation. Please keep in mind that only experienced users should try to manually edit the system files simply because deleting any single vital registry entry results in a major problem or even a computer crash. Additionally, certain malware is capable of replicating itself or preventing deletion. It is advised that you carry out the removal process in Safe Mode.
Files:
%LOCALAPPDATA%\Google\Chrome\User Data\Default\Local Extension Settings\kpocjpoifmommoiiiamepombpeoaehfh
%UserProfile%\Local Settings\Application Data\Google\Chrome\User Data\Default\Local Extension Settings\kpocjpoifmommoiiiamepombpeoaehfh
%LOCALAPPDATA%\Google\Chrome\User Data\Default\Sync Extension Settings\kpocjpoifmommoiiiamepombpeoaehfh
%UserProfile%\Local Settings\Application Data\Google\Chrome\User Data\Default\Sync Extension Settings\kpocjpoifmommoiiiamepombpeoaehfh
%UserProfile%\Local Settings\Application Data\EasyPDFCombine_ce
%LOCALAPPDATA%\EasyPDFCombine_ce
%USERPROFILE%\Application Data\easypdfcombine_ceIE
%USERPROFILE%\AppData\LocalLow\easypdfcombine_ce
%PROGRAMFILES%\easypdfcombine_ceEI
%LOCALAPPDATA%\Google\Chrome\User Data\Default\Extensions\eoijigimapijneedmehmjccmmdknkbef
%UserProfile%\Local Settings\Application Data\Google\Chrome\User Data\Default\Extensions\eoijigimapijneedmehmjccmmdknkbef
%UserProfile%\Local Settings\Application Data\Google\Chrome\User Data\Default\Extensions\kpocjpoifmommoiiiamepombpeoaehfh
chrome-extension_eoijigimapijneedmehmjccmmdknkbef_0.localstorage
%UserProfile%\Local Settings\Application Data\EasyPDFCombineTooltab
%LOCALAPPDATA%\EasyPDFCombineTooltab
Registry:
HKEY_CURRENT_USER\Software\AppDataLow\Software\easypdfcombine_ce
HKEY_CURRENT_USER\Software\Microsoft\Internet Explorer\Approved Extensions, value: 0D159187-1DDE-426D-8D17-74B6CEF7D9E3
HKEY_CURRENT_USER\Software\Microsoft\Internet Explorer\Approved Extensions, value: 1930D4C0-D0E6-4CF1-B6A4-A09140F88475
HKEY_CURRENT_USER\Software\Microsoft\Internet Explorer\Approved Extensions, value: 4E8A04A7-E70B-4391-9AF3-1C0CC98AE8DA
HKEY_LOCAL_MACHINE\SYSTEM\CurrentControlSet\services\easypdfcombine_ceService
HKEY_LOCAL_MACHINE\SYSTEM\ControlSet001\services\easypdfcombine_ceService
HKEY_LOCAL_MACHINE\SYSTEM\ControlSet002\services\easypdfcombine_ceService
HKEY_LOCAL_MACHINE\SOFTWARE\Wow6432Node\Microsoft\Windows\CurrentVersion\Run, value: EasyPDFCombine AppIntegrator 32-bit
HKEY_LOCAL_MACHINE\SOFTWARE\Wow6432Node\Microsoft\Windows\CurrentVersion\Run, value: easyPDFCombine AppIntegrator 64-bit
HKEY_LOCAL_MACHINE\SOFTWARE\Wow6432Node\Microsoft\Windows\CurrentVersion\Run, value: easyPDFCombine EPM Support
HKEY_LOCAL_MACHINE\SOFTWARE\Microsoft\Windows\CurrentVersion\Run, value: EasyPDFCombine AppIntegrator 64-bit
HKEY_LOCAL_MACHINE\SOFTWARE\Microsoft\Windows\CurrentVersion\Run, value: EasyPDFCombine EPM Support
HKEY_LOCAL_MACHINE\SOFTWARE\Microsoft\Windows\CurrentVersion\Run, value: EasyPDFCombine Search Scope Monitor
HKEY_LOCAL_MACHINE\SOFTWARE\Wow6432Node\Microsoft\Internet Explorer\Toolbar, value: 4e8a04a7-e70b-4391-9af3-1c0cc98ae8da
HKEY_LOCAL_MACHINE\SOFTWARE\Microsoft\Internet Explorer\Toolbar, value: 4e8a04a7-e70b-4391-9af3-1c0cc98ae8da
HKEY_LOCAL_MACHINE\SOFTWARE\Wow6432Node\Microsoft\Windows\CurrentVersion\explorer\Browser Helper Objects\1930d4c0-d0e6-4cf1-b6a4-a09140f88475
HKEY_LOCAL_MACHINE\SOFTWARE\Microsoft\Windows\CurrentVersion\explorer\Browser Helper Objects\1930d4c0-d0e6-4cf1-b6a4-a09140f88475
HKEY_LOCAL_MACHINE\SOFTWARE\Microsoft\Internet Explorer\LowRegistry\DOMStorage\easypdfcombine.dl.myway.com
HKEY_LOCAL_MACHINE\SOFTWARE\Microsoft\Internet Explorer\DOMStorage\easypdfcombine.dl.myway.com
HKEY_LOCAL_MACHINE\Software\Microsoft\Internet Explorer\DOMStorage\easypdfcombine.dl.tb.ask.com
HKEY_LOCAL_MACHINE\SOFTWARE\Microsoft\Internet Explorer\LowRegistry\DOMStorage\easypdfcombine.dl.tb.ask.com
HKEY_LOCAL_MACHINE\SOFTWARE\Wow6432Node\EasyPDFCombine
 As in previous Windows 10, inside Windows 11 also when you press the ALT + TAB key combination you will get a preview of all running applications along with all Browser tabs so you can go through them and pick the one you want to switch to.
 Hacker group recently came up with claims that they have stolen data from 100 million T-Mobile customers. T-Mobile has responded with confirmation it has been compromised and that over 40 million records were stolen, among them are not just present customers, but anyone who has applied for T-Mobile service as well as past accounts.

 This error is very frustrating and it annoys pretty much anyone who encountered it but do not worry we have a solution for you.
First thing is to confirm the error prompt, Click on the OK button and then on X to exit Windows 10 installation wizard. Click on yes to confirm that you want to exit the setup.
You will find yourself in original installation windows.
On that screen choose and click on Repair your computer. Choose an option screen that will pop up, click on Troubleshoot. In the advanced options, click on the command prompt.
Once you are in command prompts type DISKPART and hit ENTER
In the diskpart prompt type LIST DISK and hit ENTER again.
type SELECT DISK #, where # is listed disk number where you would like to install Windows.
type LIST VOLUME in order to list volumes in the selected disk and hit ENTER
You need to select the volume on which you would like to place your WINDOWS, to do this type in SELECT VOLUME #, where # is the listed number of the volume
Finally, type FORMAT FS=NTFS and hit ENTER
You have successfully formated a given volume, you can now exit DISKPART and return to setup, to exit DISKPART simply type exit and hit ENTER.
Leave command prompt as well by again typing exit and hitting ENTER
You will be returned to Choose an option screen, click on Turn off your PC.
Your drive has been successfully formatted and it is ready for clean Windows installation, you can now restart your Windows 10 installation and the process will complete without errors.
This error is very frustrating and it annoys pretty much anyone who encountered it but do not worry we have a solution for you.
First thing is to confirm the error prompt, Click on the OK button and then on X to exit Windows 10 installation wizard. Click on yes to confirm that you want to exit the setup.
You will find yourself in original installation windows.
On that screen choose and click on Repair your computer. Choose an option screen that will pop up, click on Troubleshoot. In the advanced options, click on the command prompt.
Once you are in command prompts type DISKPART and hit ENTER
In the diskpart prompt type LIST DISK and hit ENTER again.
type SELECT DISK #, where # is listed disk number where you would like to install Windows.
type LIST VOLUME in order to list volumes in the selected disk and hit ENTER
You need to select the volume on which you would like to place your WINDOWS, to do this type in SELECT VOLUME #, where # is the listed number of the volume
Finally, type FORMAT FS=NTFS and hit ENTER
You have successfully formated a given volume, you can now exit DISKPART and return to setup, to exit DISKPART simply type exit and hit ENTER.
Leave command prompt as well by again typing exit and hitting ENTER
You will be returned to Choose an option screen, click on Turn off your PC.
Your drive has been successfully formatted and it is ready for clean Windows installation, you can now restart your Windows 10 installation and the process will complete without errors. 
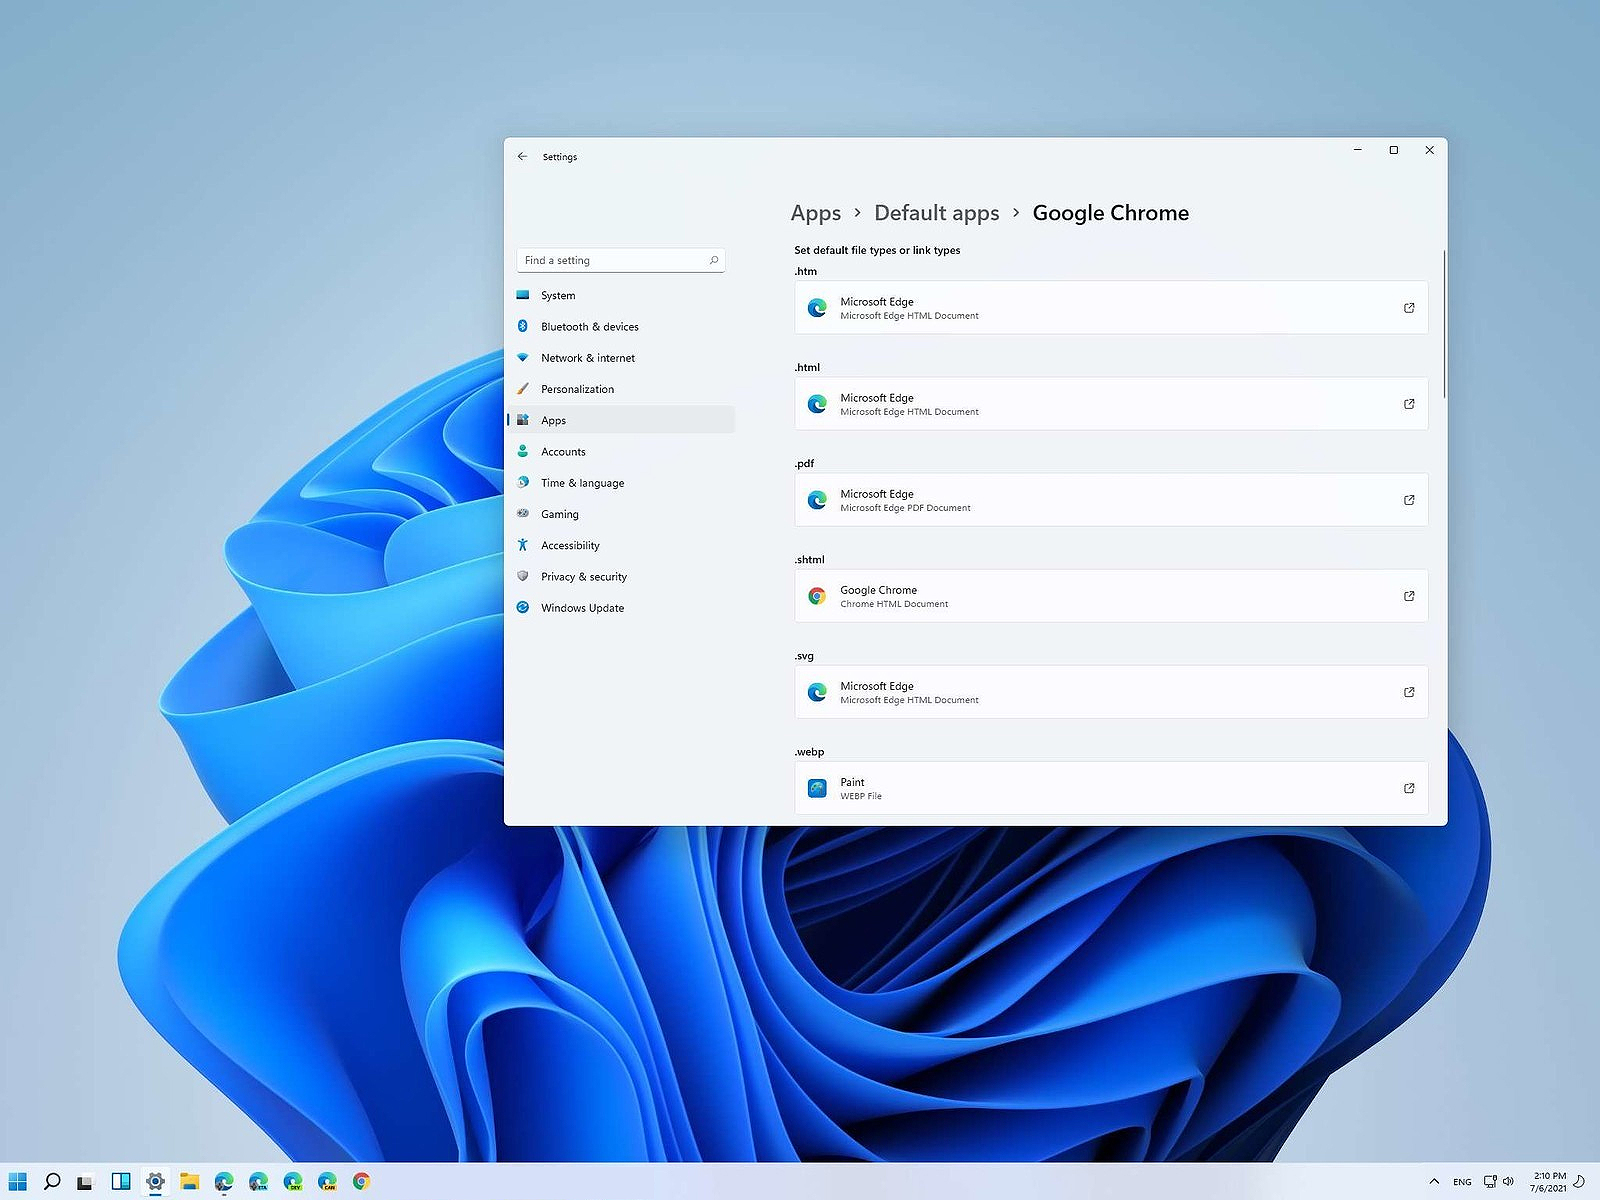 Same as in previous Windows versions, Windows 11 will also use certain applications as default ones for opening certain file types and file extensions. And yes, same as in previous versions it will come preconfigured for certain file types and associated applications like for example photos for pictures.
Of course, users usually have their own favorite applications for certain file types and much more prefer to open them inside the application of their choice instead of the default one.
We can change the default application like in previous Windows versions but this time there are two ways and overall more control of this process. Windows 11 has settings for choosing default file type applications and default file extension applications giving you more control of this process.
Same as in previous Windows versions, Windows 11 will also use certain applications as default ones for opening certain file types and file extensions. And yes, same as in previous versions it will come preconfigured for certain file types and associated applications like for example photos for pictures.
Of course, users usually have their own favorite applications for certain file types and much more prefer to open them inside the application of their choice instead of the default one.
We can change the default application like in previous Windows versions but this time there are two ways and overall more control of this process. Windows 11 has settings for choosing default file type applications and default file extension applications giving you more control of this process.