The DailyProductivityTools Toolbar is packed as a browser extension that claims to increase your productivity with access to free online tools and developed by Mindspark Inc. This extension may seem handy at first, however, while browsing the internet with it active you will experience additional ads, sponsored content, and pop-up ads throughout your browsing sessions and search results.
When installed DailyProductivityTools changed your default new tab page to Search.MyWay.com disguising as a ‘Enhanced Google Search Engine’. This extension monitors your browsing activity, visited websites and links, then uses this information to better target Ads.
DailyProductivityTools has been marked as a Potentially Unwanted Program, and is recommended for removal by many anti-virus applications.
Browser hijacking is a type of unwanted software, often a web browser add-on or extension, which causes modifications in the browser’s settings. Browser hijacker malware is designed for a variety of reasons. Generally, the idea is to force users visit certain sites that are aiming to increase their site visitor traffic and produce higher ad revenue. Many people believe that the browser hijacker is only a harmless website but that is incorrect. Almost every browser hijacker pose an actual threat to your on-line safety and it is important to classify them under privacy risks. What’s more, hijackers can make the entire infected system vulnerable – other harmful malware and viruses will grab these opportunities to intrude into your computer system very easily.
The following are some symptoms that suggest you have been hijacked: you find unauthorized modifications to your internet browser’s homepage; your internet browser is constantly being redirected to adult sites; the default web browser configurations have been modified and/or your default search engine is altered; you find many toolbars on the web browser; you see lots of pop-ups on your computer screen; your browser has become unstable or starts running slowly; you’re blocked to access those sites of antivirus solution providers.
A browser hijacker can be installed on your computer if you check out an infected site, click on an email attachment, or download something from a file-sharing site. They could also come from add-on programs, also known as browser helper objects (BHO), browser plug-ins, or toolbars. Browser hijackers sneak into your pc along with free software downloads also that you unwittingly install alongside the original. Examples of popular browser hijackers are Fireball, Ask Toolbar, GoSave, CoolWebSearch, RocketTab and Babylon Toolbar.
Browser hijacking can lead to severe privacy problems and even identity theft, disrupt your browsing experience by taking control of outbound traffic, considerably slows down your PC by consuming lots of resources, and lead to system instability also.
Certain browser hijacking can be easily corrected by finding and removing the corresponding malware program through your control panel. But, many hijackers will be more difficult to locate or remove since it might get itself connected with certain important computer files that enable it to operate as a necessary operating system process. Novice PC users shouldn’t ever attempt for the manual form of removal, as it demands comprehensive system knowledge to do repairs on the system registry and HOSTS file.
Professionals always recommend users remove any malicious software including browser hijacker by using an automatic malware removal tool, which is better, safer, and faster than the manual removal method. Among the best tools for repairing browser hijacker malware is SafeBytes Anti-Malware. It can help you eliminate any pre-existing malware on your computer and provides you real-time monitoring and protection against new internet threats. Along with anti-virus software, a system optimizer program, similar to Total System Care, can help you repair Windows registry errors, eliminate unwanted toolbars, secure your internet privacy, and stabilize software programs installed on your computer.
Malware can cause many kinds of damage to computer systems, networks, and data. Some malware types modify internet browser settings by including a proxy server or modify the PC’s DNS settings. In such cases, you’ll be unable to visit certain or all of the websites, and therefore unable to download or install the necessary security software to eliminate the malware. If you are reading this article, chances are you’re stuck with a virus infection that is preventing you to download and install Safebytes Anti-Malware program on your PC. Although this kind of issue will be tougher to get around, there are a few actions you can take.
In the event the malware is set to run at Windows start-up, then booting in Safe Mode should prevent it. Since only the minimum applications and services start-up in safe mode, there are hardly any reasons for conflicts to take place. The following are the steps you should follow to remove viruses in Safemode.
1) After switching on the computer, hit the F8 key while the Windows splash screen begins to load. This would invoke the “Advanced Boot Options” menu.
2) Select Safe Mode with Networking with arrow keys and press ENTER.
3) When this mode loads, you should have the internet. Now, utilize your internet browser normally and go to https://safebytes.com/products/anti-malware/ to download Safebytes Anti-Malware.
4) Immediately after installation, run a full scan and allow the software to get rid of the threats it detects.
Certain viruses may target vulnerabilities of a specific browser that block the downloading process. In case you suspect that your Internet Explorer has been hijacked by a virus or otherwise compromised by online hackers, the best course of action is to switch over to a different web browser like Firefox, Chrome, or Safari to download your favorite security software – Safebytes Anti-Malware.
Here’s yet another solution which is using a portable USB antivirus software that can scan your system for malicious software without needing installation. Follow these steps to run the anti-malware on the infected computer.
1) On a clean computer, download and install Safebytes Anti-Malware.
2) Plug in the USB flash drive to a USB slot on the clean computer.
3) Run the setup program by double-clicking the executable file of the downloaded application, with an .exe file extension.
4) When asked, choose the location of the USB drive as the place where you would like to store the software files. Follow the instructions on the screen to finish off the installation process.
5) Now, transfer the flash drive to the infected PC.
6) Run the Safebytes Anti-malware directly from the pen drive by double-clicking the icon.
7) Run Full System Scan to detect and clean-up up all kinds of malware.
Nowadays, anti-malware software can protect your computer from different types of online threats. But how to select the best one amongst many malware protection application that’s available in the market? Perhaps you might be aware, there are many anti-malware companies and tools for you to consider. Some of them are good, some are ok types, while some will affect your PC themselves! It is important to choose a company that creates industry-best anti-malware and it has attained a reputation as reliable. On the list of highly recommended software programs is SafeBytes Anti-Malware. SafeBytes carries a superb reputation for quality service, and clients seem to be happy with it.
SafeBytes antimalware is a highly effective and user-friendly protection tool which is suitable for users of all levels of computer literacy. Using its cutting-edge technology, this software will help you eradicate several types of malware including computer viruses, PUPs, trojans, worms, adware, ransomware, and browser hijackers.
Antimalware Protection: This deep-cleaning antimalware software goes much deeper than most antivirus tools to clean your computer system. Its critically acclaimed virus engine finds and disables hard to remove malware that hides deep inside your personal computer.
Real-time Active Protection: SafeBytes gives round the clock protection for your computer restricting the malware attacks instantly. This software will continuously monitor your PC for suspicious activity and updates itself continuously to keep current with the latest threats.
Web Filtering: SafeBytes gives instant safety rating about the pages you’re going to check out, automatically blocking harmful sites and make sure that you’re certain of your online safety while browsing the internet.
Low CPU Usage: SafeBytes is well known for its low influence on computer resources and great detection rate of diverse threats. It runs silently and efficiently in the background so you are free to use your computer at full power all the time.
24/7 Customer Support: SafeBytes provides you with 24/7 technical support, automatic maintenance and updates for best user experience.
SafeBytes has come up with a wonderful anti-malware solution that can help you conquer the latest computer threats and virus attacks. There is no doubt that your computer system will be protected in real-time as soon as you put this software to use. So if you’re searching for the very best malware removal application out there, and if you don’t mind paying out some dollars for it, opt for SafeBytes Anti-Malware.
If you’d like to carry out the removal of DailyProductivityTools manually instead of using an automated tool, you may follow these simple steps: Navigate to the Windows Control Panel, click the “Add/Remove Programs” and there, choose the offending program to uninstall. In case of suspicious versions of web browser plug-ins, you can actually get rid of it through your web browser’s extension manager. You will likely also want to reset your internet browser.
If you opt to manually delete the system files and Windows registry entries, utilize the following checklist to make sure you know exactly what files to remove before carrying out any actions. But bear in mind, this can be a difficult task and only computer experts can perform it safely. Furthermore, certain malicious programs have the capability to defend against its removal. It is advisable that you carry out the removal procedure in Safe Mode.
Files:
%UserProfile%\Local Settings\Application Data\DailyProductivityToolsTooltab
%LOCALAPPDATA%\DailyProductivityToolsTooltab
%UserProfile%\Local Settings\Application Data\Google\Chrome\User Data\Default\Sync Extension Settings\difcnlhbpohkmlhkpkimihocbagbijii
%LOCALAPPDATA%\Google\Chrome\User Data\Default\Sync Extension Settings\difcnlhbpohkmlhkpkimihocbagbijii
%UserProfile%\Local Settings\Application Data\Google\Chrome\User Data\Default\Local Extension Settings\difcnlhbpohkmlhkpkimihocbagbijii
%LOCALAPPDATA%\Google\Chrome\User Data\Default\Extensions\difcnlhbpohkmlhkpkimihocbagbijii
Registry:
HKEY_LOCAL_MACHINESoftware\Wow6432Node\DailyProductivityTools
HKEY_LOCAL_MACHINESoftware\DailyProductivityTools
HKEY_LOCAL_MACHINESoftware\Microsoft\Internet Explorer\DOMStorage\dailyproductivitytools.dl.myway.com
HKEY_LOCAL_MACHINE\Software\[APPLICATION]\Microsoft\Windows\CurrentVersion\Uninstall..Uninstaller
DailyProductivityToolsTooltab Uninstall Internet Explorer

 Check cables
/ipk <ProductKey> or /ato [<Activation ID>]
 It is officially confirmed, Windows 11 release date is October 5th. Windows 11 will be released as a free upgrade to all registered Windows 10 users that have supported hardware for it.
The rest of the users will be able to install it via ISO file as a clean installation if their computer supports Windows 10 hardware requirements. The official price for the license for Windows 11 has not yet been set but I assume after release it will be set.
Priority for W11 will have users who are upgrading from W10 as stated by Microsoft.
Also, it was officially confirmed that Android apps will not be running natively in this first release of Windows 11, that feature will come in a future update, official statement below:
It is officially confirmed, Windows 11 release date is October 5th. Windows 11 will be released as a free upgrade to all registered Windows 10 users that have supported hardware for it.
The rest of the users will be able to install it via ISO file as a clean installation if their computer supports Windows 10 hardware requirements. The official price for the license for Windows 11 has not yet been set but I assume after release it will be set.
Priority for W11 will have users who are upgrading from W10 as stated by Microsoft.
Also, it was officially confirmed that Android apps will not be running natively in this first release of Windows 11, that feature will come in a future update, official statement below:
"We look forward to continuing our journey to bring Android apps to Windows 11 and the Microsoft Store through our collaboration with Amazon and Intel; this will start with a preview for Windows Insiders over the coming months,"The rest of the features will be all included inside Windows 11 on launch.
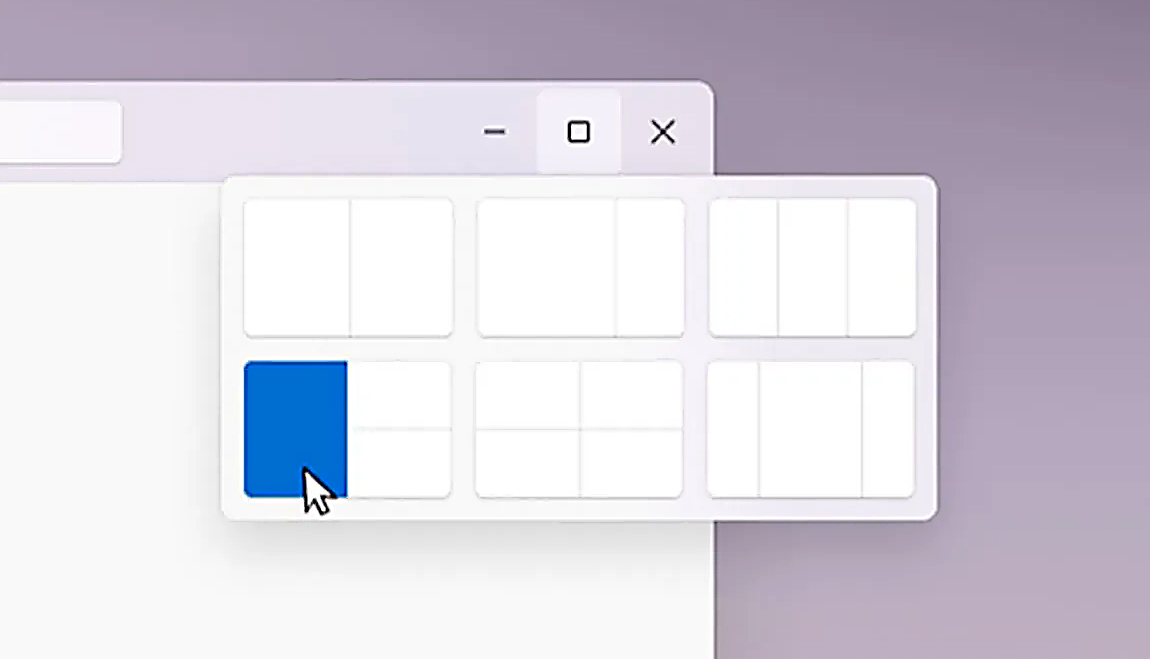 Removing options all together
New Apple's upscaling technology called MetalFX will place iOS and macOS devices back into the gaming world. Apple had great games back in the old days and some all-time hits like the prince of Persia have been made first for apple but along the way, it just lost it.
Same as NVIDIA's DLSS and Intel's XeSS systems, Apple MetalFX also uses AI algorithms to upscale the resolution of output game frames. So, for example, the GPU inside your MAC might render the game at 1080p, but through MetalFX and AI upscaling it will look like a 4K image but have a good frame rate since it is rendered in base resolution.
The ability to make AI strike a good balance between performance and image quality is a key to technology in today's modern gaming and having this technology will help developers a ton to be able to achieve great results on Apple hardware.
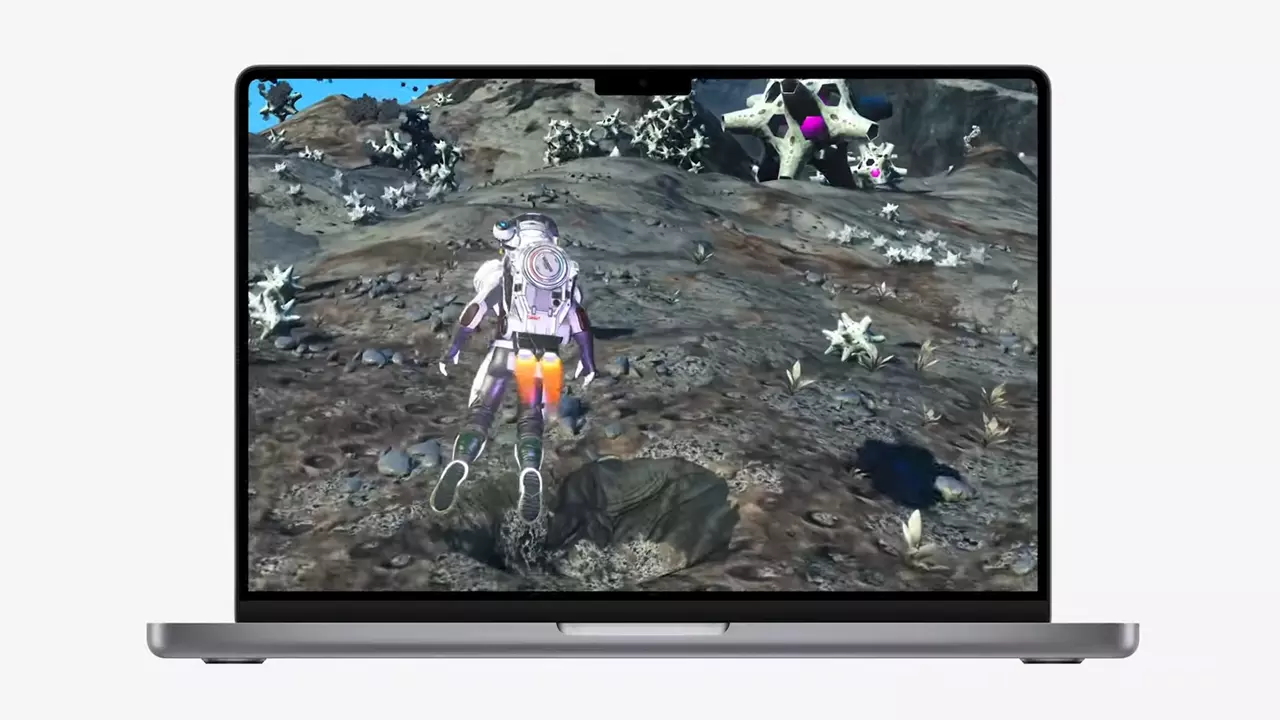
So far three official games that will use this technology and be released natively for Appl hardware are Resident Evil 8 Village, GRID legends, and No Man's Sky. All three games have been confirmed and Resident Evil 8 Village is already sent for review people are impressed since the game can run smoothly on all Apple devices, even ones with an M1 CPU.
When you say Apple gaming is probably the last thing that comes to your mind but truth be told Apple makes more money from games than Microsoft, Nintendo and Sony combined. Also, Apple itself was a big player once regarding computer games as well, Myst and Prince of Persia are games that were made and have been released for Apple first. Bungie was also founded by Apple developers and Halo was originally announced as a Mac game.
Apple has been trying and pushing gaming on its platform since it kind of died down. Today all Sony, Nintendo, and Microsoft controllers work without any issues with all Apple products. Apple also has its own gaming subscription service, Apple Arcade, and its Apple TV is packed with GPU that can rival Xbox ones.
MetalFX API ties and brings it all together, it is designed to get the most performance from the hardware by minimizing overhead.
Now, computers and laptops do not hold any large numbers if we look at the user base, and that could deter developers but if we look at iPad and iPhone things are different there, much different. How same CPU power these devices and how MetalFX is available across all products it is clear that there is a market for games there. No Man's Sky is coming to iPad using these technologies and bringing full computer experience to tablets.
Code 21 is a Device Manager error code that appears when you try to use a hardware device attached to your computer and the Windows prohibits you from using it.
This is due to the Windows experiences problems loading the device driver. This error message is displayed in the following format:
“Windows is removing this device. (Code 21)”
 Error Causes
Error code 21 means that Windows is in the device removal process and the device has not been completely removed. It occurs when you set a device to be removed and then select the same device to run on your system.
Upon your instructions, Windows start to remove that device and when you on the other hand try to use/access the same device that you selected for removal, it kicks up Code 21.
If you are experiencing error code 21 on your PC, it is advisable to resolve it immediately.
Though this error will not damage your system, but will significantly lower the performance of your PC which is definitely something you don’t want especially if you work on your computer daily and use it to perform important time-sensitive errands.
To repair and resolve, try the methods given below:
This is one of the best and easiest ways to resolve code 15 on your system. Wait for a few seconds, and then press the F5 key. This will update the Device Manager view and the error will most probably go away.
Sometimes error codes may pop up due to temporary glitches. To resolve such errors, a simple reboot of your PC is enough. Shut down Windows and then restart your system.
This is most likely to resolve Code 21. However, if the error still persists then this means the underlying problem for code 21 is deeper than you think. Try method 3 to resolve.
As mentioned earlier, the error code 21 may occur if you have selected a device to remove and then you try to reuse it.
To resolve, you may have to install the device again and the driver for that the reinstalled device. To reinstall the driver without any hassle, simply download DriverFIX.
It is a smart, user-friendly, and intuitive software program designed to resolve driver problems. The program is embedded with intelligent device identification technology which:
Furthermore, it enables accurate installation and ensures that your system is running at its optimal speed.
Other features that this program boasts are full backup and restoration, safe USB management, and ejection.
If nothing works, you can try the full backup and restoration feature and restore your PC to its previous state when it was functioning properly before the error occurred.
DriverFIX creates a backup of all your files and data hedging keeps you from disasters like data loss. It restores the system to the time when it was working properly.
Click here to download DriverFIX on your system and resolve error code 21 today.
USB Kill, a USB device is able to fry and damage your computer, mobile phone, router, etc. This device is quite dangerous and can kill electronics the moment it is inserted into an available port. By now people should know that they should not put unknown USB sticks into their devices because of potential virus and malware threats but this raises using unknown sticks to a whole new level.

Kill kits are not really new to the market, they have existed before but lately, technology really progressed and the latest USB sticks are really good, their success rate is around 95% which is pretty high and should not be taken lightly.
The second thing that you really should not play with strange USB sticks is that they dropped in price really hard, although top Kill kits will still go as high as around 300 USD, there are really cheap ones lurking in Ali Express that are just 6 USD!!! that makes them affordable devices for the mass market.
The device is made to take energy and current from the port it is plugged in, multiply it and release its charge back into the device, successfully frying some components immediately. Some more professional Kill sticks can even fry devices even when the device itself is not powered and can be even started remotely.
The point of this article is to make you aware that you should not in any kind of circumstances use and plug-in USB sticks into your devices that you do not know where they come from, especially from the mail!!
 Error Causes
powershell -ExecutionPolicy Unrestricted Add-AppxPackage -DisableDevelopmentMode -Register $Env:SystemRootWinStoreAppxManifest.xml