This is a common Device Manager Error Code that users encounter. It is commonly found on all Windows 2000 and later versions of Windows operating systems. Error Code 36 is usually prompted by the following message:
"This device is requesting a PCI interrupt but is configured for an ISA interrupt (or vice versa). Please use the computer's system setup program to reconfigure the interrupt for this device. (Code 36)"
 Error Causes
Error Code 36 occurs when there is a failure in IRQ translation due to your Windows operating system getting corrupted. This is caused due to a number of triggers, such as:
When programs are removed excessively, some programs are not removed completely and create problems in your computer’s registry.
Also, due to the presence of malware and spyware and other causes mentioned above, your computer registry builds up errors with the time that leads to slowing your PC, time lags, and even result in crashes and freezes.
Error Code 36 can cause internal and external components to malfunction or experience time lags such as DVD drive or printer and hence can severely affect your entire PC.
Error Code 36 is a severe PC error and any attempt at fixing the error must be approached with extreme caution for your PC to start functioning properly again. Here are two methods to fixing your PC.
Changing the IRQ reservation settings is the best way you can rely on to fix the error code. You can do this by changing the BIOS settings of your PC.
The BIOS stands for ‘Basic Input/Output System’ and is the program of your PC’s microprocessor that allows your PC to boot after you switch it on.
Caution needs to be exercised before changing the BIOS settings of your PC. This is because every PC’s BIOS version differs from another and any wrong attempt to change the settings may make matters worse.
It is therefore recommended to refer to hardware documentation that you received with your PC or motherboard and check for the model number and details of your PC’s motherboard.
Only after you have checked and confirmed all the details, should you use the specific BIOS settings required to configure your IRQ reservations?
Error Code 36 isn’t an easy error to remove.
While changing the BIOS settings can work to restore your PC, it may create a whole lot of inconvenience for finding the time and effort to check the hardware documentation details and attempting to change the specific settings and especially, if your PC does not support the options to change IRQ reservations.
Given the high risks of fixing such an error, you can also install software that enables you to fix your slow PC at the click of a few buttons.
Programs such as DriverFIX can enable you to download and replace your outdated drivers with new updated ones without you having to look for them. It will detect which drivers to download based on your PC’s motherboard version from the program’s database and can get rid of error code 36.
Click here to download DriverFIX and remove error code 36 and any other type of Device Manager error from your PC.

 When Task Manager opens, click on the startup tab on top.
 Once you click on startup you will get a list of applications that are set to be started when Windows is booted.
 You can now click on the application and then click on disable on the bottom button, the application status will update in task manager to disabled and it will not be booted anymore when Windows starts. In this same manner, you can enable back some applications if you changed your mind about them.
Please note that some applications are using some services and must have them running or they will not work properly. The best practice is to disable applications you are positive you will not use or use rarely so you do not want them to slow down Windows.
You can now click on the application and then click on disable on the bottom button, the application status will update in task manager to disabled and it will not be booted anymore when Windows starts. In this same manner, you can enable back some applications if you changed your mind about them.
Please note that some applications are using some services and must have them running or they will not work properly. The best practice is to disable applications you are positive you will not use or use rarely so you do not want them to slow down Windows. SweetIM Toolbar for Internet Explorer is a browser add-on which adds various shortcuts to your browsers for easy access. This toolbar also changes your homepage to home.sweetim.com. The toolbar is typically bundled with the free Sweet Instant Messenger program and does not necessarily get uninstalled when Instant Messenger is removed from the user’s PC. Additionally, if the home page and search settings were modified by this toolbar, they need to be manually reverted back by the user.
This extension injects various ads into your browser search results and changes your default search engine. While you are browsing the internet, this software records your website surfing data, clicks, and possibly private information. Several Anti-virus programs have classified SweetIM Toolbar as a potentially unwanted application and are not recommended to keep.
HKEY_CURRENT_USERSOFTWAREMicrosoftWindowsCurrentVersionExplorerAdvanced
A surprisingly large amount of things present at your home can and do interfere with your wi-fi signal making it weak so devices are dropping it, having trouble connecting, or being slow.
Hello and welcome to our latest article where we will take a look at all things that are present in a lot of homes but are very bad for your WI-Fi signal.

Having a router in a bad position can have some really large effects on WI-Fi signal strength and its availability. Usually, we do not give great attention to where we are placing our router but it has been proved over and over again that being close to certain objects does indeed have a great influence on the wireless signal strength and performance.
So, what are these objects and bad positions where we could place the router and effectively kill his Wi-Fi capabilities?
Water will block all radio waves including Wi-FI signals and waves themselves, so having a router next to the aquarium or any large source of water is a bad idea. You should always look at water as something bad for your Wi-Fi and move your router away from it as far as possible.
Paper is another story and example of the dampening effect on radio waves. Did you know that various patterns of paper are used in silent rooms and recording studios in order to eliminate sound reflection from surfaces? Well besides absorbing sound waves, the paper also absorbs Wi-Fi signals and if you have a large bookshelf with a lot of books packed one beside another you just have a great wall of signal absorbing.
The problem with mirrors is in their coating that goes over the glass in order to turn it into the mirror, that coating is metal and as such, it is absorbing signals in large amounts. If you have an old or high-quality mirror that has a silver coating things are even worse since silver will absorb even more waves than modern cheap ones.
Yup, TV is also on this list and for a similar reason as a mirror, although TV does not have coatings of metal, they have something even worse: a large metal plating on the back. Metal plating is there to produce structural integrity of the TV set and provide it with shielding from electromagnetic waves and as such it will prevent Wi-Fi waves as well. Do not place the router behind your TV.
Now when we covered mirrors and TV because of the metal they have, we must take a look at the metal itself. Any kind of metal stuff that you might have like baskets, figures, statues, frames, etc will effectively block your signal.
Kitchen appliances like refrigerators, microwaves, ovens, stoves, etc. along with home appliances and utilities like dishwashers, washing machines, dryers, etc are large metal objects enclosed in a metal cage that will block signals from spreading further and it is no secret that most kitchens have weaker Wi-Fi because of this reason.
This is a logical conclusion as to everything explained so far if you have a workout room or small gym at home it is probably filled with weights that are metal and have mirrors inside, all of that will interfere and block signals.
Thick walls will dampen signals, thick walls from bricks will dampen even more and concrete walls will kill it almost completely. Any kind of metal reinforcement wiring inside walls will reduce and kill signals as well.
This is somewhat important if you have a floor beneath or under the room where is your router located, but for the same reason how walls are blocking your signal floor and ceiling can do it as well, especially since most of the time they are made of some stronger material like concrete with metal fence inside.
If you have a heating system that is composed of metal radiators with water inside, then in terms of Wi-Fi signal strength you have an aquarium but in a metal box, and as such it will greatly reduce signal strength.
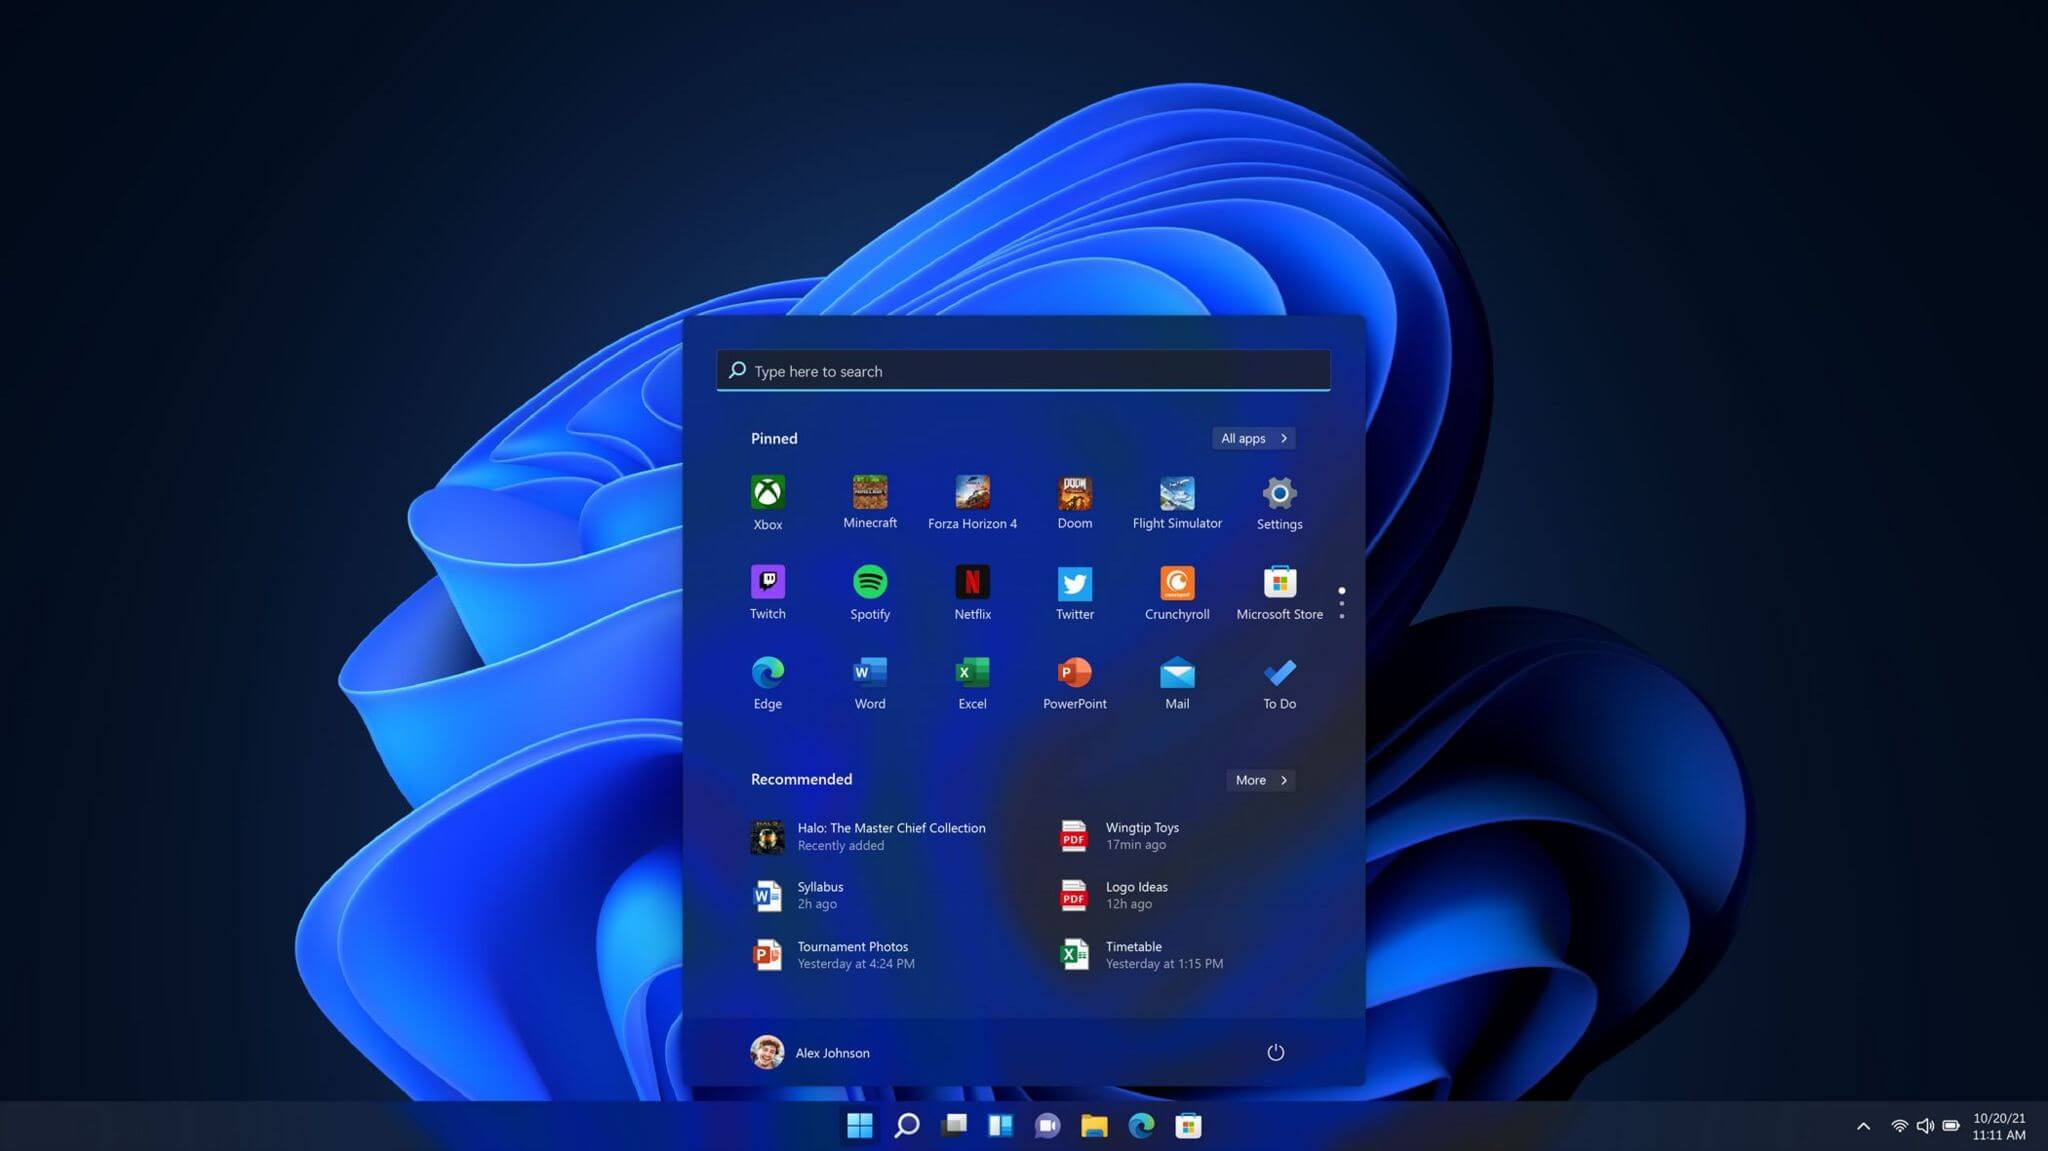 One of the first things that everyone saw when Microsoft has unveiled Windows 11 is its Start menu. Funny enough this is what has caused most of the divide among users, some find it interesting, and some do not like it. Truth is, it is different, and it is centered in the middle instead of the lower left part of the screen.
It has been confirmed however that the Start menu can be moved to any part of the screen so if you want, you could place it on the lower left as it has always been.
Live tiles do not longer exist in the Start menu, instead, we have styled simple icons.
One of the first things that everyone saw when Microsoft has unveiled Windows 11 is its Start menu. Funny enough this is what has caused most of the divide among users, some find it interesting, and some do not like it. Truth is, it is different, and it is centered in the middle instead of the lower left part of the screen.
It has been confirmed however that the Start menu can be moved to any part of the screen so if you want, you could place it on the lower left as it has always been.
Live tiles do not longer exist in the Start menu, instead, we have styled simple icons.
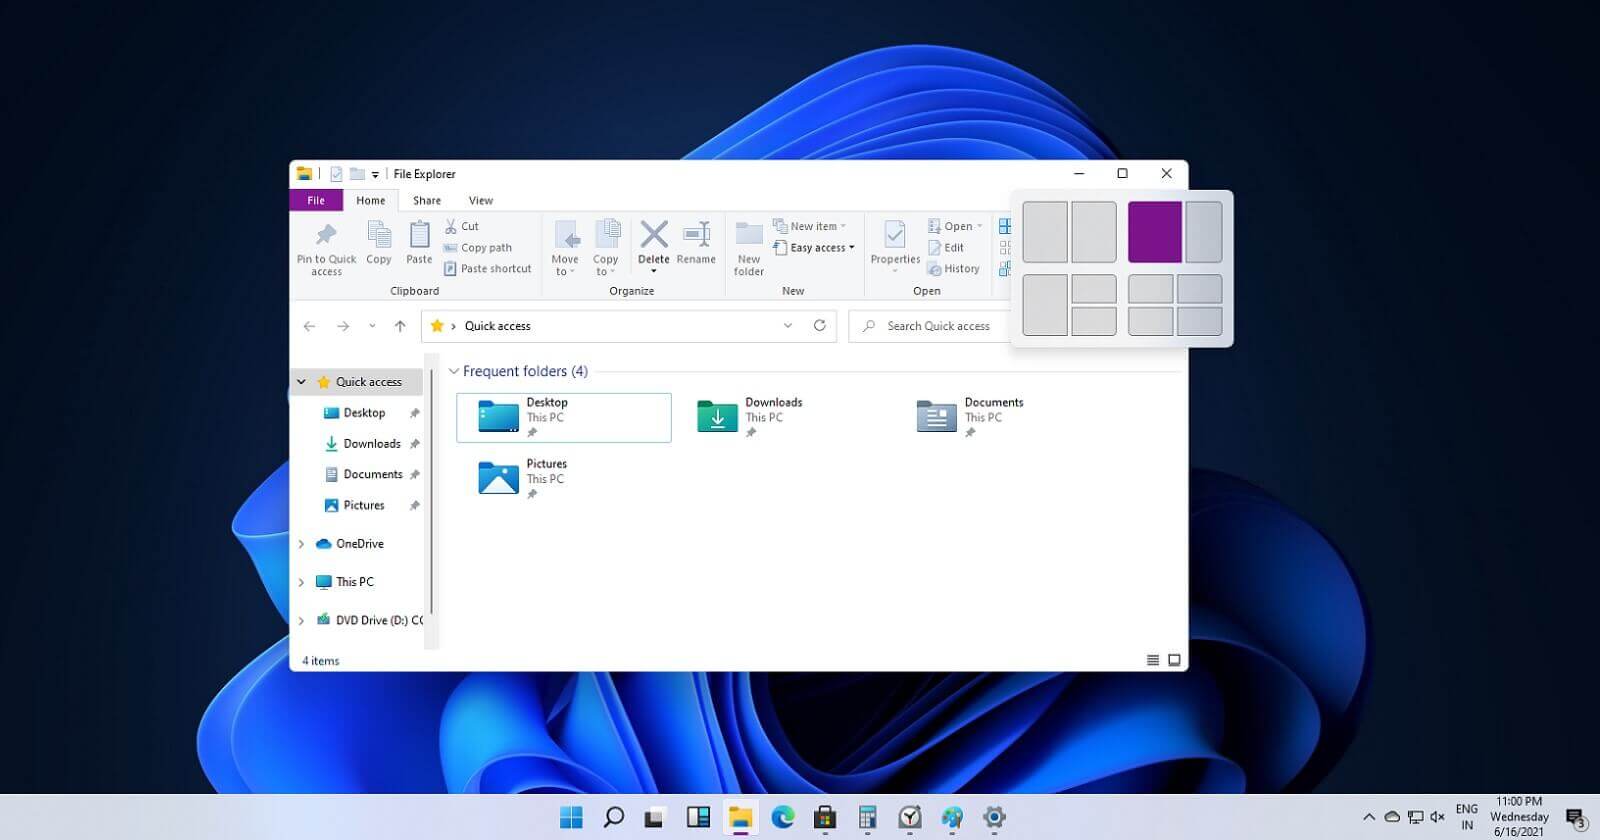 If you have used the cascade option in previous Windows versions then it is most likely that you will like the new Snap controls.
You can quickly snap windows side by side, or arrange them in sections on your desktop just by hovering over maximize button on the title bar.
If you have used the cascade option in previous Windows versions then it is most likely that you will like the new Snap controls.
You can quickly snap windows side by side, or arrange them in sections on your desktop just by hovering over maximize button on the title bar.
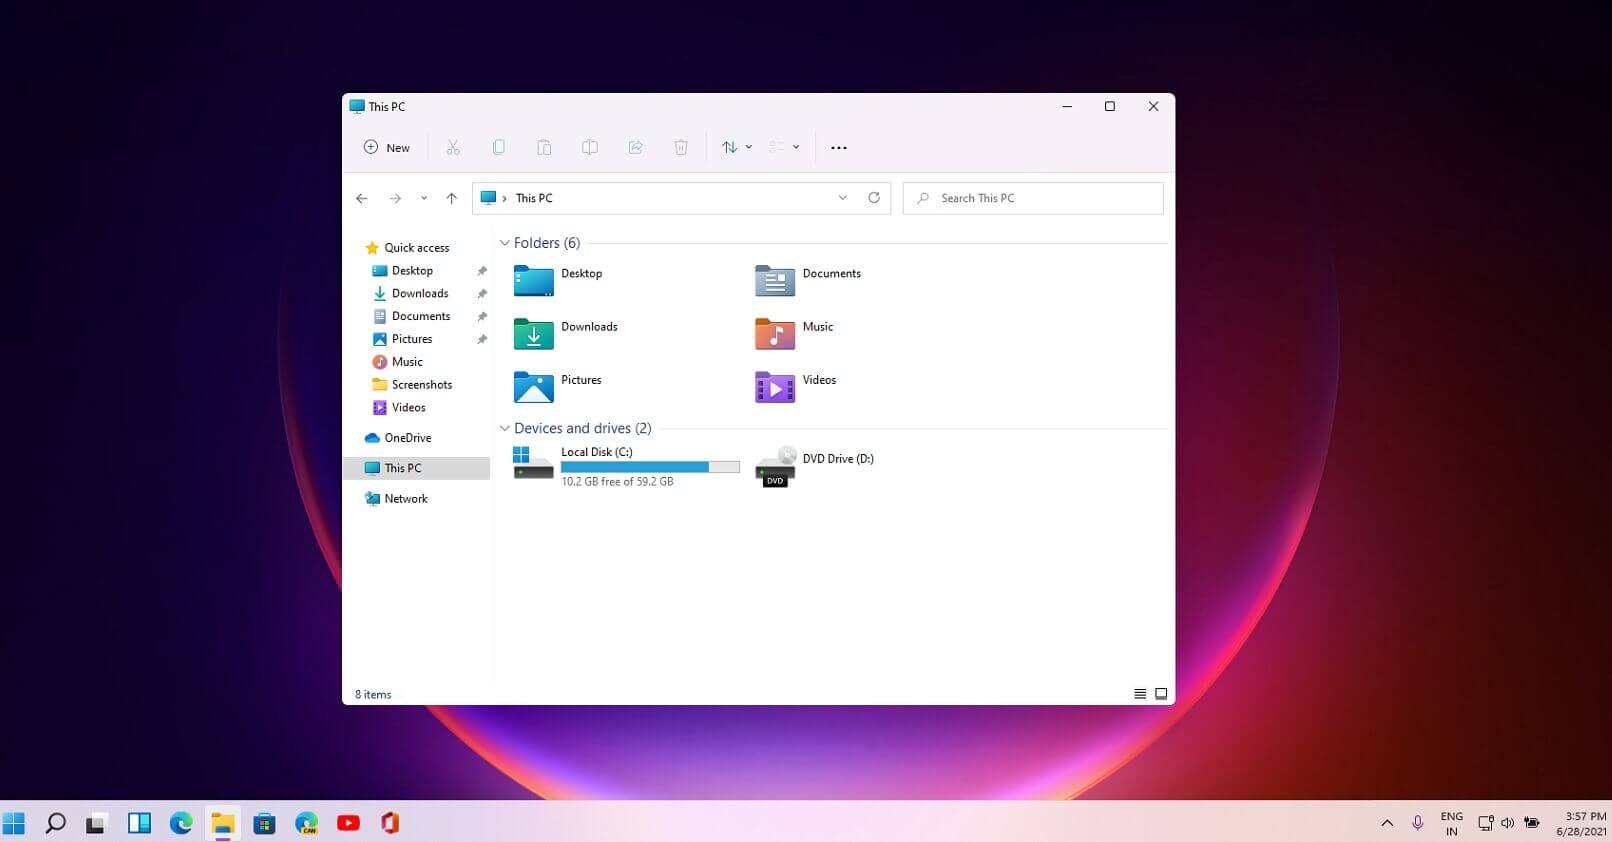 File explorer has gone through some visual and design changes, the ribbon on top has been completely removed and replaced with a header-like feature with a slick and clean design.
The header contains a nice organized and designed single row of icons like cut, paste, copy, rename, delete, and new folder icons.
File explorer has gone through some visual and design changes, the ribbon on top has been completely removed and replaced with a header-like feature with a slick and clean design.
The header contains a nice organized and designed single row of icons like cut, paste, copy, rename, delete, and new folder icons.
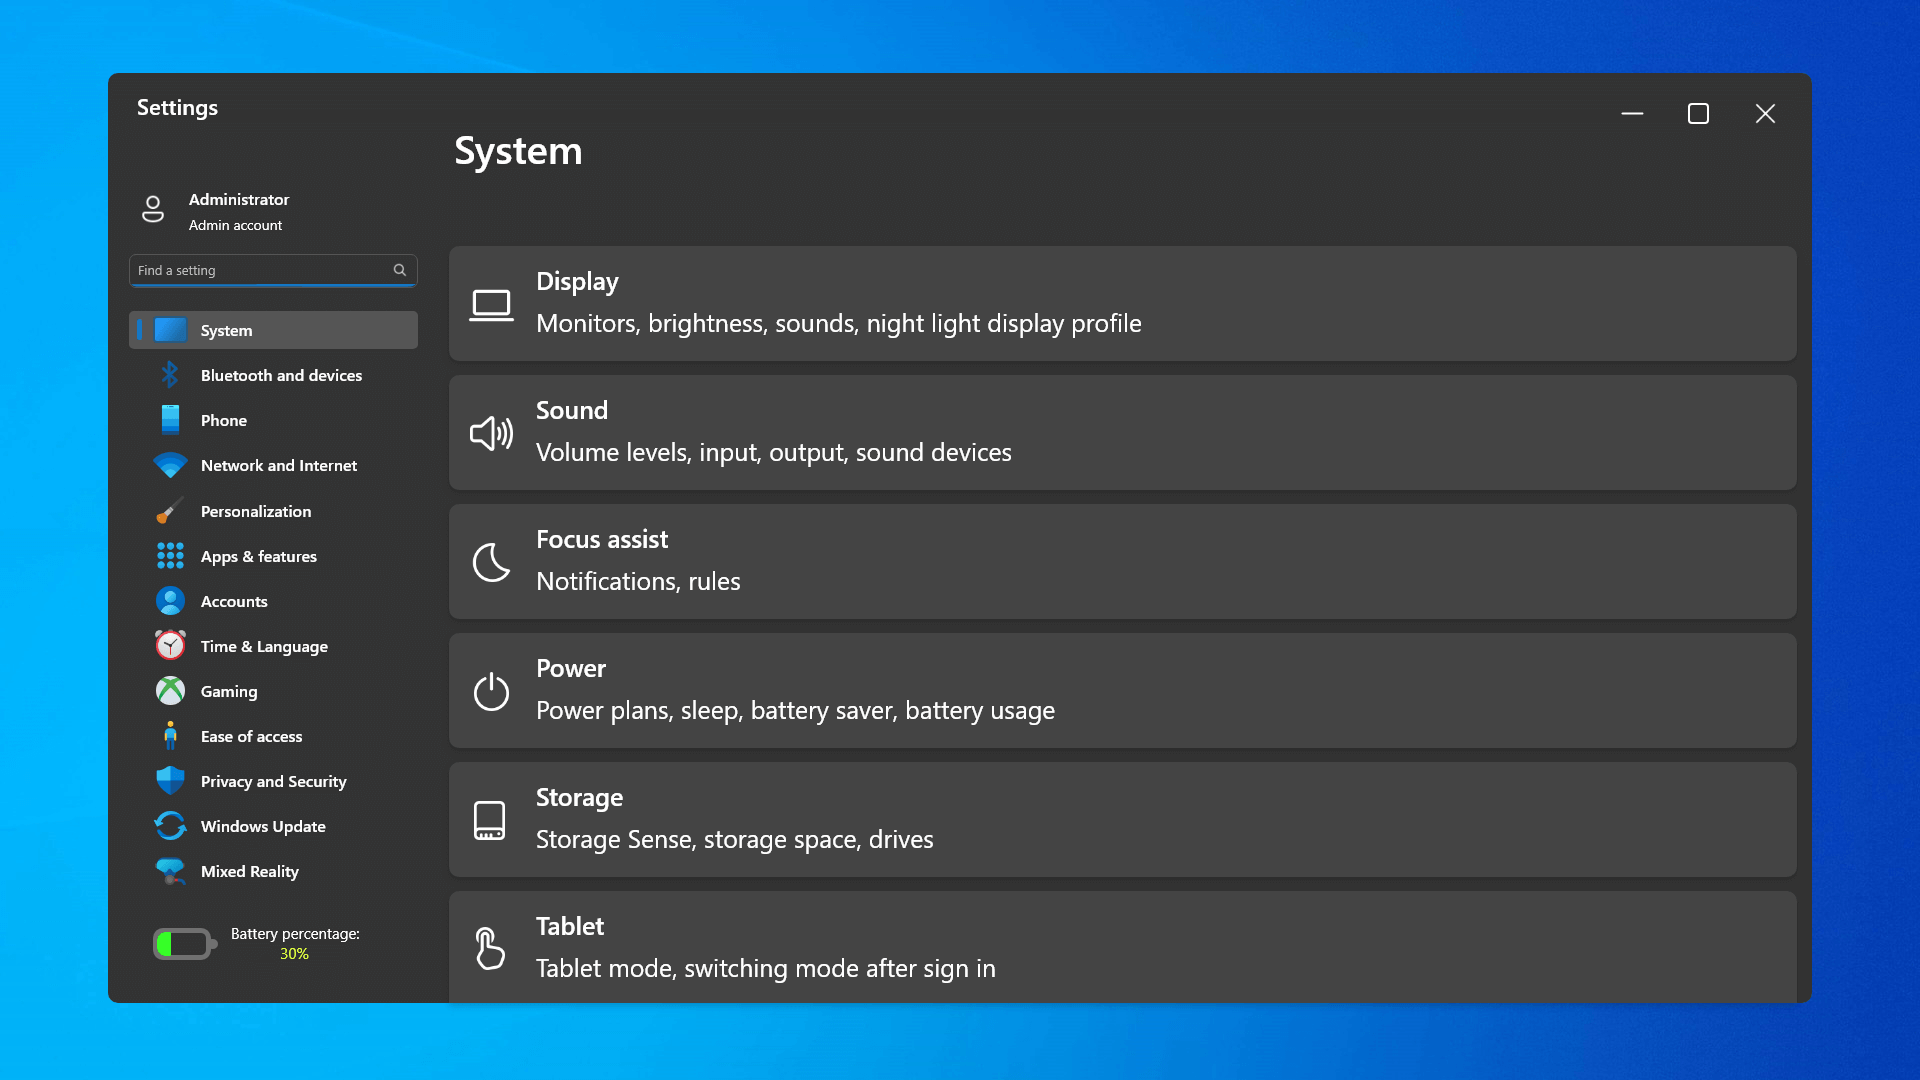 The settings app also has gone through visual and design changes. It has a new design that is very visually appealing and navigation has been simplified and more organized. Finding the right and desired setting is much faster and clearer now.
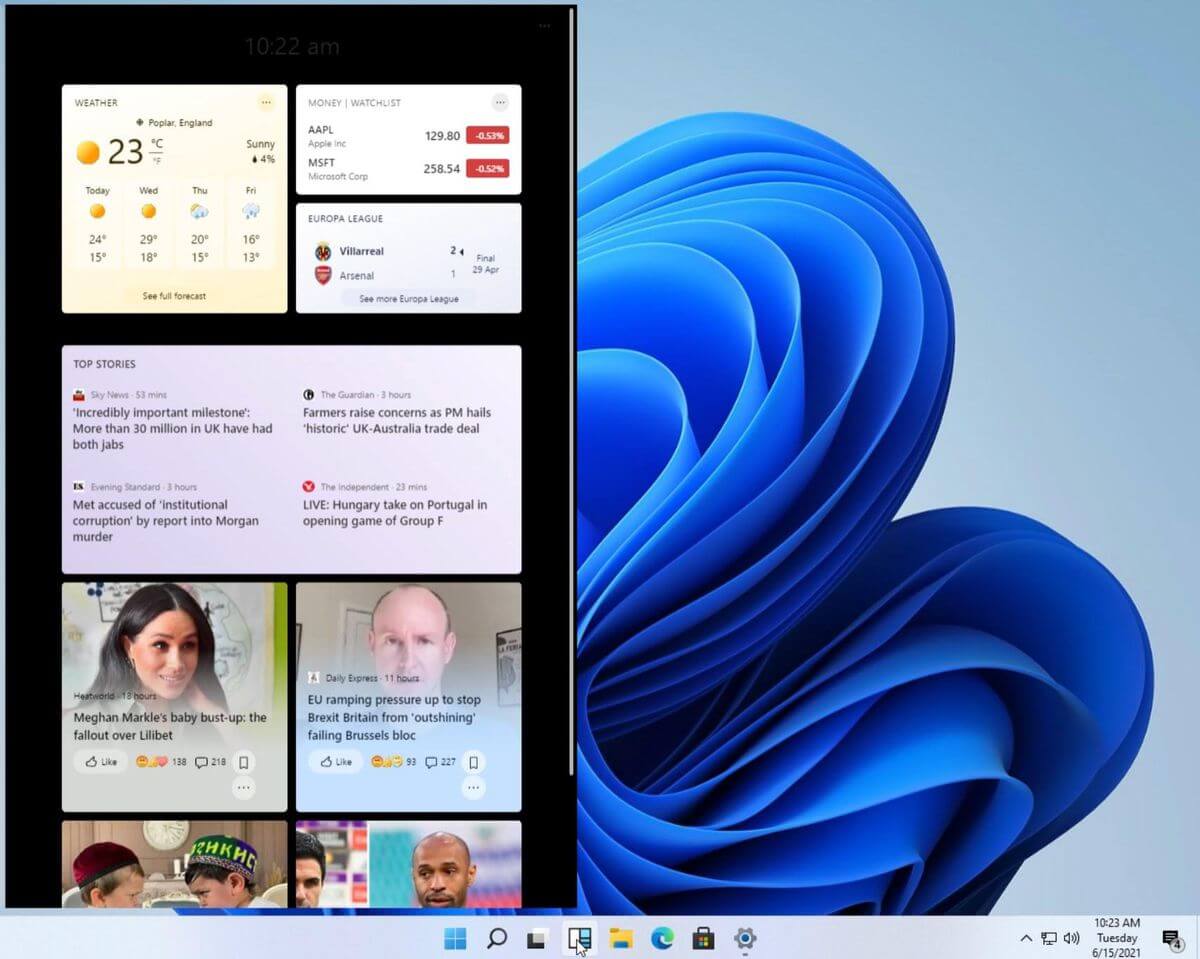 Yes, widgets are back but not like you remember them.
Instead of being all-time present at your desktop like once they used to be, now there is a button on the taskbar which brings the widget bar up that contains desired widgets. This way they are easily accessible and do not clutter desktops.
So far we have weather, news, calendar, and stocks widget but we will see how development on these goes. I expect to have community-made widgets like in old days for all of our needs.
Yes, widgets are back but not like you remember them.
Instead of being all-time present at your desktop like once they used to be, now there is a button on the taskbar which brings the widget bar up that contains desired widgets. This way they are easily accessible and do not clutter desktops.
So far we have weather, news, calendar, and stocks widget but we will see how development on these goes. I expect to have community-made widgets like in old days for all of our needs.
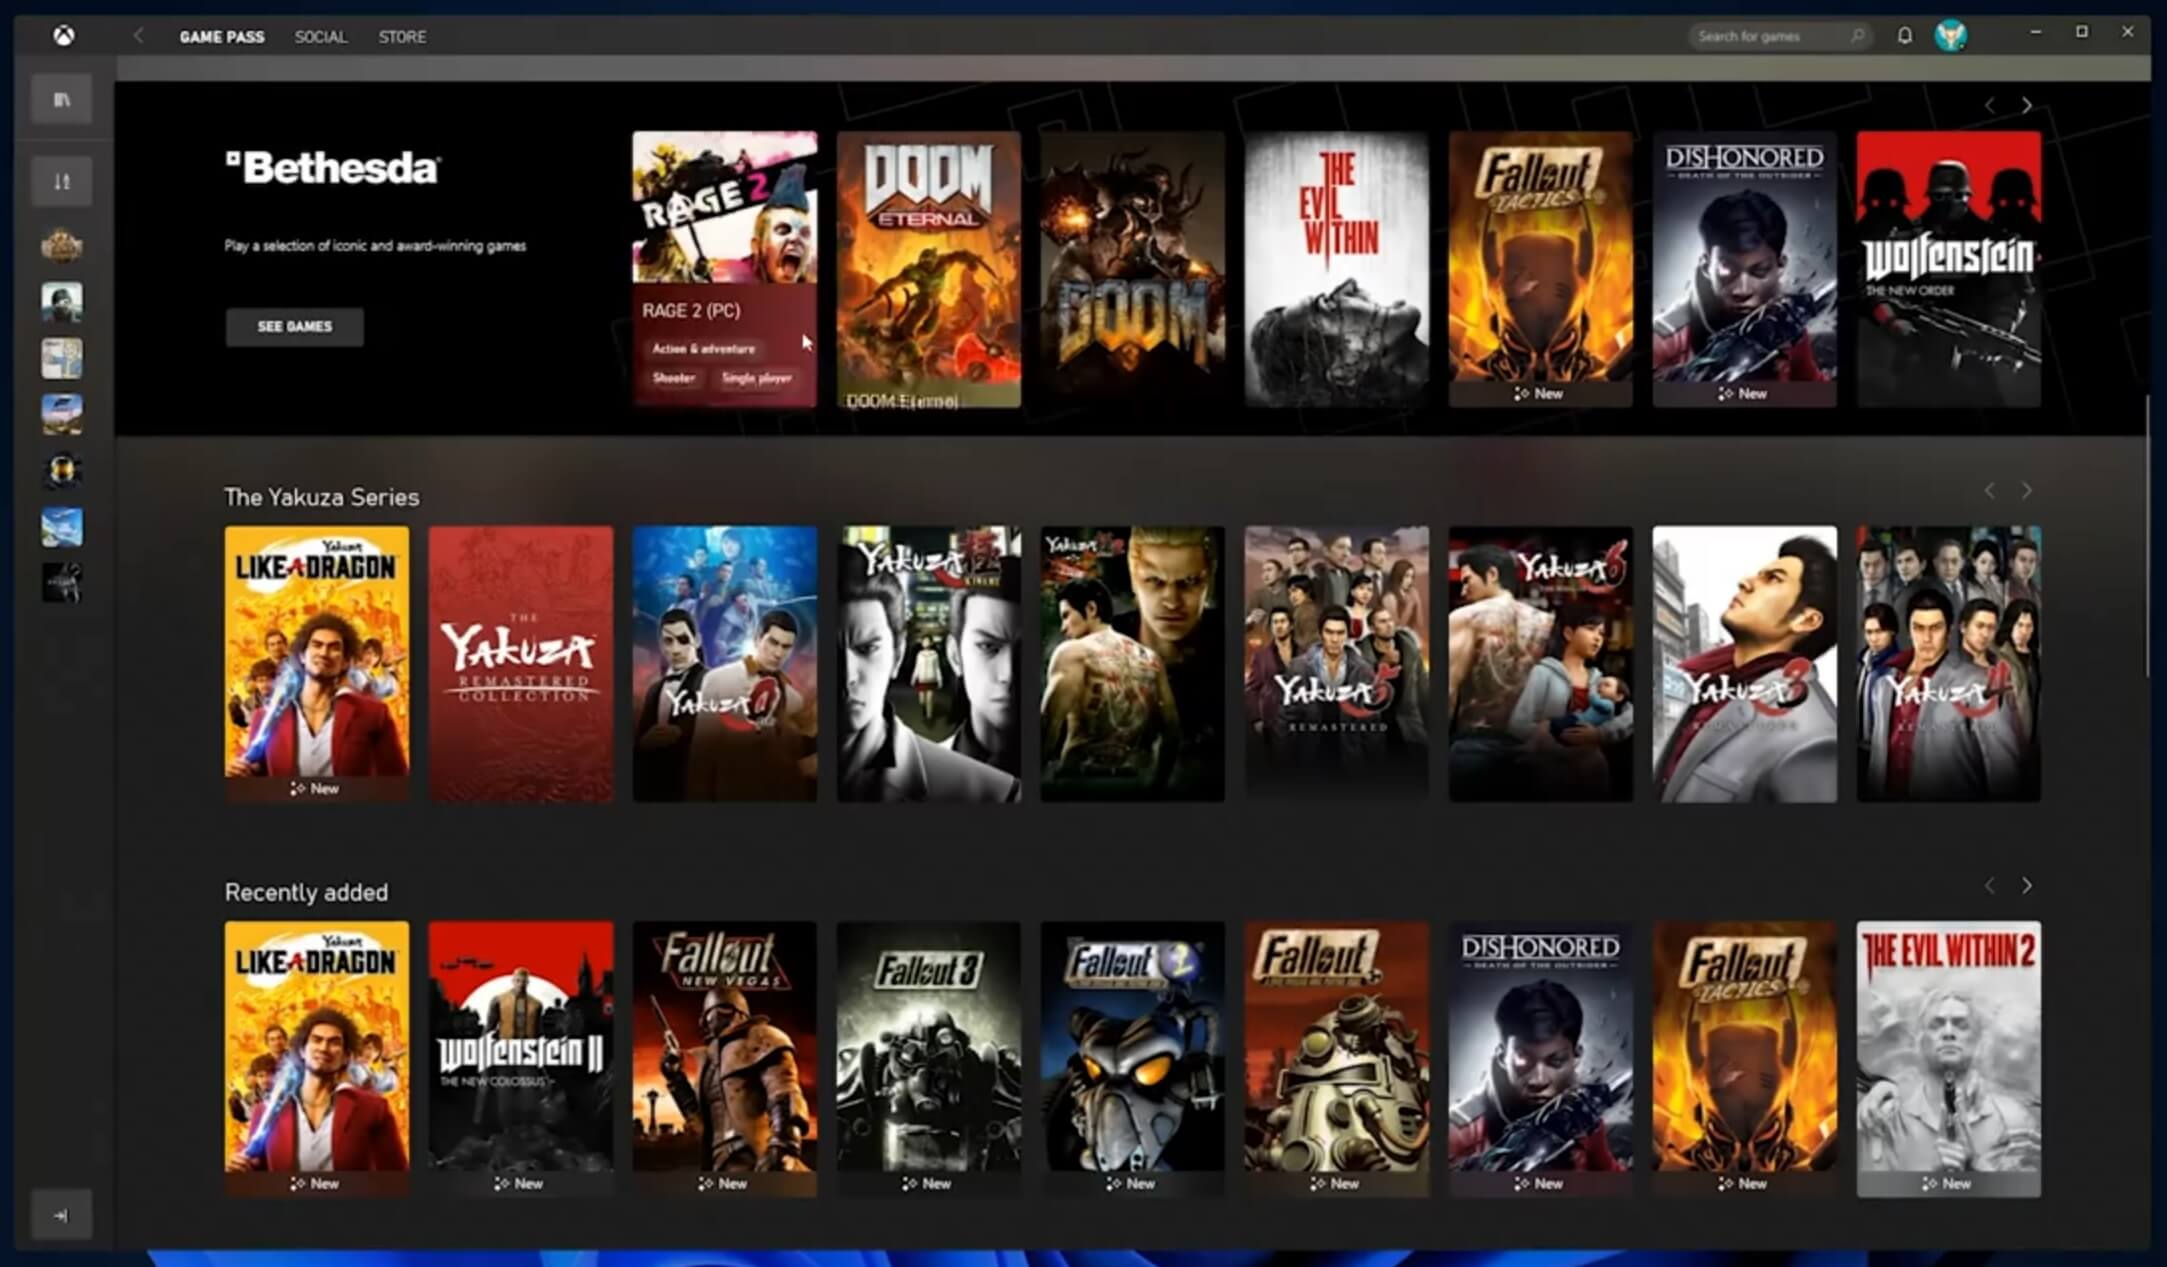 The new Xbox app is now integrated into Windows 11, offering quick access to Xbox Game Pass games, the social parts of the Xbox network, and the Xbox store.
 As widely known by now Windows 11 will require you to have a TPM 2.0 module capable CPU in order to install it.
This system requirement has caused a lot of controversies but essentially it seems that MS's goal is to protect your personal data by using this module.
The upside of course is that your data will be protected much more than in previous Windows versions, the downside, of course, will be that you will need newer hardware to run OS on it.
and that is essentially it, keep on tuned on more Windows 11 information and overall articles tied to PC and technology here at errortools.com
As widely known by now Windows 11 will require you to have a TPM 2.0 module capable CPU in order to install it.
This system requirement has caused a lot of controversies but essentially it seems that MS's goal is to protect your personal data by using this module.
The upside of course is that your data will be protected much more than in previous Windows versions, the downside, of course, will be that you will need newer hardware to run OS on it.
and that is essentially it, keep on tuned on more Windows 11 information and overall articles tied to PC and technology here at errortools.com “Error 651: The Modem (or other connecting device) has reported an error.”
 Error Causes