Firewall is preventing or blocking connections

As you know, the Windows Firewall is designed not just to protect your computer from viruses and malware, and other security threats but it’s also designed to block any program from accessing the internet. Users are given the option to block both inbound and outbound traffic for any apps on their computers. However, this kind of option can often lead to not being able to access the internet.

In such cases, when you try to run the Windows Firewall Troubleshooter or the Windows Network Diagnostic troubleshooter, it will throw an error message that says, “Windows Firewall is preventing connections to your computer. The Windows Firewall rule HSS DNS Leak Rule may be blocking your connection”. If you are in this kind of scenario, then you’ve come to the right place as this post will guide you on how exactly you can fix this error.

When you encounter this kind of error, there are several options you can check out to fix it. You can try to allow an app or feature through the Windows Firewall or uncheck the HSS DNS leak rule in both private and public. For more details, refer to the suggestions provided below.

Option 1 – Try to allow an app or feature through Windows Firewall

The first thing you can do to get rid of the error is to allow a feature or app through the Windows Firewall. To do this, follow these steps:

  • Open the Windows Defender Security Center.
  • From there, select the Firewall and Network Protection option.
  • Next, click on the “Allow an app through firewall” option and then click on the “Change Settings” button and make sure that you have administrative privileges.
  • After that, select the app or feature you want to allow through the Firewall from the menu. You also have the option to manually add the app by using the “Add an App” option.
  • Then select the between the type of network an app can access such as:
    • Private Network will allow the app to connect to the internet only at home or work.
    • Public Network will allow the app to connect to the internet from anywhere, including Public WiFi hotspots.
  • Once done, restart your computer and see if it fixed the error or not.

Option 2 – Try to uncheck the HSS DNS leak rule in both private and public

The next thing you can do to fix the error is to uncheck the HSS DNS leak rule in both private and public. You can do this by following these steps:

  • Open the Windows Defender Security Center.
  • From there, select the Firewall and Network Protection option.
  • After that, click on the “Allow an app through firewall” option and then click on the “Change Settings” button and make sure that you have administrative privileges.
  • Next, scroll down until you see the HSS DNS leak rule in both private and public option and then uncheck it.
  • Now restart your computer and check if the error is now gone.

Do You Need Help with Your Device?

Our Team of Experts May Help
Troubleshoot.Tech Experts are There for You!
Replace damaged files
Restore performance
Free disk space
Remove Malware
Protects WEB browser
Remove Viruses
Stop PC freezing
GET HELP
Troubleshoot.Tech experts work with all versions of Microsoft Windows including Windows 11, with Android, Mac, and more.

Share this article:

You might also like

Command prompt tips and tricks
Hello and welcome to errortools articles. Today we will talk about some great and awesome tips and tricks for the command prompt. Commands which can make your life easier and your workday more pleasant. That being said let's dive in right into muddy waters and swim out with new knowledge.

Tip 1: Read Motherboard information

There are a lot of reasons why you would like to read information from your motherboard, maybe you would like to upgrade your BIOS, perhaps you would like to know the serial number, maybe even the version number. Well, you can, type the following code into the command prompt and you will receive all information about your motherboard.
wmic baseboard get product,version,serialnumber,product

Tip 2: Copy command output to clipboard

Getting information from the command prompt to a word processor, into an email or any other medium can be somewhat troublesome, usually, people tend to screenshot or write from a command prompt into another destination, which could induce errors, and let's be honest, it is not practical. You can copy command output directly into the clipboard ready for pasting it anywhere with | clip. So for example if you would like to paste the directory structure of your c drive command would look like: dir c: | clip, now output would be placed into the clipboard ready to be pasted anywhere needed.

Tip 3: Erase data permanently

When you delete data on your hard drive, what really happens is that files are marked with a marker which marks that space for new data writing, but the data itself is still present and can be brought back. This sometimes could impose problems but if you would type: cipher /w:c Windows will write random data over each marked file deleting it forever without means to be brought back.

Tip 4: Manage your IP address

If you would like to play with your IP address and do fancy stuff with it do the following: ipconfig /release to release your IP address ipconfig /renew to renew your IP address ipconfig /flushdns to flush down DNS information and enjoy a new browsing start.

Tip 5: Check to see are packets reaching the desired location

You installed a new LAN printer, or a new switch, maybe you want to check if your new site is up and running. Use ping destination in order to see if TCP packets are reaching desired information, you can use it with a specific address like ping 192.168.1.1 or you can type a web address, for example, ping google.com and see if a connection can be established.

Tip 6: Get information about a specific command

So you learned some command prompt commands, but you do not know all of their configuration or switches? No worries, just type command/? to get a list of available switches for it. For example ipconfig/? will write you a list of available switches for ipconfig command.

Tip 7: Link and execute multiple commands one after another.

Let us say that for example, you would like to copy files into a different folder, then rename some and delete others and you need to do a couple of times. Instead of writing command after command once each one is finished link them with && and they will execute one after another.

Tip 8: Scan and repair files.

In order to scan files and repair broke or corrupted ones write in the command prompt: sfc /scannow. Please know that this command can take a long time since it is solely dependant on the number of files, their size, and the power of the computer.

Tip 9: Manage and configure your computer energy

Command powercfg will let you manage and see the power configuration of your computer. Just write powercfg/? and see what you need and want to change or get information about.

Tip 10: Associate files with applications

Windows already has some file associations defined, and some applications take over some type of files but if you want to take control into your own hand use assoc command. For example assoc.txt= "APPLICATION NAME" will associate txt files with the provided application.

Tip 11: Hide files and folder.

Do you have some folder or file with information that you do not want to be seen when someone opens file explorer? Use attrib +h <name of file> and hide file or attrib +h /D <folder name> to hide folder.

Tip 12: Get a list of installed computer drivers

Want to know which drivers are installed in your system? Use driverquery and take a look.

Tip 13: Find and locate shared folders

have you shared a folder but forgot which one and where? Do not bang your head on the wall, we have a simple solution for you. just type in command prompt net share and see everything.

Tip 14: Run commands as an administrator

You do not have administrator privileges? Do you want to bypass common blockades?
runas /user:yourdomainadministrator command
That is all that we have for you today, I certainly hope you have found something useful here and that we have managed to teach you some valuable things.
Read More
Purchased Adobe CC applications show as trial
Buying a product and then finding out that is not working is one of the most annoying and disappointing things that a consumer can experience. It is no secret that Adobe software and services online can malfunction or detect somewhat false information and behave accordingly placing buyers in an awkward position. Adobe no matter how huge and great can also still sometimes has software that can misbehave in this way and sometimes downloading their suite and buying it after can not be 100% registered and even after the money is transferred and purchase has been completed you can still have a trial status for your adobe cloud applications. In this guide, we will address this issue and see how we can fix it so you can get back to your creative work in no time. Follow this guide as it is presented step by step.
  1. Wait an hour

    No, seriously, wait an hour. Sometimes transaction and registration of transaction along with activation can take up to one hour of time. If you just made a purchase and you are still under trial in the launcher, give it a little time to detect the purchase and adjust accordingly.
  2. Check to see if your subscription is active

    Sign in to https://account.adobe.com/plans. If you have more than one account, make sure you sign in with the proper one. Under My plans, select Manage plan. In the Plan Information section, check to make sure that your subscription is active. If it’s expired, it's likely why you’re seeing messaging that indicates you are in trial mode or that your trial has expired. If your subscription is showing as active, then an out-of-date payment method may be the issue. To see if your payment information is current, in the Plan information section, select Manage payment. If your payment method isn’t current, update your credit card information in the pop-up window and select Save. Your new payment method will take effect in the next billing cycle.
  3. Sing out and then sign back in

    Open the Creative Cloud desktop app. (Select the icon in your Windows taskbar or the macOS menu bar.) Select the Account icon in the upper right, and then select Sign out. In the confirmation dialog box, select Sign Out. The Creative Cloud apps and services associated with your account are deactivated on the computer. Sign in again to your Adobe account. Launch any Creative Cloud app included in your membership, such as Photoshop or Illustrator. If prompted, sign-in on the next screen.
  4. Update creative cloud applications

    Open the Creative Cloud desktop app. (Select the icon in your Windows taskbar or the macOS menu bar.) Depending on your version of the Creative Cloud desktop app, do one of the following: On the Help menu, select Check for updates. or
    Select the three vertical dots icon in the upper-right corner of the app. Choose Check for App Updates from the menu. If you aren’t using the latest version of your Creative Cloud app, an update prompt appears next to it on the apps list. Select Update.
  5. Remove entries in the HOSTS file

    If the previous solutions do not work, your computer could have trouble connecting to Adobe's activation servers. This could be because of an incorrectly configured Operating System hosts file (Operating system hosts files map host names to IP addresses). To solve this issue, try removing Adobe-related entries from the hosts file. You can remove the Adobe-related entries from the hosts file in two ways: Automatically repair the hosts file using the Limited Access Repair tool: Repair the hosts file using the Limited Access Repair tool. With this method, you do not have to manually edit the hosts file -- the tool automatically repairs the file. Reset the hosts file manually: If the issue is not fixed even after you run the Limited Access Repair tool, reset the hosts file manually: To reset the hosts file on Windows, do the following: Navigate to C:\WINDOWS\System32\drivers\etc. Open the hosts file with a text editor such as Notepad. Check for any Adobe-related entries in the hosts file. If there are Adobe-related entries in the hosts file, move the file to the desktop, for example by dragging. Delete the Adobe-related entries from the hosts file. Make sure that you do not delete any other entries. Save the hosts file that you edited in the previous step. The updated hosts file should not have any Adobe-related entries. Move the file from desktop to the original location: C:\WINDOWS\System32\drivers\etc. When moving the file, select the Replace option. To reset the hosts file on macOS, do the following: To find the hosts file, open Finder and then choose to Go > Go to Folder. In the box, type the following location and then press Return: /private/etc/hosts If you are unable to locate the file, it means that the hosts file is hidden. Type the following command in terminal to unhide the file, and then repeat Step 1. chflags nohidden /etc/hosts Open the hosts file using a text editor such as Text Edit. Check for any Adobe-related entries in the hosts file. If there are Adobe-related entries in the hosts file, move the file to the desktop, for example by dragging. Delete the Adobe-related entries from the hosts file. Make sure that you do not delete any other entries. Save the hosts file that you edited in the previous step. Move the file from the desktop to the original location: /private/etc/hosts. When moving the file, select the Replace option.
Read More
Radeon Settings are currently not available
One of the most common brands of GPUs that comes in a large number of computers is AMD’s Radeon Graphics processing units. AMD included the Radeon Settings panel so that users can control how the hardware functions. However, as of late, a lot of users reported that the Radeon Settings panel throws an error that says, “Radeon Settings are currently not available. Please try again after connecting AMD graphics” when they try to use it. This kind of error in the Radeon Settings panel is most likely caused by either corrupted drivers or incompatible drivers. If you are one of the users who are facing this problem, worry not for this post will guide you in fixing this error. You can either use the Device Driver Uninstaller or change the driver version. For more details, make use of the options provided below.

Option 1 – Try to use the Device Driver Uninstaller

The first thing you can do to fix the problem is to uninstall the AMD Radeon drivers by using the Device Driver Uninstaller software. After you’ve uninstalled the AMD Radeon drivers using this software, go to the official website of AMD to download the AMD Radeon drivers. Once you’ve downloaded them, you can install them by simply running the executable file. Once the installation of the new AMD Radeon drivers is done, try to open the Radeon Settings panel and see if the error is now fixed or not. If not, refer to the next given option below.

Option 2 – Try changing the Driver version

If you have followed the instructions in the first option then you can proceed to the next given steps below.
  • Now that you’ve completely uninstalled the AMD Radeon drivers and reinstalled their latest working versions, check if the drivers are still updating. If they are, you need to stop them.
  • To disable the drivers being automatically updated, you need to go to the Group Policy Editor by tapping the Win + R keys to open the Run utility and then type “gpedit.msc” in the field and tap Enter or click OK.
  • After opening the Group Policy Editor, navigate to this policy setting: Computer Configuration > Administrative Templates > System > Device Installation > Device Installation Restrictions
  • From there, double click on the “Prevent installation of devices that match any of these device IDs” policy setting to open a new window, and from this window, you will see the following description of the setting:
“This policy setting allows you to specify a list of Plug and Play hardware IDs and compatible IDs for devices that Windows is prevented from installing. This policy setting takes precedence over any other policy setting that allows Windows to install a device. If you enable this policy setting Windows is prevented from installing a device whose hardware ID or compatible ID appears in the list you create. If you enable this policy setting on a remote desktop server the policy setting affects the redirection of the specified devices from a remote desktop client to the remote desktop server. If you disable or do not configure this policy setting devices can be installed and updated as allowed or prevented by other policy settings.”
  • Now set the radio button of the policy setting to “Enabled”. This will turn off the delete confirmation prompt. Note that setting the radio button to either Not Configured or Disabled will turn off the driver being automatically updated.
  • Next, click on the Show button under the Options section. And in the field that pops up, type in the Hardware ID of your GPU and click OK. You can find the GPU’s Hardware ID under this location: Device Manager > <DEVICE NAME> Properties > Details > Hardware IDs
  • Once you’re done, click the Apply and OK buttons to save the changes made.
  • Close the Group Policy Editor and restart your PC and see if the “Radeon Settings are currently not available. Please try again after connecting AMD graphics” error is now fixed.
Read More
How to Fix Hal.dll Error Code

Hal.dll Error - What is it?

Hal.dll error is a type of dynamic link library error that is common in Windows. Hal.dll is the critical file in all Windows installations and the error occurs when this file cannot be correctly loaded. Hal is the abbreviation for ‘Hardware Abstraction Layer’. Communication between Windows and different PC hardware is facilitated with this file. The error causes inconvenience and hampers your ability to use the hardware. The error message is displayed in either one of the following formats:
  • "Windows could not start because the following file is missing or corrupt: C:Windowssystem32hal.dll. Please re-install a copy of the above file."
  • "Cannot find WindowsSystem32hal.dll"
  • "C:WindowsSystem32Hal.dll missing or corrupt: Please re-install a copy of the above file."

Solution

Restoro box imageError Causes

Hal.dll error occurs due to multiple reasons. These include:
  • BIOS are not configured properly
  • Damaged hard drive
  • Hal.dll file is missing, damaged, or corrupt
  • Viral Infection

Further Information and Manual Repair

To fix and resolve the Hal.dll error code on your system, you don’t always have to hire a professional technician for the job. Though Hal.dll error is critical but easy to resolve, here are some solutions that you can try to fix it right away even if you don’t have any technical expertise.

1) Restart Your PC

Sometimes this can be a temporary error, so try restarting your PC. If the error is resolved then that’s great. However, if it still persists, then try other solutions.

2) Change the Boot Order

The underlying cause for the Hal.dll error is often not properly configured BIOS; if this is the cause, simply change the boot order of the bootable devices like your hard drive. The BIOS setup utility is used to change boot order settings. This can be done by restarting your PC. Once you restart, press F2 to enter the setup. Now go to SATA operation and change RAID AHCI to RAID ATA. Save changes and then exit. By doing so, you will be able to re-configure the BIOS and resolve the error.

3) Use BOOTMGR

Another way to resolve is to update the volume boot code to use BOOTMGR. To do this, access advanced startup options, open the command prompt and type bootsect command and then press Enter. Run the command and then you’ll get the following message: C: (\?Volume{37a450c8-2331-11e0-9019-806e6f6e6963}) Successfully updated NTFS filesystem bootcode. Bootcode was successfully updated on all targeted volumes. After that close the command prompt. This is most likely to resolve the error.

4) Repair Registry With Restoro.

In case the error is still not fixed, then this means that the problem is bigger than you thought. It may be due to hard drive failure, viral infection, or sometimes because of hal.dll file corruption. In the event of these error causes, it is recommended to download Restoro. Restoro is an advanced, next-generation, and multi-functional PC repair tool embedded with numerous utilities like a registry cleaner, an antivirus, and a system optimizer. The registry cleaner utility:
  • Scans for all registry issues
  • Wipes out the unnecessary files saved in the hard drive like the junk files, cookies, internet history, and temporary files
  • Cleans the disk
  • Repairs damaged and corrupt files
  • Restores the registry
The antivirus utility scans and removes all malicious software from your PC including viruses, Trojans, malware, adware, and spyware. Simultaneously, it also boosts the speed of your system. It is safe and efficient PC repair software. It has simple navigation and a user-friendly interface. Whether you are using Windows 7, 8 or Vista, it is compatible with all. It can also be used on Windows XP. Click here to download Restoro and resolve the Hal.dll error today!
Read More
Diagnosing your PC/Preparing Automatic Repair
Windows 10 is has a lot of features that help a user in optimizing a computer. So when the operating system encounters a problem, it is able to provide users with proper resources to get the problem fixed. There are even times when a user is not notified and an issue is either being repaired or dodged in the background. This kind of feature is known as the Diagnosis of the Automatic Repair feature that starts when your computer is booting. In such times, you will either see the “Diagnosing your PC” or “Preparing Automatic Repair” message on your screen. Although this feature is useful and has proven to be effective, some users reported that the process gets stuck. If you experience the same problem, read on as this post will guide you on what to do to fix it but before you start troubleshooting the problem, you might want to perform a Hard Boot first. All you have to do is to power down your computer, remove the battery and the AC adapter and then reconnect them. After that, tap and hold the power button for about 20 seconds and see if your computer boots up properly. If it doesn’t, follow the given fixes below.

Option 1 – Try disabling the automatic Startup Repair

The Automatic Startup Repair window will automatically open during boot when you have some system driver-related problem. So if you think that this is where the problem lies, you can try to disable the automatic Startup Repair.
  • Click on Troubleshoot and go to the Advanced options.
  • After that, select Command Prompt and execute the following command:
bcdedit /set recoveryenabled NO
  • Restart your computer after that and then check.

Option 2 – Run the System File Checker

System File Checker or SFC is a built-in command utility that helps in restoring corrupted files as well as missing files. It replaces bad and corrupted system files to good system files that might be the cause why you’re facing this problem. To run the SFC command, follow the steps given below.
  • Type “cmd” in the Start search and then right-click on the appropriate search result.
  • Next, select “Run as administrator” to open Command Prompt with admin privileges.
  • After opening Command Prompt, type in sfc /scannow
The command will start a system scan which will take a few whiles before it finishes. Once it’s done, you could get the following results:
  1. Windows Resource Protection did not find any integrity violations.
  2. Windows Resource Protection found corrupt files and successfully repaired them.
  3. Windows Resource Protection found corrupt files but was unable to fix some of them.
  • Now restart your computer and see if the problem is fixed or not.

Option 3 – Run CHKDSK to check your disk for errors

When it comes to some issues concerning the hard drive or removable devices, there is a utility in Windows that might help which is called “chkdsk”. This error check utility can help with several issues in the system.
  • Tap the Win + S keys to open the Search box.
  • Then type “command prompt” in the field and from the search results that appear, right-click on Command Prompt and select “Run as administrator”.
  • After opening an elevated command prompt, copy and paste the following command and hit Enter:
chkdsk /r /f
  • Now if you are prompted to run CHKDSK after your reboot your computer, just tap Y and reboot your PC.
  • If CHKDSK is not able to find any errors, tap the Win + E keys and navigate the access window. From there, right-click on the concerned drive and click on Properties.
  • After opening Properties, click on the tab Tools and then click on the “Check” button under the Error-checking section.
  • Wait until the process is completed and then restart your computer.
  • Once your computer has restarted, try accessing the file and check if the error persists.

Option 4 – Run the DISM tool

The next thing you can do is run the DISM tool. This tool is known to repair potentially corrupted files in your system as having them could also system issues like your computer getting stuck in the “Diagnosing your PC” or “Preparing Automatic Repair” screen.
  • Tap the Win + X keys and click on the “Command Prompt (Admin)” option.
  • After that, input each one of the commands listed below sequentially to execute them:
    • Dism /Online /Cleanup-Image /CheckHealth
    • Dism /Online /Cleanup-Image /ScanHealth
    • Dism /Online /Cleanup-Image /RestoreHealth
  • Once you’ve executed the commands given above, restart your computer and check if the problem is now fixed.

Option 5 – Try to use installation media to boot and repair your computer

Another thing you can try to resolve the issue is to use the Windows installation bootable media so you can boot and repair the operating system. To use it, follow these steps:
  • You need to first create an installation media which has the dame version of the operating system installed in your computer.
  • After that, once you reach the Install Windows screen, click on the “Repair your computer” link.
  • Wait until the repair is completed and then shut down your computer
  • Now once your computer has restarted, check if it can now boot properly.
Read More
Fixing Error 0xc0000005 in Windows
If you encounter Error 0xc0000005 when you try to launch a program on your Windows 10 computer then this means that Windows was unable to process the files and the configuration correctly needed in order to run the program properly. You can encounter this kind of error with an installed program and even as the installer for a particular program. To fix this error, this post will provide you with some potential fixes that might help. Error 0xc0000005 occurs due to Access Violation which happens when a user tries to open a program and this error code may be accompanied by any of the following three error messages:
  • The application was unable to start correctly
  • Access violation Exception Error
  • Windows Installation Error
To fix this error, you need to follow the given options below carefully but before you do that, you can try to use System Restore Point first to put your computer back to its previously known stable state.
  • Tap the Win + R keys to open the Run dialog box.
  • After that, type in “sysdm.cpl” in the field and tap Enter.
  • Next, go to the System Protection tab then click the System Restore button. This will open a new window where you have to select your preferred System Restore point.
  • After that, follow the on-screen instructions to finish the process and then restart your computer and check if the problem is fixed or not.
After performing System Restore check if Error 0xc0000005 is now fixed or not. If not, then make sure to use the options given below to resolve the problem.

Option 1 – Update or rollback drivers

If the System Restore didn’t work, then it’s time to either update or roll back the device drivers. It is most likely that after you updated your Windows computer that your driver also needs a refresh. On the other hand, if you have just updated your device drivers then you need to roll back the drivers to their previous versions. Whichever applies to you, refer to the steps below.
  • Open the Devices Manager from the Win X Menu.
  • Then locate the device drivers and right-click on them to open the Properties.
  • After that, switch to the Driver tab and click on the Uninstall Device button.
  • Follow the screen option to completely uninstall it.
  • Finally, restart your computer. It will just reinstall the device drivers automatically.
Note: You can install a dedicated driver on your computer in case you have it or you could also look for it directly from the website of the manufacturer.

Option 2 – Try running the System File Checker Scan

The SFC or System File Checker scan could detect and automatically repair damaged system files that could be causing Error 0xc0000005. SFC is a built-in command utility which helps in restoring corrupted files as well as missing files. It replaces bad and corrupted system files to good system files. To run the SFC command, follow the steps given below.
  • Tap Win + R to launch Run.
  • Type in cmd in the field and tap Enter.
  • After opening Command Prompt, type in sfc /scannow
The command will start a system scan which will take a few whiles before it finishes. Once it’s done, you could get the following results:
  1. Windows Resource Protection did not find any integrity violations.
  2. Windows Resource Protection found corrupt files and successfully repaired them.
  3. Windows Resource Protection found corrupt files but was unable to fix some of them.
 Now restart your computer.

Option 3 – Run the Windows Memory Diagnostic tool

Since this error could be caused by some issues in the memory, you can try running the Windows Memory Diagnostic tool and see if it helps.
  • Tap the Win + R keys to open Run and type exe and hit Enter to open the Windows Memory Diagnostic Tool.
  • After that, it will give two options such as:
    • Restart now and check for problems (Recommended)
    • Check for problems the next time I start my computer
  • Once your computer has restarted, perform a basic scan or you could also go for the “Advanced” options such as “Test mix” or “Pass count”. Simply tap the F10 key to start the test.
Note: After you select the option, your PC will restart and check for memory-based issues. If it finds any issues, it will automatically fix them and if there’s no issue found, then it’s most likely not a memory-based issue so you should try the other options given below.

Option 4 – Try recreating the Boot records

If your system files are infected and modified by some malware, then it’s no wonder why you’re getting Error 0xc0000005 since this error can also be due to malware. To fix this, you can try to recreate the boot records on your computer. How? Follow these steps:
  • Tap the Win + R keys to open the Run dialog box.
  • Then type “cmd” in the field and hit Enter to open Command Prompt.
  • After that, type in each one of the following commands below and hit Enter right after you input each one of them.
    • Del D:WindowsSystem32xOsload.exe
    • Del D:WindowsSystem32xNtKrnl.exe
    • Del D:WindowsSystem32Driversoem-drv64.sys
    • attrib c:bootbcd -h -r –s
    • ren c:bootbcd bcd.old
    • bootrec /rebuildbcd
  • After you input the listed commands above, it will recreate all the files needed inside the boot record.

Option 5 – Try turning off Data Execution Prevention or DEP

You might want to turn off Data Execution Prevention or DEP if it could be the one that’s blocking your process to run a particular program. To disable DEP, refer to the steps below.
  • Type “cmd” in the Start Search and then right-click on Command Prompt from the results and select Run as Administrator.
  • After that, type the following command and hit Enter to disable DEP:
bcedit.exe /set {current} nx AlwaysOff
  • Restart your computer.

Option 6 – Try to fix Registry

  • Tap the Win + R keys to open the Run dialog box.
  • Next, type “Regedit” in the field and hit Enter to open the Registry Editor.
  • After that, go to this registry path: HKEY_LOCAL_MACHINESOFTWAREMicrosoftWindows NTCurrentVersionWindows
  • From there, double click on LoadAppInit_DLLs located at the right side of the panel and change its value from “0” to “1”.
  • Now restart your computer.

Option 7 – Try checking RAM

You can also check RAM physically and see if it is in an operable condition. You might want to consider replacing it and see if it fixes the error.

Option 8 – Try to disable your antivirus program temporarily

Disabling the antivirus program or any security software installed in your computer might help in resolving the error since there is a good chance that it’s blocking the program from execution due to suspicious behavior. Just don’t forget to enable the antivirus program back again.

Option 9 – Troubleshot the problem in a Clean Boot State

There are some instances that some conflicting programs installed in your computer might be the one that’s causing Error 0xc0000005. To identify which program is causing the problem, you need to put your computer in a Clean Boot State. To do so, follow the steps below.
  • Log onto your PC as an administrator.
  • Type in MSConfig in the Start Search to open the System Configuration utility.
  • From there, go to the General tab and click “Selective startup”.
  • Clear the “Load Startup items” check box and make sure that the “Load System Services” and “Use Original boot configuration” options are checked.
  • Next, click the Services tab and select the “Hide All Microsoft Services” check box.
  • Click Disable all.
  • Click on Apply/OK and restart your PC. (This will put your PC into a Clean Boot State. And configure Windows to use the usual startup, just simply undo the changes.)
  • From there, start to isolate the problem by checking which one of the programs you installed recently is the root cause of the problem.

Option 10 – Try resetting Windows 10

To fix this error, you can try resetting Windows 10. Doing so won’t get rid of any file in your system – instead of erasing all your media files and documents, this reset option resets all the system settings and files.
Read More
Fix Errors 0x80070001, 0x81000037, 0x80070003
Windows has a built-in Backup and Restore system so if the Windows Backup or Restore fails and you receive any of the errors 0x80070001, 0x81000037, 0x80070003, worry not for this post will guide you in fixing the problem. You might not be able to browse to the folders and files that you want to restore in the File Restore Wizard. The cause of the error could vary depending on what error code you receive:
  • 0x80070001 – If you got this particular error code when trying to back up a specific library or when you accept the default settings in Windows Backup and Restore.
  • 0x81000037 – If you got this kind of error code when you try to read from the shadow copy on one of the volumes being backed up.
  • 0x80070003 – If you got this error code when trying to restore the folders or files in a library by using the Windows Backup and Restore.
  • On the other hand, you cannot use the Browse for files or the Browse for folders functionality.
Note that the Windows Backup or Restore failed, Errors 0x80070001, 0x81000037, 0x80070003 Error code 0x80070001, 0x81000037 occurs during backup while Error code 0x80070003 and “Browse for Files” issue occurs when you try to restore files. Whichever error codes you got, here are some possible fixes that might help.

Option 1 – Fix Windows Backup error codes 0x80070001, 0x81000037

The reason for the Windows Backup error codes 0x80070001, 0x81000037, as mentioned above, is when there is a volume that uses a FAT file system (0x80070001) and when a volume contains compressed files (0x81000037). To fix these errors, you need to remove the “reparse point” also known as SYMBOLIC LINK, and select the absolute path of this location in the Windows Backup configuration user interface. Refer to these steps to remove the reparse point.
  • Tap the Win + R keys to open the Run dialog box.
  • Then type “cmd” in the field and hit Enter to open Command Prompt.
  • Next, type the following command and hit Enter:
DIR /AL /S
  • After you enter the command, it will display the JUNCTION list.
  • Now to delete the mounted volume reparse point, you have to locate the reparse point you found and right-click on the reparse point icon, and click on Properties.
  • Confirm that the folder Type is Mounted Volume in the General tab and then delete this folder.

Option 2 – Fix the Windows Restore Error 0x81000037

When you try to restore a deleted backed-up directory, it fails and the Error code 0x81000037 pops up. You can also encounter this error when you select to restore the files to their original subfolders check box in the File Restore Wizard and you try to restore folders or files to an alternative location, then you will encounter error code 0x81000037 which will be displayed in an error message as shown below: To fix this error, you need to re-create the missing directory using the following steps:
  • Take note of the path for which the error occurs.
  • Then create the corresponding folder.
  • Now perform the restore operation again.
And since you might have subfolders in the deleted folder, click to clear the “Restore the files to their original subfolders” checkbox when you run the File Restore Wizard.

Option 3 – Cannot use the Browse for files or the Browse for folders functionality

There is no proper fix for this particular error but if you remember the name of the files, you can just search for them. Click on the Search button when using the File Restore functionality and then type the name of the file and when that file appears, select and click on it to restore it.
Read More
How to Remove FileShareFanatic

FileShareFanatic is a browser extension developed by Mindspark Inc. This extension offers users the ability to quickly access some of the most popular file-sharing websites. While this may sound tempting and useful at start, using this extension might prove more annoying then useful.

When installed FileShareFanatic hijacks your new tab page changing your default search engine to search.myway.com. Additionally it monitors user activity, recording visited websites, clicked links, viewed products, and whatever other information that can be used by the Ad network to display targeted Ads.

While browsing the internet with this extension you will notice an increase of ads on pages, especially in search results. This extension injects additional ads, sponsored links, and even displays pop-up ads in order to gain revenue.

FileShareFanatic has been marked as a Browser Hijacker by several top anti-virus scanners, and is scheduled for deletion.

About Browser Hijackers

Browser hijacking is considered the web’s constant danger that targets browsers. It is a kind of malicious software that modifies your internet browser’s configuration settings so that you are redirected to websites or pages that you had no intention of visiting. Browser hijackers can do more than simply modifying homepages. It redirects you to the sponsored sites and inserts advertisements on your browser which helps its developer generate earnings. It might appear naive, but most of these websites are not legitimate and will pose a major risk to your online safety. Browser hijackers can even let other vicious programs without your knowledge to further damage your PC.

Symptoms of browser hijack

There are numerous symptoms of browser hijacking: 1. you see unauthorized modifications to your internet browser’s homepage 2. you get re-directed to internet sites you never meant to visit 3. default online search engine is modified 4. discover new toolbars which you did not add 5. you observe lots of pop-ups on your screen 6. your web browser gets slow, buggy, and crashes frequently 7. Inability to navigate to certain sites, especially anti-malware as well as other security software webpages.

How they infect computers

Browser hijackers attack computers via malicious email attachments, downloaded infected documents, or by visiting infected internet sites. Many internet browser hijackings originate from add-on software, i.e., browser helper objects (BHO), toolbars, or extensions added to browsers to give them extra features. A browser hijacker could also be installed as a part of freeware, demoware, shareware and pirated programs. Browser hijackers can interrupt the user’s web browsing experience significantly, track the websites visited by users and steal sensitive information, cause difficulty in connecting to the internet, and eventually create stability problems, making software programs and computer to crash.

Removal

The one thing you can try to get rid of a browser hijacker is to find the malware within the “Add or Remove Programs” list in the Microsoft Windows Control Panel. It may or may not be there. If it is, try to uninstall it. But, most hijacking codes aren’t very easy to eliminate manually, as they go deeper into your operating system. Besides, browser hijackers could modify the Computer registry so that it could be very hard to repair manually, especially when you’re not a very tech-savvy individual. You can choose automatic browser hijacker removal by just installing and running reliable anti-malware software. If you need to get rid of persistent browser hijackers effectively, install the top-rated Anti-Malware software Safebytes Anti-Malware.

Find Out How To Install Safebytes Anti-Malware On An Infected PC

Malware can cause a lot of damage to your PC. Some malware types alter internet browser settings by including a proxy server or change the PC’s DNS configuration settings. When this happens, you’ll be unable to visit certain or all of the sites, and thus unable to download or install the required security software to remove the infection. If you are reading this, you may have infected by a virus that prevents you from downloading a security program such as Safebytes Antimalware on your PC. There are some actions you can take to circumvent this issue.

Download the application in Safe Mode with Networking

If the virus is set to load immediately when Microsoft Windows starts, entering Safe Mode could very well block the attempt. Since only the bare minimum programs and services launch in safe mode, there are hardly any reasons for conflicts to occur. To start your Windows XP, Vista or 7 computer in Safe Mode with Networking, please do as instructed below. 1) At power on, hit the F8 key before the Windows splash screen starts to load. This will bring up the Advanced Boot Options menu. 2) Choose Safe Mode with Networking with arrow keys and hit ENTER. 3) Once this mode loads, you will have the internet. Now, utilize your browser to download and install Safebytes Anti-malware. 4) As soon as the application is installed, allow the scan run to eliminate viruses and other malware automatically.

Switch to an alternate internet browser

Web-based viruses can be environment-specific, aiming for a particular web browser or attacking specific versions of the browser. The best solution to avoid this problem is to opt for a browser that is known for their security measures. Firefox comprises built-in Phishing and Malware Protection to keep you safe online.

Run antivirus from a USB drive

Another option is to make a portable antivirus program onto your USB thumb drive. To run antivirus from a thumb drive, follow these simple steps: 1) Download Safebytes Anti-Malware or Microsoft Windows Defender Offline onto a clean computer system. 2) Plug the Thumb drive into the uninfected computer. 3) Double-click the Setup icon of the anti-malware software to run the Installation Wizard. 4) Select the drive letter of the USB drive as the place when the wizard asks you exactly where you would like to install the anti-virus. Follow the directions to finish the installation process. 5) Unplug the pen drive. Now you can utilize this portable antivirus on the affected computer. 6) Double-click the anti-malware program EXE file on the thumb drive. 7) Simply click “Scan Now” to run a complete scan on the infected computer for malware.

SafeBytes Anti-Malware Features

To protect your personal computer from many different internet-based threats, it’s important to install an anti-malware application on your computer system. However, with countless numbers of anti-malware companies in the marketplace, nowadays it is challenging to decide which one you should purchase for your PC. Some are good ones, some are decent, and some are simply just fake anti-malware applications that could harm your personal computer themselves! You should choose one that is trustworthy, practical and has a strong reputation for its malware source protection. On the list of strongly recommended software by industry analysts is SafeBytes Anti-Malware, the most dependable program for Windows computers. SafeBytes anti-malware is a powerful, very effective protection application made to help users of all levels of computer literacy in finding and eliminating malicious threats from their computer. Once you’ve installed this program, SafeBytes state-of-the-art protection system will ensure that absolutely no viruses or malware can seep through your PC.

SafeBytes anti-malware takes PC protection to a totally new level with its enhanced features. These are some of the highlighted features included in the software.

World-class AntiMalware Protection: Built on a greatly acclaimed anti-virus engine, this malware removal tool can identify and get rid of several obstinate malware threats such as browser hijackers, potentially unwanted programs, and ransomware that other typical antivirus programs will miss. Real-time Threat Response: Malware programs attempting to get into the computer are discovered and stopped as and when detected by the SafeBytes active protection shields. It’ll examine your PC for suspicious activity at all times and its unrivaled firewall protects your computer from unauthorized access by the outside world. Safe Browsing: Safebytes assigns all sites a unique safety ranking that helps you to get an idea of whether the webpage you’re just about to visit is safe to browse or known to be a phishing site. Lowest Memory/CPU Usage: SafeBytes is a lightweight tool. It consumes a really small amount of processing power as it operates in the background therefore you will not see any computer performance difficulties. 24/7 Guidance: SafeBytes provides 24/7 technical support, automatic maintenance and updates for best user experience. All in all, SafeBytes Anti-Malware is a solid program as it has lots of features and could identify and remove any potential threats. Once you have downloaded and installed this software, you no longer need to worry about malware or any other security worries. So if you’re searching for the best anti-malware subscription for your Windows-based computer, we recommend SafeBytes Anti-Malware tool.

Technical Details and Manual Removal (Advanced Users)

If you wish to carry out the removal of FileShareFanatic manually instead of using an automated software tool, you may follow these measures: Proceed to the Windows Control Panel, click the “Add or Remove Programs” and there, choose the offending application to uninstall. In cases of suspicious versions of web browser plug-ins, you can easily get rid of it via your web browser’s extension manager. You’ll probably also want to reset your browser. To be certain of complete removal, find the following registry entries on your computer and remove it or reset the values appropriately. Having said that, editing the registry can be a complicated job that only advanced users and professionals should try to fix it. Furthermore, some malware is capable of replicating or preventing removal. It is advisable that you carry out the removal process in Windows Safe Mode.
Files: %UserProfile%\Local Settings\Application Data\FileShareFanaticTooltab %LOCALAPPDATA%\FileShareFanaticTooltab Registry: HKEY_LOCAL_MACHINE\Software\Microsoft\Internet Explorer\Approved Extensions, value: FB8C7587-6C03-425D-821D-65339B3E249E HKEY_CURRENT_USER\SOFTWARE\Wow6432Node\Microsoft\Windows\CurrentVersion\explorer\Browser Helper Objects\FB8C7587-6C03-425D-821D-65339B3E249E HKEY_CURRENT_USER\SOFTWARE\Microsoft\Windows\CurrentVersion\explorer\Browser Helper Objects\FB8C7587-6C03-425D-821D-65339B3E249E HKEY_CURRENT_USER\SOFTWARE\Wow6432Node\Microsoft\Windows\CurrentVersion\explorer\Browser Helper Objects\EA89EC10-2255-42A6-9AA7-84B4441C2DCA HKEY_CURRENT_USER\SOFTWARE\Microsoft\Windows\CurrentVersion\explorer\Browser Helper Objects\EA89EC10-2255-42A6-9AA7-84B4441C2DCA HKEY_LOCAL_MACHINE\Software\Microsoft\Windows\CurrentVersion\Ext\Stats\FB8C7587-6C03-425D-821D-65339B3E249E HKEY_LOCAL_MACHINE\Software\Microsoft\Windows\CurrentVersion\Ext\Stats\EA89EC10-2255-42A6-9AA7-84B4441C2DCA HKEY_LOCAL_MACHINE\Software\Microsoft\Windows\CurrentVersion\Ext\Settings\6E4DF5E6-A1D8-48E0-BA5A-91C5DBD6AAF1 HKEY_CURRENT_USER\SOFTWARE\Wow6432Node\Microsoft\Internet Explorer\SearchScopes\BDF4A303-E4F0-42F0-B235-351F6C8F6C1A HKEY_LOCAL_MACHINE\Software\Microsoft\Internet Explorer\SearchScopes\BDF4A303-E4F0-42F0-B235-351F6C8F6C1A HKEY_CURRENT_USER\SOFTWARE\Wow6432Node\Microsoft\Tracing\FileShareFanatic_RASMANCS HKEY_CURRENT_USER\SOFTWARE\Microsoft\Tracing\FileShareFanatic_RASMANCS HKEY_CURRENT_USER\SOFTWARE\Wow6432Node\Microsoft\Tracing\FileShareFanatic_RASAPI32 HKEY_CURRENT_USER\SOFTWARE\Microsoft\Tracing\FileShareFanatic_RASAPI32 HKEY_CURRENT_USER\SOFTWARE\Microsoft\Internet Explorer\DOMStorage\filesharefanatic.dl.myway.com HKEY_LOCAL_MACHINE\Software\FileShareFanatic

Read More
How to Fix Error Code 0xc0000142

What is Error 0xc0000142?

Error 0xc0000142 can occur in any of the Windows versions and usually occurs when an application fails to properly initialize.

This error can be critical for a computer as it signifies that the system is unstable. Error 0xc0000142 can cause slow performance in a PC, system freeze, startup and shutdown issues, blue screen and errors in installation.

Solution

Restoro box imageError Causes

Windows/Application Error 0xc0000142 can occur because of a number of reasons.

When a computer is an overload with data, or when system files get broken or missing, this error can occur and will result in startup and shutdown issues as well as the blue screen. Another reason, and one which is quite common, is improper computer maintenance.

This will cause a PC to perform slow, system freezes, and installation errors. This error displays ‘failed to initialize’ on either a Windows error box or the blue screen of death.

Further Information and Manual Repair

Error 0xc0000142 can occur at any time, but there are many ways to resolve it. For instance:

1) Clean the Registry

A corrupted registry is one of the major reasons why this error occurs. The registry is used by Windows to store information and settings on the computer, which is why it has a large database.

This database contains emails, wallpapers, saved passwords and much more in ‘file path references’. These allow Windows to run the common files in your system. A registry cleaner can fix any errors in the registry database.

2) Malware Scan

Viruses can cause certain applications to not function properly. Hence, download a strong antivirus and run a deep scan on your system and remove any potential infections and spyware.

3) Reinstall Applications

Non-critical applications in a computer are those that are installed by the user. If error 0xc0000142 displays in any of your installed programs, then you should reinstall these programs. Often applications have damaged or corrupted files which can slow them down. To resolve this, follow these steps:

  • From Start, click on Control Panel
  • Go to Add/Remove Programs and uninstall the programs
  • Restart your PC and reinstall the program

The third step is not recommended in case the error is caused by cmd.exe

4) Repair Windows

If the error is still on display despite following the previous steps, then you can repair Windows. This process allows Windows to retain all your data and information by simply replacing the program files and settings with fresh ones. This can stop error 0xc0000142 by allowing the programs access to use necessary files smoothly and effectively.

If you cannot resolve the error in any of these steps, then there is another way to do so if you have a computer that runs the Microsoft Internet Security and Acceleration (ISA) Server 2000. Follow these steps in order to resolve it:

  • Make sure that in Program Files and Microsoft ISA Server, a Clients folder exists. The ISA Server service will run on this folder
  • Confirm that Administrators and SYSTEM have Full Control assigned in the Program Files/Microsoft ISA Server/Clients folder
  • Confirm that Msplat.txt file is in the Clients folder. You can copy this file from other ISA Server computers if it is missing
  • If the Clients folder is damaged or is missing, or if you can’t copy the Msplat.tct file from another ISA Server computer, then reinstall the ISA Server 2000
Read More
Combine Hard drives with storage spaces
Why combining hard drives with storage spaces? Ok, I will admit it, I am a modern digital hamster when it comes to digital goods. I like to collect stuff and more than anything else I like to have all of that at the tip of my fingers. And how digital goods grow in size themselves (movies on Blu-ray are like 50GB each) and the collection grows in size single hard drive is starting to be completely obsolete when it comes to storage. Sometimes we will need large storage for these kinds of personal collections, sometimes we will need it for work reasons. Whatever your reason might be Windows 10 is offering us a solution via Storage spaces. Storage spaces is an integral part of Windows and it is meant as a tool to provide you with a RAID environment without a RAID controller. Of course, combining multiple hard drives via storage paces instead of RAID will not be so fast or stable but for home use of storing a large quantity of data is perfectly enough. With Storage Spaces you will also have an option to reduce some space for increased security of data loss if by any chance one of your HDD fails.

How to Create a Storage Space

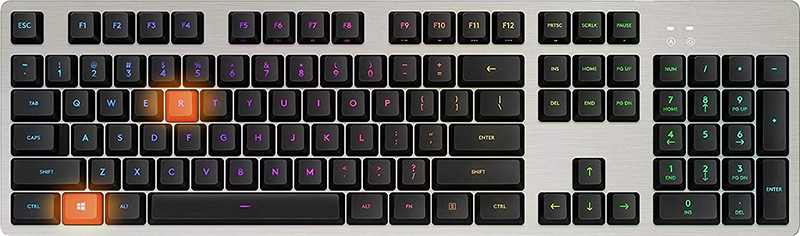
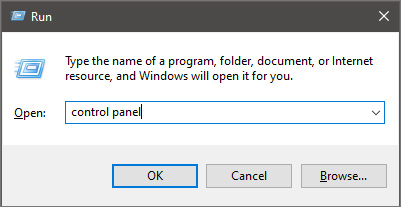
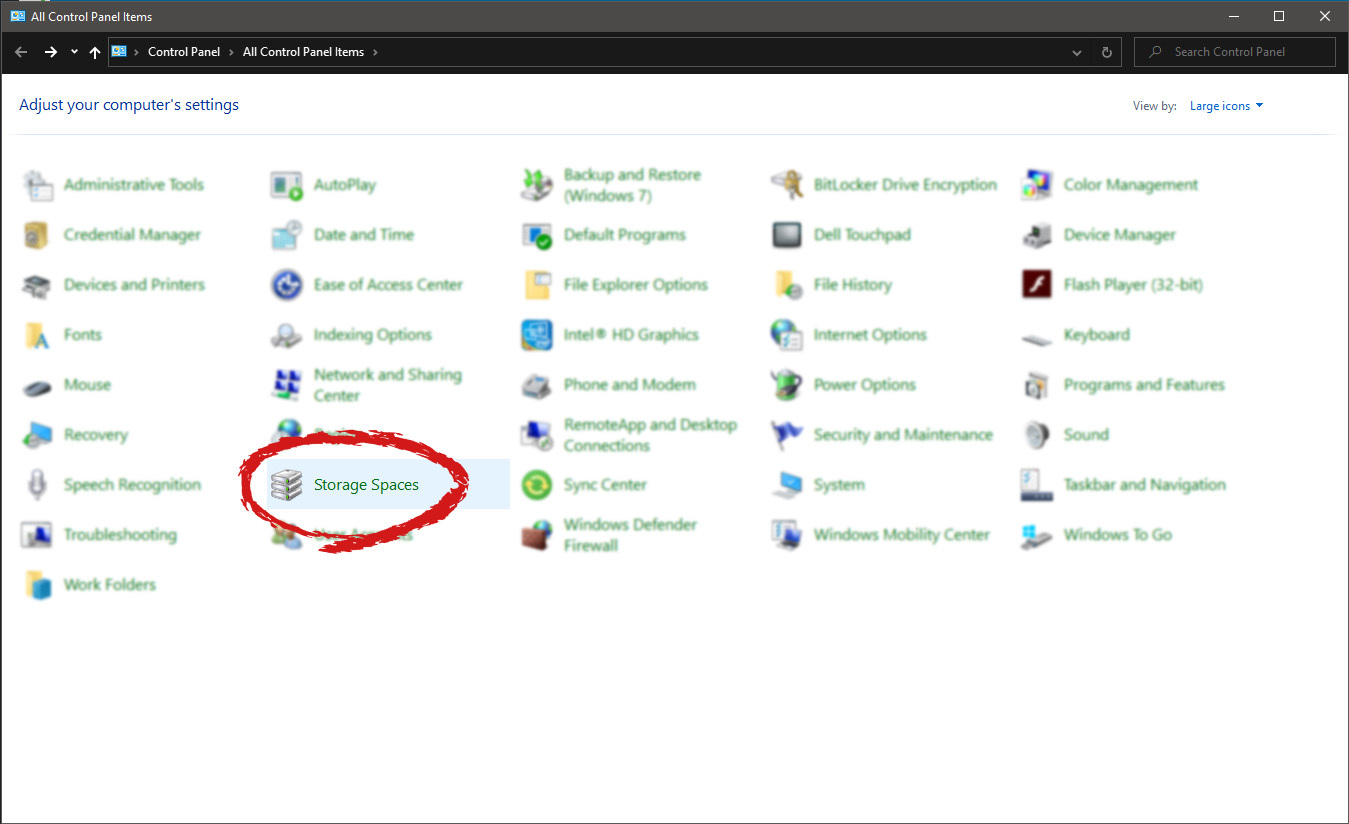
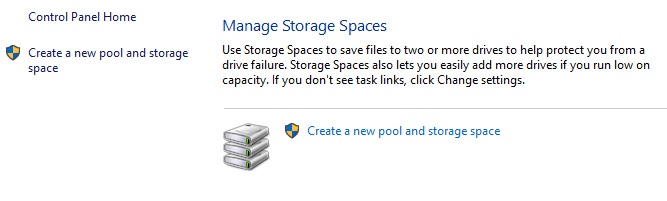
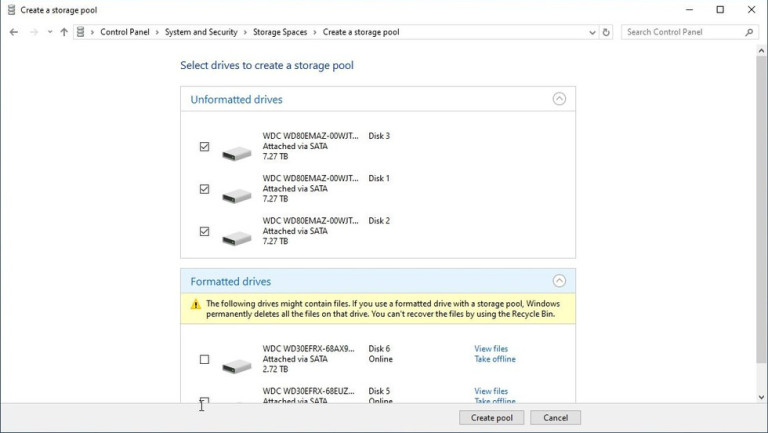
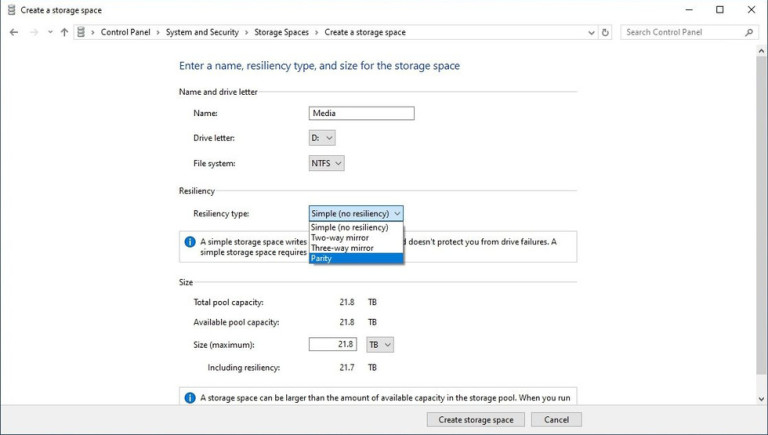
To create storage space in Windows, press ⊞ WINDOWS + R to open the run dialog. keyboard with windows and r markedIn the run box type in Control Panel and press ENTER run dialog with control panel typed inIn Control Panel find Storage Spaces and left-click on it. Control panel with storage spaces markedOnce storage spaces open, left-click on Create a new pool and storage space storage spaces manage storage spacesOnce you click on create new, you will be greeted with a list of hard drives you can use for this operation. storage spaces select drivesPlease note that all hard drives you choose will be completely erased and formatted and then assign a single drive letter. Click on Create pool. storage spaces resiliency type optionsYou will find yourself in new storage options where you can assign a drive letter, give storage space a name, etc.

Storage spaces types

One thing I would like to focus on here is resiliency type, when you expand the resiliency type drop-down menu you will see 4 options inside. Simple, Two-way mirror, Three-way mirrors, and Parity. Simple: If you choose Simple as an option, you will have maximum hard drive space but no resiliency at all, meaning that if by any chance any of your hard drives malfunction, you are losing your data from that drive completely. Two-way mirror: This option will save your data if one of your drives fails but you need at least 2 drives and storage space will be limited since some of it will be a safe backup option for the case of a drive failure. However if one of your drives fails, you can replace it in a second and keep on working as nothing happened. Three-way mirror: This option similar to the previous one will offer you safe data-keeping from a hard drive failure. this option will save your data even if 2 hard drives malfunction but it will require having 5 of them connected in order to be able to choose this option. Parity: Maybe the most popular option among people who want to have 2 or 3 drives merged but do not want to lose too much space of the two-way mirror option. It offers some protection and it does not take so much space as two-way does, let us say it is a kind of win-win situation.

Conclusion

I personally go for simple and have an important backup on optical drives but only for reason I could use more space, know that this way is requiring from me to always have a backup in optical media and that I will need to restore all of it back if even one HDD fails which could take time. But if this way is ok with you, go for it, you will have more space to use.
Read More
1 2 3 171
Logo
Copyright © 2023, ErrorTools. All Rights Reserved
Trademark: Microsoft Windows logos are registered trademarks of Microsoft. Disclaimer: ErrorTools.com is not affiliated with Microsoft, nor claims direct affiliation.
The information on this page is provided for information purposes only.
DMCA.com Protection Status